

Greetings!
Day one of WinterCon 2018 tournament was over and we learned who are our opponents for the first game on day two. This time I was about to play against Rob who brought his 100 Years' War French army. We attempted to organize a game before the event but it didn't quite work out. It was great then that we could play against each other during the event!
It was a bit odd match up if you look at it from the historical point of view. But I decided to consider the Knights as special type of Cataphracts. Rob also ensured me that his Roman army is currently being painted so there was a chance for a historically accurate re-match too!
Apart from the Knights Rob brought quite a large number of units armed with Crossbows or Longbows too. Here are the details:
100 Years' War French - Army List
Commanders
Army Commander - Talented Instinctive
Subordinate General 1 - Competent Instinctive
Subordinate General 2 - Mediocre Instinctive
Subordinate General 3 - Mediocre Instinctive
Camp
Camp - Camp, Formed Loose, Poor, Protected
TuG's
4 French Knights - Cavalry, Formed Loose, Superior, Fully Armored, Charging Lancer, Devastating Charger, Melee Expert
4 French Knights - Cavalry, Formed Loose, Superior, Fully Armored, Charging Lancer, Devastating Charger, Melee Expert
4 French Knights - Cavalry, Formed Loose, Superior, Fully Armored, Charging Lancer, Devastating Charger, Melee Expert
4 Valet de Guerre - Cavalry, Formed Loose, Average, Protected, Charging Lancer, Melee Expert
4 Valet de Guerre - Cavalry, Formed Loose, Average, Protected, Charging Lancer, Melee Expert
8 French Crossbowmen, Infantry, Formed Loose, Average, Unprotected, Crossbow, Experienced, Combat Shy
6 Mercenary Crossbowmen, Infantry, Drilled Loose, Average, Protected, Crossbow, Experienced, Combat Shy, Shield Cover
6 Mercenary Crossbowmen, Infantry, Drilled Loose, Average, Protected, Crossbow, Experienced, Combat Shy, Shield Cover
8 Ribaulds, Infantry, Tribal Loose, Poor, Unprotected, Combat Shy
8 Ribaulds, Infantry, Tribal Loose, Poor, Unprotected, Combat Shy
6 French Longbowmen, Infantry, Formed Loose, Average, Protected, Powerbow, Experienced, Combat Shy
SuG's
6 Skirmishing Crossbowmen, Infantry, Skirmisher, Average, Unprotected, Crossbow, Experienced, Combat Shy
6 Bidets, Infantry, Skirmisher, Average, Unprotected, Javelin, Experienced, Combat Shy
2 Guns, Artillery, Skirmisher, Average, Unprotected, Light Artillery, Experienced, Combat Shy, Barricades
Rob's army had an advantage in breaking point (6 vs 4), cavalry and ranged attacks. However, he was concerned about my pikes for some reason, in particular about the possibility that Phalangites may fight against his mounted units.
I definitely wanted to get into combat as quickly as possible and hopefully not suffering many casualties due to ranged attacks while marching towards the enemy. In order to prevent potential flank attack from the stronger cavalry I decided I will try to get a coastal line and some pieces of terrain. This way I should be able to narrow the battle field and force the cavalry to either stay away or fight in not so favorable conditions.
Here is my own army list for the reference:
Pre-battle phase went well as I got the coastal line terrain I hoped for and we also had a few additional terrain pieces here and there. I also managed to out-scout Rob as with a single card for that stage of the game he was at a bit of a disadvantage.
It was now up to me to use it to implement the plan accordingly.
Deployment
Rob started deployment with his Crossbowmen and Artillery on my left flank. I decided to keep some units directly across but only to shift them to the center in order to avoid the artillery. The idea was to have some elements that would engage the shooters eventually and keep them busy.
The Phalangites in the center as well as Argyraspides were to march fast forward and try to engage enemy as quickly as possible. I kept the cavalry in between in order to support either group and discourage the knights from potential flanking maneuvers. I also attached Thracians and skirmishers to Argyraspides in order to shift to the right and use the terrain to the advantage if possible.
In this battle French were the invading force.
French - Turn 1
As per pre-battle orders, Seleucids marched fast on their right while keeping left in reserve. French responded by turning their shooters towards the expected route of advance of the enemy. French knights remained stationary, carefully observing the maneuvers of the Seleucid infantry.
Seleucids - Turn 2
Seleucids continued the advance. This time the Phalangites from the left flank also joined the march, creating a reserve or second line. However, for some reason the Javelinmen attached to that group did not follow!
The French continued with outflanking maneuvers and keeping their knights more or less in the same position as at the beginning of the battle.
French - Turn 3
Seleucid Line Cavalry charged first. Seleucid cavalry aimed at the isolated unit of Crossbowmen, trying to tempt the Knights behind them for a counter attack. However, French nobles considered this unit not worthy of their efforts.
In the meantime, the Crossbowmen on the Seleucid flank started shooting at the advanced enemy. Cretan Archers tried to engage in the duel but were heavily outnumbered.
Seleucids - Turn 4
Despite loses due to enemy fire (Cretan Archers lost the duel), Phalangites advanced towards the enemy and engaged with the enemy where possible. Companions also charged against Crossbowmen engaged in combat with Line Cavalry and broke them easily. The pursuit pushed them forward, quite close towards the second line of the French Knights.
French - Turn 5
Seleucids continued their aggressive advance and this time multiple combats broke out. However, not all was going according to the plan.
First, due to recklessness of the cavalry, some of the Phalangites were forced to charge enemy cavalry in order to prevent it from hitting the flanks of either Line Cavalry or Companions. They too had to attack enemy Knights, trusting that advantage in numbers would balance out the disadvantage in armor.
The Phalangites on the left also tried to engage the enemy in combat but were successfully slowed down by incoming hail of crosbows bolts.
Seleucids - Turn 6
Perhaps the hard march towards the fresh enemy robbed Phalangites of their strength as they struggled to inflict damage upon their chosen opponents. And while the war of attrition suited them, nearby cavalry and Thracians were not in such comfortable position.
On the left flank the unprotected infantry suffered horrendous losses due to focused shooting. And when several Phalangite units were very close to breaking their opponents, Seleucids lost their cavalry and the army had to withdrew conceding defeat.
After-battle
Congratulations to Rob for a well played game and well deserved victory! His prudence and use of advantages of his army resulted in a victory! Even though a few cavalry units were just one damage point from breaking, it would not have mattered as his army was not close to breaking.
My first impression was that somehow Phalangites did not do as well as expected against enemy cavalry. Perhaps I should not have charged with them but it was a result of prior mistakes (more about these soon!). Even then I thought that in subsequent combat phases I should have a bit of advantage. It was not as big as I expected as in particular in the fights between Average Phalangites and Superior, Melee Expert and Fully Armored Knights I was rolling white versus green dice. Even Argyraspides could not land the blows properly against less protected and inferior opponents.
However, more careful analysis resulted in conclusion that I made a lot of mistakes in that game anyway and these mistakes were main contributor from my part to the defeat.
First, the deployment should have been better especially when I saw crossbowmen deployed on the left. I should have positioned all my Phalangites center right. As a distraction, I should have left Thracians with the support of some Javelinmen to enter the woods and threaten to attack from there.
Second, even with the same deployment, I should not have left the skirmishers alone. Instead of protecting the flank of the Phalangites and perhaps reducing the incoming fire, I left them behind. Mediocre general already struggled to even prompt Phalangites through fire (often not hving the right cards anyway), not to mention call upon the support of Javelinmen.
Next, the charge of Companions was not needed at all. Instead, I brought my cavalry too close to the Knights and got them into a fight that favored the enemy, even when outnumbered a little. not to mention the fact I had to move Phalangites to charge the cavalry rather than simply march forward and force impetus knights to attack them when prepared.
Last but not least, bringing Thracians to the fight in the open was the final straw. I lost because I lost 3 TuG's that more vulnerable than Phalangites and that played into the hands of Rob, my opponent. He exploited these mistakes very well, waited for the right moment and postponed the fights until he could bring his shooters into range.
I really enjoyed our game, no matter what the result is and I hope I learned valuable lessons. Sometimes one needs to learn hard way!
Thanks for reading!
Camp
Camp - Camp, Formed Loose, Poor, Protected
TuG's
4 French Knights - Cavalry, Formed Loose, Superior, Fully Armored, Charging Lancer, Devastating Charger, Melee Expert
4 French Knights - Cavalry, Formed Loose, Superior, Fully Armored, Charging Lancer, Devastating Charger, Melee Expert
4 French Knights - Cavalry, Formed Loose, Superior, Fully Armored, Charging Lancer, Devastating Charger, Melee Expert
4 Valet de Guerre - Cavalry, Formed Loose, Average, Protected, Charging Lancer, Melee Expert
4 Valet de Guerre - Cavalry, Formed Loose, Average, Protected, Charging Lancer, Melee Expert
8 French Crossbowmen, Infantry, Formed Loose, Average, Unprotected, Crossbow, Experienced, Combat Shy
6 Mercenary Crossbowmen, Infantry, Drilled Loose, Average, Protected, Crossbow, Experienced, Combat Shy, Shield Cover
6 Mercenary Crossbowmen, Infantry, Drilled Loose, Average, Protected, Crossbow, Experienced, Combat Shy, Shield Cover
8 Ribaulds, Infantry, Tribal Loose, Poor, Unprotected, Combat Shy
8 Ribaulds, Infantry, Tribal Loose, Poor, Unprotected, Combat Shy
6 French Longbowmen, Infantry, Formed Loose, Average, Protected, Powerbow, Experienced, Combat Shy
SuG's
6 Skirmishing Crossbowmen, Infantry, Skirmisher, Average, Unprotected, Crossbow, Experienced, Combat Shy
6 Bidets, Infantry, Skirmisher, Average, Unprotected, Javelin, Experienced, Combat Shy
2 Guns, Artillery, Skirmisher, Average, Unprotected, Light Artillery, Experienced, Combat Shy, Barricades
Rob's army had an advantage in breaking point (6 vs 4), cavalry and ranged attacks. However, he was concerned about my pikes for some reason, in particular about the possibility that Phalangites may fight against his mounted units.
I definitely wanted to get into combat as quickly as possible and hopefully not suffering many casualties due to ranged attacks while marching towards the enemy. In order to prevent potential flank attack from the stronger cavalry I decided I will try to get a coastal line and some pieces of terrain. This way I should be able to narrow the battle field and force the cavalry to either stay away or fight in not so favorable conditions.
Here is my own army list for the reference:
Seleucids - Army List
Commanders
Army Commander - Talented Professional
Subordinate General 1 - Competent Professional
Subordinate General 2 - Competent Professional
Subordinate General 3 - Mediocre Professional
Subordinate General 3 - Mediocre Professional
Camp
Camp - Average, Protected
TuGs
8 Argyraspides - Infantry, Drilled Close, Superior, Protected, Pike, Shove
8 Phalangites - Infantry, Drilled Close, Average, Protected, Pike, Shove
8 Phalangites - Infantry, Drilled Close, Average, Protected, Pike, Shove
8 Phalangites - Infantry, Drilled Close, Average, Protected, Pike, Shove
8 Phalangites - Infantry, Drilled Close, Average, Protected, Pike, Shove
6 Thracians - Infantry, Formed Loose, Average, Protected, Devastating Charger, Melee Expert
4 Companions - Cavalry, Drilled Loose, Superior, Protected, Charging Lancer, Melee Expert
4 Companions - Cavalry, Drilled Loose, Superior, Protected, Charging Lancer, Melee Expert
4 Line Cavalry - Cavalry, Drilled Loose, Average, Protected, Charging Lancer, Melee Expert
SuG's
6 Javelinmen - Infantry, Skirmisher, Poor, Unprotected, Javelin, Experienced, Combat Shy
6 Javelinmen - Infantry, Skirmisher, Poor, Unprotected, Javelin, Experienced, Combat Shy
6 Tarentine Cavalry - Cavalry, Skirmisher, Average, Protected, Javelin, Experienced, Cantabrian
6 Cretan Archers - Infantry, Skirmisher, Average, Unproteced, Bow, Skilled, Combat Shy
Pre-Battle
Pre-battle phase went well as I got the coastal line terrain I hoped for and we also had a few additional terrain pieces here and there. I also managed to out-scout Rob as with a single card for that stage of the game he was at a bit of a disadvantage.
It was now up to me to use it to implement the plan accordingly.
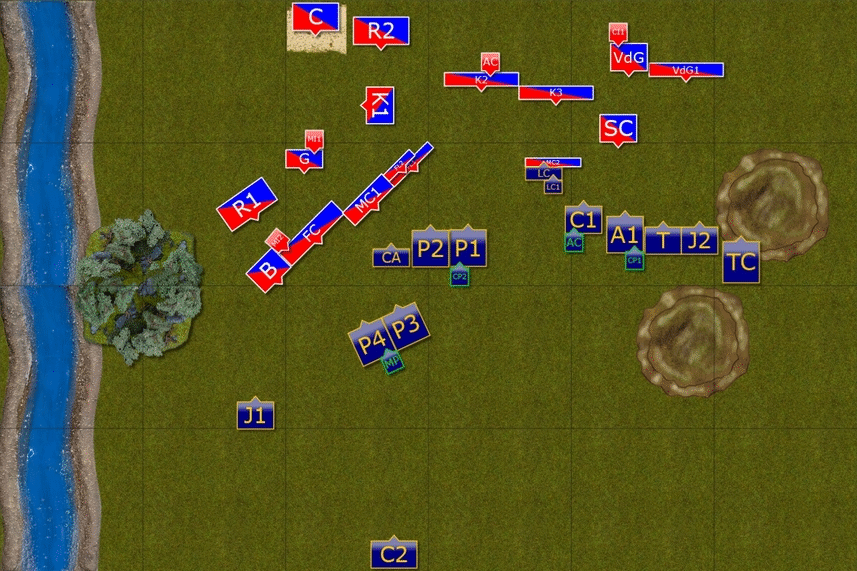
Deployment
 |
| Seleucids vs Medieval French. |
 |
| Deployment of the Armies. |
Rob started deployment with his Crossbowmen and Artillery on my left flank. I decided to keep some units directly across but only to shift them to the center in order to avoid the artillery. The idea was to have some elements that would engage the shooters eventually and keep them busy.
The Phalangites in the center as well as Argyraspides were to march fast forward and try to engage enemy as quickly as possible. I kept the cavalry in between in order to support either group and discourage the knights from potential flanking maneuvers. I also attached Thracians and skirmishers to Argyraspides in order to shift to the right and use the terrain to the advantage if possible.
In this battle French were the invading force.
French - Turn 1
 |
| Turn 1 - Sequence of Actions. |
 |
| French Knights awaiting approaching enemy. |
As per pre-battle orders, Seleucids marched fast on their right while keeping left in reserve. French responded by turning their shooters towards the expected route of advance of the enemy. French knights remained stationary, carefully observing the maneuvers of the Seleucid infantry.
 |
| Steady advance. |
Seleucids - Turn 2
 |
| Turn 2 - Sequence of Actions. |
 |
| Fearless (or reckless?) Phalangites |
Seleucids continued the advance. This time the Phalangites from the left flank also joined the march, creating a reserve or second line. However, for some reason the Javelinmen attached to that group did not follow!
The French continued with outflanking maneuvers and keeping their knights more or less in the same position as at the beginning of the battle.
 |
| Getting closer. |
French - Turn 3
 |
| Turn 3 - Sequence of Actions. |
 |
| French Crossbowmen start shooting at the approaching enemy. |
Seleucid Line Cavalry charged first. Seleucid cavalry aimed at the isolated unit of Crossbowmen, trying to tempt the Knights behind them for a counter attack. However, French nobles considered this unit not worthy of their efforts.
In the meantime, the Crossbowmen on the Seleucid flank started shooting at the advanced enemy. Cretan Archers tried to engage in the duel but were heavily outnumbered.
 |
| French Knights pulled back. |
Seleucids - Turn 4
 |
| Turn 4 - Sequence of Actions. |
 |
| Companions and Argyraspides press forward. |
Despite loses due to enemy fire (Cretan Archers lost the duel), Phalangites advanced towards the enemy and engaged with the enemy where possible. Companions also charged against Crossbowmen engaged in combat with Line Cavalry and broke them easily. The pursuit pushed them forward, quite close towards the second line of the French Knights.
 |
| The lines about to clash. |
French - Turn 5
 |
| Turn 5 - Sequence of Actions. |
 |
| Multiple combats on the right flank. |
Seleucids continued their aggressive advance and this time multiple combats broke out. However, not all was going according to the plan.
First, due to recklessness of the cavalry, some of the Phalangites were forced to charge enemy cavalry in order to prevent it from hitting the flanks of either Line Cavalry or Companions. They too had to attack enemy Knights, trusting that advantage in numbers would balance out the disadvantage in armor.
The Phalangites on the left also tried to engage the enemy in combat but were successfully slowed down by incoming hail of crosbows bolts.
 |
| Seleucids marched far into enemy territory. |
Seleucids - Turn 6
 |
| Turn 6 - Sequence of Actions. |
 |
| Argyraspides struggled to defeat French cavalry. |
Perhaps the hard march towards the fresh enemy robbed Phalangites of their strength as they struggled to inflict damage upon their chosen opponents. And while the war of attrition suited them, nearby cavalry and Thracians were not in such comfortable position.
On the left flank the unprotected infantry suffered horrendous losses due to focused shooting. And when several Phalangite units were very close to breaking their opponents, Seleucids lost their cavalry and the army had to withdrew conceding defeat.
 |
| A defeat! |
After-battle
Congratulations to Rob for a well played game and well deserved victory! His prudence and use of advantages of his army resulted in a victory! Even though a few cavalry units were just one damage point from breaking, it would not have mattered as his army was not close to breaking.
My first impression was that somehow Phalangites did not do as well as expected against enemy cavalry. Perhaps I should not have charged with them but it was a result of prior mistakes (more about these soon!). Even then I thought that in subsequent combat phases I should have a bit of advantage. It was not as big as I expected as in particular in the fights between Average Phalangites and Superior, Melee Expert and Fully Armored Knights I was rolling white versus green dice. Even Argyraspides could not land the blows properly against less protected and inferior opponents.
However, more careful analysis resulted in conclusion that I made a lot of mistakes in that game anyway and these mistakes were main contributor from my part to the defeat.
First, the deployment should have been better especially when I saw crossbowmen deployed on the left. I should have positioned all my Phalangites center right. As a distraction, I should have left Thracians with the support of some Javelinmen to enter the woods and threaten to attack from there.
Second, even with the same deployment, I should not have left the skirmishers alone. Instead of protecting the flank of the Phalangites and perhaps reducing the incoming fire, I left them behind. Mediocre general already struggled to even prompt Phalangites through fire (often not hving the right cards anyway), not to mention call upon the support of Javelinmen.
Next, the charge of Companions was not needed at all. Instead, I brought my cavalry too close to the Knights and got them into a fight that favored the enemy, even when outnumbered a little. not to mention the fact I had to move Phalangites to charge the cavalry rather than simply march forward and force impetus knights to attack them when prepared.
Last but not least, bringing Thracians to the fight in the open was the final straw. I lost because I lost 3 TuG's that more vulnerable than Phalangites and that played into the hands of Rob, my opponent. He exploited these mistakes very well, waited for the right moment and postponed the fights until he could bring his shooters into range.
I really enjoyed our game, no matter what the result is and I hope I learned valuable lessons. Sometimes one needs to learn hard way!
Thanks for reading!
No comments:
Post a Comment