
Greetings!
It's been a while since my last battle report. I had far less spare time for hobby in general, let alone for playing games in 2021. That's what happens when you welcome a new family member in your life :) Fortunately, Erasmus (aka DarkBlack on forums and UB2), who seem to be in a similar situation, came up with a brilliant idea of how to help another new dad not to lose touch with the hobby completely. He reached out and suggested we use Universal Battle 2, with its great feature of saving games, to ... Play By Email!
If you have never hear of this way, I recommend you check this video by everyone's favourite KoW community member:
Death by Dragons - How to use UB2 to play KoW by email!
In short, you play on UB2 one turn at a time, on your own, whenever you have a bit of a spare moment to do so. It is obviously not the same as playing a full game in one go. But when you are not able to reliably lock 2-3 hours at particular time of the day, then this is a perfect solution.
A huge "Thank You!" to Erasmus for reaching out and suggesting we play this way. And even more so for being extremely patient, as it took me quite a long time before we could finally begin our first game. However, when we finally started, all went smoothly and we were able to play a turn each almost every day.
I must admit that there are some aspects of this way of playing the game I like a lot! For example, I really like that I can take it easy and think a bit about my moves without time pressure. Interestingly, it does not result in me spending a lot to make the moves. It is more about the comfort of doing it at the pace I wanted. This was quite important when everything else in life seemed to be quite hectic, changing fast and quite unpredictable! Hence, a bit of peace to enjoy the hobby was exactly what I needed.
For our first game by email, my opponent chose his Night Stalker army. I consider this faction to be an archenemy for the Elves so I was thrilled to fight against it. It can be equally fast but is also significantly different in many aspects. Perfect enemy for an interesting game!
What is more, COK2022 was released just prior to when we decided to begin and we both modified our armies accordingly. Erasmus tells me he didn't change much in his force but since a number of units in the Night Stalkers list were updated, there was a lot to try out as if it was new! For me, I also tried to keep my army as similar to the one I used last time as possible. But as you will see, the same units may have gained some new options and I was curious how would they do this time.
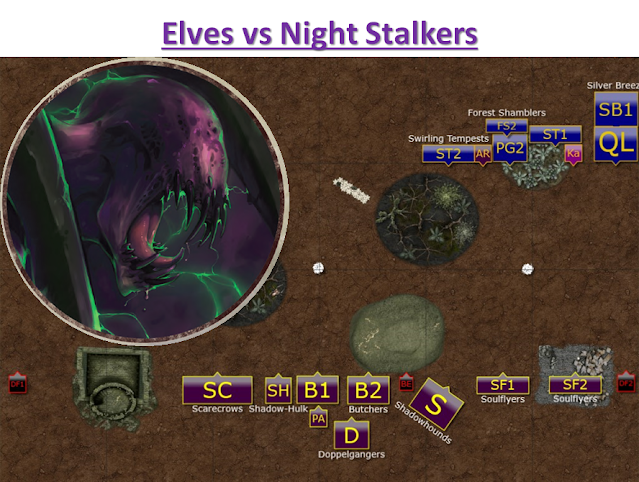
We decided to play at 2000 per side. Here are the details of the Night Stalker army:
Tentacle Street Sneakery Club - Army List
Scarecrows Horde (SC), Infantry, Screamshard - 135
Butchers Horde (B1), Large Infantry - 205
Butchers Horde (B2), Large Infantry - 205
Dopplegangers (D), Infantry - 145
Shadowhounds* (S), Cavalry, Chalice of Wrath - 205
Soulflyers* (SF1), Large Cavalry - 165
Soulflyers* (SF2), Large Cavalry - 165
Planar Apparition (PA), Monster - 165
Shadow-Hulk (SH), Titan - 225
Dread Fiend (DF1), Hero (Large Cavalry) - 135
Dread Fiend (DF2), Hero (Large Cavalry) - 135
Butcher Fleshripper (BF), Hero (Large Infantry), Blade of Slashing - 115
This army has 12 units, all of them are scoring, with a combined unit strength of 24.
The fist units I checked for changes were the fast ones. Soulflyers in particular, as I must admit I consider them a great option, with subtle but important potential. I thus noticed the number of their attacked increased. That makes them even more dangerous, especially if allowed to attack exposed flanks. Naturally, I saw them as the main adversaries for the Drakon Riders. They can potentially end up fighting each other and if that happens, it looked like those who can attack first may have an advantage.
I also wanted to see their Wind Blast in action, as I think it can be a game winning ability to have. At the same time, I would need to take it into account in my plans and try to limit the effects.
Shadowhounds got faster as well, now being able to outpace Elven knights and adding to potential threats for the Drakons. Highly maneuverable, they can prove to be difficult to catch. And with regeneration, they may be more resilient than they seem to be.
Add two Dread Fiends to the mix and it will not be a surprise that I considered these units as a priority targets to be engaged as soon as possible. And hopefully eliminated, so that I could have an advantage in speed and maneuverability.
Doing so is even more important when you look at the army's tougher and more resilient units. Butchers can take a hit and push back quite comfortably. I cannot attack them with any of my own units alone, I need combined charges. And even then with the assumption that I am going to lose some anyway. With Fury, they will always be able to counter attack and with 5+ defense and 16/18 nerve, they are not easy to rout.
Scarecrows and Shadow-Hulk are both quite resilient as well, if in a different manner. Both cannot be wavered, so are very reliable in advance. The infantry does not have much armour but can soak up some damage anyway. And the Titan can take any of my units on its own. Great addition to the army, either as unit that operates alone or heavy support for the main battle line.
Planar Apparition is also one of my favourites in the Night Stalkers list due to its versatility and a lot of useful abilities. It can support from afar, heal damaged units or enforce some unwonted nerve tests. It can also support in melee, especially if allowed to attack from the flank.
In general, it is not the army I can hope to defeat in a straight fight as it is more resilient and does better in war of attrition.
Before I continue with the general plan how I thought I may be able to win against it (before taking into account the scenario), let's have a look at CoK2022 version of my own army.
Outcasts - Army List
Quicksilver Lancers Regiment [1] (QL), Cavalry - 240
Palace Guard Regiment (PG1), Infantry - 160
Palace Guard Regiment (PG2), Infantry - 160
Therennian Sea Guard Regiment (SG), Infantry - 150
The Swirling Tempests Regiment (ST1), Large Cavalry, Kal'ar's Hunters Formation - 180
The Swirling Tempests Regiment (ST2), Large Cavalry, Kal'ar's Hunters Formation - 180
Silverbreeze* Regiment (SB), Cavalry - 200
Forest Shamblers* Regiment (FS1), Large Infantry - 120
Forest Shamblers* Regiment (FS1), Large Infantry - 120
Paul the King (K), Elven King, Hero (Cavalry), Hann's Sanguinary Scripture, Sabre Tooth Cat - 155
Kal'ar (Ka), Lord on Drakon, Hero (Large Cavalry), Kal'ar's Hunters Formation - 170
Archibald the Archmage (A), Elven Archmage, Hero (Infantry), Inspiring Talisman, Lightning Bolt (5) - 155
Argus Rodinar [1], Hero (Monster) - 70
This army has 13 units, 10 of them are scoring and the total unit strength is 23. So while the number of elements and total unit strength is comparable, the difference in scoring units was an important factor.
Let's have a look at the updates to the army list first, in comparison to its previous version, before COK2022.
The rumours already mentioned that there is a Nimble heavy cavalry with an increased nerve to 15/17, so I wanted to try that unit. I usually don't have numerical superiority to outdeploy the opponent, so I try to use higher speed and maneuverability to engineer the favourable fights. Preferably as combined charges from flanks, when possible. Hence, having a nimble regiment of Elven knights, with their great charge range, should help in achieving such a plan. Increased nerve should make them more reliable too. I decided not to add any further items for this regiment, mainly because I didn't have points left. But also because they would become a bit too expensive for me.
For a player who has always used two regiments of Drakon Riders and at least one (often two) Lords on Drakon, the new formation was a great surprise! I loved it as soon as I read what it does! I would have taken it if it only gave nimble to the regiments :) In addition, it gives the regiments and the hero a Spellward ability. And I like extra attacks for the Lord against some types of the enemies. Should make him more dangerous on the flanks, where he usually operates.
With the increase of points for the Archers, the regiment I used to have previously, I had to re-consider this option. I decided to get back to the Sea Guard regiment, as it is not much more expensive than the Archers now. And with Steady Aim rule they should be a bit better at supportive shooting now.
Unfortunately, I had a problem after all these updates. My army became more expensive and I faced a dilemma. I had to let something go from the list in order to keep it at 2000 points (I wanted to start at that size, and expand it later if needed). It looked like I would need to let Army Standard go which made me quite uncomfortable. Because I would have had only three sources of inspiring presence, two of which were fast heroes, often needed to do solitary missions.
This is where Paul came with his great advice and excellent suggestion (Thanks Paul!). First, he suggested to combine two Silverbreeze troops into a single regiment. Mainly to save points but it would also change the role of the unit a bit. It would still be the medium range support but less vulnerable and potentially more dangerous on the flanks (if needed). The price was less flexibility and one element less in the army.
Then Paul suggested taking Argus Rodinar instead of regular Army Standard. I usually don't take the Living Legends but since I have already taken Quicksilver Lancers and a formation, I decided to check this hero. It seems I misinterpreted his rules before. For some reason I thought he is not inspiring himself and gives inspiring presence to one unit only (i.e., making it self-inspiring only). I was nicely surprised to notice he is actually creating an additional source of inspiring presence. Then his new ability (Master of Strategy) sounded like a nice to have as well. On top of that, he is more resilient than regular Army Standard. And all for 10 more points only!
I have already came up with an idea for a model so I wanted to try him out because of that as well!
When comparing both armies, I thought that to balance out the disadvantage in one-on-one fights, I need to use greater maneuverability and shooting to my advantage. It would be tricky as Night Stalkers are all stealthy (makes shooting significantly less effective) but the aim would be to add a few damage points to help with the inevitable melee. Then I would need to neutralize the Soulflyers, Shadowhounds and Dread Fiends to have more room to maneuver. That would be tricky too, as it meant I would have to set up some baits and traps to lure the enemy into fights. And most likely decide what to sacrifice for the exchange.
This is risky when starting the fight with fewer scoring units. However, without "air superiority", I didn't expect to win the battle.
That was my general plan before we rolled for scenario!
Terrain
 |
| Terrain details. |
Erasmus prepared a very cool map for our game. It is appropriately dark for Ethereal Plane called "Shadowfell"! If you would like to use it for your games, it is called "Dark Land". I am sure DarkBlack would be happy if you did!
Deployment and Scenario
 |
| Elves vs Night Stalkers. |
We played one of the classic scenarios for this game - Loot. In this scenario I want the tokens to be spread, so that I can still use the speed of the army as an advantage. With Loot concentrated on one half of the battle field, that advantage is significantly restricted. I got to place the token first so I wanted to make sure I do not leave enough room for the third one to be positioned on the same side. I chose the right side and placed the second Loot token a bit less than 24" from the centre. That meant that Erasmus had to place his on the opposite flank.
Now, the question that would determine the deployment was "Do I want to fight for all three tokens or should I focus on two only?". Fighting for all three seemed to me to be risky because we have the similar number of units but I have fewer scoring ones. I.e., fewer to pick up the token if needed. Carrying a token slows the unit significantly, especially in the case of all my nimble and fast regiments. And I didn't think I would be able to hold against many of the Night Stalkers units if needed to fight one-on-one. Which may be unavoidable if I got the token first.
I thought that in order to have a chance to safely claim and keep the token, I would need to eliminate a few enemy units first. In this way, Night Stalkers superiority in war of attrition would have been neutralized. And I would have some units to keep holding back the reinforcements. Hence, I decided I would have a better chance of doing so if I focused on two tokens only.
I initially planned to spread my army into two independent task groups, more or less similar in size. I wanted to position my entire shooting base on the left and use the hill for extra punch for such regiments as SeaGuard and Silverbreeze. As Dark Black placed his Butchers first and he positioned them in the centre, I was convinced it is a better option for me. However, I modified the deployment when he placed his Soulflyers on one flank only. So instead of being on the left flank, one regiment of Drakon Riders and Silverbreeze cavalry were also deployed there. That was to ensure I had local numbers superiority.
However, it also meant that Erasmus could immediately redeploy his Butchers and Dopplegangers, so I did not have much time to execute my plan. Hence, the final idea was as follows.
Move on the left to secure the token with the scouting Forest Shamblers, especially if getting the first turn. Use shooting to damage the Dread Fiend there and engage it with the King. If it wanted to move around and attack my units, the King would be able to catch up with it. If not, the King had a good chance to win eventually.
The Sea Guard and Archie would use shooting to do some damage against Scarecrows and hopefully eliminate them in melee. And then try to hold against whatever is diverted towards that flank. If nothing, they they would try and advance towards the centre.
On the right, I wanted to use scouting Forest Shamblers as an obvious bait. Either to encourage some charges and then counter attack or to charge first and hold up enemy for a turn. I place heavy cavalry in the front to discourage the Dread Fiend from moving too far forward (in the case I was second). With the option to move Silverbreeze forward for round of shooting against it if I got the first turn.
Then I intended to use the Drakon Lord as another bait. He would be in charge range of Soulflyers but would limit the frontage to other units behind them, not allowing both regiments to attack the single target. And at the same time threaten to charge in and block them if they didn't. That was to allow other units to get into positions for the attack before the Butchers arrived to help.
It is important to take into account the fact that in order to "speed up" the deployment phase, we deployed two units at the time. Erasmus deployed first so by the time his army was fully lined up, I still had the advantage of choosing where to place Silverbreeze, Quicsilver Lancers and Drakon Riders.
Erasmus was kind to write a bit about his plan for the deployment as well:
My plan was
to have a strong centre and weight the right flank. The
strong centre is part of my army design and a habit; because I find it to be a
good principle in general; for reasons similar to those in chess and because I
think it is potentially beneficial with most scenarios.
I went for the right flank because the impassable and forest on the left make
it difficult to assault and The Outcasts are even more manoeuvrable and nimble
that my army.
It is important to note that a regiment of drakons and both regiments of
cavalry were deployed after my army, so there could have been significant force
in the centre as far as I knew until after my last unit was down.
I certainly did not expect nothing in the centre and in hindsight should not have committed to the right quite so hard. I could have deployed the soulflayers in a more versatile position that still threatened the right, lesson learned there.
As you can see I took the full advantage of the time I had to consider a few options of the deployment that Playing By Email gave me :) It was also useful for someone who had a very long break in playing!
I happened to win the roll off and decided to take the first turn to shoot a bit and get closer to the tokens with my Forest Shamblers.
 |
| Deployment of the Armies after Scout moves. |
Outcasts - Turn 1
 |
| Elves seize the initiative! |
Elven army moved forward towards the two of the locations where the treasures were buried. Forest Shamblers led the way and the one on the left flank has claimed the first one already! While the one on the right blocked the passage to the second one and tempted the enemy to commit to melee early.
The shooters on both flanks aimed at the Dread Fiends caught in the open and despite stealthy nature of their foes, managed to inflict some damage as well.
Night Stalkers - Turn 1
 |
| Night Stalkers begin rapid redeployment. |
With sneaky Elves refusing to engage in the centre, Night Stalkers army started rapid redeployment of the units concentrated in the middle of the formation. Scarecrows, Shadow-Hulk and Dopplegangers were ordered to move towards the left flank. While Butchers turned towards the right.
Soulflyers, Shadowhounds and Dread Fiends were to delay the enemy to allow the reinforcements to arrive in time. Only lonely figure, shrouded in the thickets shadows kept moving towards the centrally located treasure. Hoping the Elves would not notice him, being busy defending against immediate threat.
Outcasts - Turn 2
 |
| Paul the King leads by example! |
The Night Stalkers did not take the bait so the Elves re-arranged the formation on the right flank. In this way more Elven regiments were now threatening the charges, while the tight formation limited the option for the enemy to intercept them. The shooting continued and the Dread Fiend was damaged some more. However, it was not yet enough to discourage it from fighting.
On the opposite flank, Paul the King charged down the hill against the other Dread Fiend and tied it in melee. Forest Shamblers withdrew to avoid being charged by the Scarecrows. Who became the target for the Elven shooters now.
Night Stalkers - Turn 2
 |
| Night Stalkers are still reluctant to engage. |
The Night Stalkers are still avoiding engaging in melee with Elves and keep moving more reinforcements to bring their superior numbers to the front.
It takes time, however, for the shambling Scarecrows to close the distance to their foes. As they block the passage, it forces the Shadow-Hulk to traverse the nearby forest, which also slows it down.
On the right flank, the Soulflyers keep the safe distance, meaning they are not able to affect the movement and positioning of the Elven units at this stage. The Butchers move to the top of the hill, which means that they are now in the perfect spot to attack their enemies. Unless Elves decide to launch their attack first!
Outcasts - Turn 3
 |
| Elves attack on both flanks! |
Elven commanders decided that it was time to attack. Waiting longer would only benefit the enemy and it seemed like there were a few openings to try and exploit as well.
First, the Forest Shamblers on the left flank dropped the treasure to be picked up by the Sea Guard and joined Paul the King in his fight against the Dread Fiend. The beast was surprisingly resilient, however, and despite being wounded many times, refused to yield.
Drakon Lord was at the spearhead of the attack on the right flank. He attacked and grounded the Soulflyers. Silverbreeze cavalry followed his example and did the same to the second flock of the nightmarish beasts lurking in the nearby ruins.
That allowed Drakon Riders and Elven Knights to mount the main attack against one of the hordes of Butchers. Luckily for Elves, the attack was successful and one of the most dangerous enemy units perished.
Elves now braced for the counter attacks, with the second wave ready to join the fight. Hopefully, there will be enough Elven units form the first wave to survive and continue fighting.
Night Stalkers - Turn 3
 |
| The counter attack did not go as planned! |
Elven attack put some pressure on the Night Stalkers line. In addition, a few enemy units took advantage of the relative positioning of various regiments and were not viable targets. For example, the Dread Fiend on the right did not see Silverbreeze cavalry and was not able to flank charge the Drakon Lord either, as the gap between the units was too small.
Hence, the Soulflyers counter-charged alone. The attack did some damage to the enemy but not enough to rout them (Edit: Argus' ability to inspire units helped Silverbreeze to stay in the fight though!)
Shadowhounds had a few options to choose from in terms of the target of the charge and were ordered to aid the Butchers. Both attacked Drakon Riders and did significant amount of damage. Unfortunately for the Night Stalkers army, stubborn Elves refused to give up and held up their position! (Edit: That was one of a few double 1's nerve rolls DarkBlack got in this game!)
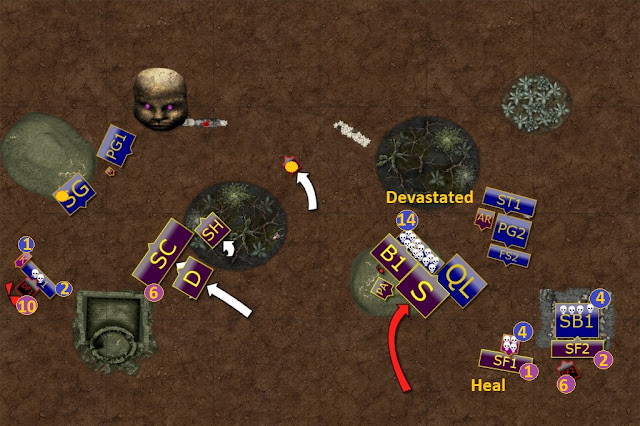
Outcasts - Turn 4
 |
| Devastating second wave of the Elven attacks. |
Elves wanted to take the full advantage of the situation and launched a second wave of the attacks. This one proved to be more devastating than the first one. Especially on the right flank, where they could send two units of their own against one of the enemy. As a result, both Soulflyers and Shadowhound regiments were routed. Remaining Butchers, Planar Apparition and Dread Fiend were now outnumbered and with limited options to counter attack.
The situation on the left flank was also interesting. Forest Shamblers were left alone to fight against the Dread Fiend and managed to destroy the beast at last! More importantly, Paul the King was free to choose a different target. Using the mobility of the individual hero to the fullest, he moved around and charged Scarecrows all alone! That had a significant advantage of holding the line not only against Scarecrows but also blocking the Dopplegangers behind them!
Night Stalkers - Turn 4
 |
| Night Stalkers do not give up! |
The Night Stalkers did not consider surrendering at all. The situation on the right flank did not look good for them but they still could claim a few Elven souls.
And they could still win the battle by stealing two pieces of treasure. One was most likely secured by the Fleshripper, silently moving away from the battle field. The other was held by the SeaGuard but the Shadow-Hulk finally cleared out the forest and was ready to attack Elven infantry. The titanic monster was more than capable of accomplishing that mission.
Outcasts - Turn 5
Can the Palace Guard hold the line?

Elven forces secured the treasure on the right flank and another round of attacks saw two more elements of the Night Stalkers army disintegrating. Only single horde of Butchers remained there to fight.
But the situation on the left was not as good as the Elven commanders hoped for. Even though Forest Shamblers scattered the remaining Scarecrows and blocked the Dopplegangers, it was up to the Palace Guard to hold the line. They charged the Shadow-Hulk to attract its attention and hoped that the Sea Guard would use the time to carry the treasure away to safety.
Night Stalkers - Turn 5
 |
| Palace Guard is destroyed! |
Neither Dopplegangers nor Butchers managed to rout their opponents. Butchers in particular disappointed with their attack against the Drakon Riders, failing to do enough damage to even waver their enemies.
But it was all less important as the Shadow-Hulk hacked and smashed through the ranks of the Palace Guard. Even the elite Elven infantry was not able to hold the line against such a ferocious attack. It then opened the path towards the Sea Guard, which was too slow to avoid the charge. Unless ...
Outcasts - Turn 6
 |
| Paul the King sacrifices himself for the greater good. |
Suddenly, despite complete victory on the right flank, Elves found themselves in a very dangerous situation. Forest Shamblers were tied up in the fight against Dopplegangers and were not able to help the Sea Guard. Elven infantry, slowed down by the heavy treasure, was not able to move away from the Shadow-Hulk either. It looked like they would need to reform and brace for impact. Hoping to hold long enough on their own.
But then, the hero the Elven army needed arrived to save the day!
Archibald the Archmage scanned the battle field from the elevated position on the hill. He could see the regiment of Sea Guard trying hard to move away far enough to secure the treasure in their possession. But he knew that they were not fast enough to do so. It looks like the commander of the regiment realized that too and started shouting order to form defensive phalanx. As Elven warriors quickly moved to their positions, the ground shook with every step the titanic Shadow-Hulk made towards its new prey.
And then Archibald the Archamge noticed a single Elven warrior galloping towards the huge monster, waving his sword and shouting at it to attract its attention. If only he could distract the beast for a while, it would buy some time for the Sea Guard to move to safety. Unfortunately, the Shadow-Hulk has not reacted to any of the efforts the Elven hero made.
Only when Paul the King (as it was him who dared to challenge the Shadow-Hulk) threw the insults worthy of the drunk Dwarven Berserker, the monster finally noticed him and turned towards him instead of the Sea Guard.
"Where did he learn such a foul language?" thought Archibald the Archmage as he waved towards the commander of the Sea Guard to hurry up and run away with the treasure."
Night Stalkers - Turn 6
 |
| Paul the King - the hero of the day! |
Night Stalkers tried one more time to snatch the treasure from the Elven hands but Paul the King had none of it! Even though badly wounded, he kept on fighting, alone against the Shadow-Hulk, refusing to give up. (Edit: Erasmus was kind to roll double 1's for that fight as well!).
When Forest Shamblers held against the Dopplegangers as well, it was clear that Elves would be able to carry two treasures to the safety. The Shadow-Hulk obeyed the voice of its master and left the wounded Elven King alone. While the Butcher Fleshripper carried away the third one, laughing quietly, knowing that Elves fell into another trap at the eve of their victory.
While the Elven forces could handily defeat the Night Stalkers to control the first piece of treasure, they had been deceived! A Night Stalker agent was already on its way to secure a second piece, making the victory hollow.
The forces of darkness could only be pushed back if the Elves controlled more elements of the treasure, so the brave King and the Archmage led a few warriors and forest allies to claim the third piece. The Night Stalkers were on their way too though!
The King had to hold off a Dread-fiend in single combat to stop it getting behind the lines! When the forest shamblers were in position he had to leave it wounded to hold off the tide of scarecrow and doppelgangers at a choke point near the ruined castle.
Then his hand picked palace guard were swept away and he was called to single combat with a titanic shadow hulk so that the sea guard could escape with their lives and the final piece of the treasure.
- by Erasmus
Summary
Turn-by-turn animation summary

After-battle
Many thanks to Erasmus for a great game! As you could see, it was not decided until the very last moment. It actually looked like, despite the Elven success on the right, that the Night Stalkers would steal the victory in the end!
Here is the game summary Erasmus wrote from his point of view:
The star of this battle was certainly the
Elven King! That hero held up four units when they needed to do something
critical. Stopped the dread-fiend outflanking early on, then held up the
scarecrows (and doppelgangers behind them) and finally got in the shadow hulk’s
way at the critical moment! I definitely underestimated the king when
estimating how much force to send to the left flank.
Truly the stuff legends are made of.
It would have made a difference if I could have gotten a regiment of soulfayers to the left flank early on, but Swordmaster put the enough pressure on that flank to tie them up there. Anything without flying would also have been held up behind the scarecrows.
It was a great game; seeing if
Swordmaster’s risky plan would pay off.
The only thing I would have suggested would be to put forest shamblers in the
centre to grab the middle token and make me fight for it. There were more elf
units that needed on the right, so one could have been spared as a safety net.
Reviewing the battle while writing the report (one of the reasons I like writing them!) I can definitely agree with Erasmus that it would have helped. To win against the Shamblers, he would have to send one of the hard hitters. Butcher Fleshripper would not have been enough on his own. I did like them on the flank during the game as they worked as a mobile obstacle. But I could have potentially used another unit to do something similar. Or simply threaten any enemy who would like to collect the token with an attack of a few units at the same time.
I was definitely happy with the way things worked out on the right flank. I expected more casualties and exchanges there. It did help to have nimble Drakon Riders as they could re-adjust their positions much easier. That, in turn, allowed me to launch the attacks against the right targets, often with two units vs one of the enemy. This is something I need to do in order to create a break through and start enveloping the foe. Very often, getting to such position with maneuvering alone is not that easy. Simply because some armies are able to deploy across entire width of the battle field.
I did make one mistake that almost cost me the battle and I am glad I managed to spot the opportunity to block the Shadow-Hulk with the King to make up for it. The mistake was to move Sea Guard in turn 5 in such a way that I still needed another pivot later on to stay on the battle field. I should have moved towards the bottom left corner then, so that I could move them at the double turn 6 without sacrificing the King. Fortunately, I was able to position him in such a way that did not allow the Shadow-Hulk to charge past him. Even with turn 7, the Sea Guard could run away, regardless if the King survived or not. However, it made for a much more fun and heroic ending of the battle when Erasmus rolled double 1's for him!
In terms of the new list, I like it and I will try to have some games with it in the future without any further changes for now. I like nimble Drakon Riders a lot and I am very happy with Argus as well. I just need to remember his Master of Strategy rule! Elven knights with Nimble and improved nerve values are great too, so I will keep using them for now as well.
It was nice to have a bit more reliable unit of Silverbreeze (troops often got wavered quite easily). Although I sacrificed the versatility of having two where I could divide the shooting between two targets. The regiment may also be a bit more useful in melee as a supporting and not often expected flanking force.
I hope you enjoyed this battle report. I highly recommend Playing By Email method if you constantly find yourself with insufficient time to play a full game. I will do my best to play again in this way and Erasmus tells me that his Dwarfs are eager to have a word with my Elves :)
Thanks for reading!
No comments:
Post a Comment