

Greetings!
It has been some time since I played a game of Kings of War "live", either with real models or online. It was thus a great that when Karl reached out to offer me a game on Tabletop Simulator I had some spare time to do so. It was our long overdue re-match too! We played our first game almost exactly a year ago. You can check it here if you are interested:
Game 152 - Salamanders - 2021/01/26
If you are interested in playing Kings of War on Tabletop Simulator platform, I highly recommend you read Karl's article on Mantic Blog:
How to play Kings of War on Tabletop Simulator
And check all the goodies Karl prepared for you on this FB group:
Kings of War - Tabletop Simulator
There are a lot of very useful functionalities built in now, that make the experience even more smooth and user friendly. I also learned that you can have moving models as well, in the same way as they are in computer games! I hope I am going to find some time in the future to play with that and create more personalized version of my own as well.
Karl brought his trusty Salamanders again and we both had some updates to our respective army lists since last time. Here are the details of the army list of Karl's Salamanders:
Salamanders - Army List
Salamander Ceremonial Guard Horde (SC), Heavy Infantry - 265
Tyrants Horde (T1), Large Infantry - 240
Tyrants Horde (T2), Large Infantry - 240
Ancients Regiment (A1), Heavy Infantry - 185
Ancients Regiment (A2), Heavy Infantry - 185
Scorchwings* (SF1), Large Cavalry - 120
Scorchwings* (SF2), Large Cavalry - 120
Fire Drake (FD1), Titan - 210
Fire Drake (FD2), Titan - 210
Herald (H), Hero (Heavy Infantry), Lute of Insatiable Darkness - 85
Mage-Priest (MP), Hero (heavy Infantry), Heal (3), Shroud of the Saint - 135
This army has 11 Units, 9 of them are scoring and the total Unit Strength is 22.
I must admit that to me, Karl's army looks really tough. There are a lot of units with defense 5+/6+, high nerve value or even fearless. A bit more fragile Tyrants are more resilient than any of my units, as they are fearless too. Only Scorchwings look a bit more vulnerable, but they are fast and maneuverable, I would not expect them to be in the open unless specifically ordered so.
It means that I would not be able to defeat any of the tough Salamanders in frontal charge, until there is some damage done to them first. Which may be even more tricky to do as the Mage-Priest came equipped with a nice healing ability.
Salamanders also have nice ranged attacks abilities. Fortunately, they are mid-range so I could potentially try to inflict some damage without risking immediate retaliation. The army is also a bit slower. I really hoped that extra maneuverability thanks to nimble would help me in exploiting potential openings.
Hence, the general plan was to focus shooting on a single target and then try and eliminate it with a timely multi-charge. Avoid engagement, in particular with the Ceremonial Guard, until sufficient damage from shooting is done and such charges can be executed. To help with that goal, I also needed to eliminate Scorchwings early. They are very nice, versatile units, that thanks to their speed and nice melee abilities, can intercept my own regiments, threaten the flanks and interfere with my movement.
My army list for reference:
Outcasts - Army List
Quicksilver Lancers Regiment [1] (QL), Cavalry - 240
Palace Guard Regiment (PG1), Infantry - 160
Palace Guard Regiment (PG2), Infantry - 160
Therennian Sea Guard Regiment (SG), Infantry - 150
The Swirling Tempests Regiment (ST1), Large Cavalry, Kal'ar's Hunters Formation - 180
The Swirling Tempests Regiment (ST2), Large Cavalry, Kal'ar's Hunters Formation - 180
Silverbreeze* Regiment (SB), Cavalry - 200
Forest Shamblers* Regiment (FS1), Large Infantry - 120
Forest Shamblers* Regiment (FS1), Large Infantry - 120
Kal'ar (Ka), Lord on Drakon, Hero (Large Cavalry), Kal'ar's Hunters Formation - 170
Archibald the Archmage (A), Elven Archmage, Hero (Infantry), Inspiring Talisman, Lightning Bolt (5) - 155
Argus Rodinar [1], Hero (Monster) - 70
This army has 13 Units, 10 of them are scoring and the total Unit Strength is 23.
Terrain
 |
| Terrain Details. |
Deployment and Scenario
 |
| Elves vs Salamanders - Deployment of the Armies. |
In this game we played Invade as a scenario. Nice and simple, at least in theory! The good thing was we did not have to worry about any tokens. The bad thing was that were not able to use some cool tokens Karl prepared for scenarios when you need them. Ah well, hopefully next time!
We have similar number of units and almost the same total Unit Strength. It means that there will be no room for error, as every loss takes a way precious Unit Strength that matters for the scenario.
In addition, at least from my point of view, I do not have staying power to engage the enemy on its territory, thus win the scenario by preventing it from invading my half of the battle field. I needed to inflict more damage than Karl and be able to move my units over the middle line safely.
Careful choosing of the targets for shooting and creating the necessary gaps in Salamander's formation would be a must. Hence, I deployed in a way that left the middle of the battlefield relatively open but with regiments close enough to threaten the approaching enemies. Either with shooting or direct attacks.
I decided to focus my own shooters on the centre left and move the infantry there. In this way, I hoped they would be able to create the gap in the enemy formation. While nimble units on the right were fast enough to change the direction of the attack. If needed.
Let's see if that worked!
 |
| Deployment from Salamanders' point of view. |
 |
| Deployment after Scout moves. |
Salamanders - Turn 1
 |
| Advance on all fronts! |
Salamanders moved forward in a seemingly impenetrable wall of scales, shields, massive weapons and sharp teeth. Exposed Forest Shamblers were the targets of the shooting but fortunately for Elves, not much damage was done.
 |
| Salamander's right flank. |
 |
| Charge (red) and ranged attacks (green) ranges, plus arcs switched on. |
Outcasts - Turn 1
 |
| Elves spotted an opening on their left flank. |
The regiments on the Elven left flank moved to positions to shoot at the enemy and to close the distance to it. Forest Shamblers charged the Fire Drake to distract it, as the nearby Drakon Riders spotted a safe landing site, in between the enemy units.
At the same time, the regiments on the right flank pulled back a little, buying more time and looking for the opportunity to choose the right target to attack.
 |
| The view from the Salamanders' left flank. |
 |
| Battlefield's overview. |
Salamanders - Turn 2
 |
| Salamanders attempt to outflank the enemy. |
The unexpected advance of the Elven units into the gap on their left flank resulted in an instantaneous response from the Salamanders. Several units pivoted on the spot and moved behind the screen of the Ceremonial Guard and the intervening terrain, to intercept the intruders.
In the meantime, Scorchwings on the Elven left flank also attempted to outflank the enemy. Unlike enemy Drakon Riders, however, they would have to survive the storm of Elven arrows.
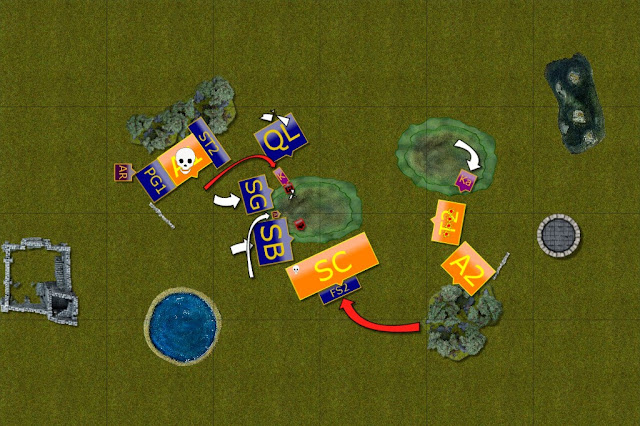
Outcasts - Turn 2
 |
| Elves attack on the flanks. |
Elves decided there are some good opportunities to create gaps in the Salamanders' battle line. First, the Drakon Riders on the left flank, joined forces with the Palace Guard and managed to eliminate one of the huge Fire Drakes.
At the same time, Sea Guard, Silverbreeze and Archmage, all targeted Scorchwings, knowing that if left unchecked, they will cause a lot of problems. Fortunately for Elves, they inflicted sufficient amount of damage to discourage flying lizards from participating in the rest of the battle.
Last but not least, Drakon Riders on the right flank attached the second flock of Scorchwings while the Drakon Lord distracted the nearby Fire Drake.
These attacks created two breaches in the enemy lines but the Salamanders were not without options to counter attack.
 |
| Aerial combat! |
Salamanders - Turn 3
 |
| Salamanders counter attack! |
Despite the best efforts, Palace Guard was not able to completely block the Ancients. The veteran Salamander warriors ignored the Elven infantry and charged Drakon Riders instead. Elven flying cavalry perished soon after.
Another Palace Guard regiment, however, got a full attention of the Tyrants but to everyone's surprise, they survived the attack! Would that be enough for other units to come to the rescue in time?
Outcasts - Turn 3
 |
| Stormwind cavalry breaks through as well. |
Majority of the Elven regiments used the opportunity to regroup and seek more favorable positions. The shooters once again focused on the Ceremonial Guard, doing a bit of a damage that Salamandres simply ignored.
The Elven Knights, however, got their chance to charge and break through at last. Together with the Drakon Lord, they chose the second Fire Drake as their target. Not only hunting down such a beast was important to ensure the threat is eliminated, but it also opened the door to the enemy territory.
Salamanders - Turn 4
 |
| Slamanders' march is slowed down again. |
With majority of the Elven army either out of range or out of sight, Slamanders focused on regrouping and covering the flanks where possible.
This time, badly damaged Palace Guard, however, had no more will to fight and was routed.
Outcasts - Turn 4
 |
| Elves concentrate their attacks on the left flank. |
Elves launched another wave of coordinated attacks. The sacrifice of the Palace Guard did not go for nothing, as the Sea Guard and Silverbreeze regiments managed to rout the Tyrants.
Interestingly, however, the nearby Ancients, despite being attacked from three sides and suffering significant damage, held their ground! Luckily for Elves, other units of the Salamanders army were too far to help.
Salamanders - Turn 5
 |
| Invading Elven territory. |
Surrounded from all sides, the Ancients tried to take as many enemies with them as possible. While, the rest of the army, unable to help, moved forward to invade Elven territory.
Outcasts - Turn 5
 |
| Elves move forward as well. |
Elves were mindful about the strategic objectives as well. With a few venues open into enemy territory, they started moving towards that direction. While using their ranged attacks to target the Tyrants, the only enemy unit with a bit less armour.
At the same time, Palace Guard and Drakon Riders managed to defeat the stubborn Ancients. This helped Elven army to control left flank.
Salamanders - Turn 6
 |
| Final charge by the Salamanders. |
The three remaining units of the Salamander army moved deeper into Elven territory. Unfortunate Forest Shamblers were not able to avoid the foe any more and were destroyed.
The final word belonged, however, to the Elven army.
Outcasts - Turn 6
 |
| Parting shots! |
Elves did not risk any unnecessary attacks this time. The remaining regiments focused on securing the perimeter and it was clear that Elves moved more numerous force into the enemy territory. It would, most likely, force the remnants of the Salamanders force to withdraw.
Only the shooters aimed at the Tyrants one more time but despite the significant damage, the large lizards refused to yield.
Nevertheless, strategic goals were achieved by the Elves who claimed victory.
Summary
 |
| Turn-by-turn animation summary. |
After-battle
First of all, many thanks to Karl for reaching out, offering the game and then being extremely patient when I tried to recall how to use Tabletop Simulator. Also for his help in learning how to use new features and, as usual, for even more patience when it took me some time to make the decisions during the game.
The new features that Karl prepared are really good. It helps enormously when you can switch on the circles indicating the range for charges and shooting. It is great to have an easy way of switching on lines indicating arcs. There are very useful features that help to pick up the right dice in no time, dramatically speeding up the game. And simply making it very easy to use. There are many more things that have been included, but I have not discovered or needed to use yet. But I highly recommend trying all the goodies that are just ready to use. And perhaps drop Karl a line, I am sure he will be happy to teach you how to use Tabletop Simulator, show the features he created and simply have a great game!
I really like his army. It looks really intimidating and I think I just got some luck to spot a few openings and not get locked in the corner by tougher, stronger and meaner Salamanders! I am glad the Fire Drakes were occupied soon to limit the effect of their ranged attacks. These titans are so versatile, especially with Nimble, that I preferred to attack them first, even if from the point of view of the scenario, they contribute only a single Unit Strength point.
Similarly, it was very important to get rid of the Scorchwings. While more fragile, they are highly maneuverable and if left unchecked, can do some damage with timely attacks from flanks and rears. And can add a few well aimed arrows, to make life of the opponent even more difficult.
Even with that goal accomplished, it was not easy to gain advantage. The remaining units are really tough. Even the Tyrants, with the defense "only" 4+, are not easy to stop. You just have to rout them completely, as they cannot be wavered. And as you could see in the game, I still had to lose a regiment to get one of them.
My shooting this game may look as if it was not efficient but it is wrong impression. The shooters managed to take care of the Schrowings on the flank. But other than that, the usual available target was Ceremonial Guard. In the course of the game I inflicted some damage but that was sufficiently neglected by the healing abilities of the Mage-Priest. Really good combination. That's why I was not able to attack that unit, even when I had opportunities for potential charges from the multiple directions.
In the end, I am quite happy with the game, especially after quite a long break. I am sure we will catch up with Karl at some stage again!
Thanks for reading!
That's one tough army, well done on your victory! And well done to the palace guard for holding out for that turn!
ReplyDeleteThank you! Indeed, a tough opponent, I am glad I won this time.
Delete