

Hello!
In the second round of the small tournament, MiniMeG III, where we used Mortem et Gloriam Pacto rules, I faced fearsome horde of Galatians commanded by Dale.
I was really impressed by the number of units Dale had in his army. Vast majority of the forces was comprised of Fearsome Warriors and the cavalry and light troops formed only a small contingent.
It was an interesting challenge as I didn't have many occasions to fight against such army before. I was also curious about the way such force would operate under Pacto rules.
Here is the army list Dale used:
Galatians - Army List

This force almost double the number of units I had in my own army. I thus assumed I would need to do something to narrow the frontage and try to fight against waves of barbarians rather than allow some of them around the flanks.
Another assumption was that if I could hold the first charge with pikes, then subsequent round of combats should be in my favour. At least, that was my first idea for a plan after I saw what I am about to fight against!
Here is my army list for the reference:
Seleucids - Army List

Pre-battle
With better cards for pre-battle phase I managed to get some more terrain on the battle field. That was important because Galatian units do not like rough ground. And allowed me to get a few narrow channels to fight in. I also hoped to use some of that rocky ground as a way to sneak Thracians through and allow them to attack the flanks or at least force Galatians to fight in the terrain they did not like.
Although outscouted, Galatians were so numerous it still didn't really matter. Besides, with quite uniform army it was clear that there will be a wide line of Warriors with units forming second wave behind them.
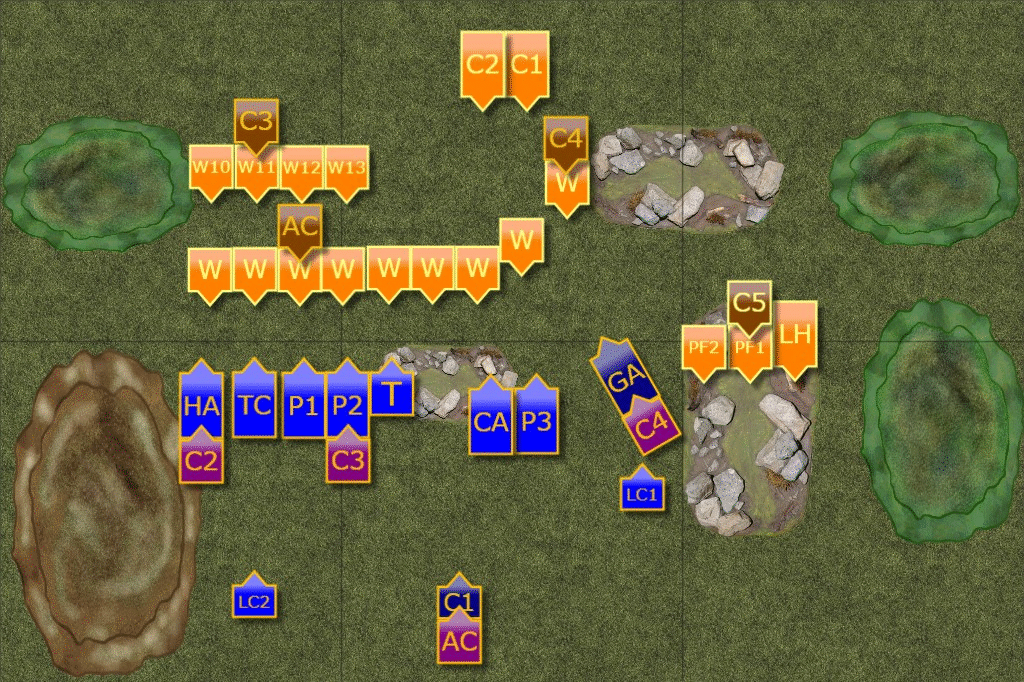
Deployment
 |
| Early Seleucids vs Galatians |
 |
| Deployment of the Armies |
With flanks protected by the terrain, I decided to advance through two gaps and hold the Galatians in these bottle necks. Meanwhile, the Thracians and Cretans would use the rocky ground to their advantage and try to assist the Phalangites.
Light horse on the left was there to shoot at the advancing warriors as well while small units of Charging Lancers were held as reserve to exploit potential breaks in enemy formation.
Galatians - Turn 1
 |
| Turn 1 - Sequence of Actions |
 |
| First wave of Feared Warriors. |
As expected, the first wave of Feared Warriors advanced bravely forward. Seleucids responded by blocking the passages with their Phalangites and keeping their cavalry in reserve. Some of the skirmishers on the right flank attempted to move past the Silver Shields, obviously trying to get to safe shooting positions.
 |
| Battle lines are getting closer. |
Seleucids - Turn 2
 |
| Turn 2 - Sequence of Actions |
 |
| Some Warriors break the formation. |
As the armies were getting closer and closer, units started breaking formations. Warriors mainly to avoid rough terrain in the centre of the battle field, while Seleucids in order to pick the fights where they preferred.
It was inevitable that some units are going to clash in a very short time indeed.
 |
| Both sides are bracing for impact. |
Galatians - Turn 3
 |
| Turn 3 - Sequence of Actions |
 |
| Phalangites vs Warriors. |
With the laud battle cry, the Warriors charged at the Phalangites and battle lines clashed. The fight was vicious but quite unpredictable. The exchange of blows on the left flank left both sides damaged, while Seleucids seemed to be getting upper hand on their right.
And just when it looked like both sides are locked in deadly combat, one of the Warrior unit on the right flank broke. The panic spread quickly and two more units of Warriors completely lost the heart to fight and fled as well.
 |
| Seleucids made a breach on the right. |
Early Seleucids - Turn 4
 |
| Turn 4 - Sequence of Actions. |
 |
| Galatians intercept out-flanking Silver Shields. |
Victorious units on the right attempted to perform out-flanking manoeuvre but were intercepted by the mounted Galatian reserves.
To make things worse for the Seleucids, what was meant to be a helpful charge by the Line Cavalry turned out to be a disaster. The Charging Lancers failed to break their weakened foe and perished instead. That triggered the panic in the nearby, badly damaged and hard pressed Phalangites. As a result, Seleucids lost left flank and almost reached a breaking point for the entire army!
Not waiting for that to happen, Seleucid commanders rallied their troops and withdrew in good order.
 |
| Heavy losses on both sides. |
Summary
 |
| Turn-by-turn animation summary |
After-battle
Many thanks to Dale for a fantastic battle! It was quite vicious, with a few moments where fortune seemed to sway to one side, only to change to the other in no time.
Dale's army looks fantastic on the battle field and I would love to have another opportunity to play against it, in particular with regular set at 10,000 points or more. I am sure it would look even better at that scale.
I had a few interesting observations I wanted to share from this game. I was glad the plan to hold the advance in two narrow passages seemed to be a good idea. However, I didn't anticipate the results of the fights appropriately.
My initial assumption was that after the charge, where the Warriors have bonuses from Devastating Charge and Short Spear, the Pikes should start having some advantages in the following turns of the fight. That was usually the case in the regular MeG. In Pacto, however, a loss of a base means the Phalangites were immediately reduced to Long Spear type of a unit. In addition, any Shove result was actually a waste as there was no second file to benefit from that.
My conclusion was then, that I should have waited a bit longer and advance with the shooters first, perhaps even together through the middle of the battle field, to inflict some damage before the clash.
Next observation was about fragility of single base units. My idea was to charge in with the Lancers, inflict some damage due to a bit better odds against Devastating Chargers on foot and withdrew to repeat it next turn. However, due to the fact we were rolling just a single dice again, no Shatter effects were possible and the results were more unpredictable. In the end, Dale rolled better and I lost the unit. But that triggered chain reaction of dramatic Kill-a-Base tests that were devastating on such small units. As I have already lost a base for each Phalangire TuG, subsequent KaB tests simply wiped out two more units.
Once again, I concluded, that I should have been more patient with such small units. it also shows, that whatever works in regular rules, may not necessarily have the same impact under Pacto. In fact, I arrived to the conclusion, that one has to design different plans under Pacto, than simple scaling down of the distances and visual similarities between the armies may suggest.
In any case, it was a very enjoyable game that ended up in a bloody, 8:8 draw. If there was more time I think my army would have been broken, as Silver Shields were in a bad spot. Even if I could somehow trigger the similar chain reaction of KaB tests on damaged Warriors' units on the left, Dale would have lost 3 units at best. And still had 2 more to break point!
Thanks for reading!
No comments:
Post a Comment