

Hello!
It's been a year since I started playing Mortem et Gloriam and since I attended my first tournament, Mini MeG. It was thus a great opportunity to come back for Mini MeG 3, this time organised with Pacto version of the rules.
Dean from Olympian Games was the tournament organiser again and this time he also participated in the event with his Parthian army.
If you would like to check the details about this small tournament and/or the version of Pacto rules adapted for it, please follow this link: Mini MeG 3 - Rules Pack
In short, Pacto is a simplified version of Mortem et Gloriam rules that allows to play with scaled down armies on smaller, 3 x 2 foot tables. In my understanding it is to allow quicker games but mainly to serve as in introduction to the full set of rules. As it requires fewer bases of the units, it should be very good for beginners and those who has just started building new armies.
I was very curious about this set. I was in particular intrigued by the opportunity to play on small tables. While I like full scale games, with the number of units that allow recreating big battles of history, having a smaller version of the rules has some advantages too. It may simply be a good alternative for quicker games when one may not necessarily commit enough time for a regular battle.
I managed to scale down my army without any changes to the number and types of units. It was great because it allowed me to have a very good comparison between both versions.
There were 6 participants on the day and we were to play 3 games. The armies represented were as follows: Armenians, 2 x Galatians, Early Seleucids, Parthians and Anglo-Danish. In the first round I played against Steven who brought an army of Armenians with some Hunnic allies. Here are the details of this force:
Armenian - Army List

As you can see, in Pacto, the units are much smaller, 2 bases each in this case. However, the number of units in the army corresponds to the force at around 10,000 points in full rules. Please note that there are no Camps under Pacto rules.
I have never had a chance to play against Armenian army. What I noticed at the start was that it has quite a large contingent of Archers, cavalry of various types and no melee orientated infantry. My first impression was that Archers will be very good at slowing down the enemy and taking a few bases in the process. Hunnic cavalry and Horse Archers would probably do the same to the opposing mounted troops. And Lancers would wait for the opportunity to strike at the weakened foes and/or attack exposed flanks.
By comparison, my army looked as follows:
Early Seleucid - Army List

Pre-battle
When outnumbered by generally faster and more manoeuvrable force, I try to get some more terrain to help with protecting the flanks. Fortunately, with more cards for PBS phase I was able to get into denser terrain and we placed a few pieces of rocky ground, in addition to the mountains on the secure flank.
I also managed to outscout Steven so he had to place some of his units first.
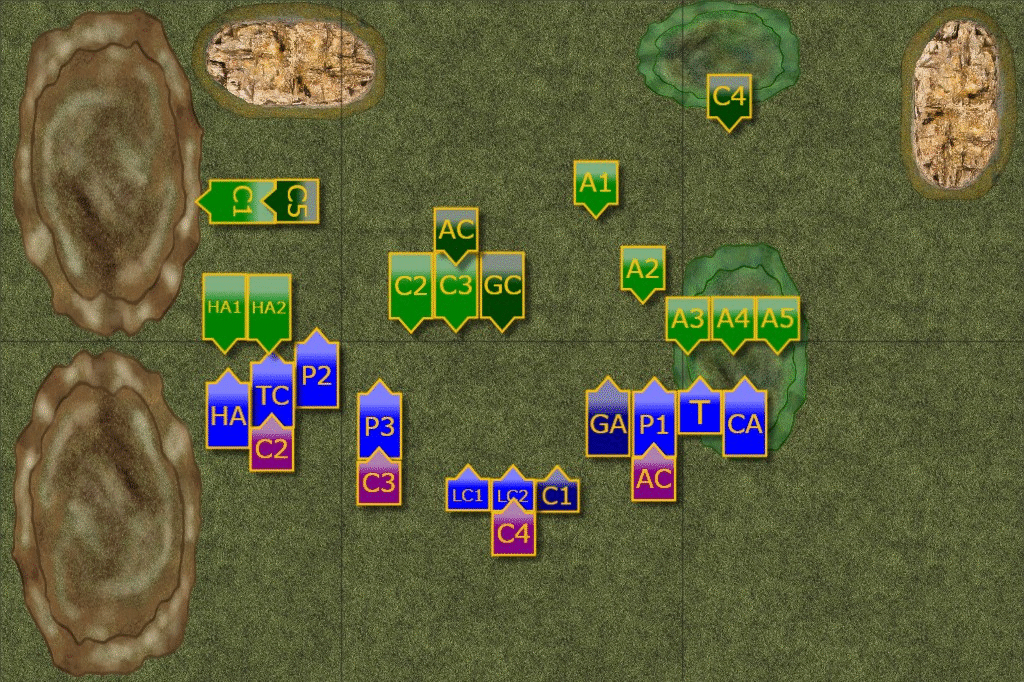
Deployment
 |
| Early Seleucids (South) vs Armenians (North) with Hunnic Allies (Flank March) |
 |
| Deployment of the Armies. |
Dense terrain and secure flank narrowed the battle field and helped me to keep the formation, while Steven decided to send his allies for the flank march. His reasoning was that there is not enough space to deploy his entire army anyway. Besides, he needs to attack flanks as frontal charges alone, especially against Phalangites, are not going to help him much.
My plan was to move two groups of Phalangites on both sides of the battle line. The left would try to stop Armenian cavalry, especially with the assistance of my own light horse. The right would try to catch some of the Archers, while supported by Thracians and Cretan Archers. The cavalry in the middle was to ensure enemy horsemen would not go for exposed sides of the advancing infantry. Companions were initially left a bit behind to act as a mobile reserve.
Armenians - Turn 1
 |
| Turn 1 - Sequence of Actions. |
 |
| Advance on the centre-right |
Both armies advanced towards each other. Surprisingly, Armenians moved forward even though their Hunnic allies have not showed up yet. For a moment soldiers from both sides looked at each other in silence. Then the Phalangites lowered their pikes and advanced in battle formation while Armenian Archers got ready to unleash first volley.
 |
| No sigh of the allies. |
Seleucids - Turn 2
 |
| Turn 2 - Sequence of Actions |
 |
| Phalangites on the course to intercept the Armenian Cavalry |
Charging Lancers and Companions blocked the advance of the Armenian Cavalry while Phalangites and Silver Shields started enveloping this enemy formation.
Light troops on the flanks engaged in a series of hit-an-run manoeuvres that resulted in Armenian units withdrawing while Seleucids kept chasing them.
The Hunnic Allies were still nowhere to be seen.
 |
| Ready to fight. |
Armenians - Turn 3
 |
| Turn 3 - Sequence of Actions. |
 |
| Armenian Cavalry is in trouble. |
Seleucids attempted to catch their elusive enemies on both flanks but were not successful there. The enemies either run away or skirmished successfully. In fact, one of the Phalangites units lost significant numbers due to incoming missile fire.
However, the units in the centre trapped three cavalry units of the Armenian army and these quickly collapsed, mainly thanks to the involvement of the Silver Shields.
 |
| The beginning of the end. |
Seleucids - Turn 4
It was clear by now that Hunnic Allies of the Armenian army would not show up. Was it due to some treachery or simply bad luck and not arriving in time - it didn't matter.
Seleucids launched another attack on the exposed flank of the fourth and last unit of Armenian cavalry while Cretans routed first unit of Archers. After that, Armenian army lost cohesion and the survivors fled to the mountains to avoid complete disaster.
Summary
 |
| Turn-by-turn animation summary |
After-battle
Many thanks to Steven for a great game! I am also really sorry for his bad luck with Allies. All he needed was just one red card for them to show up but it has never happened!
It was short but bloody encounter. The first impression was that the fights get resolved very fast and Kill-a-Base test had quite an impact too. Interestingly, we played three turns and a little bit of fourth one to achieve the resolution. So on one hand the game indeed last shorter but on the other, we have not played that many turns.
From the tactical point of view I wonder what would have happened if Steve waited with his cavalry a bit and use his archers (both infantry and mounted) to keep running away. One unit of Phalangites already lost a base and while in general, the shooting may not always result in routing entire units, it has already slowed down that element of my army.
And as soon as Armenian Cavalry got stuck in a fight with their counterparts, Phalangites could get to them too. From that moment it was really a bad situation for Armenians and they quickly perished.
In general, first impressions were positive and it was very comfortable to play a game where I could reach easily to any part of the table without a need to stand up! :)
Thanks for reading!
No comments:
Post a Comment