
Hello!
In the last game of Mortem et Gloriam tournament at CanCon 2019 I played against another Roman army, this time of the Imperial flavor. This army was led by the player I had a pleasure to play against a few times before. Paul and I have already developed well spirited sport rivalry. Our games became are often bloody encounters with the end result being decided with a single, last dice roll! I was thus very curious if either of us can come up with a new plan to outsmart the opponent!
Although Paul often switches between various time periods for his Roman armies, he usually brings a combined arms force, with a mix of various types of infantry and cavalry. It was not different this time but as we know very well, it is all about the details! Here is the army list Paul brought to the event:
Imperial Roman - Army List
 |
| Imperial Roman - Army List |
This army has only 2 more units than mine but it has more TuG's and because of that its break point is 6, a good number to have. I was more or less familiar with Auxilia and Equites as I have met them before. Both are very useful and the fact they were armed with Javelins added to the flexibility of these units.
The new elements were Clibanarii and Guard Legionaries (Praetorians!). I had to figure out how to fight against those. Fortunately, there were only two TuG's and both were of the smaller size.
With Hun Mercenaries and two units of horse archers added to the mix, it was clear that Paul had numerical superiority in the case of cavalry units. And while he also had 1 more unit of the infantry it seemed to me that Phalangites should prevail against Auxilia.
Based on that preliminary assessment of the opposing army I decided to try and engage infantry with Phalangites and keep the cavalry busy but not necessarily committing to the fight early. It was to give infantry the time they needed to engage and start winning their chosen combats.
Pre-battle
This time we ended up with mountains as a secure flank (on my right hand side) and a few woods and forests. That narrowed the battle filed and divided it into two corridors due to the central placement of the woods.
I apologize but I do not recall at the moment who out-scouted whom but it was not by much for sure.
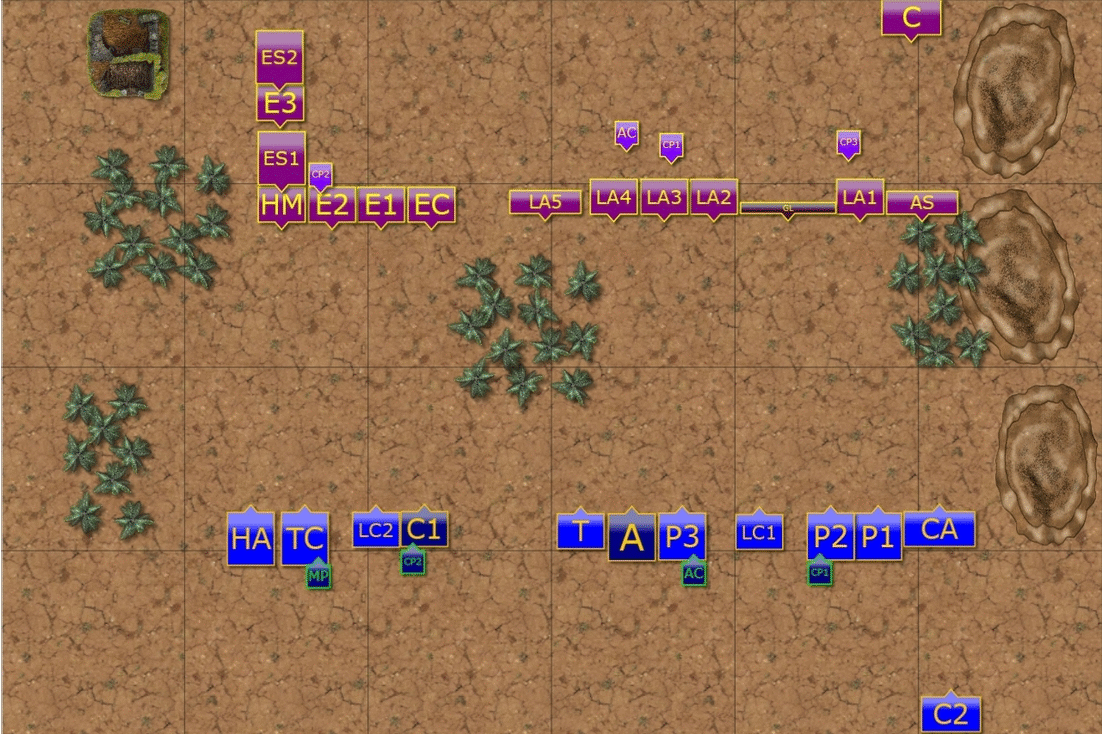
Deployment
 |
| Early Seleucids vs Imperial Roman |
 |
| Deployment of the Armies. |
My plan for the last game was as follows. The Phalangites on the right half of the battle field would march forward at a double (if possible) to engage Roman infantry as quickly as possible. Tracians on the left and Cretans on the right were to enter the woods to protect the flanks of the Phalangites. Line cavalry TuG was there to exploit potential breaks in the enemy formations.
At the same time, remaining cavalry units were to move forward and seal the passage around the woods so that numerically superior cavalry would not be able to threaten the infantry with a deep outflanking maneuver.
In order for this plan to work I would need the infantry to get to the fight quickly and hopefully inflict substantial damage to even out the disadvantage in terms of the break point. I also hoped for the cavalry to exchange blows and perhaps eliminate a TuG or two as well but the priority was to hold the enemy on the left long enough.
I assigned units for each commander while Paul decided to keep his General floating.
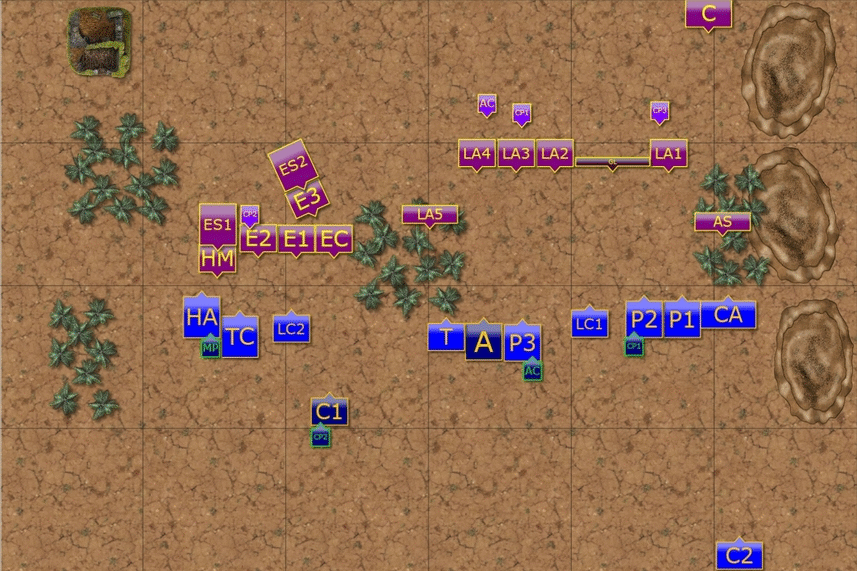
Seleucids - Turn 1
 |
| Turn 1 - Sequence of Actions |
 |
| Cavalry vs Cavalry |
Seleucids advanced towards the enemy across the whole line with the Companions on the left as the only exception. They remained as a mobile reserve and awaited the reaction of the opposing enemy.
The Phalangites marched forward, with the right flank contingent approaching at a double while the central formation moved a bit more cautiously. On the contrary, Roman infantry remained more or less stationary.
 |
| The battle begins. |
Romans - Turn 2
 |
| Turn 2 - Sequence of Actions |
 |
| In preparation for archery contest |
The cavalry units on both sides started their deadly dance of maneuver and counter maneuver. Romans tried to push back Seleucid light horse but suffered some casualties in doing so.
Seleucid infantry continued their march but as the Romans remained where they were or even withdrew, the Phalangites prepared for a longer walk.
 |
| Maneuvers continue. |
Seleucids - Turn 3
 |
| Turn 3 - Sequence of Action |
 |
| Phalangites and Thracians are getting closer. |
Seleucid cavalry on the left kept slowing down the enemy without engaging in the combat just yet. The time was not right at this stage. The infantry, however, approached the Roman lines and it was clear that the first combats will begin shortly.
 |
| Ready to fight! |
Romans - Turn 4
 |
| Turn 4 - Sequence of Actions. |
 |
| First cavalry engagement. |
After series of maneuvers and counter maneuvers the units on both sides finally committed to the fight. On the left flank Line Cavalry clashed with Clibanarii while other units moved to the flanks of those in melee. Seeing that, Seleucid Line Cavalry used their greater speed to disengage from heavily armored enemies and avoid being charged into the exposed side.
Thracians fought a bitter fight against Legions Auxilia in a thick of the woods and their expertise in such combat proved crucial. Also the Phalangites noted some initial successes, even against Roman Praetorian Guard.
 |
| First fights. |
Seleucids - Turn 5
 |
| Turn 5 - Sequence of Actions |
 |
| Infantry engagements in the center |
The cavalry fight for the Seleucids became more desperate. They already lost one unit of light horse and now Line Cavalry perished despite the frontal assault they were getting ready for. Even Companions, who caught enemy unit with the exposed flank, could not prevail and had to disengage to charge again.
Fortunately, things were getting better in the center as Thracians won a spectacular victory. They not only broke the Auxilia but in hot pursuit intercepted very surprised Roman cavalry. Romans did not expect any threat coming from that direction for sure!
Also Phalangites did well by exchanging the blows with Roman infantry and slowly but surely depleting their ranks.
Romans - Turn 6
 |
| Turn 6 - Sequence of Actions. |
 |
| Bitter struggle in the center |
The Phalangites noted first full success when, surprisingly, the first unit to break from the fight against Seleucid pikemen was the Praetorian Guard! Seleucids clearly were getting upper hand in the infantry fight.
That was, however, balanced out by the fact that they had only one unit of cavalry left to defend them from the Roman horsemen. Companions charged valiantly against the Roman Clibanarii and in furious clash of steel both units crippled each other.
 |
| Roman cavalry finally breaks through. |
Seleucids - Turn 7
 |
| Turn 7 - Sequence of Actions. |
 |
| Roman cavalry races to help the Auxilia |
With no serious resistance from the Seleucid cavalry that finally was routed from the field, Roman Equites raced towards the infantry fight on the right flank. But would they arrive in time?
Seleucids were already outflanking a few Roman units that were melting at a fast rate.
 |
| End game begins. |
Romans - Turn 8
 |
| Turn 8 - Sequence of Actions |
In the end the Roman cavalry was too late. One more unit of Legions Auxilia perished as it could not hold the line when fighting against two Phalanxes at the same time. That was enough for the remaining infantry units to lose heart and withdraw.
This time Seleucids were victorious but at a high cost and by the very small margin.
 |
| Victorious Seleucid infantry. |
Summary
 |
| Turn-by-turn animation summary |
After-battle
Many thanks to Paul for yet another great game! It was, as expected, a bloody encounter and a fantastic battle to end the tournament with. It was very interesting to observe how it unfolds into two separate areas, where cavalry fought on the left while mainly infantry engaged on the right.
This time the plan worked but I ended up with heavy losses of 3 TuG's and 2 SuG's. I was just one TuG away from breaking. Although fortunately for me, in this game the remaining units were not yet close to that end.
I was quite happy with the fact I managed to execute some tactical withdraws with my cavalry to avoid outflanking and to be able to charge again. It didn't bring spectacular effects as in the first case Line Cavalry died anyway. In the second case the Companions at least took Clibanarii with them.
I wonder if a more direct approach with three Line Cavalry units on the left to engage enemy early and seal the bottleneck earlier would be a good idea. Equites can be tricky to fight against because they can always skirmish away. While having numerical superiority was perhaps the factor that convinced Paul to press forward.
As I managed to break the opposing army, the final battle of the tournament ended with 15:8 result in my favor.
Thanks for reading!
No comments:
Post a Comment