
Hello!
The first game of the second day of the Mortem Et Gloriam tournament at CanCon 2019 was against a new type an enemy. Hordes of barbarians in the shape of the Alamanni with some Frank allies commanded by Dru.
This army was a completely new opposing force for me and I had no idea what to expect. First thing I noticed when I saw the units being deployed was that they were quite big. Eight bases for typical TuG and six only for the superior troops.
Another element is the inclusion of allies led by talented commander. The probability of the allies being unreliable is very low when their commander received four cards. In such circumstances one can assume the allies will be fighting as the main force. Here are the details of the Alamanni with Frank allies army list:
 |
| Alamanni with Frank Allies. |
This army has an obvious numerical superiority. The potential disadvantage in speed against some of the enemy regiments, in particular cavalry, is at least balanced out by the ability to cover entire width of the battle field. In addition, the combination of Short Spear and Devastating Charger means that units should deliver quite powerful attack on impact. For example, against phalanx it translates to +2 for superior and +1 for average TuG's of Foot Warriors. In the subsequent rounds the phalangites should have +1 advantage over superior and +2 over average units. But it may still mean a grind match and depending on the initial casualties, it may not necessarily be enough to win the fights. Especially when being outnumbered.
I must admit that at the time of the battle I still did not have a clear idea how I want to proceed and what I can do against this force. The fact I did not know the exact composition of the opposing force only added to the dilemma on how to deploy my army.
Here are the details of my own army list for the reference:
 |
| Early Seleucids - Army List |
Pre-battle
I thought that some terrain pieces in the middle of the battle field may be potentially useful in dividing the enemy army. Interestingly, I was not sure of a secure flank would be a good idea this time, having a bit of more room on a flank for cavalry seemed like a good thing. However, we ended up with the mountains on the secure flank and a bit of the terrain on the opposing side. The middle of the battle field was empty.
With more cards for out-scouting phase I had better chance to out-scout the enemy. However, deployment the first four elements did not reveal much of the enemy's plans.
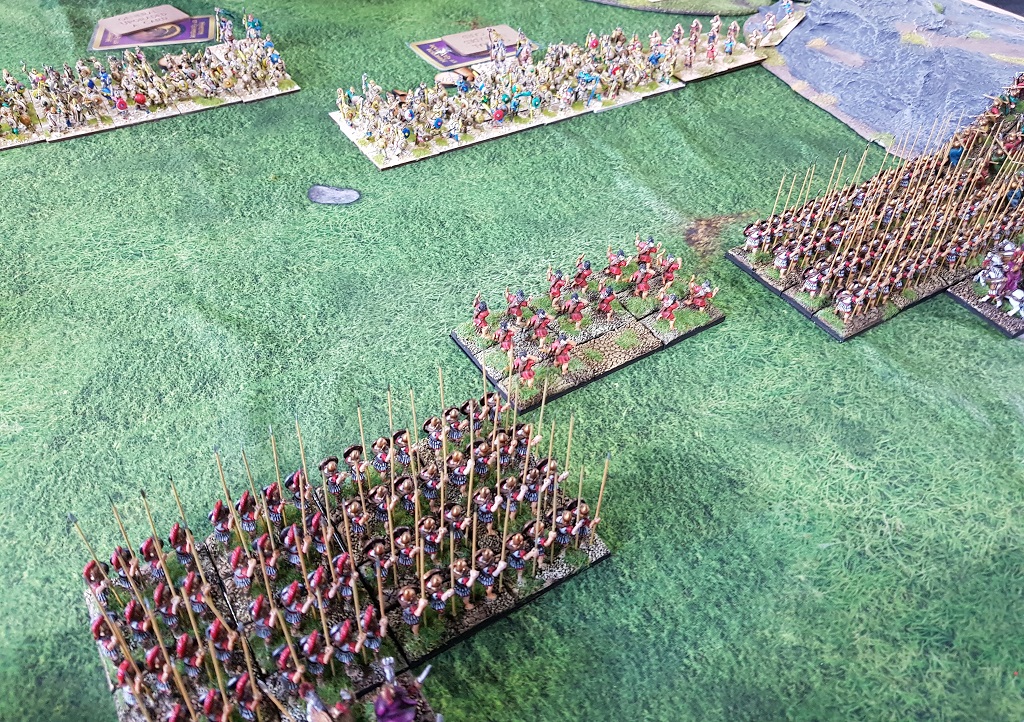
Deployment
 |
| Early Seleucids vs Almanni with Frank Allies. |
 |
| Deployment of the Armies. |
Due to the fact that there were so many unknowns I decided to play conservatively. Main objective was not to lose and look for potential openings in the enemy battle line. At the time of the deployment it looked like an impenetrable wall. The phalangites had the best chance to hold against attacking barbarians but I was concerned with them being potentially outflanked. And I could not guarantee that they would hold long enough, especially after powerful charge.
To address that issue I deployed the infantry on one flank, with Thracians guarding the secure flank further. Perhaps even be able to aid the Phalangites in a fight at the right moment.
The cavalry was deployed on the center left. The goal for light horse was to slow down the enemy that would inevitable attempt to outflank my smaller army. While the charging lancers were there to keep the distance and threaten with the charge so that the enemy would not be too fast to advance either.
I wondered if that would create a gap in the enemy formation, with the Phalangites awaiting the fight against the Franks who were not slowed down. And the rest of Alamanni that should not be able to move at a double, even from the start. If the gap appeared, I hoped that my small cavalry units would be able to use that to either attack exposed flank or even sneak in between to the back yard of the enemy force.
Alamanni - Turn 1
 |
| Turn 1 - Sequence of Actions. |
 |
| One against All |
The wall of barbarian army moved forward steadily. Single group of Seleucid charging lancers advanced towards the enemy. Brave cavalrymen were sent as a vanguard in order to better assess the enemy and to slow some of them down. Two more SuG's of the light horse were also sent in support.
On the right flank the Phalangites and supporting troops advanced towards the enemy as well.
 |
| No gaps in the enemy formation. |
Seleucids - Turn 2
 |
| Turn 2 - Sequence of Actions |
 |
| Slowing down the barbarian horde. |
The barbarians maintained the formation and discipline so Seleucids had to start moving back. The Phalangites could not take on the numerically superior force alone and the cavalry was not in the position to assist them yet. No breach in the enemy battle line was there to exploit. Hence, the Seleucid forces resorted to the delaying actions for now.
 |
| Keeping the distance. |
Alamanni - Turn 3
 |
| Turn 3 - Sequence of Actions. |
 |
| Getting Closer. |
Franks started moving ahead of Alamanni in their advance towards the enemy but for now the chieftains managed to maintain the cohesion of the battle line. The small shit that appeared in the formation has not yet created any gaps to be exploited.
Seleucids remained reluctant in committing to the fight and kept withdrawing in good order.
 |
| Small shift appears. |
Seleucids - Turn 4
 |
| Turn 4 - Sequence of Actions. |
 |
| An attempt to outflank the enemy. |
The Seleucid army could withdraw only for so long and it was clear now that this maneuver alone is not going to help anymore. The cavalry units on the left flank attempted to shift towards enemy light troops there in an attempt to outflank the foe.
At the same time the phalangites in the center moved forward to stop the Alamanni while their Frank allies continued towards the Seleucid right flank. Finally the small gap appeared and Seleucids were preparing to exploit that.
 |
| Finally the battle line is broken. |
Alamanni - Turn 5
 |
| Turn 5 - Sequence of Actions. |
 |
| Barbarians vs Phalangites. |
At long last the enemies clashed. First fights erupted on both flanks. The cavalry charge on the left did not result in Seleucid troops catching some Alamanni skirmishers. Impetus Charging Lancers hit the superior Warriors but lost the fight soon after.
On the right flank, Franks charged the Phalangites who held bravely. There were some casualties on both sides. More importantly, thanks to the blocking maneuvers of the Seleucid infantry in the center, the Companions could move to help the units on the right.
 |
| Seleucids infantry holds on - for now. |
Seleucids - Turn 6
 |
| Turn 6 - Sequence of Actions. |
 |
| Companions charge into the Warriors. |
In the last act of the battle, the Companions charged against enemy Foot Warriors that were already engaged in a fight against the Phalangites. The charge was powerful and Companions scattered the foes.
However, the battle was not concluded and both armies disengaged to fight another day.
 |
| Relative positions at the end of the game. |
After-battle
First of all, many thanks to Dru for a game! We had to stop the battle just after Charge Phase of turn 6 so the battle was not concluded. However, I think it is still worthwhile to discuss what could have happened if we continued.
I was in trouble in the center. I have just lost one unit of Charging Lancers and my two light horse SuG's may have not been able to survive for long against three SuG's of Alamanni. Perhaps I would have tried out to stay out of distance and shoot at the TuG of Foot Warriors instead.
Guard Argyraspides had a chance to hold for some time but nearby Phalangites took casualties and it was not clear if they could hold for long. Even if I committed second unit of Line Cavalry, that may have not been enough to save the center. And I could not afford to lose these three TuG's as it have broken my army.
There was hope on the right flank, however. The Companions would have hit the next unit of Foot Warriors and Thracians had a chance to turn towards the flank of another too. I would have had an opportunity to win against Frank allies. However, that would have counted for three enemy TuG's only. It means I would have needed to win fast so that at least Companions would have turned around to assist the phalangites in the center.
It all looks like a plan for 3-4 turns more so not quite feasible even in a casual game when there may be more time to play.
In the end we routed one TuG of each other's army and the game ended with 4-4 draw.
This resulted highlighted another interesting element of Mortem et Gloriam system. It definitely rewards more aggressive play, where units engage in a fight. In fact, I noticed that quite often a defeat may be a more desirable outcome during the tournament as it allows the player to earn more points.
I find such scoring system very interesting and it definitely discourages conservative play. However, even in the game of toy soldiers I cannot help to think about the fact that I am still sending troops into action. I would rather then not commit them to the fight if that may result in their demise, even if it would earn more points for the game.
I did learn a few things in that game too. If I were to face a barbarian army again, I will definitely need to come up with a different plan. I noticed, for example, that I need to be more pro-active in generating the gaps in enemy formation.
Moving the cavalry forward to slow part of the enemy force down was a good idea, I think. But it was not enough on its own. Perhaps positioning Cretans on the right flank to help Thracians move around it and get rid of the enemy skirmishers there would be one thing to change. Combining the slowing down effect on one flank and ability to create better circumstances on the other may have resulted in an opening I was looking for.
I was considering cavalry charge with all the lancers but that was a bit risky. Even considering the fact that Foot Warriors cannot claim Devastating Charger bonus against Charging Lancers in the open, on the impact it would have been only +1 advantage for the average and +2 for the superior cavalry against average infantry. It may inflict some casualties but more numerous army can still afford such losses.
Thanks for reading!
No comments:
Post a Comment