

Greetings!
It's been a while since my last battle report. Once again, real life had quite a lot of "distractions" in store for me in the last half a year. As a result, I had very little spare time for hobby in general.
I am thus grateful that Duncan reached out to me and suggested a game by email. It helped me to rekindle the interest in Kings of War and to try an carve out some time for the hobby, no matter what. I also want to take this opportunity and thank Duncan for his great patience, especially in the period prior to commencing the battle.
I have never had an opportunity to play against Duncan before. I met him virtually in March when he attended Monster March together with his daughter and submitted some really cool models! So it was great to have the opportunity to play the game together as well. What is more, he also decided to field his Twilight Kin. The army I have played before only once. Considering it is currently being heavily reworked before its new incarnation is going to be published, I thought it is going to be an interesting battle.
Twilight Kin has any interesting units to choose from and I did not know what to expect. Here is what Duncan decided to bring this time. Both armies were at 2000 points:
Twilight Kin - Army List
Blade Dancer Neophytes Horde (N), Infantry, Fire-Oil - 205
Cronebound Butchers* Horde (B1), Large Infantry - 200
Cronebound Butchers* Horde (B2), Large Infantry - 200
Twilight Gladestalkers Regiment (G3), Infantry, Dragonshard Shield - 195
Cronebound Abyssal Horsemen Regiment (H1), Cavalry, Sir Jesse's Boots of Striding - 255
Cronebound Abyssal Horsemen Regiment (H2), Cavalry, Potion of Caterpillar - 255
Cronebound Gargoyles* Troop (G1), Heavy Infantry - 85
Cronebound Gargoyles* Troop (G1), Heavy Infantry - 85
Cronebound Mind-screech (M), Monster - 150
Summoner Crone (SC), Hero (Infantry), Drain Life (6), Scorched Earth (2) - 115
Army Standard Bearer (A), Hero (Infantry), Lute of Insatiable Darkness - 85
La'theal Bleakheart[1] (LB), Hero (Infantry), Drain Life (7), Fireball (10) - 165
The army has 12 units, 9 scoring and total unit strength of 22.
Duncan's army is very similar to mine in terms of size, number of units and unit strength. It is also a versatile and flexible force that is capable of participating in every phase of the game. The differences are in the type of specific units, even if they may have similar role to some of the units that are in mine.
I could not help but to draw my attention to the cavalry and large infantry first. Two regiments of the Horsemen and two hordes of Butchers formed a very strong melee orientated contingent. Both are very good at dealing the damage on the charge, both are very resilient and have an advantage in war of attrition over anything I can match against them. Especially further augmented by Drain Life spells available and built-in Regeneration for the Horsemen.
From my previous experience I knew that my shooting can be quite ineffective against them. I had to rely on such fights where I could bring more units of my own against one of them. It is easier said than done because that requires them to be isolated. Even then, I would need to prepare for any counter attacks from the remaining units.
Twilight Kin army has some good ranged attacks. Gladestalkers and Mind-screech can pick the targets from turn 1 thanks to their range of 24" and ability to shoot after movement with no penalty. Gladestalkers will most likely get into an even better position with their Scout move too. And they can be quite versatile and join in melee as well. Especially against any 4+ defence units they can do some harm as well.
At the shorter range I would need to worry about Drain Life so I hoped that my mounted King would be able to find his way towards some of the enemy heroes. And at least distract them a bit so they don't use their spells.
I would definitely try to use small advantage in speed and manoeuvrability but that is somewhat limited by the presence of Gargoyles.
In short, I needed to pick the targets for shooting carefully to make it count. I also thought that I had to pick the fights that should end quickly as my units are not suited for protracted combat. This was further reinforced by the fact that some of Duncan's units could regenerate. And he would also use Drain Life to great effect in such circumstances.
I thought I had a chance if I could balance being careful in positioning the units to engineer the favourable combats. With being fast and and decisive as to not give Duncan time to turn any melee into war of attrition.
And that all before I even considered scenario!
As usual, here is my army for reference:
Outcasts - Army List
Quicksilver Lancers Regiment [1] (QL), Cavalry - 240
Palace Guard Regiment (PG1), Infantry - 160
Palace Guard Regiment (PG2), Infantry - 160
Therennian Sea Guard Regiment (SG), Infantry - 150
The Swirling Tempests* Regiment (ST1), Large Cavalry, Kal'ar's Hunters Formation - 180
The Swirling Tempests* Regiment (ST2), Large Cavalry, Kal'ar's Hunters Formation - 180
Silverbreeze* Regiment (SB), Cavalry - 200
Forest Shamblers* Regiement (FS1), Large Infantry - 120
Forest Shamblers* Regiement (FS2), Large Infantry - 120
Paul the King (K), Elven King, Hero (Cavalry), Hann's Sanuinary Scripture, Sabre Tooth Cat - 155
Kal'ar (Ka), Lord on Drakon, Hero (Large Cavalry), Kal'ar's Hunters Formation - 170
Archibald the Archmage (A), Elven Archmage, hero (Infantry), Inspiring Talisman, Lightning Bolt (5) - 155
Argus Rodinar [1], Hero (Monster) - 70
Terrain
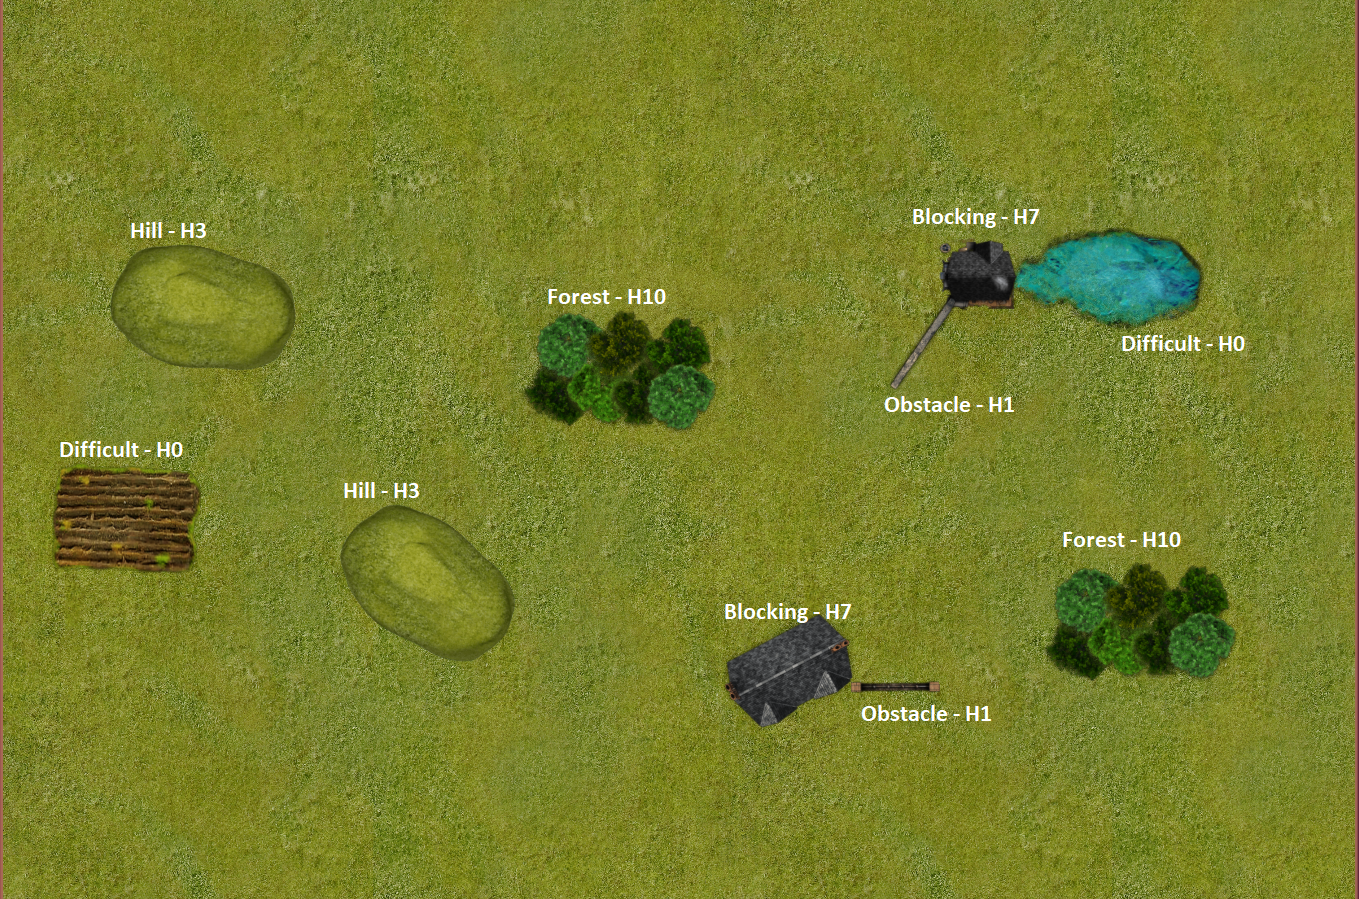 |
| Terrain Details |
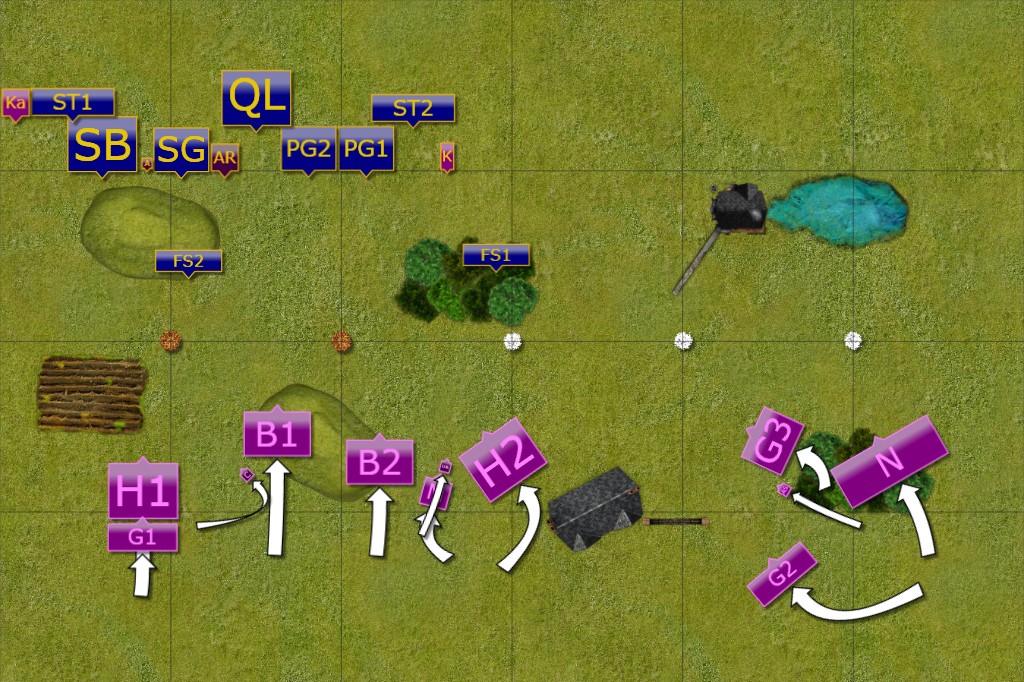
Deployment & Scenario
 |
| Elves vs Twilight Kin |
We played Plunder as a scenario in this game. You can see orange tokens worth 2 points and white tokens worth 1 point.
This game was played on Universal Battle 2 online platform in Play By Email mode. It meant that after the deployment, each of us would play the turn in our own time and send the relevant file to the opponent to continue. It is the way that helps to play games if you are not able to find enough spare time in one go to complete the battle live. I must admit I like it a lot, even if it means that it takes some time to finish the game.
We deployed our armies in the "blind deployment" way. What it means that Duncan deployed all his army without knowing how my units are going to be positioned. I did the same with all but one unit to match the number of the deployment drops in the Twilight Kin arm (twelve).
Because of that I decided on the gamble that I may not have a chance to pull off with normal deployment rules. I simply decided to go full refused flank and hope that Duncan would spread his forces across the width of the battle field. The plan was to focus on two tokens worth 2 points each and have more units on the single flank. If that worked, I would have had a chance to fulfil the plan I explained earlier. I.e., use the speed to position units in favourable positions, strike early and decisively and avoid war of attrition. Especially before the units from the opposite flank would arrive.
This situation reminded me about Paul's most recent discussion regarding such deployment in one of his battle reports (The Elven way - KOW Forum). He advised against such deployment but I hoped that because the reinforcements were infantry and rather slow, I still had a chance. It didn't help, however, that I still had to deal with well armoured units (def 5+), some with regeneration and with the full back up of Drain Life.
However, that is part of the fun to try something and see if that works!
 |
| Deployment of the armies after Scout moves. |
Twilight Kin - Turn 1
 |
| Twilight Kin army runs towards the treasures! |
Twilight Kin commanders were a bit surprised to see the deployment of their hated enemies. However, they showed nothing and ordered their troops to advance towards the Elves as if they were evenly matched.
The units on the right flank pivoted towards the centre and the shooters opened the fire at the Forest Shamblers. Unfortunately, for the Twilight Kin army, no damage was done.
Outcasts - Turn 1
 |
| Forest Shamblers charge first! |
Elve forces had to be both fast and careful in setting up the inevitable attacks. To help with that, Forest Shamblers were sent to attack the enemy early. In this way they were to buy some time for the rest of the army to get into positions.
Elven shooters moved to the top of the hill to have a better view over the battle field and opened fire at the regiment of Horsemen on the left flank.
Twilight Kin - Turn 2
 |
| Stubborn Forest Shamblers refuse to yield. |
The units on the left stopped their advance and those attacked counter-charged. Unfortunately for Butchers, their enemies refused to run despite horrendous casualties. Would that be the opening Elven forced hoped for?
In the meantime, the units from the right continued their march. Once again, the shooters failed to inflict any damage on their chosen targets.
Outcasts - Turn 2
 |
| Elves launch the first wave of their attacks! |
Elves had to attack fast to be able to take an advantage of the temporary numerical superiority. The Drakon Riders and their Lord were the first to mount a strong attack, aiming at destroying the enemy on the charge. It worked and Elven fliers were now threatening the flank of the Twilight Kin army.
Using the opportunity, Silverbreeze cavalry charged down the slope and scattered Gargoyles to the four winds. More importantly, they also collected the first treasure.
It was an important early success but it was time for the Twilight Kin to respond.
Twilight Kin - Turn 3
 |
| Twilight Kin forces attempt to regroup. |
Twilight Kin units continued to manoeuvre and to look for the chance to counter attack. Butchers finally defeated the Forest Shamblers and all units nearby regrouped to face Elves.
Outcasts - Turn 3
 |
| Second wave of the Elven attacks. |
Using the momentum of the first wave of the charges, Elves continued with committing more units to the melee. This time the combined efforts of many Elven regiments routed a horde of Butchers and a second regiment of Horsemen.
This left the army of Twilight Kin in a very disadvantaged position. The last horde of Butchers risked being surrounded, regardless if they attacked or not. The remaining units in the area were outnumbered and without many good options either.
What is more, Elves seemed to control and protect to pieces of most valuable treasures.
In such circumstances, the commanders of the Twilight Kin army decided to save what remained intact and withdraw before Elves inflicted more damage.
 |
| Final positions of the armies. |
Summary
 |
| Turn-by-turn summary animation. |
After-battle
Many thanks to Duncan for a great game!
Despite the fact we ended it before turn 6, it was not an easy one for me. I took some risks with the deployment and throughout the battle. I am thus fully aware that my gamble may have not paid off, especially if any of the melees did not end with routed enemy units.
I am, of course, happy it worked this time but I need to come up with a new plan next time we play. It is not going to work twice in a row for sure!
It was tougher lesson for Duncan, as is usually for the one who loses the battle. I wonder if Twilight Kin players who may read the report would have some feedback? What would you do differently, considering the starting positions of both armies as they were in this battle?
From my point of view I was concerned that Duncan may keep his left flank at a distance longer. My shooting was not doing much damage to his tougher units (as expected). His own did not do much either but that could have changed any time. Every turn that my units had to advance in a crowded formation without any breakthrough would decrease my chances of success.
I am glad the frontal charges worked in this game. I made some mistakes in positioning my units and had to attack this way. For example, my initial plan was to try and place Drakon Riders and Drakon Lord on the left so that they could have some flank charges. But I didn't do it well and they were still in front arcs.
It also helped that in some of the melees the nearby enemy units were not able to reinforce their friends. So if something went bad I thought I am still relatively ok. I did expect some casualties in the process anyway. But as long as I was losing fewer than Duncan, I thought I had a chance to win. As it turned out, the plan worked better than I anticipated.
I hope you enjoyed the battle report and thank you for reading!
Always enjoy your posts, Sm - nice to see some KoW content after a little break :)
ReplyDeleteHi David!
DeleteThanks! I am glad you liked it! Indeed, a "little" break it was :)
Another enjoyable read. I've enjoyed going back through your old reports too- they are a fantastic resorce ofr all aspiring elf commanders. Hopefully we won't have too wait too long for the next one.
ReplyDeleteHi Craig,
DeleteThanks a lot! It is fantastic to know you liked the old reports too!
I would love to come back to regular gaming and playing but it may be some time before that happens. I will do my best, however, to post a new battle report sooner than this one. :)