

Greetings!
Welcome to the very first battle report from the games I played during Clash of Kings Australia 2020.
In this game I had a great pleasure to meet Trevor who travelled all the way from Queensland together with a famous Team Queensland. Trevor brought one of the trademark factions for the game of Kings of War - Forces of Basilea! What is more, his army was composed entirely with Mantic Models. Well done, Trevor!
Trevor's army was an example of small, elite and hard hitting force. Here are the details of his army composition:
Trevor's army was an example of small, elite and hard hitting force. Here are the details of his army composition:
Game 1 - Forces of Basilea - Trevor
Paladin Knight Regiment (PK1), Cavalry, Aegis Fragment - 215
Paladin Knight Regiment (PK2), Cavalry, Aegis Fragment - 215
Paladin Foot Guard (PFG), Infantry, Aegis Fragment - 155
Paladin Foot Guard (PFG), Infantry, Aegis Fragment - 155
Elohi Horde* (E1), Large Infantry, Wine of Elvenkind - 310
Elohi Horde* (E2), Large Infantry, Brew of Strength - 310
Gur Panther Troop (GP1), Cavalry - 85
Gur Panther Troop (GP1), Cavalry - 85
Ur-Elohi (UE), Hero (Large Infantry) - 200
Gneaus Sallustis (GS), Hero (Large Cavalry) - 180
Dictator (D), Hero (Infantry) - 90
Trevor's army has 11 elements total, 10 of which are scoring and with combined unit strength 22. It is very fast and easily can match the speed of my own force. In fact, since Elohi operate in hordes, it means they can potentially take a frontal charge from Drakons to lure them into a fight they may lose in the counter-charge.
The small advantage of having 3 more units in general and 2 scoring ones may help but I did not consider it as something that is going to make a huge difference. After all, having a more fragile force, I could easily lose such advantage in a single turn.
Trevor's army did not have any ranged attacks either. Perhaps that would allow me to eliminate some of his more vulnerable or slower units prior to inevitable melee?
Here is my army list for comparison:
Outcasts (Elves) - Army List
Stormwind Cavalry Regiment (S), Cavalry - 215
Palace Guard Regiment (PG1), Infantry - 160
Palace Guard Regiment (PG2), Infantry - 160
Kindred Archers Regiment (A), Infantry - 120
Drakon Rider Regiment* (DR1), Large Cavalry - 165
Drakon Rider Regiment* (DR2), Large Cavalry - 165
Forest Shamblers Regiment* (FS1), Large Infantry - 120
Forest Shamblers Regiment* (FS2), Large Infantry - 120
Silverbreeze Cavalry Troop* (SB1), Cavalry - 130
Silverbreeze Cavalry Troop* (SB1), Cavalry - 130
Silverbreeze Cavalry Troop* (SB1), Cavalry - 130
Silverbreeze Cavalry Troop* (SB1), Cavalry - 130
Lord on Drakon (DL1), Hero (Large Cavalry) - 170
Lord on Drakon (DL2), Hero (Large Cavalry) - 170
Elven Archmage (M), Hero (Infantry), Inspiring Talisman, Lighting Bolt (5) - 115
Army Standard Bearer (AS), Hero (Infantry) - 60
Terrain
Deployment and Scenario
In this game the challenge I faced had multiple layers. In short, I played against a new opponent, with the army I do not have much experience against in the scenario I have never played before. In such cases I try to keep it simple and at the same time play it safe. Just to see how the things evolve and hopefully, the opportunity would present itself.
We started with the scenario and placement of the tokens. I started placing those worth "0" points first, then "1" and then "2". I came to the conclusion that I want to spread them a little and at the same time keep those worthy some points further from central line. This was to avoid a situation where were about to fight for a control of several tokens in a more confined space.
While waiting for the tokens on my half to be revealed, I hoped to keep enough fast units alive to be able to use the ever changing situation on the battle field to my advantage. As we had 6 tokens to fight for, I also needed to inflict some casualties in order to limit Trevor's options for taking some under his control.
So, my quickly formed plan was as follows. Move slowly to keep the enemy out of range but if possible threaten the first charge. Use the shooters to inflict some damage either to help in inevitable melee or to eliminate units such as Panthers. Look for openings and keep more units alive to have more options for token control.
When we deployed I realised it would be more difficult. Silver Breeze was in bad spot as they could not see much and would have to get into charge range of Elohi and/or Panthers. The good thing was I had faster troops on the right flank so hopefully that would allow me to get some of those knights before they attack.
Outcasts - Turn 1
Elves remained where they are in the centre, waiting to see what the enemy is going to do. While the units on both flanks advanced. The first shots did not do any harm to the enemy forces. It looked like a very cautious opening of the battle.
Basilea - Turn 1
Forces of Basilea were cautious on both flanks but while on the right the knights simply withdrew, on the left Elohi used their increased mobility to avoid Drakon Lord.
The rest of the army advanced forward in tight formation.
Outcasts - Turn 2
Outcasts continued the game of manoeuvre, attempting to get into positions for either shooting attacks or to put some pressure on the enemy. On the left, Drakon Lord had to withdrew behind the infantry to avoid Elohi and tempt them to charge Drakon Riders.
The shooting was a bit more effective this time but still nothing to cause any problems for Basileans.
Basilea - Turn 2
This time Basilean army was more active. Gur Panthers were sent to distract Elven light cavalry. Elohi kept manoeuvring towards the Elven left flank but the main advance was initiated by the regiments of Foot Guard supported by the second group of Elohi.
Outcasts - Turn 3
Elves assumed defensive positions on the left flank while the units on the right advanced forward again. A bit of shooting managed to disperse Gur Panthers but the damage done to Foot Guard was not enough to stop them in their march.
Basilea - Turn 3
Basileans decided it is time to attack. Foot Guard and Panthers attacked Drakon Riders and despite the fact their charge was hindered, they managed to waver Elven flying cavalry. In the meantime, Elohi got to positions to attack in a second wave while the cavalry units on the opposite flank continued evading their enemies.
Outcasts - Turn 4
Elves counter attacked on the left but while they achieved a success and routed enemy units, it was clear that the second wave will be much stronger and devastating.
Outcasts diverted Forest Shamblers and Drakon Riders to help but would these reinforcements have enough time to arrive?
At the same time, Palace Guard moved into defensive position to force enemy Knights into some action.
Basilea - Turn 4
Basileans managed to outmanoeuvre Elven units on the left and could launch a powerful attack to overwhelm the enemies on the left flank.
In an attempt to tighten the grip on the foe, Elves made crucial mistakes and overextended with some of their units. Silverbreeze and Stormwind cavalry units were thus surprised the enemies managed to intercept them.
Basileans seized the initiative to the fullest!
Outcasts - Turn 5
Elves made some attempts to counter attack and slow down enemy advance. Forest Shamblers and Drakon Riders attacked alone, even if they new their chances to defeat the enemy was slim.
Stormwind and Forest Shamblers on the right counter charged the enemy Knights and were successful in routing them.
Basilea - Turn 5
Basileans pressed froward with their attack and three more regiments of the Elven army perished. It was clear that at this stage the Forces of Basilea dominated the battle field.
Outcasts - Turn 6
For some strange reason Elves did not attack and did not shoot at their enemies and simply run after the hidden treasures. Basileans were surprised but prepare to attack themselves instead.
Edit: The strange reason is simply me timing out ... ups!
Basilea - Turn 6
Two more Elven units were routed and Basileans finally realised there may be something more at stake than defeating enemy units.
Basilea - Turn 7
They attempted to go after the treasures as well but they too were a bit late to accomplishing this task. They did manage to rout Stormwind cavalry though.
In the end, although Elven army was suffered more casualties, the strategic dominance was not achieved by either side and armies withdrew to regroup.
Summary
After-battle
Many thanks to Trevor for a great game! I really think it should have been his victory as he played better game than I did and had a better plan to attack my force too. It was only at the end he mentioned that he probably focused on fighting too much. When the game was approaching final stage he realised that he did not position his units to control more objectives. As a result, the game ended as an unexpected draw with attrition in Trevor's favour. 9:11 was a great result for me, considering all the mistakes I made!
Although it was my first time of playing Fool's Gold scenario, I thought I managed to place tokens reasonably enough to have space to fly to them at the end of the game. Unfortunately, I was not able to control any in my half and that was due to mentioned mistakes.
I didn't have well structured plan as to deal with Elohi and that made me think too long. It cost me in the end when I timed out as it meant I could not do anything and just had to wait for Trevor to do his actions. If I did not time out I had a chance to defeat his knights and perhaps safe two units of cavalry. But that is part of the game and I took that lesson to next round (Spoiler: I did not time out again :)).
Two mistakes with Stormwind advancing too close and Silverbreeze not properly hidden behind the hill from Ur-Elohi were big ones. I was immediately on back foot completely and could only react from now on. It also opened the paths to the objectives. If I didn't make these mistakes, perhaps I would have had better chance to prevent Trevor from controlling objectives in my half.
The defence on the left flank did not work well either. Mainly because I miscalculated where Elohi with Wine of Elvenkind can go. In addition, the left and the right were not supporting each other so even when I sent two units to help, it was too late.
Despite the mistakes and not so great performance on my part, I thoroughly enjoyed our game and from that point of view, it was a perfect start for me.
I hope you enjoyed reading about this game. I wonder what is your strategy for token placement in this scenario? What do you think about our respective armies and is there anything you would have done different if you were commanding either force? Let me know in the comments!
Thanks for reading!
Terrain
 |
| Terrain details |
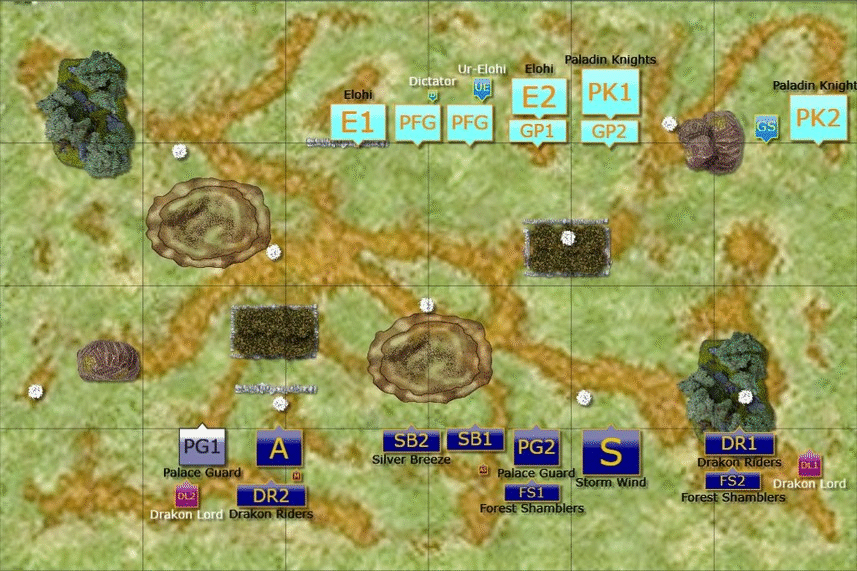
Deployment and Scenario
 |
| Elves vs Forces of Basilea |
 |
| Deployment of the Armies. |
In this game the challenge I faced had multiple layers. In short, I played against a new opponent, with the army I do not have much experience against in the scenario I have never played before. In such cases I try to keep it simple and at the same time play it safe. Just to see how the things evolve and hopefully, the opportunity would present itself.
We started with the scenario and placement of the tokens. I started placing those worth "0" points first, then "1" and then "2". I came to the conclusion that I want to spread them a little and at the same time keep those worthy some points further from central line. This was to avoid a situation where were about to fight for a control of several tokens in a more confined space.
While waiting for the tokens on my half to be revealed, I hoped to keep enough fast units alive to be able to use the ever changing situation on the battle field to my advantage. As we had 6 tokens to fight for, I also needed to inflict some casualties in order to limit Trevor's options for taking some under his control.
So, my quickly formed plan was as follows. Move slowly to keep the enemy out of range but if possible threaten the first charge. Use the shooters to inflict some damage either to help in inevitable melee or to eliminate units such as Panthers. Look for openings and keep more units alive to have more options for token control.
When we deployed I realised it would be more difficult. Silver Breeze was in bad spot as they could not see much and would have to get into charge range of Elohi and/or Panthers. The good thing was I had faster troops on the right flank so hopefully that would allow me to get some of those knights before they attack.
 |
| Deployment after Scout moves. |
Outcasts - Turn 1
 |
| Slow advance by Elven forces. |
 |
| First token revealed. |
Elves remained where they are in the centre, waiting to see what the enemy is going to do. While the units on both flanks advanced. The first shots did not do any harm to the enemy forces. It looked like a very cautious opening of the battle.
Basilea - Turn 1
 |
| Forces of Basilea advance cautiously as well. |
 |
| Advance through the centre. |
Forces of Basilea were cautious on both flanks but while on the right the knights simply withdrew, on the left Elohi used their increased mobility to avoid Drakon Lord.
The rest of the army advanced forward in tight formation.
Outcasts - Turn 2
 |
| Elves tempt Elohi on the left. |
 |
| Slow manoeuvres continue. |
Outcasts continued the game of manoeuvre, attempting to get into positions for either shooting attacks or to put some pressure on the enemy. On the left, Drakon Lord had to withdrew behind the infantry to avoid Elohi and tempt them to charge Drakon Riders.
The shooting was a bit more effective this time but still nothing to cause any problems for Basileans.
Basilea - Turn 2
 |
| Forces of Basilea move towards the Elven left flank. |
 |
| First Charge! |
This time Basilean army was more active. Gur Panthers were sent to distract Elven light cavalry. Elohi kept manoeuvring towards the Elven left flank but the main advance was initiated by the regiments of Foot Guard supported by the second group of Elohi.
Outcasts - Turn 3
 |
| Getting closer |
 |
| Elves advance on the right flank. |
Elves assumed defensive positions on the left flank while the units on the right advanced forward again. A bit of shooting managed to disperse Gur Panthers but the damage done to Foot Guard was not enough to stop them in their march.
Basilea - Turn 3
 |
| Basileans commence their attack. |
 |
| Attack on the left flank. |
Basileans decided it is time to attack. Foot Guard and Panthers attacked Drakon Riders and despite the fact their charge was hindered, they managed to waver Elven flying cavalry. In the meantime, Elohi got to positions to attack in a second wave while the cavalry units on the opposite flank continued evading their enemies.
Outcasts - Turn 4
 |
| Elves prepare for their attack. |
 |
| Counter attack on the left. |
Elves counter attacked on the left but while they achieved a success and routed enemy units, it was clear that the second wave will be much stronger and devastating.
Outcasts diverted Forest Shamblers and Drakon Riders to help but would these reinforcements have enough time to arrive?
At the same time, Palace Guard moved into defensive position to force enemy Knights into some action.
Basilea - Turn 4
 |
| Basileans attack again! |
 |
| Powerful blow to the Elven army. |
Basileans managed to outmanoeuvre Elven units on the left and could launch a powerful attack to overwhelm the enemies on the left flank.
In an attempt to tighten the grip on the foe, Elves made crucial mistakes and overextended with some of their units. Silverbreeze and Stormwind cavalry units were thus surprised the enemies managed to intercept them.
Basileans seized the initiative to the fullest!
Outcasts - Turn 5
 |
| Attempt to counter attack. |
 |
| Elves attempt to stall the Basilean attack. |
Elves made some attempts to counter attack and slow down enemy advance. Forest Shamblers and Drakon Riders attacked alone, even if they new their chances to defeat the enemy was slim.
Stormwind and Forest Shamblers on the right counter charged the enemy Knights and were successful in routing them.
Basilea - Turn 5
 |
| Basileans press forward. |
 |
| Elves lost more units. |
Basileans pressed froward with their attack and three more regiments of the Elven army perished. It was clear that at this stage the Forces of Basilea dominated the battle field.
Outcasts - Turn 6
 |
| Strangely, Elves did not move much. |
 |
| Elves focus on controlling the objectives. |
For some strange reason Elves did not attack and did not shoot at their enemies and simply run after the hidden treasures. Basileans were surprised but prepare to attack themselves instead.
Edit: The strange reason is simply me timing out ... ups!
Basilea - Turn 6
 |
| Cavalry charges Silverbreeze |
 |
| Archers were not able to hold the line alone |
Two more Elven units were routed and Basileans finally realised there may be something more at stake than defeating enemy units.
Basilea - Turn 7
 |
| Game over. |
 |
| Final positioning of the units |
They attempted to go after the treasures as well but they too were a bit late to accomplishing this task. They did manage to rout Stormwind cavalry though.
In the end, although Elven army was suffered more casualties, the strategic dominance was not achieved by either side and armies withdrew to regroup.
Summary
 |
| Turn-by-turn animation summary |
After-battle
Many thanks to Trevor for a great game! I really think it should have been his victory as he played better game than I did and had a better plan to attack my force too. It was only at the end he mentioned that he probably focused on fighting too much. When the game was approaching final stage he realised that he did not position his units to control more objectives. As a result, the game ended as an unexpected draw with attrition in Trevor's favour. 9:11 was a great result for me, considering all the mistakes I made!
Although it was my first time of playing Fool's Gold scenario, I thought I managed to place tokens reasonably enough to have space to fly to them at the end of the game. Unfortunately, I was not able to control any in my half and that was due to mentioned mistakes.
I didn't have well structured plan as to deal with Elohi and that made me think too long. It cost me in the end when I timed out as it meant I could not do anything and just had to wait for Trevor to do his actions. If I did not time out I had a chance to defeat his knights and perhaps safe two units of cavalry. But that is part of the game and I took that lesson to next round (Spoiler: I did not time out again :)).
Two mistakes with Stormwind advancing too close and Silverbreeze not properly hidden behind the hill from Ur-Elohi were big ones. I was immediately on back foot completely and could only react from now on. It also opened the paths to the objectives. If I didn't make these mistakes, perhaps I would have had better chance to prevent Trevor from controlling objectives in my half.
The defence on the left flank did not work well either. Mainly because I miscalculated where Elohi with Wine of Elvenkind can go. In addition, the left and the right were not supporting each other so even when I sent two units to help, it was too late.
Despite the mistakes and not so great performance on my part, I thoroughly enjoyed our game and from that point of view, it was a perfect start for me.
I hope you enjoyed reading about this game. I wonder what is your strategy for token placement in this scenario? What do you think about our respective armies and is there anything you would have done different if you were commanding either force? Let me know in the comments!
Thanks for reading!
What an epic battle !
ReplyDeleteThank you! I am glad you enjoyed reading about it!
DeleteSuch a fun report! Thank you for sharing.
ReplyDeleteThank you very much for your comment! I am very happy to know you had fun reading the report!
DeleteGreat work Pal you were very lucky great report
ReplyDeleteThanks a lot Alan! Indeed, luck is sometimes more important than skills :)
Delete