
Hello,
In my next game I played against Steve again but this time he decided to come back to his Early Arab Conquest army. I have played against this force before but it is still the army I find it difficult to fight.
The challenge lies in the fact that Steve, who is a great player in his own right, is in particular well versed in the use of this faction. The great thing about such challenges, however, is that it is a guarantee I can learn something new and valuable.
Steve's army did not change much since the last time I played against this faction and here are the details:
Early Arab Conquest - Army List

The general plan was to engage the infantry with Phalanx and delay cavalry with my Charging Lancers to allow the Phalangites to win the war of attrition. The challenge was in the fact that Phalanx does not have much of an advantage, especially in the initial round of melee and that the army of Early Arab Conquest has slight but important numerical superiority.
Here is my army list for the reference:

Pre-battle
I was an invader in this game so it was up to Steve to pick the terrain. We got quite a few pieces of woods which helped him to anchor one flank but at the same time left space for flexible Beduins to use it as a cover for their advance.
The middle of the battle field was empty, however. As is often the case, the out-scouting phase did not give much of an advantage to either side.
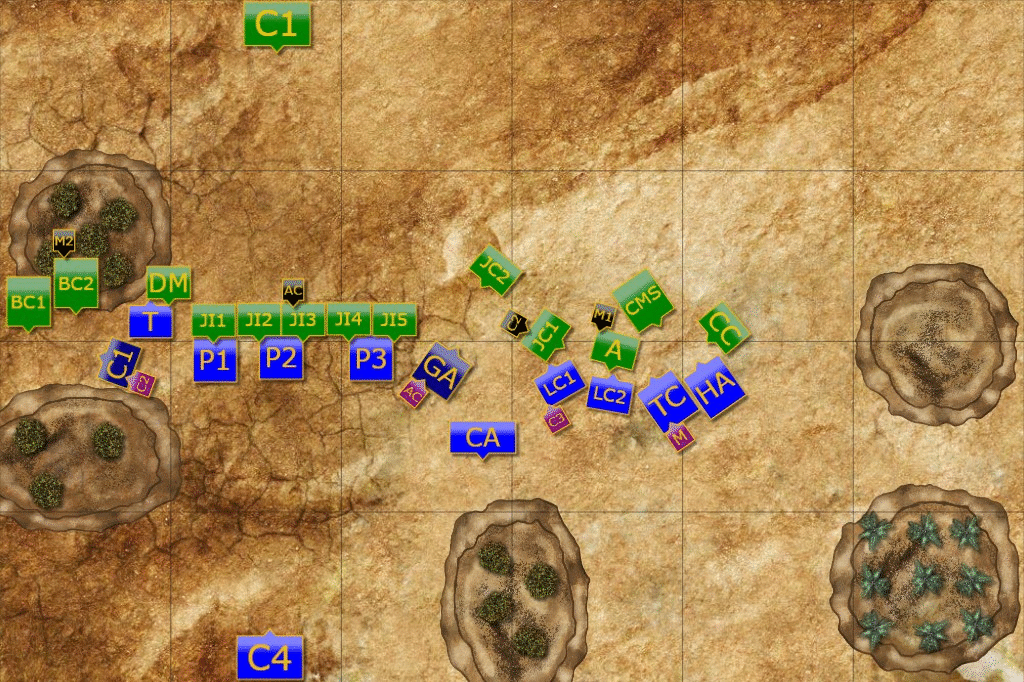
Deployment
 |
| Early Seleucids vs Early Arab Conquest |
Both infantry units from both armies deployed facing each other. However, while Jund Infantry formed a unified front, Seleucid Phalangites formed two groups. Arab cavalry formed second line, with Asawira guarding one flank and Beduins covering the other.
On the other hand, Seleucids deployed with almost entire cavalry on the right flank. Only Companions were deployed on the left to cover the advance of the Phalangites.
 |
| Deployment of the Armies. |
Seleucids - Turn 1
 |
| Turn 1 - Sequence of Actions |
 |
| Silver Shields lead the way! |
Both armies started vigorous manoeuvres right from the start. Seleucids sent their Phalangites across the desert plane and Jund Infantry marched to meet them head on.
Cavalry units on both flank moved and counter-moved as well in order to gain advantageous positions.
 |
| Closing battle lines. |
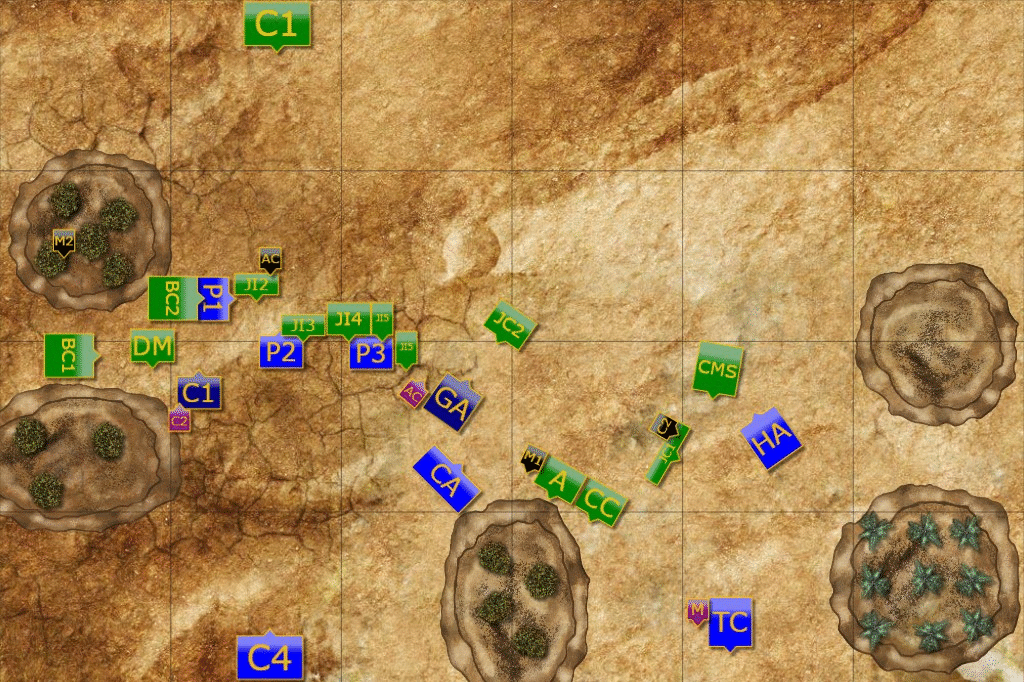
Arabs - Turn 2
 |
| Turn 2 - Sequence of Actions |
 |
| Cavalry Battle. |
The manoeuvres on both sides intensified. On the left flank Bedouins feigned a retreat in order to draw Companions into the rough ground.
On the right, Asawira and Camel Riders chased away Seleucid light horse while heavier cavalry units from both sides moved closely behind.
Infantry formations also advanced but Seleucid centre withdrew to have some more space for manoeuvres.
 |
| Chaotic manoeuvres on the right flank. |
Seleucids - Turn 3
 |
| Turn 3 - Sequence of Actions. |
 |
| The infantry lines collide. |
The infantry lines also clashed, with Seleucids spreading their units to pin down more numerous Jund Infantry. Silver Shields moved to counter one of the Jund cavalry and attempted to outflank the infantry if the mounted enemies withdrew.
The cavalry units on the right flank were getting ready for charges at last.
 |
| Everything hangs in the balance for a second. |
Arabs - Turn 4
 |
| Turn 4 - Sequence of Actions |
Charging Lancers attacked Jund Cavalry but were not able to even hold their ground. One of the units broke and that led to a breach in Seleucid formation. The cavalry on the right flank was separated from the infantry in the centre left.
Silver Shields were intercepted by un-engaged file of Jund infantry but managed to disengage from the fight to keep chasing the enemy mounted troops.
At the same time the Phalangites on the left managed to break through. Unfortunately, as Companions withdrew, Bedouins were free to outflank Thracians and threaten the infantry formation.
 |
| Seleucids are hard pressed on the flanks. |
Seleucids - Turn 5
 |
| Turn 5 - Sequence of Actions. |
 |
| Silver Shields in action. |
Seleucid infantry was fighting the war of attrition against Jund infantry with both sides taking damage. Unfortunately for Seleucids, they were clearly losing on both flanks. On the right, Charging Lancers perished and on the left, Thracians were run down by Bedouins.
 |
| Arabs are winning. |
Arabs - Turn 6
 |
| Turn 6 - Sequence of Actions |
Bedouins used the opportunity and attacked both, exposed Phalangites and Companion cavalry, pinned from the from by Dailami mercenaries. It was too much for the exhausted Seleucid infantry and they had to concede a defeat.
 |
| The End. |
Summary
 |
| Turn-by-turn animation summary |
After-battle
Many thanks to Steve for a great game and congratulations for stunning victory!
I was properly out-manoeuvred in this battle. I was not able to prevent flexible Bedouins to first, render Companions useless and then, when I foolishly withdrew them, they attacked exposed flanks of my badly damaged infantry units.
I also failed to protect the right flank, perhaps once again engaging with Jund Cavalry too early. Steve had an advantage there as he had 4 TuG's and a SuG vs my 2 TUG's and 2 SuG's. I definitely should have been more patient there.
It was good to be able to send Phalangites into the fight. However, I spread the units to avoid outflanking. As a result, I was not able to benefit from Shove effects. On the other hand, I could not afford advancing in one block as I would have been quickly outflanked by the more manoeuvrable Jund Infantry.
Hence I wonder how should I have really approached this game so that I could play to the strengths of my army rather than allowing the opponent to play to his strengths. It is often the challenge I face against many enemies, in particular those who are not only more numerous but also more manoeuvrable.
There were a few interesting moves in this game, perhaps the favourite one was when Steve used one unengaged file to intercept Silver Shields. I am glad I decided to withdraw but so did Steve soon after, denying me the opportunity to claim a few more units before my army broke.
Thanks for reading!
No comments:
Post a Comment