

Hello!
Once in a while I have an opportunity to play against an army from a completely different historical period. That was the case this time when Steve wanted to try out his Trastamara Spanish army.
I always find it quite interesting to see if any of the historically more advanced weapons would make a difference in the game. It is also kind of a test of the system as well. If armies from different periods can still do well against each other, it means the mechanics of the game is quite flexible.
I must admit that this historical period is not that well known to me, as I usually prefer to read about ancient times. However, I use such games also as an incentive to learn a bit more.
It was quite interesting to see what kind of army Steve is going to use. It was the force comprised of the regiments of different ethnicity and made it even more intriguing. Landsknechts, Italian Knights, Spanish light cavalry etc. Visually, it was relatively similar army to mine, with a main battle line formed by various Pikemen, some cavalry and supporting units.
It was quite interesting to see what kind of army Steve is going to use. It was the force comprised of the regiments of different ethnicity and made it even more intriguing. Landsknechts, Italian Knights, Spanish light cavalry etc. Visually, it was relatively similar army to mine, with a main battle line formed by various Pikemen, some cavalry and supporting units.
Here are the details:
Trastamara Spanish - Army List

Since the armies look similar I thought it may be a good idea to use my shooters to do some damage before the fight to gain a bit of an advantage. Otherwise, in one on one fights of pikemen it may take long time to obtain resolution. When both sides roll same color of dice it may be very hard to predict the outcome and to move units accordingly.
Similarly with cavalry, I needed something to be able to overcome two better armoured units of the Knights.
Pre-battle
We ended up with mountains on the secure flank which I liked because as an invader with mobile camp I wanted to make sure it is closer to difficult terrain. I usually do not have games where one side outscouts the other by much and I don't recall it was any different this time either.
We got a few more patches of the terrain which I was happy with, also for the aesthetics. Somehow I do enjoy games with more terrain on the table a lot! Even if it may cause me some trouble in the process!
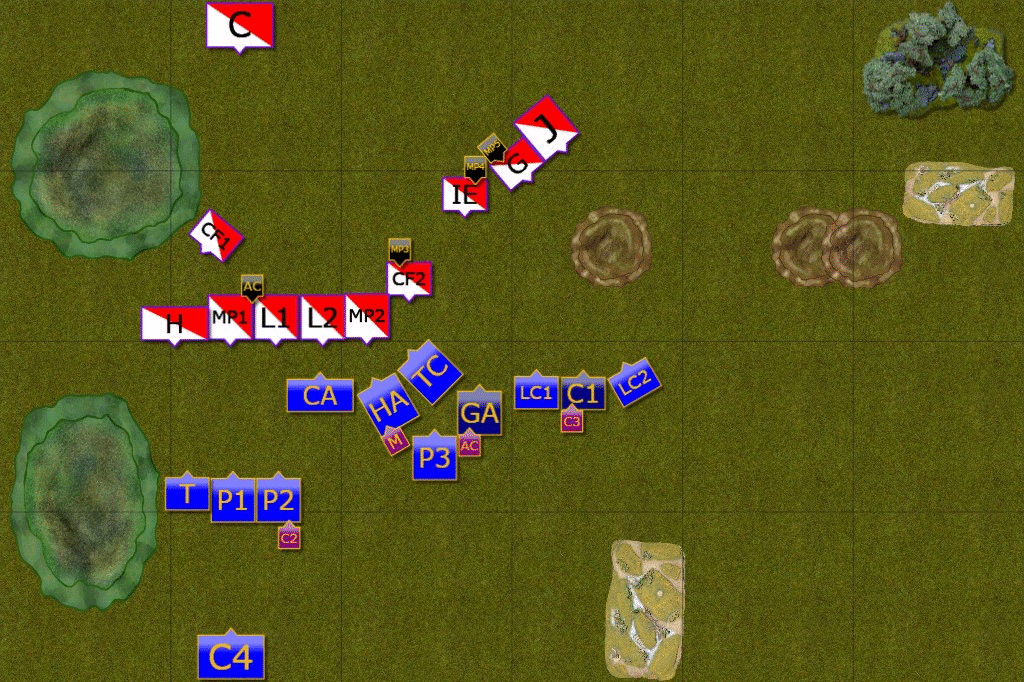
Deployment
 |
| Early Seleucids vs Trestamara Spanish |
Due to terrain placement and mountains on the secure flank on the left, the battle field had an opening on the two thirds of its width. As both armies are numerically low and pike formations usually occupy narrow frontage, it was not a surprise that both forces deployed on one side mainly.
I decided to move with my left flank first, use the shooters in the centre to either slow down or damage the units opposing them and use the right to break through weakened enemy formation. As Steve deployed his cavalry in staggered formation it seemed like a very interesting challenge!
 |
| Deployment of the Armies. |
Seleucids - Turn 1
 |
| Turn 1 - Sequence of Actions |
 |
| Massive Pike Formation. |
Seleucids held on the left to allow the skirmishers to advance in the centre and assume the positions. The Spaniards replied with a surge of almost entire formation of the Pikemen forward and at a double.
Seleucids advanced their Phalangites on the right, together with the cavalry in order to intercept enemy Knights.
 |
| Early manoeuvres. |
Spaniards - Turn 2
 |
| Turn 2 - Sequence of Actions |
 |
| It is getting crowded in the centre. |
Both armies kept advancing but at a more cautious pace now. Seleucids quickly discovered that their own mounted skirmishers may interfere with the advance of the Phalangites and desperately tried to move in a way that would not result in too much chaos.
 |
| Getting closer. |
Seleucids - Turn 3
 |
| Turn 3 - Sequence of Actions |
 |
| The Knights move forward at last. |
Seleucids continued their shooting and it started having an effect on the Landsknechts. While the Phalangites on the right advanced to stop the enemy, the Silver Shields wheeled around the flank to aim at more vulnerable Culunella. That, in turn, prompted the Knights to advance. As the elite pikemen advanced too far, the Lancers moved forward to intercept enemy cavalry.
 |
| First fights about to begin. |
Spaniards - Turn 4
 |
| Turn 4 - Sequence of Actions |
 |
| Lancers holding off the Knights - for now. |
Units clashed against each other across entire battle field. Pikemen vs Pikemen on both left and right. However, the situation on the right looked quite dangerous for the Seleucids. Silver Shields just got hit into the flank by the Italian Knights and Gendarmes broke through the formation.
Fortunately for Seleucids, the Companions were in the right spot to counter attack, hopefully with enough strength to plug the gap.
 |
| Spaniards seem to gain upper hand. |
Seleucids - Turn 5
 |
| Turn 5 - Sequence of Actions. |
 |
| Timely charge by Companions shifts the balance. |
The units on the left are now locked in deadly combat, with both sides taking casualties. Landsknechts in the middle of the battle field were routed by the Seleucid shooters before they managed to reach their chosen target.
It was then up to Colunella to stop Phalangites from attacking second group of Landsknechts, already fighting against the Silver Shields.
The Companions chose the time to attack perfectly, catching Gendarmes off guard and routing them. The pursuit brought the elite Seleucid Lancers into a fight against the Knights and that was much needed help for surrounded Silver Shields.
 |
| After destroying three enemy units, Seleucid shifted the balance into their favour. |
Spaniards - Turn 6
 |
| Killing Blow. |
Almost all units on both sides were engaged in combat but it was Seleucids who happened to have that one more element free to move. Phalangites did not hesitate in attacking exposed flank of the Landsknechts. That powerful charge was all that was needed to break the enemy and the Spaniards had to concede a defeat. Their army was broken.
Summary
 |
| Turn by turn animation summary |
After-battle
Many thanks to Steve for a great game! It was the first time I managed to defeat him so I was obviously very happy about the result.
The battle ended up quite abruptly, after a few vicious fights. I was happy that the shooting actually helped a lot as due to the combined efforts of my skirmishers, one of the enemy TuGs was destroyed.
However, I was really concerned with the Knights breaking through. I seem to make that mistake of overextending the phalangite TuGs and then they may get outmanoeuvred and hit in the flank. Interestingly, however, the loss of Charging Lancers forced Gendarmes to pursuit and expose their flank instead. Thanks to that Companions not only defeated them, but in the pursuit they got into the contact with second unit of the Knights.
These two moments, shooting down the Landsknechts and charge by Companions, turned the tide of battle. I also got lucky with the Silver Shields that managed to hold that one turn longer and allowed Phalangites the game winning flank charge.
It is not often when the game I play ends in 5 turns so it was definitely an interesting experience. I am fully aware that a few fights may have gone differently and that my victory was guaranteed. However, I think I learned some good lessons in this game.
As Steve likes to say, the battle was interesting and educational!
Thanks for reading!
No comments:
Post a Comment