
 Greetings!
I had a great pleasure to play against Mr. Devean and his Samurai Tengu themed army that was composed mainly out of Kingdom of Men list but included Forces of Basilea allies too. He suggested we play a very long time ago and I would like to apologize that I kept him waiting for so long. However, he is a very patient person that also aided him greatly in the game!
I am looking forward to the day when his army will be fully assembled and painted as the work he has done on some miniatures is very nice already! But he informed me that he hasn't received all the orders yet so it may take some time to finish this project. In the meantime we have Universal Battle!
In addition to the fact that the army has a very nice theme of Japanese Samurai force with some mythological creatures present, it also was composed in a way that made the allied contingent adding some flavor as well as a dangerous force on the battle field.
Samurai Tengu - Army List
40 Pole-Arms Block, Horde, Fire Oil - 170
- 5 Mounted Scouts, Troop - 100
- 5 Mounted Scouts, Troop - 100
- Hero, Mounted, Crystal Pendant of Retribution - 115
40 Arquebusiers, Horde, Brew of Keen-eyeness - 270
- Army Standard Bearer, Mounted, Boomistck - 95
20 Berserkers, Regiment - 140
- Wizard, Mounted, Bane Chant (2), Lighting Bolt (3), Inspiring Talisman - 100
20 Berserkers, Regiment - 140
- Wizard, Bane Chant (2), Lighting Bolt (3), Scarletmaw’s Fenulian Amulet - 75
10 Knights, Regiment, Maccwar’s Potion of the Caterpillar - 215
Forces of Basilea Allies
6 Elohi, Horde - 300
- Ur-Elohi, Hero - 180
Well, when I saw all these Lightning Bolts I heard the sound of thunder already! Here is the music video that I think is a perfect dedication to Daevan and his army :)
As an army, Kingdoms of Men is a Neutral force and that is a very interesting option already because it allows them to ally with any other force in the world of Mantica. It gives the KoM player multitudes of choices other armies might not be able to use.
In addition, the army wide special rule is Rallying Cry, that means that all sources of inspire have a Very Inspiring rule, even these that obtain this ability from the artifact. 9 inches radius for re-rolls of the nerve tests is a very useful skill for sure!
But let's look at his army list in more details as usual:
40 Pole-Arms Block - one of the two infantry hordes among KoM core of the army. It is a very interesting unit because while it seems a little bit vulnerable with Defense 3+ it compensates that disadvantage with a nice nerve value and quite good offensive abilities. With 25 attacks and Crushing Strength (1), hitting on 4+ is still very good.
As the lack of armor is a very obvious weakness I expected this unit to be either screened or using terrain for the possible cover. It is a very good core unit because it is not that expensive, can stay around for a while and cannot be ignored by the enemy.
40 Arquebusiers - second of the infantry hordes, this one is much more expensive with the magic artifact. 20 shots that hit on 4+ with piercing (2) is a very good ranged attack ability. Even with Reload! special rule, if they get to a good position they can be a very dangerous element for the enemy to deal with. In fact, even with possible cover, the target is still in bad position because the number of shots and piercing (2) make up for lack of accuracy.
But here too 3+ Defense is an obvious weakness to be exploited and if I were able to focus my own fire on this unit I could have a chance to eliminate it. It would be one of the priorities, no matter what the scenario is.
20 Berserkers - two regiments of those is a very good support of offensive capabilities. As they cannot be wavered they may as well operate alone or away from sources of inspire but of course defense 3+ would mean they need to get into that melee fast. And this is where they want to be anyway because they are quite good at inflicting damage to the enemy. Regiment size also means they can maneuver more comfortably.
10 Knights - Knights with a Pathfinder ability are a very common sight at the battle fields of Mantica so I was not surprised to see them here. Very good unit, good armor and speed, not slowed down or affected by difficult terrain. They add very much needed longer range threat so that the infantry can be either protected or supported.
5 Mounted Scouts - two units of fast cavalry are always a nice sight for me but at the same time an additional challenge for my own Silver Breeze. Potentially, if both sides decided to use fast cavalry as a weapon against their counter parts, Silver Breeze has an advantage, provided they can get into a good shooting position first. I was very curious to see how Devean uses his units.
Heroes and Wizards - There were 4 of them total, which may not be a huge number but it was clear what they were for. Hero with the Pendant is the ultimate annoyance for the enemy. Cheap enough to sacrifice but dangerous enough to create headaches. Would be great to shoot him down early but Individual and cover would see that task hard to accomplish.
Army standard and Wizards were there to provide another means for ranged attacks. And I must say I was quite intrigued. The spells are not affected by cover or movement and always hit on 4+. With additional Piercing (1) it means that these Lighting Bolts can actually be quite efficient, in particular when shot at the same target. Later in the game they will be instrumental in hunting down wounded units of the enemy to finish them off.
In addition Wizard and Army Standard provided two sources of Inspire that is always a very helpful skill to have, in particular if it means 9 inches range due to Rally Cry special rule.
6 Elohi and Ur-Elohi - air force and trusted allies. Very solid choices as they self-inspire so can be used for independent missions and can operate anywhere on the battle field. Hit hard, cannot be wavered, with a very good defense, what not to like? They will be a tough enemy for my own drakes and cavalry as they can either outpace them or receive the frontal charge and hit back hard regardless.
With 13 elements I could not comfortably out deploy this army. It basically meant that I could, at best, have 2 units left to deploy after seeing entire army of the enemy arrayed. That means I would need to have my own formation settled and might only shift to a certain area of the battle field with these two last drops.
It is the force that competes in every phase of the game. Some of its elements have low defense but it is often compensated by good nerve values. I really liked it because it was made to work if all units cooperated and mutually supported each other.
I used the same 2000 point army as during the most recent games and here is the army list for reference:
Outcasts - Army List
10 Stormwind, Regiment, Potion of the Caterpillar (Pathfinder) - 235
- 5 Silverbreeze, Troop - 145
- 5 Silverbreeze, Troop - 145
- Drakon Rider Lord, Hero, Large Cavalry - 160
3 Drakon Riders, Regiment, Dwarven Ale (Headstrong) - 185
- 5 Stormwind, Troops - 140
- Bolt Thrower, War Engine - 90
20 Palace Guard, Regiment - 150
- 10 Archers, Troop - 115
- 10 Palace Guard, Troop - 105
- Bolt Thrower, War Engine - 90
20 Spearelves, Regiment - 140
- Elven Mage, Hero, Inspiring Talisman, Bane Chant - 110
20 Spearelves, Regiment - 140
- Battle Standard Bearer, Hero - 50
- Bolt Thrower, War Engine - 90
20 Spearelves, Regiment - 140
- Elven Mage, Hero, Inspiring Talisman, Bane Chant - 110
20 Spearelves, Regiment - 140
- Battle Standard Bearer, Hero - 50
My impression was that our forces were well balanced against each other with subtle differences and advantages. Elven speed was matched by stronger flying contingent. Elven shooting by ranged attacks that hit harder or ignored penalties etc. In such circumstance experience, scenario and better use of the terrain may be of even more value to the overall success than usual.
Here is what Devean wrote about our armies (he added comments to each turn as well, I added them accordingly):
List and Matchup
A nice, well balanced list. No unit is powerful in itself but relies on support. The combined shooting (22 regular and 4 bolt thrower shots) could significantly damage any of my units. Nullifying the elven shooting would be my first priority. The speed of the elves is also greater than the humans so I would need to be careful that 2-3 units cannot gang up on any one of mine. A lack of no-modifiers shooting meant that I could take advantage of terrain much more effectively. My main advantages against this list are my 11 lightning bolts which will significantly threaten the elven troops and my arquebusier horde which have no direct threats from the list (no flying/fast combat individuals). The Arquebusiers would be able to create a no-go zone and absorb significant punishment before going down (I would love it if they were shot instead of my more vulnerable units).
In summary, elven strengths are reliable shooting and speed. Mine are the lightning bolts and the Arquebusier horde not having an easy counter. In other categories, the lists seem well matched.
Terrain
 |
| River Styks - Devean's design |
The map was designed by Devean himself and it felt as if I were to play on enemy's territory :)
Ruins and the river were height 0 difficult terrain. Flame wall, brides and the garden were all obstacles, i.e. height 1 for the purpose of cover and height 0 for the purpose of line of sight. Forests, rocks, house and pyramid were all height 4.
This was a difficult terrain set up for the shooters, in particularly those who were affected by cover and/or could not make up for it with a sheer volume of attacks and piercing. There were plenty of places to benefit from cover or even blocking line of sight entirely. From that point of view I think Samurai Tengu had the advantage as their shooting was either not affected by cover (Lightning Bolts) or could still inflict significant damage regardless.
Deployment
 |
| Deployment Order. |
It is also important to know that we used Clash of Kings player's pack and we rolled one of the new scenarios, Push!
From the point of view of the rules the amendment for Fly was probably the most important that would affect both our forces:
From the point of view of the rules the amendment for Fly was probably the most important that would affect both our forces:
Fly
The unit can move over anything (blocking terrain, enemy units, friendly units when charging, etc.), but still cannot land on top of them. The unit does not suffer hindered charges for moving over difficult terrain or obstacles, unless it ends the move within or touching them. The unit also has the Nimble special rule.
While Disordered, units lose Fly. Note that this also means they lose the Nimble that Fly provides too, unless they have it by another means (such as Individuals).
The scenario itself was very interesting too and it definitely had an impact on the deployment of armies as well as plans on both sides. Here are the rules for Push!:
Push!
This is a new scenario as follows:
Set-up
Place one loot counter in the dead centre of the table. After all units have been placed on both sides but before any Vanguard moves, roll a D3 and assign that many additional loot counters to each player. Starting with the player that placed the first unit, players alternate placing these loot counters into their own set-up areas. Set-up ends when both players have placed all of their units and loot counters. Loot counters may be carried by units starting the game on them.
Controlling, capturing and carrying loot counters works in exactly the same way as described in the standard Loot! scenario. However, loot counters in Push! cannot be taken off the table.
Objective
At the end of the game, you score 1 Loot Point for each loot counter in the possession of one of your units, and an additional +1 Loot Point for each loot counter you hold where the unit possessing it is entirely in your opponent’s half of the table.
If you score more Loot Points than your opponent, you win, otherwise the game is a draw.
 |
| Final scenario - loot counters allocated. |
I won the roll off to pick the sides and took South. One of the reasons was that I didn't want to give Arquebusiers a good shooting position. Even if they had to spend one turn to actually get there. I also decided to deploy in refused formation to be able to bring more units on a stronger flank and create some kind of advantage (as otherwise we had similar number of units). If I succeeded in breaking through I would have also brought loot tokens with me into enemy deployment zone.
At the same time Shooters were to slow down the enemy on the other flank and jump on the hill to harass approaching foe and/or shoot at their counterparts in horde formation. The first lesson I learned during that phase was that one unit can actually carry more than one loot token! The reason I allocated mine to Spears was that I wanted my tokens to be close to other units in case I needed to pick them up again.
Another part of the plan was to use the forest as a cover from shooting and use it as a good defensive position if needed. However, that plan relied on the fact I could be there faster than the enemy. I also deployed heavy cavalry in the second line as a reserve as I wanted to see how the enemy would approach and then decide which area to attack. In particular that they would ignore plenty of difficult terrain present on the battle field.
Deployment
My priority for taking on this list was to a) eliminate/neuter fast cavalry on the right and b) delay the left flank as much as possible. If I could clear the right side of the board, my scouts would be able to cross the half way point and claim 4 points out of a possible 10. Almost everything would have to go the elves way on the other flank for them to be able to claim a win if my scouts were able to take the loot across the board. My arquebusiers were positioned to be able to claim cover but also to threaten the middle zone, guard the middle counter and discourage any troops crossing the river to help the other flank. Once the fast cavalry had been destroyed on the right, I hoped to fly the ur- elohi over to the other side and get some flank/rear charges. Elohi horde were positioned to dissuade the left flank from advancing too quickly (my horde would have plenty of flank options if they were allowed to fly over the pyramid uncontested). Elven fliers were placed in response to the elohi and I was reasonably happy with the stalemate (as my momentum would be predominantly on the right side of the board).
My plan was then confronted with the reality when Devean won the roll of for the first turn and chose to move first!
Samurai Tengu -Turn 1
 |
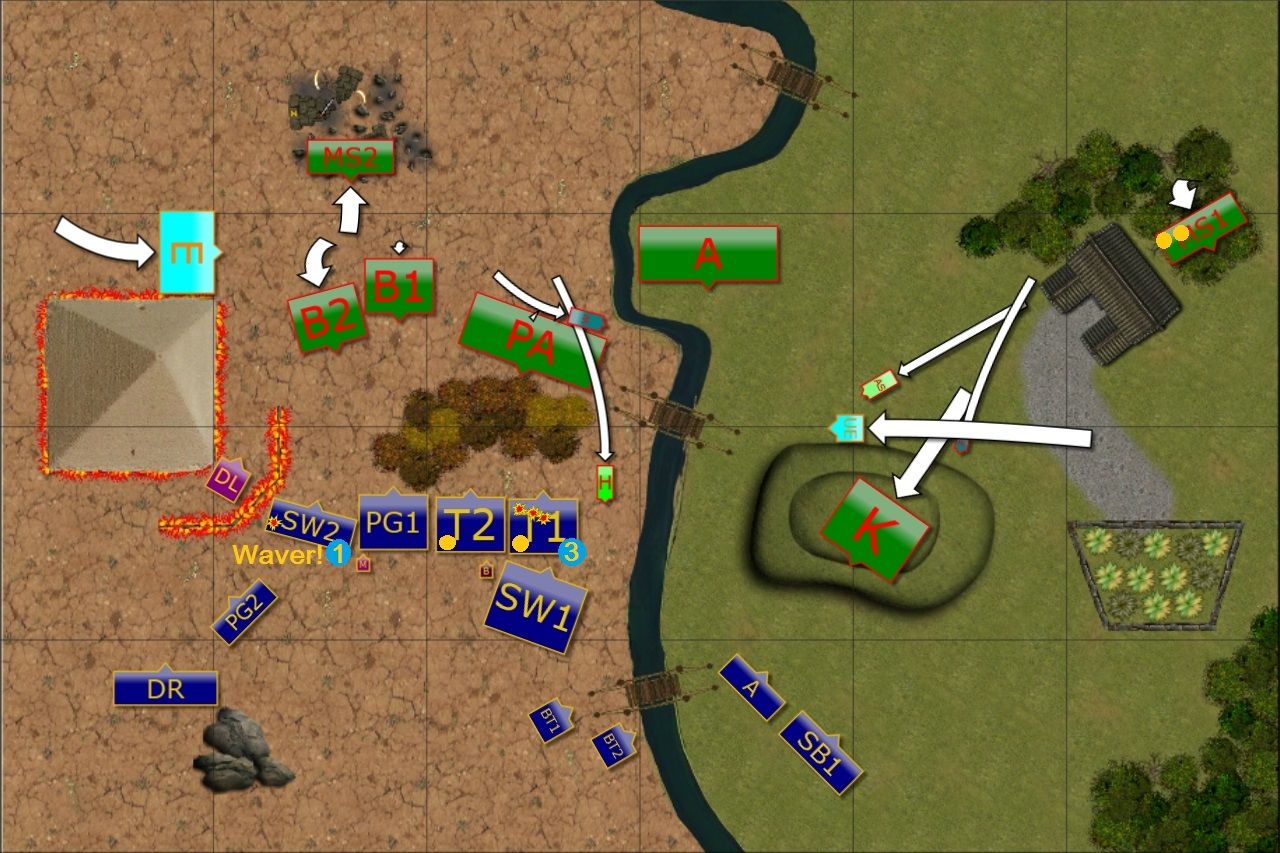
| Samurai Tengu advance aggressively! |
The army of the Samurai moved forward at a double, approaching Elven battle line in order to stop it before it picks up the momentum. The infantry in the center moved in the way that didn't expose it to faster enemy, with majority of units still behind various covers.
On the East the approach was even more aggressive, with the Kinghts spearheading the advance but still staying beyond the hill and out of sight of the Bolt Throwers. The support of Ur-Elohi added further pressure on the Elven weaker flank.
Then the thunders spoke and the lightnings stroke from the clear sky. As a result, one unit of Silver Breeze cavalry was completely destroyed and the survivors routed, as they tried to catch and calm down their scared to death mounts.
KoM Turn 1:
Elohi advanced behind the pyramid, ready to pounce if the fliers left their posts. In hindsight, this was a poor move as the elves could easily have used the stormwind as a deterrent (backed up by PG troop). As we are playing the CoK pack, the elohi would have become stuck, leaving the elven fliers to get behind my lines. I wanted to get control of the forest to negate the elves speed. As all I needed to do was delay this flank the polearms and berserkers just needed to ensure that the fliers didn’t fly over the back. I advanced the hero so that next turn he would be prepared to either a) charge and block up advancing elves on the left or b) march up and threaten the elven bolt throwers next turn. The right flank advanced as much as possible and the KoM were lucky to rout a fast cav troop right off the bat.
Outcasts - Turn 1
The initial plan didn't survive the contact with the enemy so Elves had to adapt quickly. The shooters made a hard decision and repositioned to be able to hopefully stop the Knights. But in doing so they already telegraphed to the enemy that the Western flank is not endangered by the ranged attacks.
The infantry moved boldly forward with the cavalry supporting. Only small contingent of Palace Guard moved towards the Pyramid to assist the Drakon Riders in their interception mission. Just in case Elohi decided to fly over.
Elves turn 1:
The drakon rider advancing was a good move. In subsequent turns he could be used to get some tasty flank charges unless I was able to block him with my own fliers.
Samurai Tengu -Turn 2
With the Elven infantry close, Humans decided to stop their own advance and make Elves move first. Only on the flank the Knights moved forward again, keeping the pressure on and forcing the Elven shooters to focus on them rather than on other units.
On the East the approach was even more aggressive, with the Kinghts spearheading the advance but still staying beyond the hill and out of sight of the Bolt Throwers. The support of Ur-Elohi added further pressure on the Elven weaker flank.
Then the thunders spoke and the lightnings stroke from the clear sky. As a result, one unit of Silver Breeze cavalry was completely destroyed and the survivors routed, as they tried to catch and calm down their scared to death mounts.
KoM Turn 1:
Elohi advanced behind the pyramid, ready to pounce if the fliers left their posts. In hindsight, this was a poor move as the elves could easily have used the stormwind as a deterrent (backed up by PG troop). As we are playing the CoK pack, the elohi would have become stuck, leaving the elven fliers to get behind my lines. I wanted to get control of the forest to negate the elves speed. As all I needed to do was delay this flank the polearms and berserkers just needed to ensure that the fliers didn’t fly over the back. I advanced the hero so that next turn he would be prepared to either a) charge and block up advancing elves on the left or b) march up and threaten the elven bolt throwers next turn. The right flank advanced as much as possible and the KoM were lucky to rout a fast cav troop right off the bat.
Outcasts - Turn 1
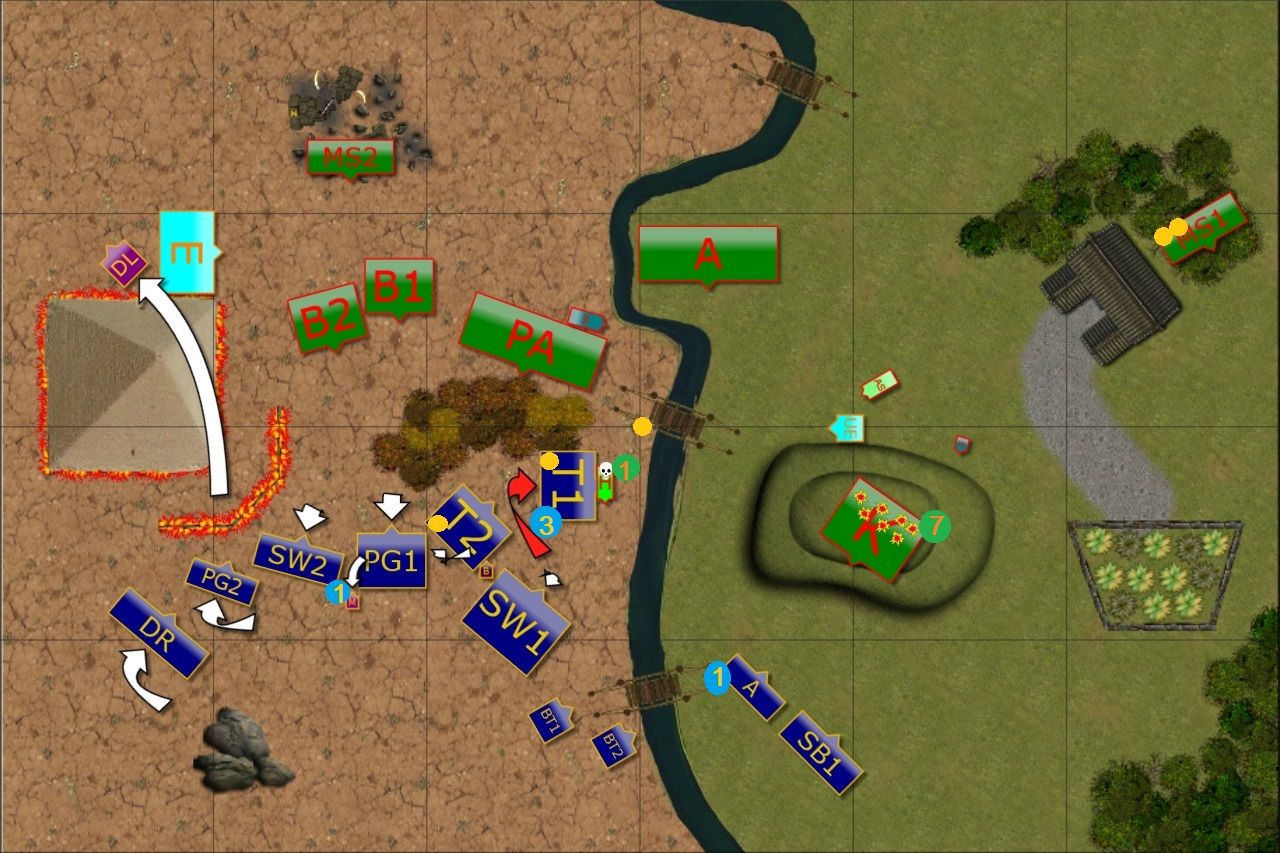
 |
| Elves try to adapt to the new situation. |
The initial plan didn't survive the contact with the enemy so Elves had to adapt quickly. The shooters made a hard decision and repositioned to be able to hopefully stop the Knights. But in doing so they already telegraphed to the enemy that the Western flank is not endangered by the ranged attacks.
The infantry moved boldly forward with the cavalry supporting. Only small contingent of Palace Guard moved towards the Pyramid to assist the Drakon Riders in their interception mission. Just in case Elohi decided to fly over.
Elves turn 1:
The drakon rider advancing was a good move. In subsequent turns he could be used to get some tasty flank charges unless I was able to block him with my own fliers.
Samurai Tengu -Turn 2
 |
| Humans consolidate their positions. |
Arequebusiers aimed at the Tallspears and inflicted some damage but not yet substantial. On the other hand, mounted scouts got lucky, unhorsed one of the Elven Knights and ... entire unit wavered due to unexpected casualty.
Last but not least a lone hero came forward, shouting both challenges and insults in hope that the enemy would help him to meet his ancestors so that he could regain his lost honor.
KoM turn 2:
Elohi horde ensure that if the drakon lord advances he will either be charged or useless for a turn. At the same time, Elohi are in a good position to threaten elves if they advance further into the forest. Although the heavy cav troop and drakon lord can see the elohi, they cannot charge as they are in the flank arc which is protected by the pyramid. Seeing that the heavy cav regiment is preparing to charge the arquebusiers, hero decides to advance to get in the way whilst also threatening bolt throwers if he is not killed. The right flank further advances to pressure the two remaining elven troops and potentially cross the river next turn.
Outcasts - Turn 2
 |
| Elves hesitated |
Elves where hard pressed and could not move out of their corner. On the West units tried to re-arrange their positions while Drakon Lord flew over the pyramid to land behind the enemy lines. On the East the shooters did their best to turn the Knights away but stubborn humans didn't even waver.
Tallspears tried to get rid of the suicidal hero but their attack was not well coordinated and not only they didn't succeed but were in a very bad spot with their flank exposed.
Elves turn 2:
Annoyingly, the fast cav are able to escape the LoS of the knights. I will have to rely on LB to take out the troop which could threaten the scouts on the far right.
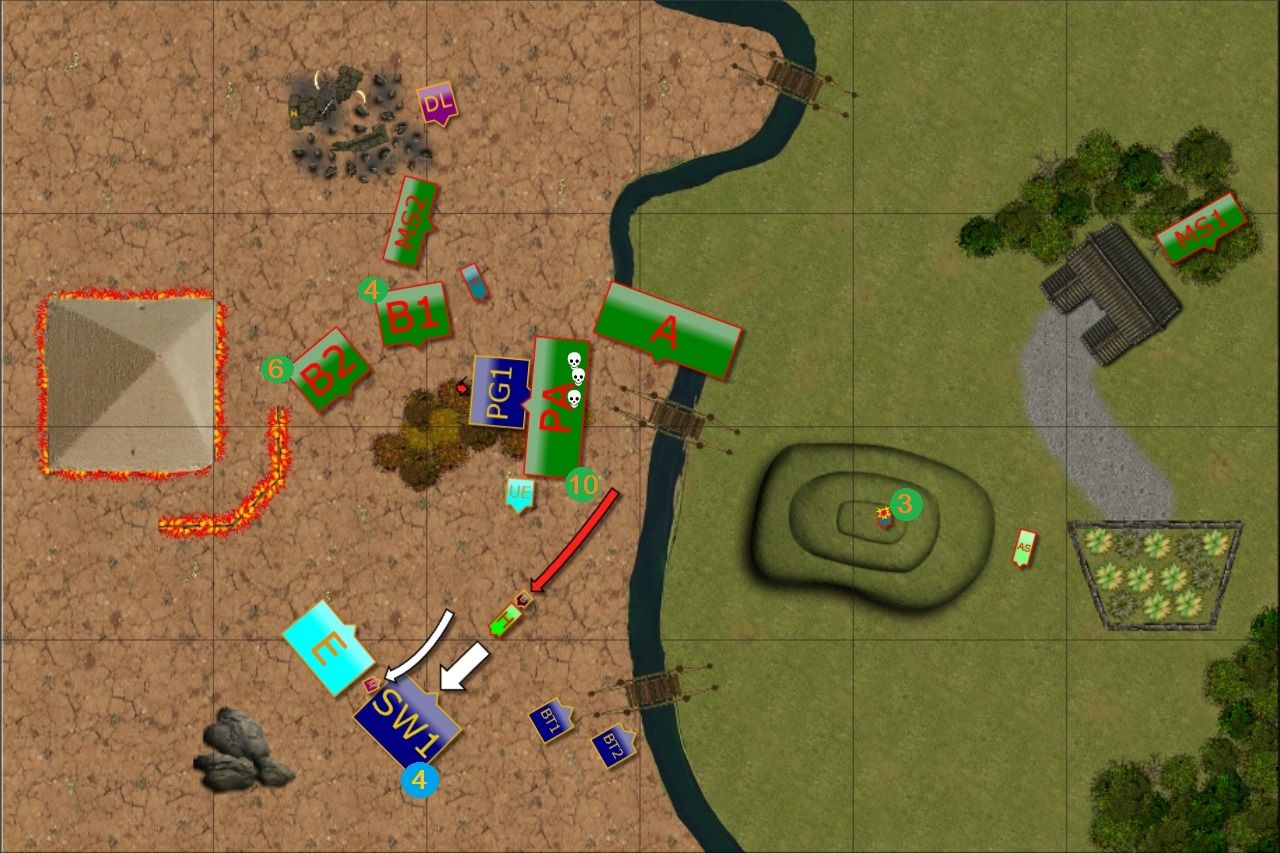
Samurai Tengu -Turn 3
 |
| Elves are pushed back. |
Samurai Tengu army exploited Elven mistakes. Pole-Arms had no trouble with routing Tallspears and what is more, taking control over the loot in the process too. The Knights easily defeated Archers and nearby Silver Breeze cavalry was wavered by the Lightning Bolts spells cast at them by a wizard and army standard bearer.
Elves were being pushed back now and they were losing units in the process.
KoM turn 3:
Scouts turn to face the drakon lord and make it very difficult for him to get back into the battle next turn unopposed. Incredibly, the Hero survives the PG attack and is now able to do what he does best: get in the way. With the Hero blocking up the heavy cav regiment, the polearms are able to face the rest of the elven force and ensure that any charges against them will be costly as the berserkers wait to spring their trap.
Outcasts - Turn 3
 |
| Elves attempt to counter attack. |
Elves decided to launch an attack in order to give themselves a chance. Palace Guard and Storm Wind troops charged one regiment of Berserkers each in order to stop them from attacking exposed rear of the infantry regiments that engaged Pole-Arms.
Neither of these attacks was aimed at routing the enemy but to hold them in place so that Drakon Riders and Elven Knights kept in reserve could attack as a second wave. But in order to do that a bit of luck with shooting was required.
It started well with a Bolt Thrower unloading its deadly missiles at the Knights and this time they were finally destroyed. The second Bolt Thrower did well in hitting and wounding suicidal hero but he refused to give up in his quest for a glorious death.
Even army standard bearer charged Ur-Elohi to distract it and prevent it from flying over to attack Elven troops but this brave attempt failed.
Elves turn 3:
A good move by Swordmaster, bar the placement of the drakon riders regiment. He was able to attack but also nullify my berserker counterpunch. This was an all-in, desperate attempt to swing the game back for the elves. If the standard had caused a wound to the Ur-Elohi, if either berserker regiment had routed or if the hero had routed, my forces would be hard pressed to answer the elven challenge.
Samurai Tengu -Turn 4
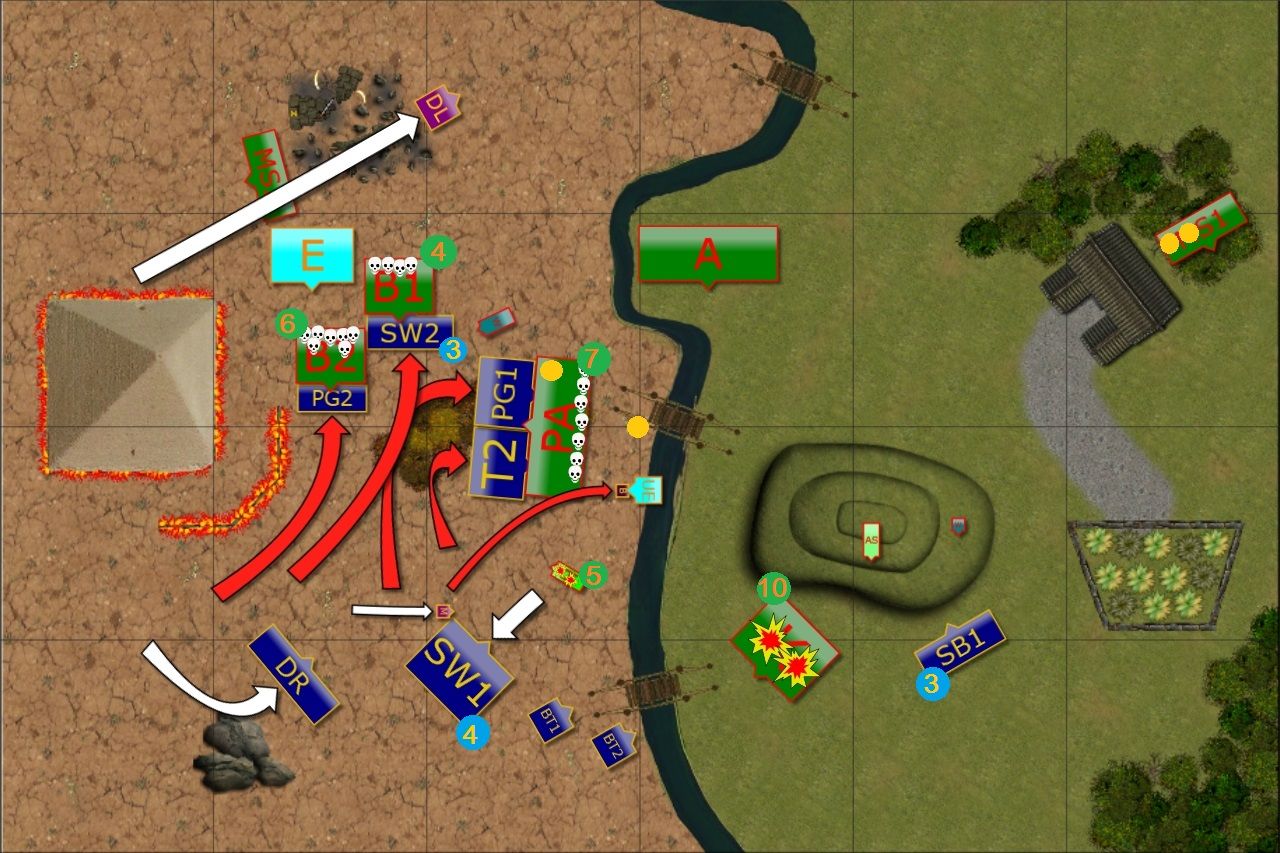
The following attack by Samurai Tengu was truly devastating. First, Elohi exploited a mistake by Drakon Riders who landed a bit too close and were attack by the flying Tengu. Caught in the open, Drakons could not hold.
Both regiment of Berserkers had no problems with routing the blocking Elven troops. At the same time Pole-Arms aided by Ur-Elohi made a short work of the Tallspears and collected another Loot.
Then suicidal Hero charged Elven Knights alone, hoping this time his challenge would not go unaswered and ... wavered them!
Finally, remaining Silver Breeze cavalry was finished off by more Lightnings.
KoM turn 4:
Fortunately for the KoM, none of the potential of the previous turn came into effect. Further, both the drakon and spear regiments were successfully one-hit and with the Hero still blocking the heavy cav, things were looking grim for the elves. To add insult to injury, the Silver Breeze on the right were routed by combined lightning and shooting. If they had survived unscathed, they may have had a chance to shoot and rout the scouts in the forest.
Outcasts - Turn 4
After such a heavy blow Elven army had no chance to even decrease the margin of defeat. A few attempts to counter attack were made just to make room for withdrawal. Heavily beaten, Elven survivors surrendered.
Elves turn 4:
Not a lot that the elves can do to claim markers at this point. Although the drakon lord is now behind the lines, it’s a little too late as the rest of the army will be gone before he can have much impact.
Summary
After-battle thoughts
Well, that was a harsh lesson and hard beating! :) But first of all let me thank Daevan for a great game and showing me what a true master in Kings of War can do. It was a pleasure and privilege to play against such a good player and was clearly outclassed. Congratulations on your well deserved victory! :)
It was the first time when I threw the towel too. I had games before where I was tabled or that it looked bad from the start but somehow I kept going. This time it was so clear what the next turn would be that I decided to surrender. The good thing is that it can only be better next time :D
Fortunately, when the lesson is so harsh there is also a lot to learn. So let me start with the decisions I made but didn't really bring the positive results.
1. Sides choosing - it is part of the deployment phase but I wanted to emphasize on this aspect because I think it was an important one. Ideally, the terrain should not favor any sides but provide both challenges and opportunities. I explained earlier why I chose South but it is a good idea, I think, to consider North as an option too.
First of all, the fact that there was a bit more open ground there might have helped my shooters. Of course, it does not mean Samurai Tengu would oblige and climb that mountain so I could shoot at them freely but it seems now, with the full benefit of hindsight, that that was also an option to exploit.
2. Deployment - it was very interesting to see two opposite approaches to the deployment. I wanted to go for a refused flank while Devean spread his army. I wanted to carry my loot tokens through the enemy lines, while Devean chose fast troops to do so and at least contest the other tokens. Or prevent my army from reaching his side. I had my fliers only on one flank and despite that I could not counter Elohi well. While Devean had them on both flanks and could either press forward to keep in check the enemy that would otherwise land behind his lines.
In the end I had a poor deployment where I was not really in the position to either put the pressure on or counter with my faster troops and/or longer range artillery. Additional mistakes of positioning fast cavalry too close to the enemy for the first turn Lightning Bolt didn't help either.
3. The game - yet again I played in a very indecisive manner and that showed too. The situations I think I made significant mistakes are:
- assigning tokens to the front line troops and not releasing them later
- attacking the individual with Spears when I had to go trough the forest - as a result I exposed the flank and didn't even had a chance to rout the enemy. It also shows I should have had at least one Silver Breeze cavalry as a reserve there as one of the weaknesses of this type of an individual is his vulnerability to ranged attacks.
- attacking piece-meal - I should have at least add Drakons to the charge of Palace Guard against the Berserkers - I wanted to prevent these units from attacking the infantry in the forest but I simply threw my units away. If I added Drakons I would have had a chance to rout Berserkers. Then, due to close proximity of troops it would have been possible to protect them from the charge of Elohi. I would still be in trouble but at least I would have had some units intact.
- mistake in positioning of the Drakons - very silly one indeed.
- poor positioning of the Drakon Lord - he did absolutely nothing and I placed him in such way that didn't project any danger to enemy units at all. I admit that the fact we were using new rules for the fliers made me more careful with them but it looks I was way too shy with them.
4. The terrain - I didn't use any piece to my advantage, quite the contrary. It was great to see what Devean can do with every single element of the terrain, how his deployment made sure each unit has some cover and how he navigated between the pieces to get into advantageous positions. I really need to learn the same as it is an aspect of the game that has a huge influence on the battle.
5. The Army - it is actually the first time when I started looking at my army composition again. I have been very happy with it so far but I begun seeing some problems recently. Mainly with the static shooting, such as Bolt Throwers. With more elements on the table it is already more difficult to keep the line of sight clear. With more terrain on the table, as this battle showed (or the previous one for that matter) it is even more challenging.
At the same time I was greatly impressed by highly mobile sources of Lightning Bolts. They may have shorter effective range but they more than make up for it with the fact it is a radius, not arc of sight, due to being individual. Even a pedestrian wizard has a potential to affect targets in 24 + 5 = 29" radius. That is very good. In addition, he can always benefit from the cover due to terrain and nearby units but would always hit on 4+.
Of course I didn't lose because Devean had Lightning Bolts and I didn't but I see a great potential in a more mobile sources of ranged attacks. I have already came up with some alterations to the list, it is probably a good idea to test them now and see what I like more. Of course it would have been great to keep BT's and add some Lightning Bolts but that is even more difficult to accomplish without heavy reconstruction of the army list.
What is more, I don't really want to focus on that, I'd rather still do my best to learn from the mistakes and come up with a better deployment, terrain use and successful plan in the first place.
Post-game thoughts
This was a difficult map to play due to the amount of terrain on it. I was pleasantly surprised to see all of the vulnerable shooting troops were left by their own without inspiring. If they had been supported by the drakon lord he would have both inspired the fragile troops but also forced me to be much more conservative on that flank.
Overall, I had a great time playing. The new scenarios are great (I have since played Control also) and Swordmaster forced me to think through every move I made. There were plenty of traps and counters in this game which made it very tactically rewarding.
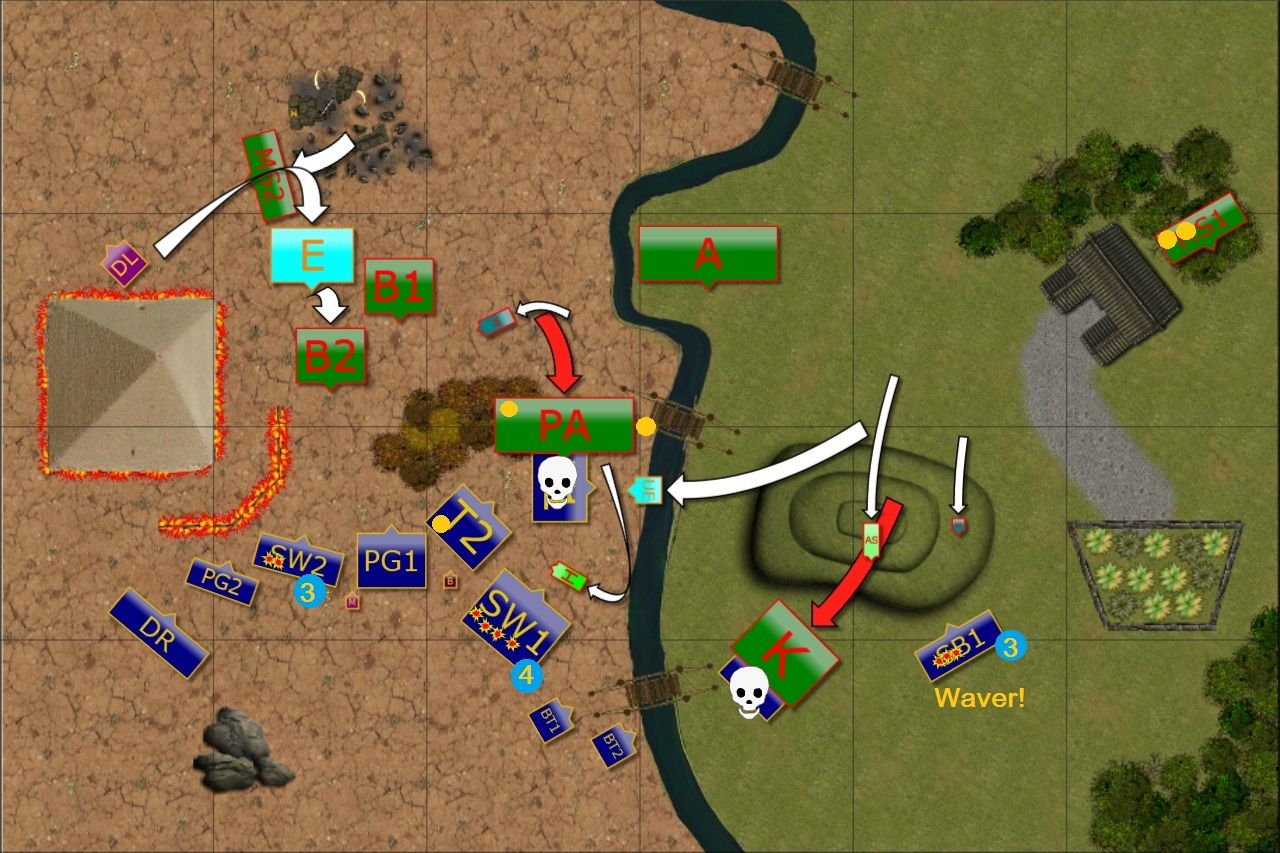
 |
| Killing Blow! |
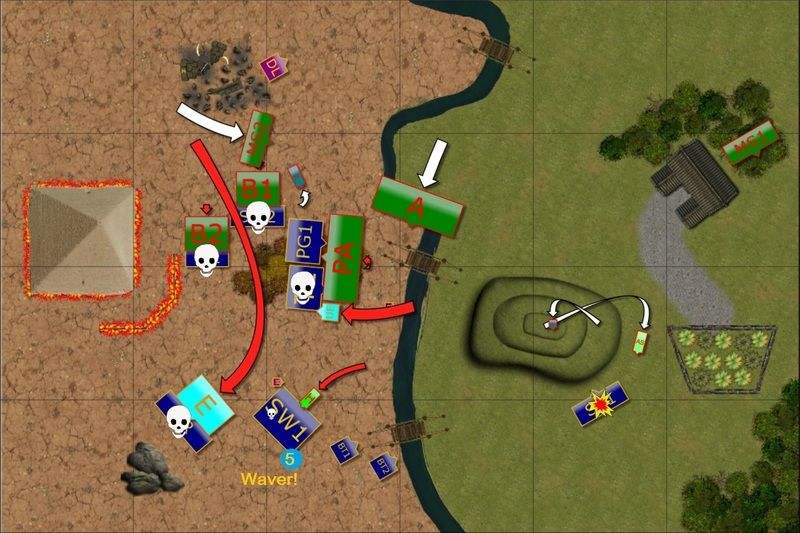
The following attack by Samurai Tengu was truly devastating. First, Elohi exploited a mistake by Drakon Riders who landed a bit too close and were attack by the flying Tengu. Caught in the open, Drakons could not hold.
Both regiment of Berserkers had no problems with routing the blocking Elven troops. At the same time Pole-Arms aided by Ur-Elohi made a short work of the Tallspears and collected another Loot.
Then suicidal Hero charged Elven Knights alone, hoping this time his challenge would not go unaswered and ... wavered them!
Finally, remaining Silver Breeze cavalry was finished off by more Lightnings.
KoM turn 4:
Fortunately for the KoM, none of the potential of the previous turn came into effect. Further, both the drakon and spear regiments were successfully one-hit and with the Hero still blocking the heavy cav, things were looking grim for the elves. To add insult to injury, the Silver Breeze on the right were routed by combined lightning and shooting. If they had survived unscathed, they may have had a chance to shoot and rout the scouts in the forest.
Outcasts - Turn 4
 |
| Elves surrender. |
After such a heavy blow Elven army had no chance to even decrease the margin of defeat. A few attempts to counter attack were made just to make room for withdrawal. Heavily beaten, Elven survivors surrendered.
Elves turn 4:
Not a lot that the elves can do to claim markers at this point. Although the drakon lord is now behind the lines, it’s a little too late as the rest of the army will be gone before he can have much impact.
Summary
 |
| Turn-by-turn summary animation. |
After-battle thoughts
Well, that was a harsh lesson and hard beating! :) But first of all let me thank Daevan for a great game and showing me what a true master in Kings of War can do. It was a pleasure and privilege to play against such a good player and was clearly outclassed. Congratulations on your well deserved victory! :)
It was the first time when I threw the towel too. I had games before where I was tabled or that it looked bad from the start but somehow I kept going. This time it was so clear what the next turn would be that I decided to surrender. The good thing is that it can only be better next time :D
Fortunately, when the lesson is so harsh there is also a lot to learn. So let me start with the decisions I made but didn't really bring the positive results.
1. Sides choosing - it is part of the deployment phase but I wanted to emphasize on this aspect because I think it was an important one. Ideally, the terrain should not favor any sides but provide both challenges and opportunities. I explained earlier why I chose South but it is a good idea, I think, to consider North as an option too.
First of all, the fact that there was a bit more open ground there might have helped my shooters. Of course, it does not mean Samurai Tengu would oblige and climb that mountain so I could shoot at them freely but it seems now, with the full benefit of hindsight, that that was also an option to exploit.
2. Deployment - it was very interesting to see two opposite approaches to the deployment. I wanted to go for a refused flank while Devean spread his army. I wanted to carry my loot tokens through the enemy lines, while Devean chose fast troops to do so and at least contest the other tokens. Or prevent my army from reaching his side. I had my fliers only on one flank and despite that I could not counter Elohi well. While Devean had them on both flanks and could either press forward to keep in check the enemy that would otherwise land behind his lines.
In the end I had a poor deployment where I was not really in the position to either put the pressure on or counter with my faster troops and/or longer range artillery. Additional mistakes of positioning fast cavalry too close to the enemy for the first turn Lightning Bolt didn't help either.
3. The game - yet again I played in a very indecisive manner and that showed too. The situations I think I made significant mistakes are:
- assigning tokens to the front line troops and not releasing them later
- attacking the individual with Spears when I had to go trough the forest - as a result I exposed the flank and didn't even had a chance to rout the enemy. It also shows I should have had at least one Silver Breeze cavalry as a reserve there as one of the weaknesses of this type of an individual is his vulnerability to ranged attacks.
- attacking piece-meal - I should have at least add Drakons to the charge of Palace Guard against the Berserkers - I wanted to prevent these units from attacking the infantry in the forest but I simply threw my units away. If I added Drakons I would have had a chance to rout Berserkers. Then, due to close proximity of troops it would have been possible to protect them from the charge of Elohi. I would still be in trouble but at least I would have had some units intact.
- mistake in positioning of the Drakons - very silly one indeed.
- poor positioning of the Drakon Lord - he did absolutely nothing and I placed him in such way that didn't project any danger to enemy units at all. I admit that the fact we were using new rules for the fliers made me more careful with them but it looks I was way too shy with them.
4. The terrain - I didn't use any piece to my advantage, quite the contrary. It was great to see what Devean can do with every single element of the terrain, how his deployment made sure each unit has some cover and how he navigated between the pieces to get into advantageous positions. I really need to learn the same as it is an aspect of the game that has a huge influence on the battle.
5. The Army - it is actually the first time when I started looking at my army composition again. I have been very happy with it so far but I begun seeing some problems recently. Mainly with the static shooting, such as Bolt Throwers. With more elements on the table it is already more difficult to keep the line of sight clear. With more terrain on the table, as this battle showed (or the previous one for that matter) it is even more challenging.
At the same time I was greatly impressed by highly mobile sources of Lightning Bolts. They may have shorter effective range but they more than make up for it with the fact it is a radius, not arc of sight, due to being individual. Even a pedestrian wizard has a potential to affect targets in 24 + 5 = 29" radius. That is very good. In addition, he can always benefit from the cover due to terrain and nearby units but would always hit on 4+.
Of course I didn't lose because Devean had Lightning Bolts and I didn't but I see a great potential in a more mobile sources of ranged attacks. I have already came up with some alterations to the list, it is probably a good idea to test them now and see what I like more. Of course it would have been great to keep BT's and add some Lightning Bolts but that is even more difficult to accomplish without heavy reconstruction of the army list.
What is more, I don't really want to focus on that, I'd rather still do my best to learn from the mistakes and come up with a better deployment, terrain use and successful plan in the first place.
Post-game thoughts
This was a difficult map to play due to the amount of terrain on it. I was pleasantly surprised to see all of the vulnerable shooting troops were left by their own without inspiring. If they had been supported by the drakon lord he would have both inspired the fragile troops but also forced me to be much more conservative on that flank.
Overall, I had a great time playing. The new scenarios are great (I have since played Control also) and Swordmaster forced me to think through every move I made. There were plenty of traps and counters in this game which made it very tactically rewarding.
Thanks a lot for reading! I hope you enjoyed it!
Cheers!
No comments:
Post a Comment