

Greetings!
I was very lucky that my good friend, Darth Sabre (check out his blog here: Darth's Miniature Wargaming Adventures) found some time for another intercontinental, time traveling gaming experience in the magic world of Mantica. Among his many hobby projects, Darth is looking for his perfect Basilean army list and in addition to that, he also wanted a revenge after our previous encounters. His new army, inspired by a great collection of Lord of the Rings miniatures (looks like Gondor is a fantastic range for Basilean army!), took the following shape:
Forces of Basilea - Army List
40 Crossbowmen, Horde, Brew of Keen-eyeness (+1 to hit) - 260
- 5 Sisterhood Panter Lancers, Troop - 115
40 Crossbowmen, Horde, Brew of Keen-eyeness (+1 to hit) - 260
- 5 Sisterhood Panter Lancers, Troop - 115
- Priest, Hero, Bane Chant- 90
- Phoenix, Monster - 165
10 Paladin Knights, Regiment - 210
10 Paladin Knights, Regiment - 210
- High Paladin on Griffin, Hero, Diadem of Dragon-Kind (Breath Attack (10)) - 240
6 Elohi, Horde, Blessing of the Gods (Elite) - 325
20 Paladin Foot Guard, Regiment - 150
20 Paladin Foot Guard, Regiment - 150
6 Elohi, Horde, Blessing of the Gods (Elite) - 325
20 Paladin Foot Guard, Regiment - 150
20 Paladin Foot Guard, Regiment - 150
20 Men-at-Arms (Spear & Shield) - 135
20 Men-at-Arms (Spear & Shield) - 135
This army can form very nice battle line with infantry deployed either wide to cover a lot of area and keep the flanks of the crossbowmen protected. Or in double line if needed, to receive the charge and have units ready to counter.
Elohi and the Knights are obviously the hammers of the army that can be further assisted by Griffon and Panther Lancers. These fast units can be very dangerous if adding to the effort of the main heavy hitters while attacking from the flank.
Darth had some good shooting options in the form of breath attacks in his fliers too and crossbowmen with +1 to hit are always a threat. In particular to my small units. As always, healing abilities of the army thanks to the army wide special rule (Iron Resolve) and characters spells were a great asset.
The general idea was to avoid war of attrition as I think that benefits the opponent. He has better healing and with many units being Headstrong, he can continue fighting better than my units. Also, being close means I give him more opportunities to use breath attacks to finish off damaged units too.
I expected some maneuvers at the beginning because my faster elements want to get to the targets they can harm while avoiding Spears and counter from Knights and Elohi.
Here is my own army for reference, as I haven't changed it since the last game.
Outcasts - Army List
10 Stormwind, Regiment, Potion of the Caterpillar (Pathfinder) - 235
- 5 Silverbreeze, Troop - 145
- 5 Silverbreeze, Troop - 145
- Drakon Rider Lord, Hero, Large Cavalry - 160
3 Drakon Riders, Regiment, Dwarven Ale - 185
- 5 Stormwind, Troops - 140
- Bolt Thrower, War Machine - 90
20 Palace Guard, Regiment - 150
- 10 Archers - 115
- 10 Palace Guard, Troop - 105
- Bolt Thrower, War Machine - 90
20 Spearelves, Regiment - 140
- Elven Mage, Inspiring Talisman, Bane Chant - 110
20 Spearelves, Regiment - 140
- Battle Standard Bearer, Hero - 50
- Bolt Thrower, War Machine - 90
20 Spearelves, Regiment - 140
- Elven Mage, Inspiring Talisman, Bane Chant - 110
20 Spearelves, Regiment - 140
- Battle Standard Bearer, Hero - 50
Terrain
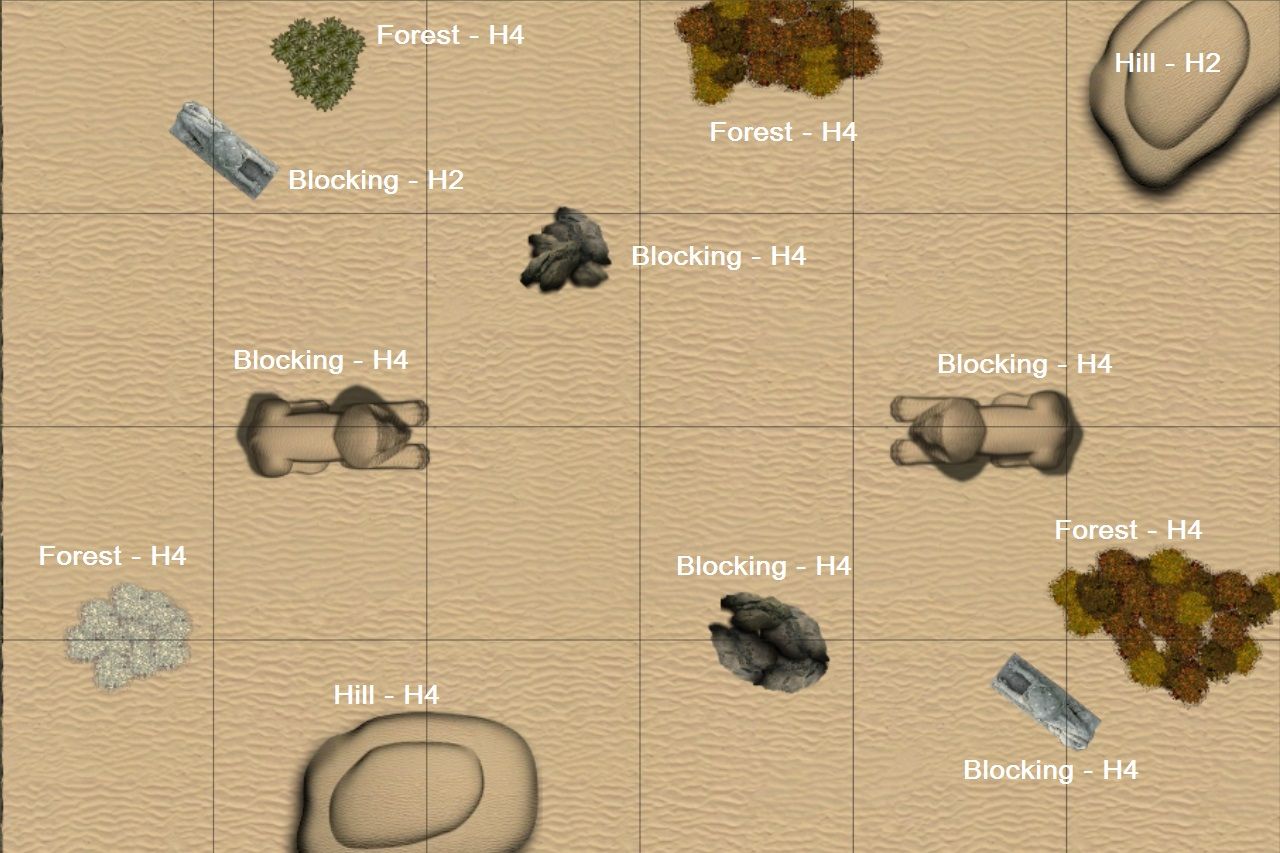 |
| Terrain and height details |
Darth was very kind to prepare the set of six maps so we quickly rolled to pick one and it happened to be desert one. I guess it was inspired by Christmas time in Australia :)
As you can see there is plenty of terrain with height 4. I have just noticed I also made a mistake, as the hill on the South was height 2 only, my apologies for that.
Then we rolled for scenario and got Dominate! It was the second time I played this one and I find it very intriguing as it forces you to hunt down expensive units of the enemy while trying to keep your own safe.
Deployment
 |
| Deployment Order |
Deplyment Order:
1. Archers - Panther Lancers
2. Silver Breeze (SB1) - Men-at-Arms
3. Silver Breeze (SB2) - Paladins (P1)
4. Bolt Thrower (BT1) - Knights
5. Bolt Thrower (BT2) - Men-at-Arms
6. Mage - Paladin on Griffin
7. Spearelves (S1) - Paladins (P2)
8. Spearelves (S2) - Priest
9. Storm Wind (SW2) - Crossbowmen
10. Palace Guard (PG2) - Elohi
11. Palace Guard (PG1) - Phoenix
12. Rest of the Army
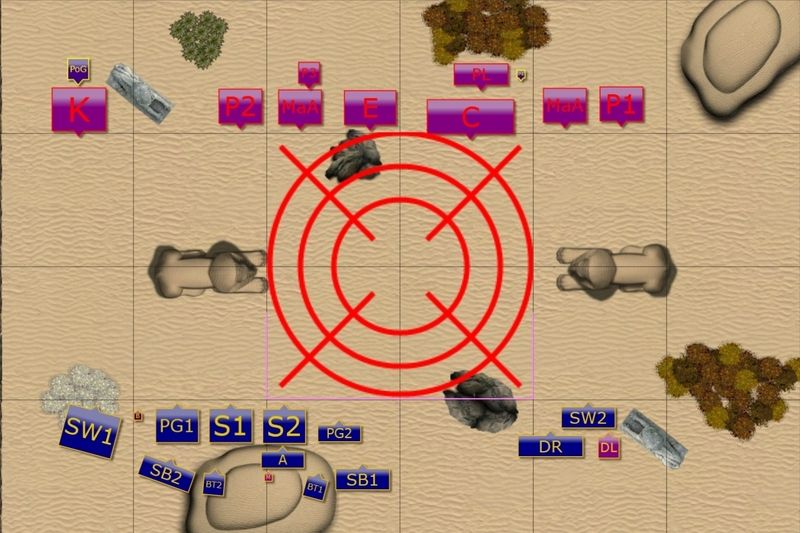 |
| Final deployment with the scenario area marked. |
I didn't have staying power to just go to the middle of the field and defend it from the enemy so I had to choose different tactics. I won the roll off to pick the sides and I chose South. It was obvious I would use the hill for my war machines but it was just too good to pass even if Darth knew already where my bolt throwers would go. It just gave me a very good opportunity to shoot at the center of the battle field so that I could try and rout some units from the area that counted for scenario purposes.
At the same time I wanted to make sure no units are in range for crossbows and if possible, keep it that way as long as I can. They are one of the most expensive units in the enemy forces too so I wanted to use my own speed to try and isolate them and then hopefully destroy them. I expected that unit to move towards the center and keep shooting at whatever it could. By doing so they played a very important role for the scenario so they had to be dealt with.
Elohi and Knights were also elements that were very expensive and mere presence of these in the middle of the battle field would be a huge swing in Darth's favor. Hence, my idea was to try and attack from the flanks to try and lure them out long enough to be too late to come back and land in the middle again. And if possible, destroy them too.
I definitely wanted a second turn because I thought that with the natural speed of the Elves I could jump in with them on the last turn and try to secure the victory if simple routing of the enemy regiments would not work efficiently enough. Especially, considering some expensive fliers that can hide whole game and still make a difference in the end.
I got lucky and won the roll off and handed the first turn over to Darth.
Forces of Basilea - Turn 1
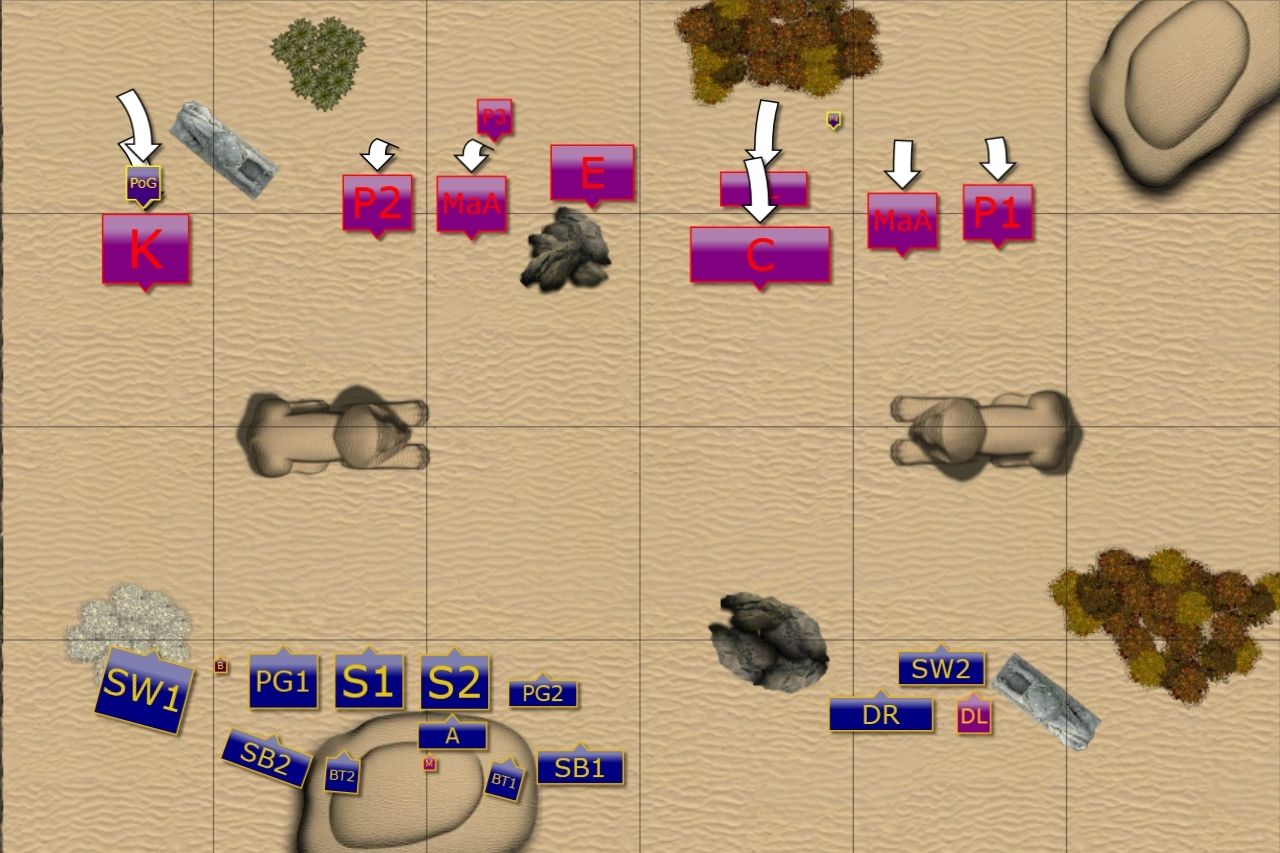 |
| Basileans move cautiously forward. |
Forces of Basilea moved forward cautiously. Their own shooting was not yet in range but some units didn't want to get into that of enemy either.
Outcasts - Turn 1
 |
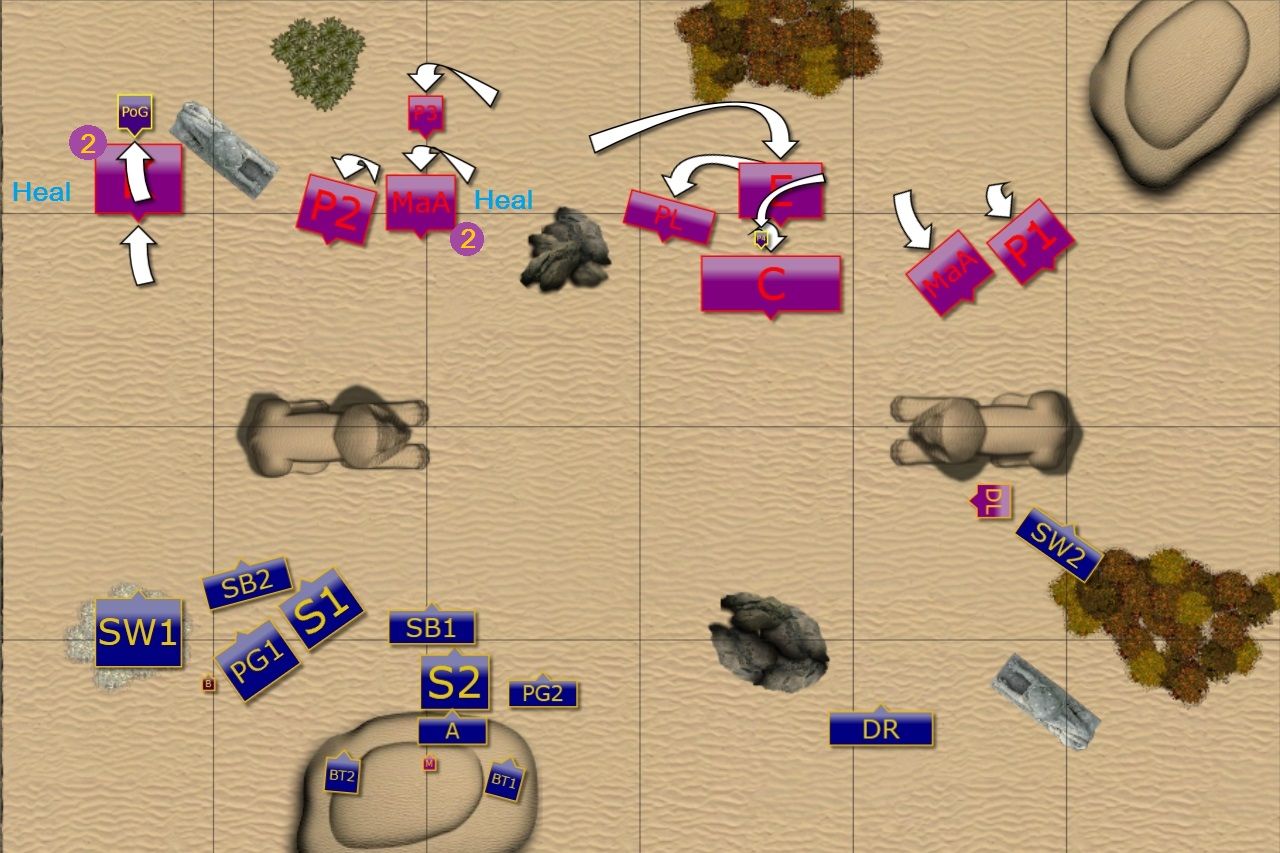
| Elves reinforce the flanks and open fire. |
Elves moved on the flanks, stronger West kept the enemy Knights in check while one of the Bolt Throwers hit them a few times. In the middle, the shooters decided to focus fire on Men-at-Arms in case they wanted to reinforce the Knights.
The units on the East used the nearby statue as a cover while Drakes pulled back a little.
Forces of Basilea - Turn 2
 |
| Cautious maneuvers continue |
Basileans continued to approach with caution, clearly not wanting to get into range of Elven heavy cavalry. Their amazing healing abilities allowed for some proper recovery of damaged units. Unfortunately Crossbowmen still could not find any targets and had to move forward a little.
Outcasts - Turn 2
 |
| Elves keep reinforcing the flanks and shoot at the enemy |
Elven infantry moved boldly forward on the West. Tallspears were tempting human knights to charge them but the trap was too obvious.
Bolt Thrower crew kept shooting at them while the rest of ranged attacks were directed Panther Lancers. But for now no significant result was achieved.
Drakon Lord managed to find a safe spot to land behind enemy lines and cause some trouble.
Forces of Basilea - Turn 3
 |
| More healing with a little bit of shooting. |
The battle line of Basilean army breaks cohesion a little. On the West the units try to converge on the flank better to support the Knights. Paladin on Griffon attacks nearby Tallspears instead of healing his own units this time.
On the East, the units try to cover their backs in case Drakon Lord starts to be more aggressive. And Crossbowmen turn towards the flank anticipating some enemy might finally emerge from behind the cover of a statue.
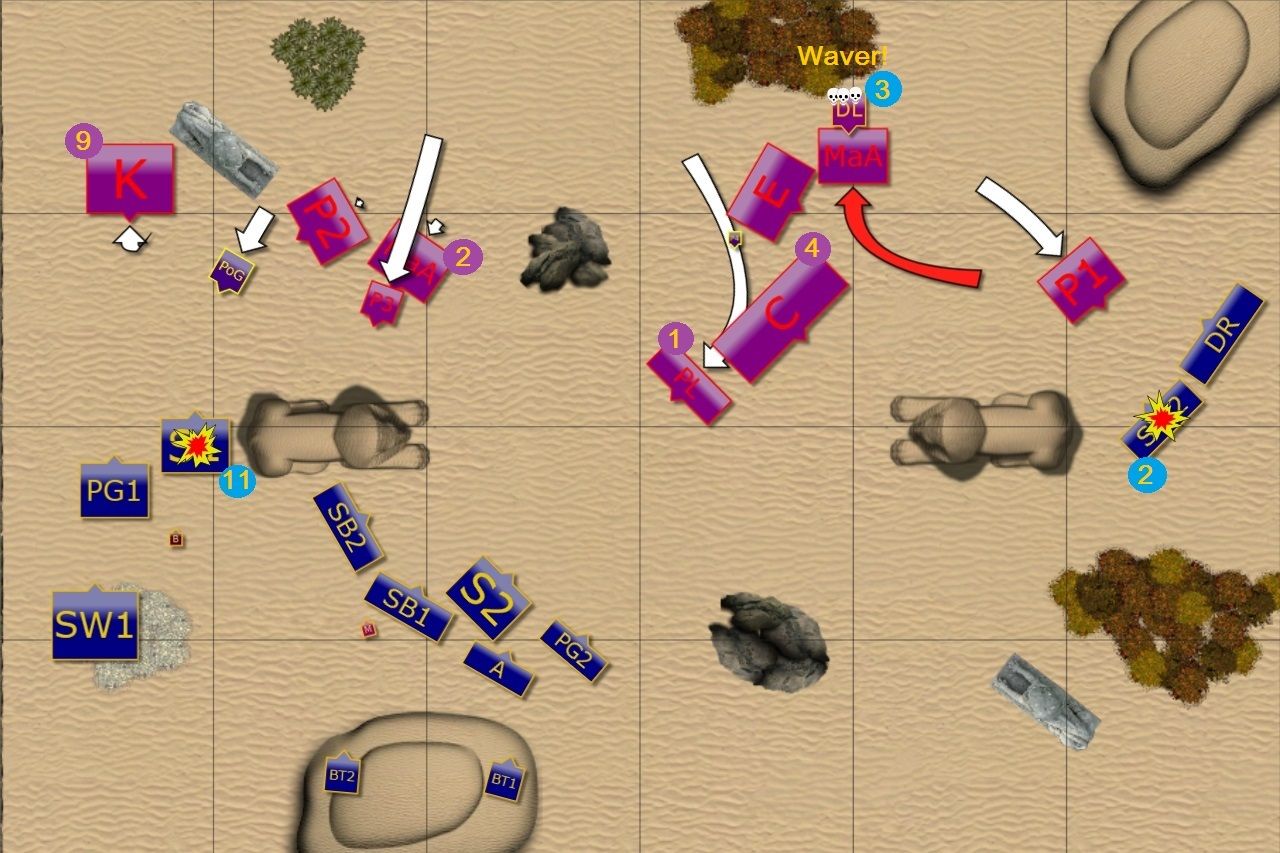
Outcasts - Turn 3
 |
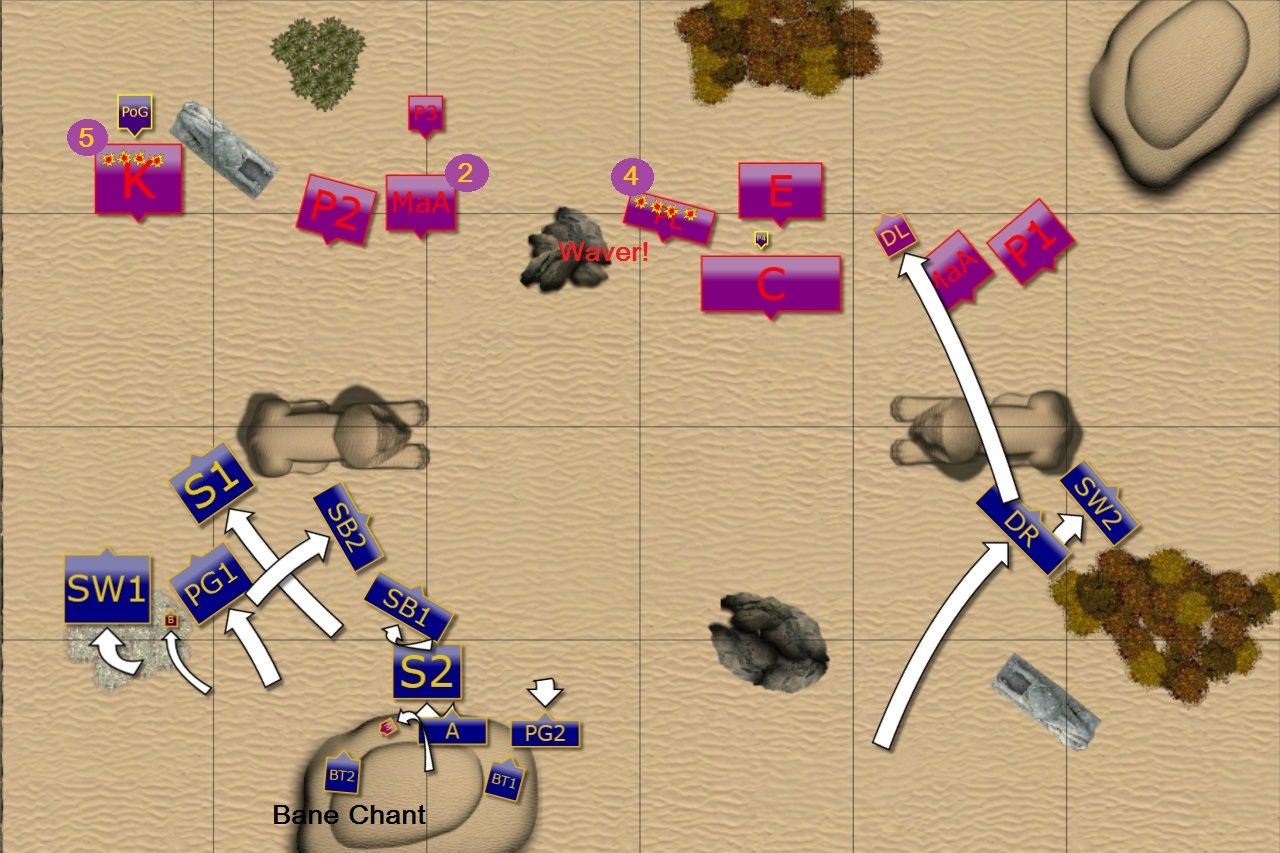
| Elves press forward but became reckless |
Elves decided it is time to be more decisive. On the West infantry moved forward to intercept the Knights but in doing so kind of blocked cavalry. Mage tried to heal Tallspears but was not quite successful.
In the middle second unit of Tallspears and Palace Guard used the opportunity and moved towards the Crossbowmen while they were not looking. Shooters also aimed at them but didn't inflict that much of a damage.
On the East fast units were a little bit too reckless. First, Drakon Lord was arrogant enough to land in front of Men-at-Arms and taunting them to attack him. Then Storm Wind and Drakons indeed left the safety of the statue but landed in a place that gave clear line of sight to any of them for enemy Crossbowmen. They were about to pay for such folly.
Forces of Basilea - Turn 4
 |
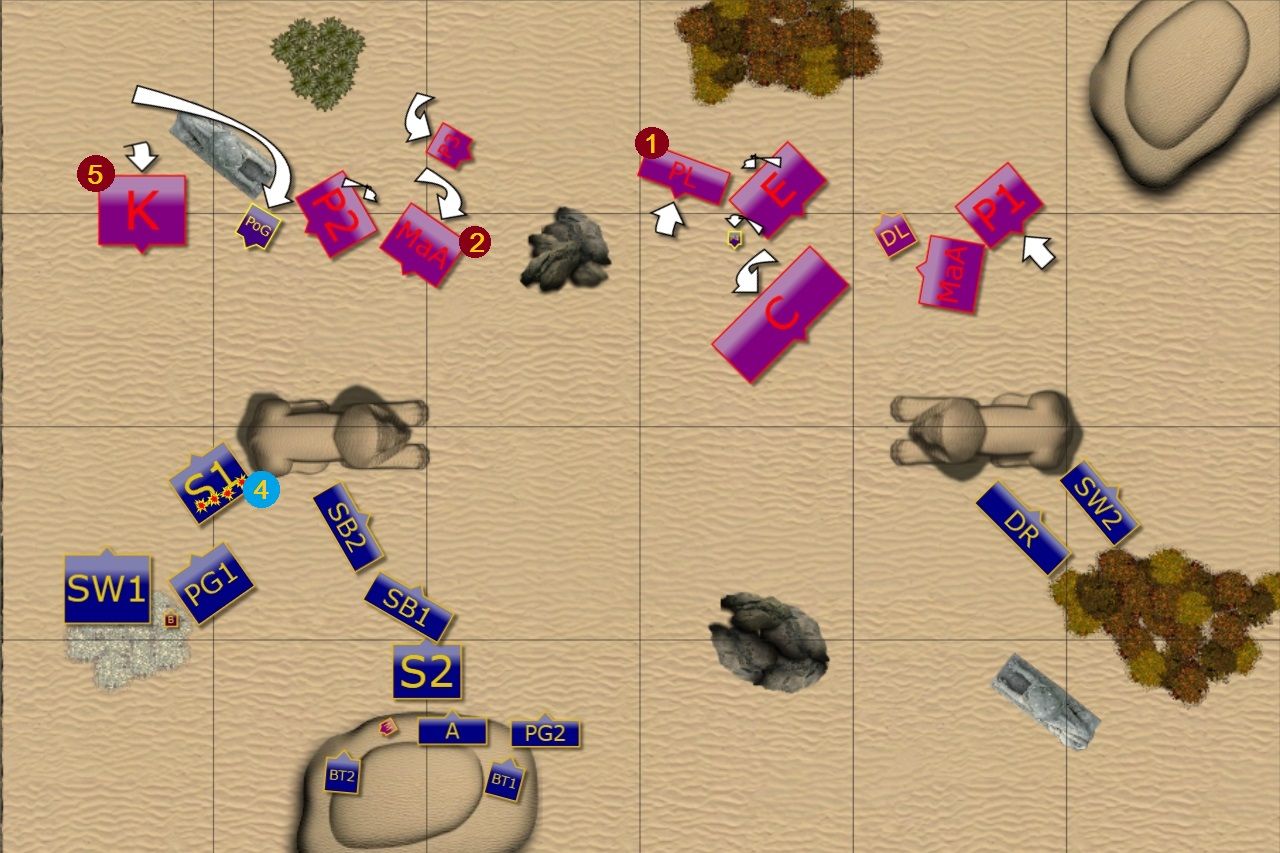
| Forces of Basilea claim first kills. |
Basileans finally launched some attacks. Griffin and Phoenix routed Tallspears and suddenly it was Basileans who had advantage on the flank.
On the East Storm Wind cavalry was also routed by a few well chosen crossbow bolts. While Men-at-Arms wounded and wavered Drakon Lord! That was definitely a good moment for Forces of Basilea!
Outcasts - Turn 4
 |
| Elves fight back! |
It was a tough blow to lose two units but it was far from over. On the West, heavy cavalry didn't took the bait and pulled back. So did Palace Guard. The odds were not good for Elves so they kept shooting at the Knights, this time with the aid of Silver Breeze cavalry too. The damage was substantial but the Knights only wavered.
In the middle of the battle field it was a bit better as Panther Lancers were routed by shooting , thus opening the path towards exposed Crossbowmen.
Drakon Lord could only pull back into the forest and hope for some extra protection it offered. Drakon Riders also decided it is better to come back to the safety of the cover.
Forces of Basilea - Turn 5
 |
| More healing! |
Basileans reformed after the previous successes, eager to capitalize on them. The Knights, now with a bit of released pressure, got some healing done.
Crossbowmen faced incoming enemy infantry with Elohi waiting nearby to counter attack. Behind them, Men-at-Arms eagerly entered to woods to hunt some monsters but this time Drakon Lord was not harmed much and was free to fly away.
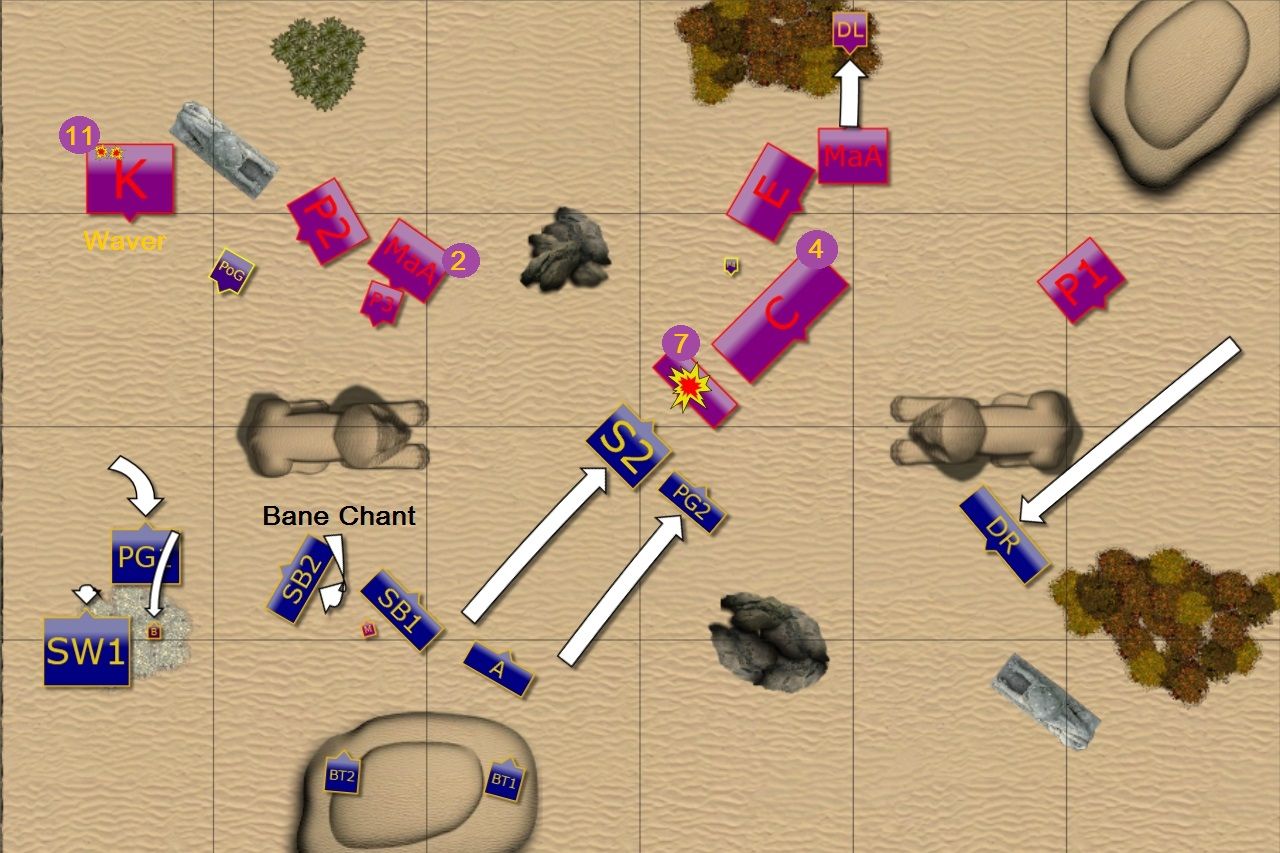
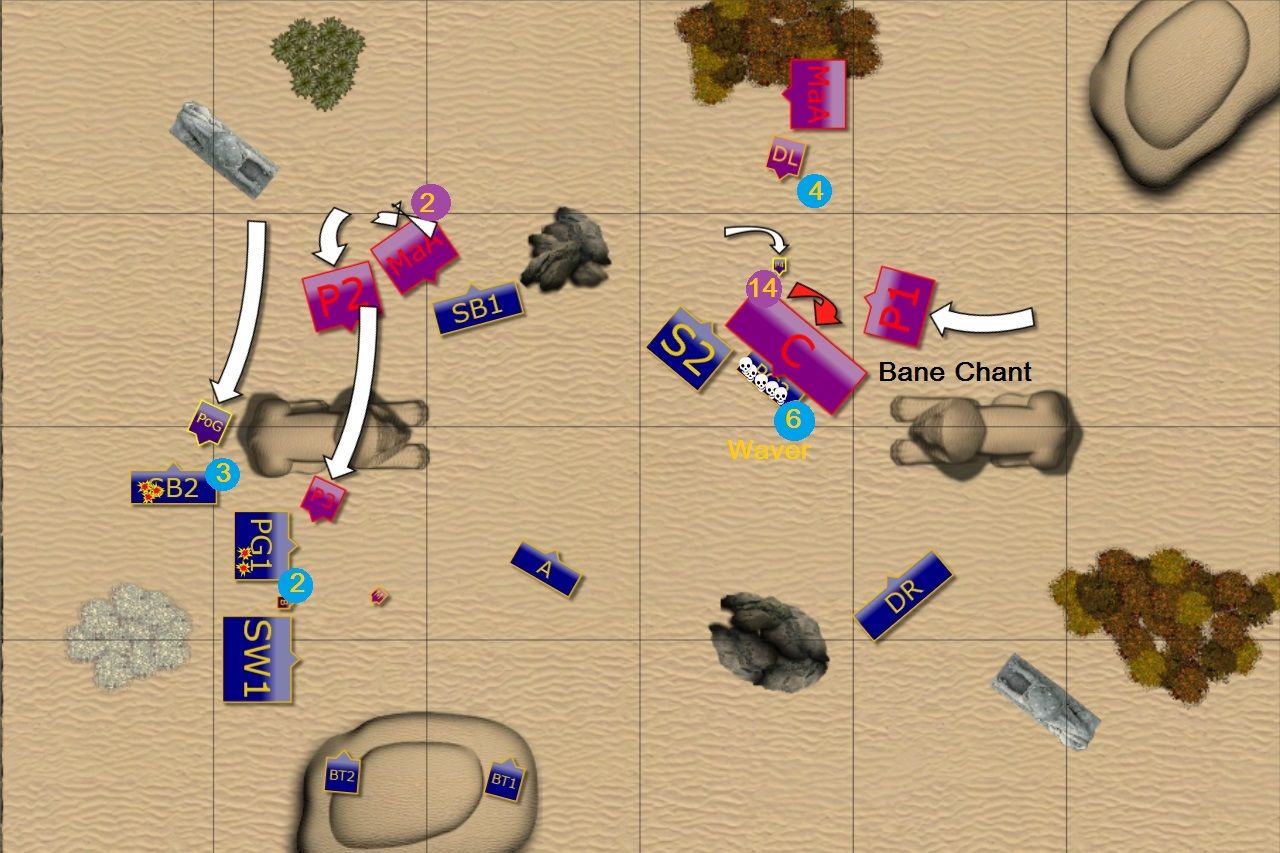
Outcasts - Turn 5
 |
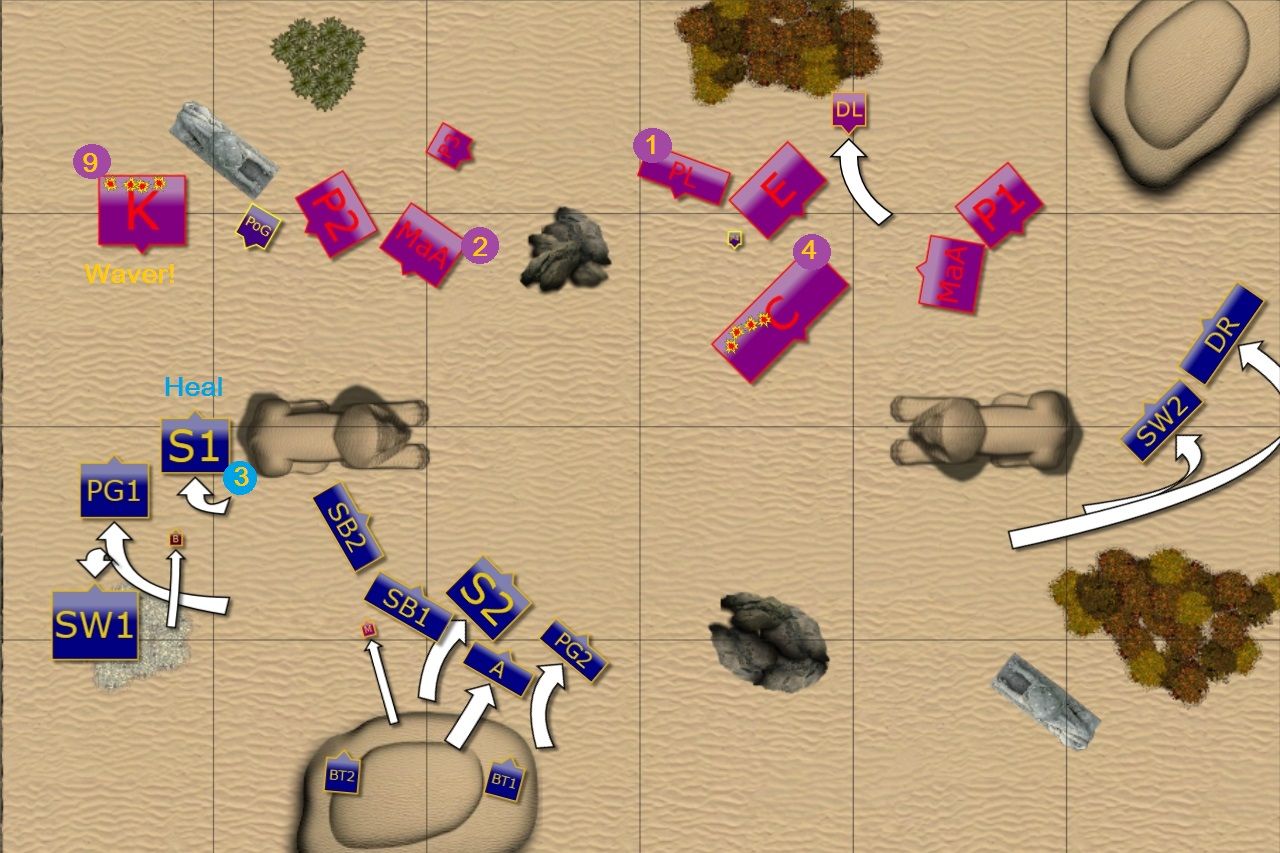
| Devastating attack! |
Elves launched their own attacks at this moment. The forces on the West decided it is about time to turn and race towards the center to occupy it before the enemy. Both fast cavalry sped forward to cover the maneuver and to block enemy units from entering the zone. Bolt thrower crew finally managed to inflict enough damage to rout the Knights.
Tallspears and Palace Guard attacked their chosen target but Crossbowmen held this time. Unfortunately, help would not come as Elohi were routed by Drakon Lord all by himself! (Edit: I was very lucky here because I rolled 11 for a nerve test twice in a row.)
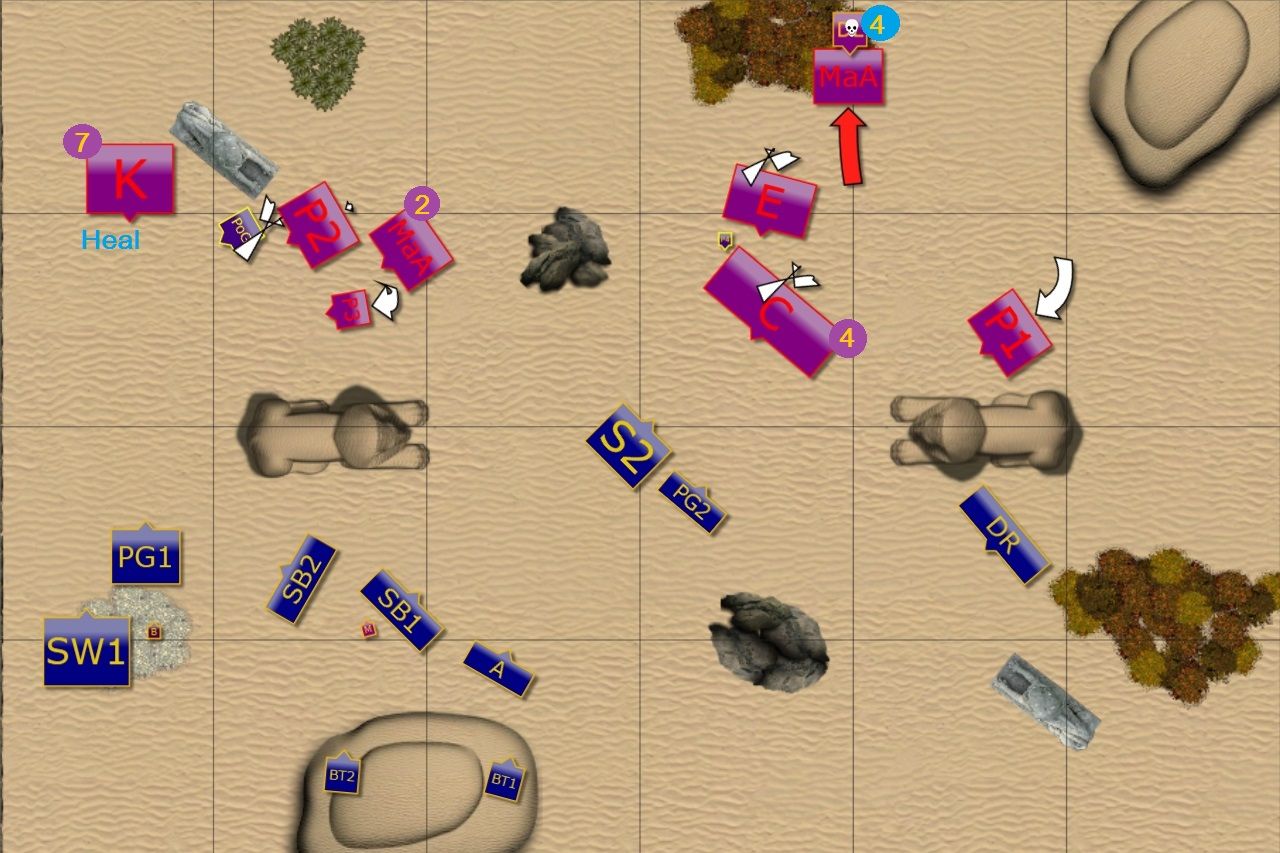
Forces of Basilea - Turn 6
 |
| Basileans in the last attempt to inflict some damage |
The situation for Basileans turned from good to bad in a matter of seconds. They lost their two most powerful units, their infantry was either blocked or too far from the center of the battle field and the Elves were in good position to add some more regiments there anyway.
Basileans launched their fliers then to try and rout some more Elven units but they spread their efforts and no significant effect was achieved.
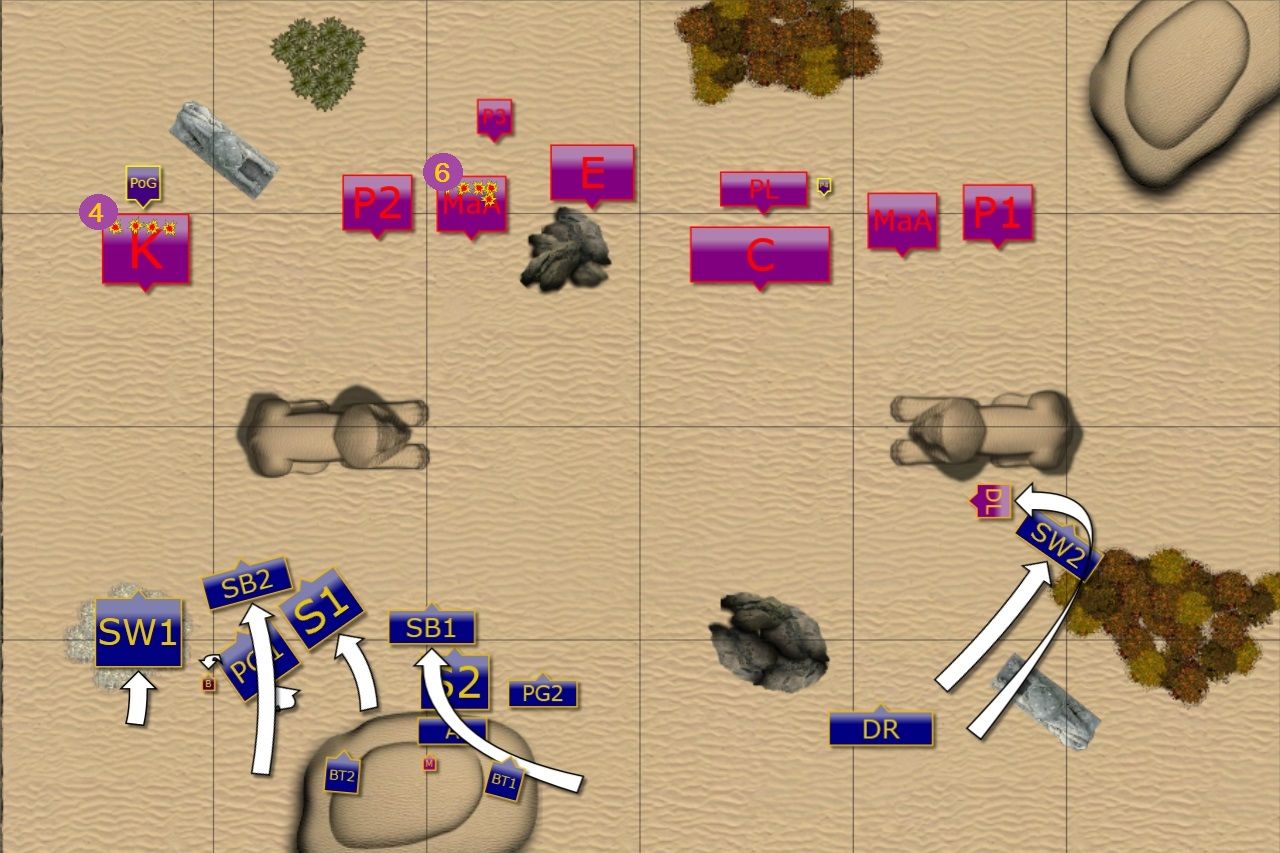
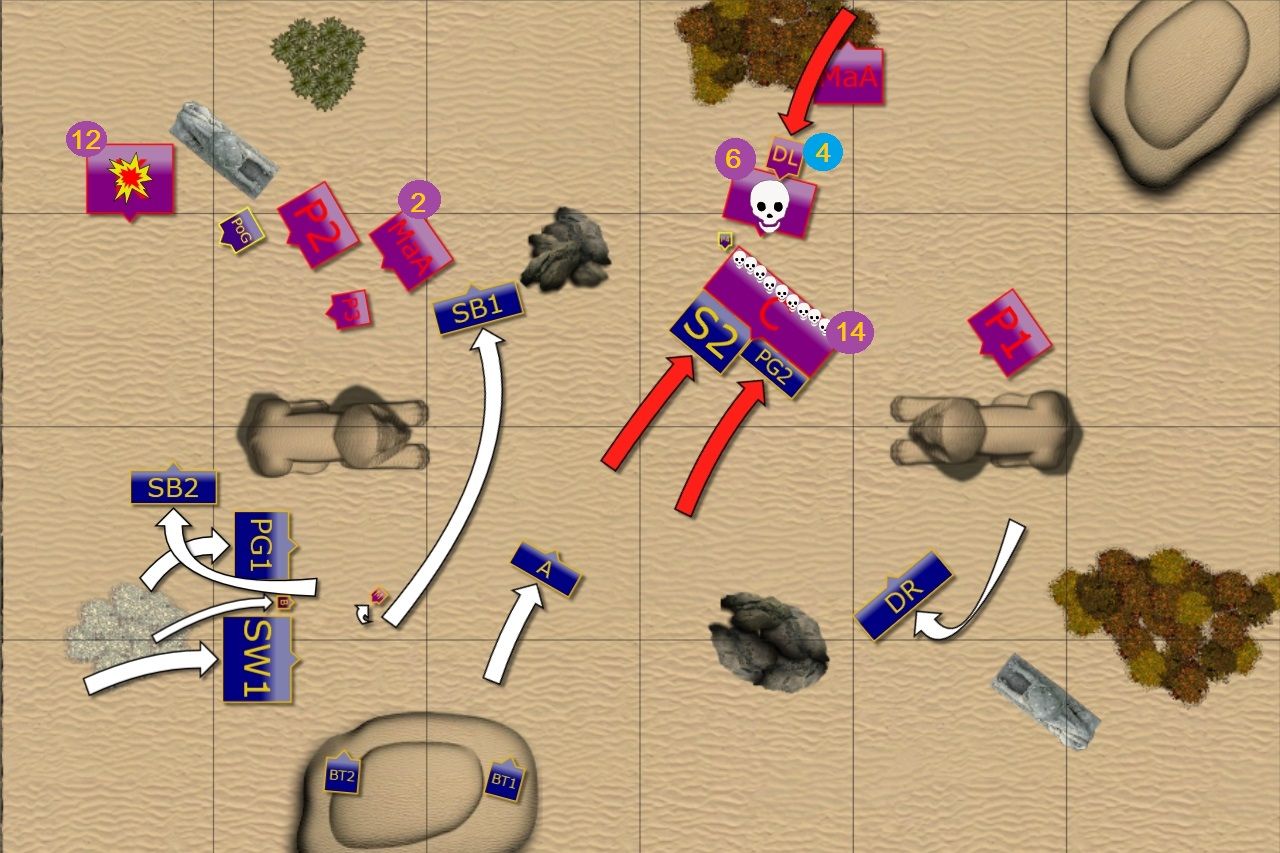
Outcasts - Turn 6
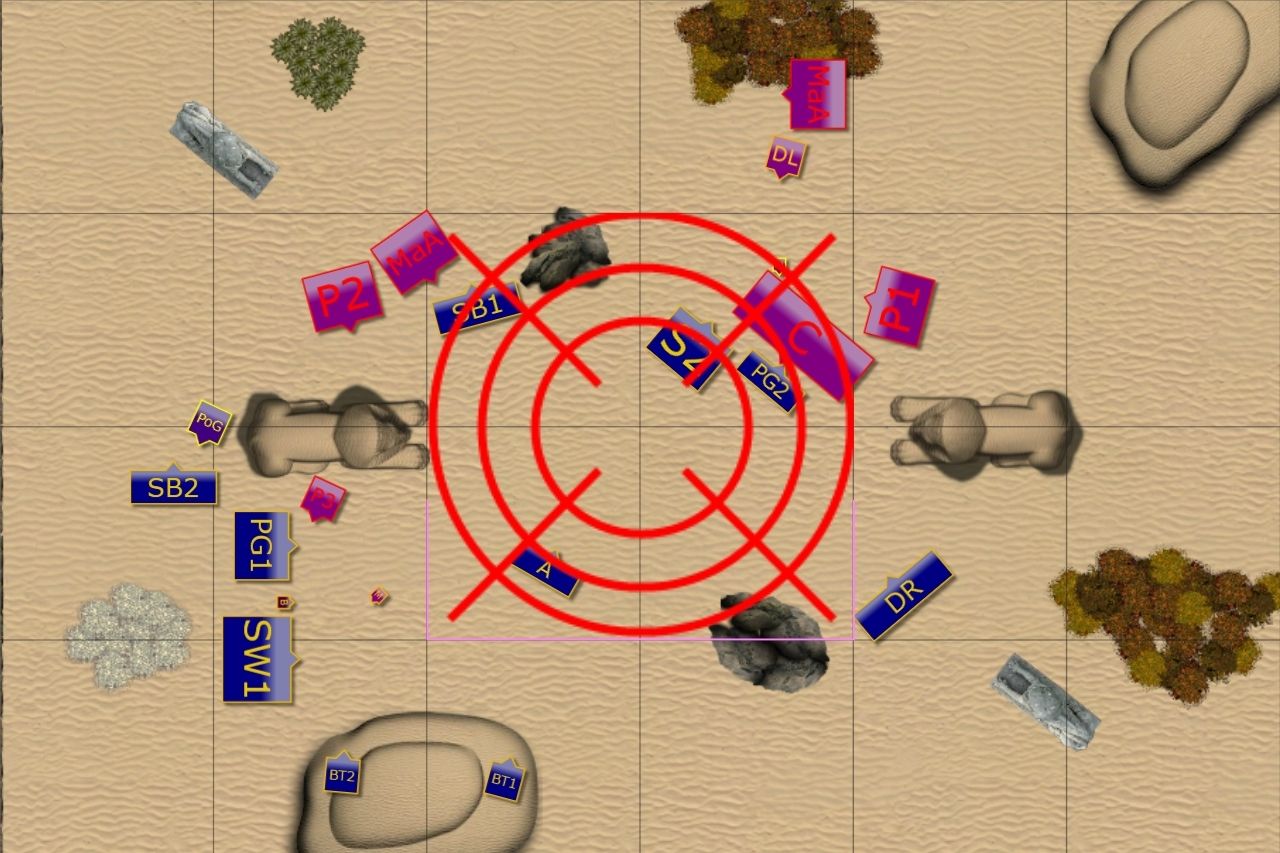 |
| Situation at the beginning of Elven turn 6. |
At this stage Darth decided he has not chance to break through towards the center and to balance the number of units I could have in the zone to change the result of the battle so we stopped at this stage.
I had a chance to flank charge Paladins with Drakons to hopefully prevent them from entering the middle of the battle field in the case of turn 7. I also was looking at a charge against the Priest with Drakon Lord or against damaged Crossbowmen or even against Paladins to assists the Drakon Riders. I think I would attack Crossbowmen with Tallspears just to make sure I clear the middle ground from enemy troops.
Then both my characters and Stormwind cavalry were free to go there too, making sure to be in position to counter any infantry assaulting from North-West.
I would have to attack the Phoenix with my Palace Guard. Not sure if that would have been enough to rout it but I was losing nothing in trying.
Summary
 |
| Turn-by-turn animation summary |
After-battle thoughts
I must say I didn't expect that dramatic shift in the 5th turn. I charged Elohi simply to distract them, do some damage and prepare for their charge against Drakon Lord (good because that leads them away from the middle zone for scenario objectives). Or if they didn't attack him I would be in position to charge again, maybe even with the help of Drakon Riders.
I am of course very happy with the victory but I made some mistakes that were unacceptable. First, it looked like a minor one because the enemy didn't move against Palace Guard on the West. However, if they got charged by the Knights and Griffon they would probably die. That would allow to break through. Or even worse, if they wavered, they would block my own heavy cavalry.
Even worse mistakes were made on the East where I exposed units for shooting. That was totally unnecessary and I could have avoided that by simply checking the distances. Same with the Drakon Lord where I got lucky not to be routed by Men-at-Arms.
It was interesting to observe that the game was not dynamic most of the time simply because neither of us wanted to commit on the flank. I think it worked for me better because I could still shoot at the Knights with my Bolt Thrower and then had enough time to turn and race towards the center of the battle field to fulfill the scenario conditions.
I am not happy with the deployment though because I didn't use the Archers at all. They had some shooting opportunities but did nothing anyway. They were too far from the start.
I divided the shooting too much. I am happy with the way Bolt Thrower and fast cavalry did on the flank but I could use my other shooters to hit Crossbowmen earlier. I am definitely not complaining about the results in general, I just think I could do it better and achieve more.
I also think that the fact that Darth was quite shy with advancing his units and then moving them away from the center of the battle field, helped me to block his regiments and secure the victory.
We discussed the options after the game and Mr. szypul, who observed the game, gave some good ideas on how to deploy Basileans better. He suggested to use the fast elements on the East and attack aggressively from there. Then use the infantry in the center to maintain cohesion and provide axis for the whole outflanking maneuver.
Darth also mentioned that he is still looking for that army list that would suit him the best. He tried a few iterations so far but he is not satisfied yet. He is thinking about adding shooting contingent of Elves instead of his own Crossbowmen, for example. I hope he will find the balance in the Force because it would be a shame not to show off these beautiful models he is currently working on!
Darth, it was a great pleasure to play against you, as always and I am sure that despite the losses you are not going to give up and will get me next time! I really got lucky!
Thanks for reading!
Nice game !!! Loving KOW at the moment !!
ReplyDeleteThanks! I really got hooked too! Had two more games (finally!) and already working on first report. Stay tuned!
Delete