

Hello!
Encouraged by his most recent victory, my regular opponent - Eastern Barbarian - decided he is going to bring his Forces of Abyss army once again. It is 1:1 between us at the moment so I am sure he wanted to prove it was not a coincidence he won. While I was happy to get a chance for a revenge! He used exactly the same army as last time while I had to correct the mistake I unknowingly overlooked.
Forces of Abyss - Army List
20 Succubi, Regiment, Mace of Crushing - 195
- 10 Gargoyles, Troop - 80
- Abyssal Temptress, Hero, Bane Chant, Wind Blast - 135
20 Succubi, Regiment - 190
- The Well of Souls - 275
20 Flamebearers, Regiment - 140
20 Flamebearers, Regiment - 140
- Efreet, Hero, Inspiring Talisman - 155
10 Abyssal Horsemen, Regiment, Potion of the Caterpillar (Pathfinder) - 235
10 Abyssal Horsemen, Regiment, Brew of Haste (+1 Speed) - 230
6 Tortured Souls, Horde, Blade of Slashing - 225
Outcasts - Army List
10 Stormwind, Regiment, Potion of the Caterpillar (Pathfinder) - 235
- 5 Silverbreeze, Troop - 145
- 5 Silverbreeze, Troop - 145
- Drakon Rider Lord, Hero, Large Cavalry - 160
3 Drakon Riders, Regiment, Dwarven Ale - 185
- 5 Stormwind, Troops - 140
- Bolt Thrower, War Machine - 90
20 Palace Guard, Regiment - 150
- 10 Archers - 115
- 10 Palace Guard, Troop - 105
- Bolt Thrower, War Machine - 90
20 Spearelves, Regiment - 140
- Elven Mage, Inspiring Talisman, Bane Chant - 110
20 Spearelves, Regiment - 140
- Battle Standard Bearer, Hero - 50
- Bolt Thrower, War Machine - 90
20 Spearelves, Regiment - 140
- Elven Mage, Inspiring Talisman, Bane Chant - 110
20 Spearelves, Regiment - 140
- Battle Standard Bearer, Hero - 50
EB's army was the same as before so I am not going to go through his units like I do usually as I don't have anything new to add. I am learning how to deal with his army in different settings while he decided to play with it a few times before he decides if he needs any changes or not.
From my point of view as his opponent I think it is already a good army, he just needs practice. Of course small tweaks here and there are always to be considered but I find it more of a personal taste rather than "must-have" solutions.
I replaced one unit of Archers with Palace Guard troop. I did it because I don't want my opponents to feel I have shooty army (I think they still think so!) and had an excuse to add the models I like too. With extra points I got Dwarven Ale for Drakons as I was really annoyed how many times they wavered when I needed them to move!
Terrain
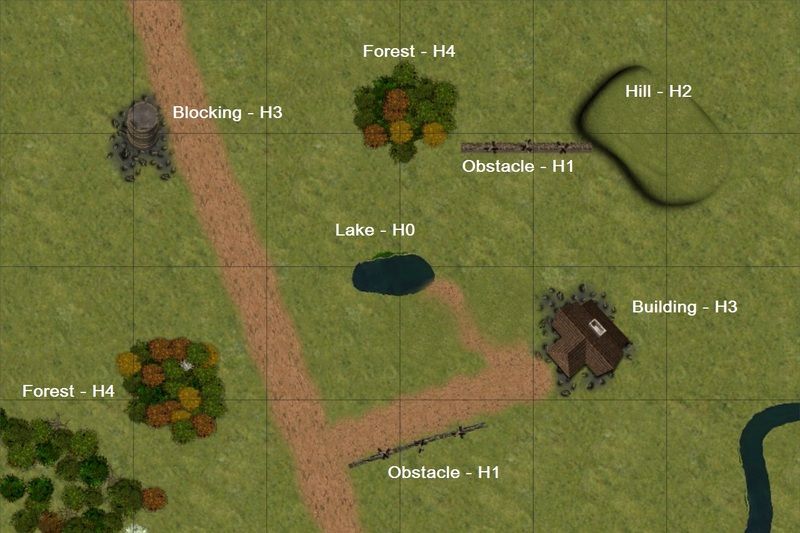 |
| Terrain |
This time I tried to find a map where variety of terrain is represented, in particular I hoped the inclusion of obstacles will spice up our game.
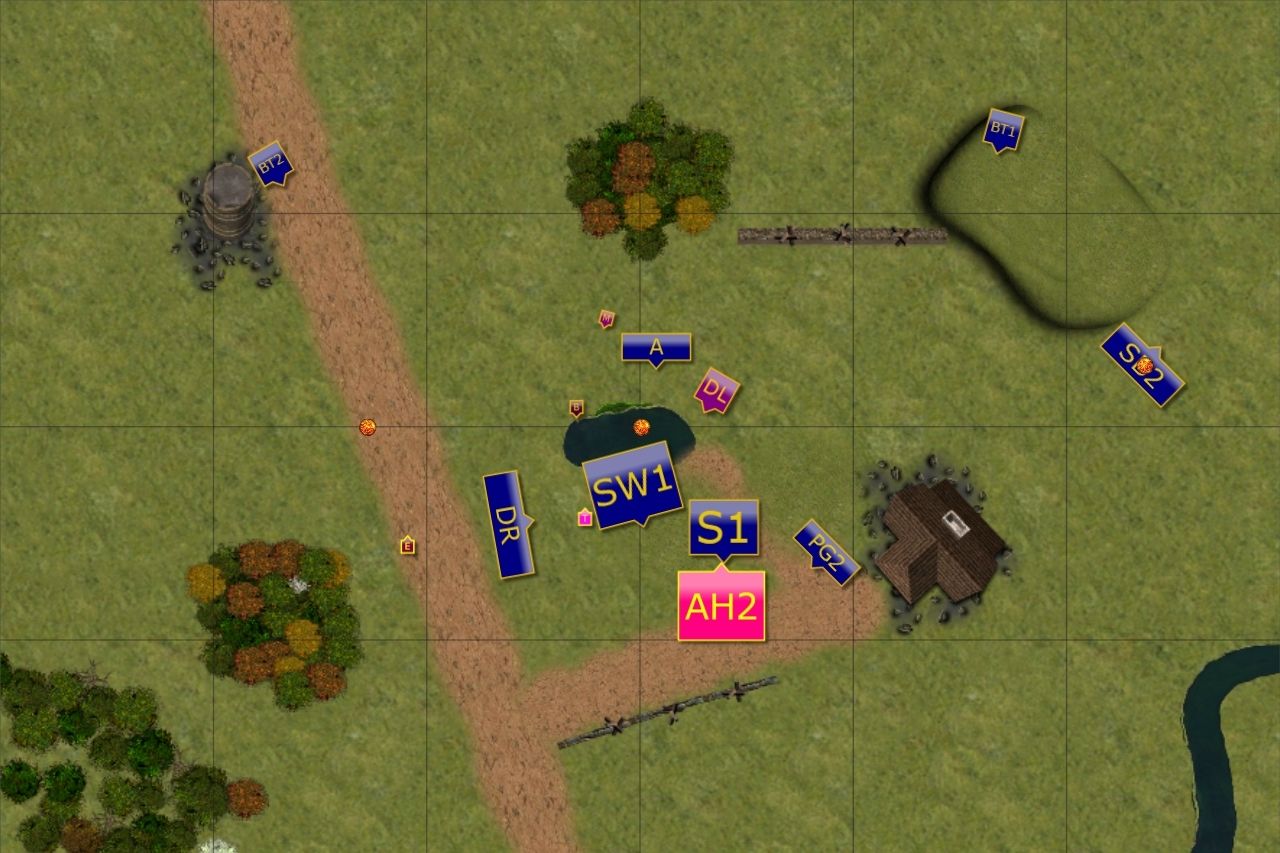
We also rolled for a scenario and when we got Kill! in the first roll we decided to re-roll that and got Loot for the second time. Here is the map with Loot counters placed:
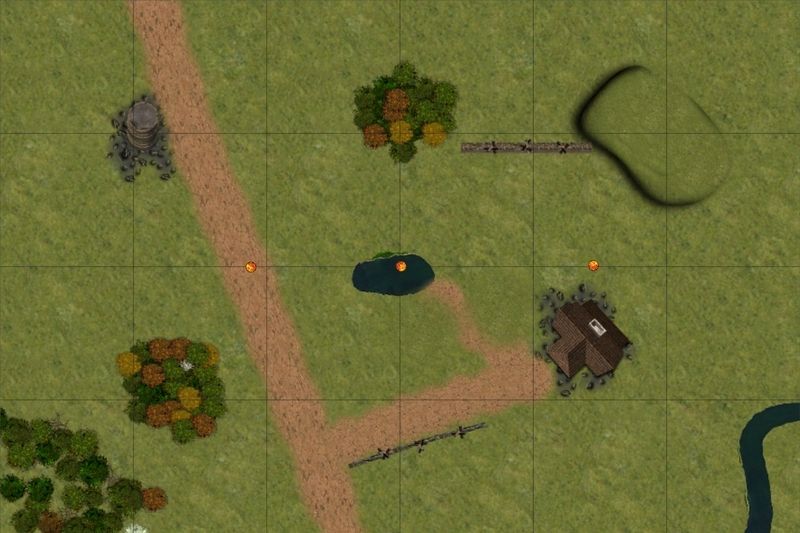 |
| Loot counters added. |
I won the roll off and placed my Loot counter on the left. Then EB positioned his on the right. Unfortunately, we haven't discussed it after the game so I am not sure why he chose this spot.
It was quite tricky to make a decision about Loot counter placement because we didn't give much thought to it yet. I wonder if there are any particular strategies people use when doing so. I was wondering for example if they give up one, overload their units to secure the other and try to get just enough advantage to fight for the third one.
I positioned mine closer to the center so that more units would be able to grab it or put up a fight to not let to take it by the enemy.
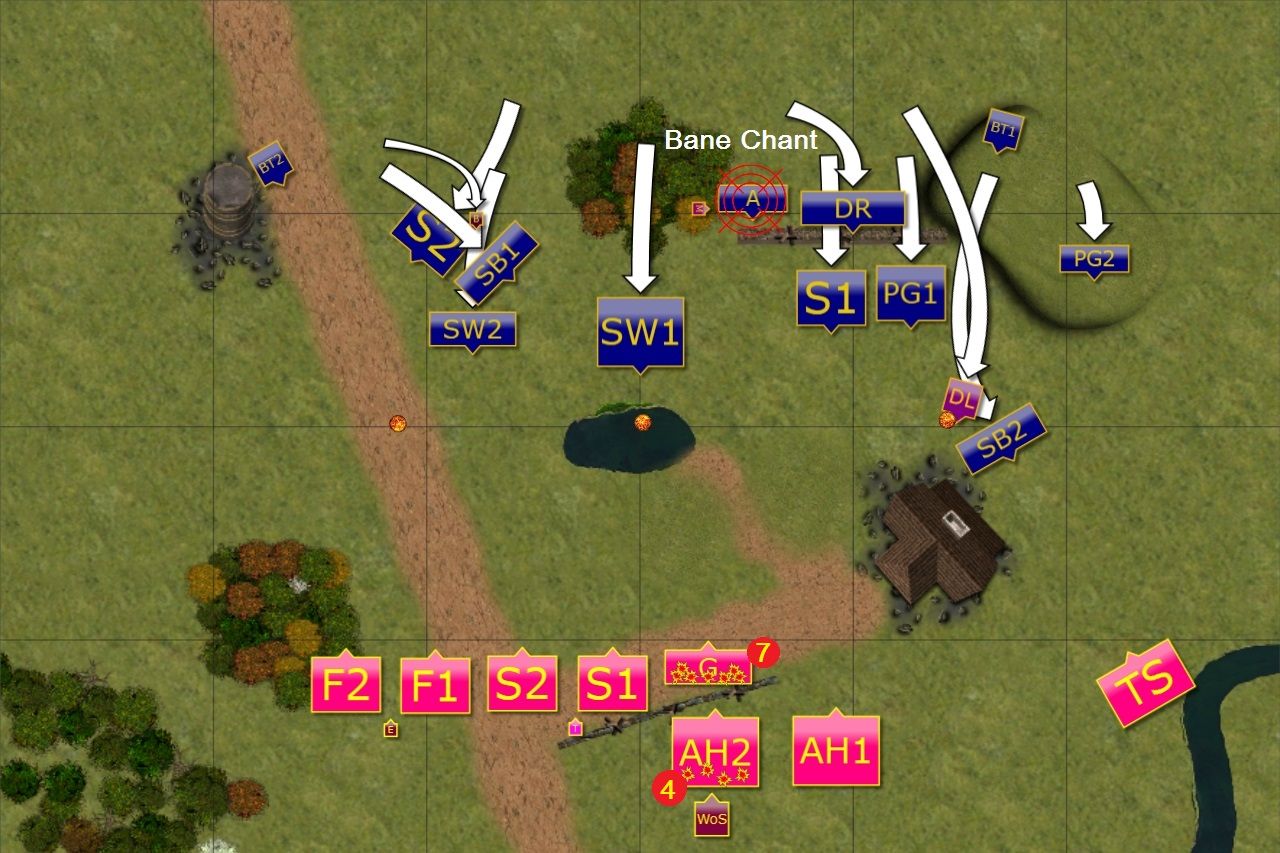
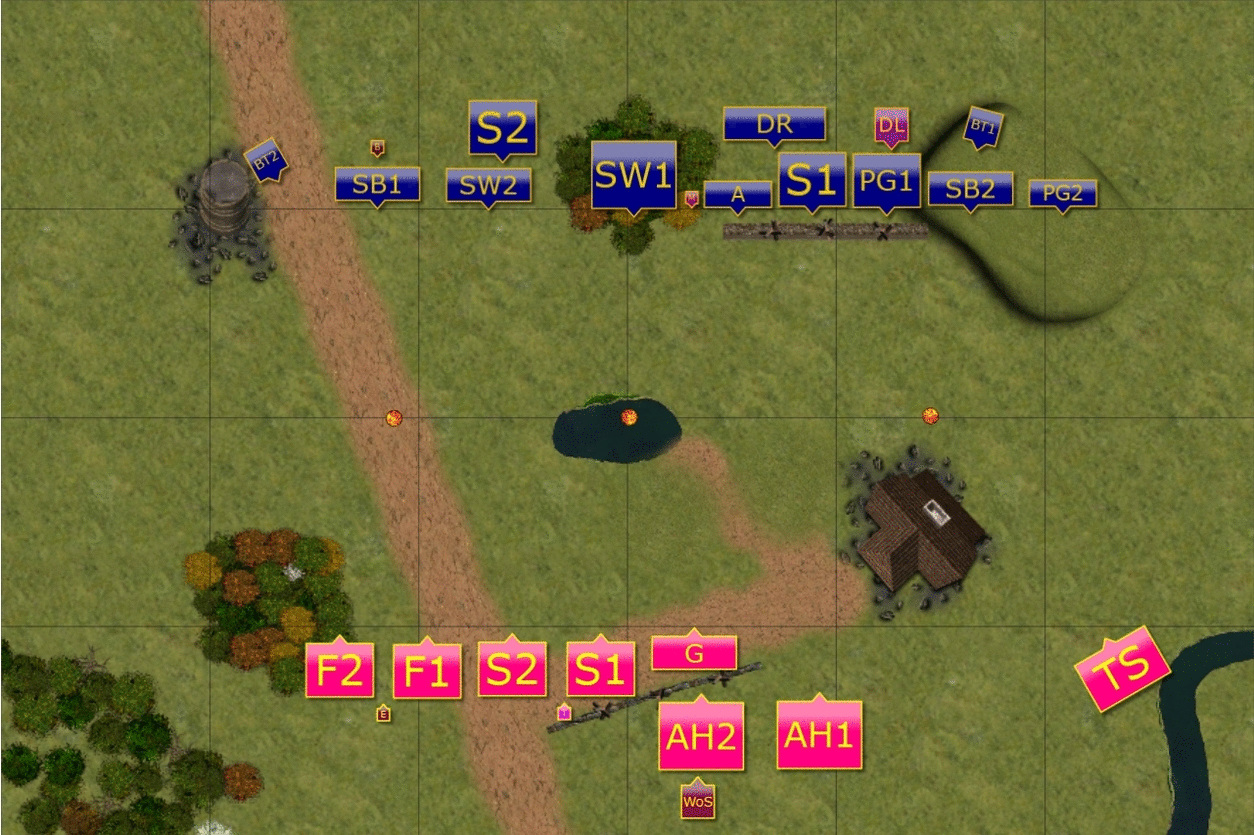
Deployment
 |
| Deployment order |
Deployment Order:
1. Gargoyles - Storm Wind (SW1)
2. Succubi (S1) - Silver Breeze (SB1)
3. Temptress - Storm Wind (SW2)
4. Succubi (S2) - Silver Breeze (SB2)
5. Flamebearers (F1) - Bolt Thrower (BT1)
6. Flamebearers (F2) - Bolt Thrower (BT2)
7. Efreet - Archers
8. Tortured Souls - Drakon Riders
9. Abyssal Horsemen (AB1) - BSB
10. Abyssal Horsemen (AB2) - Palace Guard (PG1)
11. Well of Souls - Rest of the Army
I decided I would like to either grab the Loot counters early or be in a position to immediately attack if the enemy did so. That is why I started with the cavalry in the center, Drakons nearby and fast units on the edge of the deployment so that they could move as fast and far as possible.
However, EB had a very solid battle line in the center and I noticed that even if I moved my heavy cavalry far to cover fast cavalry to allow them to pick the Loot I would not be able to delay the enemy for long. Simply because I would have been charged by the entire army.
I had to adapt during the deployment then. I continued with the formation I decided in the first place but I thought that I would continue with the plan only on the right, where there was some cover from the building.
In the center and on the left I thought I would move a bit but use long charge range to trouble EB with possible charges and hopefully outflank him in the process to either win or contest the other two counters.
I won the roll off and took the first turn.
Outcasts - Turn 1
 |
| Elves grab the Loot on the right. |
Elves moved forward but didn't let the greed to overcome them as it was often evidenced by Dwarven downfalls. Only on the East they used the cover of the building to secure the objective and recover precious item.
Other than that they used their infamous shooting to inflict some damage to the enemy but usually cowardly Gargoyles refused to run away!
Forces of Abyss
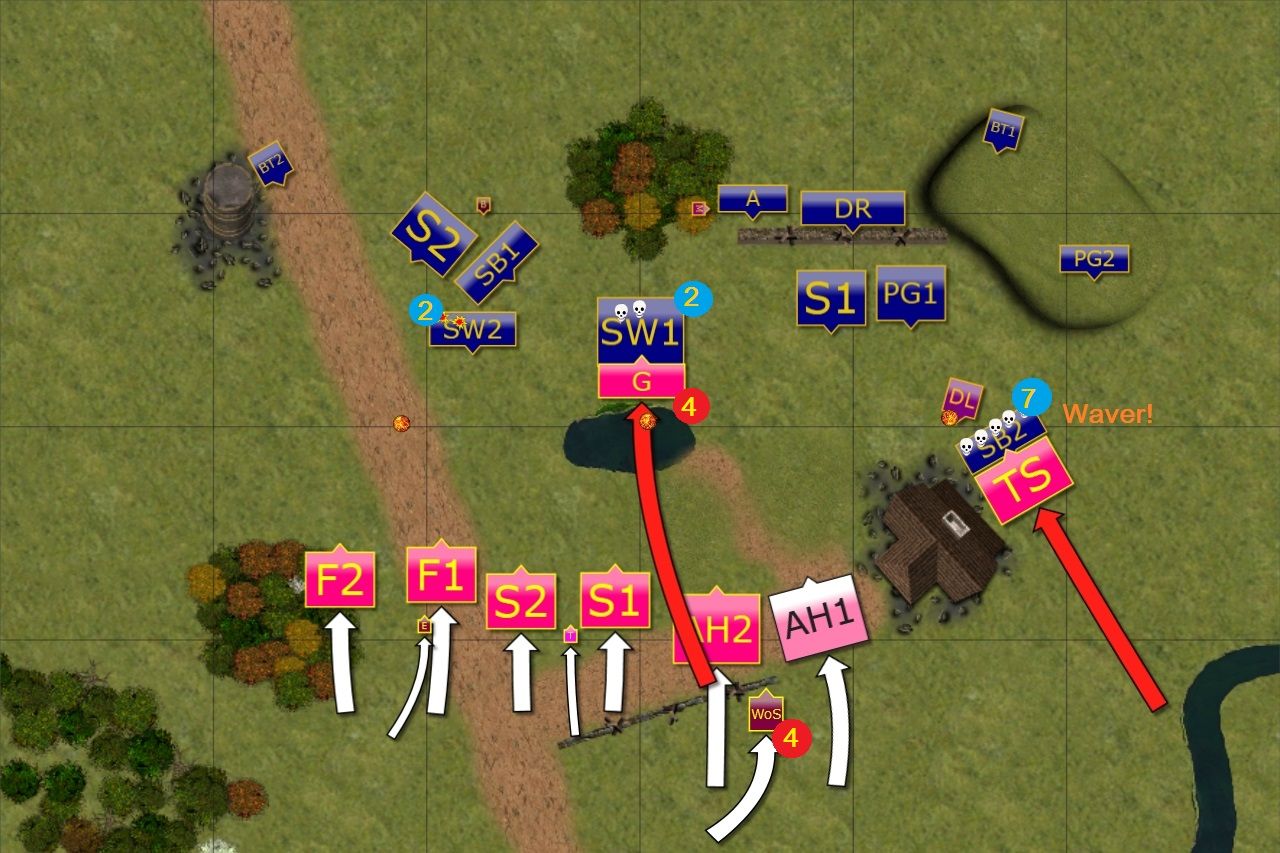 |
| Abyssals charged early! |
Gargoyles, empowered by the fact they survived started regenerating damage on the fly and attacked the most powerful Elven unit. The Knights were a bit surprised but the enemy is the enemy and they kept tight defensive formation.
On the East, Tortured Souls hunted Elven fast cavalry but surprisingly they survived the charge (although wavered).
In the meantime the rest of the army advanced steadily and Well of Souls healed nearby Horsemen.
Outcasts - Turn 2
 |
| Elves counter and win the East! |
Elves spotted the opportunity on the flank where the enemy overextended itself and was not supported. The infantry turned towards the center to cover the maneuver. Wavered fast cavalry pulled back and made room for the attackers. Drakon Lord, Drakes and Palace Guard hit as one and gave no chance to their foe.
In the meantime, Storm Wind troop charged against enemy cavalry to stop their advance while their companions from the bigger regiment regrouped. Fast cavalry covered them too and shot at pesky Gargoyles that this time flew away never to return.
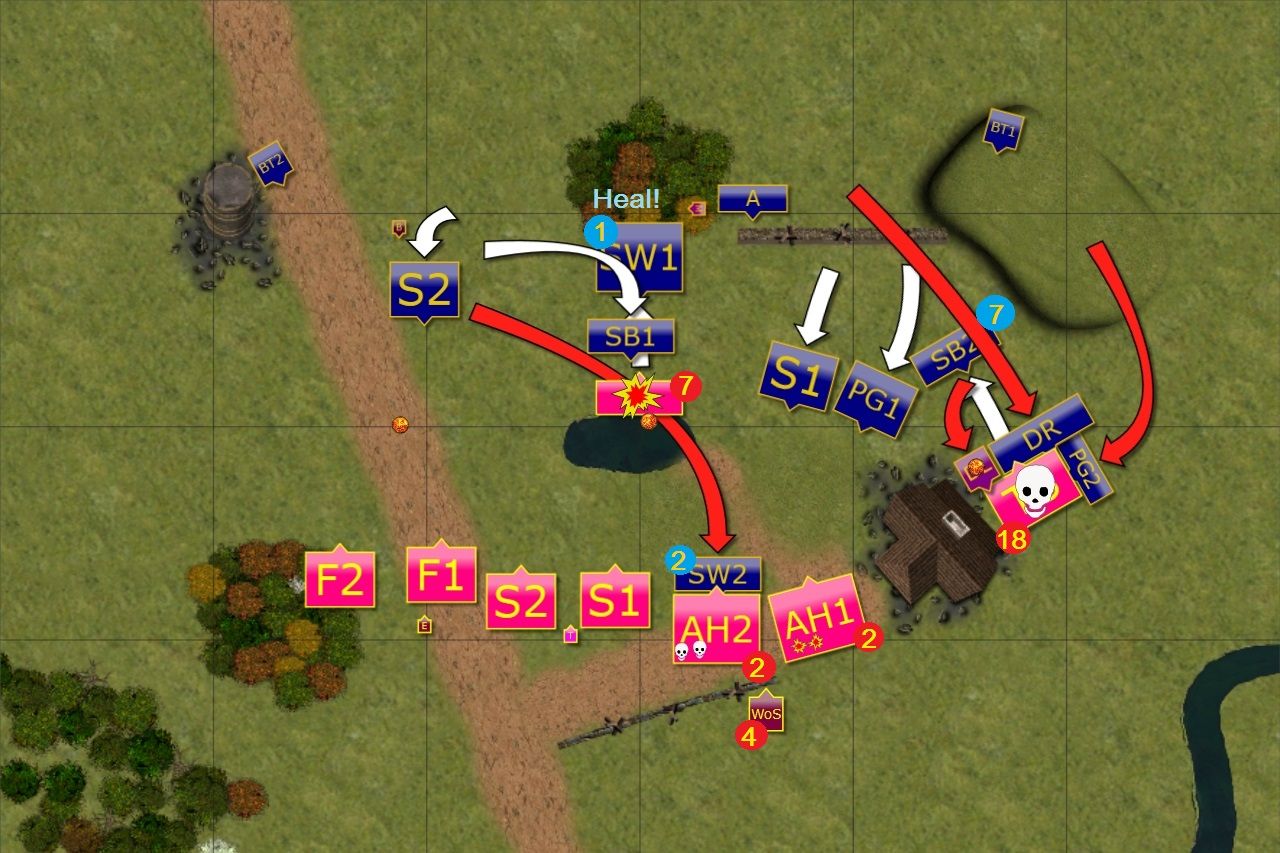
Forces of Abyss - Turn 2
 |
| Attack through the center. |
Abyssal Horsemen and Well of Souls attacked brave but reckless Knights who paid ultimate price for their folly. The Well not only healed the Horsemen again but also used the Elven souls to repair itself.
The second unit of cavalry didn't take the bait and didn't attack Elven infantry as it would have exposed their flank to a swift and deadly charge.
On the other hand, Succubii stormed through the center and anihilated lightly armored fast cavalry. Left unit used a bit of momentum to avoid Tallspears regiment that was readying for flank attack. The right unit just reformed.
On the Western flank, Flamebearers and Efreet finally obtained their target and focused their fire on poor Tallspears. But in unusual show of bravery they refused to rout despite suffering horrendous casualties.
Outcasts - Turn 3
 |
| Things escalated quickly. |
The Elves had to hit fast and hard now. On the West, Tallspears charged Flamebearers in a kind of suicidal attack as they wanted to take some enemy with them.
In the center, Storm Wind got unexpected support from the Archers and together they managed to rout Succubi regiment. Drakon Lord and Drakon Riders all hit the flank of the second Succubi regiment but this time Forces of Abyss prevailed.
That created a very tense situation as despite the effort of the infantry that was tying up enemy cavalry, dangerous Well of Souls was free to pick up its targets. Elves had nothing else to do but brace for impact now.
Forces of Abyss - Turn 3
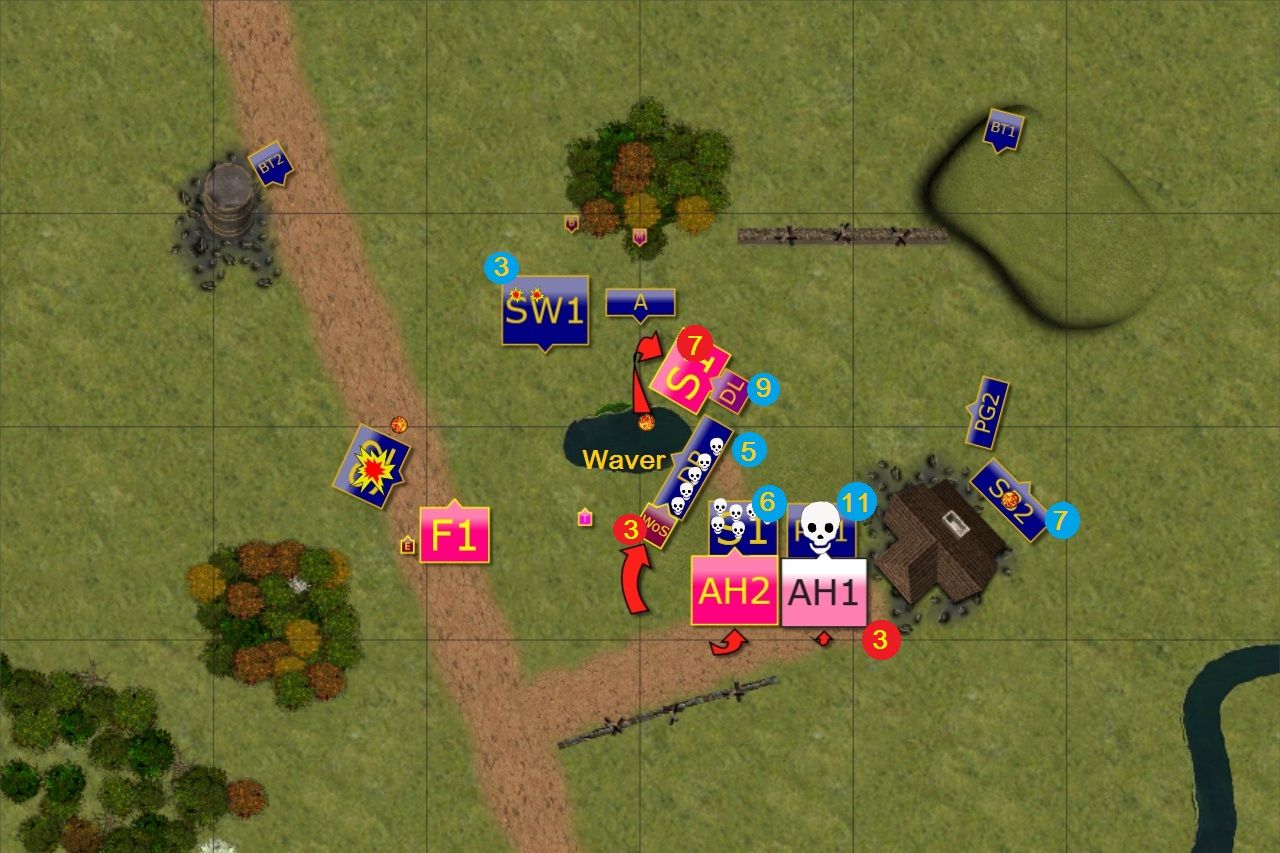 |
| Counter Charge! |
It was now or never for the Forces of Abyss. First, Efreet finished off annoying Tallspears and that allowed Flamebearers to shoot at Storm Wind cavalry. The damage was not big though.
Succubi counter charged Elven lord and did a very significant damage (with the assist of Bane Chant) but he miraculously survived! Well of Souls didn't manage to destroy Drakon Riders either but they were wavered (for now).
Cavalry charged one infantry regiment each and Palace Guard was routed immediately while Tallspears survived the attack.
That was not exactly what Forces of Abyss wanted to achieve. Elves were hit hard but not hard enough to stop their next all out attack.
Outcasts - Turn 4
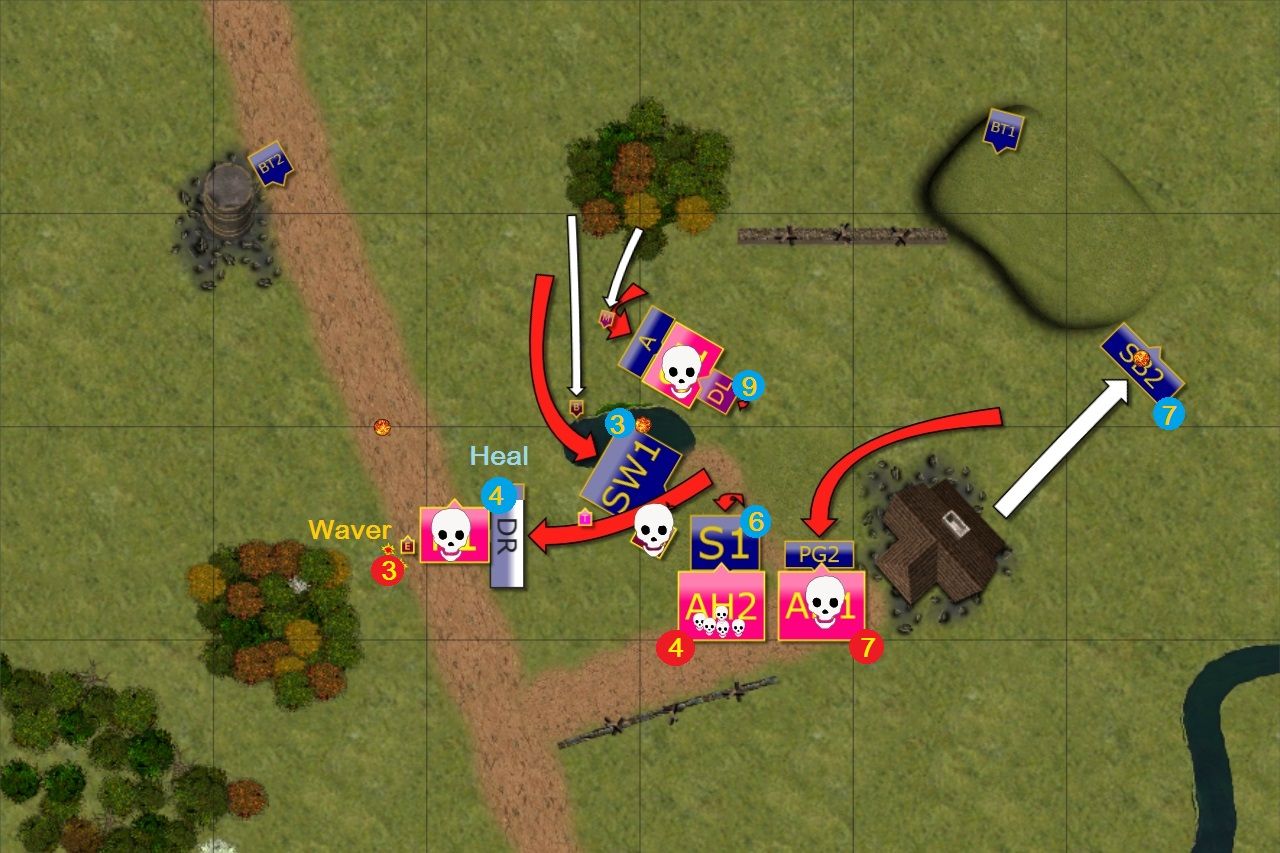 |
| Killing Blow! |
Both armies were bleeding heavily and it was definitely a crucial moment of the battle. Elves were determined to tip the scales into their favor once and for all.
Drakon Riders gulped awful in taste and quite smelly elixir but it did what it was advertised it supposed to do. Wavering warriors found that one more surge of strength and shrugged off the exhaustion of the battle and attacked Flamebearers. They didn't expect that attack at all and were quickly destroyed.
Bolt thrower crew spotted Efreet wondering alone and with lucky shot they got it Wavered that was very important for the victorious Drakon Riders nearby.
Drakon Lord and Archers (again!) finished off Succubi regiment while Storm Wind used the opportunity and attacked isolated Well of Souls and destroyed it completely.
Finally, infantry repeated the attack at the enemy cavalry and Palace Guard managed to rout their adversaries.
With such a powerful attack Forces of Abyss were reduced to a single regiment and were left with no hope to prevail, let alone to capture any precious items.
 |
| Final positions |
Summary
 |
| Turn-by-turn animation summary |
After-battle thoughts
Oh boy, that was pretty brutal outcome and I honestly didn't expect that the game would have such violent and abrupt ending.
It seems we both were kind of cautions and didn't want to pick up the loot until the item was properly surrounded. I had to sacrifice some of my infantry to keep EB's cavalry from joining the fight and I think that was crucial to what happened.
But let's start from the beginning. I am still not sure how Loot markers should be placed and how to deploy to use the scenario rules to the best advantage. I can see how hordes can be useful here as you can march a unit like that to the marker and simply take it and then get the charges in.
Neither of our army had such unit and neither had anything that could comfortably grab the Loot and survive the immediate charge. I think that is why we were both kind of shy.
I think I got some advantage when EB decided to commit his Tortured Souls and I expected to lose fast cavalry. I had enough units there to counter though and I think this attack helped me. It allowed me to clear the flank and redirect the units towards the center.
In the meantime I used my Storm Wind troop and infantry to block the Horsemen. Their speed and powerful attack on a charge could break my formation easily so I had to delay them. What is more, they could cover the infantry from my units and help it to grab the Loot.
I admit I also had some luck that had a significant impact. It started with Tallspears that despite getting 9 points of damage didn't care and not only kept Flamebearers occupied but also took one of the regiments with them.
Then Succubi could not get my Lord and Well of Souls didn't rout Drake Riders. If the dice were just average I would have lost Tallspears and both flying units in one go and that would have created a very tough situation for me in the center.
It really was hanging on the very fine line of balance for me. If that happened I would have had only surrounded unit of Spears fighting cavalry and my own heavy horse to attack. I think in this situation the result would not have been decided until the very last moment. I had some heavy hitters left and my shooting was still powerful but the combination of surviving fliers and exposed flanks of units that otherwise would have reformed, was what resulted in such a dramatic end.
I wanted to emphasize that because it may look as an easy win for me but I really think the outcome might have been much different. That simply shows I need to come up with a better plan next time as I know EB is already plotting how to get even! :)
Thanks for reading!
I don't understand how in Turn 4, PG2 charged AH1. This may just be your map program, but it sure looks like AH1 was outside the 45 degree arc of sight of PG2.
ReplyDeleteHi Dan,
DeleteYes, it may look at the first glance that enemy cavalry was out of line of sight for Palace Guard. However, they were still in the front arch and I could draw line of sight from the leader to the enemy. Please, follow the link where I showed that on a diagram in the relevant topic on Mantic forum:
http://vb.manticforum.com/forum/kings-of-war/kow-battle-reports/257503-swordmaster-s-battle-reports/page6