

I have had two games of Kings of War recently but the first one was not finished yet. Hopefully we will be able to find time to do it as I am very curious about the outcome in the scenario. In the second game, I played a re-match against Eastern Barbarian and his Forces of Abyss. We had some great feedback on Mantic Forum about our previous encounter and EB was very eager to incorporate new ideas as well as test his modified army list. We also decided to try a scenario to spice it all up too!
Forces of Abyss - Army List
20 Succubi, Regiment, Mace of Crushing - 195
- 10 Gargoyles, Troop - 80
- Abyssal Temptress, Hero, Bane Chant, Wind Blast - 135
20 Succubi, Regiment - 190
- The Well of Souls - 275
20 Flamebearers, Regiment - 140
20 Flamebearers, Regiment - 140
- Efreet, Hero, Inspiring Talisman - 155
10 Abyssal Horsemen, Regiment, Potion of the Caterpillar (Pathfinder) - 235
10 Abyssal Horsemen, Regiment, Brew of Haste (+1 Speed) - 230
6 Tortured Souls, Horde, Blade of Slashing - 225
In general the army has the same feel as it's previous version but there are some important changes.
1. Flamebearers and Efreet - together they form a very nice, mobile firebase. Regiments instead of troops means they are not going to rout so quickly. More shots per turn is nice but main improvement is in their suitability. Efreet was there to inspire but also to add some fireballs and I must say they look very good as second line that either protects the rear or provides shooting support to the first line of attack.
2. Abyssal Horsemen - one of the regiments got +1 speed making them as fast as Elven cavalry and I must say it is a very nice addition. It does not look like much at first glance but these guys are now more dangerous than before.
3. Tortured Souls - another example of a unit that was boosted to a bigger version, this time from a regiment to horde. That makes them a truly hard hitting unit with 18 attacks and CS2 and more durable with nerve -/18.
4. The Well of Souls - that is a very interesting addition too. The most expensive in the army. But with some unique ability to "heal" friendly units. Lifeleech (5) allows for proper damage point nullification. Def 5 and nerve -/20 makes it very resilient but depending how it would take the damage points from other units it may cause some problems too. It flies and has 10 attacks so it can be very good asset in close combat. It also inspires nearby troops which is great.
In comparison to the previous army it has 11 elements instead of 13 but looks more solid so to speak.
Outcasts - Army List
10 Stormwind, Regiment, Potion of the Caterpillar (Pathfinder) - 235
- 5 Silverbreeze, Troop - 145
- 5 Silverbreeze, Troop - 145
- Drakon Rider Lord, Hero, Large Cavalry, Blade of the Beast Slayer - 180
3 Drakon Riders, Regiment - 175
- 5 Stormwind, Troops - 140
- Bolt Thrower, War Machine - 90
20 Palace Guard, Regiment - 150
- 10 Archers - 115
- Bolt Thrower, War Machine - 90
20 Spearelves, Regiment - 140
- Elven Mage, Inspiring Talisman, Bane Chant - 110
20 Spearelves, Regiment - 140
- Battle Standard Bearer, Hero - 50
Prince, Hero, Mounted, Quicksilver Rapier, Pussy Cat - 95
First of all I have just realized my army is illegal :( I could not include the Prince in this configuration. I am terribly sorry for this mistake. Which is also a pity as it is a major change to my army where I thought I could trade off one unit of archers for additional hero with anti-hero equipment.
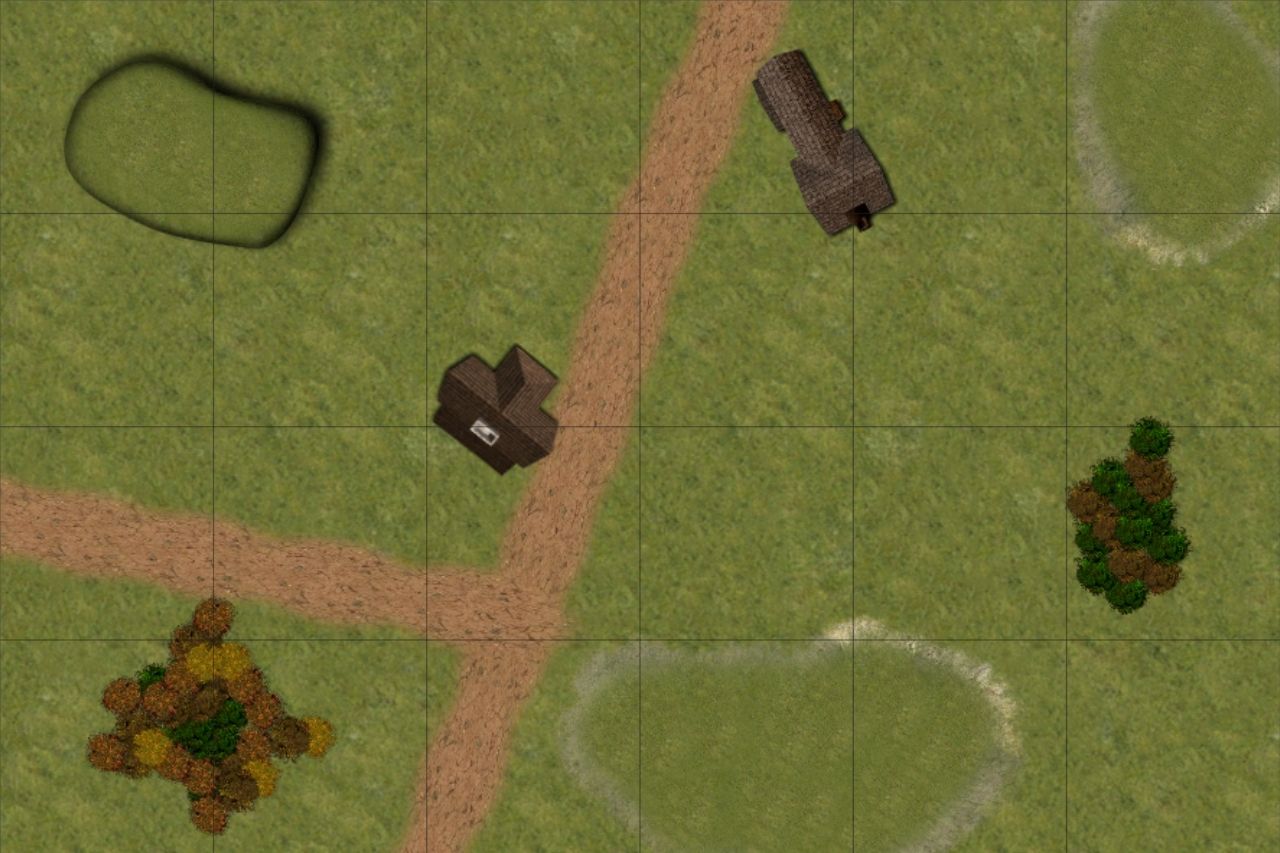
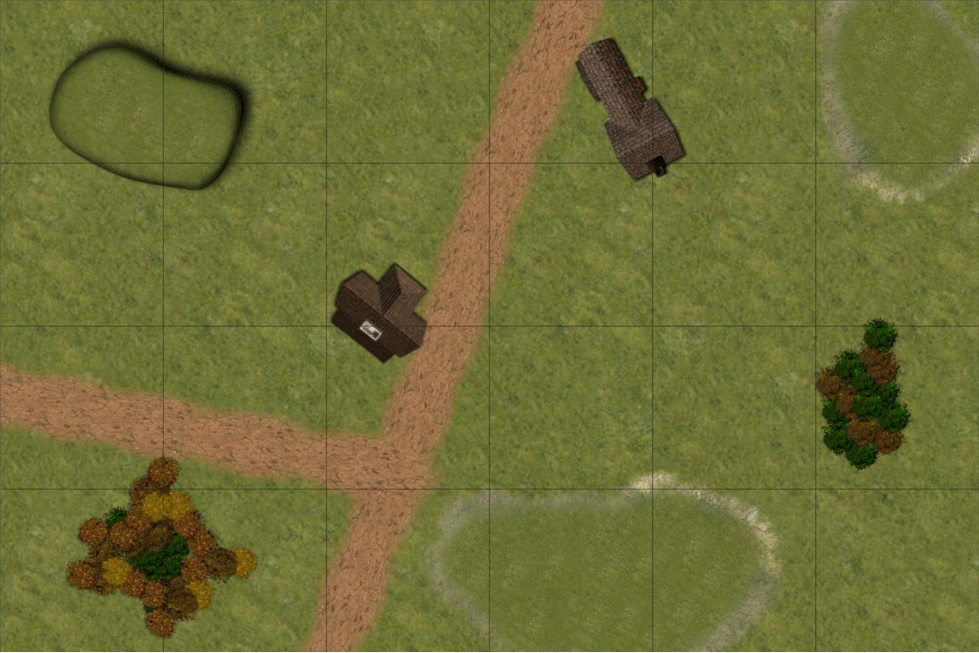
Terrain
 |
| Terrain |
Hills - Height 2
Buildings - Height 3
Forests - Height 4
Deployment
 |
| Deployment Order |
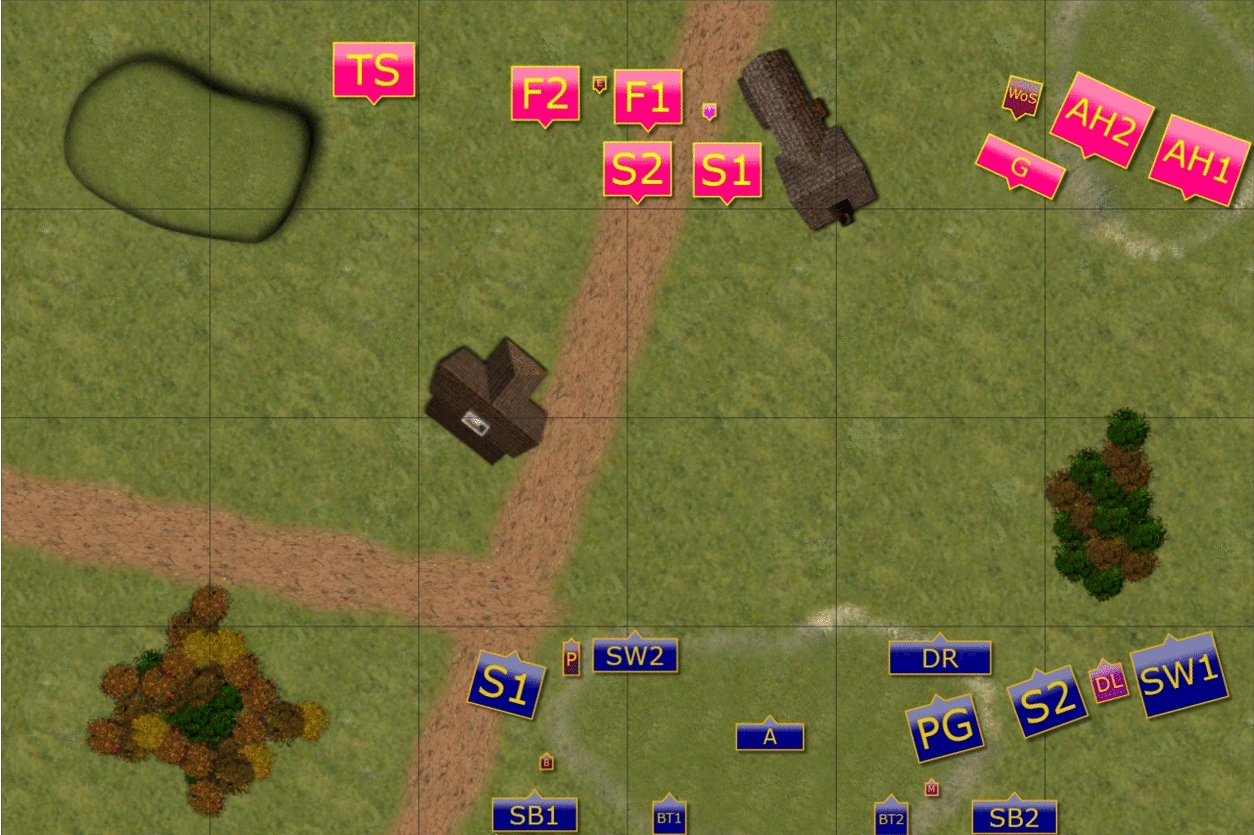
Deployment Order:
1. Bolt Thrower (BT1) - Gargoyles
2. Bolt Thrower (BT2) - Succubi (S1)
3. Silver Breeze (SB1) - Succubi (S2)
4. Silver Breeze (SB2) - Temptress
5. Spearelves (S1) - Flamebearers (F1)
6. Spearelves (S2) - Flamebearers (F2)
7. Archers - Efreet
8. Palace Guard - Abyssal Horde (AB1 - Pathfinder)
9. Mage - Abyssal Horde (AB2 - +1 Speed)
10. Storm Wind (SW2) - Well of Souls
11. Prince - Tortured Souls
12. Rest of the Army
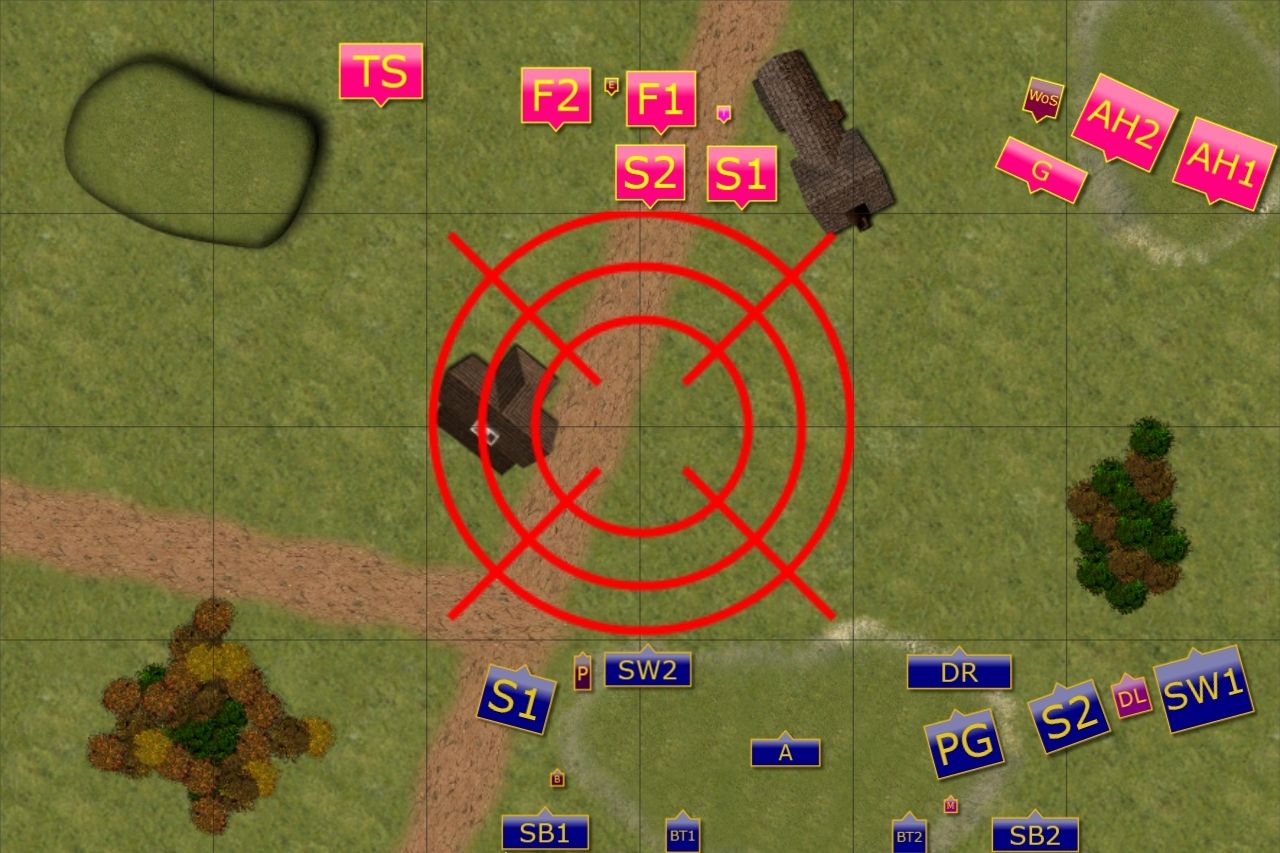 |
| Final Deployment - Scenario: Dominate! |
We played Dominate! scenario. It means that we would need to calculate the combined value of all units 12" from the center at the end of the game. That is that red circle on the diagram above. Whoever has 200VP or more wins.
I must say it sounded very intriguing. It does not matter how much you kill (not directly at least) but how much can you keep alive and in the right spot at the end of the game.
My first thought was that in this scenario it may be better to have the last turn. In addition, I thought I would deploy my shooters further and let the enemy come forward.
I chose South (I won the roll off to chose sides) because large hill looked like it is a better choice for shooters to overview the middle of the battle field.
I didn't want to go for war of attrition in the middle of the battle field because I think Forces of Abyss are better at it with Well of Souls and Tortured Souls being able to hold the line very well and Succubi regiments being a dangerous opponent even to heavy cavalry with so many attacks.
Because of that I decided I will use my shooting to get rid of some Succubi first (or at least thin them down for some fast troops to finish the job) and still try to move on the flanks to counter enemy units there.
The dilemma I had was which flank to choose. I could reinforce left flank and try to get to the Flamebearers anyway, despite the presence of Tortured Souls. Or choose right flank and try to offer some exchange of troops and clear out enemy heavy cavalry. I chose the latter because I thought it is more important to at least neutralize the horsemen so that they don't move into the zone while if I could keep my heavy hitters alive I could still have last turn to get there.
I won the roll off but I gave the first turn to EB as planed.
Forces of Abyss - Turn 1
Forces of Abyss - Turn 1
 | |
| Forward! |
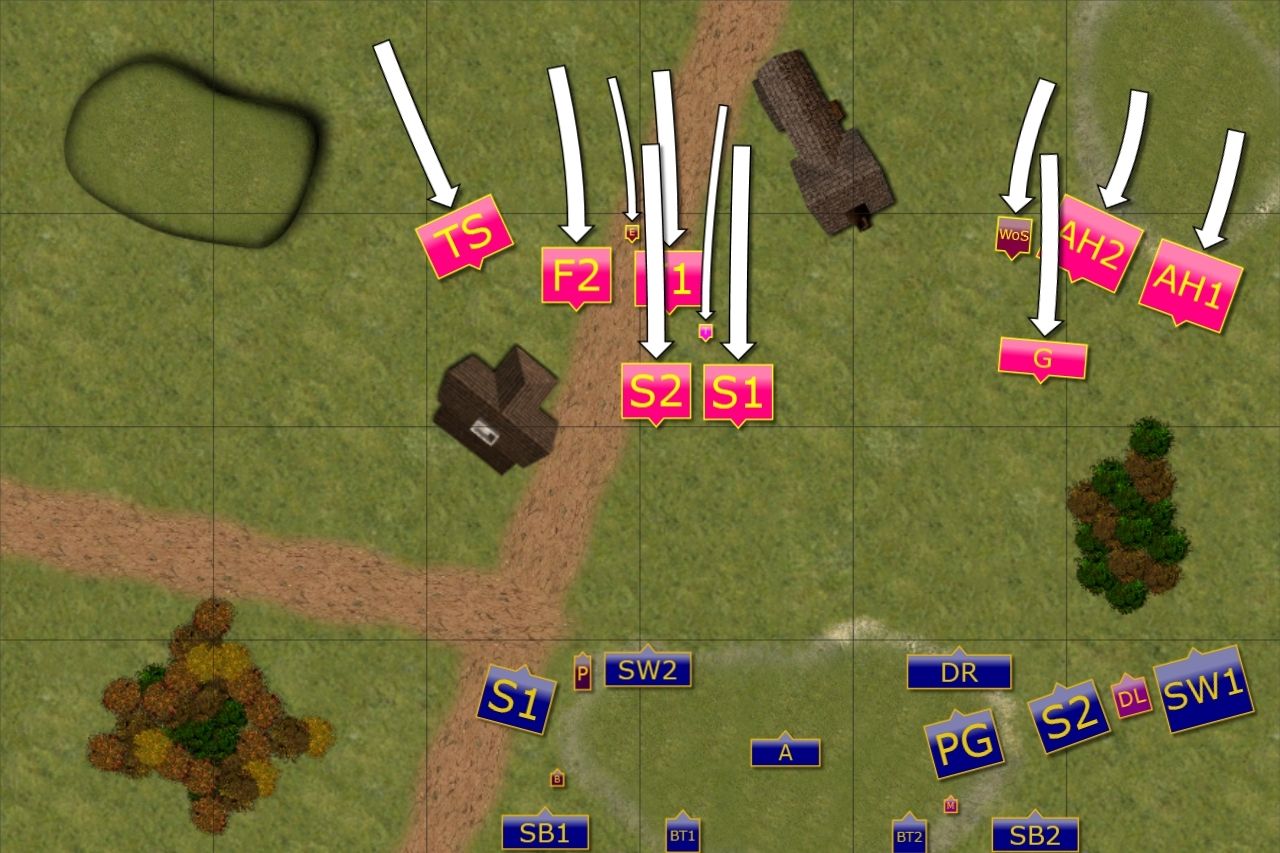
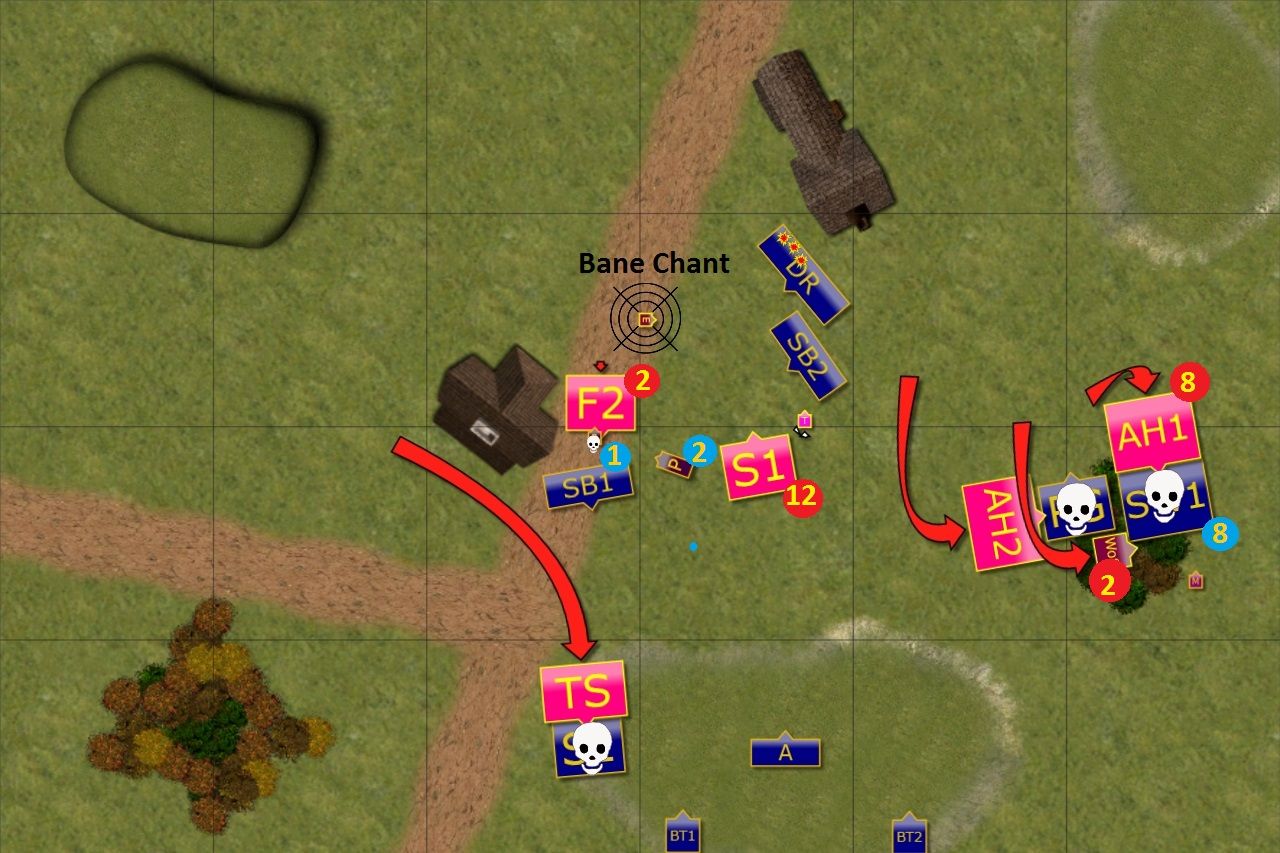
Forces of Abyss move forward towards the Elven battle line. The units in the center advanced at a double to take hold of the center of the battle field as soon as possible. The cavalry on the flank moved more cautiously due to the presence of Elven knights opposing them. At this stage no units were in range for shooting attacks.
Outcasts - Turn 1
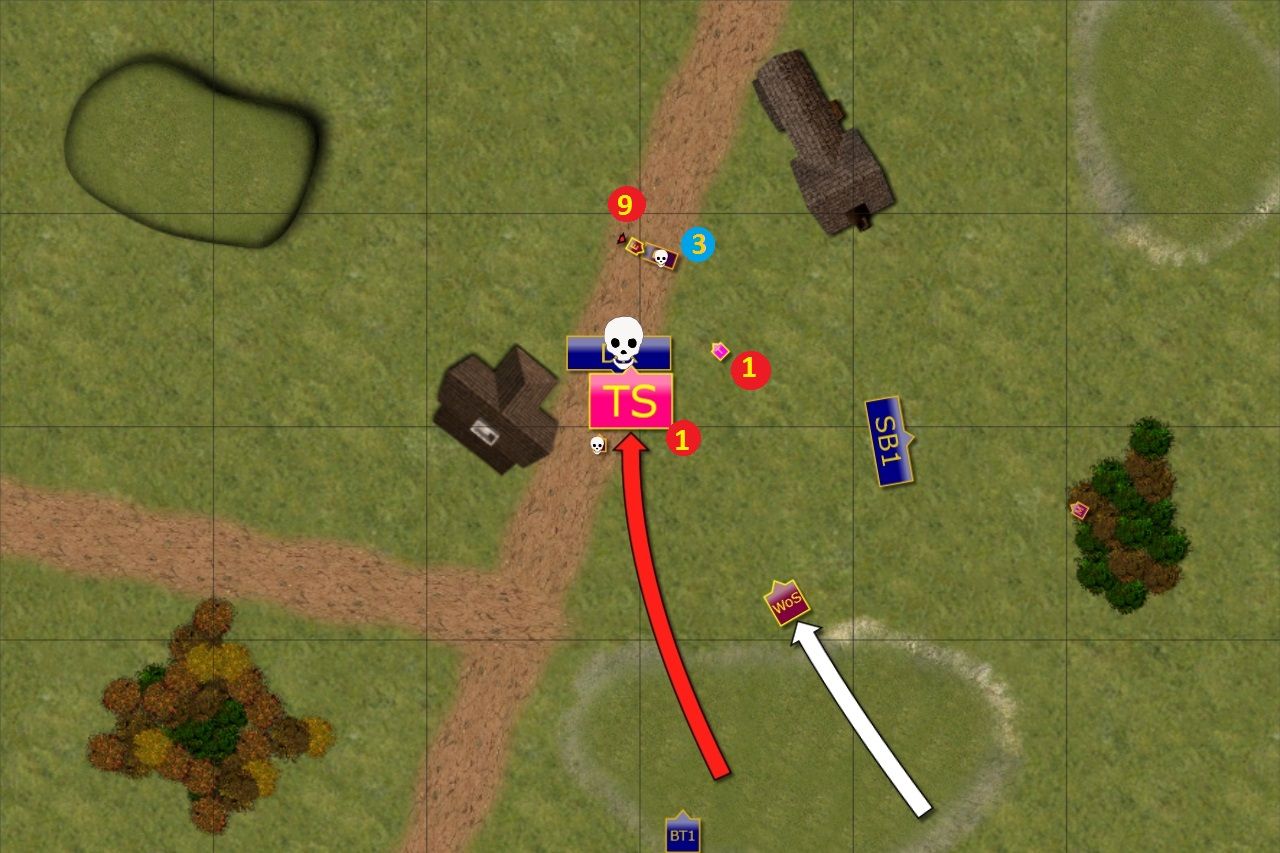
Elves pull back to avoid long charges of Abyssal fliers and start shooting at advancing enemy. All effort was focused on Succubi that despite their protective aura took considerable damage. (Edit: They took 9 points of damage, sorry for a mistake in a diagram.)
Forces of Abyss - Turn 1
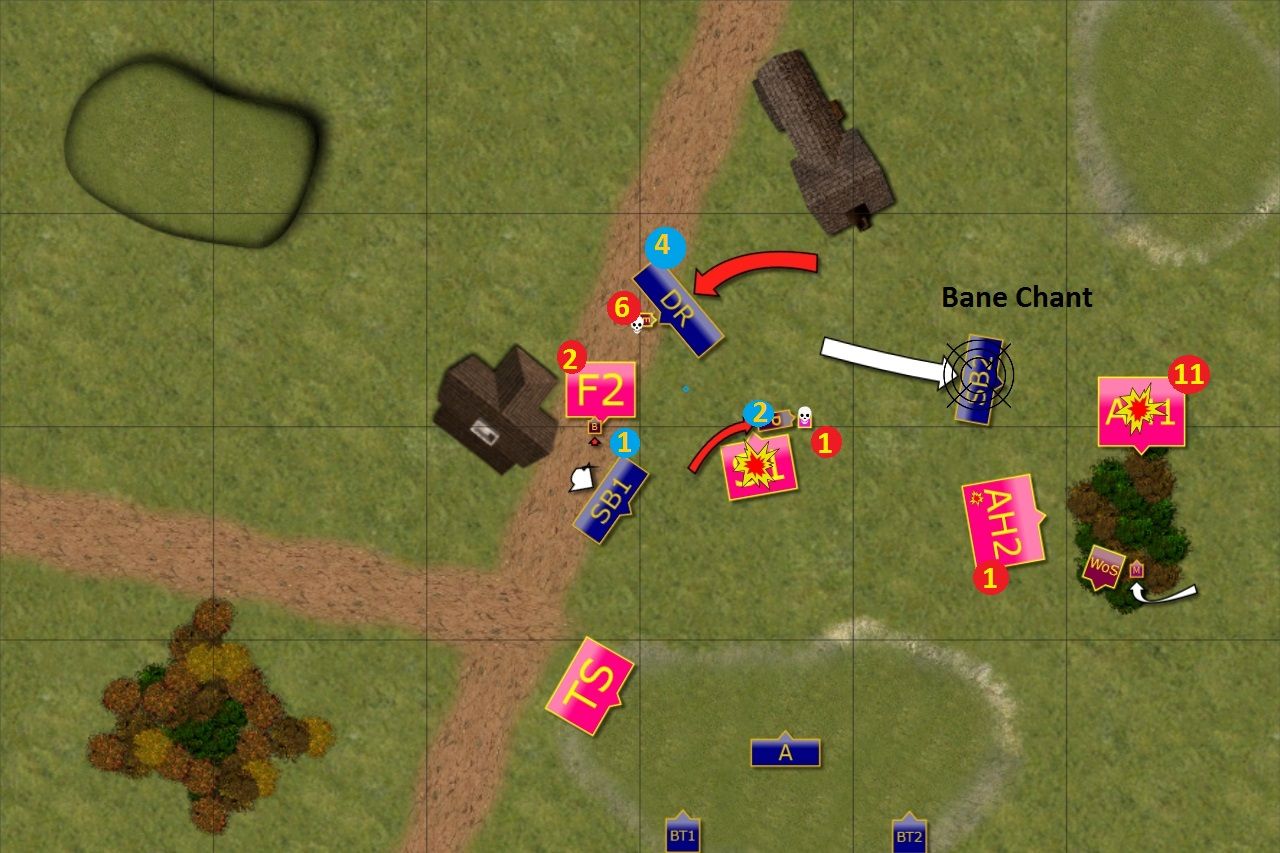
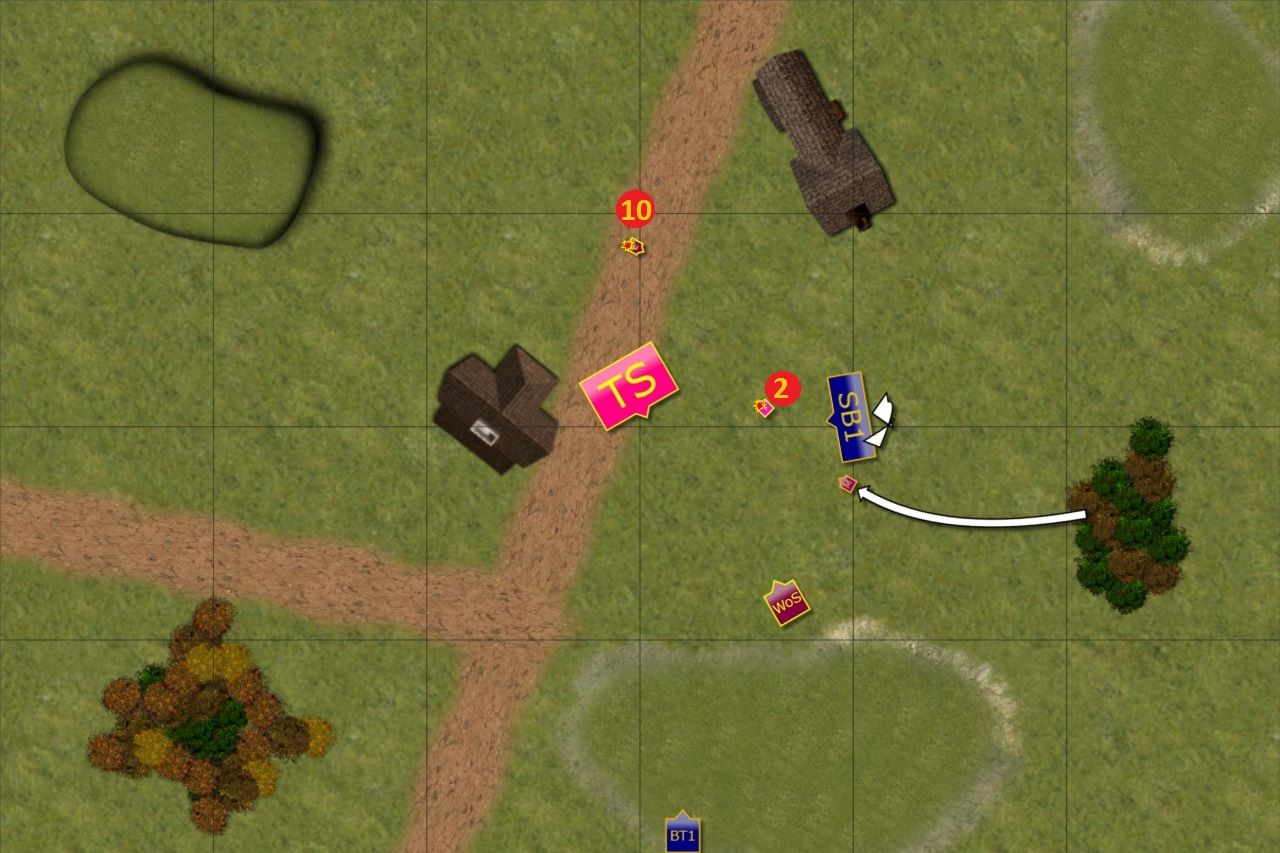
Seeing that the Elves pulled back, Forces of Abyss moved cautiously. One cannot trust an elf, if he is retreating it is definitely a trap. The units in the center formed double line to be ready to absorb charges and counter. Tortured Souls secured one flank while the cavalry used the cover of the forest well to watch the other.
Outcasts - Turn 2
Elves decided to attack in an attempt to seize the initiative and to overwhelm the center using the fact that there was a breach in enemy formation. Drakon Riders smashed Flamebearers to pieces while Prince distracted another unit that might seek the opportunity to punish flying cavalry.
Stormwind squadron attacked damaged Succubi but this time Elven knights didn't manage to break the enemy and now were in big trouble themselves. The army shooters focused their fire on the second Succubi regiment but also failed to rout the enemy and these two, very bloodied units, would enact vengeance for sure.
Fast cavalry and Drakon Lord moved through the gap in the enemy formation but while avoiding the attention of the Wall of Souls, Elven Lord ignored much more dangerous threat in the form of enemy cavalry. This recklessness would cost him dearly.
Finally, Spearelves attacked Gargoyles, routed them and prepared to take the charge of the enemy.
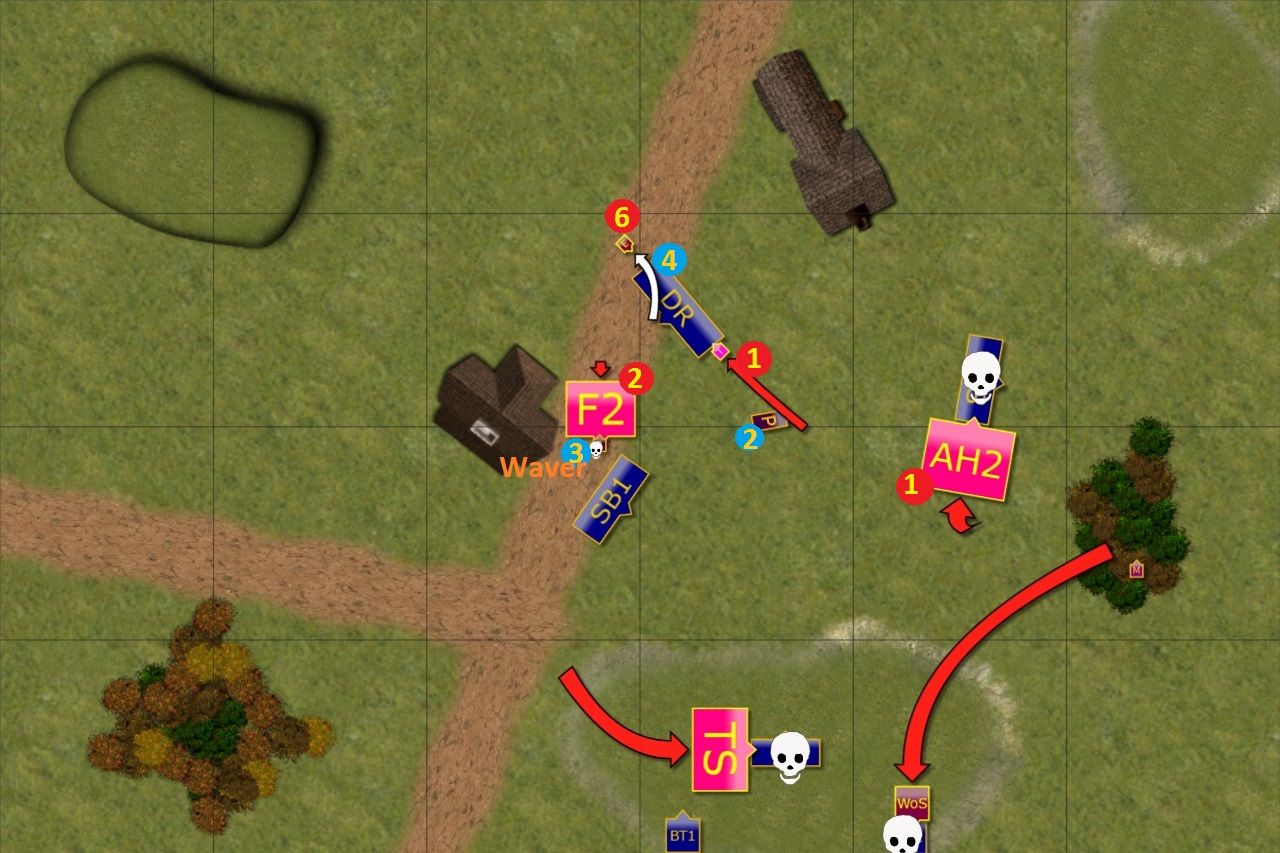
Forces of Abyss - Turn 3
Forces of Abyss attacked in a well coordinated manner against multiple enemy units at the same time. Succubi gave no chance to now exposed Elven Knights and routed them easily. Powerful flank attack of the cavalry took care of a vain and arrogant Elven Lord. Nearby Drakes were attacked by the Efreet and fireballs wavered Elven fliers. Even Flamebearers scared Elven Princeling!
Last but not least , Well of Souls and second cavalry regiment attacked isolated Spearelves who could not hold against such a powerful attack.
Outcasts - Turn 3
Elven army was in a very bad position now. What was supposed to be a sweeping attack through the gap in enemy lines ended in disaster. But they still had the option to attack. In the center, BSB kept distracting Flamebearers while the shooters took aim. One regiment of Succubi was finally routed but the second one only wavered despite being almost totally spent.
Finally, Palace Guard and Stormwind Regiment attacked enemy cavalry but failed to rout them and were now in a very bad position to receive enemy counter attack.
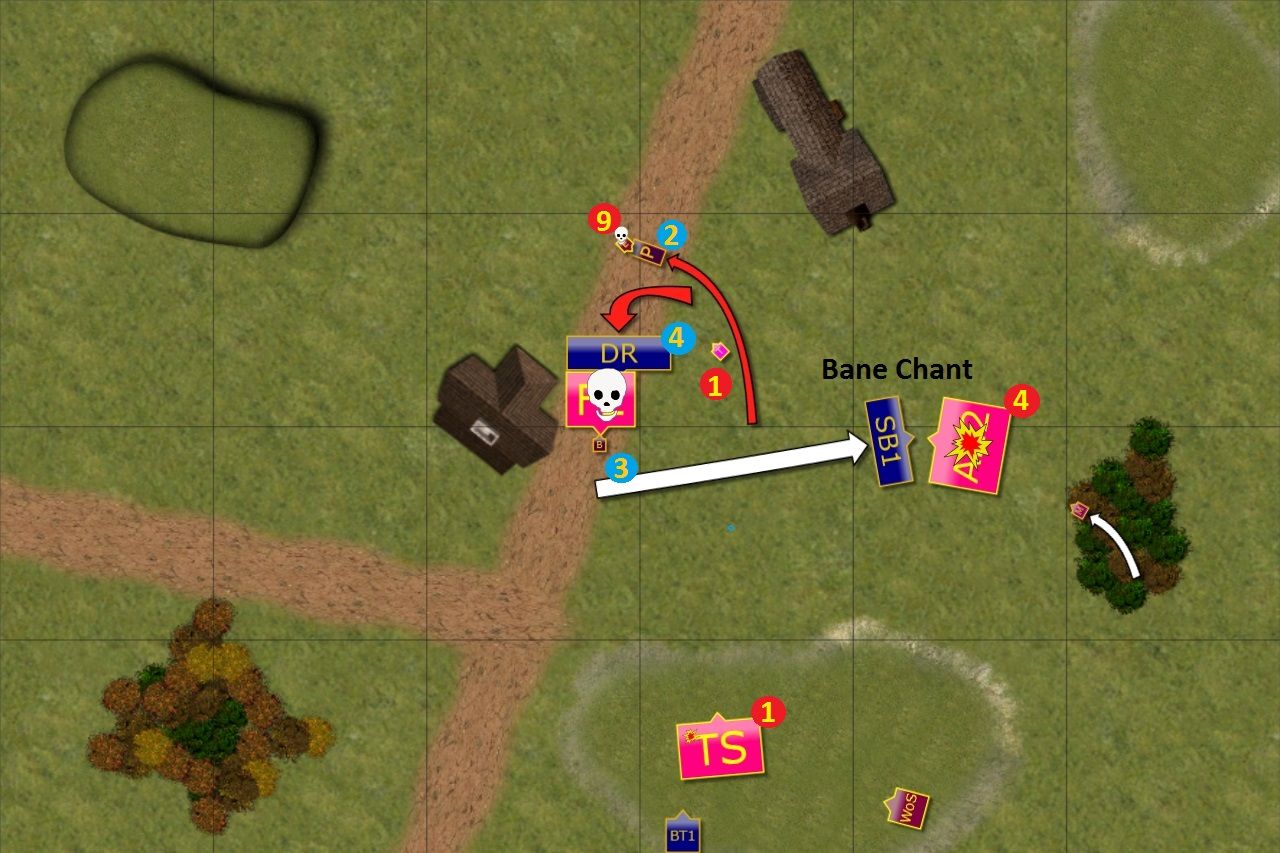
Forces of Abyss - Turn 4
Forces of Abyss didn't let the Elves seize the initiative. Tortured Souls finally were in a position to attack Elven rear and Spearelves stood no chance against such enemy.
Efreet, this time with the help of Temptress and her magic, once again tried to get rid of the Drakon Riders but failed and this time they didn't waver either.
But the flank belonged to Forces of Abyss. Palace Guard stood no chance against another flank attack. Well of Souls had an opportunity for flank attack against Stormwind cavalry too and charged in with Abyssal Horsemen. Fighting in the woods was tough but they still managed to rout Elven cavalry despite inspiring presence of the nearby Mage.
(Edit: Well of Souls took away two wounds from the Horsemen that were subsequently "healed" by Lifeleach.)
Situation was looking grim for the Elves but they refused to give up. They remembered the famous arena warrior, Sylvus Sly Stallionus, who said "It ain't over til it's over" and kept on fighting!
Outcasts - Turn 4
Elves had few resources left but they used whatever they had to full potential. Brave BSB was battling whole regiment of Flamebearers all by himself, buing time for his companions.
The shooters finally finished Succubi and tried to harm enemy cavalry. One of the units was just scratched but the reinforced arrows of fast cavalry were enough to rout the other, already damaged unit.
Drakon Riders attacked exposed Efreet but could not rout the enemy and failed to overrun to help BSB in his heroic fight.
Forces of Abyss - Turn 5
(Edit: In this round a silly situation occurred. In a previous turn I moved my units believing that AH2 regiment faces the forest. As strange it looked I didn't ask my opponent about it. In his turn it happened that AH2 was actually facing the different direction and it looked like some kind of UB bug didn't show the situation the same way for both of us. As I moved my units with wrong assumption, EB offered that he will charge just fast cavalry instead of making more dangerous moves with this particular unit.
Thank a lot, Eastern Barbarian! )
Forces of Abyss continued their rampage. Heavy cavalry punished nearby fast horse of the Elves for their arrogant attack. Tortured Souls continued destruction of the Elven shooters, now joined by the Well of Souls.
Temptress attacked Drakon Riders but could not land a single blow. Flamebears, however, managed to waver annoying Elven BSB.
Outcasts - Turn 5
It was a desperate fight for the Elves now. But they did what they could! First, fast cavalry, once again supported by the mage, shot at the enemy horsemen. Surprisingly, these few arrows were enough to discourage daemonic riders from continuing the fight! (Edit: Lucky double 6's for the nerve roll here.)
Drakon Riders attacked exposed Flamebearers and routed them too. But the Prince could not get rid of the Efreet despite inflicting significant damage. (Edit: This time I rolled double 1's :))
Forces of Abyss - Turn 6
Few remaining elements of the Abyssal army started converging towards the center of the battlefield. First, Efreet took her vengeance by attacking the Prince. He got wounded only once but was routed anyway!
But the most important attack was delivered by Tortured Souls. They first dispatched Elven BSB as if he was not there and then continued towards Drakon Riders and routed them too! (Edit: That was amazing! I moved back the Drakons after defeating the Flamebearers but rolled only 1 inch to do so. It was enough to avoid Tortured Souls in direct attack. When they charged BSB it was clear they needed a 6 for overrun to hit Drakon Riders and continue the melee. And EB got it! )
Outcasts - Turn 6
Elves had no tools to shift Tortured Souls so they tried to get rid of the enemy leaders. Bolt Thrower shot at Efreet, wounded it and ... it didn't rout! (Edit: You know what happened? I rolled double 1's again :D)
Fast cavalry inflicted only single wound on Temptress and she didn't care. With that last shot it was clear that Forces of Abyss controlled the objective and Elves had to withdraw defeated.
Summary
After-battle thoughts
First of all I would like to congratulate Eastern Barbarian for a well deserved victory and successful rematch. He played very well and while he didn't avoid some mistakes he didn't give up and fought his way back to the victory. Well done!
Second, my sincere apologies for playing with illegal list. I think karma punished me already with some of the dice rolls but I would feel even more embarrassed if I actually won. I really don't know how did I miss that. :(
Before I go to the discussion on what I learned from this game and what did I observer during it as well as during the preparation of the battle report, I would like to say a few things about the way EB played.
I think he did great this time.In our previous two games he was clearly not sure sometimes what units can do but this game he had them nicely grouped and supporting each other. Succubi formed the front line and while they took the beating they kept going, counter charged when possible and simply took a lot of arrows that would have been directed at other units.
Flamebearers formed rear guard nicely and while they had no chance to shoot they successfully discouraged my drakons from attempt to start the game on the left flank. Tortured Souls nicely covered the flank and flew towards the back yard to kill my shooters and then come back to win the battle for the Forces of Abyss.
The second group of cavalry also cooperated nicely, destroying my most dangerous units there.
I know he got a lot of great advice from more experienced players from Mantic Forum so I would like to thank them for their help. You can see he learns fast and he is a good student!
His main mistake was leaving the exposed flank of Flamebearers but this time it was more difficult to spot so I don't blame him for not seeing that. It was a dangerous situation but his Succubi held long enough to avoid the collapse of the center too early. I also think he could have moved Efreet from the sight of Drakons and Well of Souls could start in between the units of cavalry as sometimes it was a bit too far away to inspire.
Other than that he played a very solid game, secured the center early and didn't let me to throw him away from there.
I made tons of mistakes though and I really can't forgive myself that stupid move with the Drakon Lord in particular. He would have been so important later in the game especially.
I am not happy with the deployment. I need to work better on it but I think I didn't leave enough on the left flank to counter Tortured Souls and didn't position units well to intercept the enemy on the right.
When I finally decided to attack through the forest it was already very risky. I had to rout the enemy cavalry to reform and present front to the second cavalry regiment and Well of Souls. I was concerned with the safety of the Mage at the same time and when I moved him behind the forest I could not cast spells. That was a mistake, I should have cast Bane Chant on Stormwind to inflict maximum damage. I can't remember the result of the rolls but I believe I scored quite a lot 2's for damage.
If I succeeded I had a chance to prevail or at least tie the enemy on that flank and allow me to stay in the fight. After that loss I was really in a desperate position and I got lucky with the shooting.
But I made yet another mistake, that is not moving BSB away from Flamebaerers as despite the fact that he wavered I could still move him. That would create a gap between Drakons and him larger than 6" and would have saved them.
EB had 790 points left while I had only 255 that counted for the scenario purpose so he was winning by 535 points. It was a long shot but with Drakons alive I had a chance to save a draw if I got Efreet and Temptress.
I guess the conclusion is that I was simply outplayed regardless and I need to find the better overall plan and avoid mistakes like the one with the Drakon Lord.
It was my first full game with the scenario though and I would like to share some observations about it too. I really like the fact that you have to count your own points in the certain area instead of how much did you kill. In our game we killed a lot of each other but it was all aimed at units that were either in the middle or attempted to get there.
Deployment and the decision to start or go second in particular were affected by the scenario objectives. But look how EB slowed down his units despite the fact that going forward full speed would have allowed him to get into range of shooting next turn and threaten my own lines with Succubi. He also ignored last Bolt Thrower, that was still dangerous because it paid off more to get very expensive Well of Souls into 12" range from the center.
I think from now on we simply will keep playing scenarios as they definitely add great variety to the game. We never doubted it but I believe we are now better prepared to do it.
Thanks for reading and I hope you enjoyed it!
Cheers!
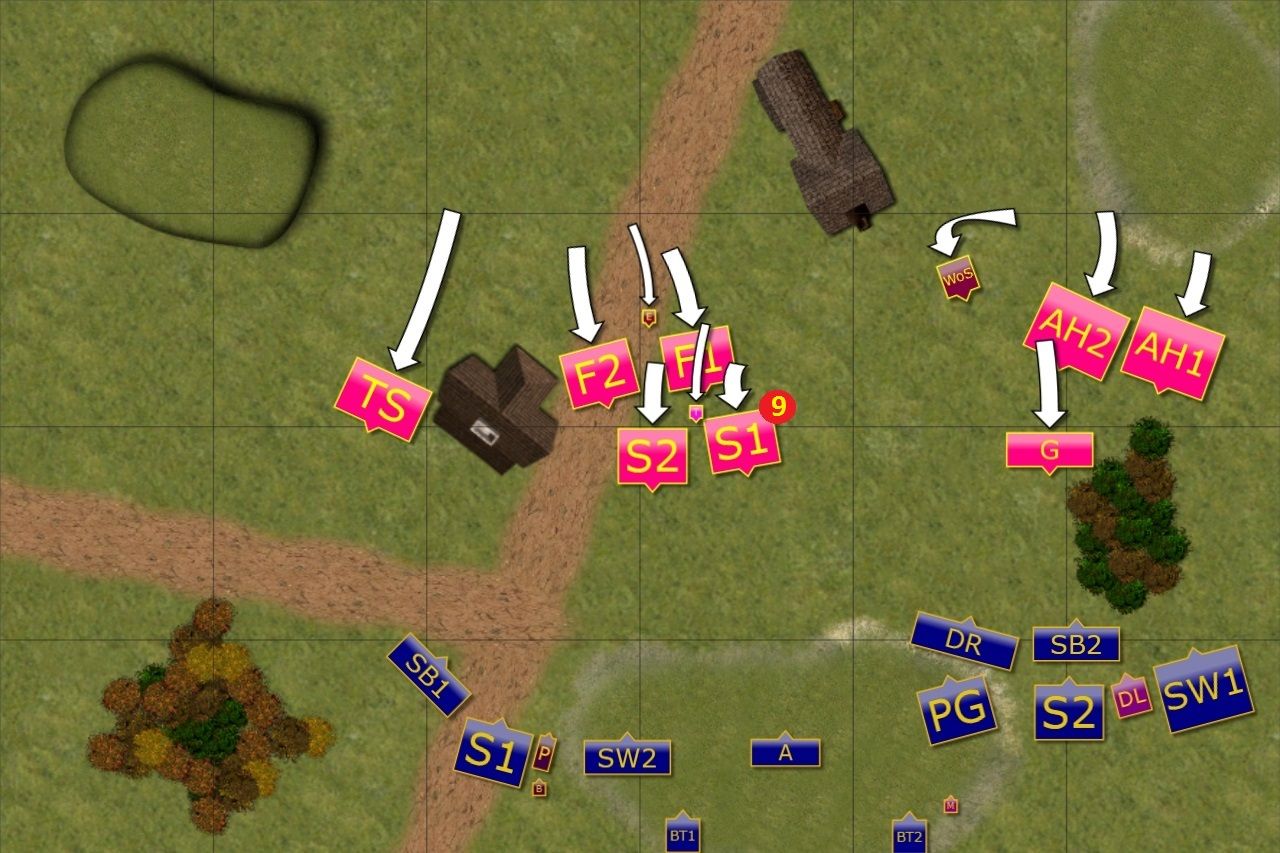
Outcasts - Turn 1
 |
| Elves pull back a little |
Elves pull back to avoid long charges of Abyssal fliers and start shooting at advancing enemy. All effort was focused on Succubi that despite their protective aura took considerable damage. (Edit: They took 9 points of damage, sorry for a mistake in a diagram.)
Forces of Abyss - Turn 1
 |
| Forces of Abyss slow down their advance |
Seeing that the Elves pulled back, Forces of Abyss moved cautiously. One cannot trust an elf, if he is retreating it is definitely a trap. The units in the center formed double line to be ready to absorb charges and counter. Tortured Souls secured one flank while the cavalry used the cover of the forest well to watch the other.
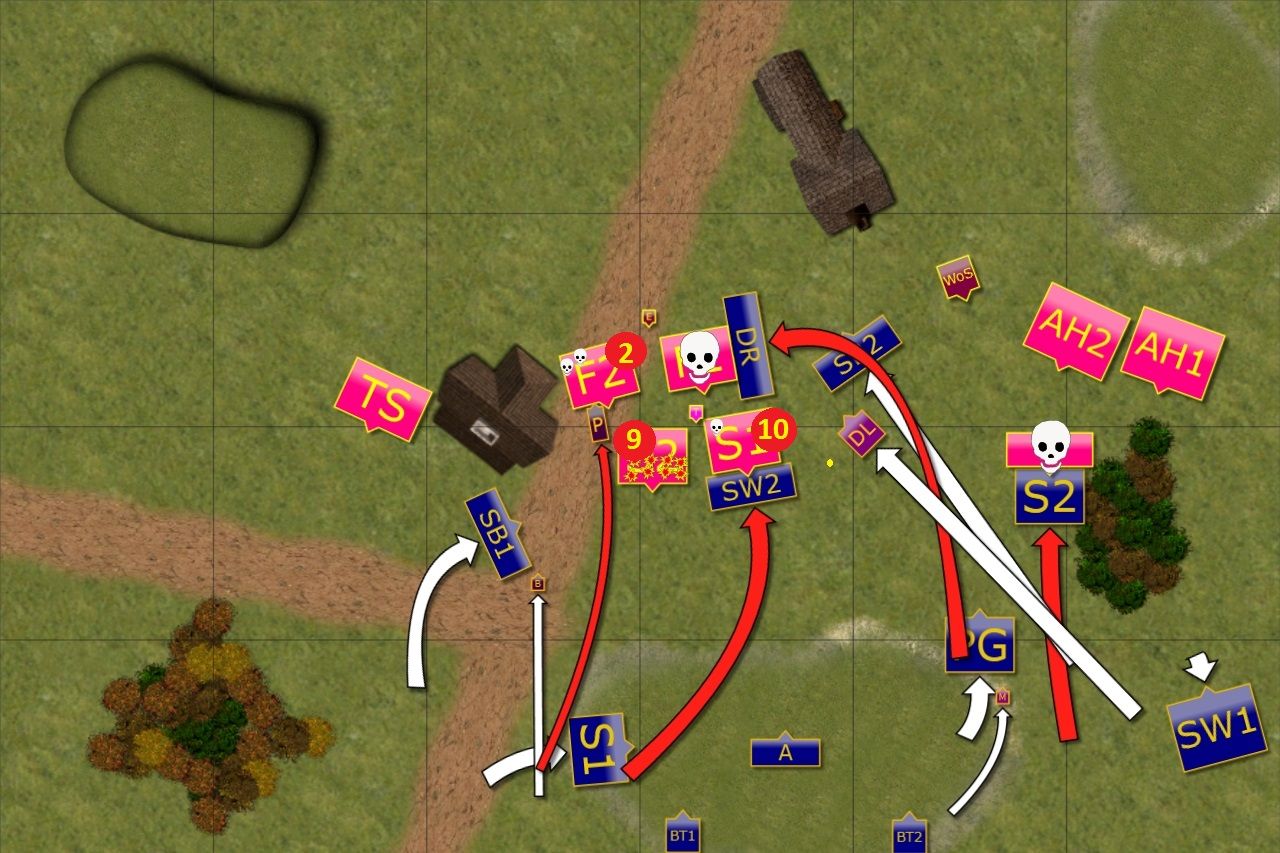
Outcasts - Turn 2
 |
| Elves attack! |
Elves decided to attack in an attempt to seize the initiative and to overwhelm the center using the fact that there was a breach in enemy formation. Drakon Riders smashed Flamebearers to pieces while Prince distracted another unit that might seek the opportunity to punish flying cavalry.
Stormwind squadron attacked damaged Succubi but this time Elven knights didn't manage to break the enemy and now were in big trouble themselves. The army shooters focused their fire on the second Succubi regiment but also failed to rout the enemy and these two, very bloodied units, would enact vengeance for sure.
Fast cavalry and Drakon Lord moved through the gap in the enemy formation but while avoiding the attention of the Wall of Souls, Elven Lord ignored much more dangerous threat in the form of enemy cavalry. This recklessness would cost him dearly.
Finally, Spearelves attacked Gargoyles, routed them and prepared to take the charge of the enemy.
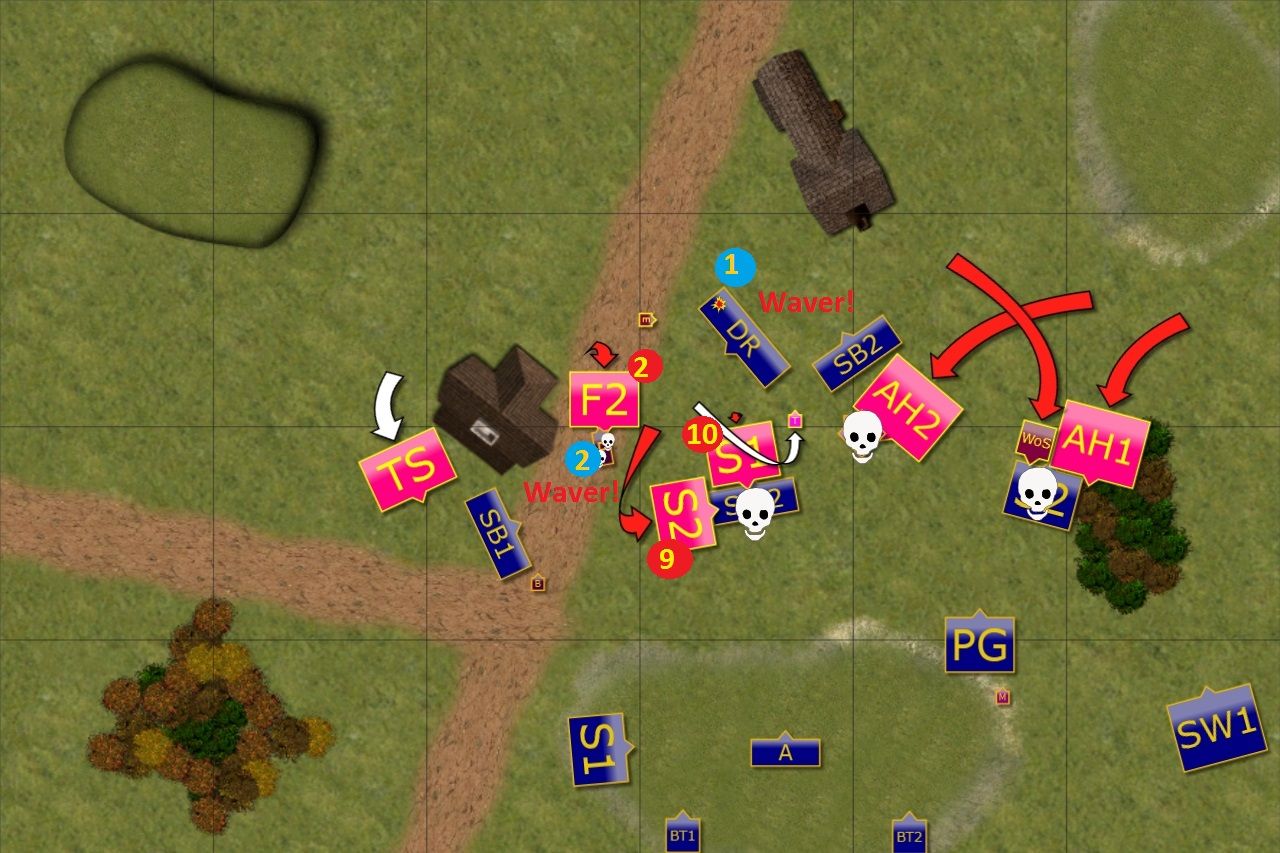
Forces of Abyss - Turn 3
 |
| Powerful counter attack! |
Forces of Abyss attacked in a well coordinated manner against multiple enemy units at the same time. Succubi gave no chance to now exposed Elven Knights and routed them easily. Powerful flank attack of the cavalry took care of a vain and arrogant Elven Lord. Nearby Drakes were attacked by the Efreet and fireballs wavered Elven fliers. Even Flamebearers scared Elven Princeling!
Last but not least , Well of Souls and second cavalry regiment attacked isolated Spearelves who could not hold against such a powerful attack.
Outcasts - Turn 3
 |
| Counter on the right flank failed! |
Elven army was in a very bad position now. What was supposed to be a sweeping attack through the gap in enemy lines ended in disaster. But they still had the option to attack. In the center, BSB kept distracting Flamebearers while the shooters took aim. One regiment of Succubi was finally routed but the second one only wavered despite being almost totally spent.
Finally, Palace Guard and Stormwind Regiment attacked enemy cavalry but failed to rout them and were now in a very bad position to receive enemy counter attack.
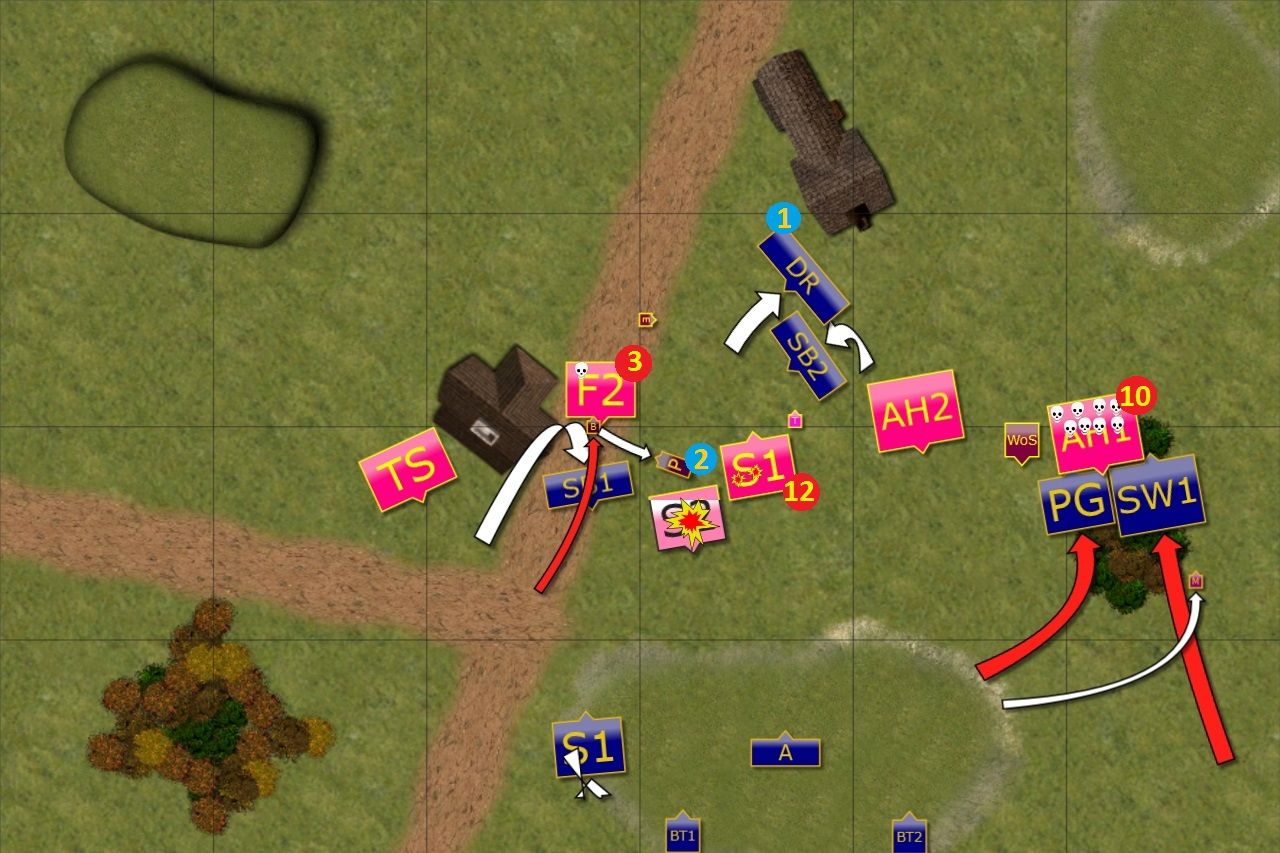
Forces of Abyss - Turn 4
 |
| Another heavy counter-punch! |
Forces of Abyss didn't let the Elves seize the initiative. Tortured Souls finally were in a position to attack Elven rear and Spearelves stood no chance against such enemy.
Efreet, this time with the help of Temptress and her magic, once again tried to get rid of the Drakon Riders but failed and this time they didn't waver either.
But the flank belonged to Forces of Abyss. Palace Guard stood no chance against another flank attack. Well of Souls had an opportunity for flank attack against Stormwind cavalry too and charged in with Abyssal Horsemen. Fighting in the woods was tough but they still managed to rout Elven cavalry despite inspiring presence of the nearby Mage.
(Edit: Well of Souls took away two wounds from the Horsemen that were subsequently "healed" by Lifeleach.)
Situation was looking grim for the Elves but they refused to give up. They remembered the famous arena warrior, Sylvus Sly Stallionus, who said "It ain't over til it's over" and kept on fighting!
Outcasts - Turn 4
 |
| The power of Elven shooting! |
Elves had few resources left but they used whatever they had to full potential. Brave BSB was battling whole regiment of Flamebearers all by himself, buing time for his companions.
The shooters finally finished Succubi and tried to harm enemy cavalry. One of the units was just scratched but the reinforced arrows of fast cavalry were enough to rout the other, already damaged unit.
Drakon Riders attacked exposed Efreet but could not rout the enemy and failed to overrun to help BSB in his heroic fight.
Forces of Abyss - Turn 5
 |
| Exchange of blows continues! |
(Edit: In this round a silly situation occurred. In a previous turn I moved my units believing that AH2 regiment faces the forest. As strange it looked I didn't ask my opponent about it. In his turn it happened that AH2 was actually facing the different direction and it looked like some kind of UB bug didn't show the situation the same way for both of us. As I moved my units with wrong assumption, EB offered that he will charge just fast cavalry instead of making more dangerous moves with this particular unit.
Thank a lot, Eastern Barbarian! )
Forces of Abyss continued their rampage. Heavy cavalry punished nearby fast horse of the Elves for their arrogant attack. Tortured Souls continued destruction of the Elven shooters, now joined by the Well of Souls.
Temptress attacked Drakon Riders but could not land a single blow. Flamebears, however, managed to waver annoying Elven BSB.
Outcasts - Turn 5
 |
| Fast cavalry for the win! |
It was a desperate fight for the Elves now. But they did what they could! First, fast cavalry, once again supported by the mage, shot at the enemy horsemen. Surprisingly, these few arrows were enough to discourage daemonic riders from continuing the fight! (Edit: Lucky double 6's for the nerve roll here.)
Drakon Riders attacked exposed Flamebearers and routed them too. But the Prince could not get rid of the Efreet despite inflicting significant damage. (Edit: This time I rolled double 1's :))
Forces of Abyss - Turn 6
 |
| Tortured Souls secure the objective! |
Few remaining elements of the Abyssal army started converging towards the center of the battlefield. First, Efreet took her vengeance by attacking the Prince. He got wounded only once but was routed anyway!
But the most important attack was delivered by Tortured Souls. They first dispatched Elven BSB as if he was not there and then continued towards Drakon Riders and routed them too! (Edit: That was amazing! I moved back the Drakons after defeating the Flamebearers but rolled only 1 inch to do so. It was enough to avoid Tortured Souls in direct attack. When they charged BSB it was clear they needed a 6 for overrun to hit Drakon Riders and continue the melee. And EB got it! )
Outcasts - Turn 6
 |
| Last effort |
Elves had no tools to shift Tortured Souls so they tried to get rid of the enemy leaders. Bolt Thrower shot at Efreet, wounded it and ... it didn't rout! (Edit: You know what happened? I rolled double 1's again :D)
Fast cavalry inflicted only single wound on Temptress and she didn't care. With that last shot it was clear that Forces of Abyss controlled the objective and Elves had to withdraw defeated.
Summary
 |
| Turn-byt-turn summary animation |
After-battle thoughts
First of all I would like to congratulate Eastern Barbarian for a well deserved victory and successful rematch. He played very well and while he didn't avoid some mistakes he didn't give up and fought his way back to the victory. Well done!
Second, my sincere apologies for playing with illegal list. I think karma punished me already with some of the dice rolls but I would feel even more embarrassed if I actually won. I really don't know how did I miss that. :(
Before I go to the discussion on what I learned from this game and what did I observer during it as well as during the preparation of the battle report, I would like to say a few things about the way EB played.
I think he did great this time.In our previous two games he was clearly not sure sometimes what units can do but this game he had them nicely grouped and supporting each other. Succubi formed the front line and while they took the beating they kept going, counter charged when possible and simply took a lot of arrows that would have been directed at other units.
Flamebearers formed rear guard nicely and while they had no chance to shoot they successfully discouraged my drakons from attempt to start the game on the left flank. Tortured Souls nicely covered the flank and flew towards the back yard to kill my shooters and then come back to win the battle for the Forces of Abyss.
The second group of cavalry also cooperated nicely, destroying my most dangerous units there.
I know he got a lot of great advice from more experienced players from Mantic Forum so I would like to thank them for their help. You can see he learns fast and he is a good student!
His main mistake was leaving the exposed flank of Flamebearers but this time it was more difficult to spot so I don't blame him for not seeing that. It was a dangerous situation but his Succubi held long enough to avoid the collapse of the center too early. I also think he could have moved Efreet from the sight of Drakons and Well of Souls could start in between the units of cavalry as sometimes it was a bit too far away to inspire.
Other than that he played a very solid game, secured the center early and didn't let me to throw him away from there.
I made tons of mistakes though and I really can't forgive myself that stupid move with the Drakon Lord in particular. He would have been so important later in the game especially.
I am not happy with the deployment. I need to work better on it but I think I didn't leave enough on the left flank to counter Tortured Souls and didn't position units well to intercept the enemy on the right.
When I finally decided to attack through the forest it was already very risky. I had to rout the enemy cavalry to reform and present front to the second cavalry regiment and Well of Souls. I was concerned with the safety of the Mage at the same time and when I moved him behind the forest I could not cast spells. That was a mistake, I should have cast Bane Chant on Stormwind to inflict maximum damage. I can't remember the result of the rolls but I believe I scored quite a lot 2's for damage.
If I succeeded I had a chance to prevail or at least tie the enemy on that flank and allow me to stay in the fight. After that loss I was really in a desperate position and I got lucky with the shooting.
But I made yet another mistake, that is not moving BSB away from Flamebaerers as despite the fact that he wavered I could still move him. That would create a gap between Drakons and him larger than 6" and would have saved them.
EB had 790 points left while I had only 255 that counted for the scenario purpose so he was winning by 535 points. It was a long shot but with Drakons alive I had a chance to save a draw if I got Efreet and Temptress.
I guess the conclusion is that I was simply outplayed regardless and I need to find the better overall plan and avoid mistakes like the one with the Drakon Lord.
It was my first full game with the scenario though and I would like to share some observations about it too. I really like the fact that you have to count your own points in the certain area instead of how much did you kill. In our game we killed a lot of each other but it was all aimed at units that were either in the middle or attempted to get there.
Deployment and the decision to start or go second in particular were affected by the scenario objectives. But look how EB slowed down his units despite the fact that going forward full speed would have allowed him to get into range of shooting next turn and threaten my own lines with Succubi. He also ignored last Bolt Thrower, that was still dangerous because it paid off more to get very expensive Well of Souls into 12" range from the center.
I think from now on we simply will keep playing scenarios as they definitely add great variety to the game. We never doubted it but I believe we are now better prepared to do it.
Thanks for reading and I hope you enjoyed it!
Cheers!
I have a question about that flank charge on to the flamebearers.
ReplyDeleteIt looks to me from your diagrams that that should have been a frontal charge, as you started in his front arc. The section under Flank and rear charges stated you must charge the arc you start your charge move in. What am i missing?
-und_ed
Hi Ed,
DeleteThanks a lot for your comment!
When we checked the relative positioning of the units it showed that the leader point of the Drakon Riders regiment is in the flank arc of the Flamebearers. Drakon Riders barely had the flank edge in their front arc too so if the Flamebearers moved 1 inch further then I would not be able to attack them at all.
I will see if I can create a diagram with a front/flank arc templates to show it better but we did check where the leader point of drakon riders really is.
Cheers!
Ah, that makes more sense.
ReplyDeleteToo much Warhammer, I forgot that the Leader position is what matters.
Big difference that makes!
No worries! We all suffer from Warhammer hangover :)
DeleteThanks a lot for the question again, great to know I have very astute readers that don't hesitate to point out possible mistakes. I really appreciate it a lot!
Cheers!