

Greetings,
I have finally convinced Eastern Barbarian (or wardancer on some forums) that it is a good idea to give KoW a try. I actually didn't have to do much convincing but as always it is more of a problem with EB himself. You see, he simply plays so many games ( I really lost tracks of what he currently plays and collects) that I had to queue for my turn and was just lucky it was with KoW this time. :)
EB considered two army lists for his first KoW game and decided to take Orcs (Abyssals was the other option). It was more challenging choice because Orcs are considered to be more difficult army to command due to general lack of flying units (with the exception of some characters) and shooting. However, my first game against Orcs showed they hit hard and are not that easy to outmaneuver either.
Here is the list EB took:
Orcs - Army List
40 Ax, Horde, Dwarven Ale - 215
- 10 Skulks, Troop - 75
- 10 Skulks, Troop - 75
- War Drum, Monster - 80
- Krudger, Hero, mounted, Goblin Zappy Sneak - 165
20 Ax, Regiment - 125
- 10 Skulks, Troop - 75
- Godspeaker, Hero, Fireball (9), Heal (2) - 85
20 Moreax, Regiment - 200
- Giant, Monster - 190
10 Gore Riders, Regiment - 185
10 Gore Riders, Regiment - 185
6 Trolls, Horde - 190
3 Fight Wagons, Regiment - 170
There were many familiar elements in that army but also a few new ones. In general, I felt the army poses similar threats as the one I fought before but I also know it is very often all about the details that make the difference in the end. Since it is only second game against Orcs I will still try to have a look at this army one by one.
40 Ax - this horde looks as main anvil of the army, axis for all maneuvers and quite a significant threat on its own. Previously I assumed this unit is untouchable for me. Def 5 and every high nerve means it takes a lot of effort to get even closer to routing it. But at the same time I knew I need to try something to hurt it and see what my army can do.
10 Skulks - cheap drops and general annoyance/sacrificial units. They are 75 points each which is still cheaper than many other troops. As before I intended to get rid of them fast as they can mess up with my own movement phase.
War Drum - great addition and great idea for unique element of the army. Very helpful and very characterful too. It becomes a priority for my shooting too (if possible) because it can be instrumental (pun intended :)) for each player plans.
20 Ax - I was intrigued to see this unit in action. I observed a few games with Orcs and Ax tend to be fielded in hordes only. I can see some advantages in having a regiment like that (not being a fan of hordes myself) and I decided to treat it as secondary and smaller anvil.
20 Moreax - Morax is definitely a unit that needs to attack. Even from the front it can deal a lot of damage (don't forget about army wide Crushing Strength!). But a little less defense means that they are also more vulnerable so I wanted to use that against them. Of course they are as tough as almost entire army of mine so it does not mean this unit is easy picking. Quite contrary.
Giant - giants seem to me one of my big problems (damn puns! :)). But I gave them some thought and I think I can take one down with good planning and coordinated action of the certain units, in particular if supported by Bane Chant. Time to see if I can make the theory work!
10 Gore Riders - fast and hard hitting, I expected these guys to be hammers to Ax anvils. My previous game showed that they need to be hurt first in order to be routed so I needed to use some shooting to do so and then play to the advantage of longer charge range of fast elements in my own force.
6 Trolls - one of the most dangerous units in the army, also because they can play a role of an anvil as well as a hammer. Smaller footprint and faster than infantry makes them very good indeed. I was not sure if I have enough tools to remove them, especially that they are not the only threat.
3 Fight Wagons - wagons are quite intriguing choice. Faster than infantry but not as fast as Gore Riders. Good defense, huge amount of attacks but not that cheap for a regiment and as such - quite low nerve. I definitely needed to get rid of them fast as they can be devastating on the charge even with "only" CS(1) and no thunderous charge.
Characters - Eb had only 2 heroes and only 1 source of Inspire so I was curious how that would serve him. Krudger is dangerous because he has quite a few attacks but can easily sneak in to the flank where it hurts even more. Godspeaker will use his Fireball for sure too. Last time I was lucky but I am sure that will not last forever!
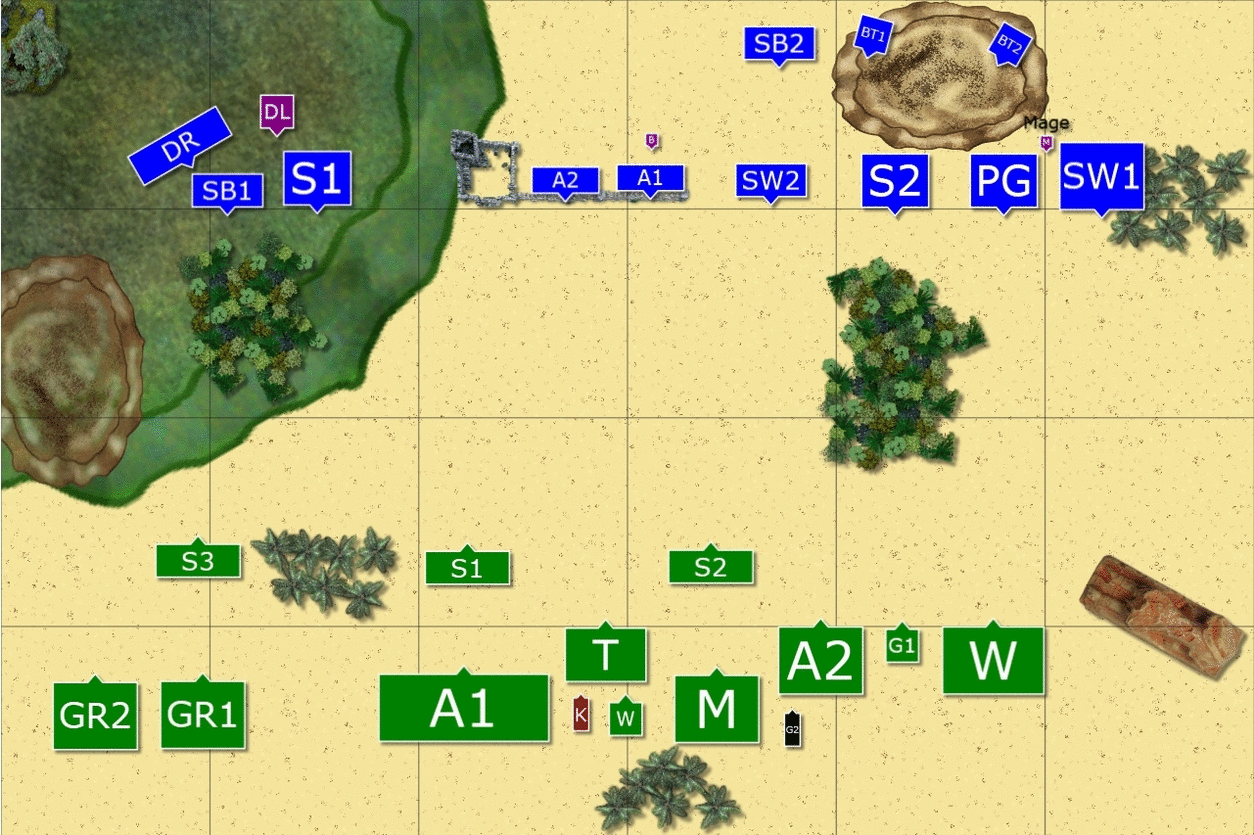
This Orcs army has 14 elements in total, just 1 less than mine so I could not even think about out deploying. I needed a plan for the formation from the start. I consider it as the force that has considerable advantage in melee and is more resilient. If it catches my units it will win the war of attrition.
I decided to use the same army as last time and here is the list for reminder:
Outcasts - Army List
10 Stormwind, Regiment, Potion of the Caterpillar (Pathfinder) - 235
- 5 Silverbreeze, Troop - 145
- 5 Silverbreeze, Troop - 145
- Drakon Rider Lord, Hero, Large Cavalry - 160
3 Drakon Riders, Regiment - 175
- 5 Stormwind, Troops - 140
- Bolt Thrower, War Machine - 90
20 Palace Guard, Regiment - 150
- 10 Archers - 115
- 10 Archers - 115
- Bolt Thrower, War Machine - 90
20 Spearelves, Regiment - 140
- Elven Mage, Inspire, Bane Chant - 110
20 Spearelves, Regiment - 140
- Battle Standard Bearer, Hero - 50
I intended to use speed and shooting to my advantage, putting some damage on certain regiments (or routing them if I get lucky) and trying to pick the combats I could win fast so that I could reform before the counter attacks comes.
Terrain
 |
| Terrain |
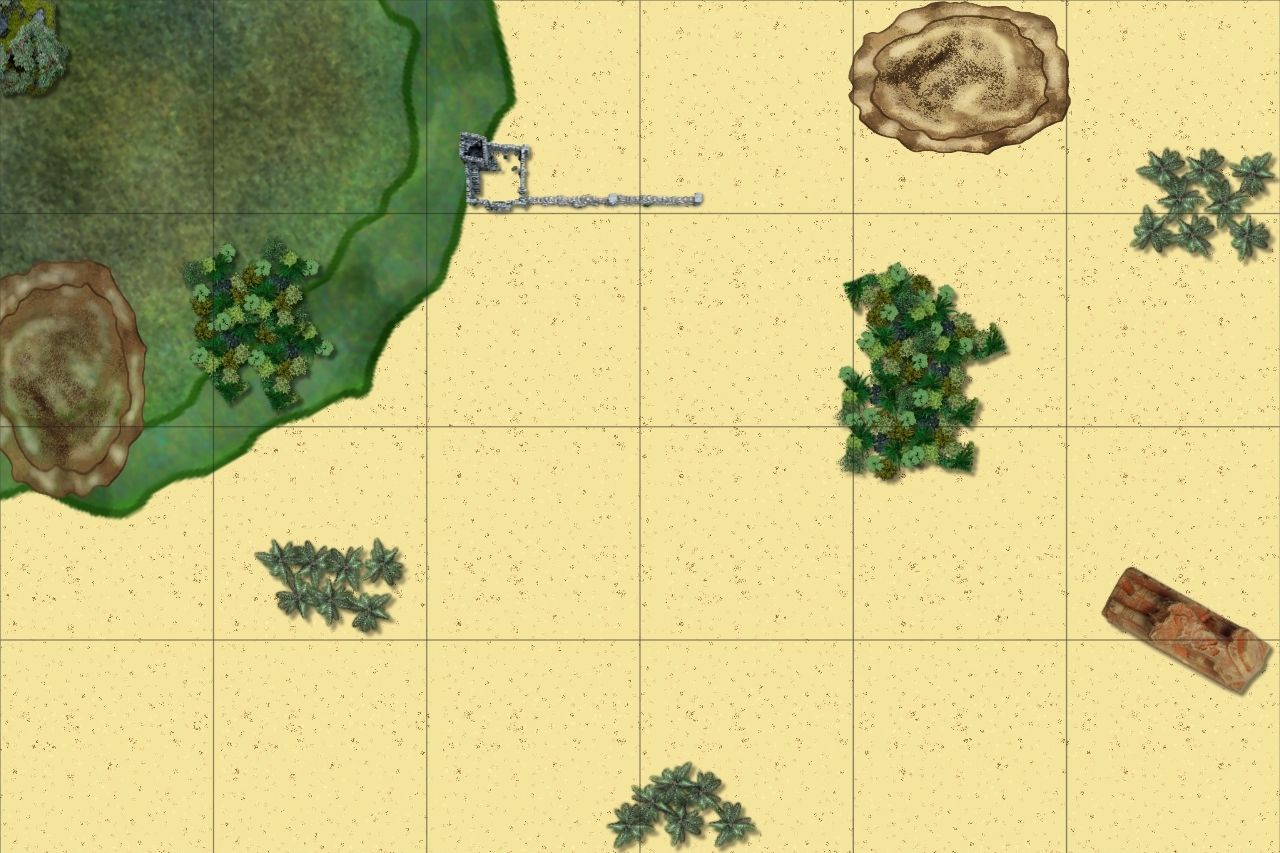
The green field in the left top corner is still open ground. It is to represent the map that had both desert and grassland on it. We had two hills of height 2, Sphinx was blocking terrain of height 3. The wall was close to some ruins that were difficult terrain but otherwise didn't affect line of sight. Forests were agreed to be height 4.
Deployment
 |
| Deployment Order and Vanguards |
I won the roll off to pick the sides and chose North because I could not resist getting a hill for my bolt throwers. I wanted to use forests on each flank either to force charges through them and then countering or to allow Storm Wind regiment to have an advantage and be able to attack unhindered.
Deployment Order:
1. Bolt Thrower (BT1) - Skullks (S1)
2. Bolt Thrower (BT2) - Skullks (S2)
3. Silver Breeze (SB1) - Skullks (S3)
4. Archers (A1) - Ax (A2)
5. Archers (A2) - Trolls
6. Spearelves (S1) - Ax (A1)
7. Silver Breeze (SB2) - Giant
8. Spearelves (S2) - Moreax
9. Storm Wind (SW2) - Krudger
10. BSB - Godspeaker
11. Palace Guard - War Drum
12. Drakon Riders - Wagons
13. Storm Wind (SW1) - Gore Riders (GR1)
14. Drakon Lord - Gore Riders (GR2)
15. Mage - Vanguards
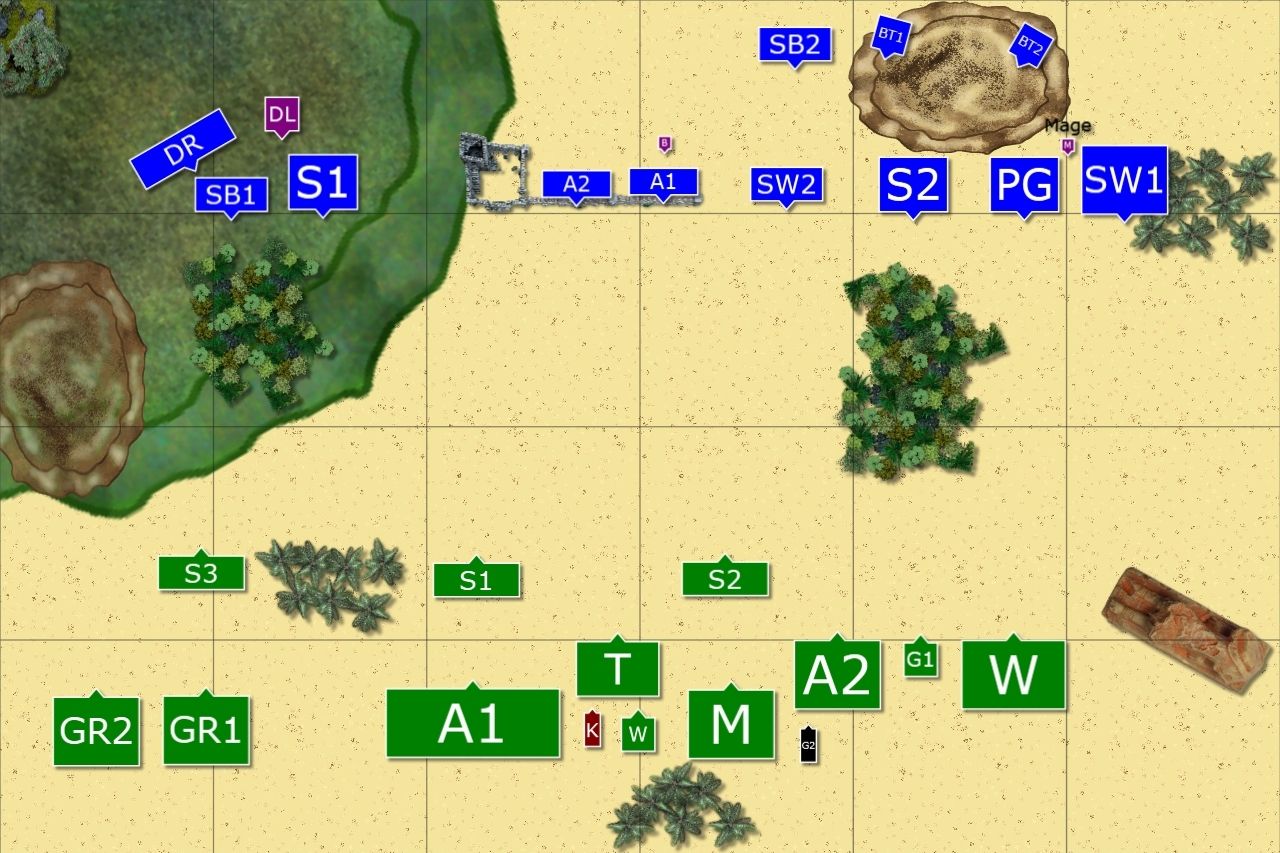 |
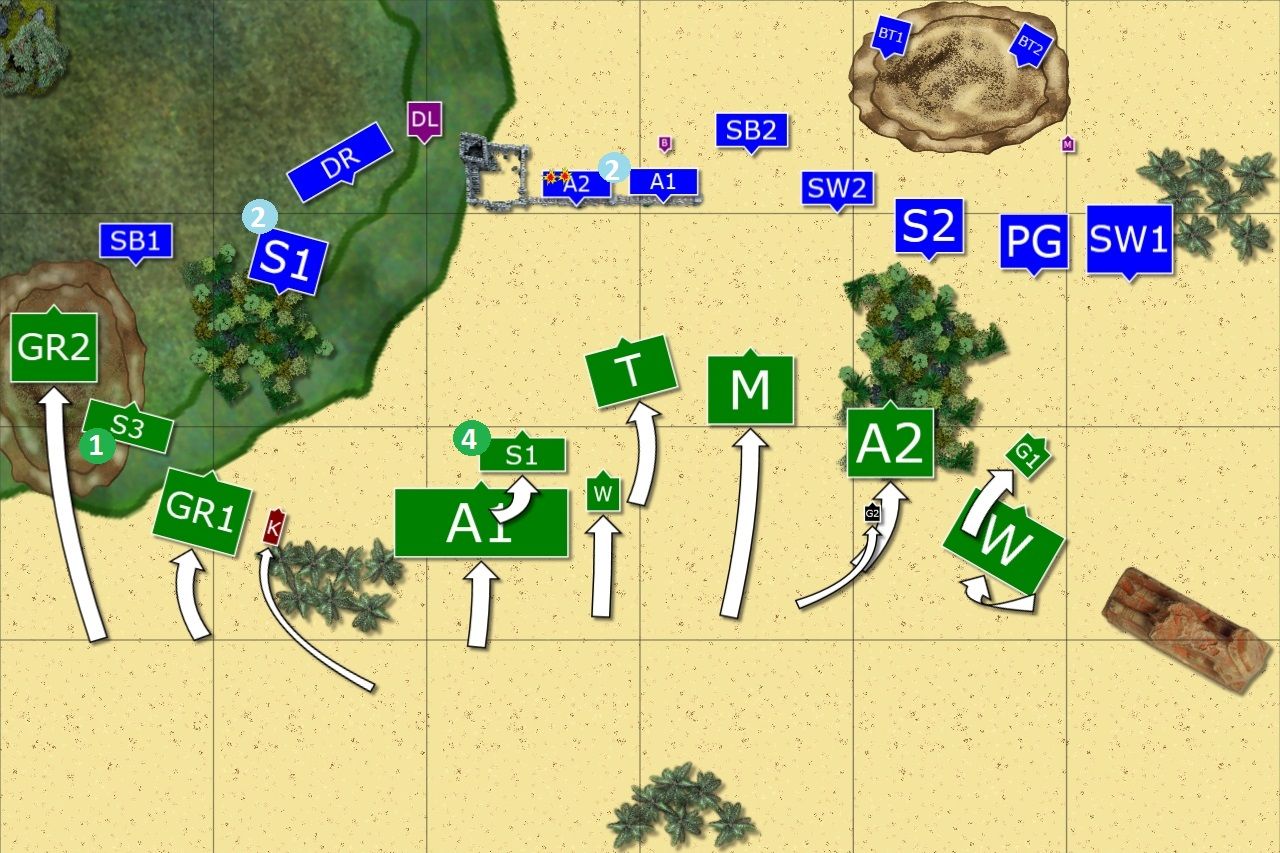
| Final deployment |
When we started deploying I was not sure about all the details of my own formation. I knew I wanted bolt throwers on the hill and archers defending the wall. I wanted fast cavalry to be close to start shooting at the enemy turn 1 but at the same time didn't want to lose them to lucky shots as last time. Because of that I deployed one unit behind the forest and the other one in second line.
Then I wanted to group each regiment of spears with other units instead of working as a team as I tried to do that earlier. The reason was that I didn't know where the gore riders would be deployed. So I wanted to use spears to try and lure them into attack inside the forest where they would be hindered and lose their TC. Of course that was a very obvious trap but allowed me to put some pressure on. In order to have a good chance to make it happen I positioned spears on both flanks.
After that it was a tough decision about which flank to reinforce and if I should spread the forces evenly. Initially, I planned to move Stormwind regiment on the left, with the support of Palace Guard and a Mage for Bane Chant. Drakons, Storm Wind troops and Lord would use the forest on the right flank to get behind enemy lines.
However, when I saw the horde on the right flank I decided I have a better chance to overcome right flank despite presence of giant there. In addition, when EB positioned his Gore Riders together on the left I felt I can have speed advantage there as well. I was really happy I had Pathfinder on my heavy cavalry though as it was very important to be able to charge fast and hard unhindered.
It was kind of funny because on one hand I was super excited I came up with some kind of plan and then I still altered it during the deployment phase :)
EB won the roll off and he chose to begin.
Orcs - Turn 1
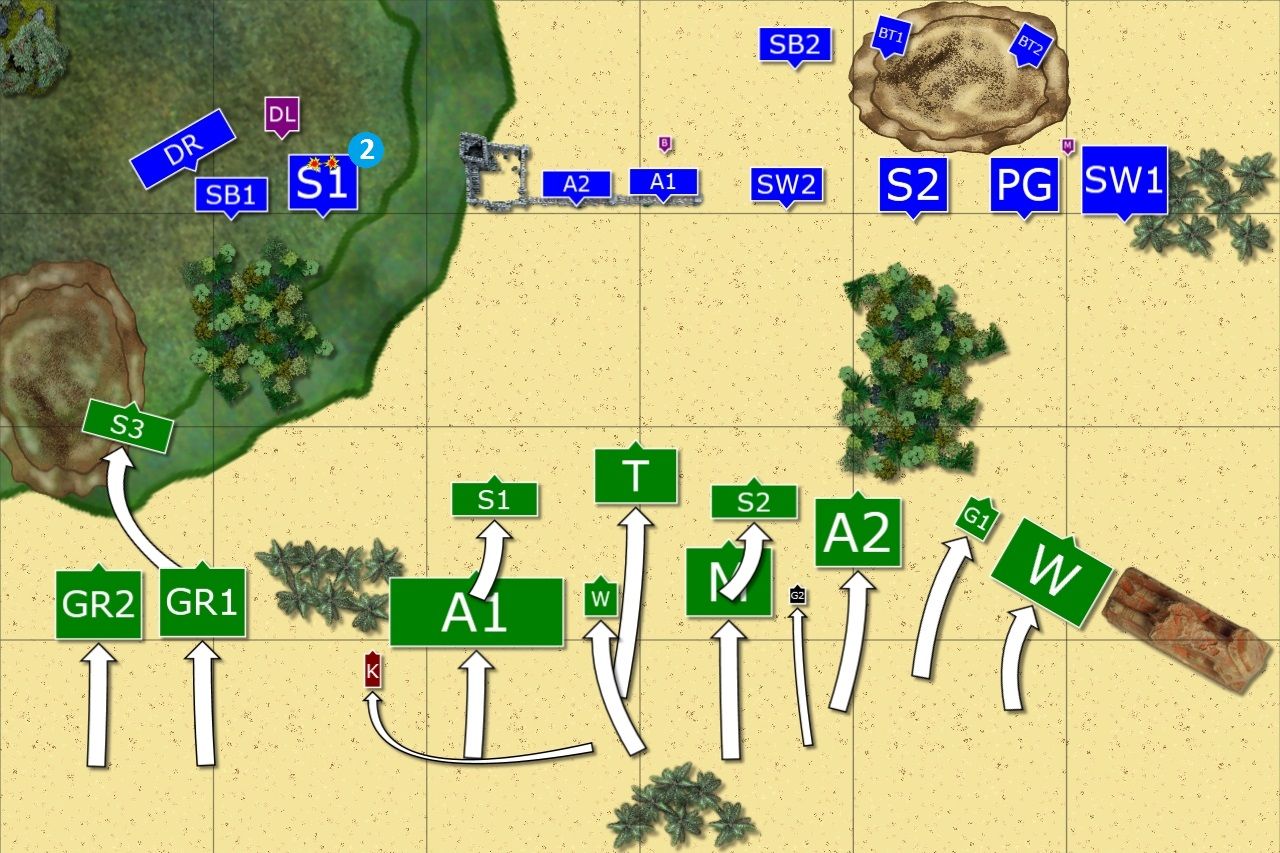 |
| Orcs advance |
Orc army advanced along whole line, with units in the center moving the fastest. Only Skullks could try and attack the enemy at a distance and some Spearelves were damaged a little.
Outcasts - Turn 1
 |
| Elves fire at Skullks only |
Elves maneuver on the flanks instead but advance carefully while the shooters aim at Skullks mainly and one of the troops is routed as a result. Bolt Thrower aims at wagons but fails to hit yet.
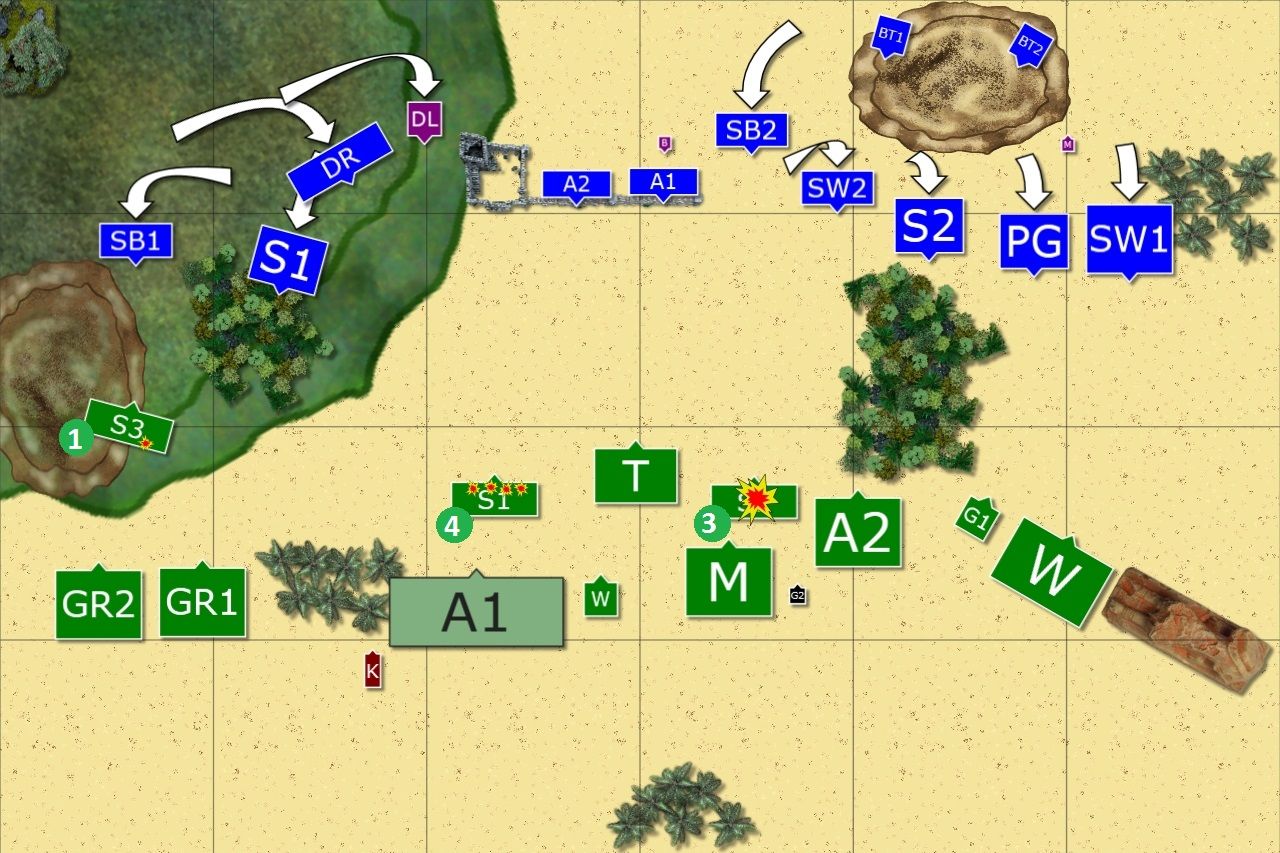
Orcs - Turn 2
 |
| Orcs press forward! |
Orcs moved towards their enemies at a steady pace, getting into range distances and pressing harder on the left flank. Skullks kept shooting at the elven light troops but to no effect yet.
Outcasts - Turn 2
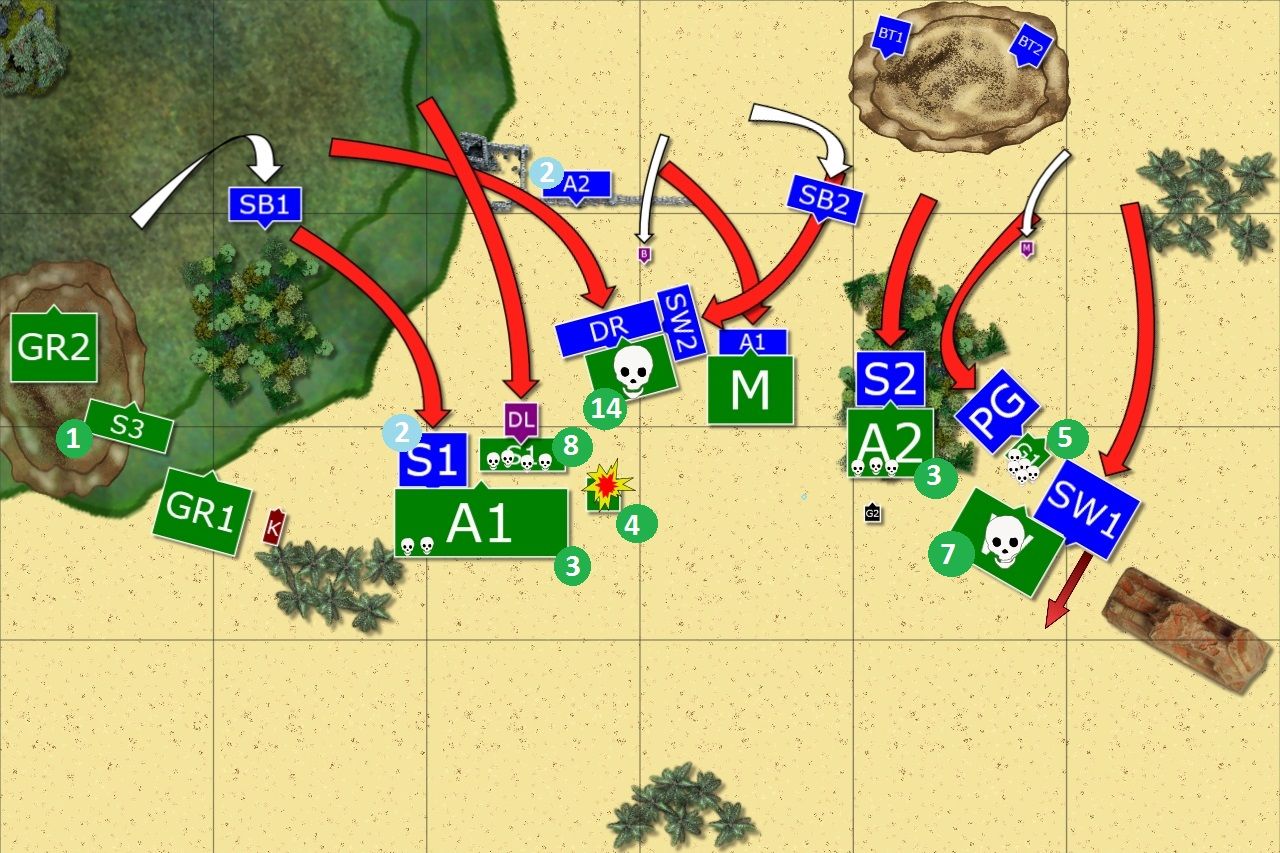 |
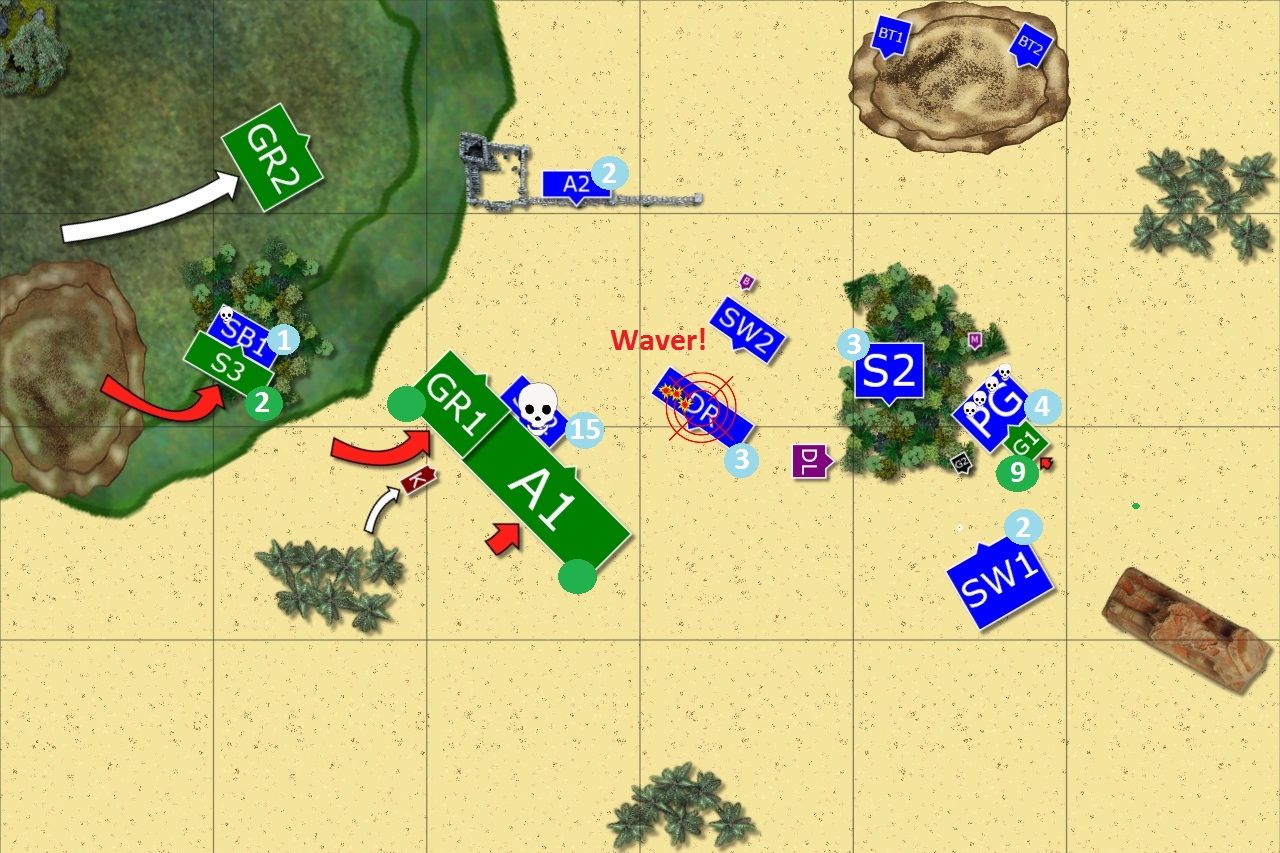
| Massive all out attack by the Elves |
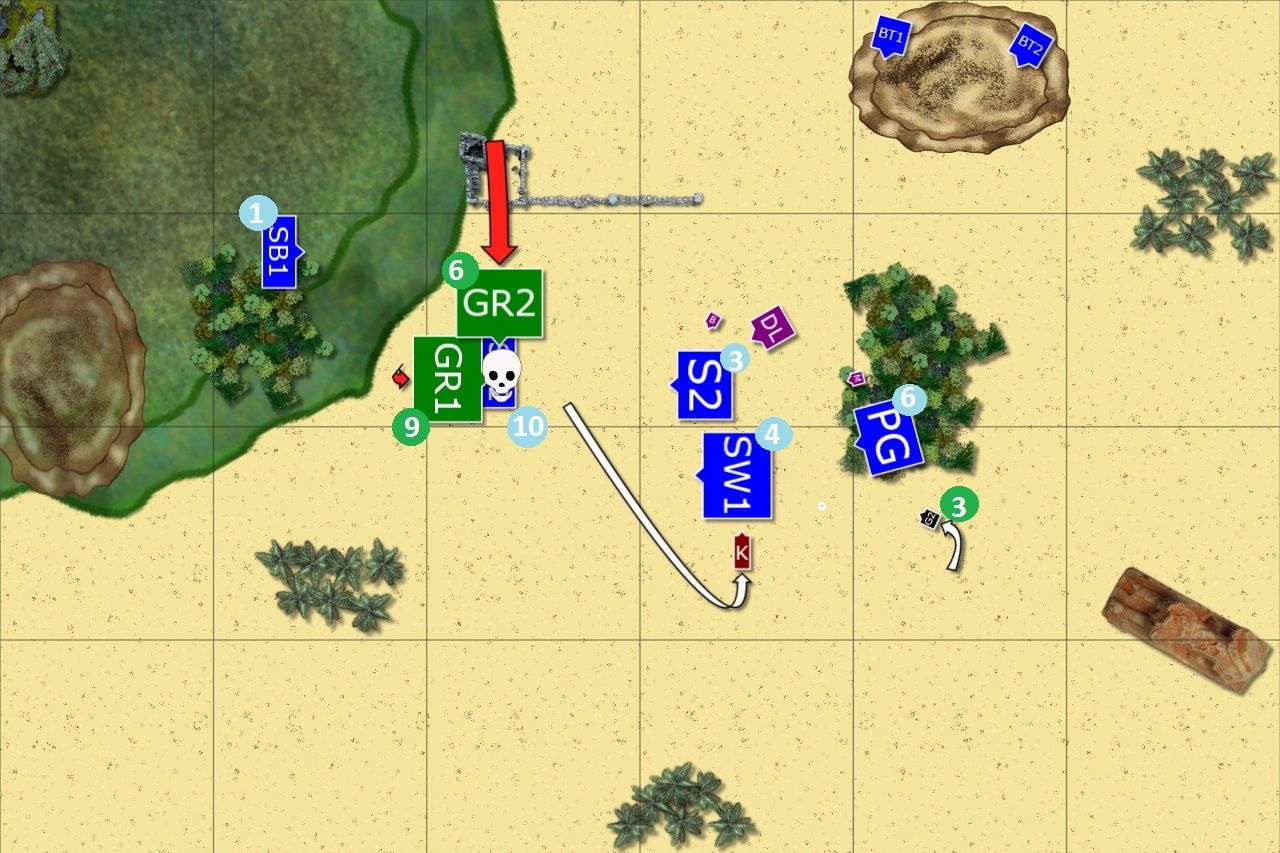
Elves decided that the best way to defend is to attack and almost entire army charged their foes. On the Western flank, Spears charged out of the woods against the horde of Ax in noble sarifice to buy time for their companions. Thanks to them, Drakon Lord could clear out the nearby Skullks while Drakons and Storm Wind squadron charged trolls.
Big brutes didn't keep the formation well and exposed their flank. The charge was perfectly timed as bolt thrower crews managed to destroy the war drum and trolls lost their march rhythm as well. The confused creatures didn't know what hit them and even their regenerative abilities were not enough to repel such a thunderous charge.
Nearby Morax were distracted by brave archers and Spearelves on the Eastern flank did the same with Ax regiment. That helped Palace Guard to tie the Giant in a mortal combat and allowed Stromwind regiment to destroy Wagons on a charge!
That was a massive blow to Orc army but the battle was far from over.
Orcs - Turn 3
 |
| Orcs counter charge! |
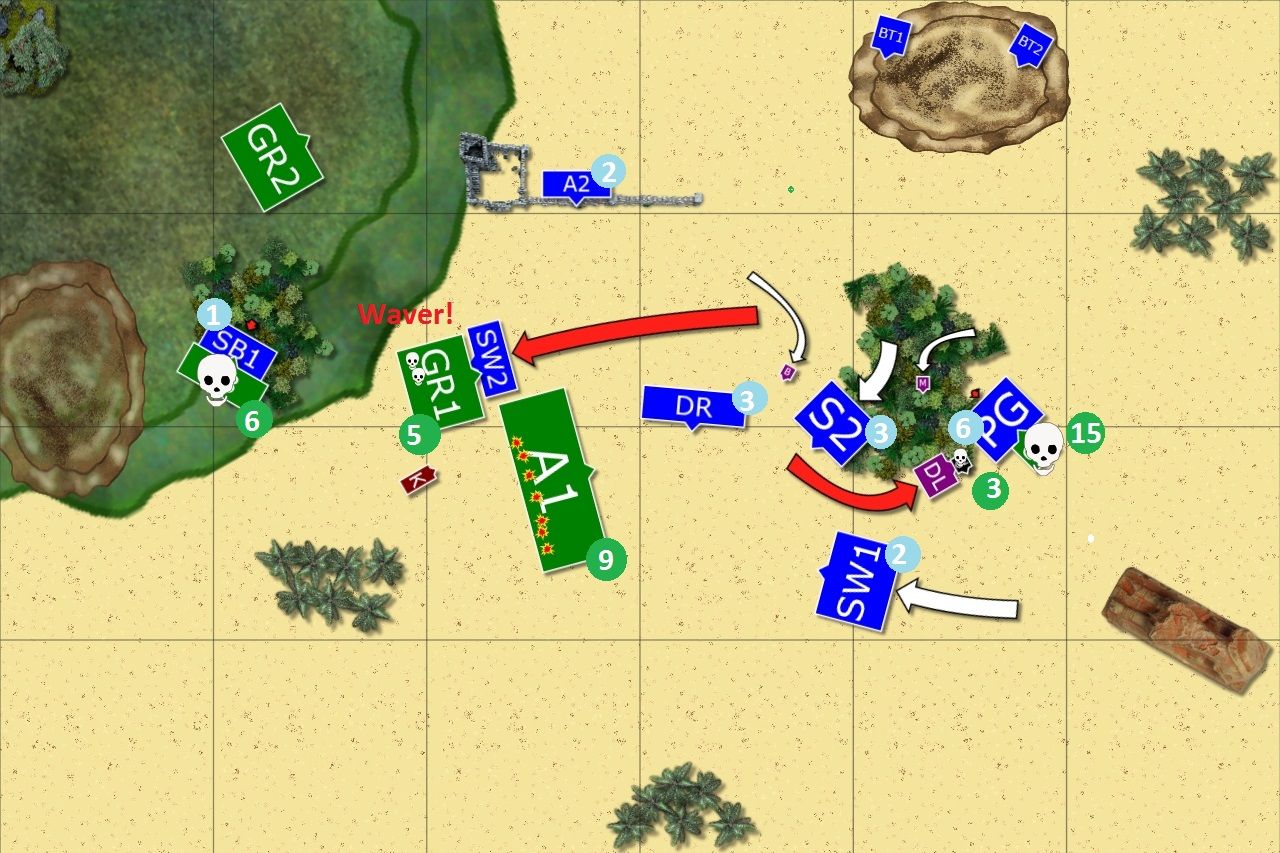
Orcs got even more eager to fight the Elves after they showed they might actually be worthy fighting for since they didn't hide behind the walls and charged into close combat instead.
Gore Riders and Ax horde destroyed poor Spearelves who bought a little time for the assault troops in the middle to regroup. Morax gave no chance to Archers either. Ax regiment didn't have such an easy job in the forest but still managed to waver their opponents. Only Giant failed to impress Palace Guard who was now ready to attack again.
Outcasts - Turn 3
 |
| Exchange of the blows continues |
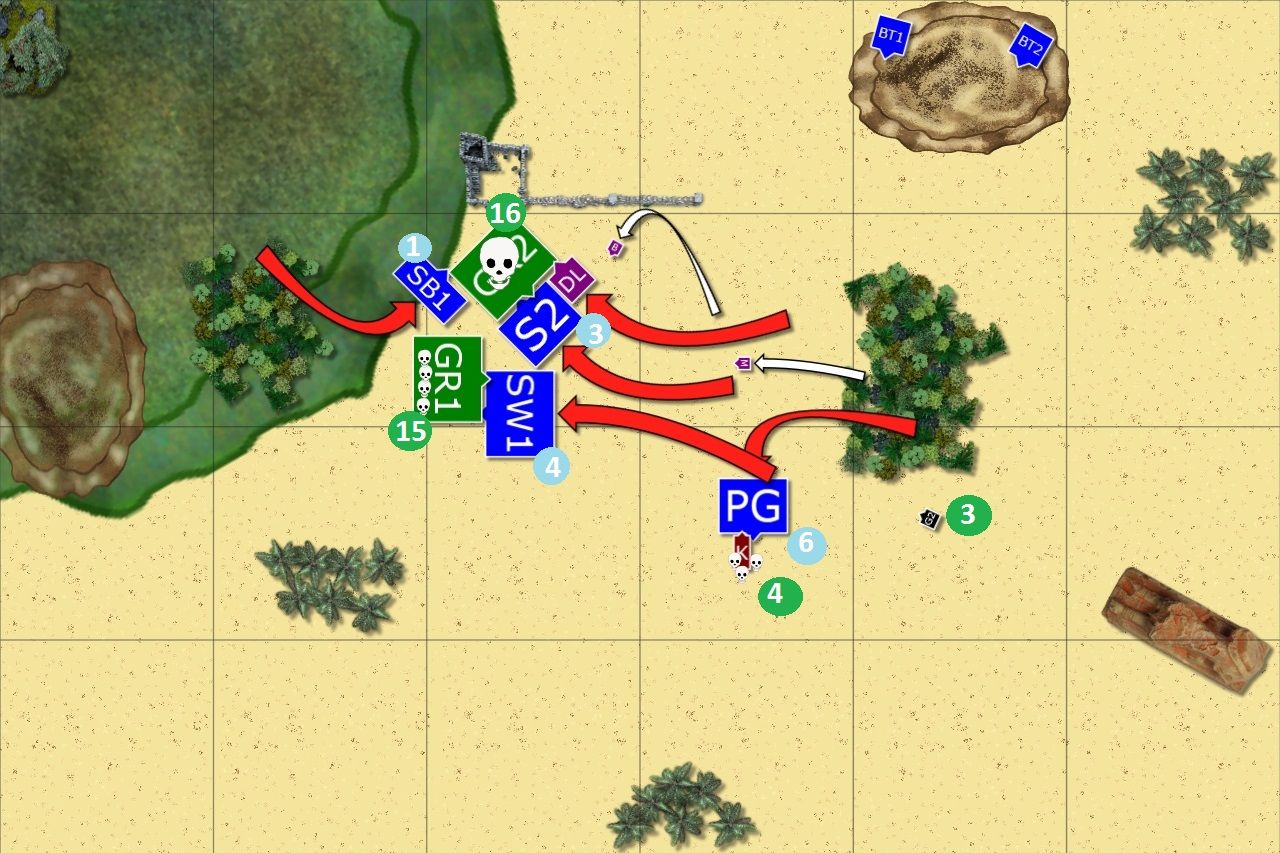
Using their famous speed Elves shifted the direction of the fight towards the Eastern flank and kept attacking. Drakon Riders and Storm Wind squadron charged Morax that were in the open and routed their enemy. Drakon Lord flank charged Ax regiment that was temporarily pushed out of the woods and that unexpected attack routed them too!
Palace Guard harmed the Giant some more while nearby Wizard healed them a little as they would need any help to surive another counter charge before the cavalry could save the day.
Shooters did some damage here and there that seemed not important now but could make some difference in the inevitable fights.
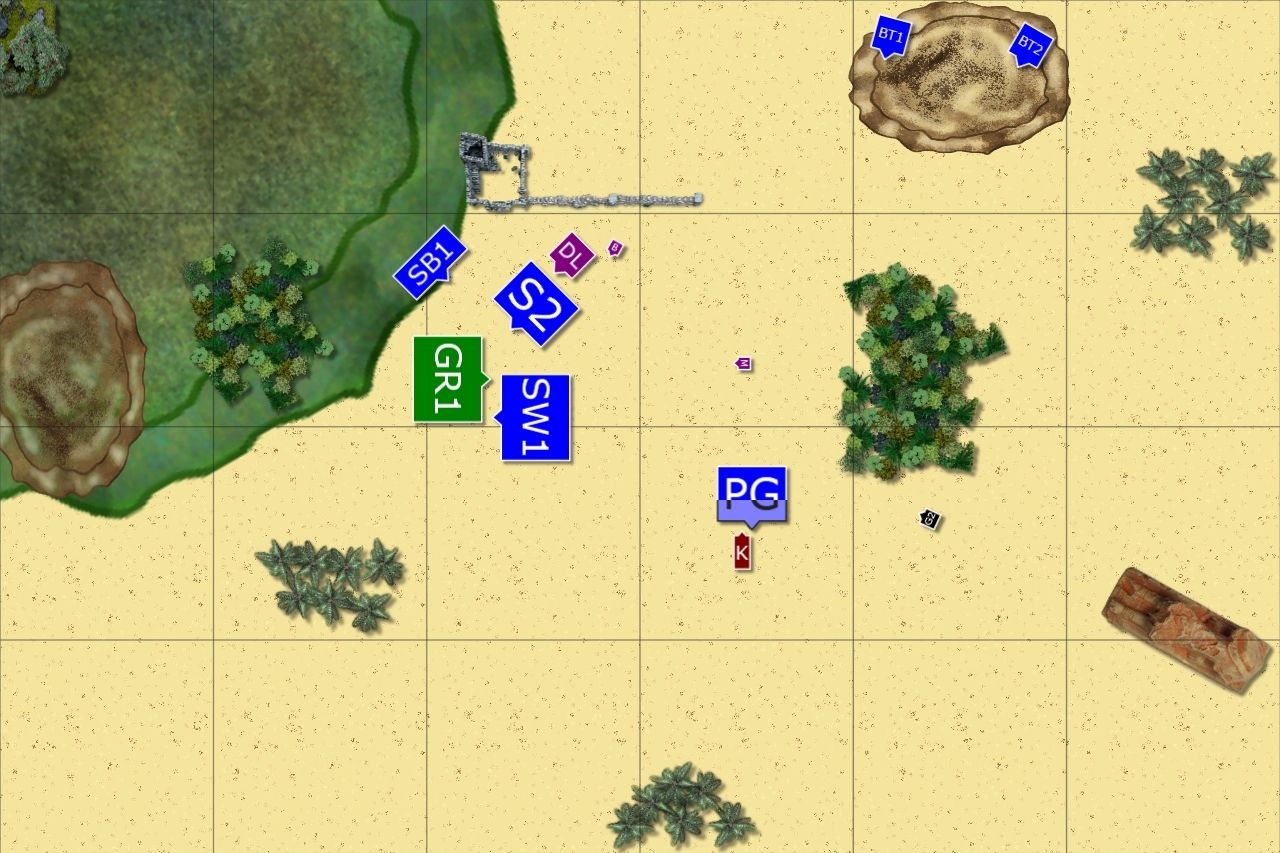
Orcs - Turn 4
 |
| Orcs attack but are slowed down |
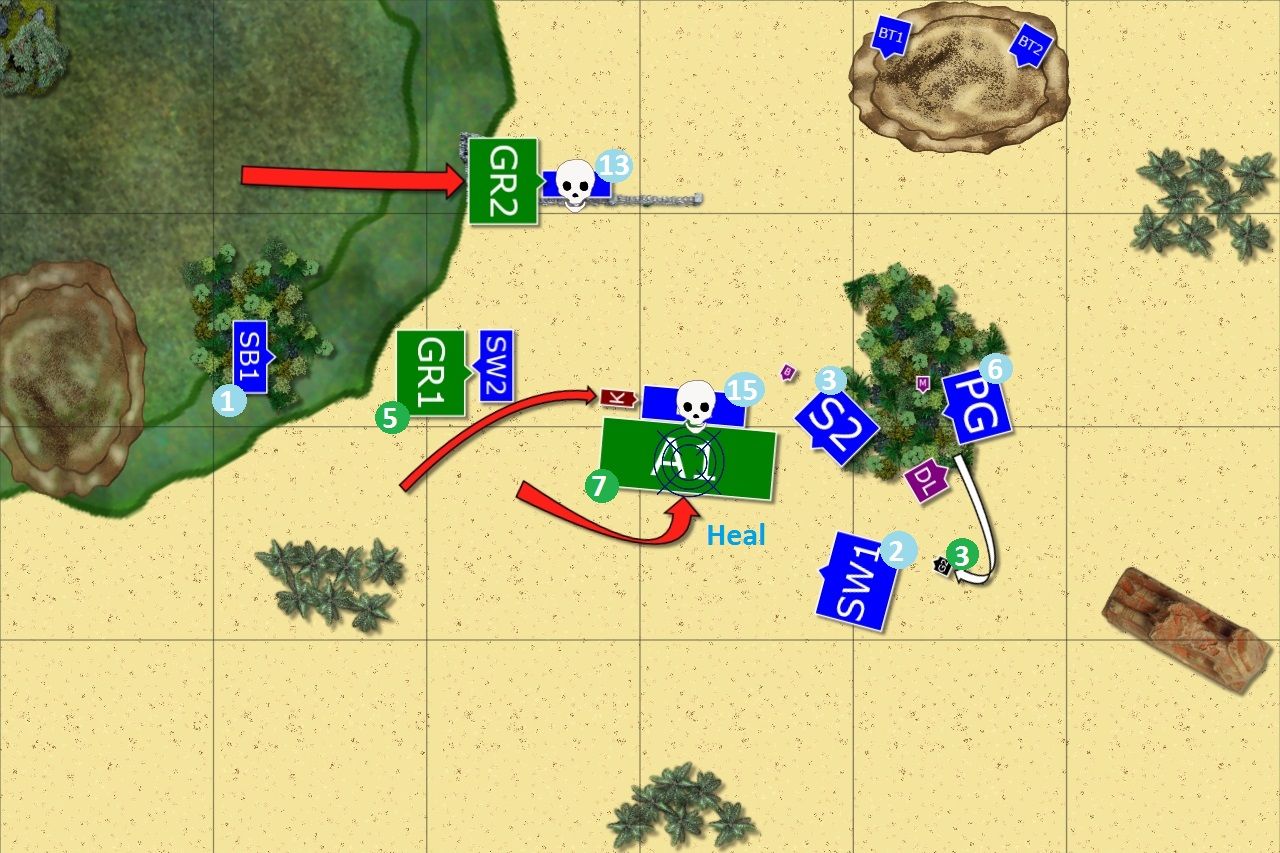
Orcs had to attack some light cavalry before they could get to the more juicy targets as Elves slowed their advance as much as they could. Krudger used his zapping skills and aimed at nearby Drakon Riders and managed to waver them! That looked like a postponed execution for them.
Giant charged one more time but Palace Guard held fast (Edit: It seems I made a mistake, PG had 6 damage points after this attack.)
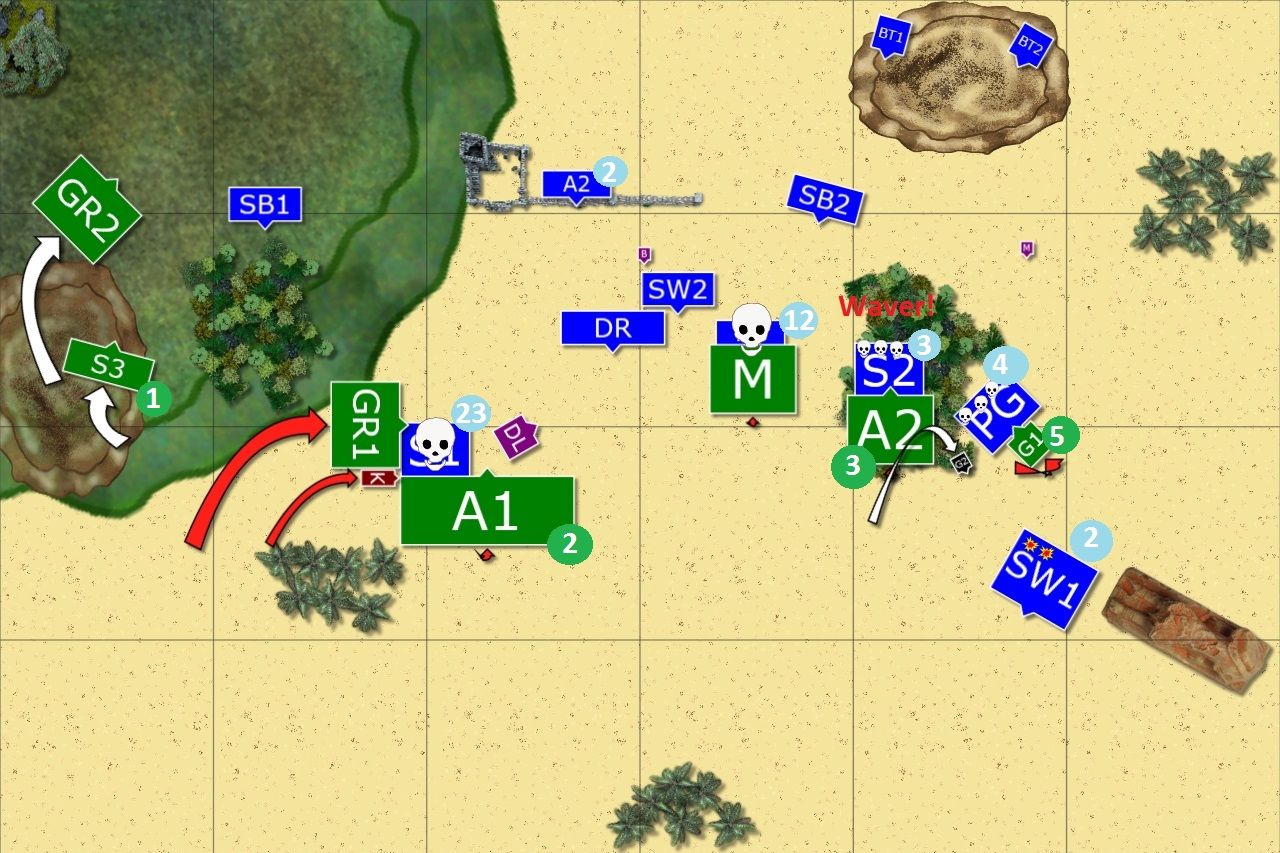
Outcasts - Turn 4
 |
| The situation was becoming more tense! |
Storm Wind squadron charged past the horde and attacked damaged Gore Riders and while they didn't hit hard enough to rout them, Elven knights managed to waver their enemies!
Drakon Lord hoped to destroy the Godspeaker and help Palace Guard with the Giant but could not finish Orc wizard. Fortunately Palace Guard did great this time and fell the monster once and for all!
On the now forgotten Western flank elven light cavalry destroyed last of the Skullks too, while shooters in the middle started to adding to the damage of the Ax horde.
Orcs - Turn 5
 |
| Revenge! |
Ax Horde attacked grounded Drakons and Elven flying cavalry was no more. Gore Riders overrun Archers too. Orcs made Elves pay in blood for all the advantages they might be getting during the course of battle.
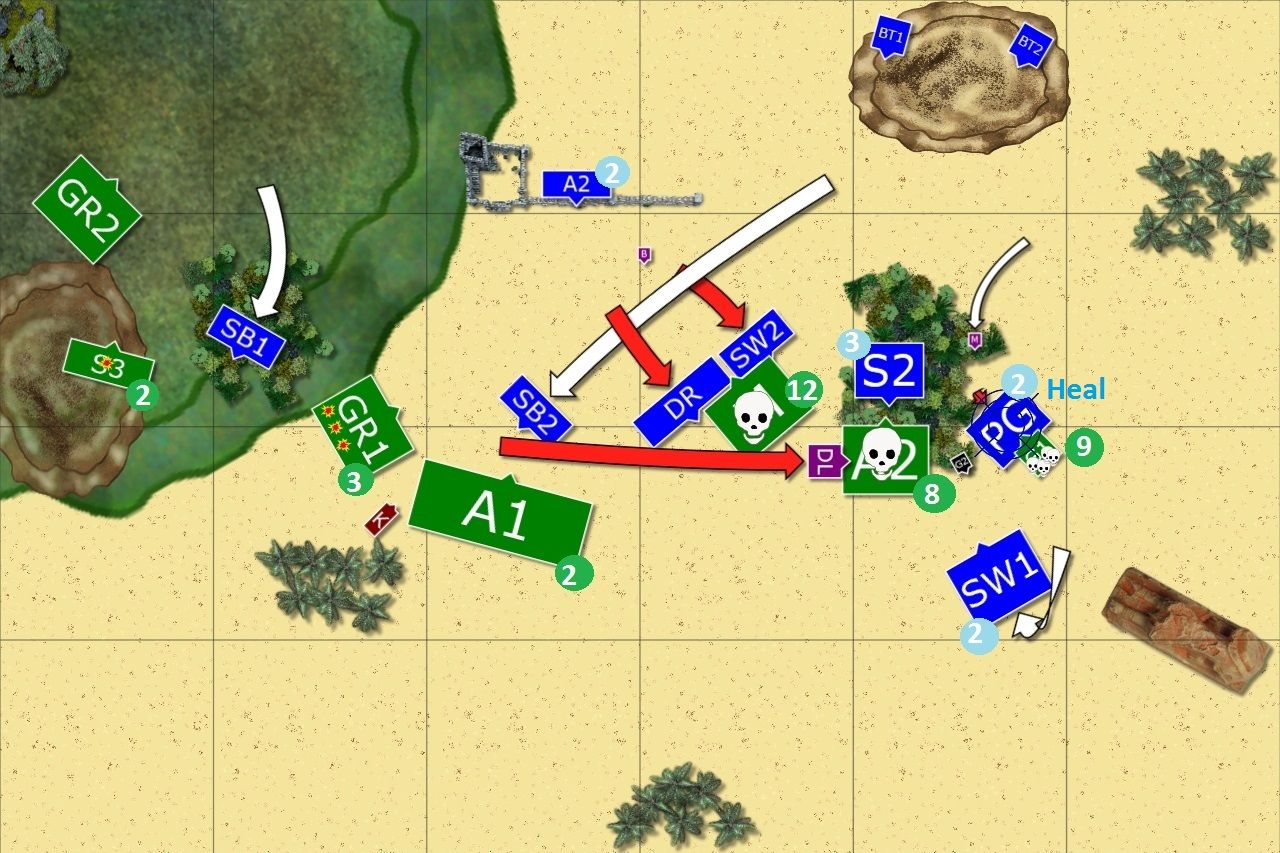
Outcasts - Turn 5
Outcasts - Turn 5
 |
| Another powerful charge of Elven cavalry! |
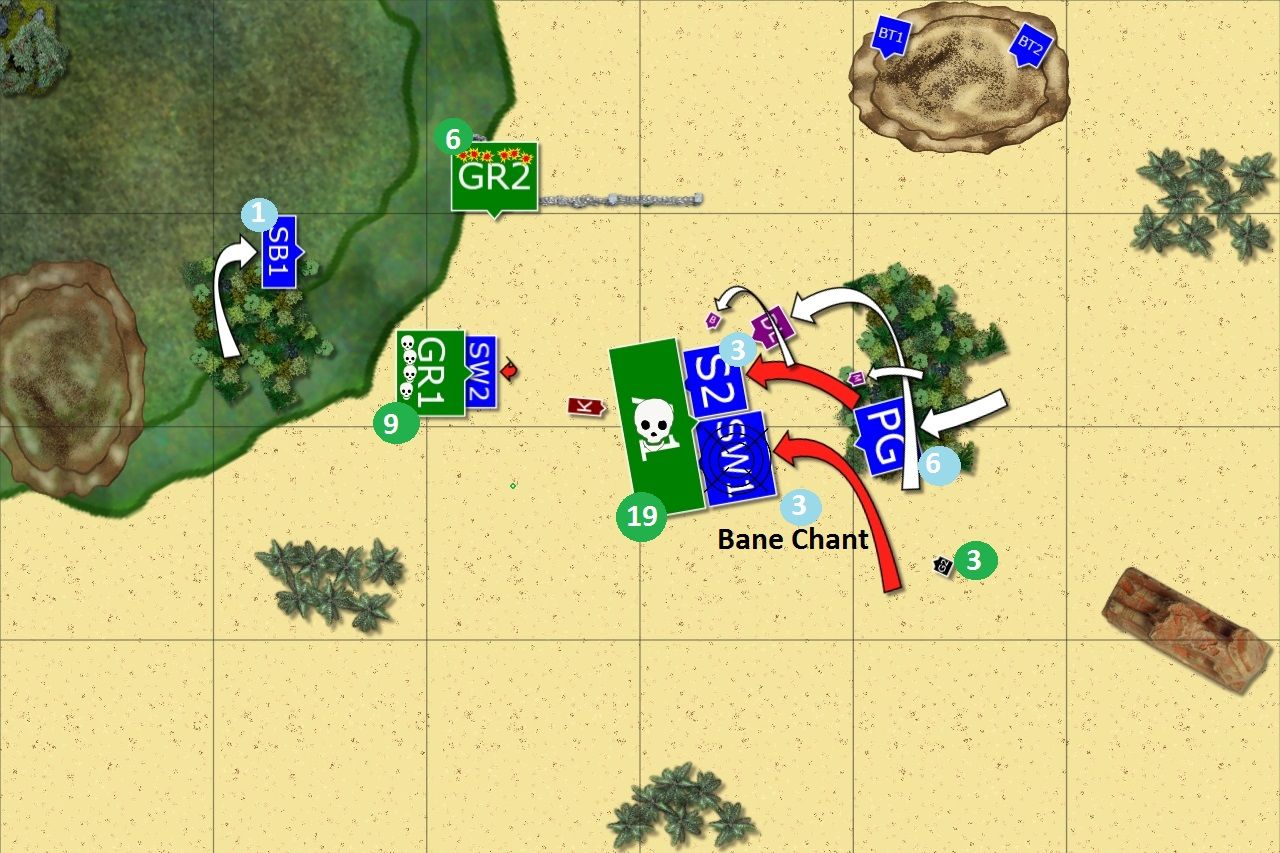
Storm Wind and Spears regiments charged frontally against the Ax horde. It was now or never. Fortunately, Elven mage managed to cast the spell this time and Elven knights hit even harder. That was crucial because they managed to break the horde on the charge.
Nearby Storm Wind squadron charged wavering gore riders but despite inflicting substantial damage they could not shift the enemy. That was bad news because now they would be a target of the attack of not one but two gore riders regiments. (Edit: I did what I could with the shooting but it was double 1's on nerve roll that sealed the deal for Storm Wind troops here!)
Orcs - Turn 6
 |
| Final attack of the Orcs |
Gore Riders destroyed small squadron of the Elven Knights as expected but that was all that Orcs could do. Their fireballs didn't impress Elven cavalry and now their badly damaged regiments had to face counter attack of the Elves.
Outcasts - Turn 6
 |
| Victorious charge |
Spearelves, Silver Breeze and Drakon Lord joined forces and attacked one of the regiments of Gore Riders. The damage was hge and the unit was routed. It seemed the same fate awaits second regiment but despite the fact that thunderous charge of the Elven Knights dealt powerful blow these Orcs didn't break! (Edit: Guess what, another double 1's for nerve test! :))
That attack allowed Palace Guard to charge the Krudger but Orc general managed to survive that charge. After that he decided it is a good idea to withdraw and call reinforcements to take on the Elves another time.
 |
| Survivors of the battle |
Summary
 |
| Turn-by-turn summary animation |
After-battle thoughts
We didn't get the 7th turn but it was clear Elves were victorious. I was very happy to get that result and I would like to thank EB for the game and in particular for the fact he kept fighting despite early heavy blows. Please, note that despite the fact it was his first game he still managed to destroy half of my army!
I am happy the plan worked although I am fully aware I had some good nerve rolls when needed and that I managed to spot the opportunities. For example, I got the war drum early. Otherwise it would add to nerve values and not always it would have been possible to route the units as I did.
The mistakes EB made when exposed flanks were really minor in terms of angles and they just show it pays off to spend that extra few seconds to double check what is where. It just happens sometimes that even after some games one can simply forget and to tell you the truth until I checked I thought they are frontal attacks too.
I was also lucky to roll high enough to avoid giant to the flank of Storm Wind cavalry when they destroyed Wagons. Otherwise it would have been tough for them, in particular that the mage with Inspire was not in range.
I must say I was happy to see that this Elven army I field actually can hit hard too. I really like the fact it is also fragile and I need to co-ordinate the movement of the units well to make it possible for them to attack as teams. Thanks to that I could destroy tough enemy units such as trolls or Ax horde. I was also happy to see that Palace Guard can be a match for a giant.
I definitely made some mistakes too. For example, I should have moved my remaining archers as they were in charge range of gore riders while I fooled myself with the ruins and forgot they can still be attacked. My mage could not cast a spell this time. Even with re-rolls of 1's I got two spells out of six attempts. I hope he will get better!
Interesting observation was that it often paid off to charge the enemy not because I could do a few points of damage but because I could block them more efficiently. If I moved with just one pivot I would not be able to get close enough to block them but charge put my units where I wanted them. It still meant I lost the regiments in the process but at least I could choose which ones I lost and managed to use the exchange to get a bigger prize.
As I said I was impressed EB killed half of my army anyway and I expect our future games will be much closer.
Thanks for reading!
Thank you for yet another awesome Kings of War battle report! I love the Multiple Small Units. I believe MSU to be a counter to both shooting hordes with +1 to hit and a counter to lists with a lot of flyers. Did you just break the meta?? :P
ReplyDeleteTheNotoriousGorilla
Hi there!
DeleteThanks a lot! I am very happy you enjoyed the report and can tell you that I have just finished another game so you can expect a new report in a few days.
MSU is not as well defined in KoW as it was in WHFB but I simply started enjoying the army I have. I may make small changes here and there (e.g. maybe exchange one troops of archers for troop of palace guard?) but after a few recent games I actually like what I have and will rather try to play against other armies to learn more.
I am not sure if that is going to break the meta (I haven't played against these tough lists yet!) but I am happy to try :)
Cheers!