
Game 2 of Kings of Dave was against Luke and his Empire of Dust. I haven't had a chance to play against him before so it was a great pleasure to meet a new opponent too!
My first encounters against this army were not particularly successful. I hoped it was due to the fact these were my first games in Kings of War and was looking forward to the opportunity to see if I learned enough in the meantime to prevail against my nemesis!
Luke brought the army that had some familiar elements but also contained quite a few completely new units to me. I was thus very curious to see what they are capable of and how to deal with them.
Empire of Dust - Army List
40 Revenants, Horde, Casket of the Damned - 210
- Balefire Catapult, War Engine - 100
- Ahmunite Pharaoh, Hero, Wings of Honeymaze - 195
40 Skeleton Archers, Horde - 165
- Balefire Catapult, War Engine - 100
- Revenant Champion on Warm, Hero - 135
40 Skeleton Archers, Horde - 165
- Monolith, War Engine - 80
- Cursed Priest, Hero, Breath (12) + Vicious, Mounted - 155
20 Mummies, Regiment, Casket of the Damned - 180
- Idol of Shobik, Hero - 350
6 Enslaved Guardians, Horde, Casket of the Damned - 255
- Mortibris the Necormancer, Hero (from the Destiny of Kings campaign) - 210
6 Swarm, Horde, Crystal Pendant of Retribution - 150
There quite a few heroes in this army but it still has 14 elements total. That is quite interesting and something I am still getting used to in Kings of War. There is a significant amount of shooting in this army too, which I kind of expected. But let's see what the army is comprised of in more detail:
40 Revenants - tough infantry with defense 5+, not possible to waver (something to remember when fighting against Undead). Looks like a proper anvil for the army, although 25 attacks can hurt any unit. I also need to remember about Casket of the Damned, as there are quite a few of them around. I must say it makes a bit more tricky to predict where the unit may be and what it can attack. On one hand the horde is even slower than its counterparts in other armies. On the other it can be faster with Surge and good dice rolls or it can change the direction of advance and then attack from different angle.
40 Skeleton Archers - these are not the best archers in the world but there are many of them. They are also not so easy to rout and require the attention of some hard hitters to do so. Or repeated attacks. They are lightly armored but I expect I would need to use my own shooters to get rid of some other threats (and not always I would be able to focus the shooting on a single target). I assumed I would use my King one way or another to at least disrupt them for a while, after all I took him for such duties.
20 Mummies - another unit of tough infantry with 5+ defense and regeneration too! Very good nerve as well. They have "only" 12 attacks that hit on 4+ but they hit hard with CS(2). I think they are quite versatile due to the fact they can hold some attacks and then hit back. They are more maneuverable than horde formation which from my point of view makes them more dangerous.
6 Enslaved Guardians - I had a chance to play against Archers but not against their melee version. It was interesting to see them because they combine some intriguing abilities. They are obviously made for combat, 18 attacks and CS(2) means they can hit hard. They are tough too, even if they don't sport the Regeneration ability as Mummies. But the most intriguing part is their WindBlast ability and I was very curious how it can be used. In particular that it is the units ability too.
6 Swarm - at first I didn't pay too much attention this unit because I simply treated it as a sacrificial element. Can be very useful, no mistake about it. But then I was reminded about certain magic artifact that was attached to it and suddenly it was a different story :) I think it was a very good idea to give it the Crystal Pendant. The unit does not cost that much with it but can move fast enough (especially with the Vanguard) to intercept an expensive unit of the enemy. I had to make sure to get rid of the Swarm before it hit something important.
Balefire Catapult - long range artillery added more versatile tools to the shooting abilities of the army. I found that with these type of weapons it is a bit hard to take into account their impact on the game. If they hit they can potentially wipe out any unit I have in one go. But would they? Fortunately, I had some fast elements in the army to deal with such threat and I planned to use them for that particular task. It is better to avoid the risk by eliminating the cause.
Monolith - it is one of the units that has new rule introduced in Uncharted Empires supplement, namely Advanced Deployment. I played against it once and I expected it to be placed somewhere in the middle of the enemy deployment zone so that all the casters could benefit from its presence. As you will see later, it was not a correct assumption!
Ahmunite Pharaoh - The infamous flying Pharaoh! I would be playing against one for the first time. He is very tough to kill due to the combination of defense 6+ and regeneration 5+. With flying ability and individual as well as still being an infantry model, this hero is extremely mobile. I decided it would be futile to try and to avoid him entirely so I'd rather try and make sure I don't expose any flanks to him.
Revenant Champion on Warm - first of all, Luke had a great model for this hero. I can't wait to see it painted and presented in all its glory. As he can inspire only the Revenants, I expected him to be somewhere nearby that unit. He can hit hard but with Me 4+ he is not the most skilled of the heroes in Mantica. Not to be underestimated at all though, he can add a few points of damage that can be the difference between holding and being routed.
Cursed Priest - very versatile hero. Faster than most of the units so that he can be where he is needed the most. Another source of Inspire never hurts to have. Surge (10) will definitely be used and in addition, Breath attack. Fortunately, unlike other heroes in this army he is not that heavily armored and given a chance I would try to get rid of him either with ranged attacks or in melee, if he gets exposed to a charge.
Idol of Shobik - The most expensive model in the army. Plenty of special rules to use. Hits very hard for starters and is reasonably fast so I need to be careful in approaching it. Can heal units and combination of Iron Resolve, Lifeleech and potential Heal means that whatever is close enough can quickly recover damage done.
It is also very tough with defense 6+ and very high nerve. It would require a dedicated attack, with the Bane Chant to have a reasonable chance to rout it. Even then I would not expect any of my units to be able to do that on the charge and/or on the undamaged Idol.
Mortibris the Necormancer - another very interesting hero, with full selection of spells but also a nice rule that provides Stealth rule to nearby units. Always good to have. He might not be particularly tough but it is hard to rout it with ranged attacks and with careful positioning it may not be possible to charge it either.
In general, I faced the army with very good and versatile shooting, plenty of inspire sources, huge spells selection and unique maneuverability due to Surge. It looked more compact because it had fewer units but it also had much more flexible and more numerous heroes. As we were about to play Loot scenario I wanted to use the Hunters and their vanguard move to snatch 2 loot counters right from the start. But let's have a look at the terrain and the deployment first.
Terrain
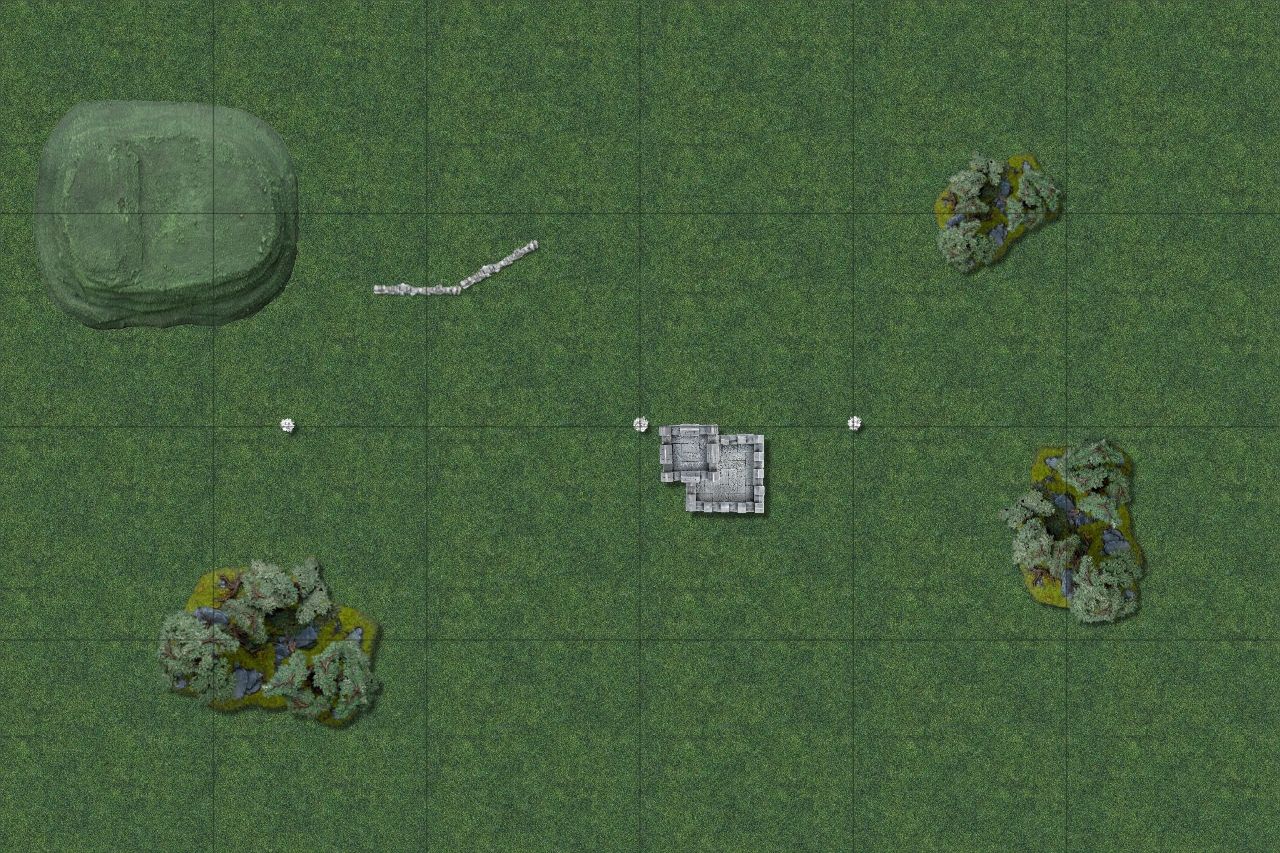 |
| Terrain and loot markers. |
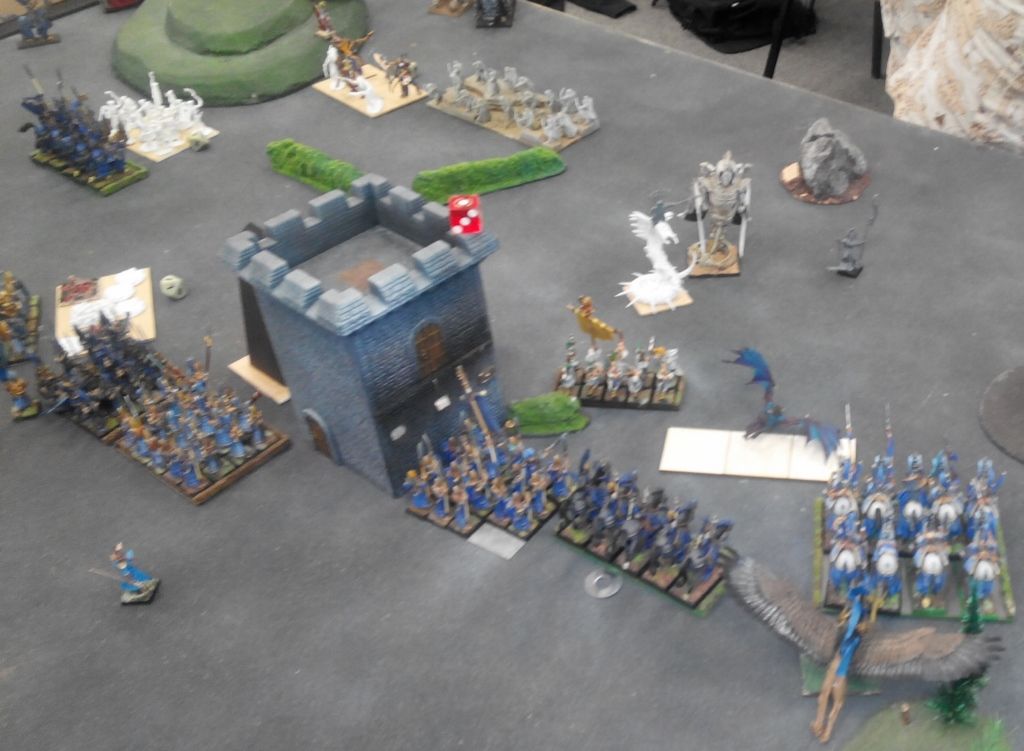
The terrain was relatively simple in terms of variety. The tower in the middle was height turn 4 and the hills were height 2. But simple does not mean not interesting and not being able to impact the game.
Just the fact we had the tall tower in the middle that was not that small in terms of area it occupied either was already good. It divided the battle field and forced both of us to take into account the fact it may be a bit more difficult to go around it. And since it was Loot scenario one may need to try and move around anyway.
The hill and the nearby obstacles were good defensive positions so I was not surprised Luke picked this side of the table when he won the roll off.
The woods offered some good defensive positions against the shooters too but as they were spread in the corners I didn't expect them to play significant role in affecting the movement of the armies.
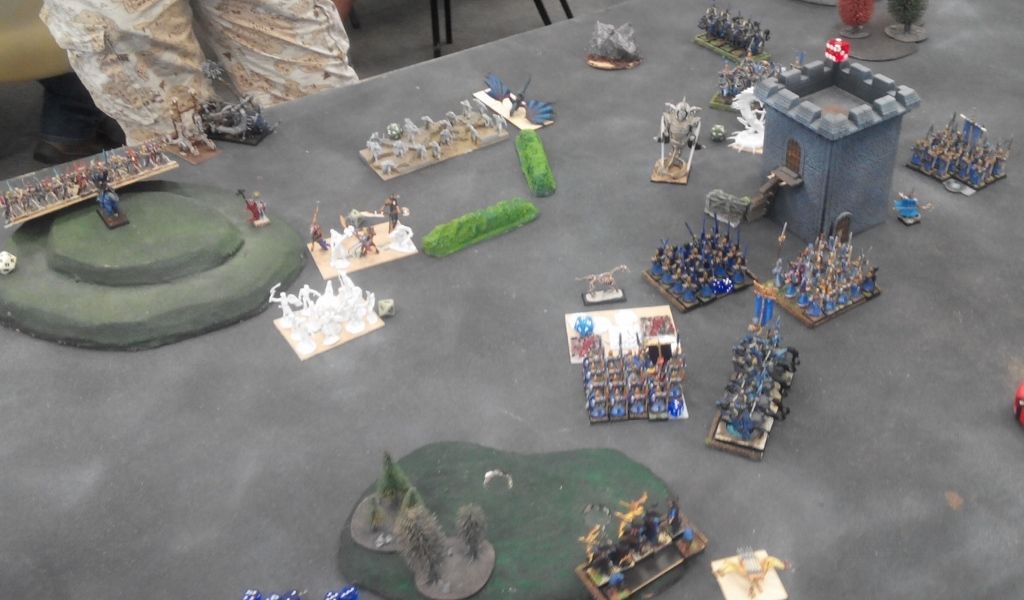
Deployment
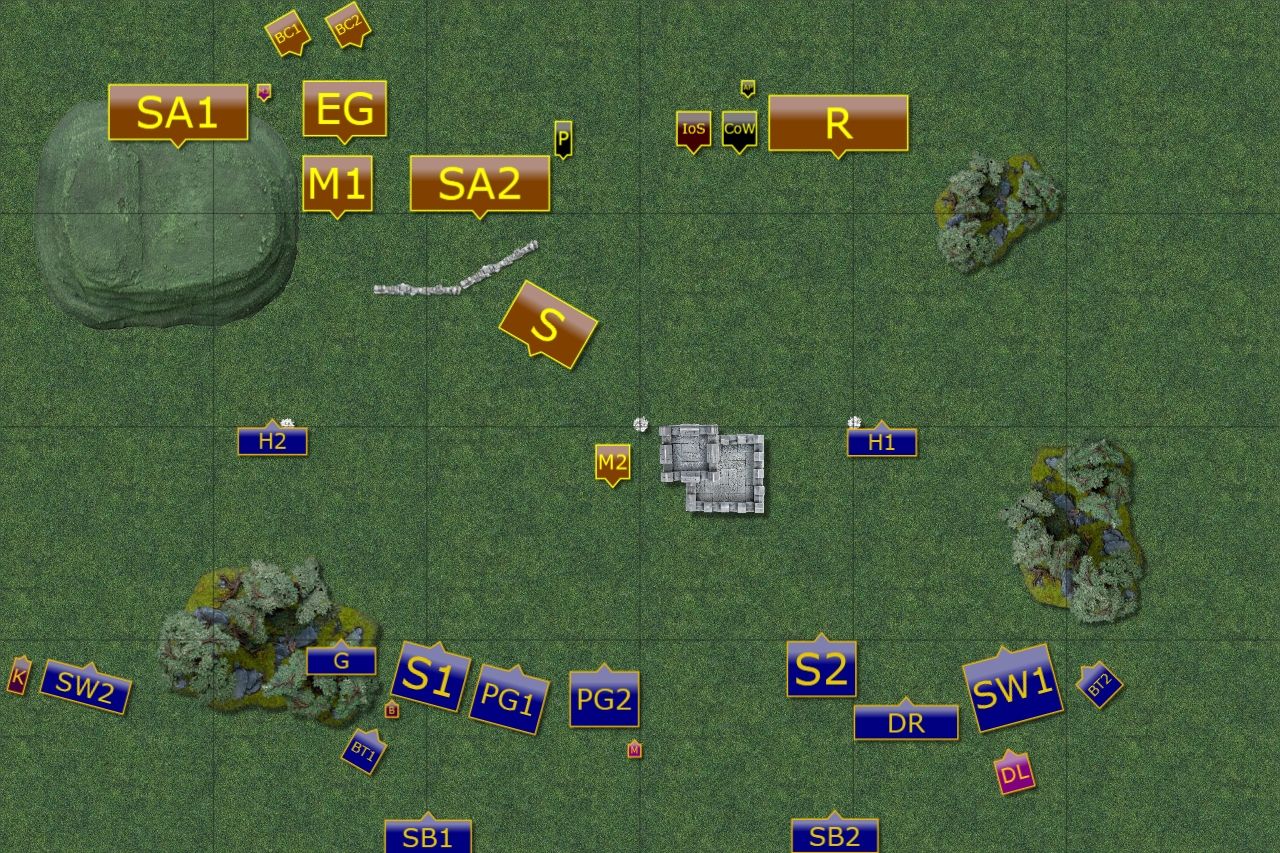
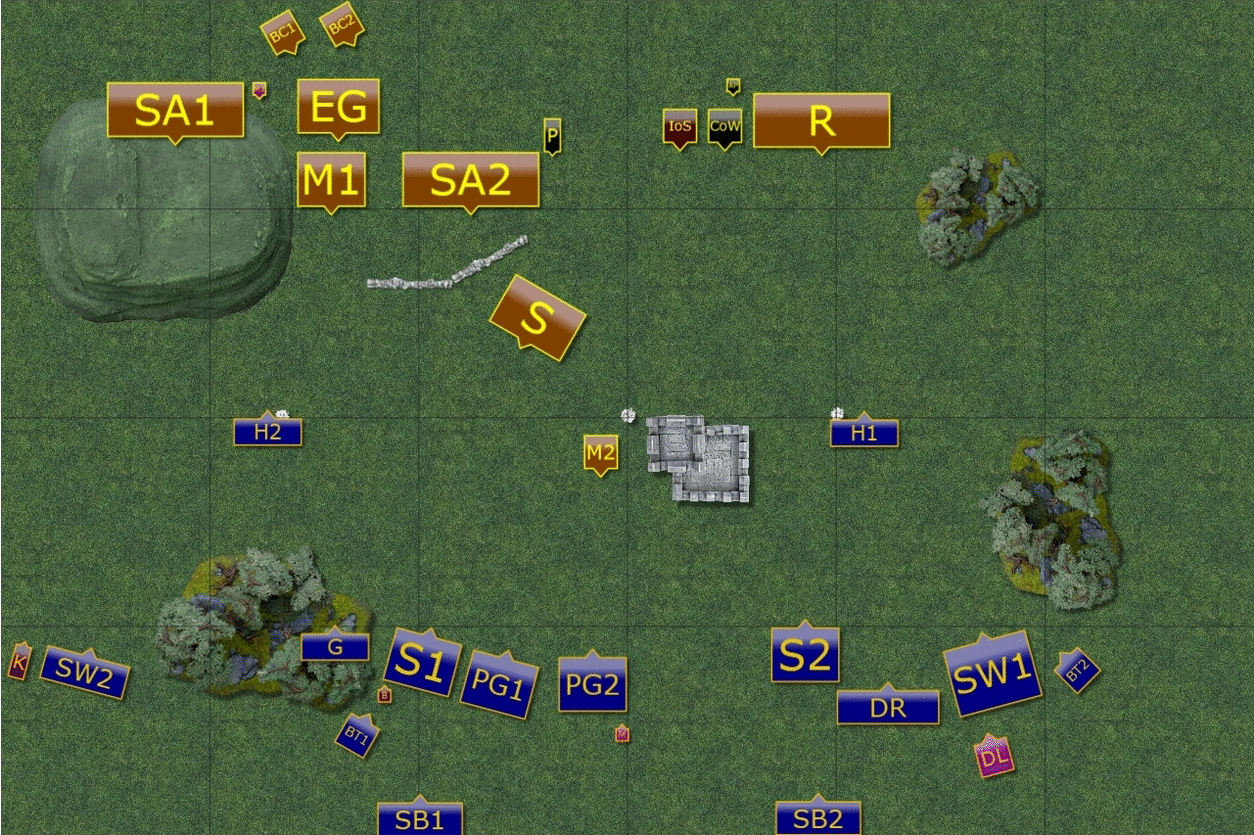
 |
| Deployment of the armies. |
 |
| Deployment order. |
 |
| Final deployment after vanguard. |
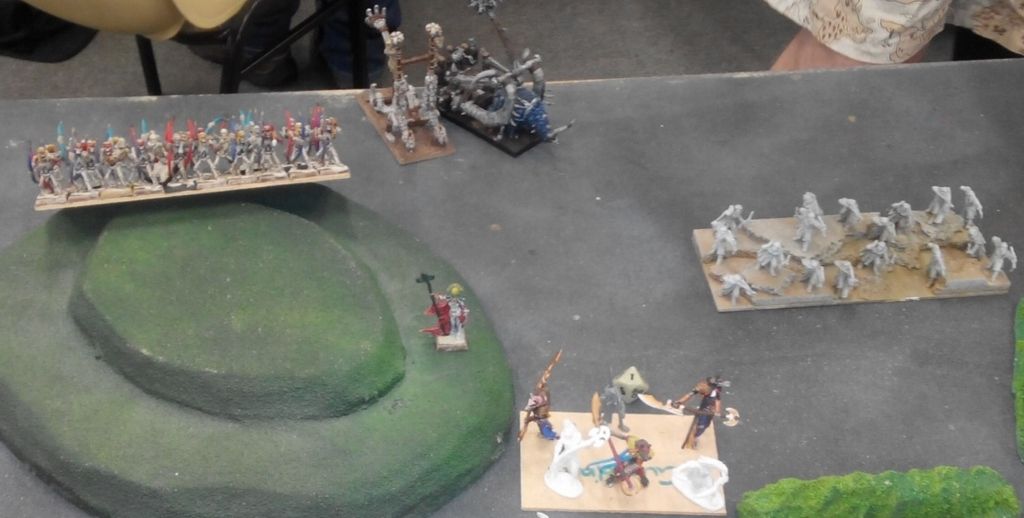
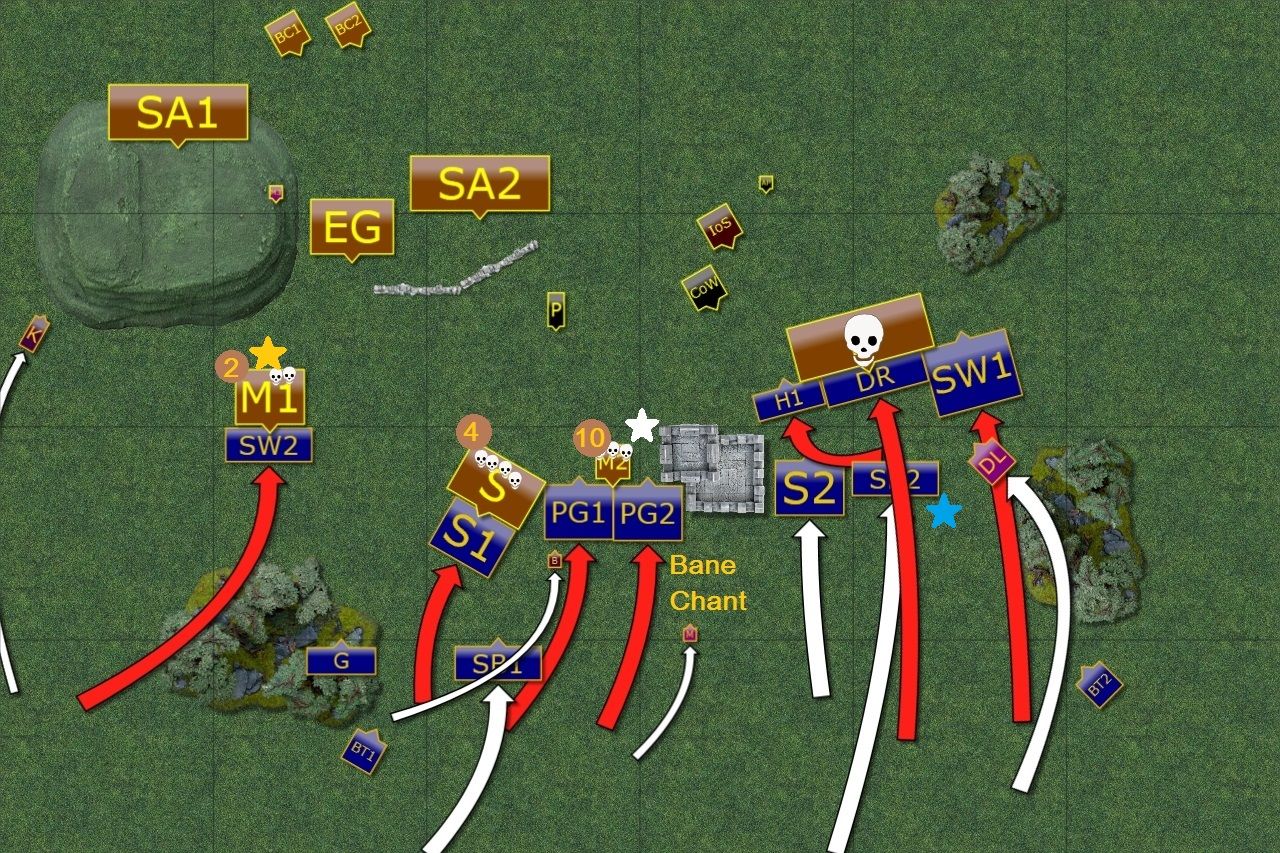
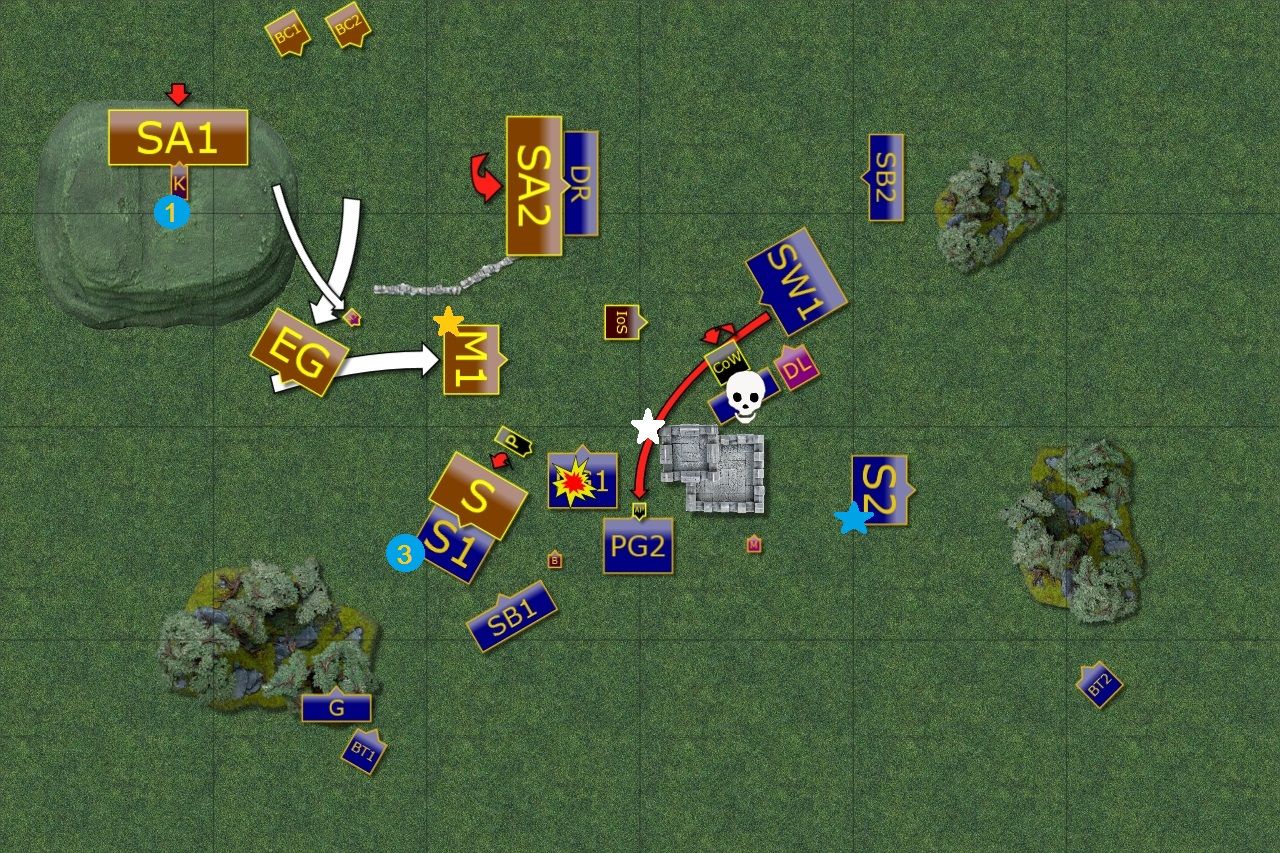
I rolled 1 or 2 for the Gem so Luke deployed his Monolith and 2 units first. I was surprised he positioned the Monolith so close to my lines. I wonder if it was not to shield the Loot token in the middle. But given the opportunity I placed two units of Palace Guard to be able to charge it first turn and Spears (S1) to get into the flank if I happen to start the game.
At the same time I used the Hunters to vanguard and grab the other two loot tokens. I knew it was risky but I was willing to take it. The plan was to either move away to the sides with the Loot and then shield them with faster elements moving through or drop the Loot first turn, move forward to block the enemy and then pick it up with the units in the second line.
I placed the King and Storm Wind troops on the left flank, where they could quickly engage one horde and possibly move to attack the catapults. On the other hand, I had majority of hard hitters on the right flank. Firstly, to avoid being shot at by all the enemy shooters at the same time and secondly, to overwhelm that flank. If my plan worked I could hold the center-left with the infantry and then move to the side of enemy formation (or maybe even the rear!) with fast elements. I had to move around the tower to grab the middle loot token anyway.
As it happened, Luke won the roll off for first turn and chose to start the game!
Empire of Dust - Turn 1
 |
| The Hunters were about to die and give up the loot. |
 | |||
| Elves lost one loot token, one remains unclaimed. |
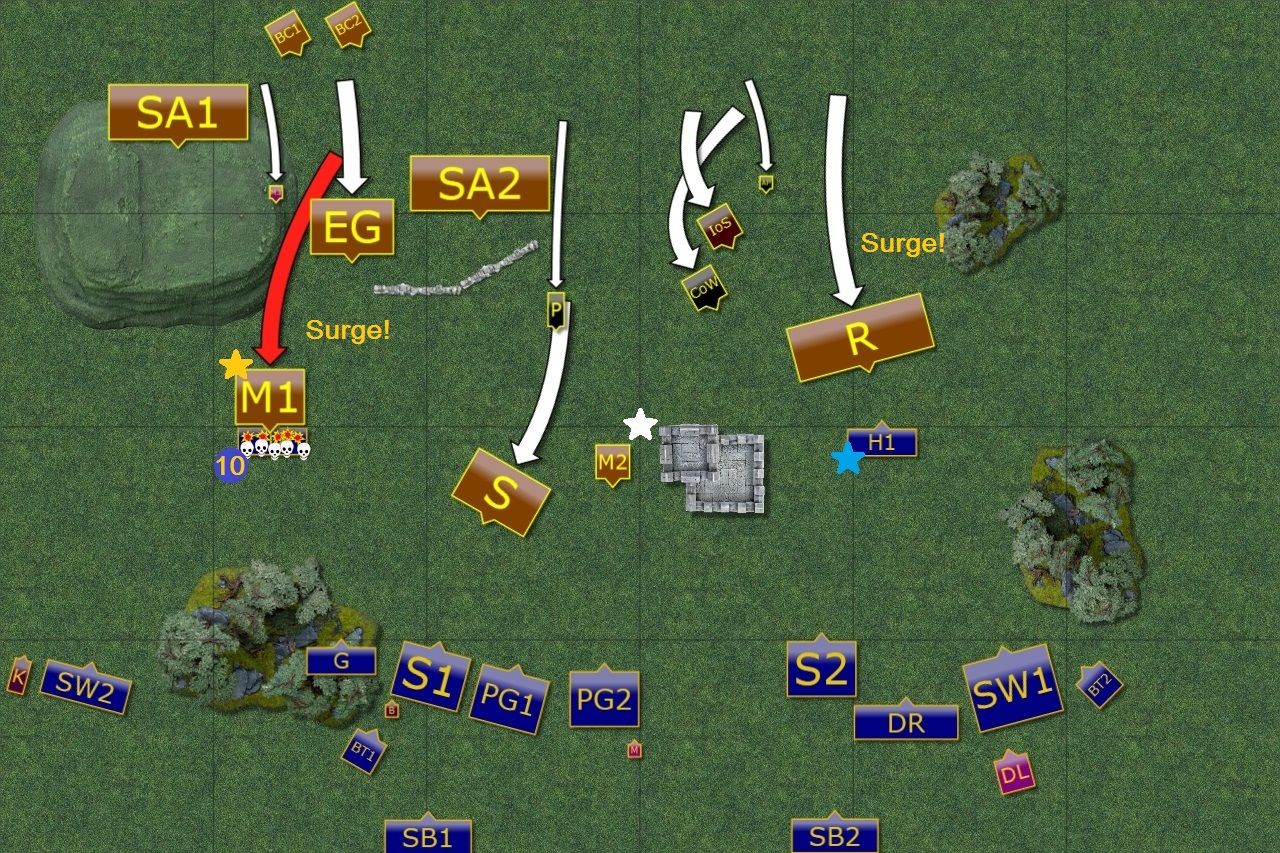
Undead were commanded to move at all three directions of the advance. Mummies shambled forward the Hunters who were already a target for the Skeleton Archers. Magical advance of their enemies completely surprised them and they were routed. It was even more important for the further battle development, as Mummies took the control over the Loot!
In the middle the Swarms kept pushing forward to engage Elven units as soon as possible. While on the right flank Revenants tried to do what Mummies did. However, the magic didn't run strong here, even despite the assistance of Casket of Souls.
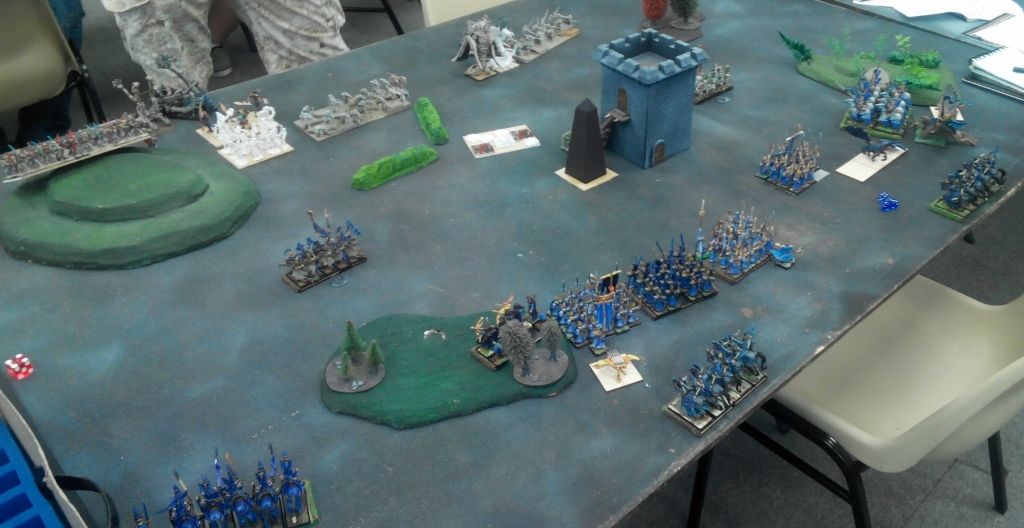
Outcasts - Turn 1
 |
| Elves engage their enemies across the battle field. |
 |
| Successful attack on the right flank |
 |
| Elven all-out attack. |
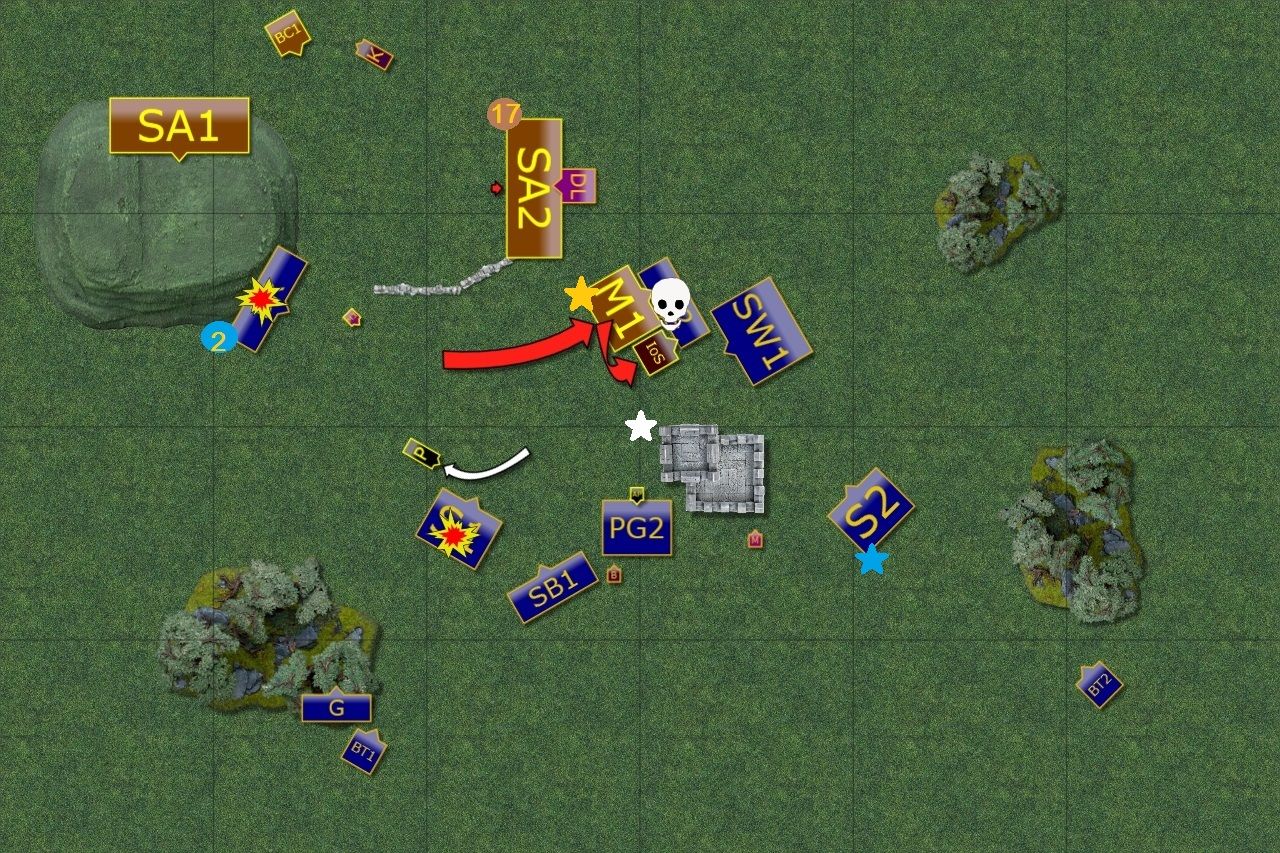
As the enemy seemed to be a bit stretched out, Elves decided to take advantage of that. On the left flank small Storm Wind squadron attacked Mummies to prevent them from charging the flank of the infantry formation in the center.
In the middle Spears attacked suspiciously aggressive Swarms but could not get rid of them! Neither the attack of Palace Guard regiments, one of each also benefited from the magical support.
On the right flank, the surviving Hunters dropped the Loot and together with Drakons and Storm Wind regiment stormed against incoming Revenants. That was a brutal frontal assault and even heavy infantry could not hold against it. Revenants crumbled to dust.
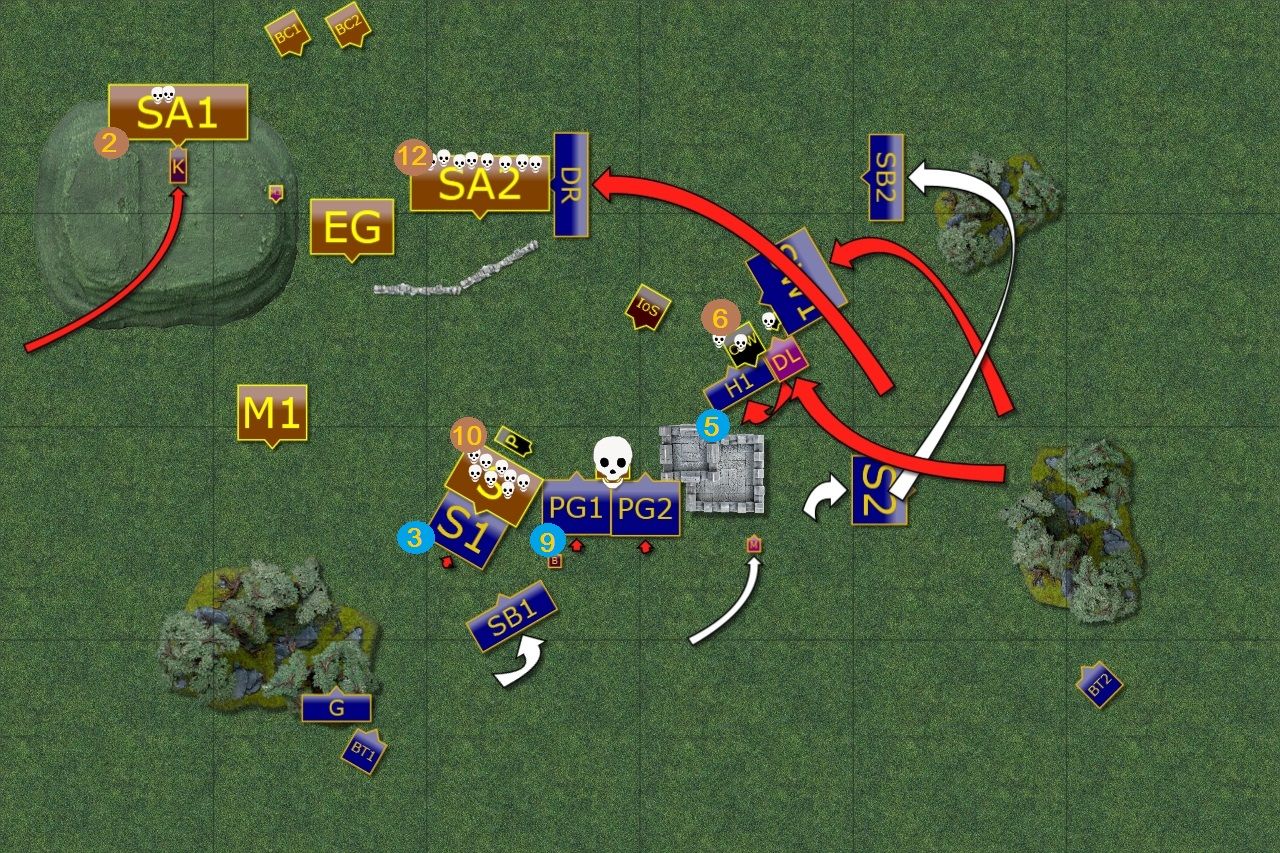
Empire of Dust - Turn 2
 |
| Undead hit back. |
 |
| But the Hunters hold the line! |
 |
| Elves are hurt badly. |
Such a bold move demanded reply and Undead obeyed their masters' will without hesitation. Chammpion and Paharoh took the matters in their own hands too but somehow their attack was not as devastating as expected and stubborn Hunters refused to bow to the might of the Undead leaders.
The fight in the middle got more intense. While the Monolith was healed and while the Swarm tried to overwhelm the Spears, one of the Palace Guard regiments attracted the attention of the nearby Priest and Undead shooters. The sun was blocked by the multitude arrows and Elves were hurt badly but didn't give up this time either.
Outcasts - Turn 2
 |
| The Swarms are still there to keep fighting! |
 |
| Undead leaders hold the flank. |
 |
| Elven fast elements take on the Skeletons Archers. |
The King, no all alone, spurred his steed and attacked the horde of Skeleton Archers. This attack had no chance of routing such a numerous enemy but it would help to distract the foe so that it would not shoot at the Elven units.
The same mission had Drakon Riders, although the fact they could now attack an exposed flank of the second Skeleton Archers unit gave them good chance to inflict a significant damage.
In the middle Elven infantry kept wrestling with the Undead. The unholy Monolith finally toppled down but the Swarms refused to give up again! (Edit: I rolled double 1's for a nerve test! :))
On the right flank Elven units took a gamble. The Storm Wind cavalry attacked now exposed Paraoh but as the magical support didn't take effect on Elven Knights, their attack was less damaging than expected. Instead of carrying the charge to the flank of nearby Revenant Champion, they were stuck.
The Hunters and the Drakon Lord continued their charge against that Undead hero, even if now the attack had smaller chance of a success. And indeed, the Revenant Champion, although wounded, kept fighting!
Empire of Dust - Turn 3
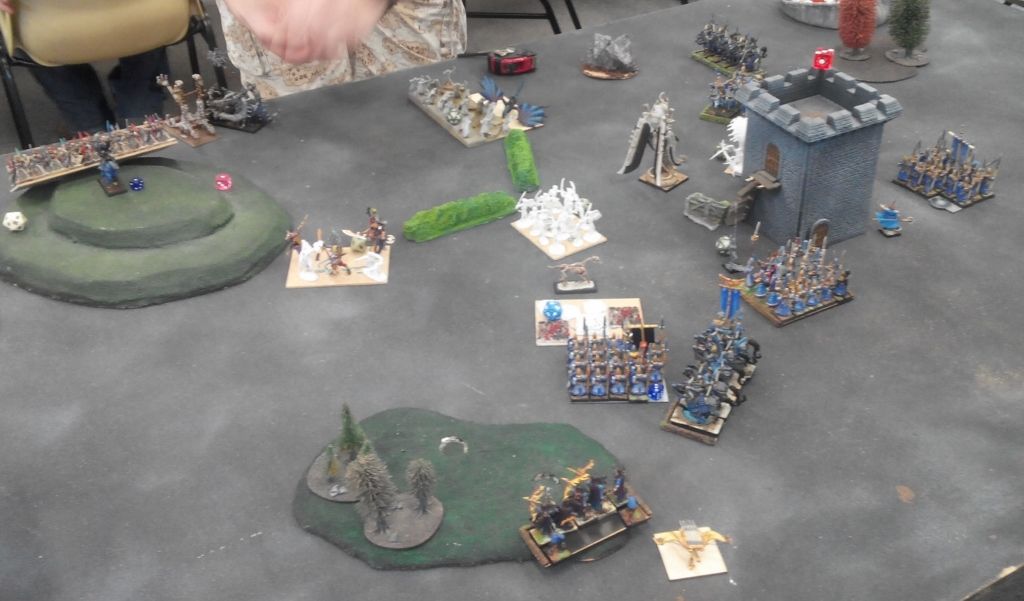 |
| Undead counter attack. |
 |
| Elves lose two more units. |
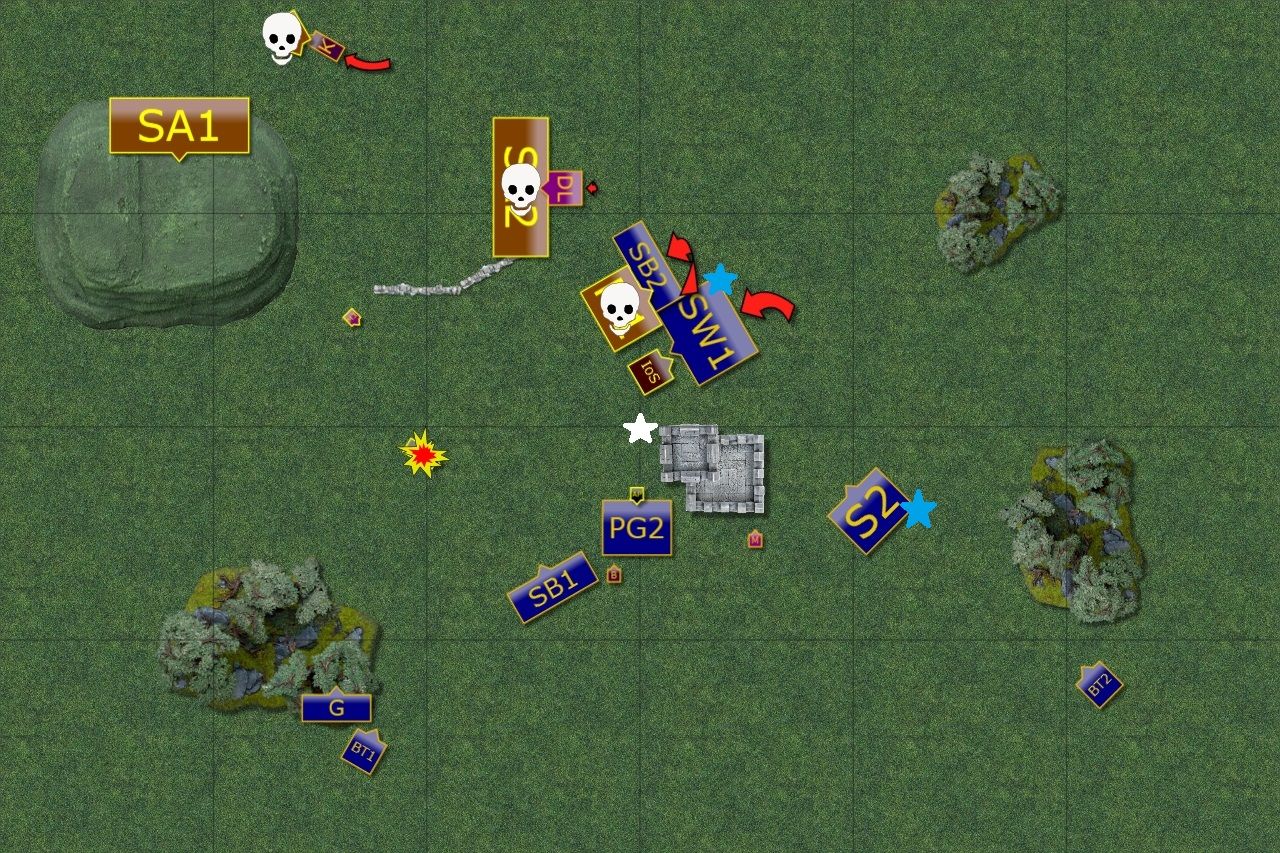
Although Elves started moving to the rear of Undead formation, Skeletal army kept fighting back relentlessly. Archers, now distracted by the enemy that attacked them close and personally, were ordered to counter-charge but with minor effects. So did the Swarms with a similar result.
Badly damaged regiment of Phoenix Guard could not hold the line any longer as they received yet another salvo and this time was destroyed.
The Revenant Champion also enacted a revenge and punished the Hunters for their bold attack against him.
Outcasts - Turn 3
 |
| Elves continue their attack. |
 |
| Drakons behind the enemy lines. |
Elves continue their attack in order to disrupt the enemy shooting. The King charges at the Catapult and destroys it. Drakon Lord attacks Skeleton Archers but despite well placed strikes tha magic bond was not broken yet. (Edit: Another double 1's for a nerve test :))
The Drakon Riders, however, instead of aiding their commander in fighting against the enemy bowmen, spotted more juicy target. Enslaved Guardians wondered a bit too far for their own safety and exposed their rear. The Drakon Riders would never miss such an opportunity and attacked, destroying their enemy on the charge.
Spears finally destroyed the annoying Swarm but as soon as the last bug was crushed, something exploded powerfully and Elves were very close to being decimated too!
Last but not least, Elven Knights gave no chance of survival to a badly wounded Revenant Champion.
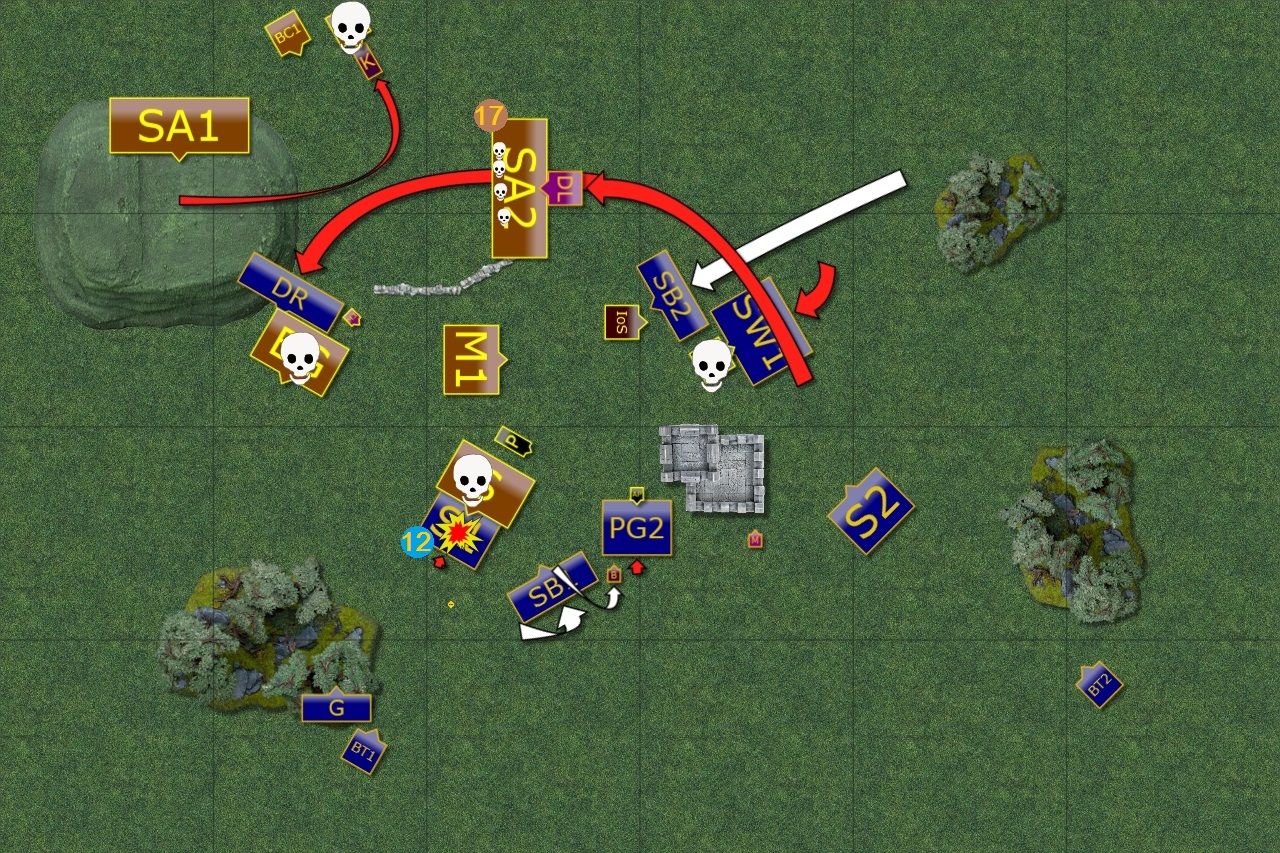
Empire of Dust - Turn 4
 | ||
| Undead during the maneuvers. |
 |
| Drakons pay for their folly. |
The battle still hung in the balance as both armies controlled single Loot token each. Undead army still had means to hurt the Elves. First, badly damaged Spears were finally destroyed. Then the brave Silver Breeze cavalry was attacked and .. they stubbornly stood their ground! (Edit: yet another double 1's this game!). Finally, the Drakon Riders got shot at by Skeleton Archers and despite minimal damage, they were destroyed! (Edit: Nothing like double 6's for nerve test :))
Undead were definitely fighting back but the last word belonged to Elves.
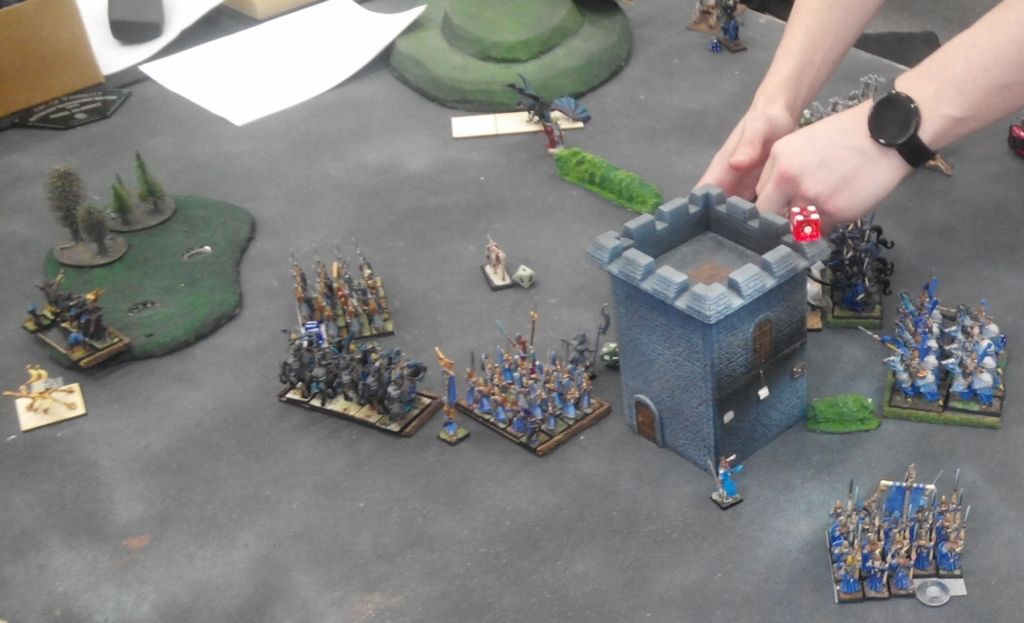
Outcasts - Turn4
 |
| Suddenly it became very empty in the middle of the battle field. |
 |
| Elves reclaim Loot token and win the battle! |
It was the last chance for the Elves to finally shift the balance in their favor so they didn't hesitate to attack.
The King led the way and hunted down yet another catapult. His good friend Drakon Lord finished one of the Archers unit too. Elven shooters aimed at the now exposed Priest and he was soon no more.
But the most important attack went against the Mummies. Elven cavalry, both light and heavy, stormed in and managed to rout enemy regiment, despite inspiring presence of the nearby Idol of Shobik.
With this last effort Elves reclaimed a Loot token and won the battle!
Summary
 |
| Turn-by-turn animation summary |
After-battle thoughts
First of all I would like to thank Luke for a great game! And again, my sincere apologies for not playing faster to have full 6 turns.
I took 2 out of 3 loot counters but I am fully aware I might have lost the one I have just reclaimed in turn 4. The reason is that my heavy cavalry had some damage done to it by the catapults. I apologize for not recording it but I the pictures I took didn't show how much damage I took.
Idol of Shobik, with its 10 attacks hitting on 3+ and CS(4) had a perfect chance to take the loot back from me. And I would be hard pressed to win it over again as it is very difficult to destroy it (defense 6+ and high nerve value!).
However, I think I would have had a chance to snatch the one that was yet unclaimed, thus still prevailing in terms of the scenario conditions.
I hope the advantage in turn 4 was good enough to secure the game anyway but of course it would have been far better to play full game and know for sure.
Having said that there are always things that could have been done better, regardless of the result.
First of all, we made a mistake in assuming that one can grab the Loot with a vanguard move. Hence, that idea was bad from the start. However, I could still use the Hunters to get into nice positions to attack anyway.
Second, the deployment was far from ideal. My shooting in particular was quite inefficient and it is due to the fact my units were dispersed and I could not focus fire on a single target and often had to shoot over intervening elements with additional penalty.
If I were to correct it I would simply position both Bolt Throwers in the forest on the left together with Glade Stalkers and keep shooting at suitable targets there.
Next, the move of the Hunters on the left simply allowed the enemy to charge them turn 1. On the right flank it made sense as I could draw the foe closer and had enough units to counter attack and gain advantage. But not on the left.
Then the charge of the heavy cavalry was also reckless. I should have kept them as a threat and possibly use them against the Archers.
During that game I also realized that I have been playing against non-undead forces for a long time and forgot that Empire of Dust plays in a different way. For instance, Luke was using his shooting to soften the unit and then charged it with some regiment of his own thanks to Surge. That was very efficient way of getting rid of the enemy!
I hope you enjoyed the report, thanks for reading!
Fantastic report, as always. The new CoK pack will nerf those Pharohs a bit.
ReplyDeleteHi Jonah,
DeleteThanks a lot for your kind words! I must say that the Pharaoh was not that annoying but I am sure he can be. However, in this particular game, I think my own fliers would have been affected more by the CoK rules. In particular the Drakon Riders would not have been able to attack so many units. But I would be glad to test this set of rules anyway. Maybe next tournament? We will see!
Hey SM
ReplyDeleteFirstly thanks for posting up another game, I'm falling behind in comments so my apologies.
I am of course drawn to the empire of dust for obvious reasons and I know you've struggled with them in the past so I'm very intrigued with this match up for a number of reasons and in particular if you can avoid being caught with the surge to get the undead units into combat that much quicker. I've got the oddest feeling your flyers will be of credit to you in this game but I could be wrong.
I really like the sound of Luke's worm rider model!
You certainly had some amazing dice rolls go your way by the sounds of things SM! Great result and a well deserved win.
Hi Jimmy!
DeleteThanks a lot for your feedback! I know you are busy man so please, don't worry about delay. It is always good to read your comments whenever you post them.
I really like how Undead armies in general work in KoW. They are really unique in their style. And it requires a different approach. In fact, Surge seems to be a very good counter for the fliers!
I hope we will have some time to discuss Empire of Dust further as you have a fantastic collection of perfect models to build such an army. :)
Cheers!