
Greetings!
It took me some time but I have finally had my opportunity to play Kings of War with real miniatures! My very good friend, Adam, against whom I played many times when Warhammer 8th Edition was the main fantasy game around, offered a game in a local store, Jolt Games.
It is a very nice venue and staff is very friendly. I really liked the place and I highly recommend it to anybody who is in Canberra. Here is the link if you are interested:
Adam initially planned to bring his Dwarfs. He has a few armies to choose from and was considering checking how they might perform in Kings of War. However, last minute decision was made and he picked the Herd instead. Thanks to that I had a chance to play against yet another army I haven't faced on the battle field yet!
The Herd - Army List
20 Longhorns, Regiment, Dwarven Ale (Headstrong) - 155
- 10 Harpies, Troop - 90
- 10 Harpies, Troop - 90
- Chimera, Monster, Wings - 210
6 Lycans, Horde, Brew of Haste (+1 Movement) - 260
- Avatar of the Father, Hero, Wings, Heal (6) - 345
6 Tribal Chariots, Horde - 215
- Great Chieftain on Tribal Chariot, Hero, Bow, Wine of Elvenkind - 240
10 Beast Pack, Regiment - 110
6 Stampede, Horde, Blessing of the Gods - 285
On of the first things I try to assess in my opponent's army is number of elements in their force. It is hard to out deploy the enemy in KoW because no matter what armies still have 10+ units and the difference between total number of these in respective forces might not be that large either. However, I noticed that Adam had exactly 10 deployment drops versus my 15 and as far as KoW goes I think it was significant difference.
The second thing I try to check is the army wide special rule and the Herd has Pathfinder across the board (with some exceptions). I find it a very good advantage, even if the battle field is not thick with forests. Combined with the fact that the Herd has an access to fast and often nimble units it makes that army a very dangerous foe. I assumed this rule alone would balance out the fact that the army had fewer elements than mine.
Let's have a look at Adam's army in more detail:
20 Longhorns - Fast and quite hard hitting infantry. Not that many attacks but hitting on 3+ with Crushing Strength (1) and Thunderous Charge (1) should make them count. Pathfinder is very helpful here as they can charge into the Forest without any penalties too. Can go for war of attrition with any of my Infantry and the outcome would be decided by the dice alone here. Dangerous but not the most dangerous of the enemy units. Cannot be ignored but thanks to the fact it is a bit slower than the rest it might not be the priority to deal with.
10 Harpies - 2 units of the very fast and maneuverable units. While very fragile and expendable they are very important part of any army. I will look for my chances to eliminate them quickly. They are simply too maneuverable to be ignored and can effectively block my own units from attacking their chosen targets.
Chimera - one of the two big fliers and obviously a serious threat. 7 attacks hitting on 3+ and with Vicious would ensure it does the job and flying ability always make it worthy having. As it is a Monster it will have even easier job in finding exposed flanks or rears. It can fight either alone or add its considerable strength to any other unit in the army.
One of the ways to deal with it is to shoot at it but I expected Adam would hide his monster and wait for the right moment to attack. My own fliers would be a good counter to Chimera alone so I would look for the chance to at least keep it in check.
6 Lycans - Horde of super fast unit that also has significant amount of attacks with CS(1). Having them hitting the flank of any unit is a recipe for disaster and I would need to do everything to avoid that. Their sheer speed makes them harder to hunt down with my own cavalry, for example, so I would probably need to sacrifice a unit to draw their attention and be able to counter. With Def 4+ I am sure they would also try to hide from the shooting and that might be my advantage too. The longer it takes them yo get into the position to attack the better for me.
Avatar of the Father - without a doubt the most dangerous element of the army. It is simply amazing how versatile this Hero is. It is extremely powerful in the attack but it also seems to be a good idea to attack it in order to get rid of Thunderous Charge for a turn. Of course, when it flies it means it can simply move away from the enemy it does not want to fight.
Defensively it is also very powerful as it cannot be wavered and Defense 5+ and -/19 nerve mean it is quite hard to route. Even if isolated it might need repeated attacks to go down.
In addition to the above it is a great leader with Very Inspiring rule and Heal (6) can come very handy indeed.
6 Tribal Chariots - a very intriguing unit in my opinion. On one hand, it is very dangerous in the attack. Very fast, Thunderous Charge (2), hitting on 3+, just like my own Stormwind. It also looks versatile with bows. On the other hand it has a very big footprint and is one of the exceptions to overall army rule. It does not have heavy cavalry armor either which makes them a bit more vulnerable too.
They would be on the list of the targets for sure but again, I expected to sacrifice something to get into a good position for counter.
Great Chief on Tribal Chariot - Second of the Inspiring Heroes in the army and another versatile unit. Like the Chariots above, he does not have the Pathfinder special rule. However, with a flask of Elven win in his cart he can make up for it with being nimble. It also makes his shooting more accurate as range 4+ without any penalties for movement is definitely good to have.
Good speed, good in melee, good Defense 5+, he seems to be a very good unit on his own and he can definitely help others when needed. Chariot might be bigger than other Heroes' footprint but it is still narrow enough to get through some gaps or around the intervening objects.
10 Beast Pack - fast cavalry of the Herd. Irregular unit too. Because of its sheer speed it can be used as a very good war machine hunter and I would not like it to be on my flank or rear either. Fortunately, as many fast cavalries it also has low armor and in addition quite low nerve. I placed this unit in the same category as Harpies and I wanted to eliminate them as soon as possible. Given the choice between shooting at them and some other unit, that is more dangerous but with better defense and nerve, I would still hit the pack. Simply to avoid being constraint in my own movement phase by a unit my opponent would consider expendable.
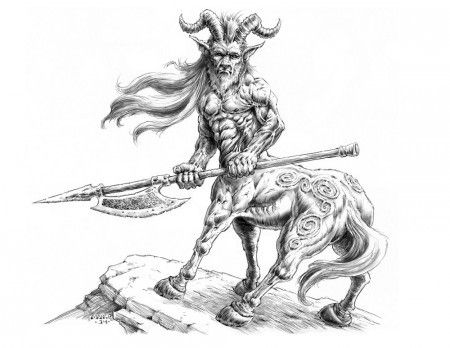
Stampede - now this unit looked properly impressive. I hope the pictures below would give you an impression of how fantastic it looks even in its WiP stage. Extremely dangerous, also thanks to Elite status.
In terms of sheer power of a potential frontal attack nothing hits as hard as this unit. Fortunately for me it is not as fast as many other elements of the Herd and due to very big footprint I believe I can slow it down and surround it.
In general, I was facing a fast and hard hitting army. My chance was in being able to slow down and isolate units in order to move other elements to take them down. In order to do that I would have to sacrifice my own regiments and make sure that I could use it to mount an attack that would eliminate the enemy on the charge. Otherwise the counter, in particular with the fliers engaged, might prove too hard to handle.
My army for reference:
Outcasts - Army List
10 Stormwind, Regiment, Potion of the Caterpillar (Pathfinder) - 235
- 5 Silverbreeze, Troop - 145
- 5 Silverbreeze, Troop - 145
- Drakon Rider Lord, Hero, Large Cavalry - 160
3 Drakon Riders, Regiment, Dwarven Ale (Headstrong) - 185
- 5 Stormwind, Troops - 140
- Bolt Thrower, War Machine - 90
20 Palace Guard, Regiment - 150
- 10 Archers, Troop - 115
- 10 Palace Guard, Troop - 105
- Bolt Thrower, War Machine - 90
20 Spearelves, Regiment - 140
- Elven Mage, Hero, Inspiring Talisman, Bane Chant - 110
20 Spearelves, Regiment - 140
- Battle Standard Bearer, Hero - 50
- Bolt Thrower, War Machine - 90
20 Spearelves, Regiment - 140
- Elven Mage, Hero, Inspiring Talisman, Bane Chant - 110
20 Spearelves, Regiment - 140
- Battle Standard Bearer, Hero - 50
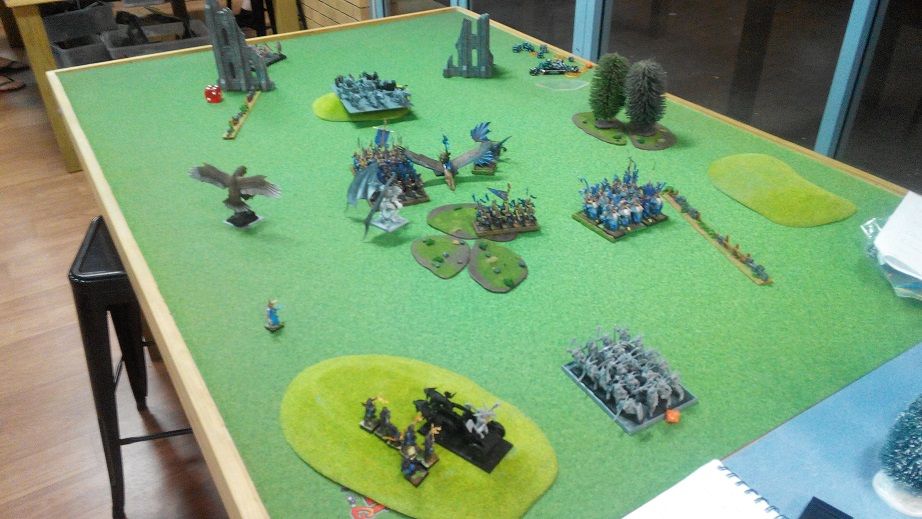
Terrain
 |
| Terrain details |
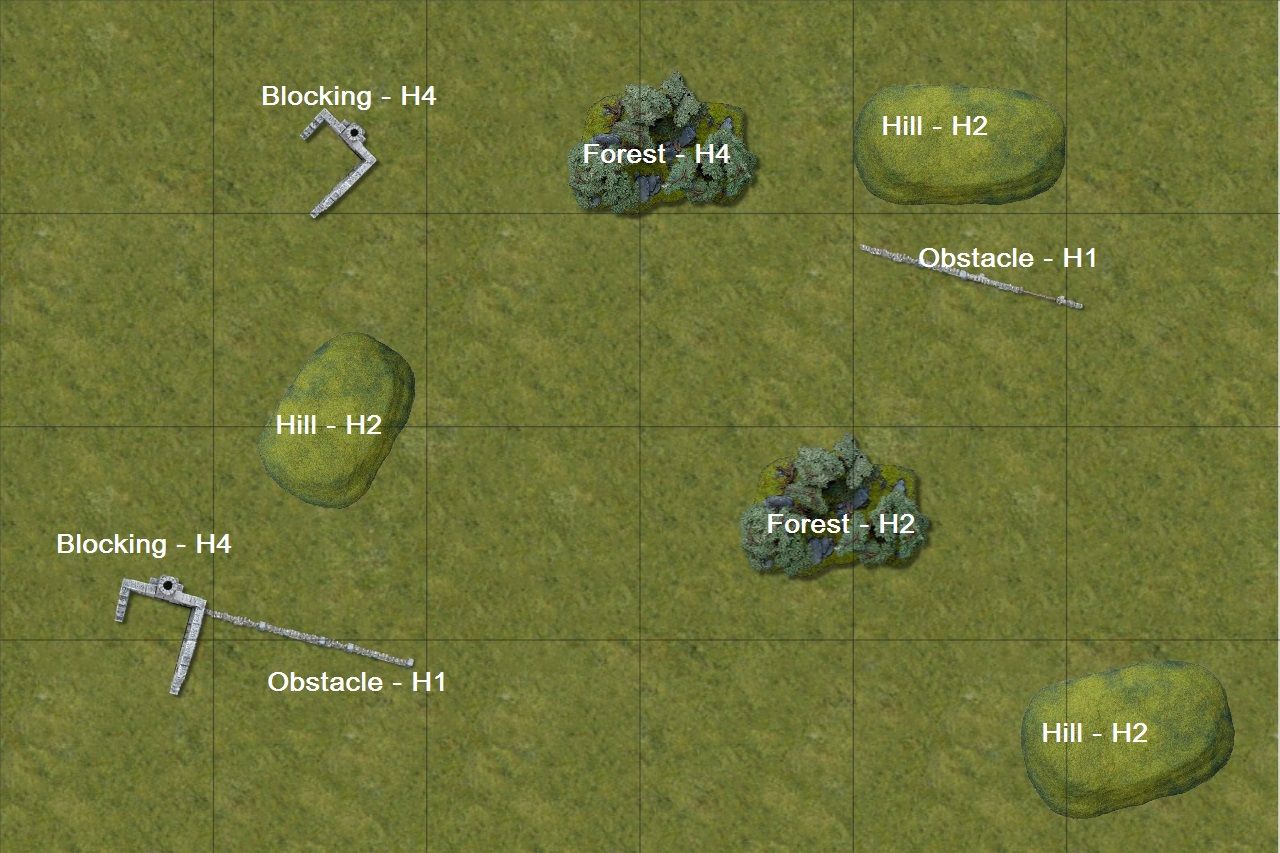
We placed the terrain without using any particular method. We ended up with a few pieces of particular type and the picture shows the details of each. We used Hills of Height 2 because that is what we have done so far in general in our games (despite playing different opponents). I know Rules Committee suggests having Hills of Height 1 but as we haven't had enough time to discuss it yer we went for the usual solution that worked well for us so far.
As you can see the middle of the battle field is relatively open. The hills offer some nice overview but at the same time the forest in the middle and the fact the hills themselves are to the sides mean that they are not dominating features either.
It would not be a problem for the Herd, more of an advantage really, since they didn't have that much of shooting. At the same time thanks to Pathfinder they could use it well to screen their advance but not slow down or have any further penalties due to moving through.
I also expected Chariots to be positioned somewhere in the middle of either deployment zone because they would not like to go through forest obviously. In fact, I was wondering if Adam is not going to go for an assault through the center with just some harpies blocking any potential flanking force to move around his battle line.
Obstacles offered some interesting defensive abilities but if they were about to be used as such depended on the scenario and respective deployment zones.
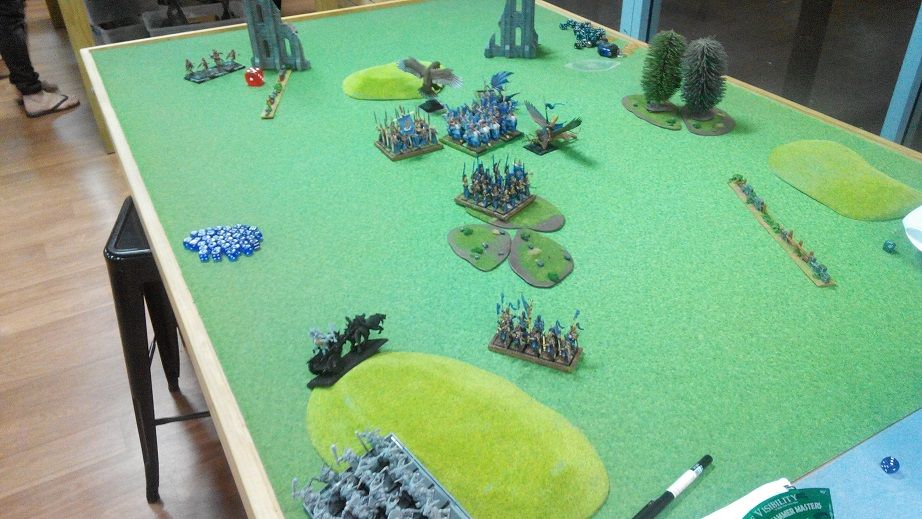
Deployment
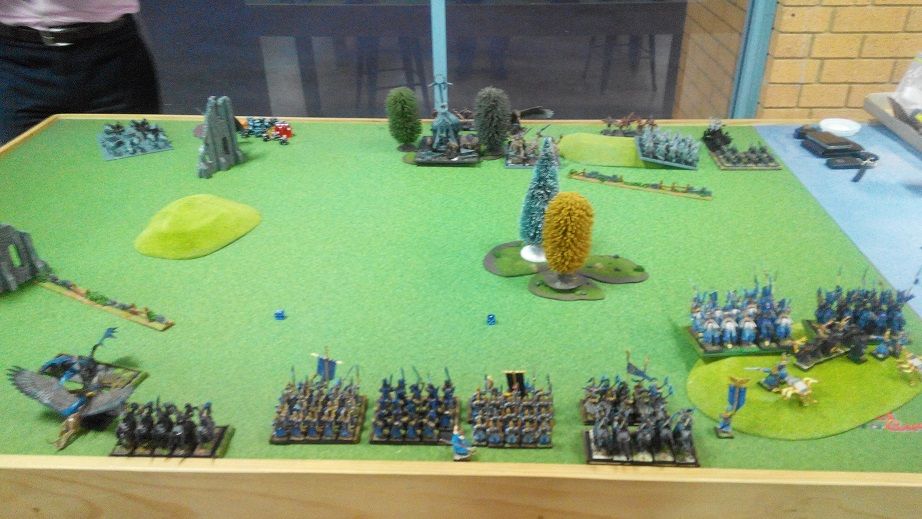 |
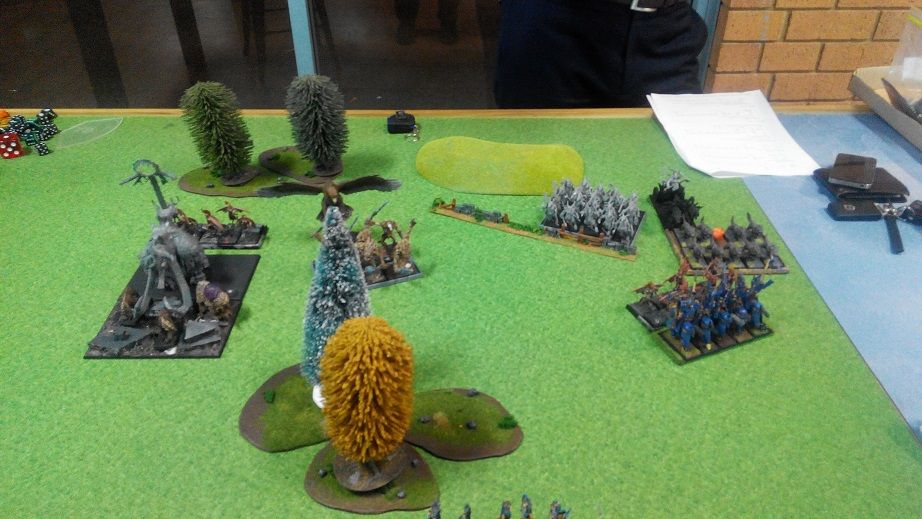
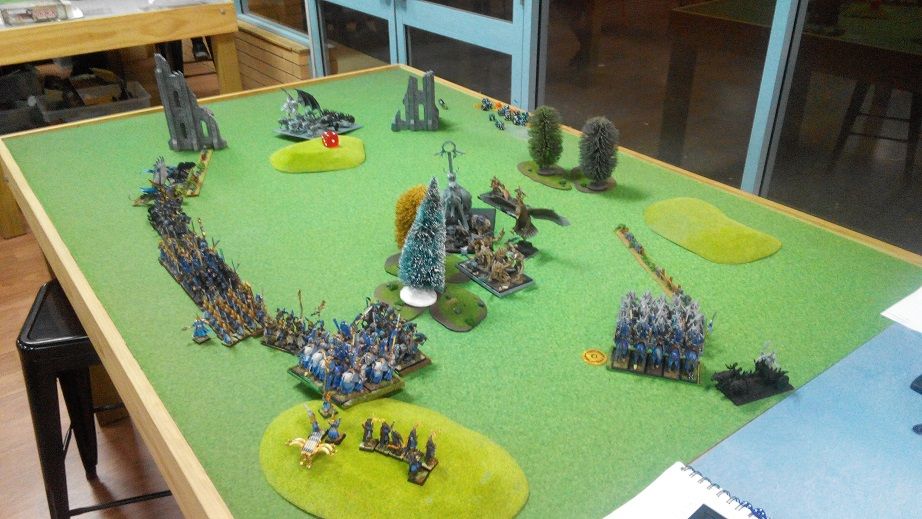
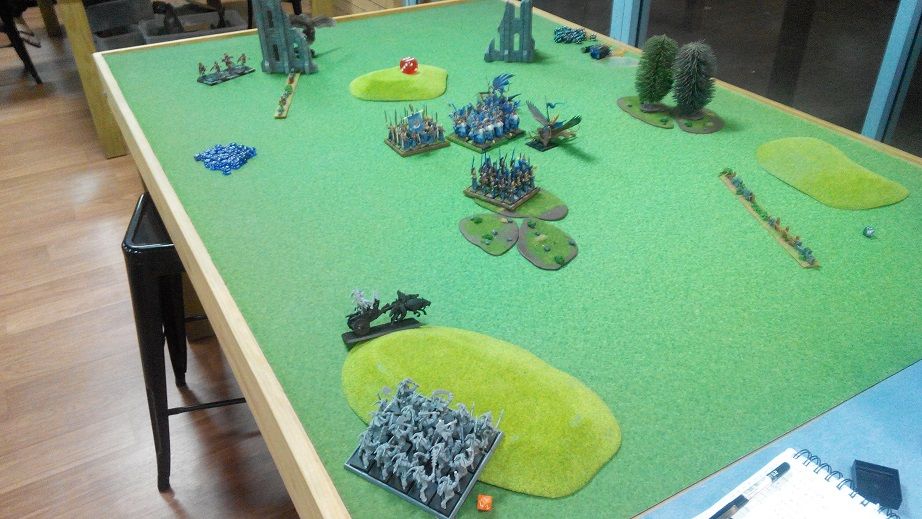
| Armies arrayed for battle |
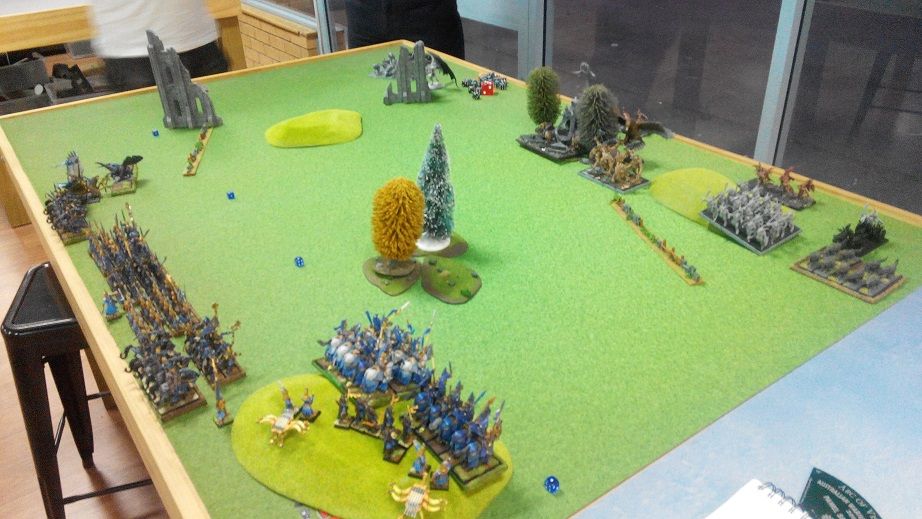 |
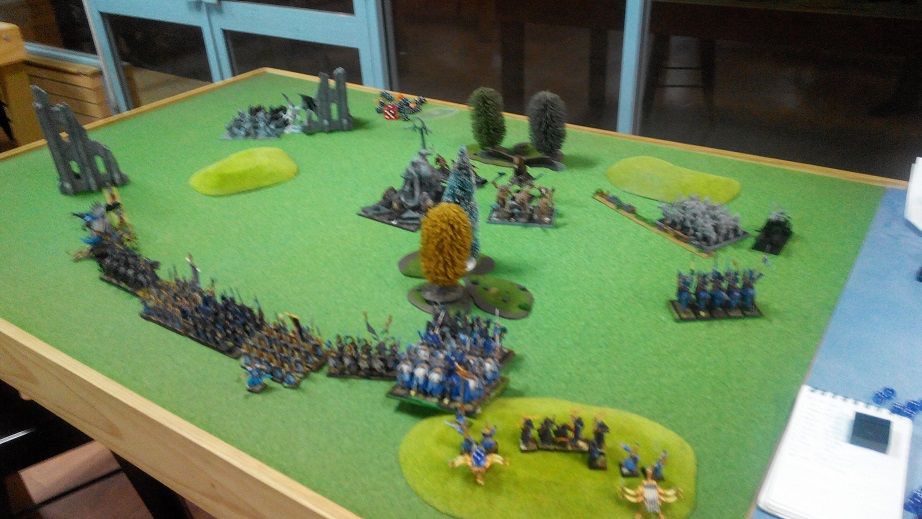
| Deployment seen from a different angle |
We rolled for the scenario and got Invade. I think it is a good scenario for melee orientated army that likes to attack the enemy right from the start.
Adam won the roll off and picked Northern deployment zone. At this stage I decided only that I am going to deploy further back to give my shooting a bit more time to soften up the Herd.
 |
| Deployment Order |
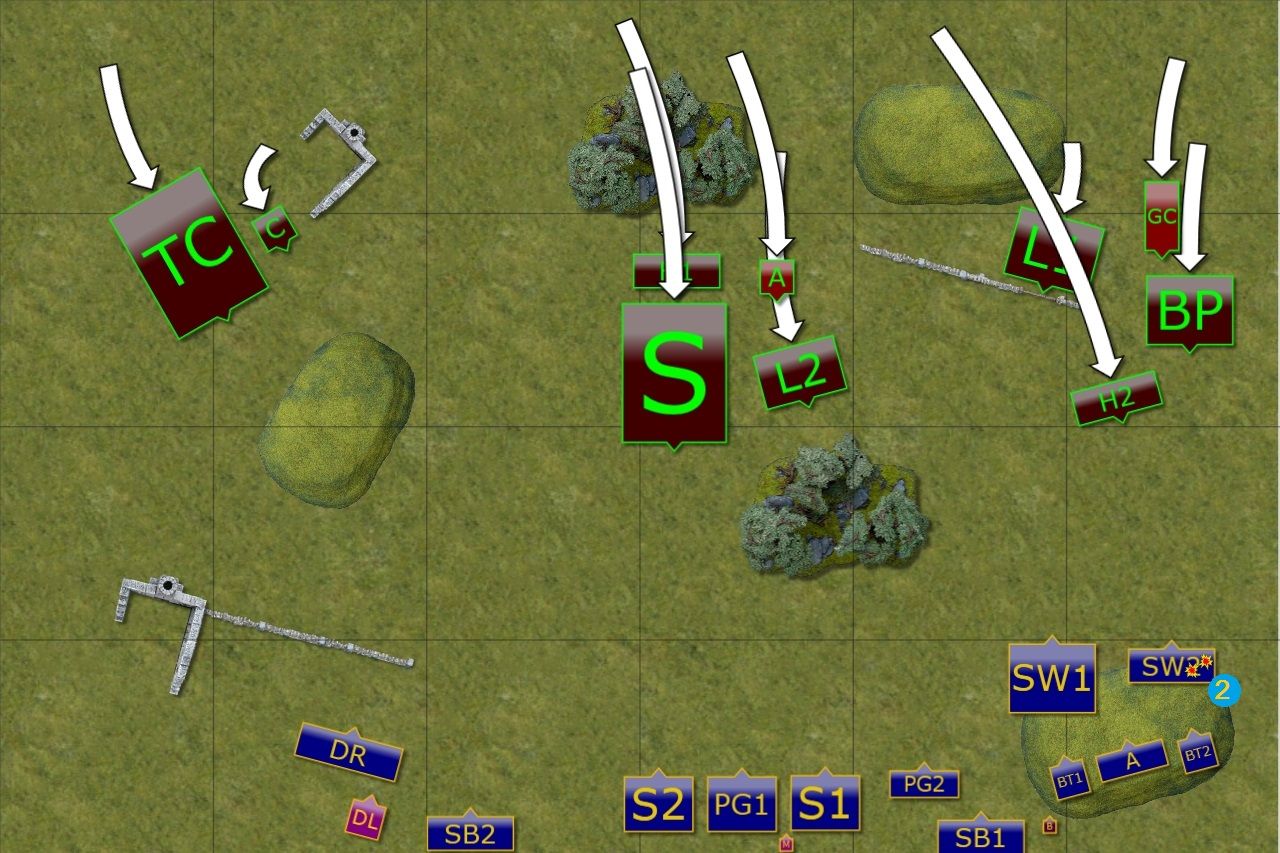
Deployment Order:
1. Longhorns (L1) - Silver Breeze (SB1)
2. Harpies (H1) - Silver Breeze (SB2)
3. Harpies (H2) - Bolt Thrower (BT1)
4. Beast Pack (BP) - Archers
5. Great Chieftain - Spears (S1)
6. Lycans (L2) - Palace Guard (PG2)
7. Stampede - Palace Guard (PG1)
8. Avatar - BSB
9. Tribal Chariots - Spears (S2)
10. Chimera - Rest of the Army
 |
| Final Deployment |
Knowing that many of my opponents' units are faster than my infantry I kept Spears and Palace Guard close to the middle. That allowed me to move to either flank faster and reinforce the attacking units there.
While the position of the hill was not ideal I decided on the following plan (and noticing that huge units such as Stampede and Chariots are not deployed on that side of the battle field). I would keep the shooters on the hill and use them to help the cavalry there to win that flank faster. Since my own center was a bit further back that should create the situation where some of the enemy units would need to either keep pushing forward or start reacting to the flank forces.
At the same time I left my fliers on the West because of two reasons. Since I had Adam's army deployed already I noticed there is a gap in his formation. I wanted to exploit it and who better to do it than the fliers. Their presence on that flank also meant the chariots and chimera would probably advance at a slower pace. So the idea was to use it to my advantage and when the time was right I would jump to the gap and use fast cavalry as a unit to slow down the chariots further.
As you can see, my plan was to invade enemy territory by eliminating some of his most dangerous units in the process. In my opinion, invade still requires some killing to be done. Either to ensure the units that go to the enemy half of the battle field are safe and don't expose their flanks/rears. Or to rout enemy units that would invade my own half, thus contributing to the victory conditions.
Adam won the roll off again and chose to have the first turn.
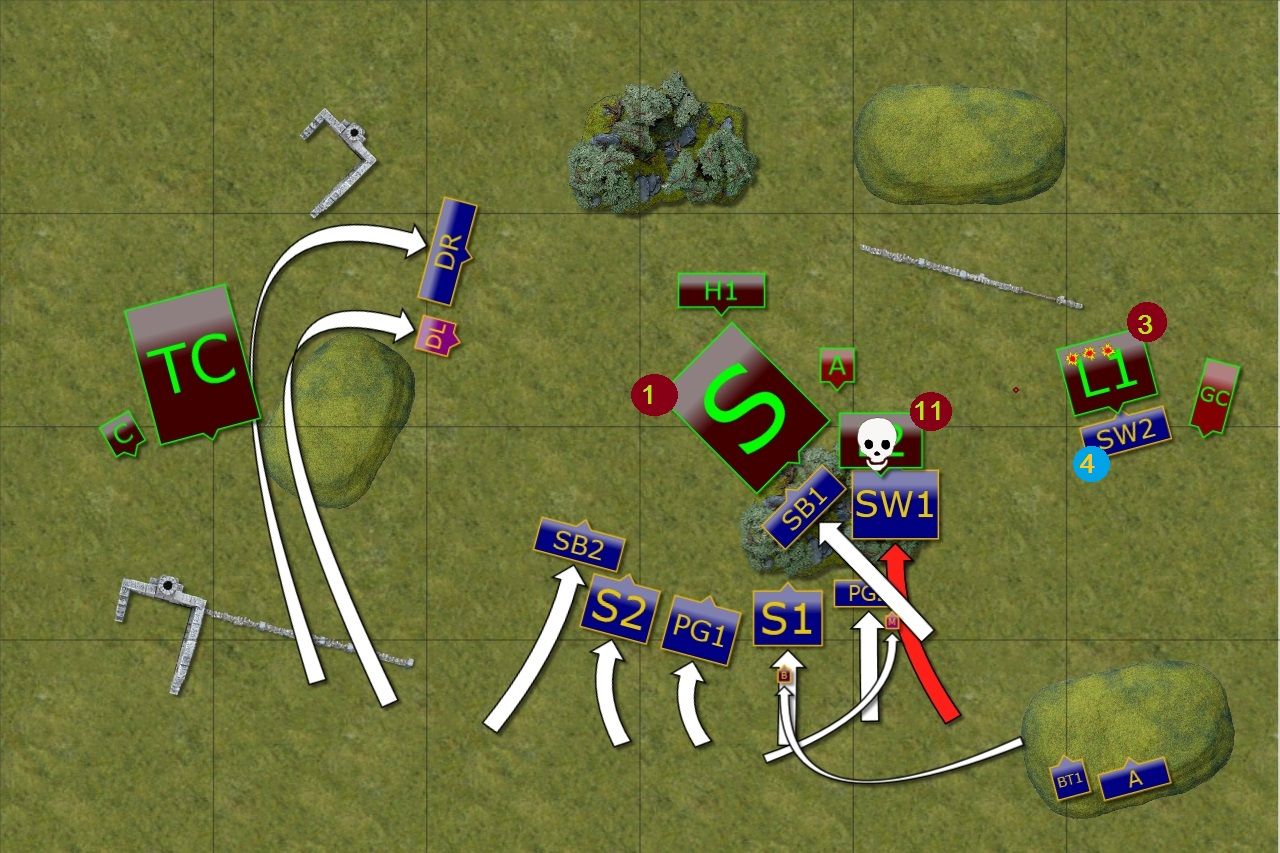
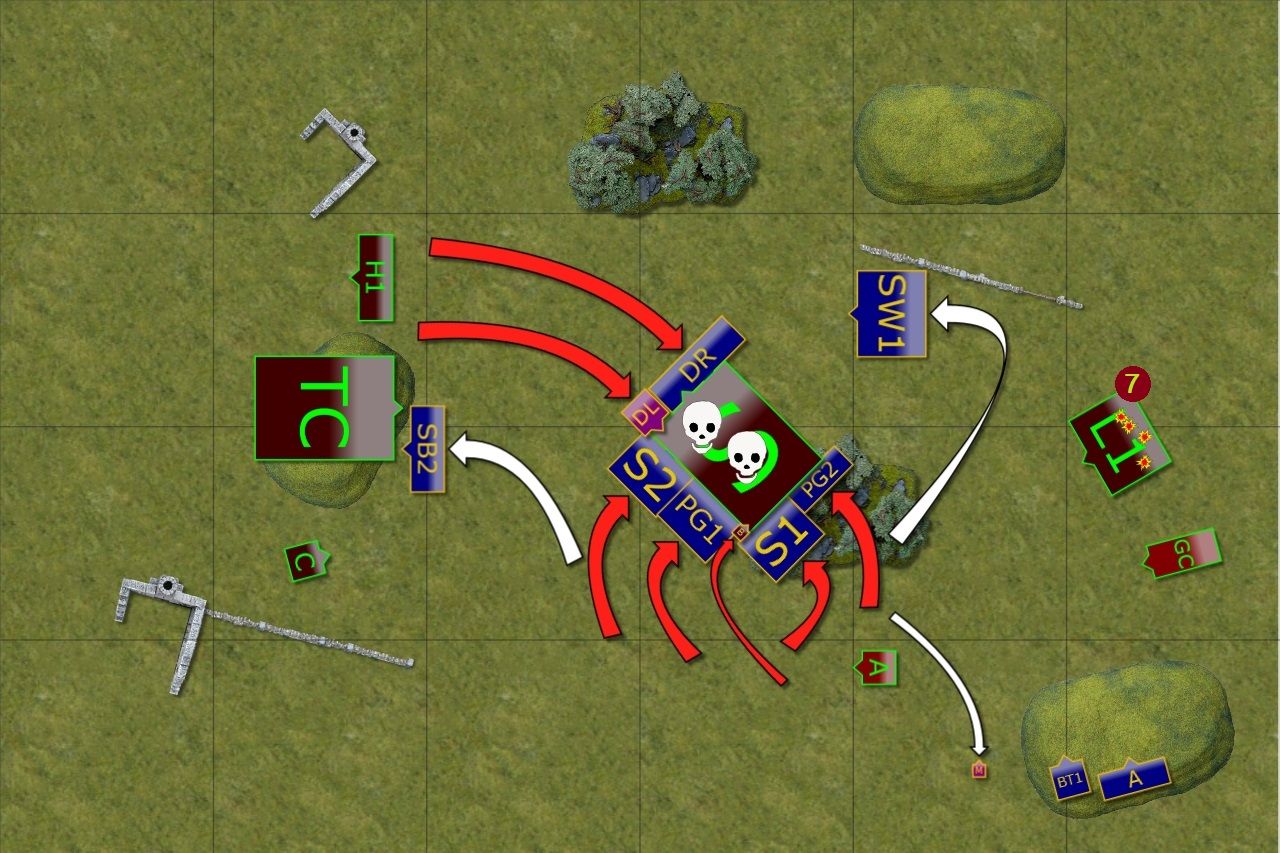
The Herd - Turn 1
 |
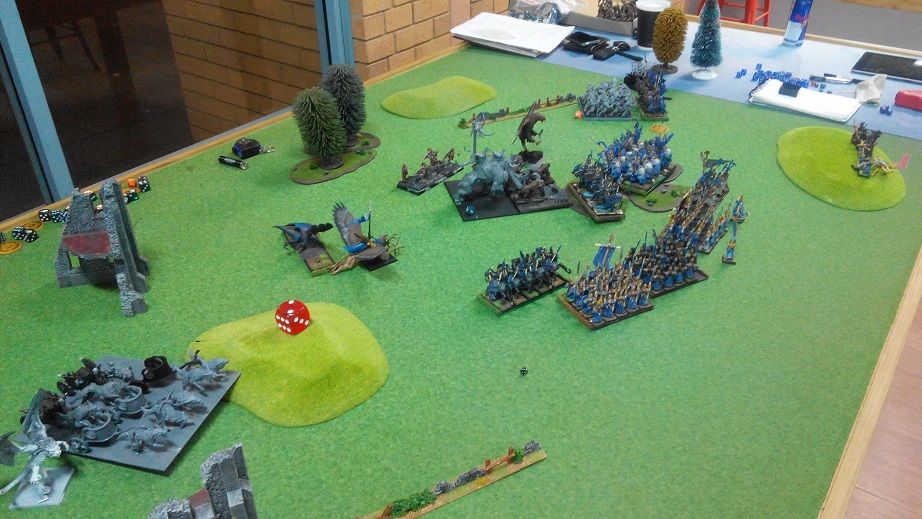
| The Herd advances |
The Herd moves forward against thin blue line of the Elven army. On the West Chariots and nearby Chimera advance carefully, trying not to provoke Drakons. Even the mighty Stampede emerges from the Forest in a controlled manner. No doubt the presence of the Avatar has a becalming effect. For now.
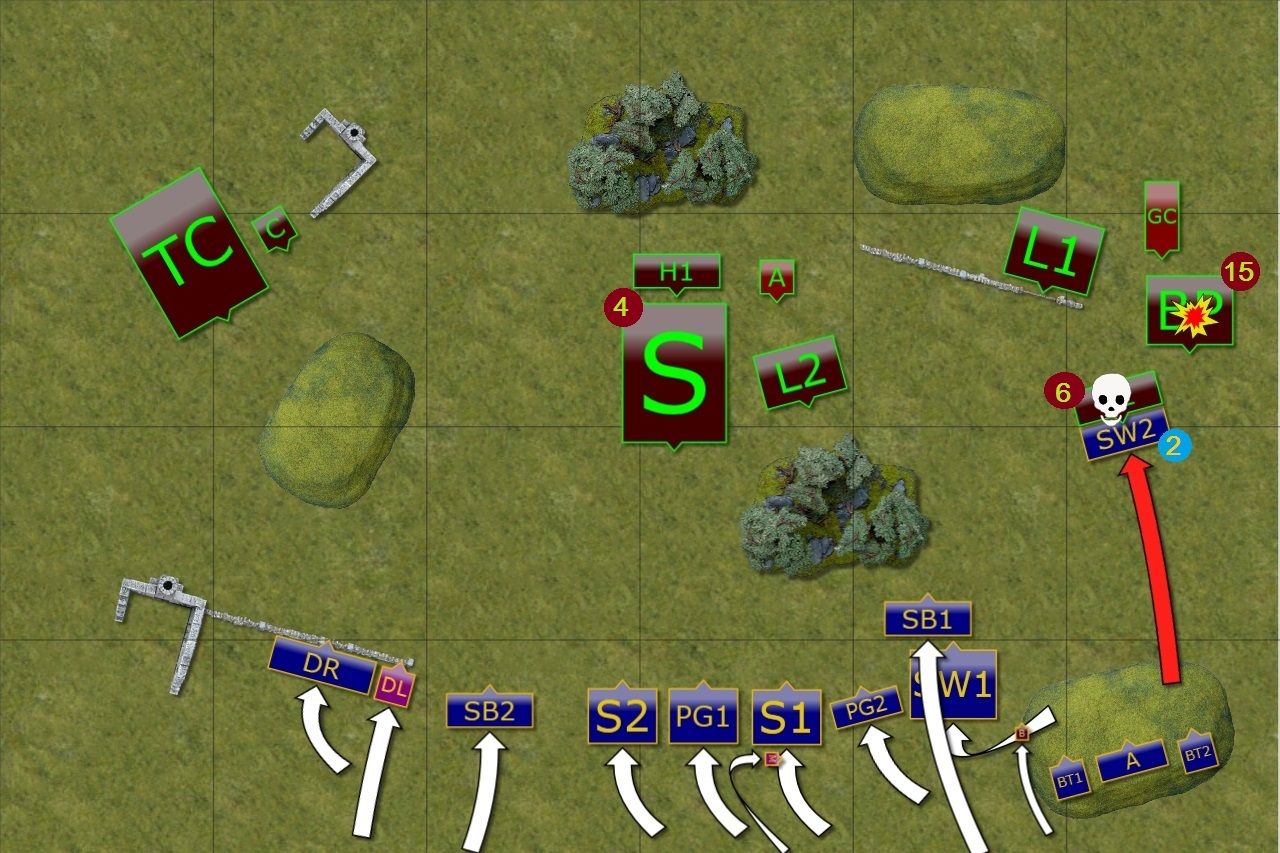
Finally, the units on the East also move forward and Harpies land in front of them, baiting Elven Knights for early attack.
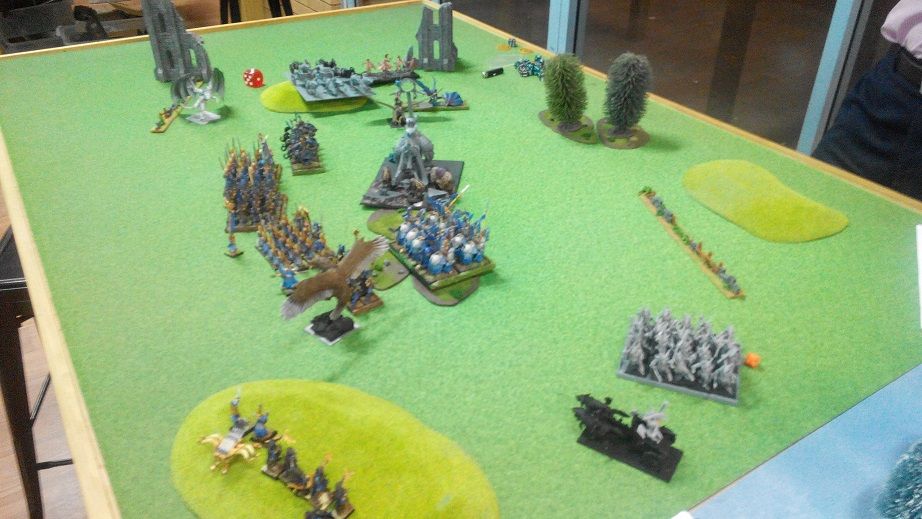
Outcasts - Turn 1
 |
| Storm Wind cavalry leads the attack on the Eastern flank ... |
 |
| ... while the rest of the army consolidates the formation. |
 |
| Elves hit hard on the Eastern flank. |
Entire Elven army consolidates their formation, staying just out of the possible charge range of the enemy units but closing in mutual support.
Storm Wind cavalry troop attacks the obvious bait and destroy vicious Harpies on the charge, hoping their action will stall enemy advance on that flank. They received a support of the shooters stationed on the hill as nearby Beast Pack is obliterated by a focused fire from Silver Breeze, Archers and Bolt Throwers.
The second unit of fast cavalry aims at Stampede, adding a bit of a damage there as the harpies, the preferable target, were still hiding.
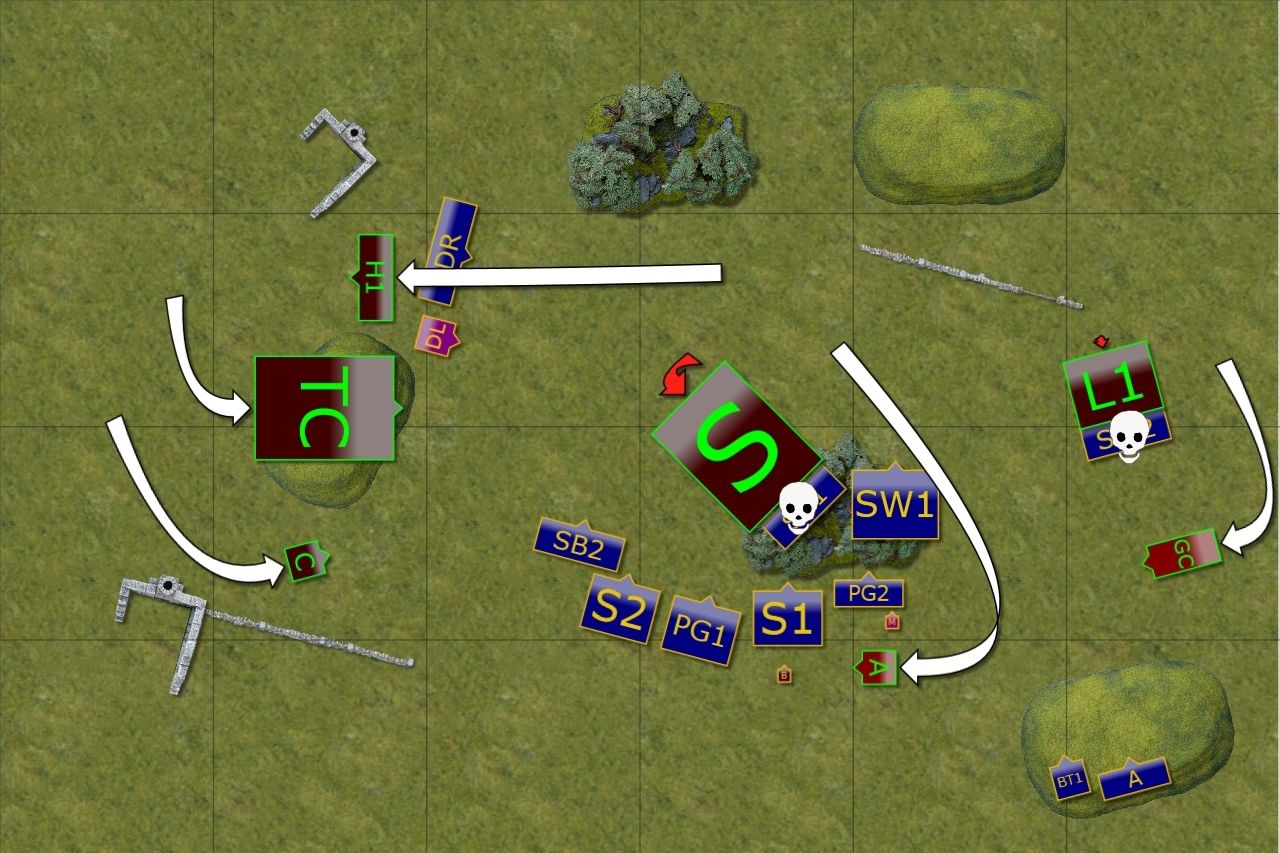
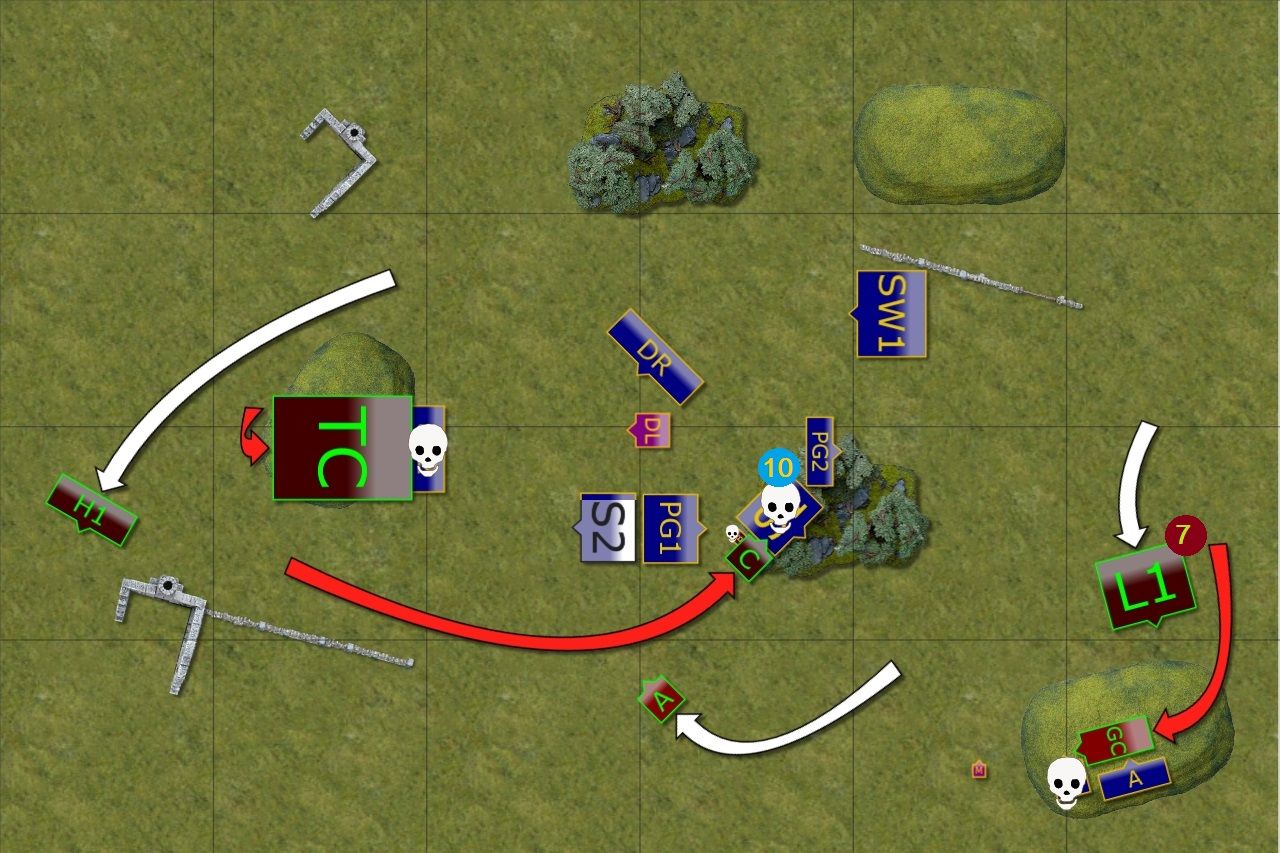
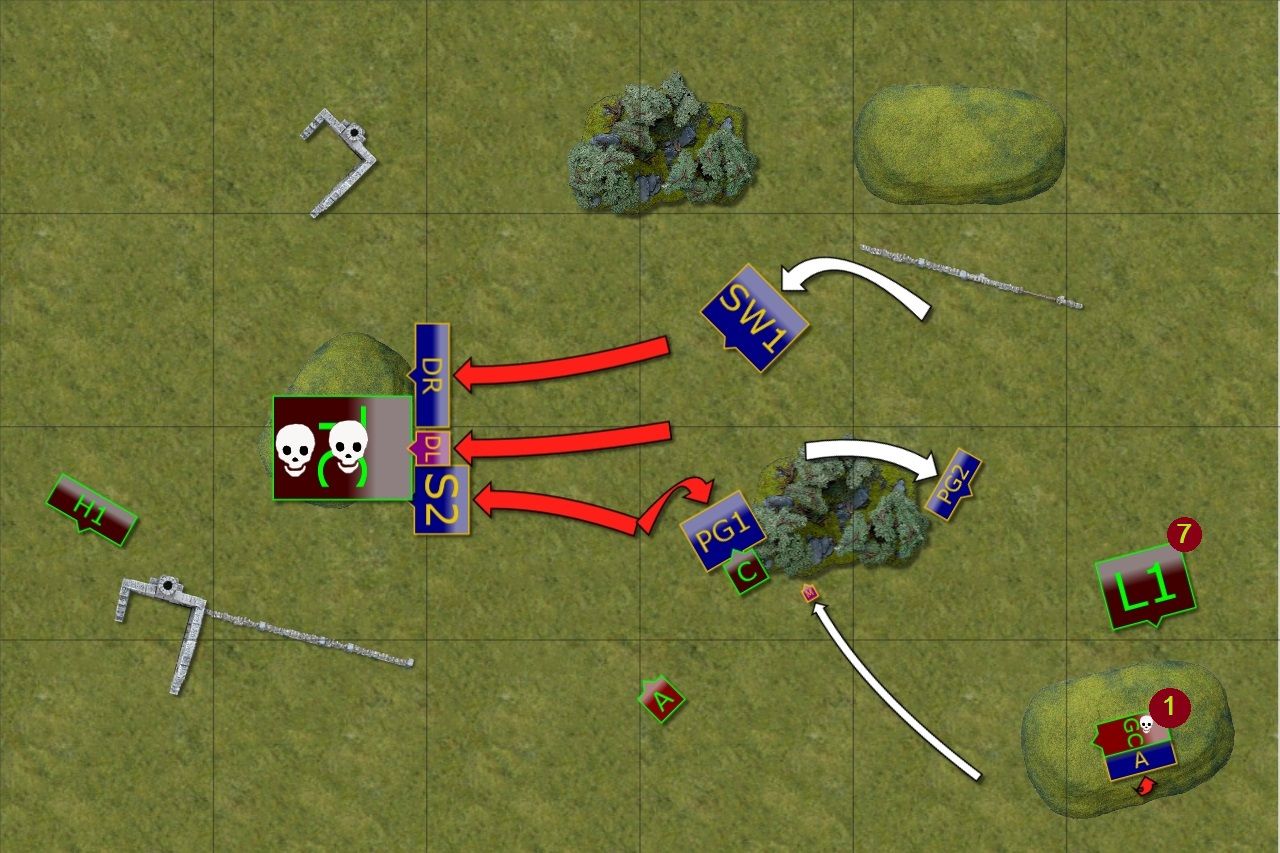
The Herd - Turn 2
 |
| The Herd slows down its advance |
 |
| The Herd fights back |
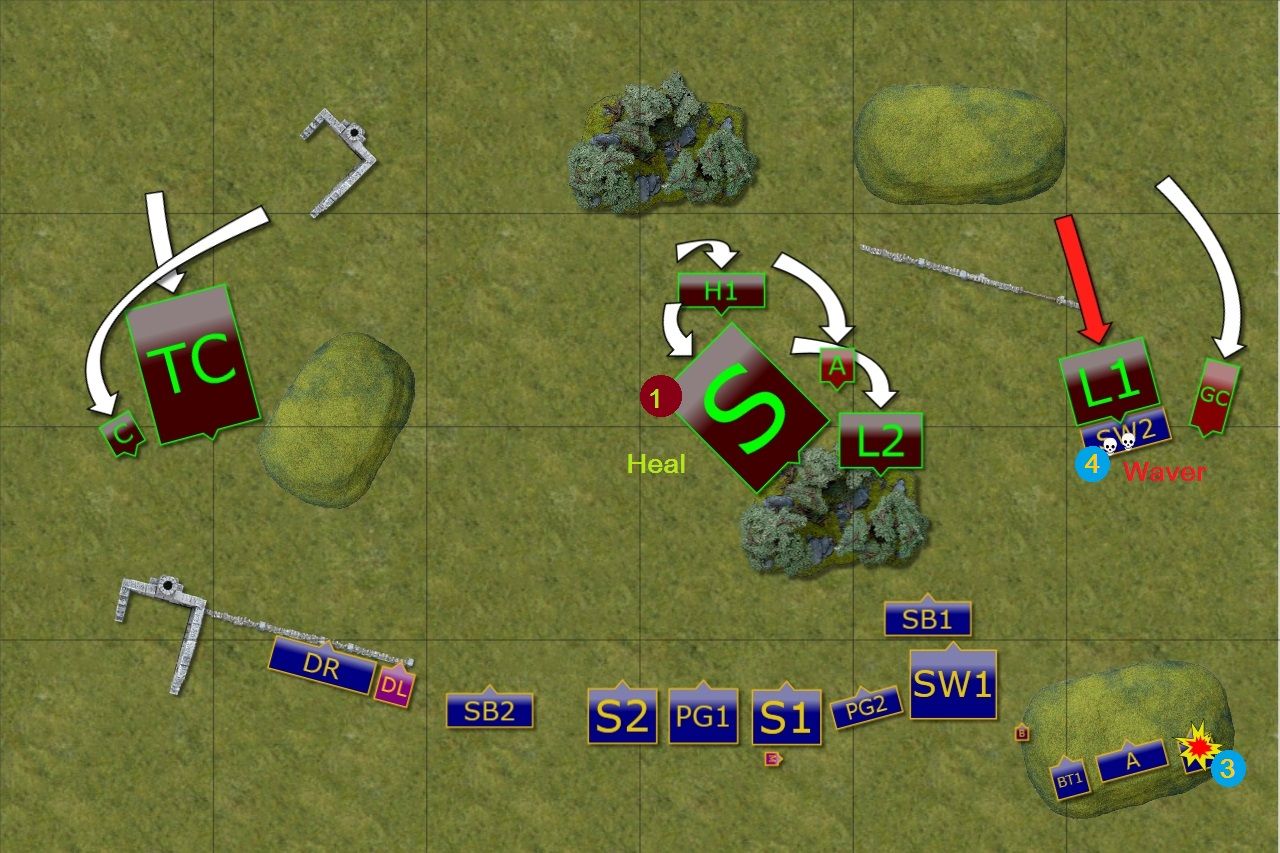
Stampede and Lycans moved to the edge of the forest, slowing down the advance and staying out of the charge range of the Elven infantry. Chariots and Chimera on the West maneuvered so that they could avoid a combined attack of Drakons.
On the East, Longhorns jumped over the fence and attacked Elven knights. Despite the fact the attack was not as powerful as it could have been the Knights wavered. That allowed the Chieftain to maneuver around them and shoot at one of the Bolt Throwers. The crew, too far from Army Standard to gain some courage, was routed.
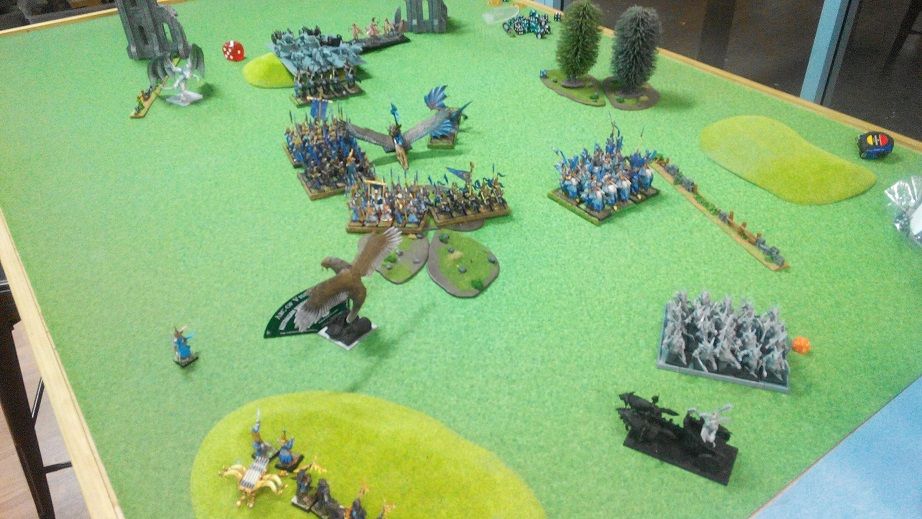
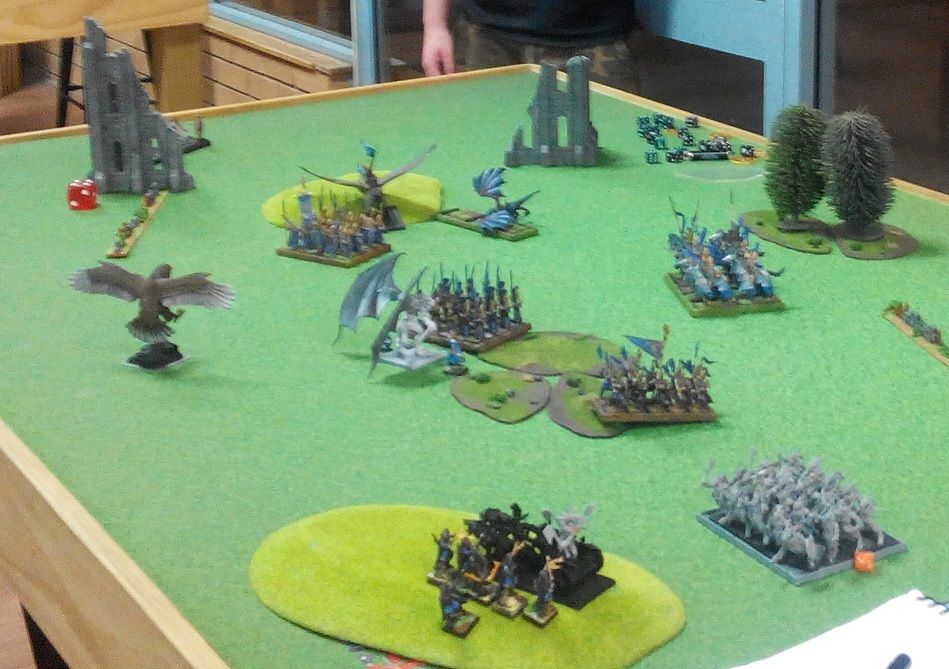
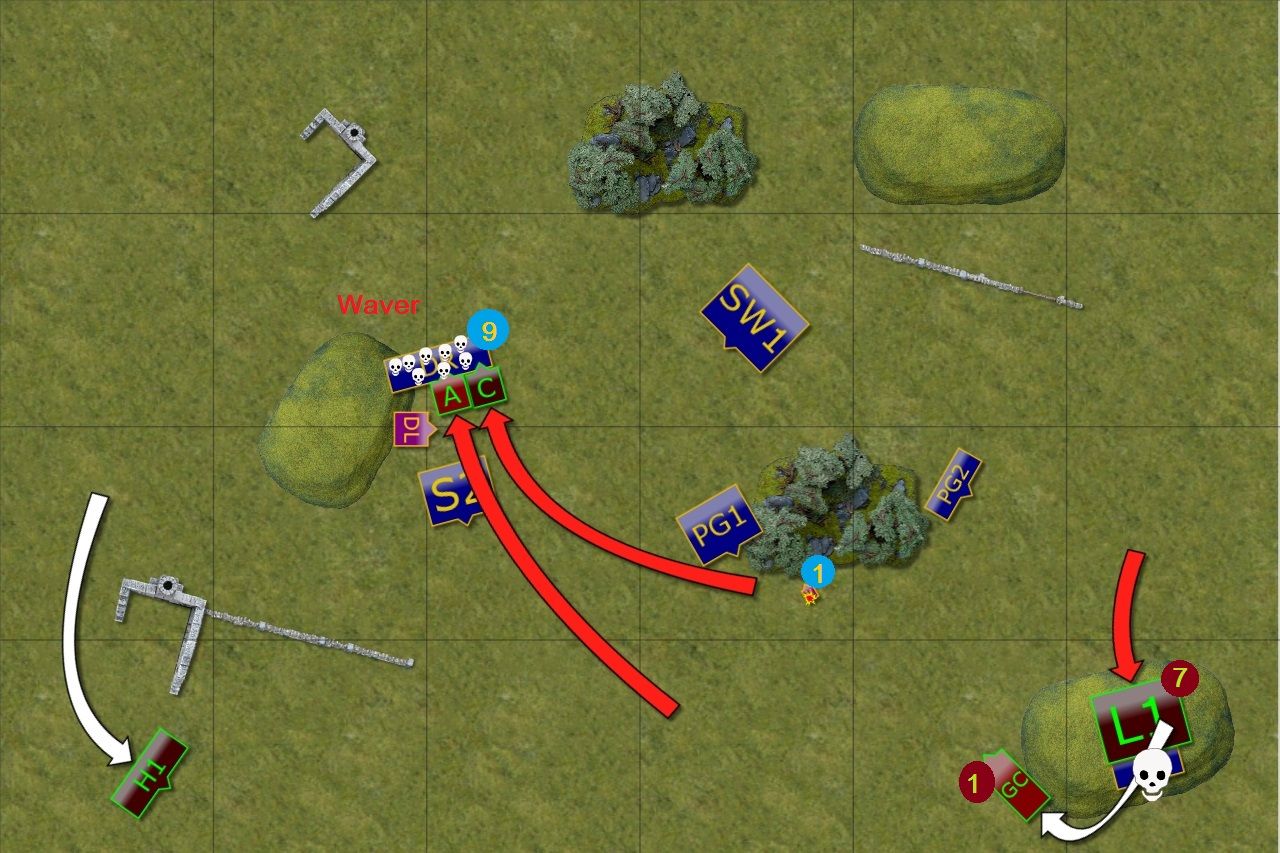
Outcasts - Turn 2
 |
| Stampede is being surrounded by multiple Elven units. |
 |
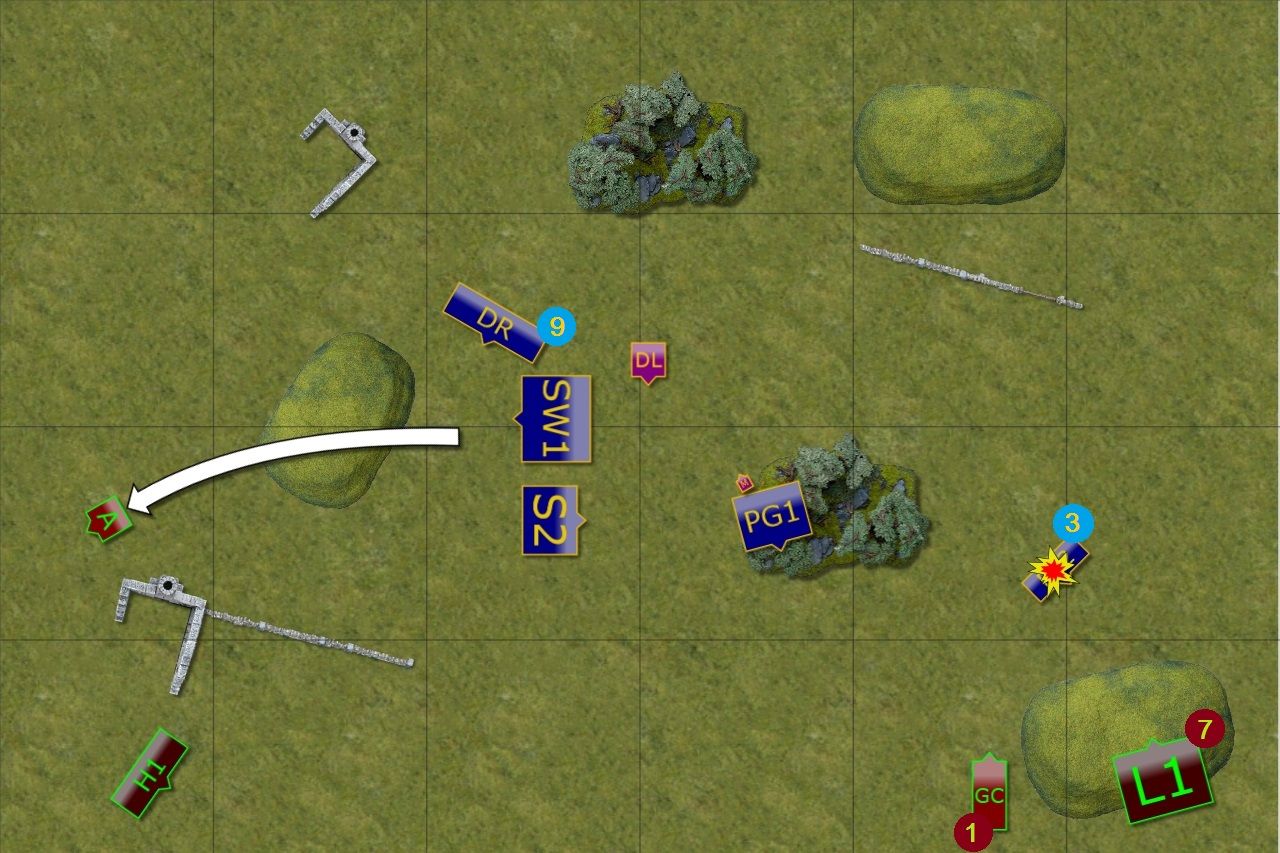
| Storm Wind cavalry exploits Lycans' mistake. |
The good opportunity presented itself and Elves used it the the full advantage. Swift Silver Breeze cavalry moved boldly forward to attract the attention of the Stampede. That opened the path for a charge of Storm Wind Knights, who charged through the forest as if it was not there. Lycans were totally surprised by the attack they didn't expect to come and were routed despite the inspiring presence of the Avatar.
This strike helped the center of the battle line to close in and tighten the ring around Stampede. Drakons mislead the Chariots and flew to the safe landing zone and behind the enemy lines.
At the same time Storm Wind troop kept blocking Longhorns on the Eastern flank and didn't allow them nor the Chieftain to join the melee in the center.
The Herd - Turn 3
 |
| Stampede tramples the enemy but cannot escape the trap. |
 | ||
| Elven cavalry dies. |
Stampede storms in and brave fast cavalry is trampled to death. Longhorns also can celebrate a success as they finally routed Elven Knights stopping them. The Chariots rolled on the top of the hill to have a better overview and choice of potential targets. And both Chimera and the Avatar flew behind Elven lines to look for weak spots.
Outcasts - Turn 3
 |
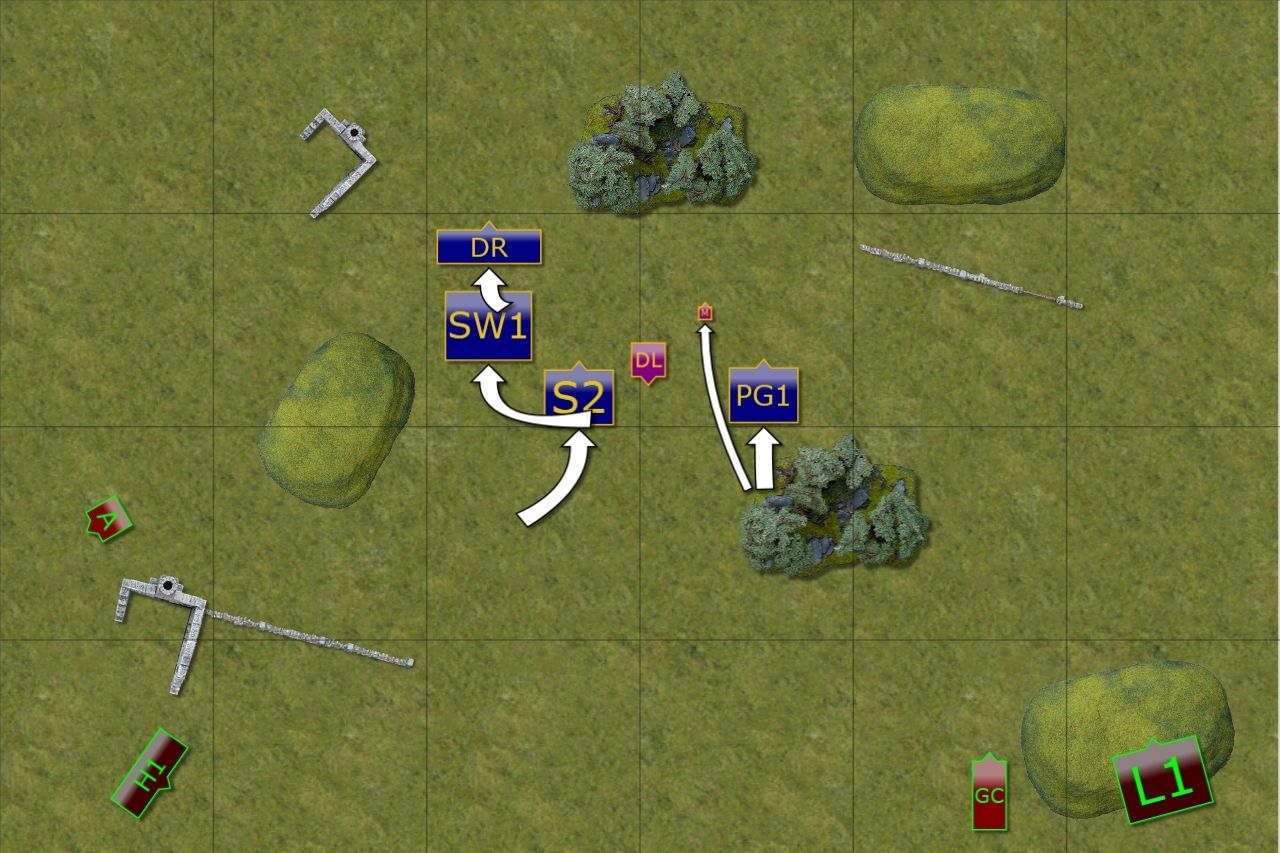
| Stampede is hunted down. |
 |
| All out attack at Stampede. |
Due to poor reforming after victorious charge against Lycans, Storm Wind cavalry missed the party. Almost every single unit in the Elven army charged the Stampede and even such a mighty beast fell to the attack of much more numerous foes.
Elves didn't celebrate the victory just yet, however, as with powerful flying monsters still nearby they had to be very careful not to get caught unaware.
The Herd - Turn 4
 |
| Chimera fights back ... |
 |
| ... and eats Army Standard and nearby Spears. |
The Herd suffered a heavy blow but it was far from over. The Chariots easily defeated fast cavalry blocking them but could not hide from Elven units waiting to counter charge.
Despite maneuvering and putting the best effort to cover all angles, Elves left some openings and Chimera spotted one of them. Army Standard was exposed and what is more, so was the flank of nearby Spears. Chimera made a short work of the poor Elf and used the momentum to smash the ranks of the Spears who could not hold against such a ferocious attack and were routed. That created a dangerous gap in the Elven formation.
Last but not least, Chief attacked remaining bolt thrower and in doing so blocked the archers. The fight continued then with the blows exchange.
Outcasts - Turn 4
 |
| Elves rout the Tribal Chariots |
 |
| But enemy fliers are still a big threat. |
Exposed chariots had to face a coordinated attack by 3 Elven units and could not held fast against such pressure. The Elves reformed to get ready for the potential charge of the enemy large fliers.
In the meantime, Palace Guard tried to keep Chimera distracted but charge through the forest and no magical support from the mage meant they didn't damage the monster enough to achieve that goal.
Also Archers, who in desperation attacked the Chieftain didn't do much damage.
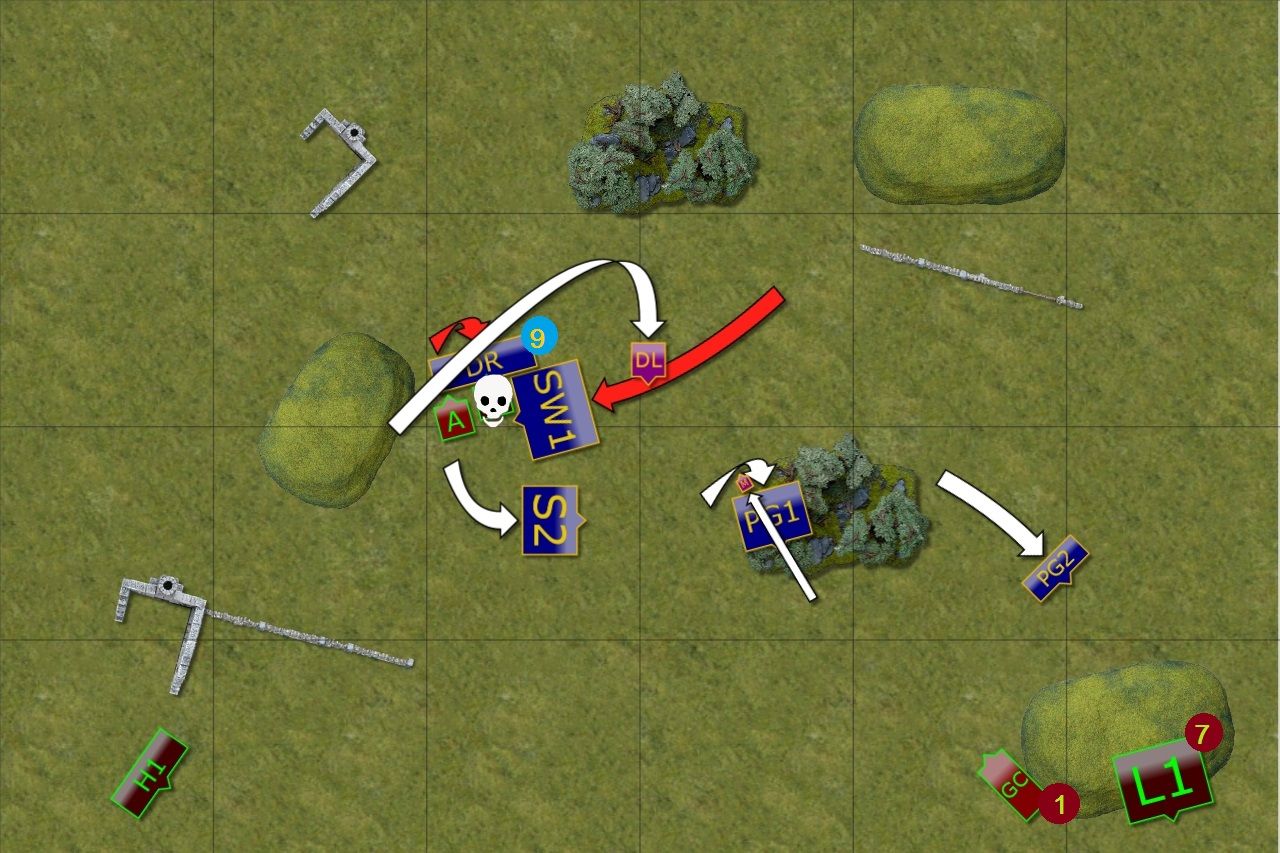
The Herd - Turn 5
 |
| Aerial fight between the Avatar, Chimera and the Drakons! |
 |
| The Drakons miraculously survived! |
With a choice of different targets, the Avatar and Chimera decided to combine their efforts and engage Elven Drakons in deadly aerial combat. It was a smart choice as not only they had odds in their favor but the momentum of the attack would carry them to safety, i.e. avoid Storm Wind heavy cavalry. Unfortunately for Chimera in particular, the Drakons managed to hold the line (although only thanks to the inspiring presence of their lord nearby)!
On the other end of the battle field Longhorns made a short work of the Archers and managed to move away from the charge range of the pursuing Palace Guard too!
Outcasts - Turn 5
 |
| Elven heavy cavalry destroys one of the monsters. |
 |
| Drakons have their revenge too. |
While flank attack by Storm Wind cavalry was powerful on its own, Drakons wanted their revenge and attacked too. It was possible because they came equipped with potent Dwarven ale and shrugged off any wavering effects of the previous charge of their enemies. In the end monstrous Chimera was dead.
In the meantime, Spear maneuvered to support Palace Guard that defended the forest in case Chieftain decided to attack them there. Palace Guard troop relentlessly pursued wounded Longhorns, hoping to destroy them and remove another enemy that invaded their territory.
The Herd - Turn 6
 |
| The Herd disengages |
 |
| Parting shots. |
The Avatar didn't finish the job and didn't attack badly damaged Drakons but instead flew deep into Elven army territory, avoiding any pursuit.
Chieftain and Longorns didn't attack their enemies close and personally but instead the arrows were shot at pursuing Palace Guard. The damage was not great but still enough to rout the Elves!
Outcasts - Turn 6
 |
| With no enemy to attack Elves moved into enemy land. |
Elves didn't have any means to attack the enemy at range so all they could do at this stage was to reform and move deeper into enemy territory. Both forces disengaged and the battle came to an end.
Summary
 |
| Turn-by-turn animation summary |
After-battle thoughts
When we calculated the total value of the units we had in the enemy's half of the battle field we found out that it was 980 for Elves and 830 for the Herd. It was a Draw!
First of all, I would like to thank Adam for a fantastic game! It was great to play with real miniatures again, roll real dice and I am also grateful for introducing me to a new store that is really close to where I live. I am sure I will visit the venue more often now!
I think Adam played better game in terms of focusing on the scenario objectives and despite some mistakes and misfortune in the first half of the battle, he didn't give up. Instead, he methodically kept routing my units and in the end got enough points in my half of the battle field to secure a draw.
I liked our game very much, it looks like the result of the battle was not decided until the very last moment. I think I felt too secure after eliminating Lycans and Stampede in the center and made some mistakes. Because of that I didn't use my initial advantage to the fullest and could not achieve the victory.
As usual, when writing a battle report I found a lot of moments where I could make a different decision or simply made a mistake. Let's have a look at each of my turn separately to discuss these situations in more detail.
Turn 1 - I was happy with my deployment. I think the threat of Drakons worked well on the Western flank and slowed down the advance of Chimera and Chariots. Where I made a mistake? I think I should have left Army Standard with the shooters on the hill. The cavalry was not yet in immediate danger and had mage to help them. While it was clear that Bolt Throwers and Archers are more vulnerable targets and even a few shots from Chieftain may rout them. As it indeed happened.
Turn 2 - First decision I am not sure about is what to do with wavered Storm Wind troop. I considered briefly to pull them back a little to block the Chieftain. However, he had Nimble special rule and could easily avoid my unit and still move to the shooting position. I decided not to move the cavalry because in doing so I would have opened the room for Longhorns and let them pivot towards the center and exposed flank.
Second decision, where I think I made a mistake, was how to reform Storm Wind regiment after routing Lycans. I wanted them to have avatar in front but because I remained in the position I also allowed Stampede to attack Silver Breeze from the direction that kept them safe from the Knights!
I think that what I should have done instead was to pivot the Knights towards Longhorns but keep Avatar in front arc. It is simply waste of a turn when powerful unit like that cannot attack again.
Turn 3 - I clearly should not have left Army Standard on the flank of my own unit. I charged with him into melee to avoid being attacked. However, it is better that he is attacked alone and not lead to a disaster where I lose him and nearby unit.
To avoid this situation I should have advanced with him after melee or simply do not engage at all. And make sure that whoever attacks him is in range for counter attack.
The second thing is the overall attack against Stampede. We actually didn't roll the attacks, just proceeded to nerve test. I wonder then if infantry alone should have been enough to rout Stampede. Was adding Drakons an overkill? While I still could reform and face the enemy I had the option to keep them moving and countering enemy fliers instead.
Turn 4 - I haven't checked the distances but I think I might have not been able to avoid enemy fliers with Drakons or Drakon Lord, even if they advanced after the attack against the chariots. But what I should have done better was to position Storm Wind cavalry in the way that would have covered potential advance of the Avatar and the Chimera if they have routed the Drakons as expected.
At this stage I also should have thought more about the scenario. I foolishly ignored the potential of the Chieftain as a mobile shooting platform and moved my Palace Guard in chase instead of pivoting around and going to the enemy half with Forest as a protection.
Turn 5 - I had a certain dilemma. I am not sure now why. 32 attacks into a flank with TC(2) should have been more than enough to rout Chimera on their own. What I didn't do here was to attack the Avatar from the flank with Drakon Lord and with Drakons from the front. If I remember correctly I had Bane Chant successfully cast on Drakons too. That means I had 19 attacks hitting on 3+, re-rolls of 1's and then 3+ to do damage.
It was a long shot but I think I should have taken it to simply give myself a chance to rout the most expensive enemy model and the one that secured the draw for my opponent.
As you can see the list of mistakes is quite long so now wonder I didn't win the game! But I really enjoyed it despite that, I am always optimistic if the result was affected this way because it means I can further improve my gaming skills.
It was also a great experience to face new army and these huge units do feel intimidating!
I hope you enjoyed the report and I am looking forward to reading your comments!
Thanks!
Before he works any more on that great Stampede, make sure to let him know it's on regular monster bases and not chariot bases like it was in the early beta. It doesn't need to be so huge!
ReplyDeleteActually, you might not want to tell him, as that means he'll have two Stapede hordes ready to go!
Ha! Indeed! Thanks for pointing that out, I have already told him and he was happy to learn that :)
DeletePoetry in motion! Those multi charges were a thing of beauty, as was the use of chaff units. I certainly wouldn't volunteer for a job in the horse archers in your army :)
ReplyDeleteNice analysis of the things you could have done differently, the only one that stood out to me was the charge in turn 5 where you didn't target the Avatar. I think you're right about your opponent though, focussing on the objective worked out very well for him.
Thank you, Nick! I am glad you enjoyed the dynamism of the game. It was very enjoyable to observe it unfolding in front of our eyes and I hoped to grasp it with the report!
DeleteI just have to disagree with you one matter. There is no chaff in my army. All warriors are highly valuable and those who sacrifice their lives for their companions are immortalized in the songs and sagas as heroes! :)
More seriously though, it looks to me that KoW is the game where you have to trade units like pieces on a chess board to buy time and/or space. From that point of view every single one of them, even the most expensive ones, could possibly be called for that duty. This time it was Silver Breeze, mainly because they were fast enough to do the job.
But when I think about it I should have tried to use Spears in their stead. First of all, they would rob both Chariots and Stampede of Thunderous Charge. It is not a guarantee they would have survived. But they had better chance to do so.
And in the end game these horse archers would have been a better asset in hunting down harpies or damaged Longhorns.
It is of course easier said than done but I need to remember I can do it. At the same time, if you look at some other reports you would notice that Silver Breeze cavalry is not always thrown under the bus for the greater good :)
Also, part of the joy of writing reports is to have good archive of previous games and to learn from my own mistakes!
Cheers!
Hey SM
ReplyDeleteFirstly I think you should recognise that your reports are simply the best across the internet I've ever come across. Right from your deployment explanations, to breaking down the opponents army and even the time you spend with the animated deployment stages. It all makes for an awesome battle report and it's hard to read anything else of lower quality to be honest.
With such a detailed explanation as to why you made the deployment choices to counter Adam's I am really keen to see firstly not only how effective they are, but secondly if you have correctly anticipate your opponent.
By turn 3 I'm reminded of the awesome MSU days of previous gaming and it appears nothing has changed. You master the battlefield like a soldier masters his blade.
I must say Adam did a great job after suffering such a significant blow and clawing a draw so hats off to him for keeping his composure. very admirable.
Thank you for taking the time so continue to publish amazing content SM, looking forward to the next one!
Hi Jimmy,
DeleteThanks a lot for your kind words, my friend! They mean a lot to me because you know the best how long way we, as battle reporters, went through and that it took significant amount of time to improve the quality of our respective blogs. I am very happy to know you praise mine so high and that alone is a great motivator to keep going and strive for even better solutions in the future.
I was concerned at the very beginning of my KoW journey if what I learned prior to that can be useful at all. But as you pointed out, MSU is still a viable playing style and I am very glad I can use it in Kings of War.
This game also showed perfectly that one should never give up and keep playing until the very last moment in order to get the best result possible. I learned from my mistakes a lot but I also observed how Adam tackled a difficult situation with the army he played for the first time. It was definitely a great example where cool head and a focus on objectives can save your day no matter what.
I hope it is just the beginning and that we will have more opportunities to play against each other.
Once again, thanks a lot for your feedback and very kind words!
Cheers!
Stumbled on this awesome battle report while I was looking for herd tactics. Great job and looking forward to more reports in the future..
ReplyDeleteHi Pointy Ears! Thanks a lot! Im glad you liked the report. Unfortunately, my friend moved to T9A so I haven't had a chance to have a rematch since our first game. Hopefully I will have an opportunity to play against the Herd again!
ReplyDeleteCheers!