
Greetings!

One of the great things about Kings of War at the moment is that one gets to play against so many armies that all fall into a category called "new opponent". There are 20 army lists total in Kings of War Rulebook and Uncharted Empires supplement combined and that does not include allies!
It is easy then to play a game after game against totally new enemy, one has no prior experience with. It was exactly that situation with the most recent battle where I had a pleasure to face the knightly might of the Brotherhood! What is more, I was playing against Mr. laribold, whom I faced before. Laribold is now trying out different army lists as his collection allows him to play multiple forces. I have already met his Salamanders, saw his Forces of Nature in action but this time it was up to Knightly Orders to teach the Outcasts the lesson. Laribold told me his army is based on old school Kislev models from Warhammer and this time he brought the following:
Brotherhood of Dobrensk - Army List
20 Order of the Brotherhood, Horde, Maccwar's Caterpillar - 365
- 5 Villein Reconnoiterer Troop, Warbow of Kaba - 105
- 5 Villein Reconnoiterer Troop, Warbow of Kaba - 105
- 5 Villein Reconnoiterer Troop - 100
- Devoted on Horse, Hero, Heal(4), Surge(5), Talisman of Inspiration - 145
10 Order of Redemption, Regiment - 260
- 10 Villein Bowmen, Troop - 85
- Exemplar Hunter on Horse, Hero, Blade of Slashing - 125
10 Order of the Abyssal Hunt, Regiment, Brew of Strength - 250
3 Order of the Forsaken, Regiment - 170
20 Villein Martyrs, Regiment - 115
6 Water Elementals, Horde, Diadem of Dragonkind - 250
So many Knights! I really wish I could see all these Winged Lancers in a single horde unit live. I hope one day I will!
Hm, so how to bite that armored might? Well, let's see what these units can do in particular.
20 Order of the Brotherhood - the main unit of the army, definitely a center piece and the hardest hitting force too. They hit very hard indeed with 32 attacks! The interesting thing is, however, that all these attacks are subject to Thunderous Charge rule. No wonder then that these knights came equipped with Pathfinder skill as with such a huge unit it is impossible to avoid terrain.
But even without that impressive bonus for Lances the horde of Knights packs enough attacks to make a dent in any foe's defense. With Def5 and high nerve of 22/24 it is not that easy to make this unit too worried.
I planned to exploit the fact that this unit has a very wide frontage. First of all, it means you can attack it with many units of your own. Second, it also means it can be blocked easier too. So the plan would be to prevent the unit from attacking anything bigger and charge with a few units of my own at the same time. I knew I would not rout this unit on a charge. However, it can counter charge only a single unit of my own so having a few more would ensure that next punch would be inevitable and deadly.
5 Villein Reconnoiterer Troop - fighting type of a fast cavalry. I like these a lot. They can be sent to disrupt the enemy, to block it, to harass the shooters etc. As always, such troops are the priority for me to eliminate. They might look expendable to my enemy but I want to decide when they are sacrificed so that I can get rid of them quickly. Otherwise they will interfere with my own movement phase and that would be my undoing.
10 Order of Redemption - the most powerful of Knightly Orders, fortunately available up to Regiment "only" :) They are even tougher than regular Knights because of Regeneration and Headstrong special rules. They also serve as a source of Inspire which is very important too. And they pack 20 attacks on their own so it is definitely a good idea not to be on the receiving end of their attacks.
The way to deal with enemy Knights is to shoot at them, at least to weaken them and to use longer charge distance my own assault troops have. Even then, it is absolutely crucial to isolate the regiment so that there is no help coming when my own bounce back after initial attack.
10 Order of the Abyssal Hunt - another type of the Knights. These are Monsters hunters and as such are more dangerous because they have a combination of Crushing Strength and Thunderous Charge. Hence, even if hindered or disrupted they are still capable to hit hard with their 18 attacks. What is more, this unit has Magical Artifact that gives them additional CS1.
They are not as well protected though (something I forgot during the game!) but have high nerve value of 15/18!
3 Order of the Forsaken - flying cavalry, another priority on my list due to the fact they are incredibly mobile. Fortunately, as a regiment they are a bit more fragile. However, I expected that they would be constantly benefiting from cover at least and shooting might not be a good option to deal with them. If there is an opportunity though I would definitely use it!
I expected some aerial combat between them and my Drakons :)
6 Water Elementals - I must say I am getting used to some kind of large infantry horde being present among my opponent's armies. These are very good anvils and often have Surge ability that is a very handy option for sure. You can use them as the anvil but also as a rear guard and with Surge, they can try and get rid of some nasty but careless fliers.
Water Elementals are not the hardest hitting or the toughest in their own category but they are faster with M7 and can heal themselves. The fact they cannot be wavered is a very good bonus too!
20 Villein Martyrs - there are very few infantry units in this army and I wondered what their role is. They are not to be ignored for sure and can fill some gaps in the formation. But I would not deny they were not the most dangerous target and I thought I could try to take them off with my own infantry in one-on-one melee if needs be.
10 Villein Bowmen - Quite different unit of shooters than Elven Archers. Less mobile due to Reload! but better protected thanks to Phalanx. Also, having default Piercing is always nice. I am sure their role is to deal with some annoying fast units with well aimed ranged attacks.
Devoted on Horse - the only spell caster in the army. Her duty is to heal the Knights, surge the Elementals and Inspire nearby troops. Very important indeed.
Exemplar Hunter on Horse - Fast fighting character is very useful in disrupting shooters and hunting down war machines but can always add a few more attacks in any melee. He is also another source of Inspire which is already good on its own.
In general, I faced a very fast, well armored force that can hit very hard on the charge. It does not have much of a shooting so I expected it not to waste time and advance aggressively. I wanted to get rid of the fast elements first and then use the larger number of troops to block and isolate knightly units so that I could prepare and execute the charges with few units of my own against a single target.
My army list for reference:
Terrain
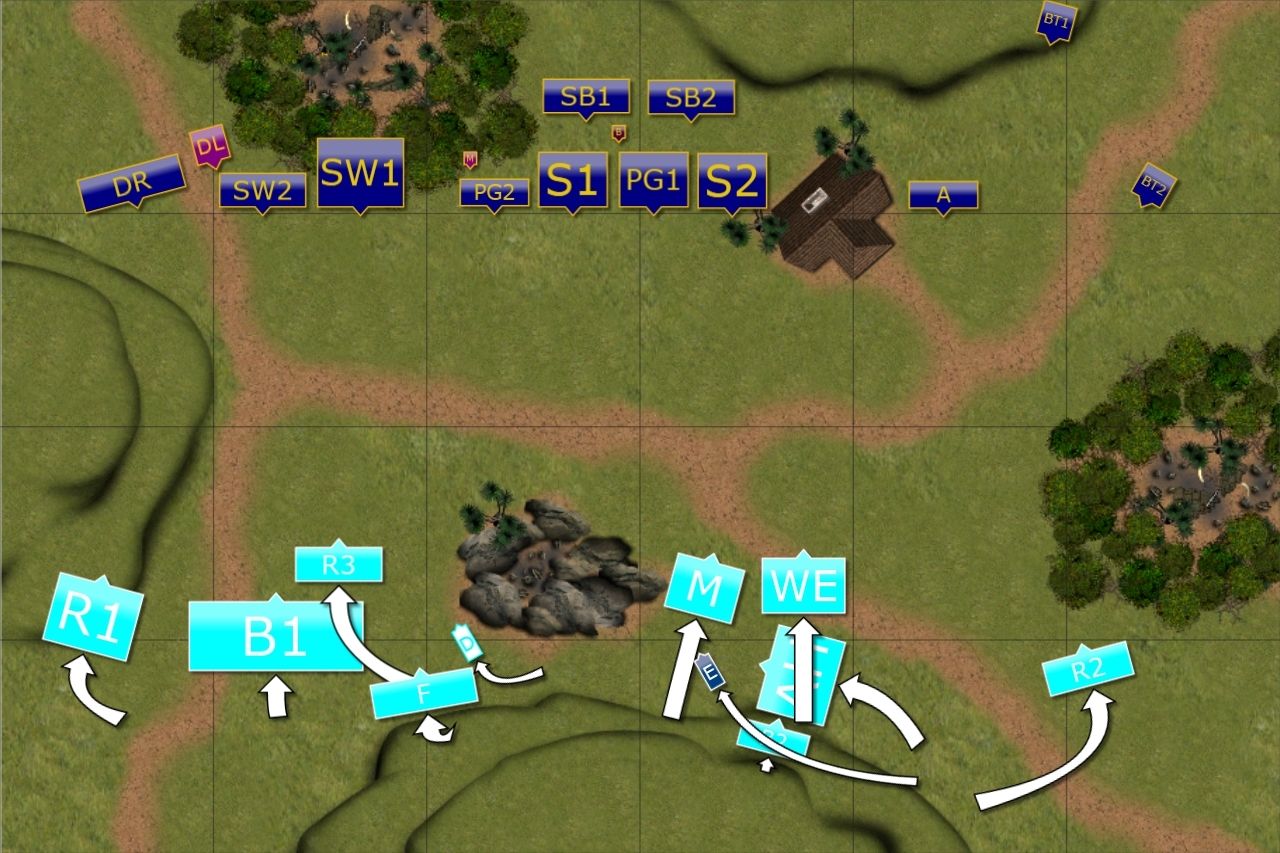
Deployment
Deployment Order:
1. Martyrs - Spearelves (S1)
2. Bowen - Spearelves (S2)
3. Water Elementals - Palace Guard (PG1)
4. Devoted - Palace Guard (PG2)
5. Reconnoiterers (R2) - BSB
6. Order of the Abyssal Hunt - Bolt Thrower (BT1)
7. Exemplar - Archers
8. Reconnoiterers (R3) - Silverbreeze (SB1)
9. Order of the Brotherhood - Silverbreeze (SB2)
10. Order of Redemption - Bolt Thrower (BT2)
11. Order of the Forsaken - Rest of the Army
Please, bear in mind that we rolled Invade scenario for this game and that may have also affected the deployment order and final formations of both armies.
From my point of view I could not allow to leave any part of the battle field unattended. It is possible that if done so some of the elements of the enemy army may sneak into my half of the field easily. In this game I thought it would be easier to meet the enemy in the middle and fight through.
I wanted to use my higher number of units to my advantage to create a local superiority and to interfere with the movement of the Brotherhood horde. As Knightly units are also quite expensive it was important to rout some of them to give myself a better chance for meeting scenario conditions.
It led to the situation where I decided to fight the Knights on the Western flank with my own assault troops supported by fast cavalry, to create favorable charges. When I noticed the Knights are not going to be deployed on the East, I decided it is worth risking leaving my shooters there unguarded. Thanks to that I had more units where the fight was about to happen, had some blockers in the middle and forced the enemy to deal with the shooters. If they diverted units to do so, my advantage in unit numbers on the West would be even stronger. If not, then the shooters would pepper the advancing enemy with arrows.
We then rolled off for the first turn and the Brotherhood of Dobrensk was the first to move forward!
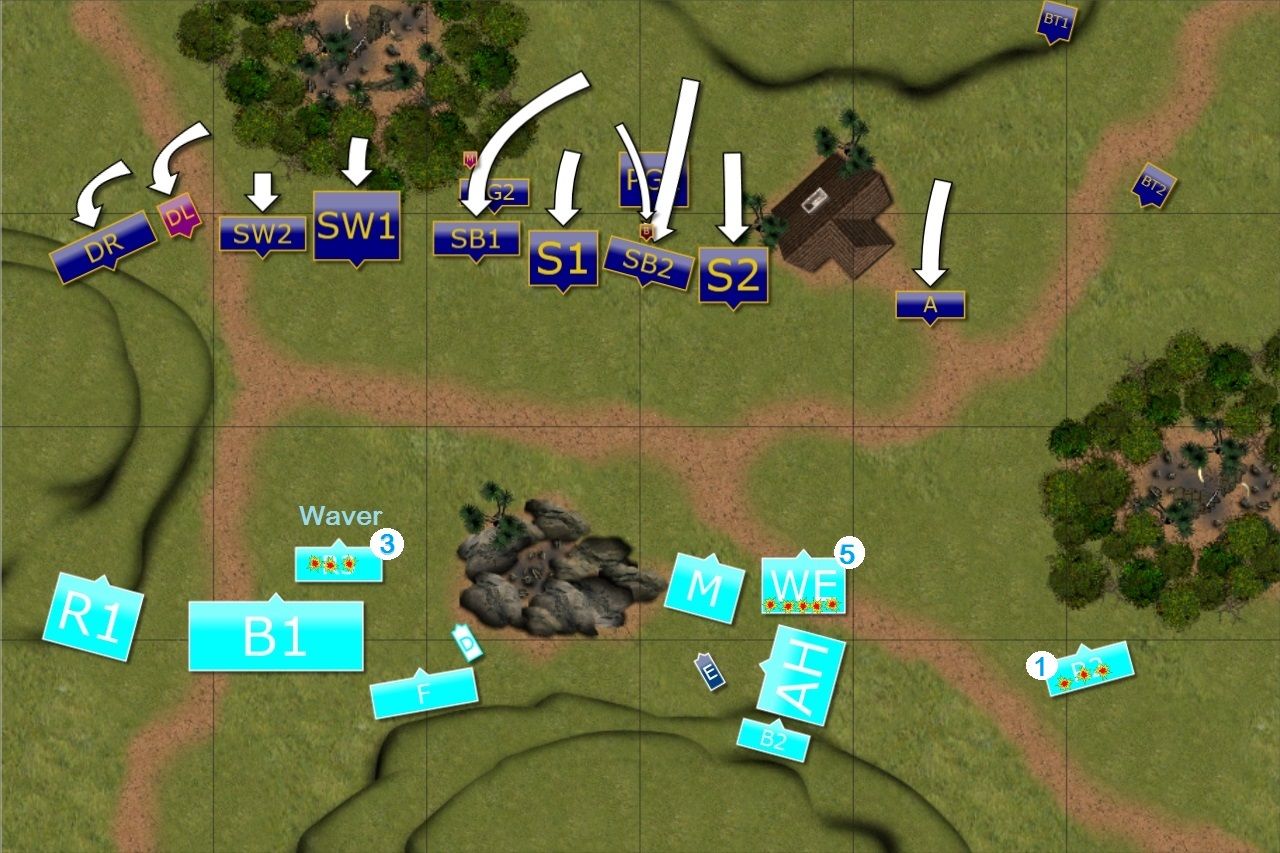
Brotherhood of Dobrensk - Turn 1
The Knights of the Brotherhood moved forward at a slow pace, proud banners raised high. The army was divided into two formations, the West was covered by the Knights, while middle East was controlled by slower troops, supported by the Knights of the Abyssal Hunt. As the Elves were still out of range now arrows were shot at them.
Outcasts - Turn 1
The Elves advanced their entire battle line but stayed out of charge range of the enemy knights while threatening to attack with their faster units. As always, the opening fire was the first wave of attack and it was already felt by the Brotherhood troops. Despite the encouraging presence of the Knights, fast cavalry scouts were visibly shaken by the deadly fire unleashed by their counterparts.
Brotherhood of Dobrensk - Turn 2
The Knights on the Western flank slowed their advance so that Devoted had time to heal back some damage. The units in the middle of the battle field advanced further, however. Then Bowmen opened fire at Elven Archers and with the help of ice blasts from the Elementals (Edit: Breath Weapon :)) they routed their first enemy unit!
Outcasts - Turn 2
Elves keep advancing carefully and use their superior firepower to gain some advantage. Bolt thrower crews decided the more imminent threat should be addressed first and both aimed at fast cavalry in the woods. Despite the protection of the forest, lonely unit is routed and bolt throwers will not be threatened for a while.
Silverbreeze cavalry kept shooting at another unit of mounted scouts and inflicted more damage but this time the faith in the Brotherhood was strong.
Brotherhood of Dobrensk - Turn 3
The fastest troops were committed to the fight and Brotherhood made first charges. That was some kind of a surprise to the Elves (Edit: I thought fast cavalry is M8 and quickly learned about my mistake!) who lost Silverbreeze cavalry in that attack.
The second wave comprised of the Knights advanced too and hoped that the chargers would occupy Elven units long enough to catch the enemy unprepared.
Outcasts - Turn 3
The Elves knew that the best form of defense is offense, especially against armored might of the Brotherhood. Drakon Riders attacked Order of redemption to stop them from flanking their companions.
At the same time the Stormwind cavalry and Palace Guard got rid of the units spearheading the attack of the Brotherhood. Valiant Knights and mounted scouts fought bravely but had to give up when faced more experienced Elven warriors.
To prevent Order of the Brotherhood horde to join that fight Silverbreeze cavalry moved in front of them and Spearelves were threatening the flank of that formation. That would give enough time for the second Elven line to regroup.
Infantry in the middle pulled back a bit but kept close enough to threaten the enemy in the middle of the battle field if they decided to go to towards Eastern flank. Bolt throwers kept shooting at Elementals, as they were the toughest enemy unit there and Elven infantry needed as much support as possible before inevitable melee.
Brotherhood of Dobrensk - Turn 4
The Brotherhood was in a difficult situation now. The Knights of Redemption healed their damage but their attack lacked usual power and Drakon riders withstood the counter charge. Nearby Brotherhood routed blocking Silverbreeze cavalry but in doing so they also put themselves in an immediate danger.
The other half of the army advanced through the center but they were slow in doing so and could not neglect nearby Elven infantry either. The units of the Brotherhood did what they could and now braced for the impact.
Outcasts - Turn 4
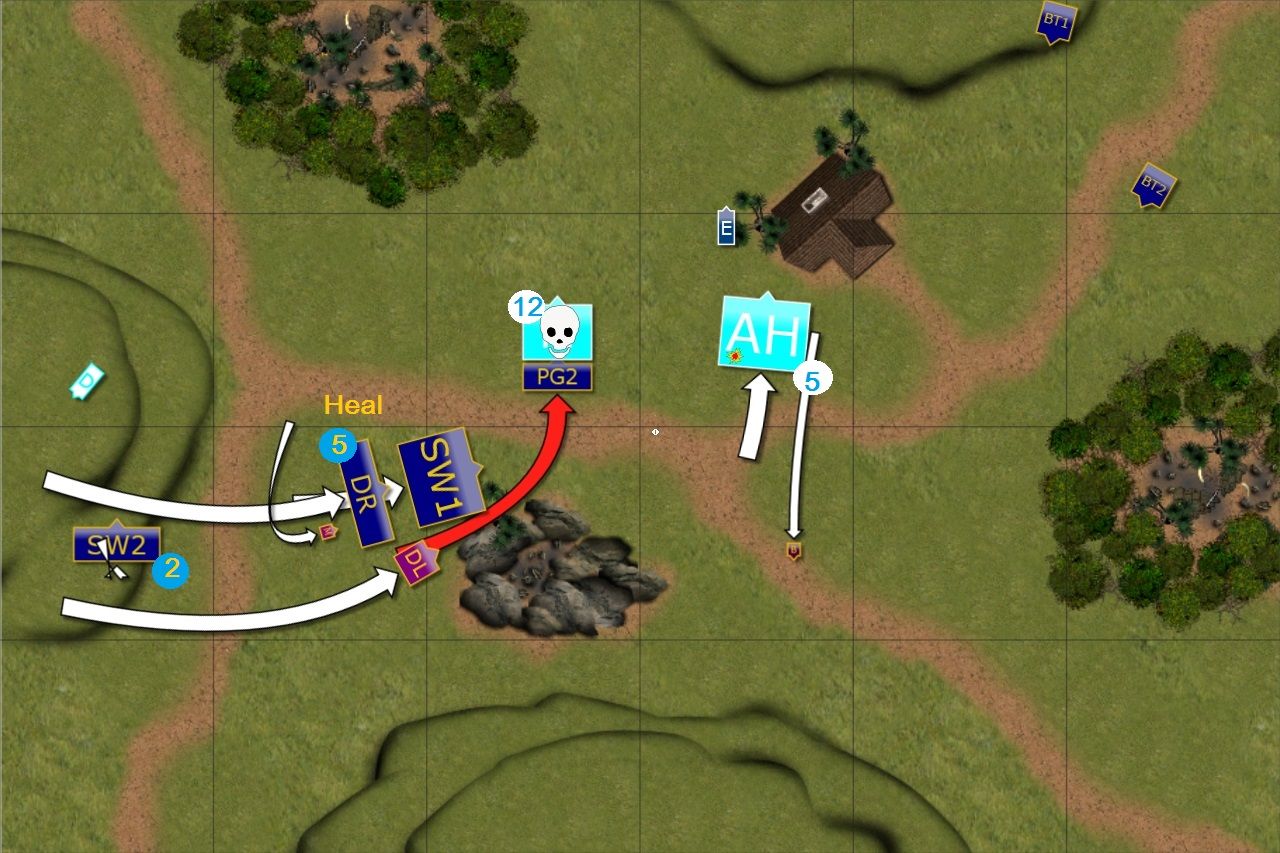
Second wave of the attack was much harder and went across entire battle field. Drakon Riders were supported by Stormwind troop but even then Knights of Redemption didn't yield. Fortunately for Elves, they were now surrounded and could only counter charge.
Main attack was directed at the Order of the Brotherhood and only thanks to their high morale the unit managed to hold. But the damage was enormous and it looked like the flank was crumbling.
The situation in the middle was surprising a bit because Elven infantry also attacked and they chose to hit Elementals, the powerful anvil of the enemy army. But the charge was well coordinated and Water Elementals were routed!
Even nearby Bowmen were destroyed by the very accurate Bolt Throwers. It was a powerful blow against Brotherhood and although the battle was far from over they stood on shaky legs, stunned and trying to recover fast.
Brotherhood of Dobrensk - Turn 5
The Brotherhood kept fighting! Knights of Redemption tried to rout Drakon riders again but since their offensive power was limited they could not shift the enemy again. The Order of Brotherhood made a short work of Spearelves (Edit: very impressive considering they didn't have Thunderous Charge this time.)
Finally, the Order of the Abyssal Hunt supported by the Examplat charged Palace Guard and routed them on the charge. Some revenge was taken but Elves still had hard hitting units to send into the melee.
Outcasts - Turn 5
This time even the Knights of the Brotherhood could not withstand the attack. Both knightly units were charged by multiple enemy units and were routed.
In the middle, spearelves could not avoid the attention of the Order of the Abyssal Hunt and decided to block their advance while Bolt Throwers shot at them. (Edit: I forgot these Knights have Def4 otherwise I think attacking with my infantry could have been a better option. )
Brotherhood of Dobrensk - Turn 6
With all the other Orders gone, only the Abyssal Hunt could attack. They charged Spearelves and routed Elven infantry to invade Elven territory. But it was clear the Elves gained the upper hand by winning the Western flank already.
Outcasts - Turn 6
Elves closed the distance to the invading enemy. Palace Guard was the closest and managed to catch martyrs and rout them. Bolt throwers crews aimed at the last unit of Knights but this time their bolts didn't do enough damage to rout the enemy.
Despite that, Elves managed to invade enemy territory with greater force and they won this time!
Summary
After-battle thoughts
First of all I would like to thank laribold for a great game and continuing when his army suffered significant damage. I know it is tough moment and one simply wants to throw the towel. I am glad he kept fighting because I believe it will add to our mutual experience for sure.
In general I think I used the advantage of playing with the army I played with for some time when laribold brought another new list and was learning how to use it. I am sure, however, that in the longer run he may have an advantage over me because his experience will be more varied and he will have a broader understanding of the game.
I still hope he would look at this report with optimistic attitude despite the defeat. We talked about the game a bit after and I think what made him sad about the outcome was not the result itself. It was more about the feeling you are on the back foot at some stage and can't make the enemy to fight for his victory.
It didn't look as if I had the game in the bag from the start at all from my point of view. I simply needed to be very careful not to give the Knights the chance to charge me and having a bit longer range helped here too. However, I think it was more about having enough units to go for exchange and still have enough of them left (as well as those who can deal damage).
When I looked at the game again while making the maps I keep wondering about some details such as reforming and how that impacted the game. For example, when Brotherhood destroyed Spearelves (S1) I think they could reform so that Stormwind would not be able to see them. But that would expose their flank to Palace Guard. The Horde was already damaged so a flank charge from that unit may have had a similar result.
Another thing I am trying to figure out is how to fight against less numerous enemy that simply goes for refused flank. I believe in Invade scenario, such formation, with Horde going through the forest on the East, would have caused a lot of trouble.
What I learned about the Bortherhood is that they are very tough army and even when deprived of their Thunderous Charge, which makes a huge difference, they can still hit hard. I think that Brotherhood players should take advantage of it as even without their lances they can damage enemies. And with a very long charge range they can out pace many enemies. Hence a more decisive approach could be what they need too.
I am really curious about your comments and i hope you enjoyed the report.
Thanks for reading!
My army list for reference:
Outcasts - Army List
10 Stormwind, Regiment, Potion of the Caterpillar (Pathfinder) - 235
- 5 Silverbreeze, Troop - 145
- 5 Silverbreeze, Troop - 145
- Drakon Rider Lord, Hero, Large Cavalry - 160
3 Drakon Riders, Regiment, Dwarven Ale - 185
- 5 Stormwind, Troops - 140
- Bolt Thrower, War Machine - 90
20 Palace Guard, Regiment - 150
- 10 Archers - 115
- 10 Palace Guard, Troop - 105
- Bolt Thrower, War Machine - 90
20 Spearelves, Regiment - 140
- Elven Mage, Inspiring Talisman, Bane Chant - 110
20 Spearelves, Regiment - 140
- Battle Standard Bearer, Hero - 50
- Bolt Thrower, War Machine - 90
20 Spearelves, Regiment - 140
- Elven Mage, Inspiring Talisman, Bane Chant - 110
20 Spearelves, Regiment - 140
- Battle Standard Bearer, Hero - 50
Terrain
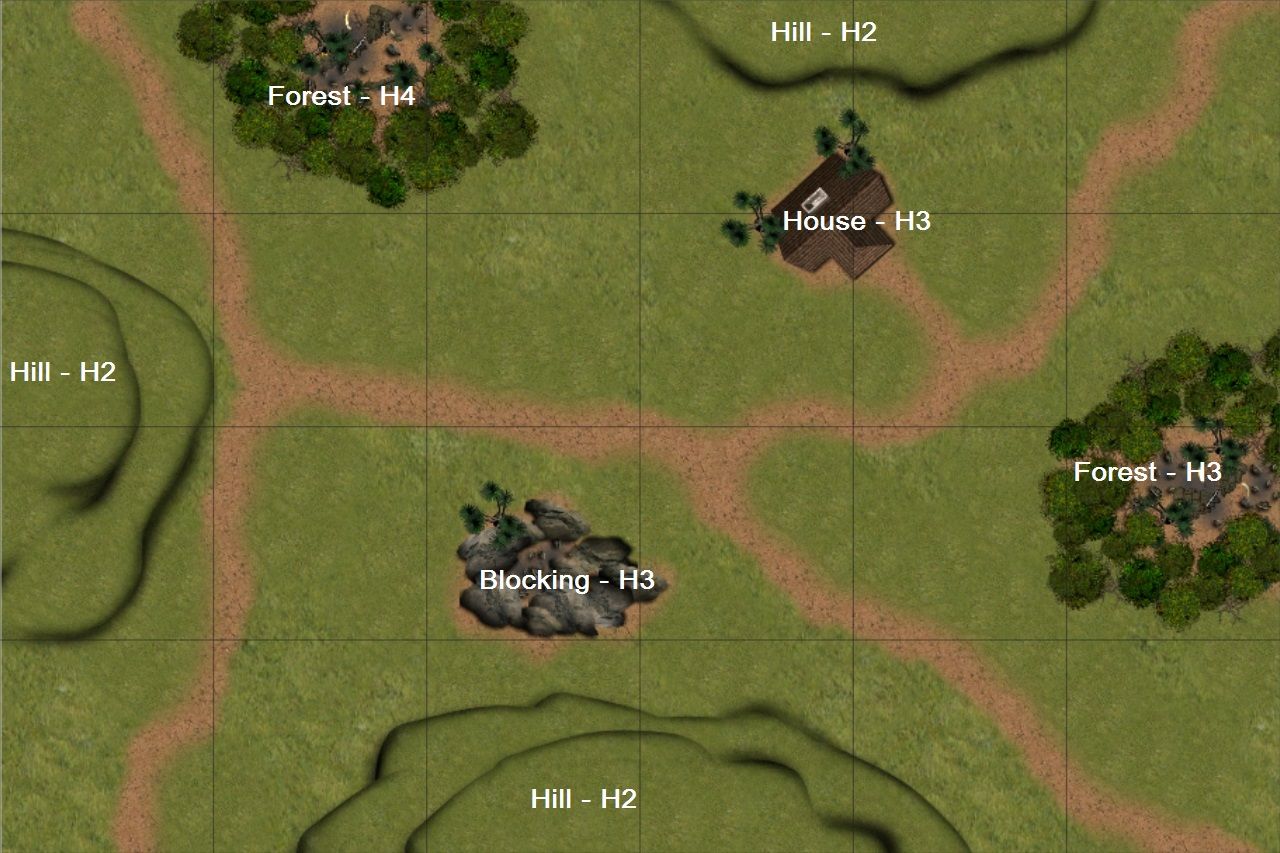 |
| Terrain details |
Deployment
 | ||
| Deployment Order |
1. Martyrs - Spearelves (S1)
2. Bowen - Spearelves (S2)
3. Water Elementals - Palace Guard (PG1)
4. Devoted - Palace Guard (PG2)
5. Reconnoiterers (R2) - BSB
6. Order of the Abyssal Hunt - Bolt Thrower (BT1)
7. Exemplar - Archers
8. Reconnoiterers (R3) - Silverbreeze (SB1)
9. Order of the Brotherhood - Silverbreeze (SB2)
10. Order of Redemption - Bolt Thrower (BT2)
11. Order of the Forsaken - Rest of the Army
 | ||
| Final Deployment |
From my point of view I could not allow to leave any part of the battle field unattended. It is possible that if done so some of the elements of the enemy army may sneak into my half of the field easily. In this game I thought it would be easier to meet the enemy in the middle and fight through.
I wanted to use my higher number of units to my advantage to create a local superiority and to interfere with the movement of the Brotherhood horde. As Knightly units are also quite expensive it was important to rout some of them to give myself a better chance for meeting scenario conditions.
It led to the situation where I decided to fight the Knights on the Western flank with my own assault troops supported by fast cavalry, to create favorable charges. When I noticed the Knights are not going to be deployed on the East, I decided it is worth risking leaving my shooters there unguarded. Thanks to that I had more units where the fight was about to happen, had some blockers in the middle and forced the enemy to deal with the shooters. If they diverted units to do so, my advantage in unit numbers on the West would be even stronger. If not, then the shooters would pepper the advancing enemy with arrows.
We then rolled off for the first turn and the Brotherhood of Dobrensk was the first to move forward!
Brotherhood of Dobrensk - Turn 1
 |
| The Knightly Orders advance |
Outcasts - Turn 1
 | |
| Elves advance too |
The Elves advanced their entire battle line but stayed out of charge range of the enemy knights while threatening to attack with their faster units. As always, the opening fire was the first wave of attack and it was already felt by the Brotherhood troops. Despite the encouraging presence of the Knights, fast cavalry scouts were visibly shaken by the deadly fire unleashed by their counterparts.
Brotherhood of Dobrensk - Turn 2
 |
| Bowmen fire back! |
Outcasts - Turn 2
 |
| Elves intensify their ranged attacks. |
Elves keep advancing carefully and use their superior firepower to gain some advantage. Bolt thrower crews decided the more imminent threat should be addressed first and both aimed at fast cavalry in the woods. Despite the protection of the forest, lonely unit is routed and bolt throwers will not be threatened for a while.
Silverbreeze cavalry kept shooting at another unit of mounted scouts and inflicted more damage but this time the faith in the Brotherhood was strong.
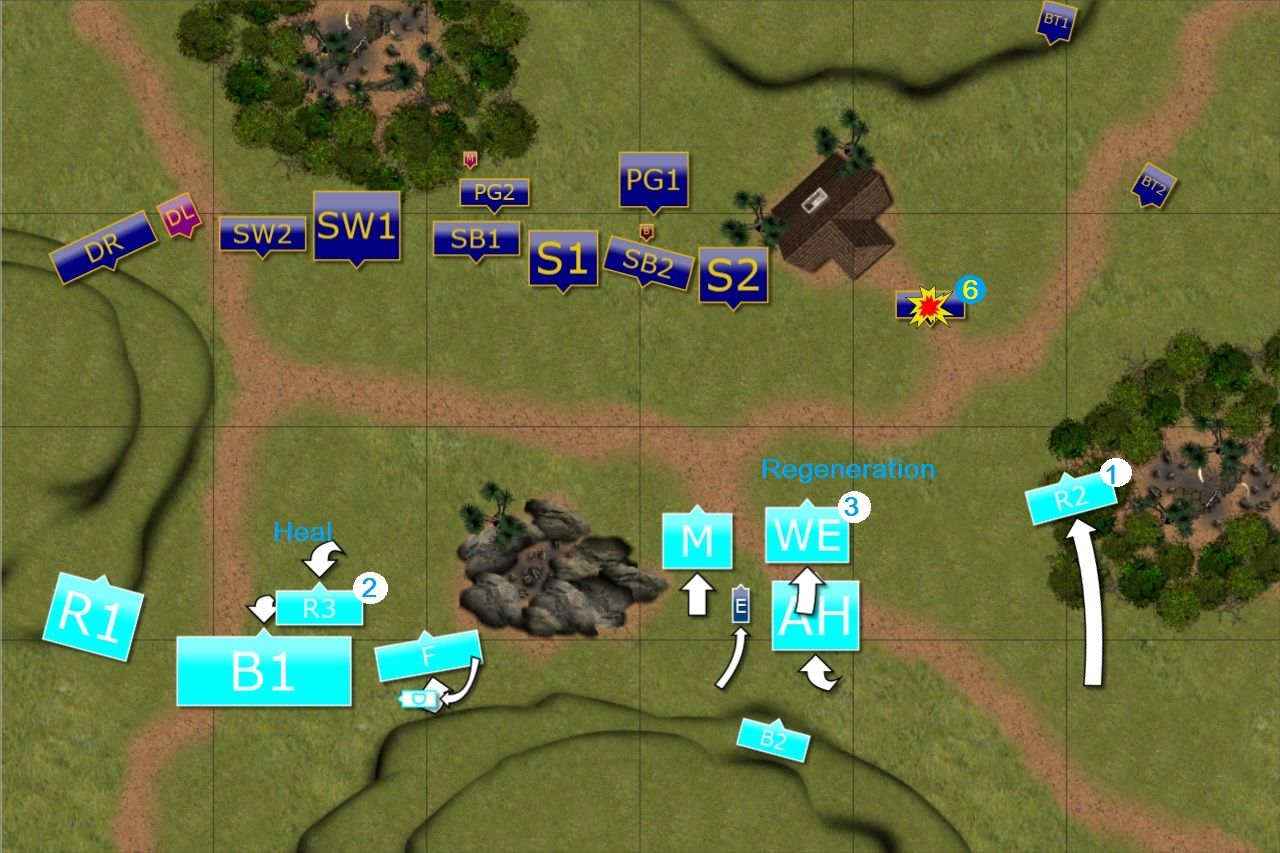
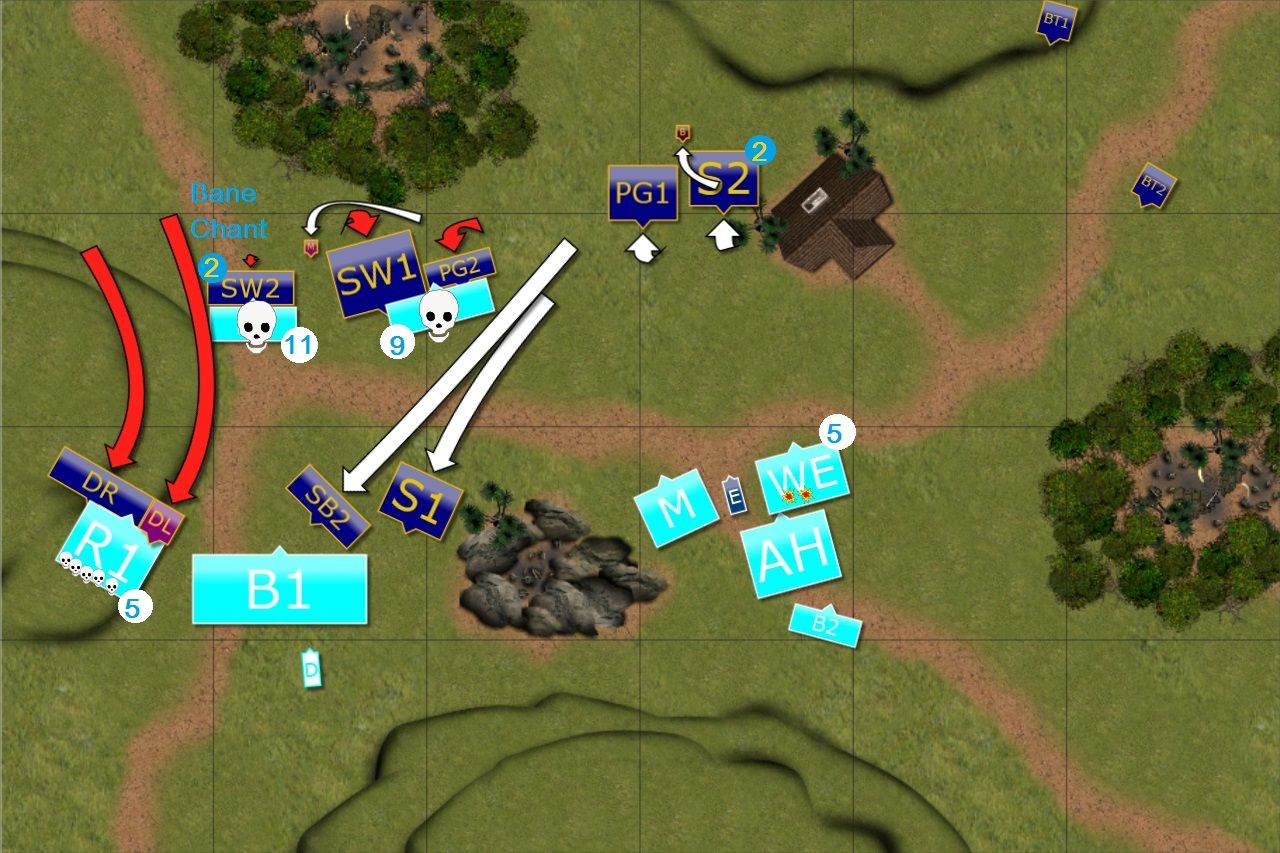
Brotherhood of Dobrensk - Turn 3
 |
| The Brotherhood strikes first! |
The second wave comprised of the Knights advanced too and hoped that the chargers would occupy Elven units long enough to catch the enemy unprepared.
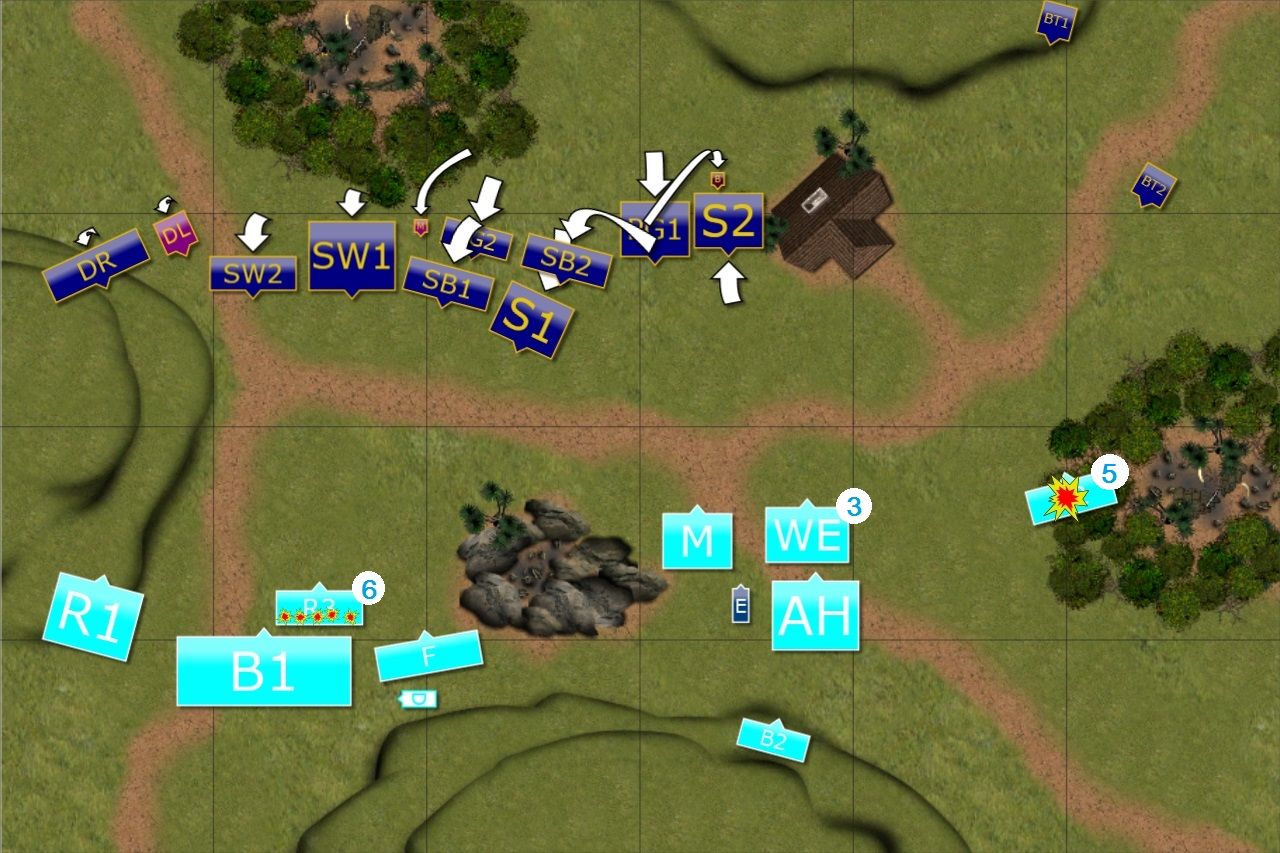
Outcasts - Turn 3
 |
| Elves counter attack! |
At the same time the Stormwind cavalry and Palace Guard got rid of the units spearheading the attack of the Brotherhood. Valiant Knights and mounted scouts fought bravely but had to give up when faced more experienced Elven warriors.
To prevent Order of the Brotherhood horde to join that fight Silverbreeze cavalry moved in front of them and Spearelves were threatening the flank of that formation. That would give enough time for the second Elven line to regroup.
Infantry in the middle pulled back a bit but kept close enough to threaten the enemy in the middle of the battle field if they decided to go to towards Eastern flank. Bolt throwers kept shooting at Elementals, as they were the toughest enemy unit there and Elven infantry needed as much support as possible before inevitable melee.
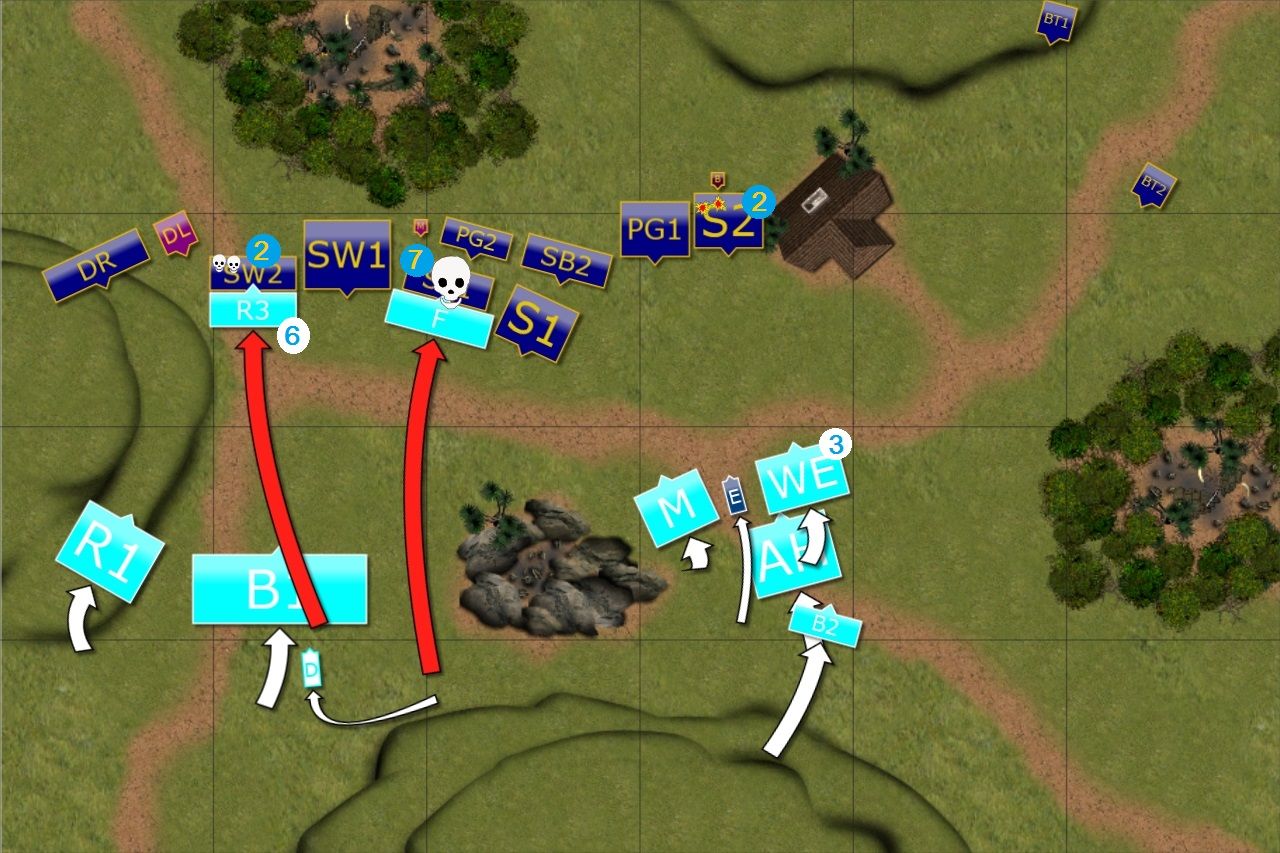
Brotherhood of Dobrensk - Turn 4
 |
| The brotherhood fights back! |
The other half of the army advanced through the center but they were slow in doing so and could not neglect nearby Elven infantry either. The units of the Brotherhood did what they could and now braced for the impact.
Outcasts - Turn 4
 | ||
| Second punch was much harder! |
Second wave of the attack was much harder and went across entire battle field. Drakon Riders were supported by Stormwind troop but even then Knights of Redemption didn't yield. Fortunately for Elves, they were now surrounded and could only counter charge.
Main attack was directed at the Order of the Brotherhood and only thanks to their high morale the unit managed to hold. But the damage was enormous and it looked like the flank was crumbling.
The situation in the middle was surprising a bit because Elven infantry also attacked and they chose to hit Elementals, the powerful anvil of the enemy army. But the charge was well coordinated and Water Elementals were routed!
Even nearby Bowmen were destroyed by the very accurate Bolt Throwers. It was a powerful blow against Brotherhood and although the battle was far from over they stood on shaky legs, stunned and trying to recover fast.
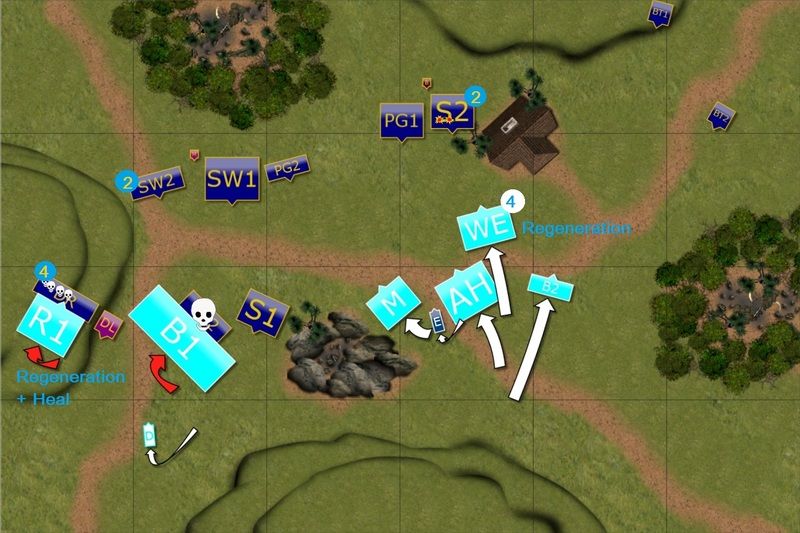
Brotherhood of Dobrensk - Turn 5
 |
| Brotherhood counter charges and claims some Elven units |
Finally, the Order of the Abyssal Hunt supported by the Examplat charged Palace Guard and routed them on the charge. Some revenge was taken but Elves still had hard hitting units to send into the melee.
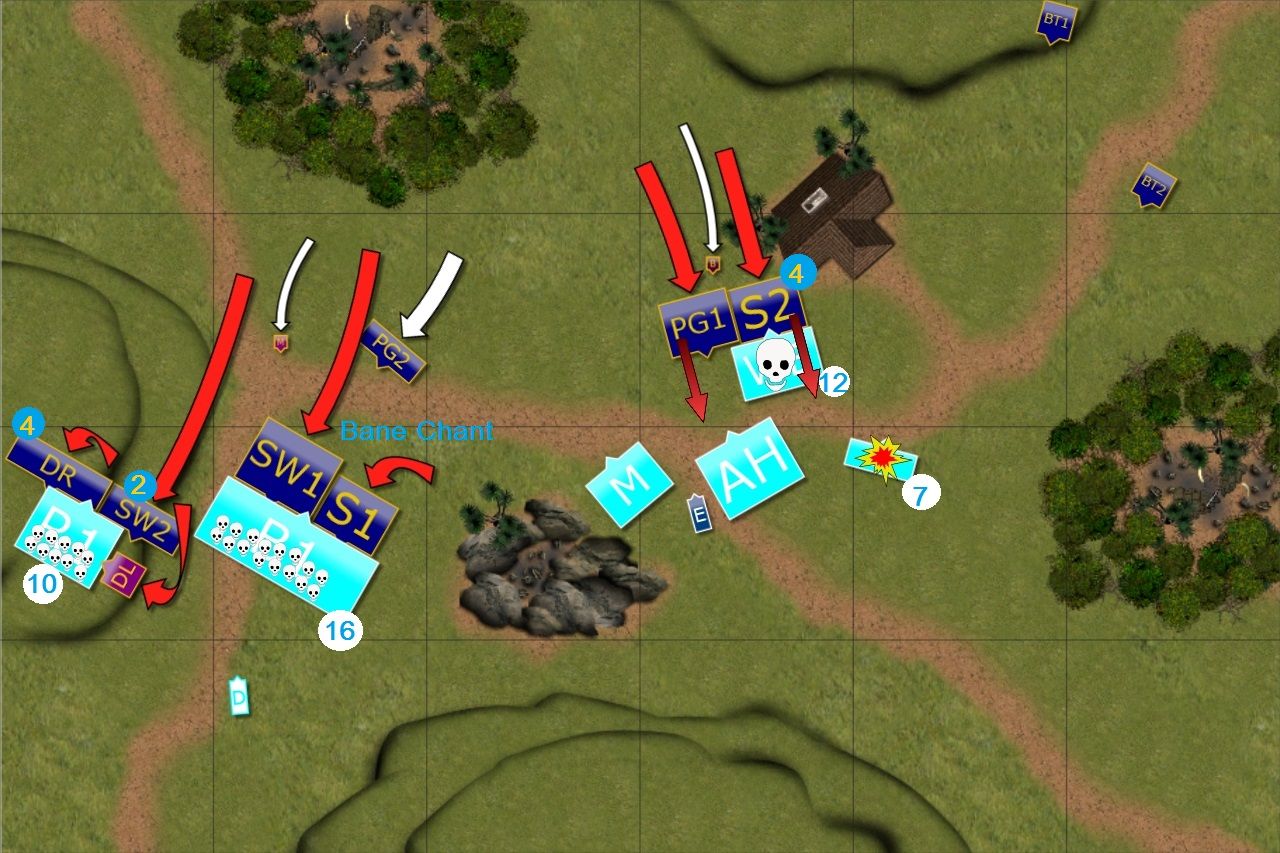
Outcasts - Turn 5
 | ||
| The collapse of the Western Flank |
This time even the Knights of the Brotherhood could not withstand the attack. Both knightly units were charged by multiple enemy units and were routed.
In the middle, spearelves could not avoid the attention of the Order of the Abyssal Hunt and decided to block their advance while Bolt Throwers shot at them. (Edit: I forgot these Knights have Def4 otherwise I think attacking with my infantry could have been a better option. )
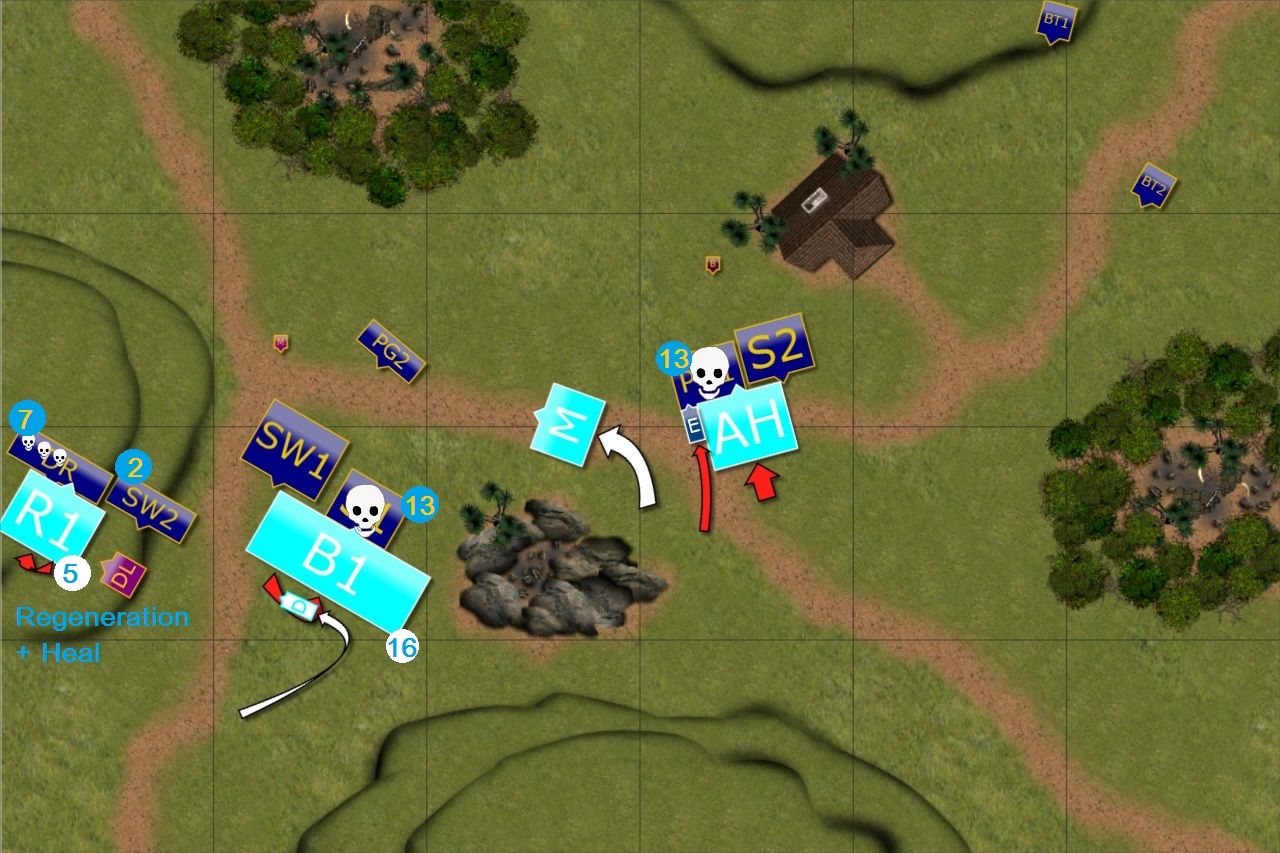
Brotherhood of Dobrensk - Turn 6
 | ||
| Last charge of the Brotherhood! |
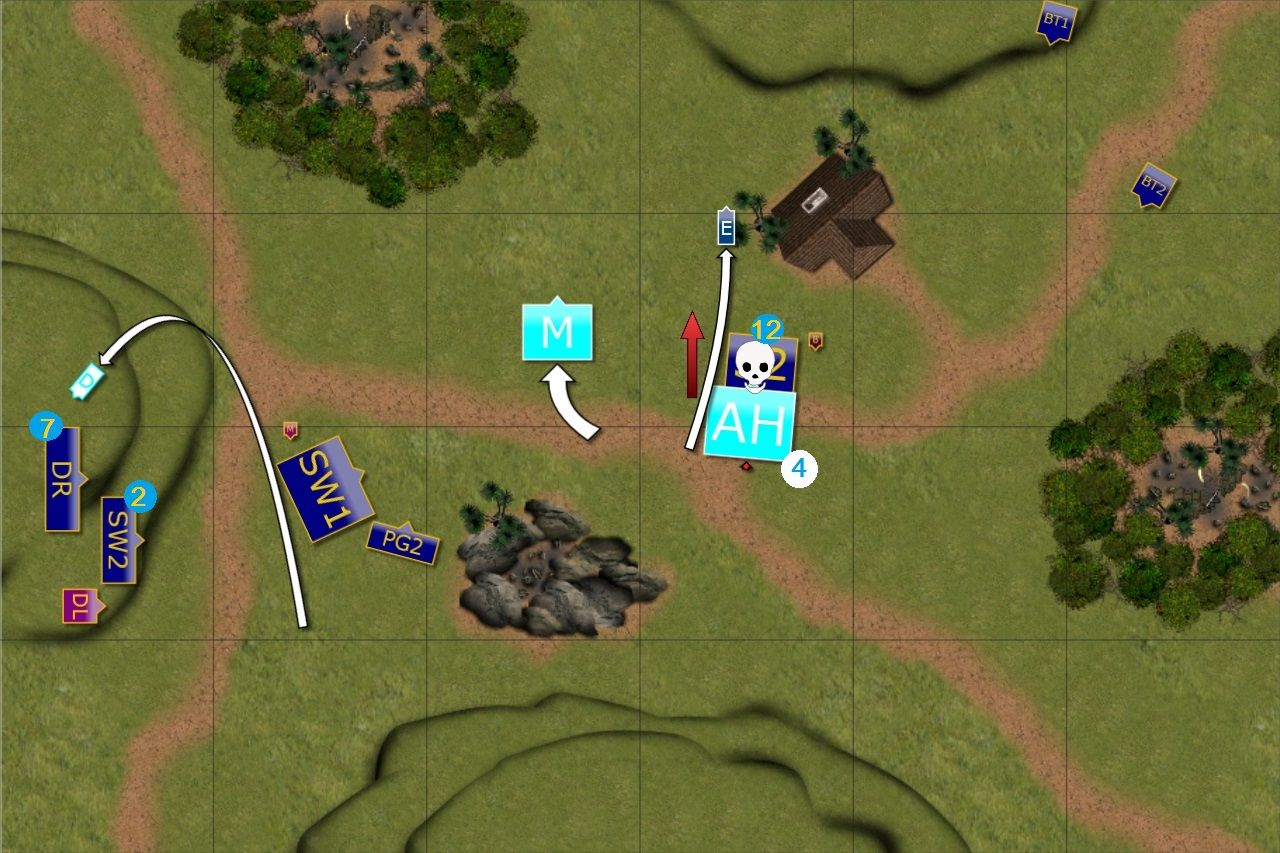
Outcasts - Turn 6
 |
| Final Assault |
Elves closed the distance to the invading enemy. Palace Guard was the closest and managed to catch martyrs and rout them. Bolt throwers crews aimed at the last unit of Knights but this time their bolts didn't do enough damage to rout the enemy.
Despite that, Elves managed to invade enemy territory with greater force and they won this time!
Summary
 |
| Turn-by-turn summary animation |
After-battle thoughts
First of all I would like to thank laribold for a great game and continuing when his army suffered significant damage. I know it is tough moment and one simply wants to throw the towel. I am glad he kept fighting because I believe it will add to our mutual experience for sure.
In general I think I used the advantage of playing with the army I played with for some time when laribold brought another new list and was learning how to use it. I am sure, however, that in the longer run he may have an advantage over me because his experience will be more varied and he will have a broader understanding of the game.
I still hope he would look at this report with optimistic attitude despite the defeat. We talked about the game a bit after and I think what made him sad about the outcome was not the result itself. It was more about the feeling you are on the back foot at some stage and can't make the enemy to fight for his victory.
It didn't look as if I had the game in the bag from the start at all from my point of view. I simply needed to be very careful not to give the Knights the chance to charge me and having a bit longer range helped here too. However, I think it was more about having enough units to go for exchange and still have enough of them left (as well as those who can deal damage).
When I looked at the game again while making the maps I keep wondering about some details such as reforming and how that impacted the game. For example, when Brotherhood destroyed Spearelves (S1) I think they could reform so that Stormwind would not be able to see them. But that would expose their flank to Palace Guard. The Horde was already damaged so a flank charge from that unit may have had a similar result.
Another thing I am trying to figure out is how to fight against less numerous enemy that simply goes for refused flank. I believe in Invade scenario, such formation, with Horde going through the forest on the East, would have caused a lot of trouble.
What I learned about the Bortherhood is that they are very tough army and even when deprived of their Thunderous Charge, which makes a huge difference, they can still hit hard. I think that Brotherhood players should take advantage of it as even without their lances they can damage enemies. And with a very long charge range they can out pace many enemies. Hence a more decisive approach could be what they need too.
I am really curious about your comments and i hope you enjoyed the report.
Thanks for reading!
I don't normally like reading UB battle reports, but yours are always great. Keep up the good work!
ReplyDeleteHi MasterSlowPoke!
DeleteThanks a lot! I am glad to know you like my reports! I will do my best to provide new ones but you need to be patient as I real life keeps occupying me now.
Btw, what seems to be the usual problem with UB reports for you? Or what is that you are looking for in the reports in general? Your feedback is very much appreciated and will definitely help me to improve my future reports!
Cheers!
Most of the time it's hard to follow what's happening, and I have to constantly switch back and forth from the legend to the description to the image. Your labels and arrows are excellent.
DeleteHi MasterSlowPoke,
DeleteThat is true. Sometimes the units on UB do not look self explanatory. It is of course still better than text only. But that is why I am using Battle Chronicler as the labels and arrows help a lot!
Thanks again and let me know if you have any further suggestions. I always want to learn how to make the reports better!
Cheers!
So, when's the next report? It is immoral to cut us off like this!
ReplyDeleteHi Jonah,
DeleteI wish I could give you an exact date but due to the fact I have just moved to new place it may take a bit for me to organize another game. It is not due to lack of opportunities but simply because I am quite busy with real life things.
Sorry I have to keep you waiting :(
Thank you for a great report. The moving maps really help!
ReplyDeleteThanks a lot, Cornwall!
DeleteI am very glad you like them! I am always looking for the ways to improve the quality of the reports so it is great to know that new features are accepted by the readers!
Cheers!