
Greetings!
After a lot of thinking, reading and observing I have finally had a chance to play my first game on KoW. I had a pleasure to play against Loriel, who also was interested in trying out new system and he decided to use one of the experimental lists, Empire of Dust.
If you are interested in these armies here is the link: KoW - Beta Army Lists
Loriel told me he picked the units from his collection purely on their aesthetics as we are both new and we didn't yet know what to expect from these regiments. His army was:
Cursed Kings - Army List
Revenant Chariot Horde - 185
- Skeleton Cavalry - 85
- Skeleton Cavalry - 85
- Balefire Catapult - 100
- Bone Giant - 180
- Cursed Pharaoh in Chariot -225
Enslaved Guardian Archers Horde - 230
- Bone Giant - 180
Skeleton Archers Regiment - 100
- Cursed High Priest, Heal - 145
Skeleton Archers Regiment - 100
- Balefire Catapult - 100
Swarms Regiment - 65
Swarms Horde - 100
I decided to use the following army list:
Outcasts - Army List
Palace Guard Regiment - 150
- Stormwind Troop - 140
- Stormwind Troop - 140
- Drakon Rider Lord, Beastslayer Sword- 180
Sea Guard Regiment - 170
- Silverbreeze Troop - 145
- Silverbreeze Troop - 145
- Wizard with Banechant and Inspire - 110
Sea Guard Regiment - 170
- Palace Guard Troop - 105
- Palace Guard Troop - 105
- Drakon Rider Lord - 160
Hunters Regiment - 170
- Bolt Thrower - 90
Army Total: 2000
You can read more about this army and why I chose these regiments on my blog: MSU Elves in KoW
Let me go briefly through each choice in the EoD army. It is more to learn what these units can really do so let's see if I can assess their roles accurately before the game started.
Chariots - Very versatile unit, that is equipped with bows meaning they can be used both as shooters but can hit hard too due to their Thunderous Charge (2) rule. They also have quite a reasonable number of attacks so hitting on 4+ in combat and 5+ in shooting will do some damage. Of course moving and shooting is not that great because of the additional penalty but they can be useful both as static and dynamic unit. What seemed to be their disadvantage in my opinion is their big foot print. They can be potentially attacked by many enemies at the same time and despite the fact they have good nerve (I think :)) they are definitely not invulnerable.
To attack them first will be tricky as they are fast but it would be good to take away a few damage points and then hit them hard, hopefully with my heavy cavalry and drake lords.
Skeleton Cavalry - they look to me as medium cavalry. They are nimble, so can have additional pivot but no bows. They hit harder due to Thunderous Charge (1) but it is not as hard as Chariots (fewer attacks, not as strong impact and hitting on 5+). They are also fastest units in this army. If possible I would like to destroy them fast as they look to me as units that can interfere with my movement phase well.
Balefire Catapult - two war machines that are actually good at inflicting damage but they also have 5+ to hit and one can always try to move out of line of sight. However, with 48" range it is not easy to hide from them. I decided to make them my priority and try to eliminate them first. Both with shooting (for lucky nerve test or simply to inflict damage) and in combat. Units triple their attacks against war machines so I thought that whatever hits them - kills them.
Bone Giant - these guys are really tough. Very high nerve, defense 6+ (meaning I would need 6's to do damage unless piercing, crushing strength or thunderous charge rules apply) and hit very hard too! With relatively small foot print they can also sneak around nicely. I thought that I could potentially inflict some damage with Bolt Thrower against them, and try to attack it from two directions with Drake Lords. But even then I would need to face counter charge and if I cannot isolate them it can be very tough opponent to destroy.
Pharaoh in Chariot - first, source of inspire. Second, has surge (6) so can help the army to move faster. He is quite good in combat and definitely hard to destroy with Defense 6+ and regeneration. As with the Giant I was thinking about softening it up with Bolt Thrower and finish it with my own heroes.
Enslaved Guardians - walking statues with giant crossbows. Excellent, 36" range means it will be hard to avoid their fire. They hit on 5+ but they have many attacks. They can hit well in combat too so they make another versatile unit. As a horde they also have a good nerve value. In order to bring them down I need either a cooperation of several units or good shooting and then attack. Seems like there are many targets like that in the enemy camp!
Skeleton Archers - they might not strike fear in their enemies hearts but they should not be ignored. Their shooting always adds damage, they are not easily destroyed but have to be taken into account. They should be easier to deal with that other tough units and I think I might actually try and attack them to receive their charge (and stop them from shooting) and finish them in subsequent round of combat.
High Priest - Surge (10) is great at pushing units forward and with additional heal he is great. He also has Inspire rule which makes him 2nd and last source of that in the army. Fragile so will be kept in safe place but needs to stay close to help the units.
Swarms - good at interfering with the movement phase and cheap to sacrifice but can suffer damage quickly. Vanguarding units so that can be very useful too.
In general, EoD has advantage in shooting but is slow due to whole army Shambling (i.e. cannot move at a double). Surge will be vital here but can be cast on 2 units maximum. I wanted to use my shooting to help the regiments in combat but at the same time I would have to move fast to neglect my enemy's advantage.
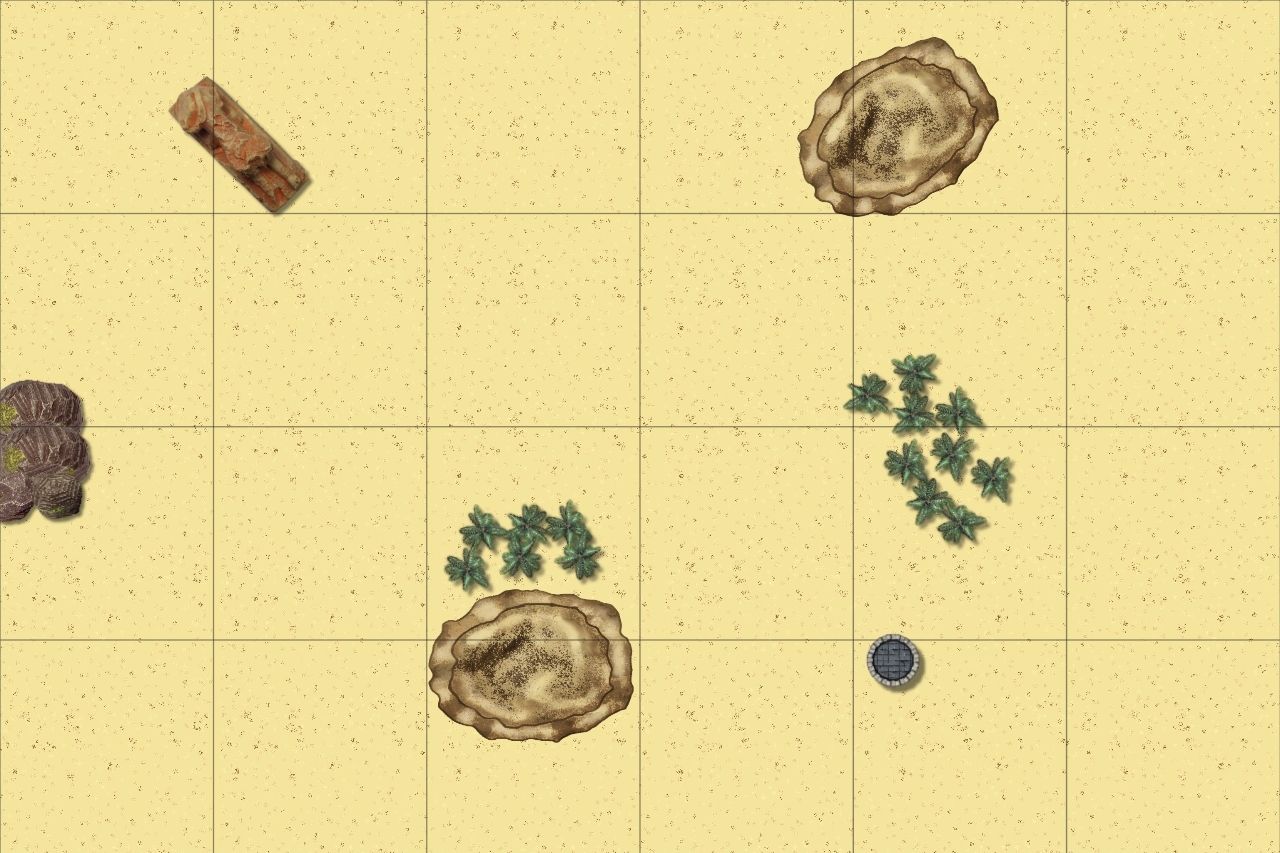
Terrain
 |
| Terrain |
We wanted to keep the things simple so decided the hills are very high so while the largest monster is level 4 we decided to make hills level 5 (although I am not sure if that is possible in the system :)).
The rocks were blocking terrain meaning you cannot see and move through them at all. Trees were level 3 high for the purpose of determining if units on the hill are in cover/shoot through cover.
Deployment
The rocks were blocking terrain meaning you cannot see and move through them at all. Trees were level 3 high for the purpose of determining if units on the hill are in cover/shoot through cover.
Deployment
 |
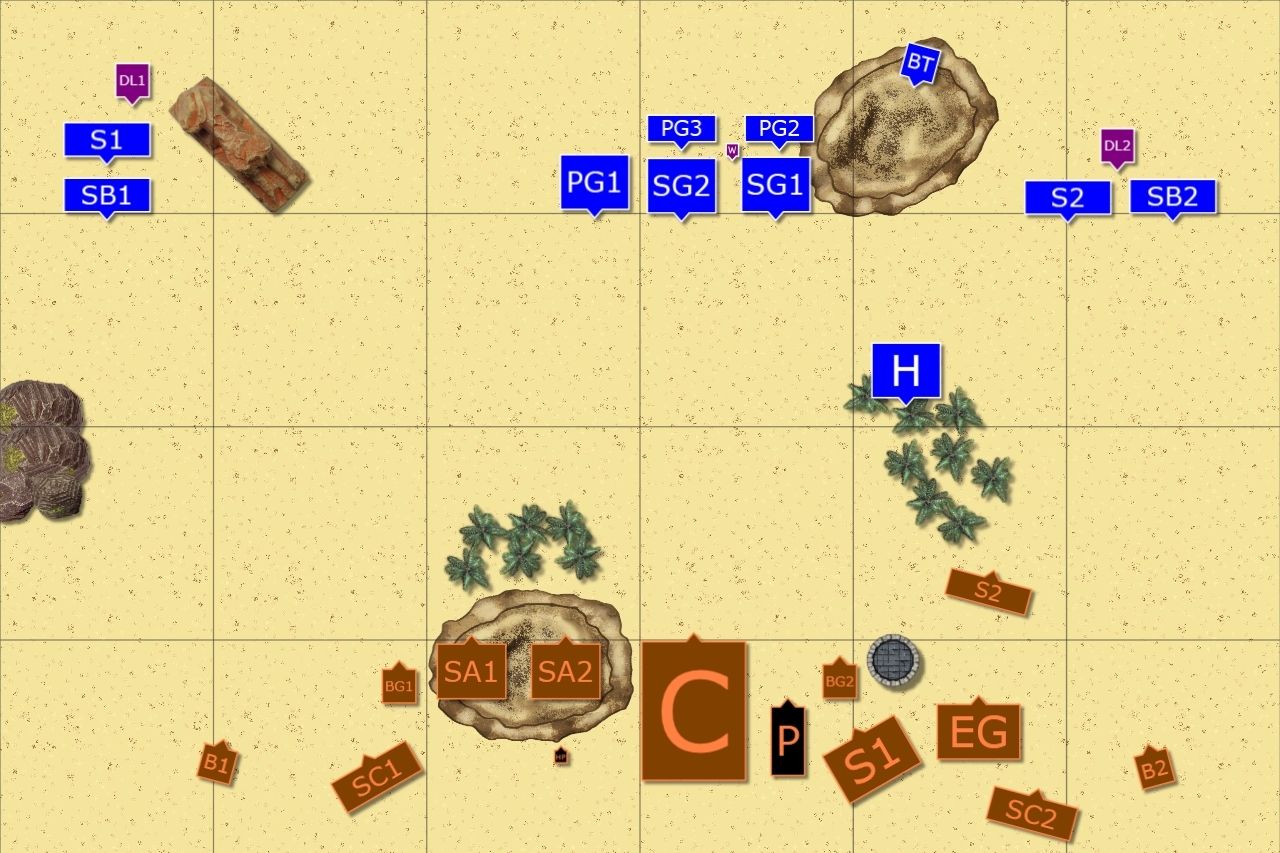
| Deployment order and vanguards |
The deployment order:
1. Skeleton Archers (SA1) - Silverbreeze (SB1)
2. Skeleton Archers (SA2) - Silverbreeze (SB2)
3. Bone Giant (BG1) - Stormwind (S1)
4. Balefire (BF1) - Stormwind (S2)
5. Chariots (C) - Hunters (H)
6. Enslaved Guardians (EG) - Sea Guard (SG1)
7. Balefire (BF2) - Palace Guard (PG2)
8. Bone Giant (BG2) - Sea Guard (SG2)
9. Skeleton Cavalry (SC1) - Palace Guard (PG3)
10. Skeleton Cavalry (SC2) - Palace Guard (PG1)
11. Swarms (S2) - Bolt Thrower (BT)
12. Pharaoh (P) - Wizard (W)
13. High Priest (HP) - Drake Lord (DL1)
14. Swarms (S1) - Drake Lord (DL2)
Vanguard:
15. Swarms (S1) - Hunters (H)
 |
| Deployment after Vanguards |
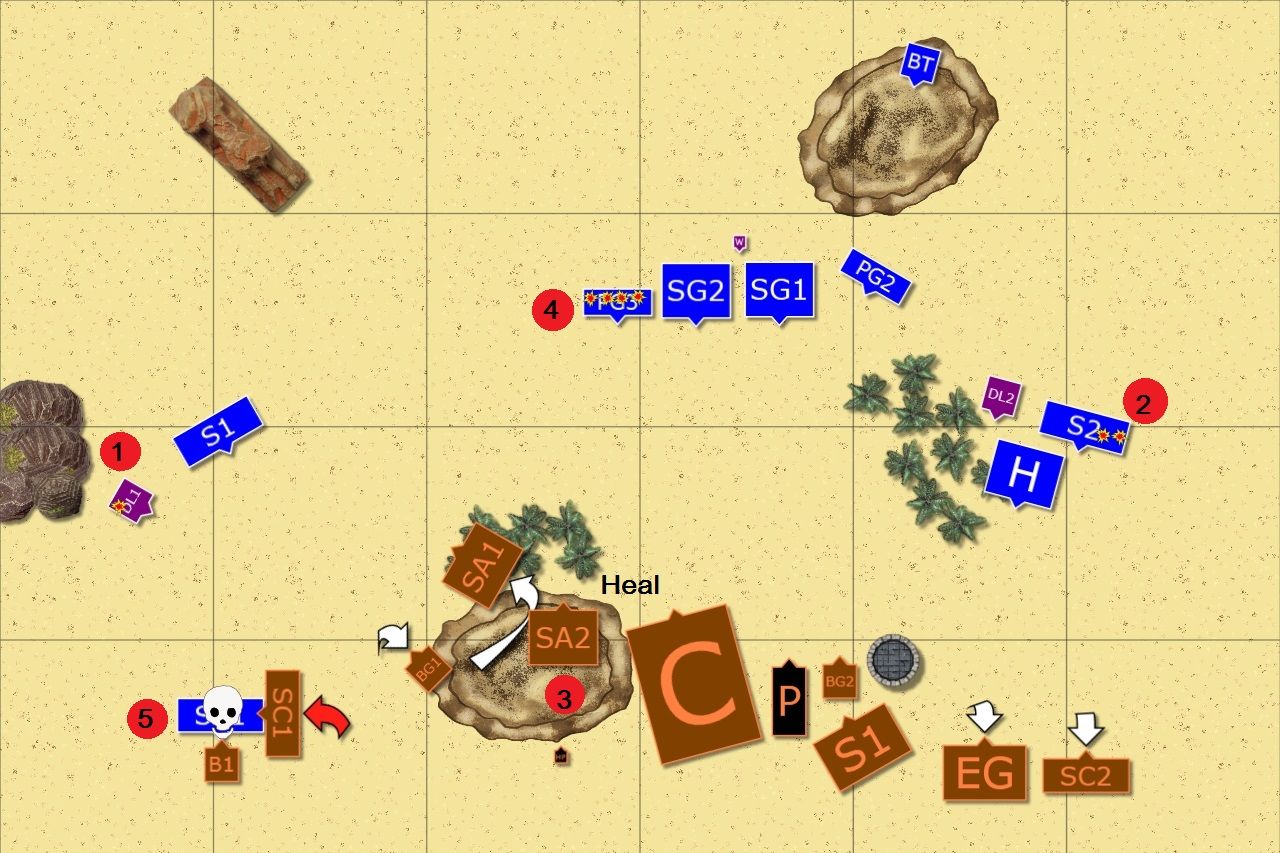
As expected I had a dilemma how to deploy as my usual approach of having more units than the enemy and positioning the units accordingly could not be used. I decided to use fast elements in two groups on both flanks so that I could use Drake Lords to provide sources of inspire and combine their efforts to outflank the enemy.
I had infantry in the middle with small PG behind to protect them from shooting and close together to be in inspire range. I knew I am at disadvantage in shooting but wanted to still use it until cavalry secures the flank to weaken the enemy. If that worked I could then coordinate the approach of all units from three directions and use fliers to attack what I want without being blocked by ground forces.
Another reason I used Sea Guard as a main line of defense is that they have Phalanx special rule and have a chance to reduce the impact of the chariot charge since Thunderous Charge is neglected.
I was very curious if that simple and kind of obvious plan is going to work! :)
Loriel won the roll-off and decided to take the first turn.
Cursed Kings - Turn 1
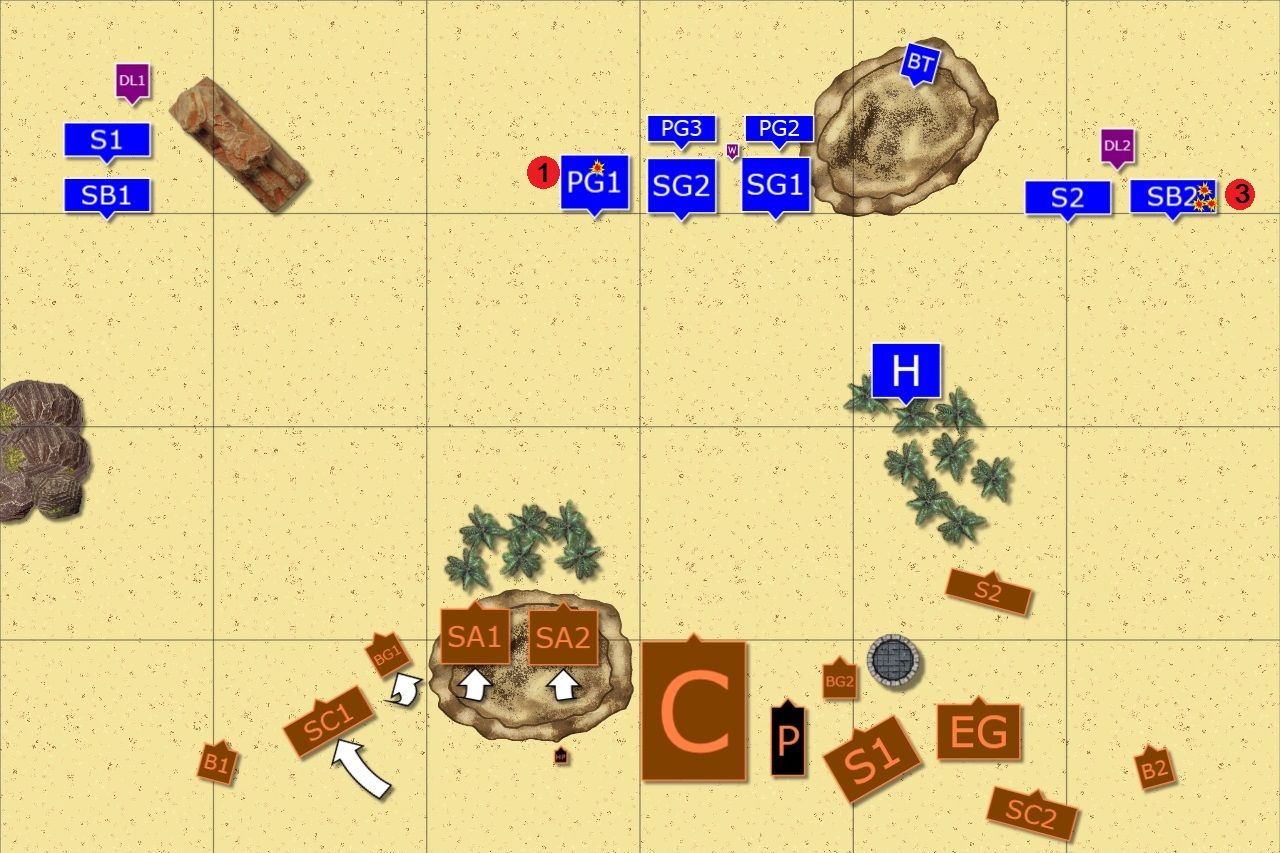 |
| Opening fire |
Pharaoh looked at the mortal army across the desert and with a single move of his hand the order was given. Silent warriors shuffled forward where necessary and arrows sailed towards the Outcasts. Early shooting was not yet as harmful but fast cavalry on the right flank suffered some casualties but they held fast.
Outcasts - Turn 1
Outcasts - Turn 1
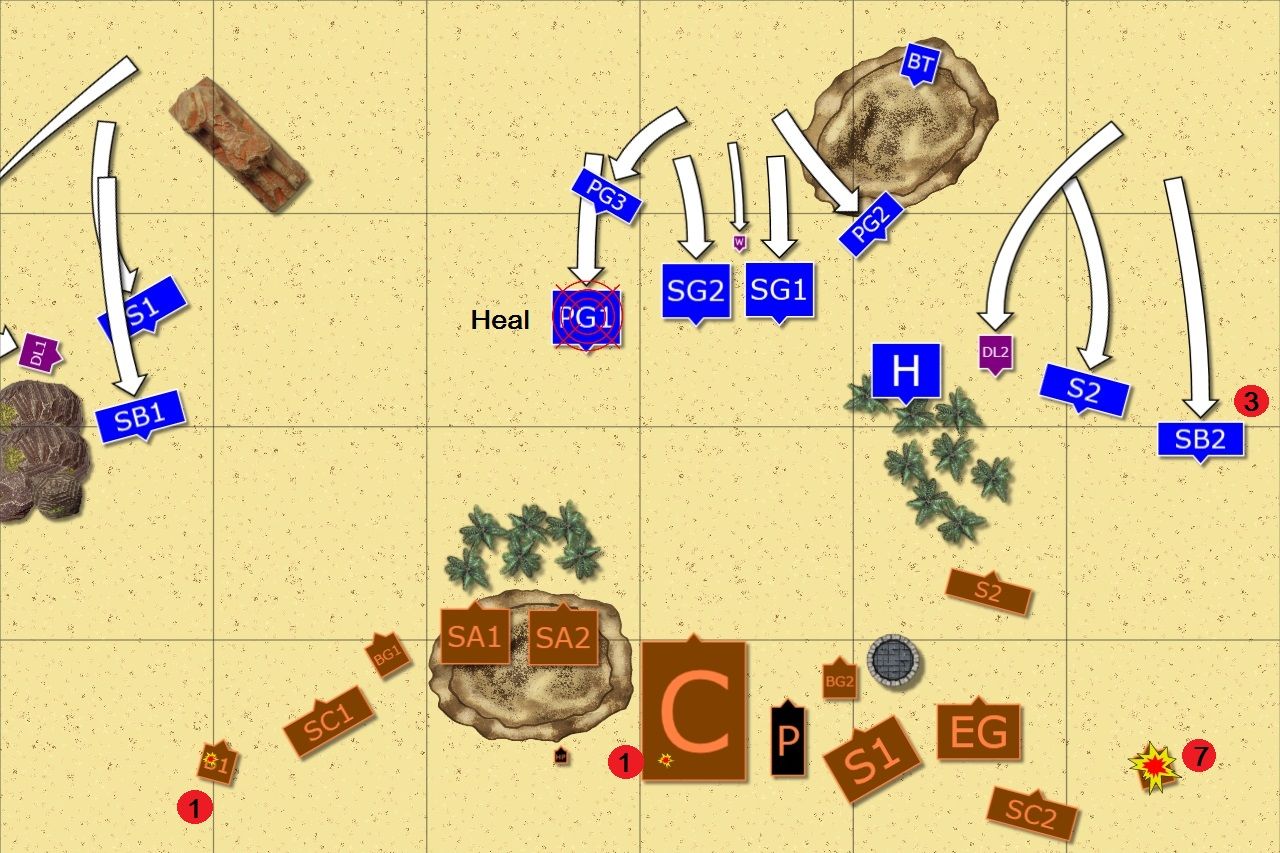 |
| Outcasts on the move |
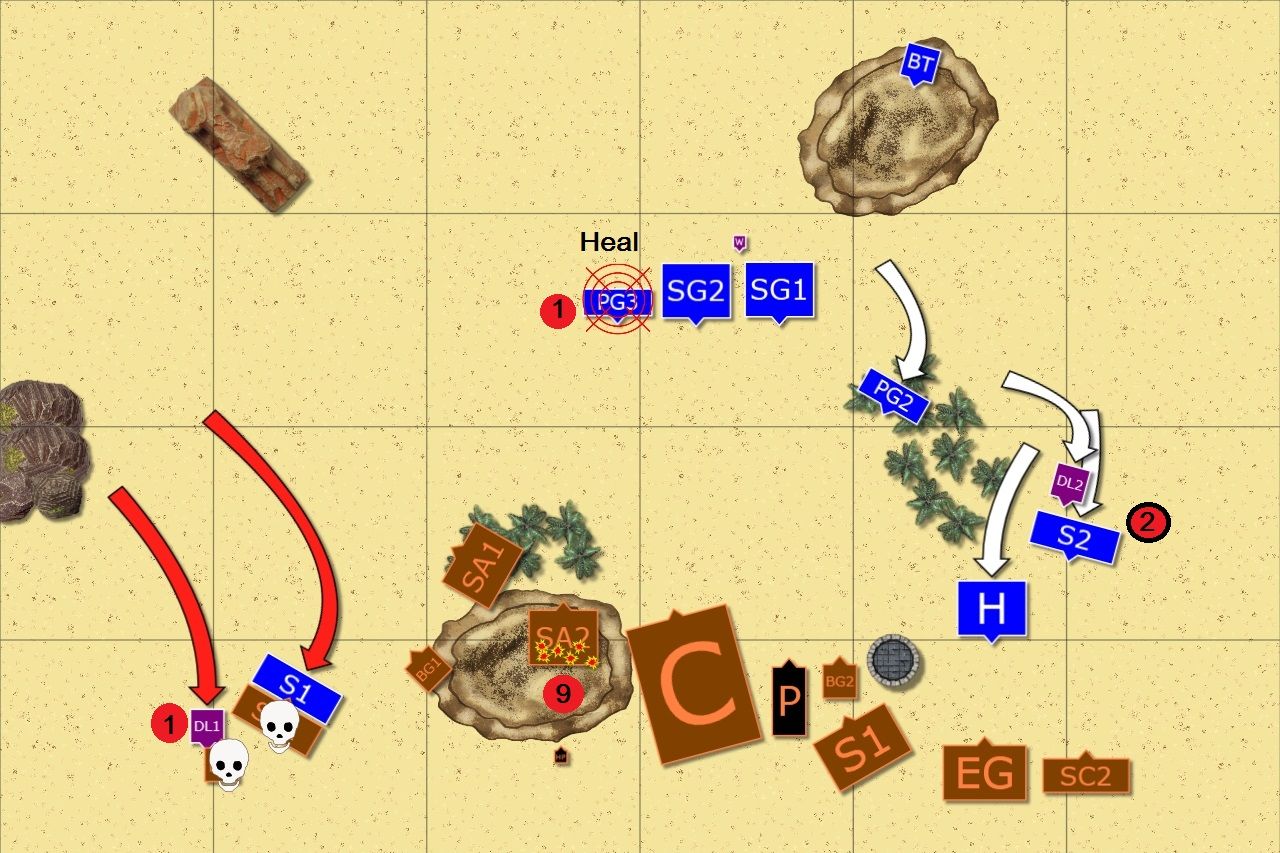
Elves moved forward, with the center approaching slower to be able to shoot at the enemy. However, the impact was low as the shooting was not yet that accurate. On both flanks fast cavalry opened fire at the catapults but it was the one on the right that was utterly destroyed thanks to the help of Bolt Thrower crew great skill.
Cursed Kings - Turn 2
 |
| Elves die in droves! |
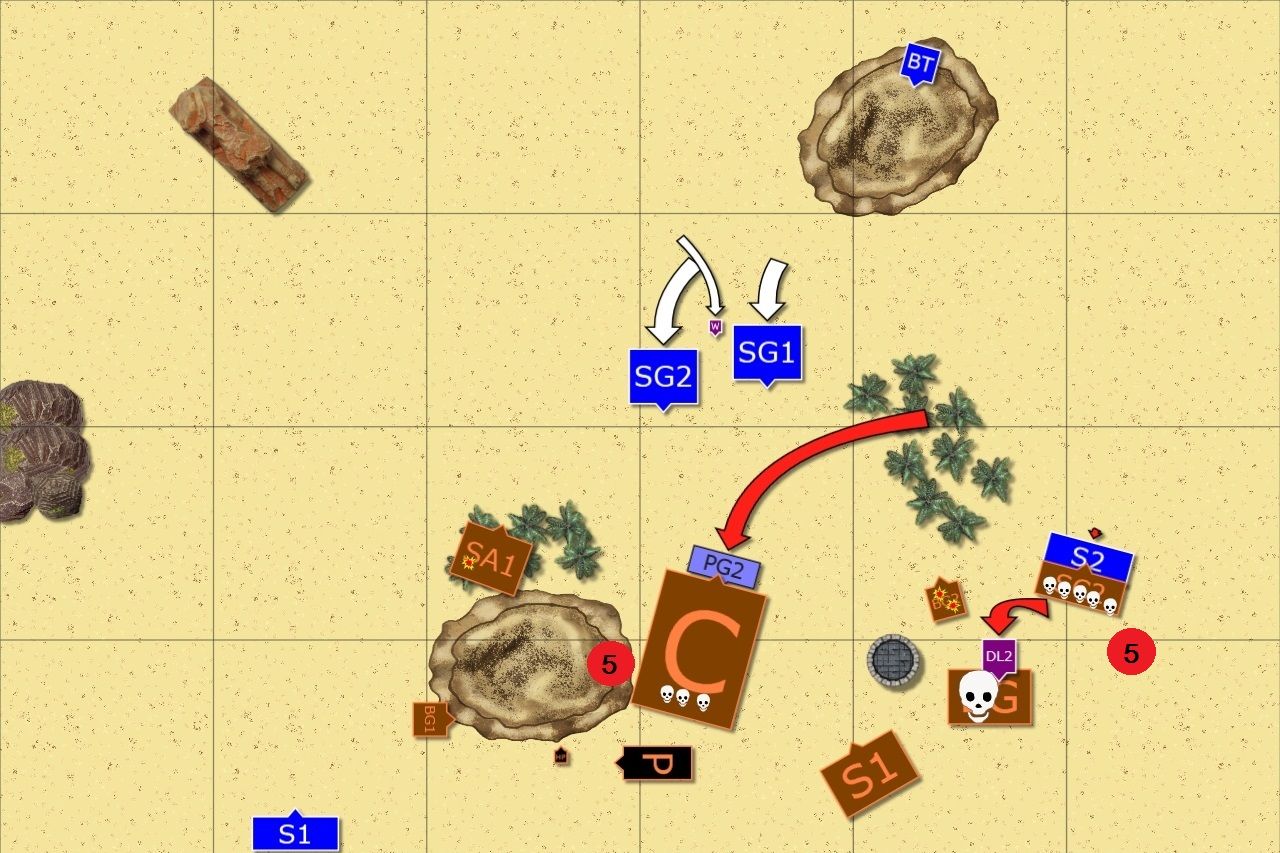
Pharaoh kept his army steady and his warriors, now not distracted by the unnecessary movement, aimed much better. Two Elven regiments were the targets and both suffered a lot of damage. Surviving warriors lost their nerve and fled the battle (Edit: I tried to show damage in red circles in this report to provide information on the odds of losing the nerve and being routed. In addition, I was careless and didn't bring both inspiring characters into range for lucky re-roll. While Silverbreeze cavalry was probably gone anyway, Palace Guard still had a small chance to survive for a little bit longer.)
Outcasts - Turn 2
 |
| First Elven charges |
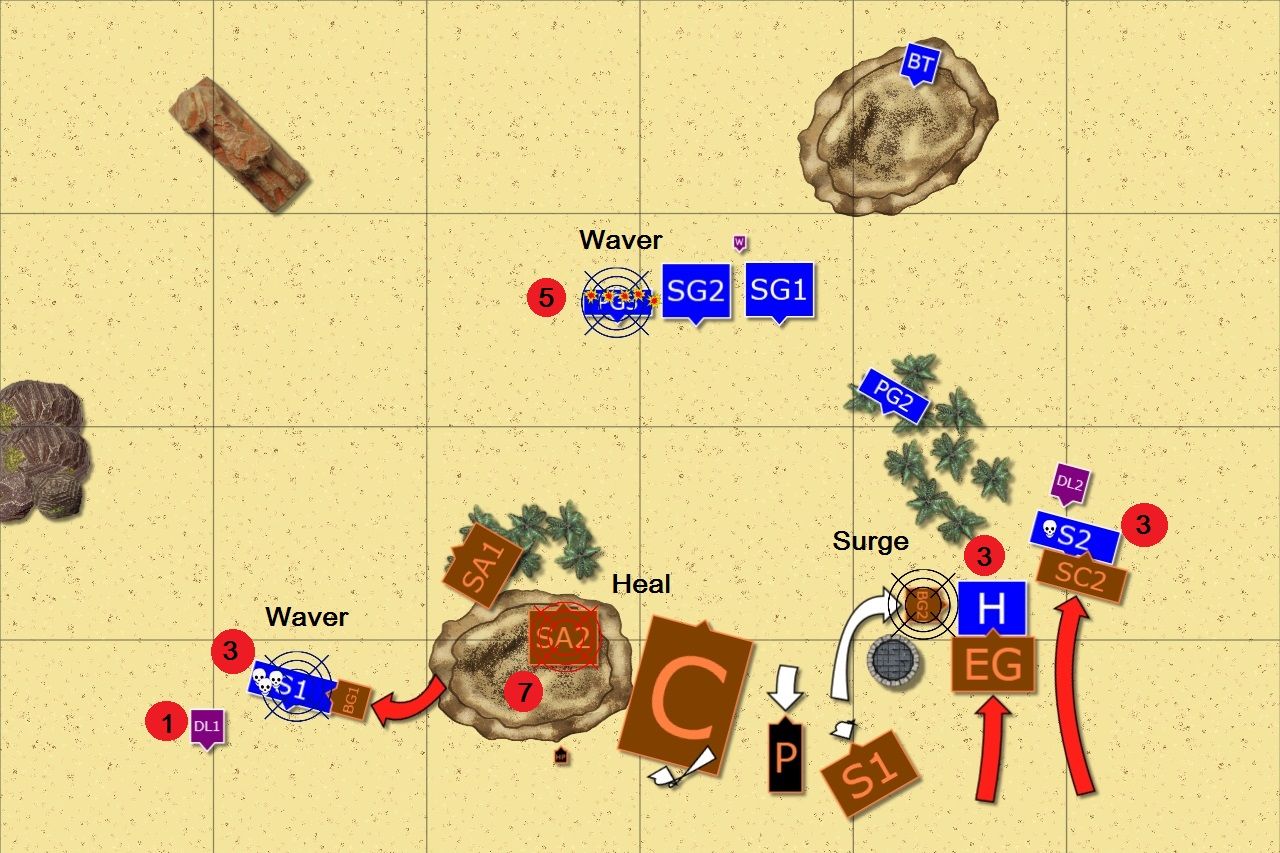
Elves decided to launch first charges. On the left flank fast cavalry attacked the war machine of the enemy but the long charge must have drained their strength as they failed to destroy it and now were in a very bad spot as they exposed their flank for the counter charge.
On the right flank Hunters, not hindered by the forest, cleared it from some undead bugs stopping their advance.
In the center, Sea Guard parked firmly and with the aid of their wizard leader continued shooting match, this time choosing more vulnerable target.
Cursed Kings - Turn 3
 |
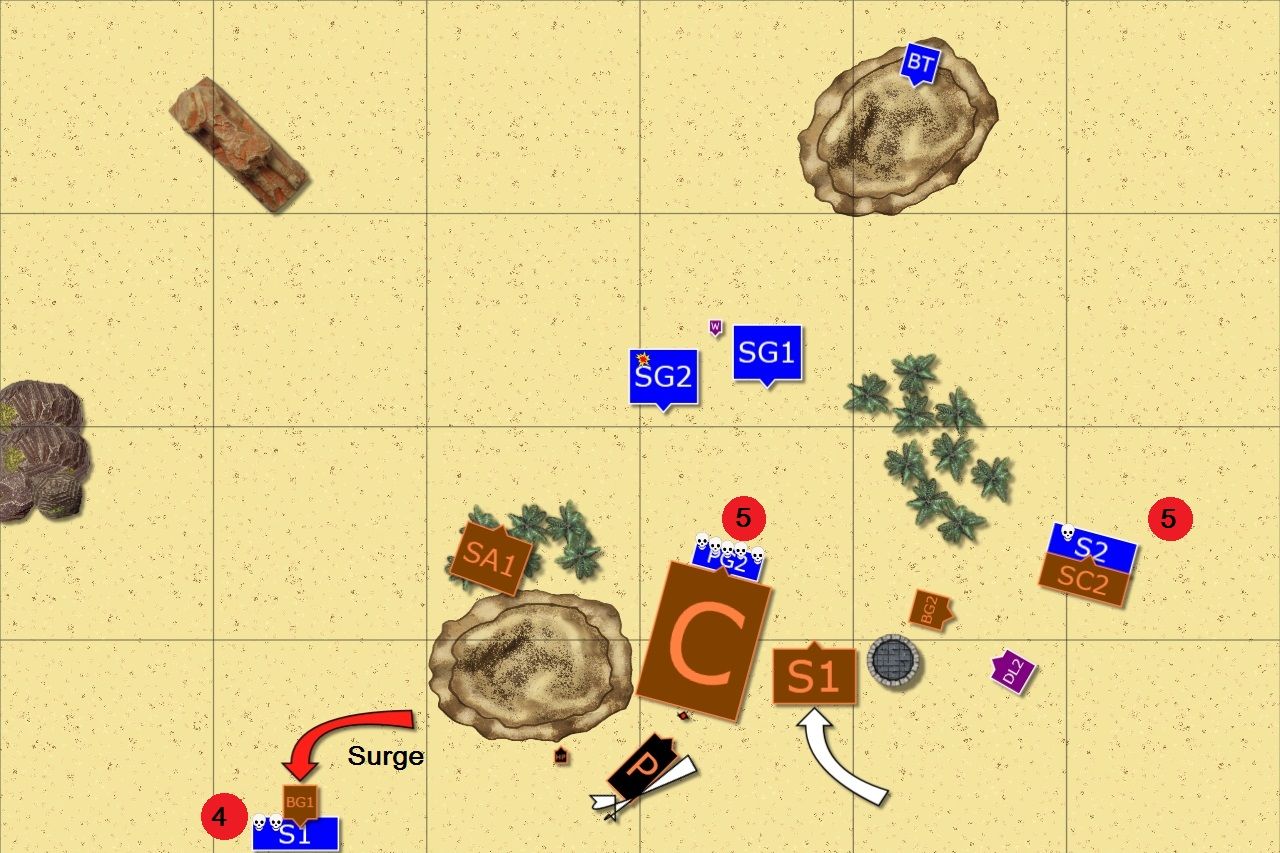
| Undead shooting is still dangerous |
Skeleton cavalry countered the Elves and their fast unit could not hold against flank attack and broke. Undead shooters aimed at various targets across the battle field and while they didn't claim any regiments this time the damage was substantial.
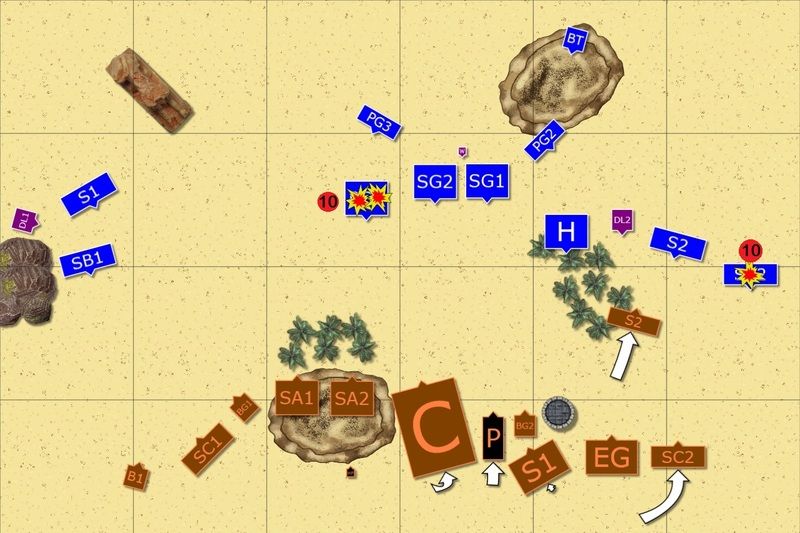
Outcasts - Turn 3
 |
| Elves continue the advance on the flanks |
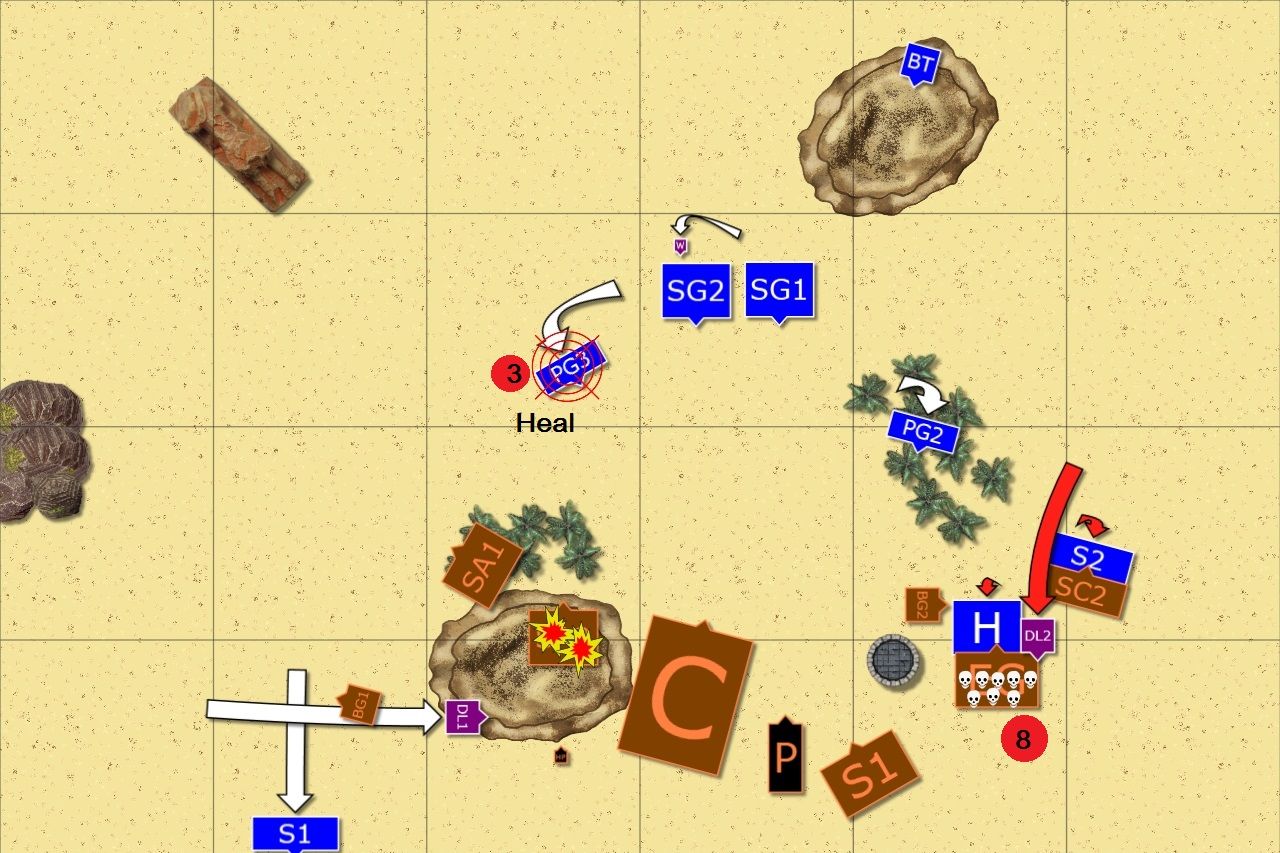
Elves took the risk and attacked on the left flank. Both targets, the catapult and cavalry, were finally destroyed but the impetus of the attack was not enough to carry Stormwind squadron away from the nearby giant.
On the right flank the hunters led the way to dare the giants to attacks them with fast troops following and waiting for the chance to counter.
Sea Guard continued the shooting at the Skeleton Warriors but they still refused to crumble, despite heavy losses.
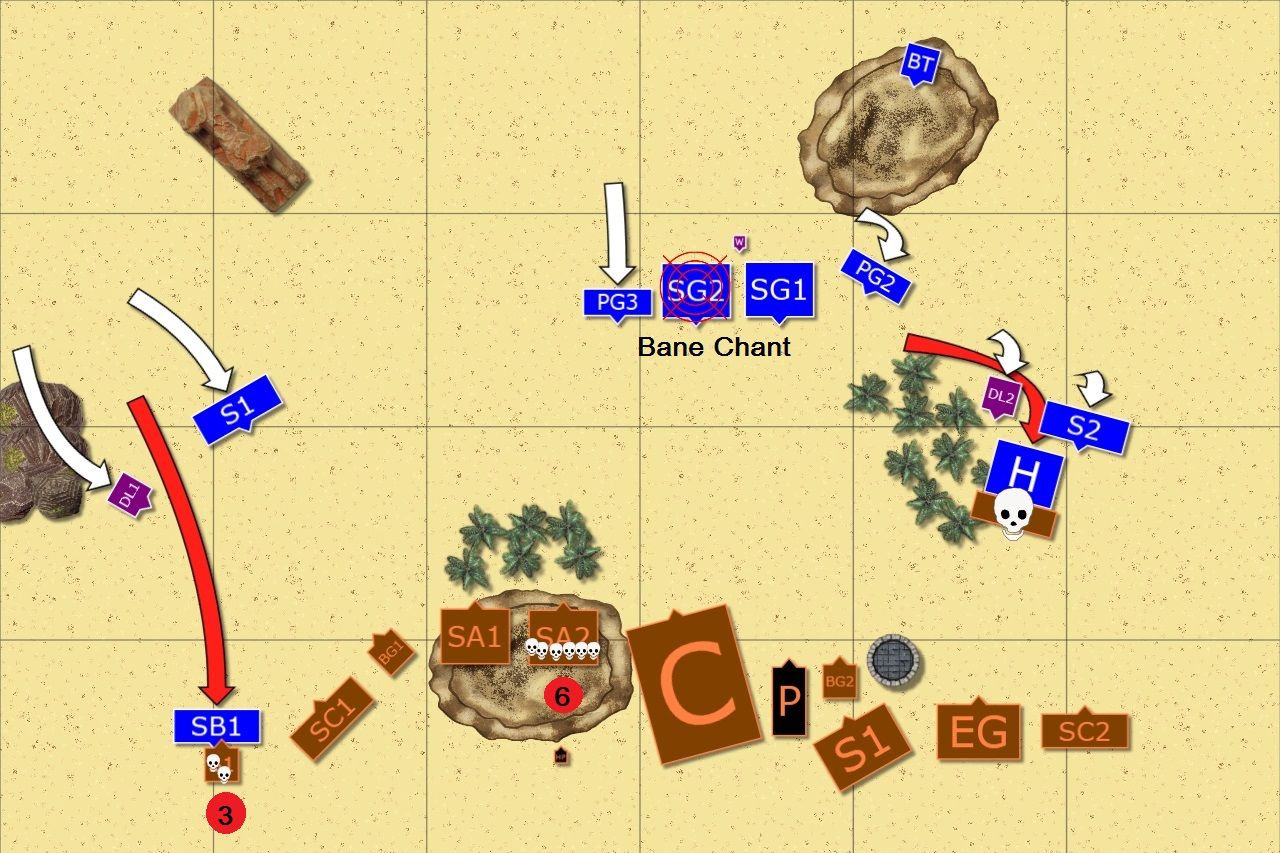
Cursed Kings - Turn 4
 |
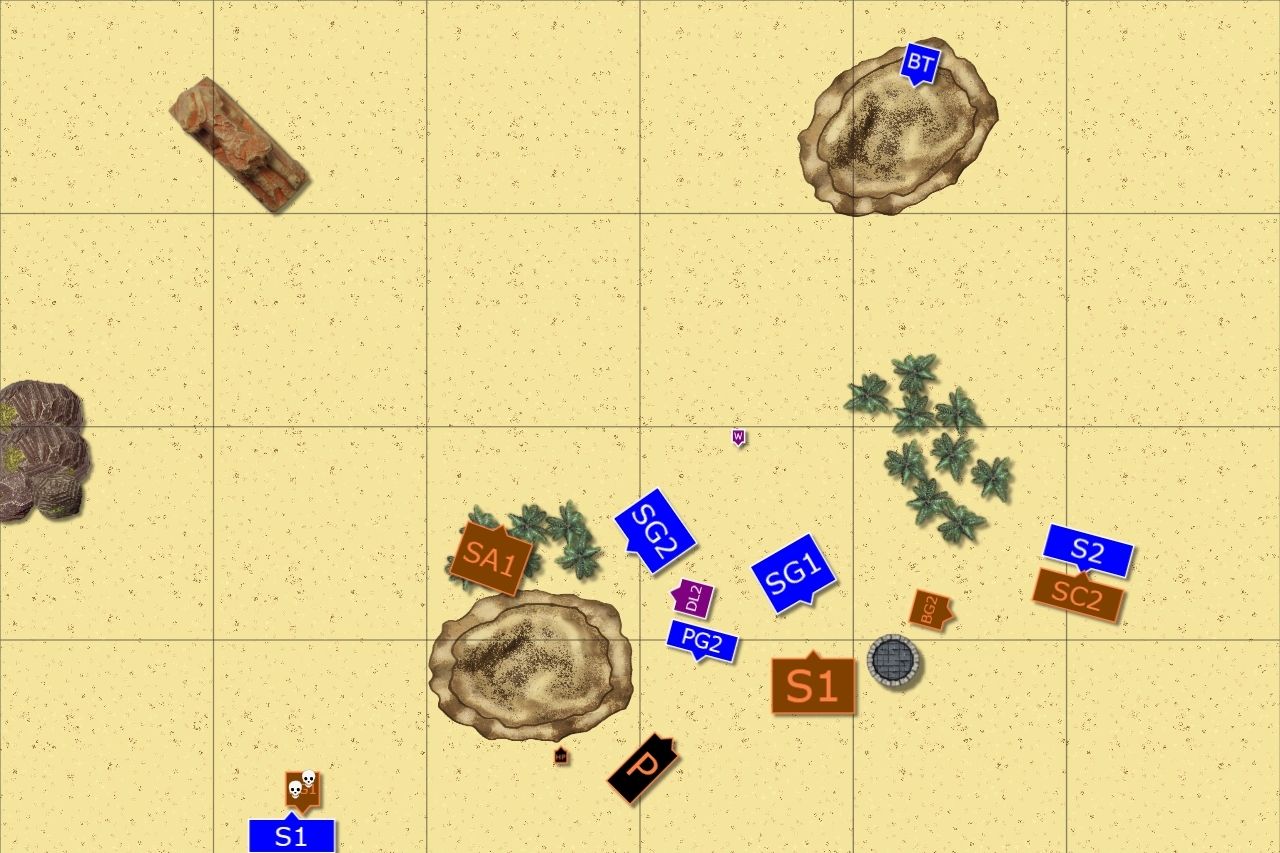
| Undead counter attack |
Expected counter attacks hit home. On the left flank the giant stormed through the flank of elven cavalry and they barely held but were wavered and had to limp away to regroup. Also Palace Guard now securing the flank of the Sea Guard wavered under heavy fire.
On the right flank Hunters were lucky to be charged by Enslaved Guardians only as the magical Surge of the nearby giant didn't bring him in contact. However, skeleton cavalry spotted the opening and attacked their elven counterparts. The attack resulted in disruption of the enemy.
Outcasts - Turn 4
 |
| Elves push again |
The fight on flanks continued with no definite result yet. Stormwind cavalry on the left flank had to move away from the giant to avoid extermination. Hunters and Drake Rider on the right flank pushed against Enslaved Guardians but despite heavy punch they didn't crumble just yet. Disrupted formation of the right flank cavalry prevented them from mounting successful charge and their attack lacked cohesion and didn't bring any effect.
Cursed Kings - Turn 5
 |
| Another heavy punch by Undead warriors |
Yet another opportunity presented itself and Pharaoh was eager to use it to his advantage. He and his loyal High Priest used their unholy magic to animate Bone Giant and one of the Elven Drake Lords was totally surprised by the attack and smashed to a bloody pulp.
On the other flank Hunters were not able to withstand such a heavy punch when rampaging giant hit their flank together with vengeful guardians and were destroyed. Cavalry squadrons continued their fight with no side gaining the upper hand yet.
What is more, arrows of the undead warriors finally destroyed yet another Palace Guard unit. Elven forces melted at dangerous speed in the merciless heat of the desert sun.
Outcasts - Turn 5
 |
| Preemptive attack |
With flanks collapsing it was the time that central units moved to positions. On the right flank Drake Lord managed to destroy the heavily damaged Guardians but cavalry were still locked in combat.
Valiant Palace Guard charged alone against Chariots, ready to sacrifice themselves but their valor allowed phalanxes of sea guard to move safely to position and disrupt the enemy so that their counter charge would be less devastating.
Cursed Kings - Turn 6
 |
| Palace Guards holds! |
Chariots as expected stormed into thin line of the Palace Guard but proud Elves refused to give up their position. Undead forces try to finish off Elven cavalry but these warriors hold fast too. Although the regiment on the right flank wavered and had to regroup.
It was the last change for the Elves to hit the enemy hard!
Outcasts - Turn 6
 |
| Powerful attack! |
Finally, Elven units managed to combine their efforts and attack together against single powerful enemy. However, the attack, also supported by the mage, hit so hard the ancient chariots crumbled into dust and victorious Elves moved forward re-grouping quickly to be ready for a counter attack.
But such attack never came as desert storm, appearing as if from nowhere, separated the forces and when it cleared out as quickly as it started, undead warriors were all gone.
It was clear that it is not the end to the feud between two armies but for now commanders of both forces decided to withdraw as the conflict remained unresolved.
 |
| Final position of the forces |
Summary
 |
| Turn-by-turn summary animation |
After-battle thoughts
After turn 6 we rolled to see if we are going to play one more turn but it was not to be and we simply calculated the points to find out it was a draw! It is a perfect result for the first game, where both players are learning the game, if you ask me and I was happy to get one after such powerful hits for sure.
I would like to thank Loriel for a great game where we were both very slow but I am sure it is just a matter of practice. However, I really liked the game and I am also happy to learn that my previous concerns it can be quite static were not justified.
It was inevitable that we made some mistakes but more importantly it showed that if you take the army you like the look of it can still be dangerous on the battle field. My first impression is thus very positive as it suggests that you can play successfully with any army.
I believe, however, I could have avoided many of these mistakes and they cannot be simply justified by the fact it was our first game.
First of all I should have positioned my fast cavalry on the right flank behind the forest to provide cover from shooting. Second, when I moved them forward I was not in 6" range of inspire from my Drake Lord. In fact, I made that mistake several times and while the chances were not great at least I would give myself the opportunity to save the unit.
I also think I should have kept the Palace Guard as a second wave and provide some cover from shooting too. They were more important that game because they can do more damage with CS(1) (and even more so with Bane Chant) while being static with Sea Guard was not as successful as I hoped for. Instead, I should have kept marching and even being in the charge range of the Chariots would put me in the good position with Phalanx rule and the good support from other units for a counter charge.
I thought I took Surge into account but Loriel quickly showed me I didn't. In the first flanking attack I was lucky but I should have really paid more attention second time when I moved my drake lord to the center. It simply means that against armies with Surge such maneuvers are too risky as the units can still turn around and then be pushed forward. Hard lesson learned!
Another mistake was exposing Stormwind cavalry for the charge of Skeletons horse. I lost thunderous charge due to that and as a result the unit that can hit hard was stuck and I was lucky not to lose it.
In general, I found that cavalry is a very tricky tool to use and seems like it can be devastating but only when charging first. It also greatly pays off to attack the unit with TC rule just to inflict a single damage so that they lose the ability for next turn.
I liked that last charge so much! I was nicely surprised to see I can inflict a lot of damage indeed and that it was really enough to crumble the horde that is not that easy to destroy.
In addition to the observation I made about cavalry I also think it is interesting to see how shooting works. On one hand it can indeed inflict enough damage to destroy units. In fact, dishing out 10 damage point for the regiment of 20 warriors is already enough to have a great chance to rout it. And that is important conclusion for me.
However, I took Sea Guard that is easily limited in their shooting abilities as they hit on 5+ so any penalty makes it 6+ quickly. Hence, I need to re-think how I want to use them and as this game showed I may need to be more aggressive with them if the enemy does not want to come to me.
I think I will play a few more games with the same force as I need to test it against different foes before I will start thinking about any changes. I need to learn what works well for me in this system. But the first impressions are very positive.
I hope you liked the report, thanks for reading and looking forward to your comments and feedback!
Cheers!
Have you considered testing 9th age that is in Development now? You strike me as the sort of HE player they need to test out the rules and get good feedback :P Anyways enjoyed the KOW report and the older 8th batreps ^^
ReplyDeleteHi Metabaron1986,
DeleteI hope you will be pleased to know I am in the process of preparing my first report with 9th Age rules as we speak! I should be able to finish it in a few days and I will do my best to organize future games in that system. I intend to post my reports as feedback for the guys who create it. Hopefully they will find them useful!
Also, thanks for the kind words, I would be really happy to know these games could be useful and I am glad to know you enjoyed other reports too!
Cheers!
Hello -
ReplyDeleteas a whfb player who is now tantalised by KoW since the disintegration of my hobby, I really appreciated this!
Thanks a lot for your kind words! I hope to heave steady stream of reports for KoW :)
DeleteGreat Batrep. Interested to see you take no Tallspears, and try trying Seaguard. Having the shooting & melee flexibility is great, but would Archers, who have reversed Me/De can also be effective, but having greater influence in shooting
ReplyDeleteHi Neal,
DeleteI certainly hoped See Guard would provide the flexibility I like so much but after two games I decided I could not make them work yet and decided to try separate Spears and Archers units. As you could see in my other reports it looked like I can do much better in such configuration.
Cheers!