
Greetings!
I had a great pleasure to play against fellow forum member and battle reporter, Loriel. We played over Universal Battle and Loriel was kind enough to let me choose which army I would like to face, High Elves or Tomb Kings. As I have played against HE recently quite often and I haven't had a chance to see new units from End Times in action, I asked for Tomb Kings! However, Loriel told me he plays old school with no benefits from End Times books whatsoever!
We agreed on a simple Battle Field with standard 2400 points armies. Loriel asked for closed lists so the one I am going to present below was not fully known to me during the game. In fact, I didn't know the composition of his force at all (I had some clues though) so please, take that into account when considering my decisions during the deployment phase.
Cursed Kings - Army List
Liche High Priest, level 4, Obsidian Lodestone, Power Stone - Lore of Nehekara - 275
Prince Apophas - 130
20 Skeleton Archers, Master of Arrows, Musician - 140
20 Skeleton Archers, Musician - 130
20 Skeleton Archers, Musician - 130
12 Skeleton Archers - 72
5 Skeleton Horse Archers - 70
5 Skeleton Horse Archers - 70
3 Necropolis Knights, Standard, Entombed Beneath the Sands - 220
3 Necropolis Knights, Standard, Entombed Beneath the Sands - 220
3 Sepulcher Stalkers, Entombed Beneath the Sands - 165
3 Sepulcher Stalkers, Entombed Beneath the Sands - 165
Tomb Scorpion, Entombed Beneath the Sands - 85
Tomb Scorpion, Entombed Beneath the Sands - 85
2 Tomb Swarms, Entombed Beneath the Sands - 80
2 Tomb Swarms, Entombed Beneath the Sands - 80
Casket of Souls - 135
Casket of Souls - 135
Screaming Skull Catapult - 90
Screaming Skull Catapult - 90
I decided to use my most recent version of MSU force:
Outcasts - Army List
Larry the Loremaster, Earthing Rod, Armor of Fortune, Obsidian Amulet - 320
Bob the Battle Standard Bearer, Griffon (Swiftsense), Dragon Armor, Lance, Talisman of Preservation, Charmed Shield - 331
16 Archers, Full Command - 190
15 Archers, Full Command - 180
5 Ellyrian Reavers, Champion, Musician, Bows, Spears - 115
5 Ellyrian Reavers, Champion, Musician, Bows, Spears - 115
5 Dragon Princes, Musician, Banner of Eternal Flame - 175
5 Dragon Princes, Musician - 155
10 Swordmasters, Bladelord, Musician - 150
10 Swordmasters, Bladelord, Musician - 150
10 Lions, Banner, Musician, Gleaming Pennant - 150
Eagle Claw Bolt Thrower - 70
Eagle Claw Bolt Thrower - 70
Great Eagle - 50
Great Eagle - 50
9 Sisters - 126
Army Total: 2397
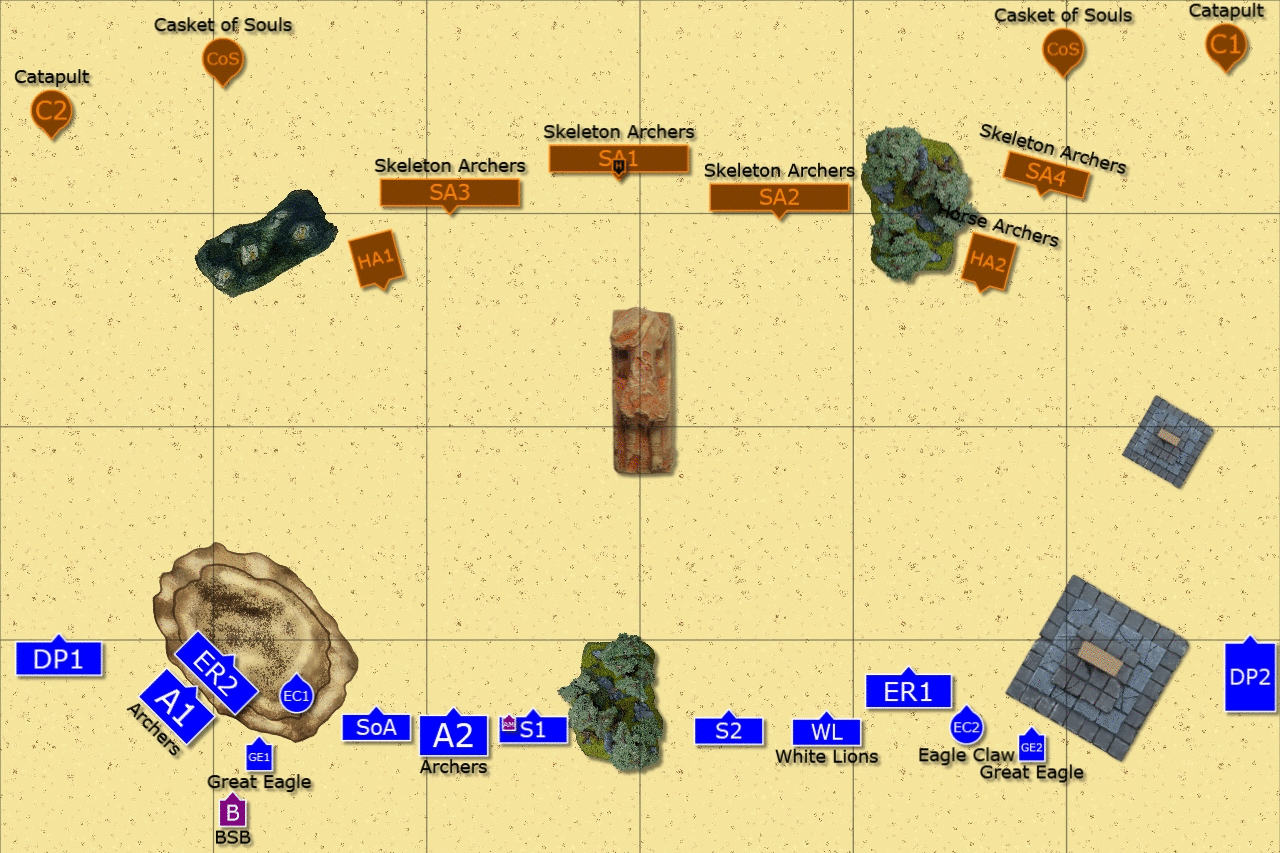
Terrain
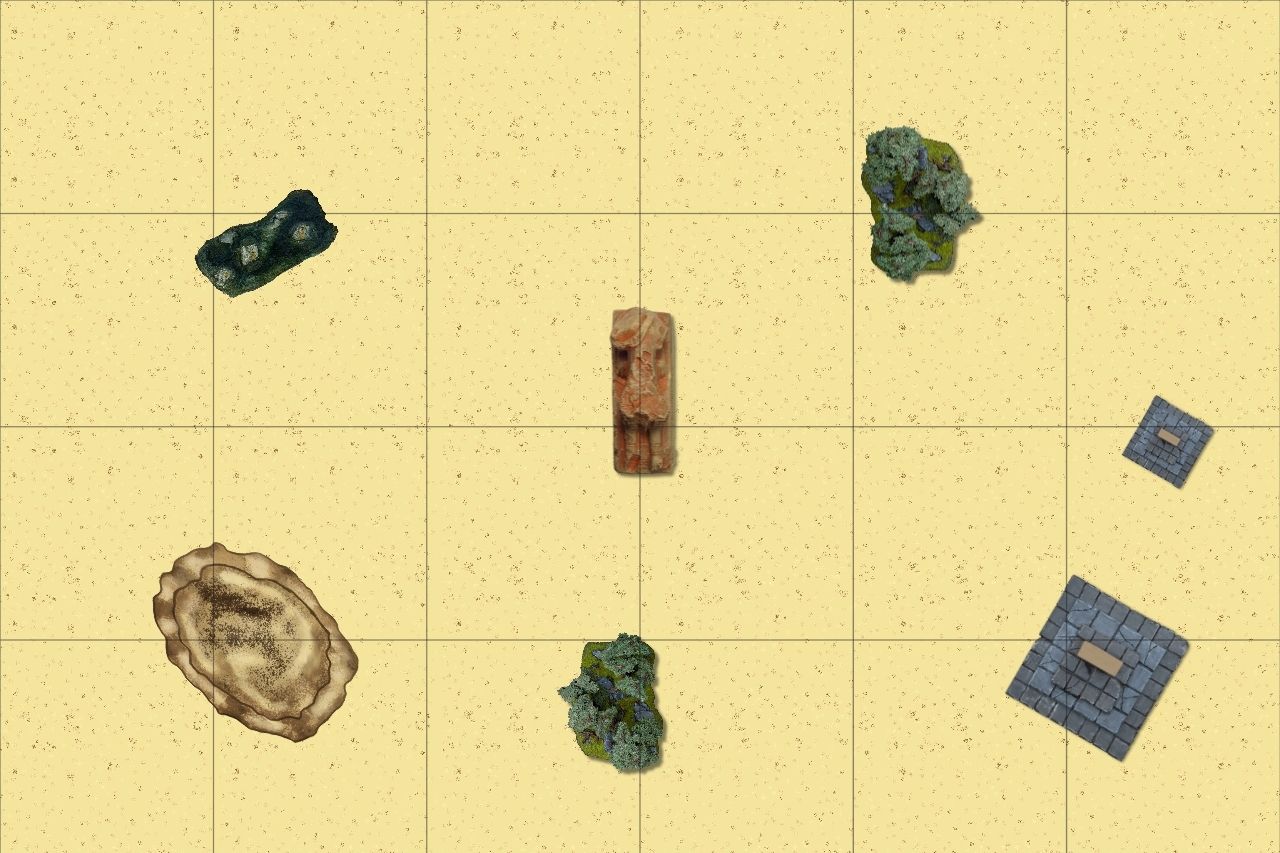
Hill - Blocks line of sight
Forrests - Mysterious terrain
Lake - Mysterious terrain
Pyramids - Impassable, blocks line of sight
Sphinx - Nehekeran Sphinx (as per rulebook, p. 130), blocks line of sight
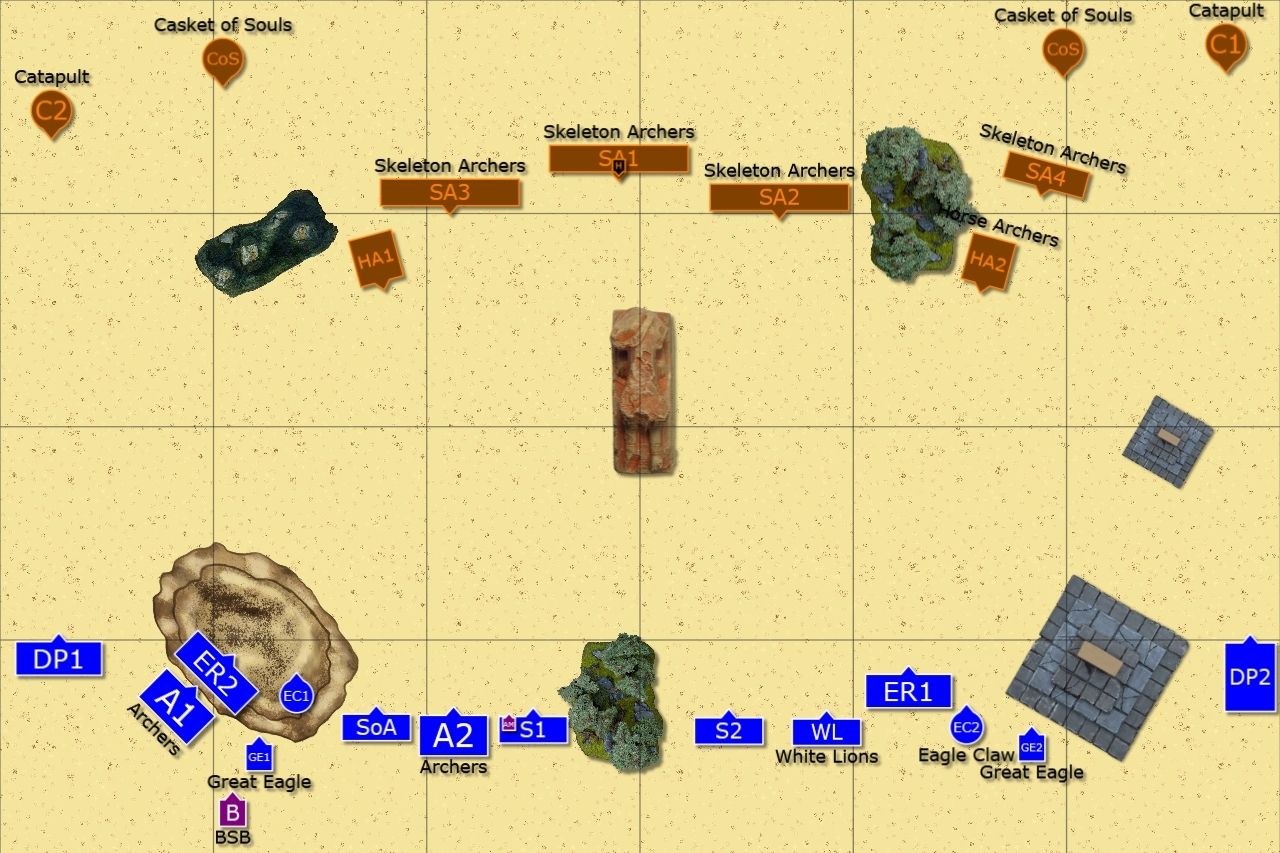
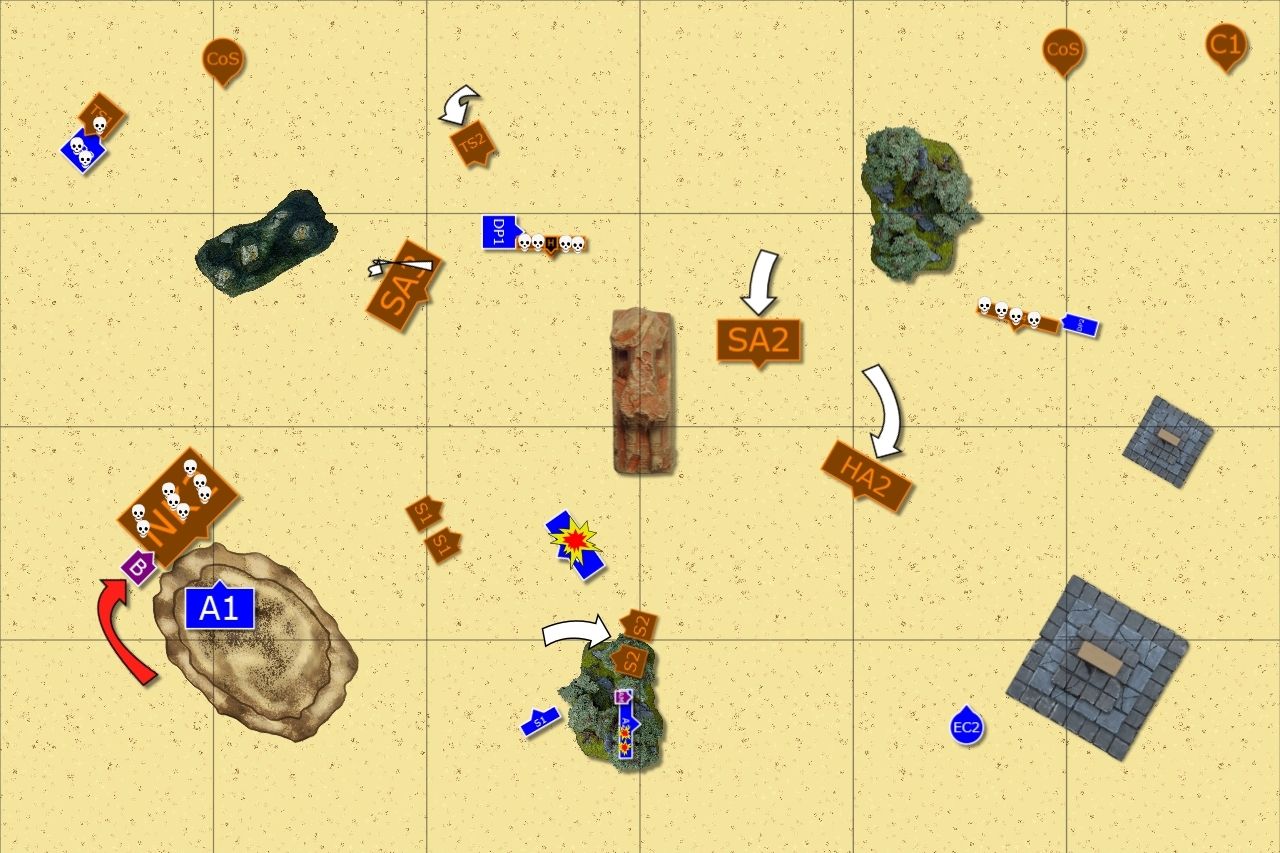
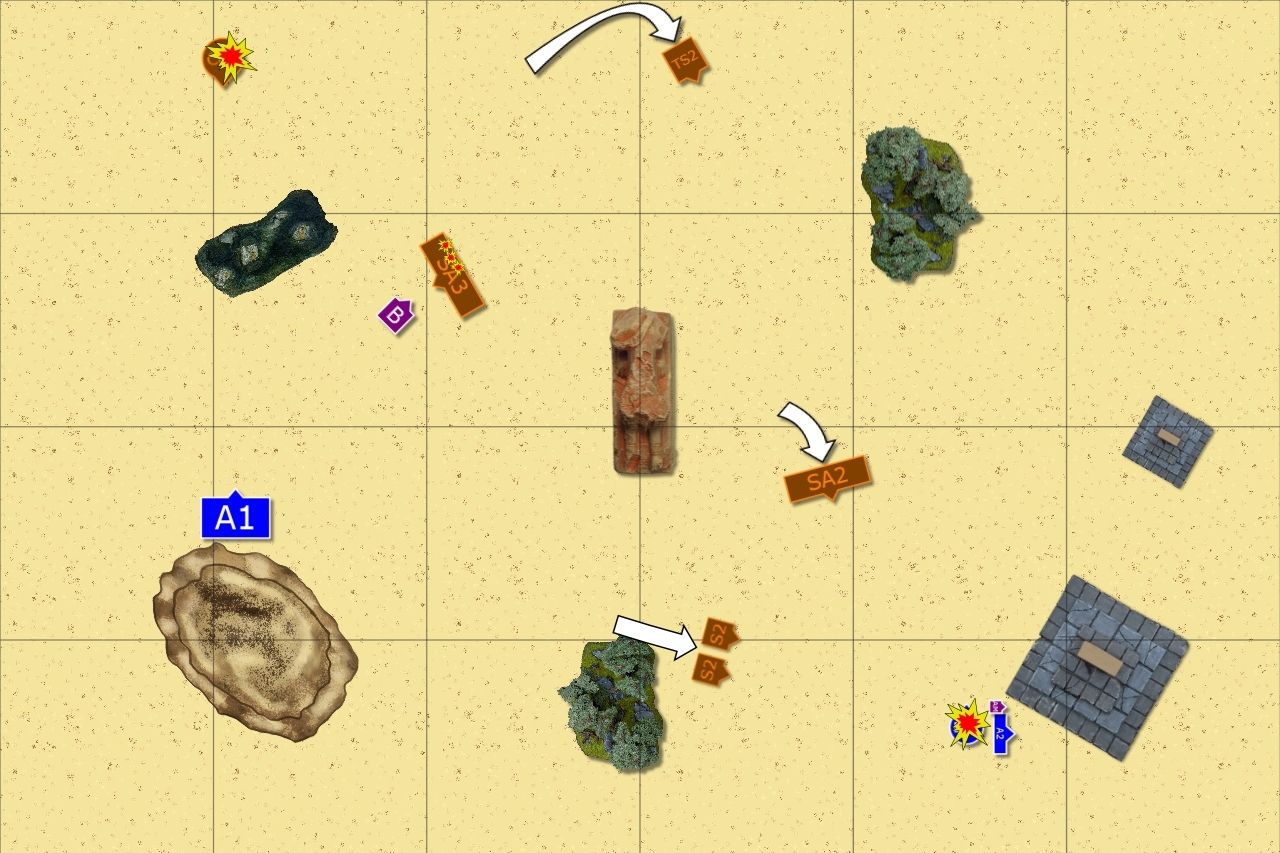
I won the roll off for picking up the side and chose South. Loriel won the roll determining who is going to start deploying troops.
Deployment
 |
| Deployment, Scouts, Vanguards |
 |
| Final deployment |
Deployment order:
Skeleton Archers (SA1) - Ellyrian Reavers (ER1)
Skeleton Archers (SA2) - Ellyrian Reavers (ER2)
Skeleton Archers (SA3) - Great Eagle (GE1)
War Machines - Great Eagle (GE2)
Skeleton Archers (SA4) - Archers (A1)
Hierophant - Rest of the Army
Horse Archers (Scouts)
I won the roll off for vanguards and started:
Ellyrian Reavers (ER1) - Horse Archers (HA1)
Ellyrian Reavers (ER2) - Horse Archers (HA2)
Loriel's Hierophant got following spells: Desert Wind, Cursed Blades, Dessication, Skullstorm
Loriel won the roll off as expected and proceeded to his first turn!
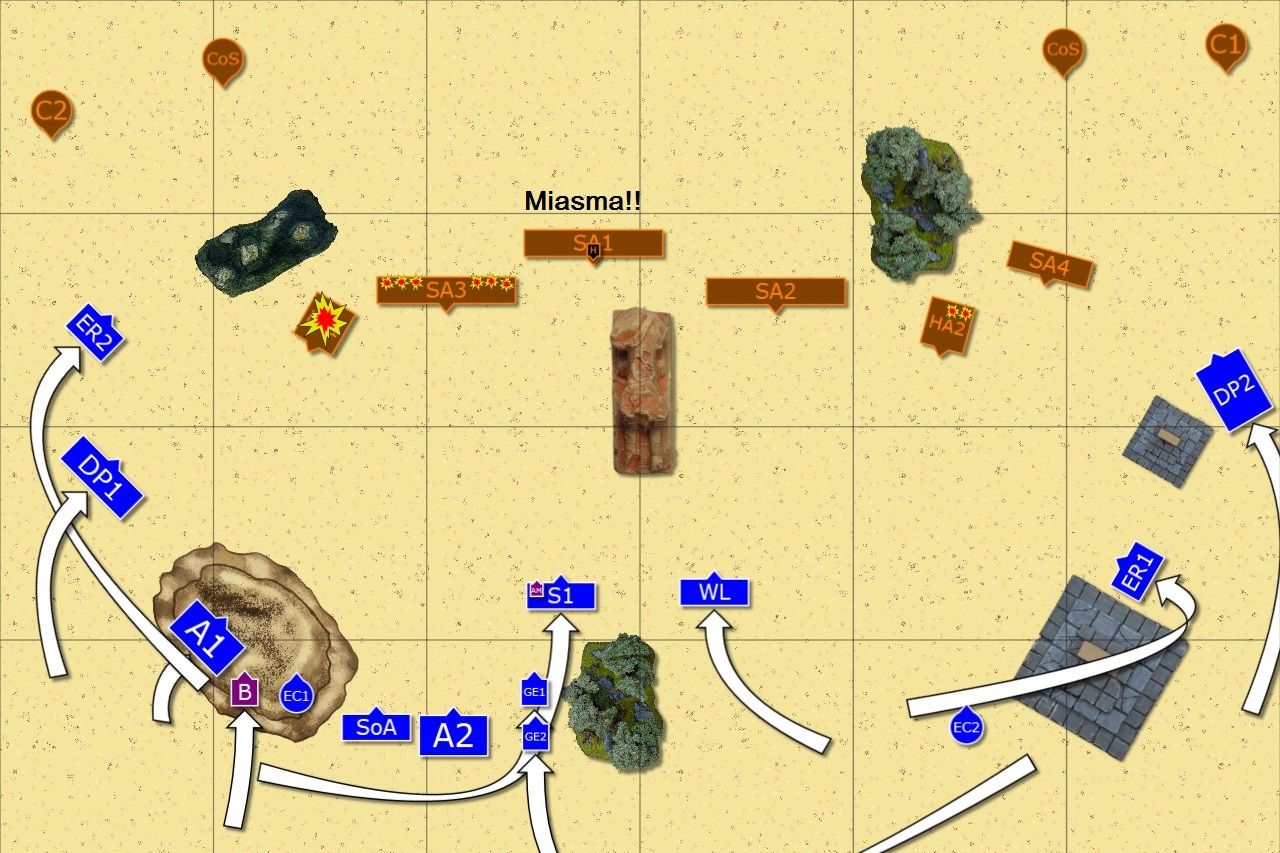
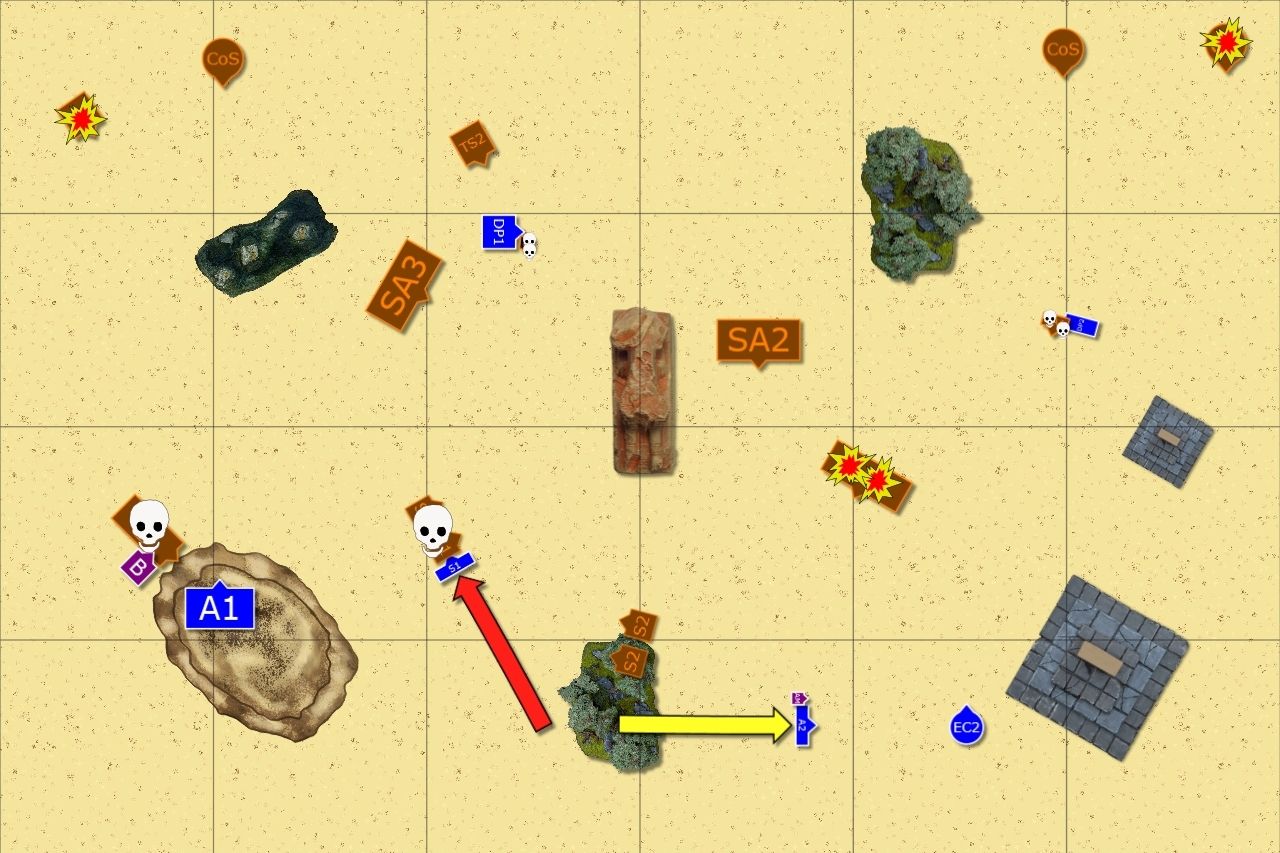
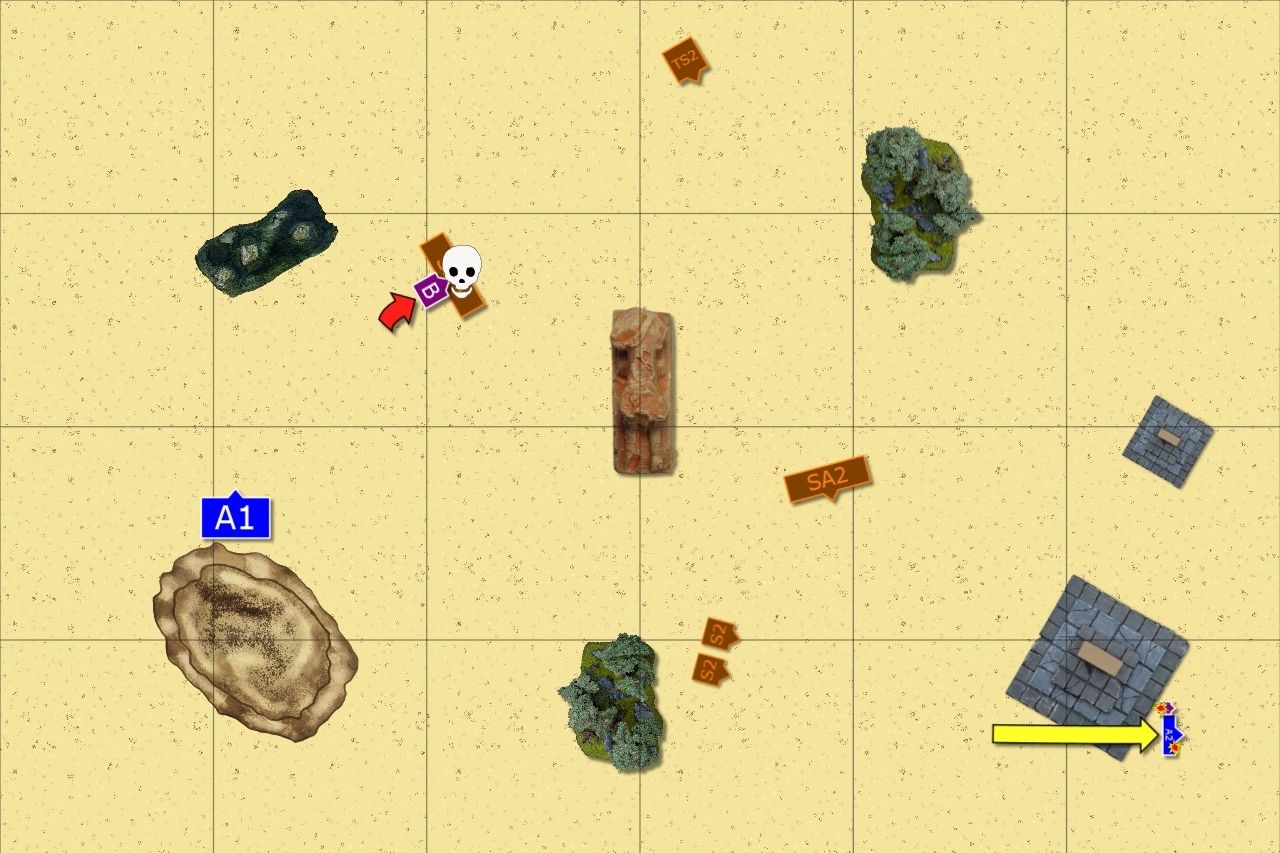
Cursed Kings - Turn 1
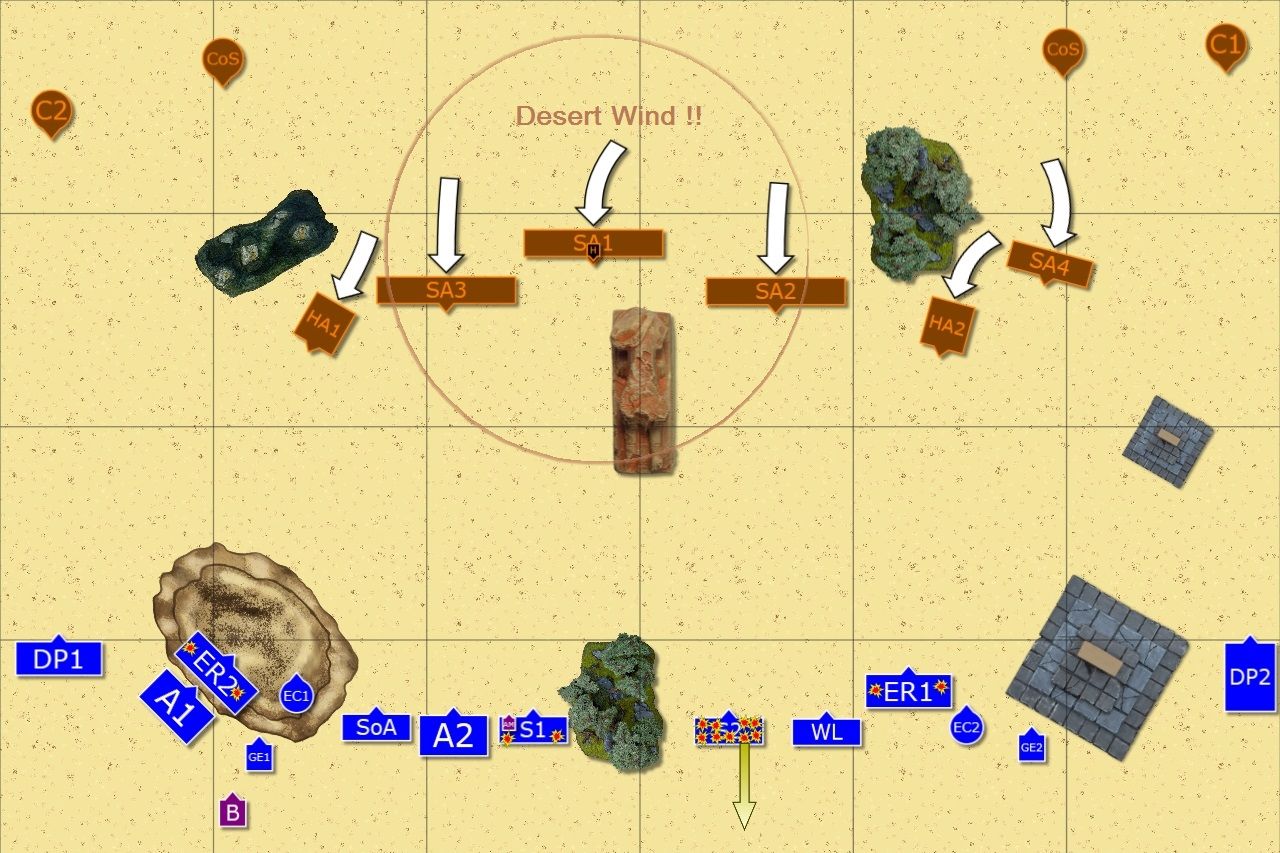 |
| First blood for Cursed Kings |
Hierophant ordered his minions forward and drew deeply from the raging winds of magic. Larry could stop only one thing and focused on shutting down the effect of one casket of souls. Thanks to that Hierophant moved his units forward faster and the second casket released its deadly cargo. The unit of Swordmasters became the target and howling souls claimed all but the Bladelord. Even the training in White Tower didn't prepare him for the horrors he has just witnessed and he went mad. Nearby White Lions were shaken too but fortunately for them magical banner calmed them down (Edit: Had to use Gleaming Pennant for failed panic check do to destroyed unit in 6", i.e. fleeing Bladelord off the table edge.).
Magic Phase Details:
Winds of Magic: 6,6 --> 12:6 (no channels)
Desert Wind: 3,6 + 4 = 13 --> no dispel attempt
Casket of Souls (right): 1,3,4,5,6 = 19 --> dispelled on a roll 1,3,4,5,6,6
Casket of Souls (left): 1,3,3,4,5 = 16 --> no dispel attempt --> 3d6 Ld test for Swordmasters (S2): 5,6,6 - ld8 = 9 wounds, panic failed on a roll of 4,6 --> Bladelord fled off the table --> didn't jump to new unit due to roll of 2 to do so
Shooting Phase Details:
Horse Archers (HA2) at Reavers (ER2): 5+ to hit --> 4 hits, 4+ to wound --> 2 wounds, no saves (failed 5+)
Archers(SA2) at Reavers (ER2): 5+ to hit --> 4 hits, 4+ to wound --> 2 wounds, both saved on 5+
Archers(SA3) at Reavers (ER1): 5+ to hit (11 can shoot) --> 1 hit, 4+ to wound --> 1 wound, saved on 6+
Horse Archers (HA1) at Reavers (ER1): 5+ to hit --> 4 hits, 4+ to wound --> 2 wounds, no saves (failed 5+)
Right Catapult at Larry the Loremaster: HIT --> Look Out Sir! passed --> 2 Archers affected but no wounds --> 6 + 1 Swordmasters hit --> 4 + to wound (2+ for one) --> 3 wound (1 wound) --> 2 saved on 5+
Left Catapult at Eagle Claw (EC1): missed the target
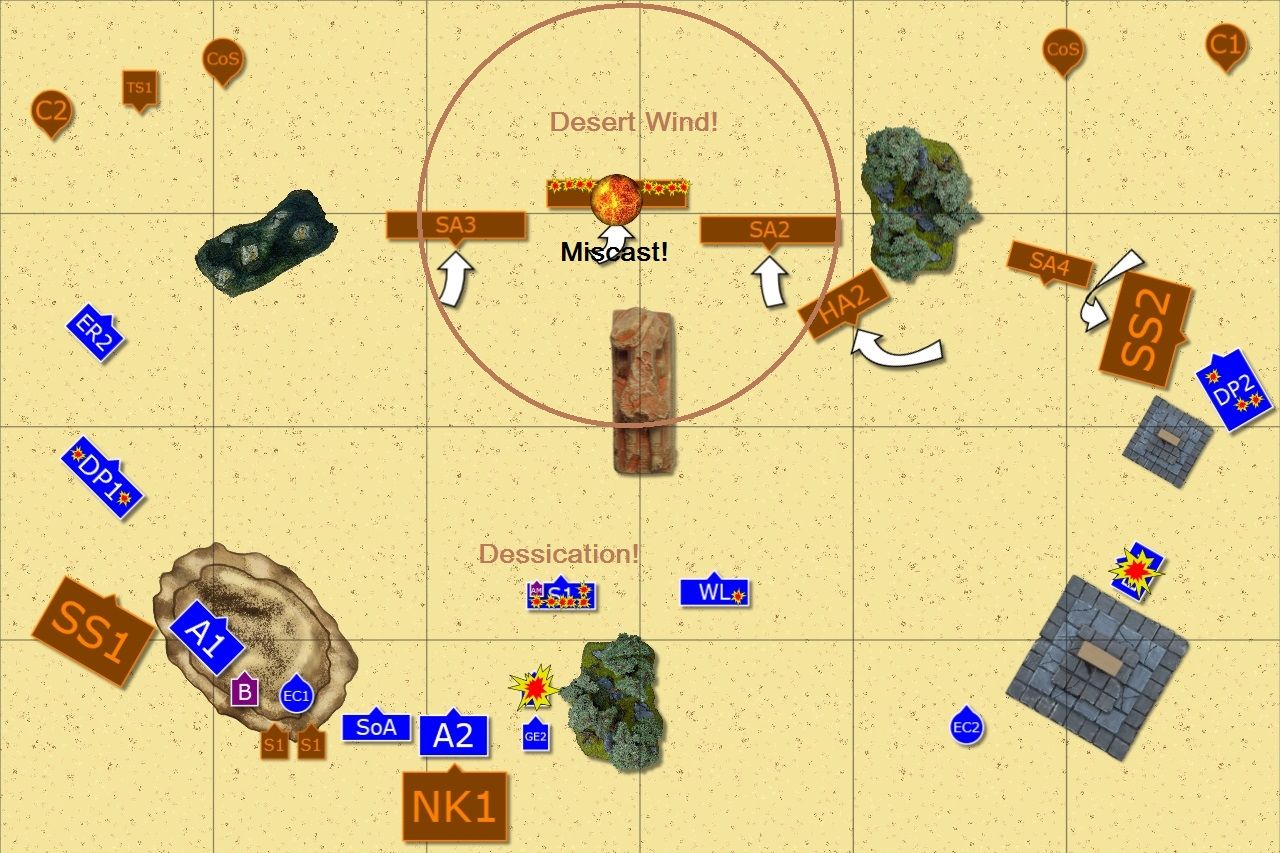
Outcasts - Turn 1
Magic Phase Details:
Winds of Magic: 6,6 --> 12:6 (no channels)
Desert Wind: 3,6 + 4 = 13 --> no dispel attempt
Casket of Souls (right): 1,3,4,5,6 = 19 --> dispelled on a roll 1,3,4,5,6,6
Casket of Souls (left): 1,3,3,4,5 = 16 --> no dispel attempt --> 3d6 Ld test for Swordmasters (S2): 5,6,6 - ld8 = 9 wounds, panic failed on a roll of 4,6 --> Bladelord fled off the table --> didn't jump to new unit due to roll of 2 to do so
Shooting Phase Details:
Horse Archers (HA2) at Reavers (ER2): 5+ to hit --> 4 hits, 4+ to wound --> 2 wounds, no saves (failed 5+)
Archers(SA2) at Reavers (ER2): 5+ to hit --> 4 hits, 4+ to wound --> 2 wounds, both saved on 5+
Archers(SA3) at Reavers (ER1): 5+ to hit (11 can shoot) --> 1 hit, 4+ to wound --> 1 wound, saved on 6+
Horse Archers (HA1) at Reavers (ER1): 5+ to hit --> 4 hits, 4+ to wound --> 2 wounds, no saves (failed 5+)
Right Catapult at Larry the Loremaster: HIT --> Look Out Sir! passed --> 2 Archers affected but no wounds --> 6 + 1 Swordmasters hit --> 4 + to wound (2+ for one) --> 3 wound (1 wound) --> 2 saved on 5+
Left Catapult at Eagle Claw (EC1): missed the target
Outcasts - Turn 1
 |
| Outcasts move forward! |
Elves had to move fast to use the opportunity that ambushing elements of the enemy army (expected but not known in what quantity yet) have not joined the battle yet. Since the enemy deployed in the center outflanking seems like an invitation and it would have been rude not to oblige. Especially as a guest!
Larry tried to make undead bowmen less accurate and burn some others to dust but somehow his fireball didn't even form properly and he lost his energy completely.
The shooters picked up but although one unit of Horse Archers was destroyed, the general performance seemed not to be as efficient as expected.
Magic Phase Details:
Winds of Magic: 2,6 --> 8:6 (no channels)
Miasma at Archers (SA1): 2,6 + 2 = 10 --> no dispel attempt --> -1 BS
2d6 Fireball at Archers (SA3): 1,2,3 +2 = 8 failed to cast
Shooting Phase Details:
Reavers (ER2) at Horse Archers (HA2): move, range, 4+/5+ (champ/unit) --> 2 hits, 4+ to wound --> 1 wound, no save
Sisters at Horse Archers (HA2): range, 3+ --> 6 hits, 3+ to wound --> 5 wounds, no save
Archers (A1) at Archers (SA3): move, range, 4+/5+ (champion/unit) --> 2 hits, 4 + to wound --> 1 wound
Eagle Claw (EC1) at Archers (SA3): 3+ to hit, multiple --> 4 hits, 3+ to wound --> 2 wounds
Archers (A2) at Archers (SA3): range, 3+/4+ (champion/unit) --> 10 hits, 4 + to wound --> 3 wounds
Eagle Claw (EC2) at Horse Archers (SA1): 4+ to hit, multiple --> 3 hits, 3+ to wound --> 2 wounds
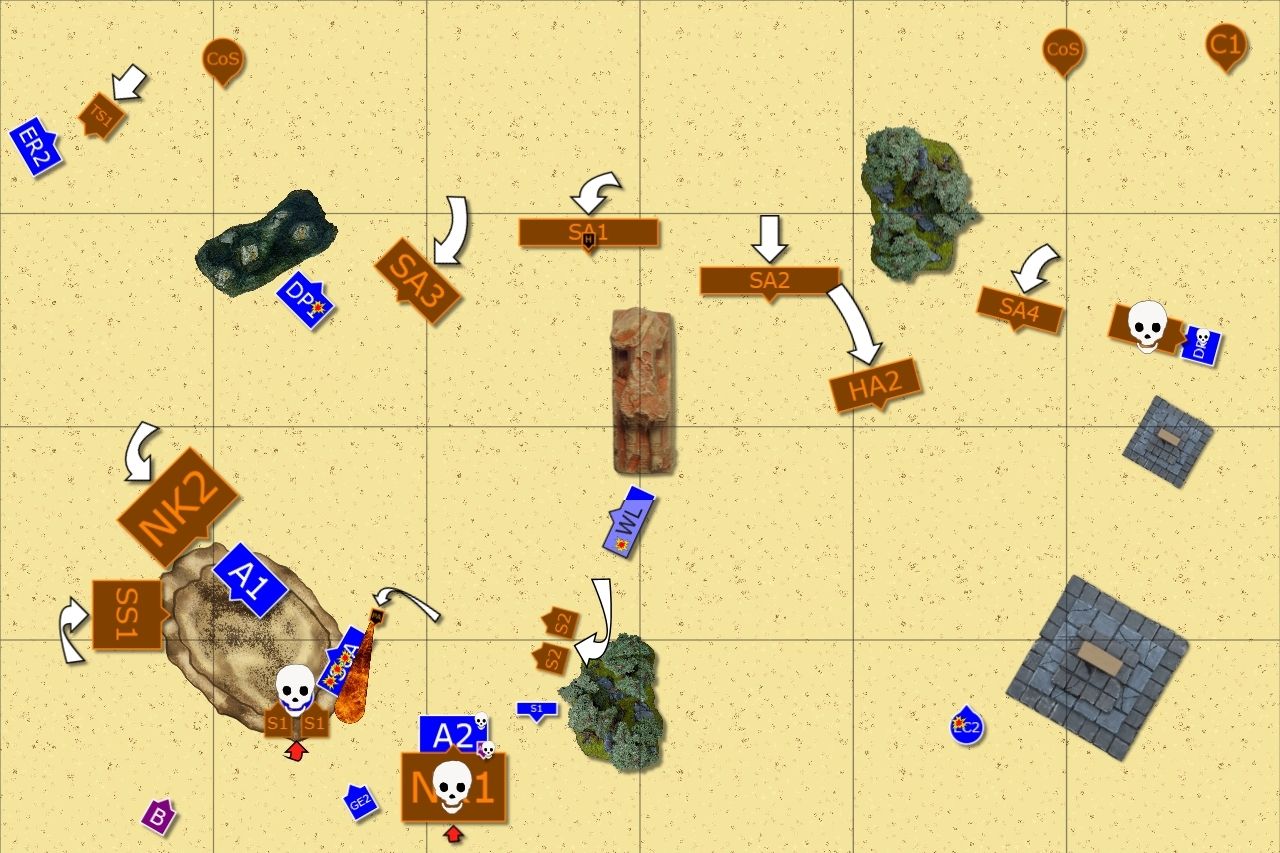
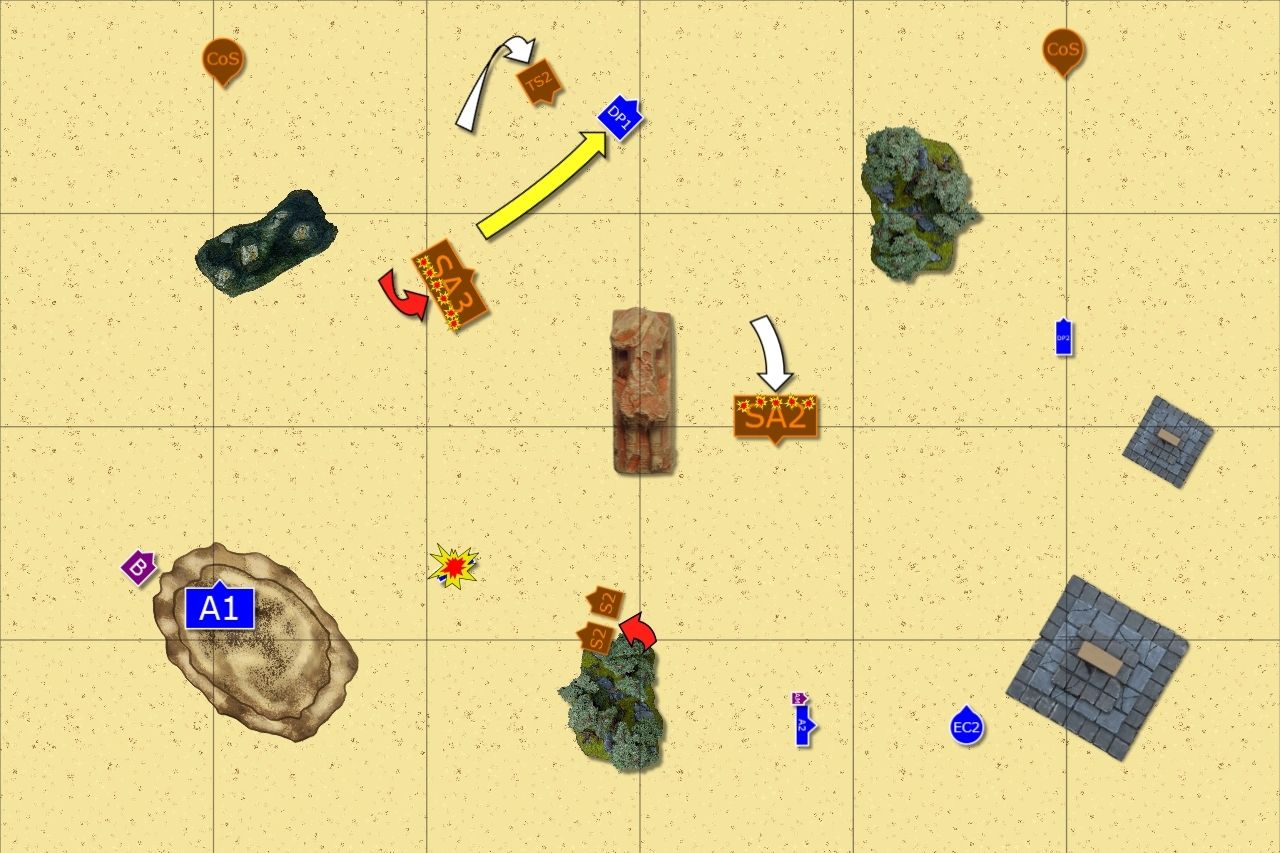
Cursed Kings - Turn 2
 |
| Units start crawling out of the sands |
The call to arms and to protect their King resonated through vast desert. It was answered by the creatures buried beneath the sands, small and large and each dangerous in its own way. Majority of the ambushing forces appeared behind Elven lines, where Sepulchar Stalkers, Swarms and Necropolis Knights made their presence seen. Another pack of Stalkers blocked Dragon Princes on the East and both tried to transfix as many knights as possible. There were significant casualties but the survivors were determined to hold fast and enact vengeance!
A lone Tomb scorpion lost its way, however, but fortunately showed up close it its own forces to be still of some use. At the same time Skeletons moved back as their Hierophant wanted to put extra distance in between the forces. Some of the fallen warriors stood up to fight again but unlucky magical feedback turned some of them into dust again. Elves suffered more damage again although it seemed slightly less devastating than before. Unfortunately, they could not be resurrected as the Undead warriors and each casualty was making the situation of the Outcasts worse.
Magic Phase Details:
Winds of Magic: 5,5 --> 12:6 (2 power dice from casket and one channel for Elves)
Desert Wind: 1,4 + 4 = 9 (no dispel attempt)
Left Casket of Souls at BSB: 2,2,3,3,4 = 14 --> dispelled with the roll 1,3,3,4,6 + 2 = 19
Right Casket of Souls at Great Eagle (GE1): 2,4,6 = 12 --> no dispel attempt --> 2,4,6 - Ld9 = 3w --> jumps to great eagle (GE2) --> 1,3,5 - Ld 9 = 0w --> jumps to Archers --> 1,3,3 - Ld 9 = 0w --> fails to jump further
Dessication at Swordmasters (SM1): 6,6 --> Irresistible Force --> Miscast: 1,5 --> small template s10 hits --> 9 archers destroyed, hierophant wounded
Shooting Phase Details:
Horse Archers (HA2) at Reavers (ER2): 5+ to hit --> 3 hits, 4+ to wound --> 3 wounds, no saves (failed 5+)
Sepulchar Stalkers (SS2) at Dragon Princes (DP2): 6,6,8 = 20 hits, 6+ to wound --> 3 wounds, 6++ ward saves --> no saves, panic passed
Sepulchar Stalkers (SS1) at Dragon Princes (DP1): 6,6,MISFIRE (suffered 1 wound) = 12 hits, 6+ to wound --> 2 wounds, 6++ ward saves --> no saves, panic passed
Left Catapult at BSB: misses the target
Right Catapult at Eagle Claw (EC2): misses the target
Archers (SA1) at Swordmasters (SM1): 11 could shoot, 6+ to hit (due to Miasma) --> 2 hits, 3+ to wound (due to Dessication) --> 2 wounds, 1 save on 5+
Archers (SA3) at Swordmasters (SM1): 18 shots, 5+ to hit --> 11 hits, 3+ to wound (due to Dessication) --> 6 wounds, 2 saves on 5+, 1 parry on 6++
Archers (SA4) at White Lions: 12 shots, 5+ to hit --> 3 hits, 4+ to wound --> 3 wounds, 3+ save --> all saved
Archers (SA2) at White Lions: 20 shots, 5+ to hit --> 8 hits, 4+ to wound --> 4 wounds, 3+ save --> 3 saves
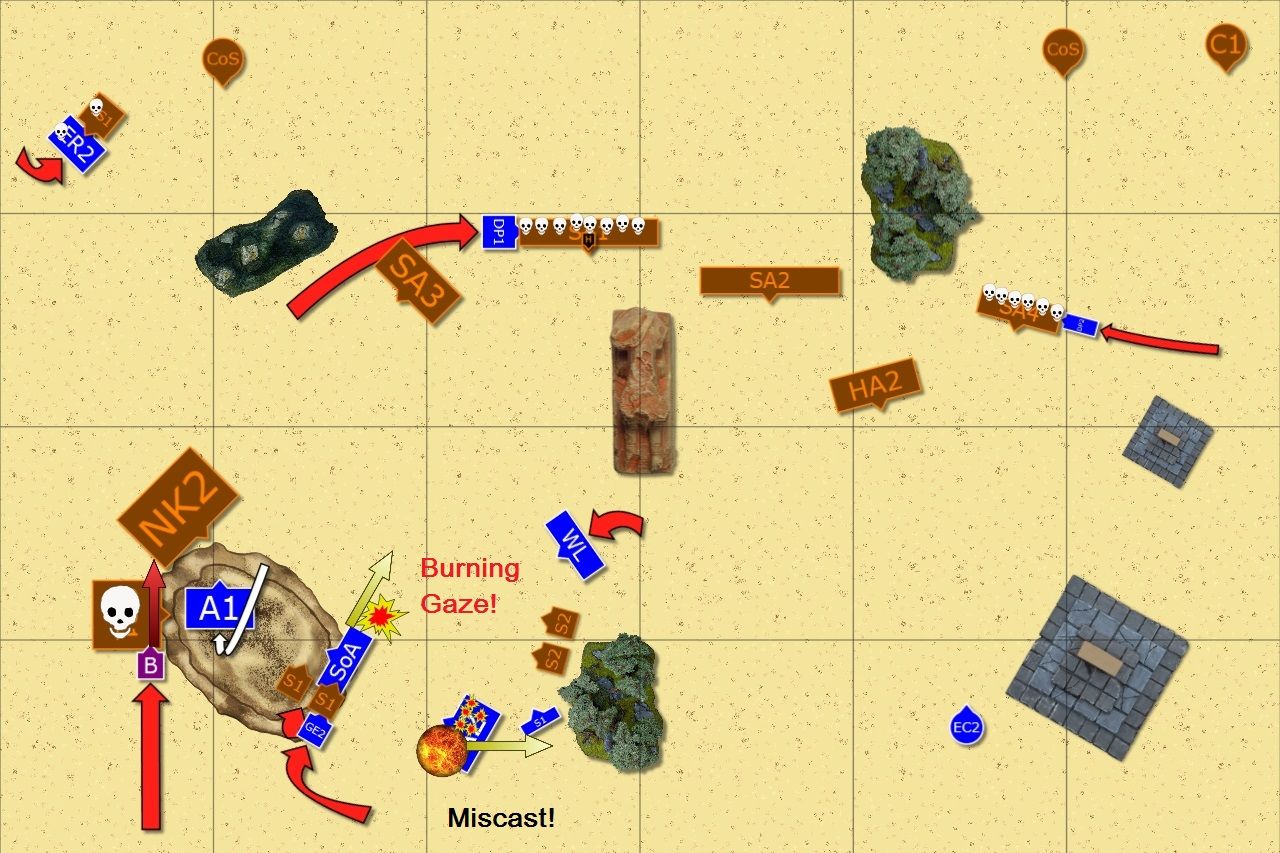
Outcasts - Turn 2
 |
| Elves re-arrange their formation to counter a new threat |
With new players entering the stage Elves had to react fast. Their leaders noticed that the enemy bowmen pulled back and that gave them a little bit more breathing space they wanted to to use to their advantage. The new plan was quickly formulated. Cavalry on the flanks proceeded with their initial push and Reavers destroyed first catapult on the West while Dragon Princes avenged their fallen companions and attacked Stalkers.
In the meantime, the rest of the forces reformed and tried to hurt the ambushers with ranged attacks before bracing for impact. However, the magic and shooting results were a big disappointment and Elves stoically awaited incoming attacks.
Magic Phase Details:
Winds of Magic: 1,1 --> 2:1 (no channels)
Burning Gaze at Necropolis Knights (NK1): 4,5 + 2 = 11 --> 1,3 = 4 hits, 4+ to wound --> 1 wound, 4+ to save --> saved
Shooting Phase Details:
Eagle Claw (EC2) at Necropolis Knights (NK1): single shot, 3+ to hit --> hits, 2+ to wound --> wounds, multiplies to 1 wound, does not go further
Archers (A2) at Necropolis Knights (NK1): move, 3+/4+ to hit (champ/unit) --> 10 hits, 5+ to wound --> 2 wounds, 1 save on 3+
Eagle Claw (EC2) at Necropolis Knights (NK1): multiple shot, 3+ to hit --> 4 hits, 4+ to wound --> 4 wound, 5+ to save --> all saved
Sisters at Sepulcher Stalkers (SS1): move, distance, 4+ to hit --> 4 hits, 4+ to wound --> 2 wounds, 6+ to save --> no saves
Arches (A1) at Sepulcher Stalkers (SS1): move, 3+/4+ to hit (champ/unit) --> 6 hits, 5+ to wound --> 2 wounds, 5+ save --> no saves
Cursed Kings - Turn 3
 |
| Prince Apophas is here! |
Prince Apophas made it to the battle among more swarms but he went towards the Sisters as main target. They were also attacked by vicious swarms who have just devoured eagle claw and its crew.
More Necropolis Knights emerged from beneath the sands and they joined nearby Stalkers to attack elven archers. However, those that attacked elven forces earlier didn't fare that well. First group of the Knights charged against Archers but their ranks and martial prowess of the Loremaster meant that only one knight was allowed to strike back and he crumbled to dust soon after. It was the fate of the Stalkers attacked by Dragon Princes too although only regimental standard bearer remained alive.
Hierophant and his legions of shooters stepped in but surprisingly this time they didn't claim as many casualties.
Magic Phase Details:
Winds of Magic: 3,3 --> 9:3 (3 additional from Casket)
Desert Wind: 2,2 + 4 = 8 --> Dispelled on a roll of 2,3,5 + 2 = 12
Left Casket of Souls at Dragon Princes (DP1): 2,4,4 = 10 --> 2,3,6 - Ld9 = 2w --> 1 6++ ward save --> panic check passed
Right Casket of Souls at Eagle Claw (EC2): 1,4,6,6 = 17 --> 1,2,6 - Ld8 = 1w
Shooting Phase Details:
Horse Archers at Eagle Claw (EC2): 5+ to hit --> 2 hits, 6+ to wound --> no wounds
Stalkers (SS1) at Archers (A1): 8,6 = 14 hits, 6+ to wound --> 1w
Prince Apophas at Sisters: 7 hits, 5+ to wound --> 3 wounds, 6+ save --> no save
Catapult at Eagle Claw (EC2): missed the target
Archers (A3) at Dragon Princes (DP1): 12 shots, 5+ to hit --> 4 hits, 4+ to wound --> 3 wounds, all saved
Remaining Archers at White Lions: 1 wound total
Close Combat Details:
Stalker (SS2) vs Dragon Princes (DP2): DP 3+ to hit with re-roll --> 3 hits, 5+ to wound --> 2 wounds, 5+ save --> no saves; Steeds, 4+ to hit --> 2 hits, 5+ to wound --> no wounds; Stalker, 4+ to hit --> 2 hits, 2+ to wound --> 2w, 4+/6++ to save --> 1 save; Stalker crumbles
Necropolis Knights (NK1) vs Archers (A2): Archers, 4+ to hit with re-rolls --> 8 hits, 5+ to wound --> 6 wounds, 3+ to save --> 4 saves; Larry the Loremaster --> 3+ to hit --> 3 hits, 2+ to wound --> 3 wounds, 6+ to save --> no saves; Necropolis Knight, 2 attacks 4+ to hit --> 1 hit, 2+ to wound --> wounds, 5++ save --> saved; Snake Mount, 3 attacks, 4+ to hit --> 1 hit, 2+ to wound --> 1 wound, 5++ save --> no save; The Knight crumbles
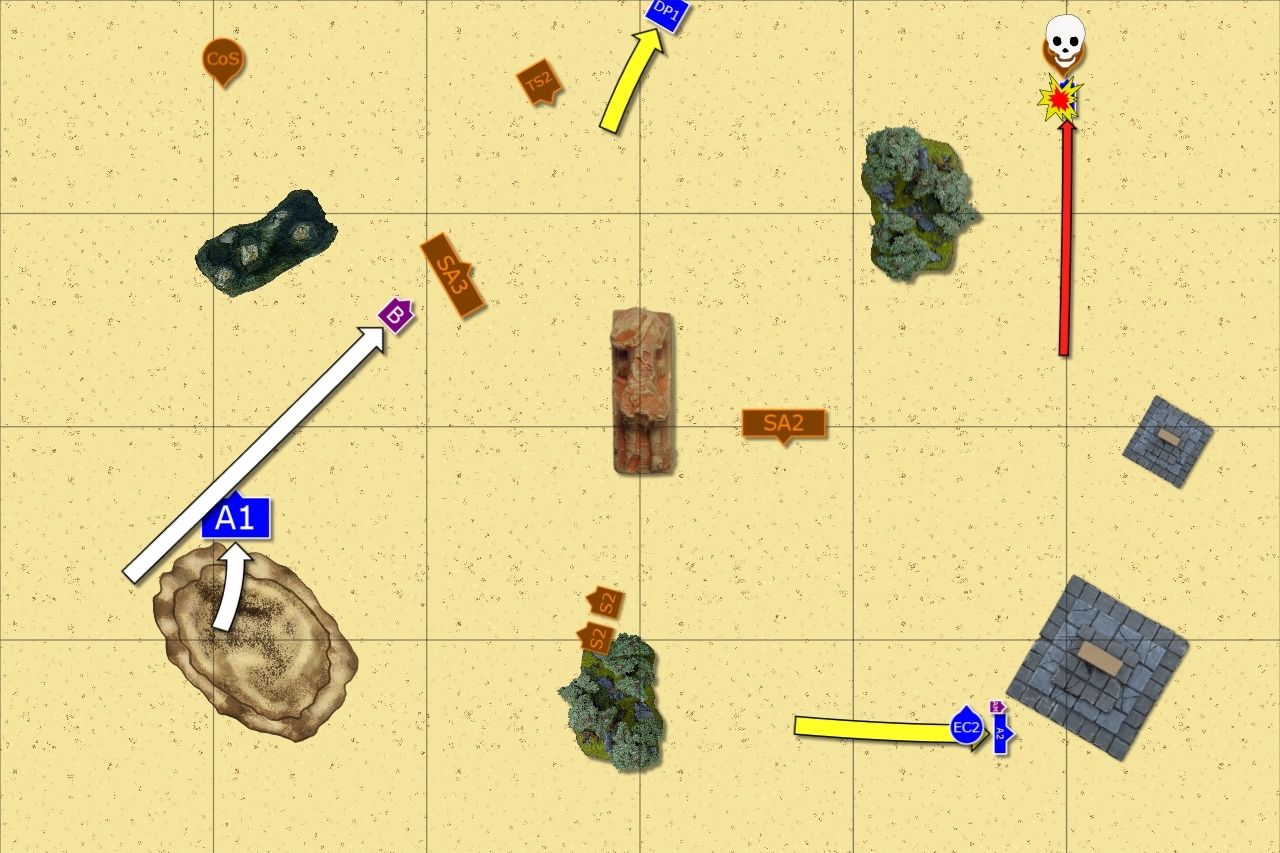
Outcasts - Turn 3
Stalkers (SS1) at Archers (A1): 8,6 = 14 hits, 6+ to wound --> 1w
Prince Apophas at Sisters: 7 hits, 5+ to wound --> 3 wounds, 6+ save --> no save
Catapult at Eagle Claw (EC2): missed the target
Archers (A3) at Dragon Princes (DP1): 12 shots, 5+ to hit --> 4 hits, 4+ to wound --> 3 wounds, all saved
Remaining Archers at White Lions: 1 wound total
Close Combat Details:
Stalker (SS2) vs Dragon Princes (DP2): DP 3+ to hit with re-roll --> 3 hits, 5+ to wound --> 2 wounds, 5+ save --> no saves; Steeds, 4+ to hit --> 2 hits, 5+ to wound --> no wounds; Stalker, 4+ to hit --> 2 hits, 2+ to wound --> 2w, 4+/6++ to save --> 1 save; Stalker crumbles
Necropolis Knights (NK1) vs Archers (A2): Archers, 4+ to hit with re-rolls --> 8 hits, 5+ to wound --> 6 wounds, 3+ to save --> 4 saves; Larry the Loremaster --> 3+ to hit --> 3 hits, 2+ to wound --> 3 wounds, 6+ to save --> no saves; Necropolis Knight, 2 attacks 4+ to hit --> 1 hit, 2+ to wound --> wounds, 5++ save --> saved; Snake Mount, 3 attacks, 4+ to hit --> 1 hit, 2+ to wound --> 1 wound, 5++ save --> no save; The Knight crumbles
Outcasts - Turn 3
 |
| Lots of explosions! |
Outcasts had to push harder if they wanted to survive that tough situations. Fortunately, they had the tools to do so. Depleted squadrons of the cavalry were still dangerous and they didn't hesitate to attack. Reavers charge the scorpion and pinned it down for a while although they lost another rider. Dragon Princes charged their respective targets and while the lonely standard bearer inflicted significant damage it was his companions who had a more important task to accomplish. They spotted exposed flank of the units where the Hierophant was hiding. They hit fast, they hit hard and more than half of a unit crumbled. Now, would they be able to hack it to pieces fast enough before the reinforces would come?
In the meantime Bob the Battle Standard Bearer exploited another mistake his undead foe made. He charged at the exposed flank of the Stalkers, tore through them like hot knife and impacted into a flank of another regiment, freshly emerged Necropolis Knights.
One of the great eagles tried to aid Sisters but poisonous attacks of the vicious undead swarms were too much for him and Sisters could not hold and broke only to be run down in the pursuit.
Larry used his potent magic but anger made him careless. He drew too much of the energy, it was unstoppable balefire that evaporated Prince Apophas in an instant. However, as he exploded the feedback also resulted in another disaster. Many Archers fell and their surviving companions thought it was better to take away Larry to safety despite his vocal protests! (Edit: I made a huge mistake here. I thought charging Bob has them in range still but I didn't measure and when the explosions happened I failed panic check and was just above 18" for the re-roll!)
Magic Phase Details:
Winds of Magic: 3,5 --> 8:5 (no channels attempts)
Burning Gaze at Prince Apophas: 6,6 --> 2d6 (due to lore attribute against undead) = 11, 4+ to wound --> 6w; his explosion kills 3 archers; Miscast result = 1,4 --> Loremaster wounded but saves on ward 6+ --> 7 more archers die --> failed panic check
Cursed Kings - Turn 4
 |
| Few Elves that survive try to fight back |
With many fights around the battle field the balance seemed to swing towards one and then to the other side. On one hand Elves defeated their enemies in close combat (although Reavers were still destroyed by Tomb Scorpion) and were very close to get the main prize, the Hierophant now. On the other Undead were deadly with their ranged attacks, in particular Caskets reminded about their presence by destroying entire regiment of White Lions!
Larry and his few companions lost some more warriors to asp arrows and they were now interested only in trying to find a shelter and simply surviving the battle.
Magic Phase Details:
Winds of Magic: 1,5 --> 9:4 (3 dice from casket)
Dessication at Dragon Princes (DP1): 1,5,6 + 4 = 16, dispelled on the roll of 1,3,4,6 + 2 = 16 (Edit: According to my chat copy I thought I had only 4 dispel dice, I would use 5th dice for this attempt for sure)
Left Casket to White Lions: 4,5,6 = 15 --> 4,5,5 - Ld8 = 6 wounds
Right Casket to White Lions: 2,5 = 7 --> 4,6,6 - Ld8 = 8 wounds, dead unit
Cursed Blades at Archers (A1): 2,2,3 + 4 = 11 (with the use of a power stone) --> no dispel attempt, 2 models resurrected
Shooting Phase Details:
Horse Archers (HA2) at Archers (A2): 5+ to hit --> 1 hit, 4+ to wound --> no wounds
Archers (SA2) at Archers (A2): 5+ to hit --> 5 hits, 1 allocated to Larry (saved) --> 2 wounds
Catapult at Eagle Claw: missed the target
Outcasts - Turn 4
 |
| Hierophant is destroyed! |
Knowing that if they get the Hierophant then there is a chance to survive the battle, Elves pushed for one more effort. Bob the Battle Standard Bearer destroyed last Knights and was scanning the field. On far East single Dragon Prince emerged victorious from the fight against Skeleton Archers. Remaining Swordmasters crushed the annoying but dangerous Swarms.
But in the most important fight, two Elven knights finished off the Hierophant and the magic that bind the walking skeletons weakened. As a result one Tomb Scorpion, Horse Archers and Catapult crumbled to dust. That relieved some pressure from the Outcasts but the battle was far from over!
Cursed Kings - Turn 5
 |
| Leaderless the army of undead slowly crumbles to dust |
Without the Hierophat to lead them the undead forces were not as vigorous and some of the skeleton warriors started to crumble. But the fight continued and one regiment of Archers attacked Dragon Princes. Exhausted Knights moved away to avoid the combat.
One of the Casket of Souls was still stopped but the other one released its cargo and remaining Swordmasters were claimed by the souls of the dead.
Outcasts - Turn 5
 |
| Very few warriors remain |
Larry and his few companions keep fleeing, they almost managed to reach the pyramid and while they are not yet completely safe at least they will not be attacked anymore.
Bob the Battle Standard Bearer spurred his mount and flew towards Dragon Princes but he was too late. Elven Knights were so battered they had to withdraw immediately to avoid destruction. Their lone companion in a heroic charge finally demolished the cursed Casket that claimed so many Elven lives but the resulting detonation killed brave Knight as well.
The archers tried to finish off the other Casket of Souls that suffered some damage due to weakening of the bond between realms of the dead and the living but could not make it.
Cursed Kings - Turn 6
 |
| Last strike by Cursed Kings |
More units crumbled and last Casket fell apart too. Without any magic and no chance for combat, Skeleton Archers released the last arrows and got the remaining crew member of the Eagle Claw bolt thrower.
The final word belonged to Elves however.
Outcasts - Turn 6
 |
| Last combat |
Larry the Loremaster climbed through the ruins and almost fell if not for a helping hand of his companion. They were exhausted, wounded and barely alive but made it to the safety and could wait for the rescue teams now.
Bob led the last attack all by himself and stormed furiously into the remnants of the Skeleton Archers. He and his griffon left no foe to fight any further.
In the meantime, Archers marched to shoot at a Tomb Scorpion. It was clear that the beast is brely animated and a single arrow would end its artificial live but the target was not easy to hit and Archers didn't deliver the final blow.
Although both armies were almost utterly destroyed, Elves carried the day as their leaders were still among them!
Summary
 |
| Turn by turn animation summary |
After-battle thoughts
First of all I would like to thank Loriel for a great game! He is a great person and I highly recommend that you go and ask him for a game. The sportsmanship of your opponent is the most crucial factor in determining how much fun you get from it and Loriel is an example to follow!
I also hope that this game showed that you should never underestimate Tomb Kings. I absolutely love the army Loriel brought to the game as in my opinion it emphasizes the nature of the skeleton warriors of the Desert. In particular the huge amount of regiments that were entombed beneath the sands.
This time I go an upper hand but I am sure you could see many moments in that game were things could go much better for Loriel and he was definitely on a good path to the victory. As always, tiny details can change the course of battle! Here are the situations I think had a significant impact on our game:
1. Opening the route to the hierophant - even if didn't bring much destruction to TK army on its own it definitely helped. First of all, with the constant threat of Caskets I had a tough choice, allow them to unleash their deadly cargo or allow the TK general to move his firebase into range and resurrect fallen troops. Both situations where undesirable because both meant I was losing warriors.
Getting the hierophant and the bonus for the general was still a significant amount of points. In addition, when the crumbling occurred, Loriel lost one Casket and remaining catapult, further limiting his ability to inflict damage at the distance. It is also important to note that killing hierophant took away horse archers who would otherwise attack fleeing Loremaster and earned Lorile 600+ points!
2. Exposing the flank of Satlkers and Knights - that simply crushed the plan Loriel had to surround and destroy my archers and I was happy to use BSB as mobile reserve for that particular purpose. I just wish I noticed I could charge with the Eagle against the Knights so that BSB could fight twice the same turn and hopefully finish the enemy earlier.
3. Not charging with Archers against Swarms attacking Eagle Claw - I considered that and acknowledging the full benefit of a hindsight I think it was a mistake not to do so. If I did I would be able to save Sisters and prevent Larry from fleeing even if he miscast anyway.
4. Not measuring the distance from charging BSB to other units - that was simply unacceptable. And if not for some luck I would have lost my general and another unit. Not to mention that the loremaster had no opportunity to redeem himself for quite miserable magic phases in the first half of the game.
I still wonder how could I deploy better, the main and always the same question I ask each time I play a game :)
I hope you enjoyed the report and we are both looking forward to reading your comments!
Cheers!
Hi Swordmaster (and Loriel, if he's reading these comments as well, which you kind of imply).
ReplyDeleteThank you for an epic fight and an excellent writeup. These kind of games bring the thrill of the battle alive and you almost feel sorry for all those brave warriors dying. Almost, but not quite!
One thing I find important in Warhammer is to have every army have a distinct style. Wood Elves are slippery archers, Orcs are hard to control, Skaven need numbers for courage. &c. It's something I thought the later edition army books tended to disappoint a bit in, as it often felt like they tried to give every army a bit of everything. Ambushing dwarfs, really?
Anyways, the point I'm trying to make is that Tomb Kings are distinct because of their desert sand sleeping armies. A big bravo to your opponent then for coming to play with an army that really captured the feeling of the arid, dusty land shifting; and scorpions and swarms and long dead knights suddenly rising up to fight some fancy elven invader. It felt like a horror movie.
The battle itself certainly showed that Bob and his new pet pack a punch. I'm still not convinced yet, but it certainly was a more active game for him than the previous ones. On the other hand, it's deceptive. Sure, he single handedly defeated three units, but that's taking up a role as a combat model. I feel that a BsB should be sticking to his BsB role.
The following points are admittedly completely one-sided thinking and disregard everything Bob did well for you in the battle, but it's just for the sake of argument:
First, You had to protect Bob from three turns of shooting. Deployment had him behind the hill, I think in the second turn your opponent should have focused fire on him! Unless that was impossible somehow? And then after that, he went back behind the hill as a planned countercharger. All of these manoeuvres had an impact on his activity as an LD reroll bubble, which is still his main role.
Second, you said yourself how using him as a combat unit didn't synergise well with his BsB role. By overrunning, he went outside of range for your loremaster's unit. I don't think you really should have measured that one beforehand, as you shouldn't play expecting the miscast to happen and expecting the following explosion to force a panic check. That kind of reasoning would see you never take a risk at all. It feels like (unless if you were six dicing it) the panic check was quite unlucky and statistically unlikely. Still, that's why you keep a BsB in the middle. Not because you know you'll need him in one spot, but because you know that unlikely things can still happen anywhere and WH is just such a game.
Third, to me, there's an alternative. I wrote a few tactica for wood elf armies and one of the points I always make is that every unit has a tactical role and should stick to that. If you try to do two things with a single unit, you'll always compromise and end up doing neither one very well. Moreover, you inevitably spend more points. Of course, there's something to be said about flexibility but you can only do so much. A healthy balance is what we're looking for!
I absolutely like the idea of a noble on a griffon. But here's what I'd do:
Put Bob on foot and give him only basic equipment. Heavy armour (maybe Dragon), Enchanted Shield, Luckstone, Golden Crown. These kind of things. Maybe a potion of strength or a great weapon or something. Even a potion of foolhardiness or the Shrieking Blade or Biting Blade are decent choices. Something like that.
Get another noble on a griffon.
Skimp a bit here and there to get the necessary points. Obsidian Trinket instead of Amulet. Talisman of Endurance instead of Preservation. 14 Archers in each regiment. That's 60 points already. Maybe the champions for the reavers? A sister less?
Anyways, I'd like to repeat just one more time that I'm just offering you ideas and opinions. Judging on his own merit, Bob certainly proved his worth!
Hi Bonsai,
DeleteI am sure Loriel is aware of my blog but it seems I didn't edit that report properly when re-posting :) I made it for Ulthuan first where I usually post deployment and armies first. Then I wait for predictions about the outcome of the battle (sometimes I even get some!) and continue with the rest of the report later. In this case we agreed with Loriel to post 1 turn per day and he added his comments on the situation. Also about things he planned to achieve or what his decision making was influenced by.
After the report was finished I re-posted it here but it seems I forgot to remove the part that was not relevant anymore. Sorry for little confusion but I am going to make sure Loriel reads your comments too!
I totally agree with your description of that unique spirit of Tomb Kings army. It was indeed very cinematic when all these regiments started emerging from beneath the sands. And as you could see they were very close to annihilate my troops too! I absolutely love that type of an army and if not for other circumstances I would love to try it myself!
To continue with the BSB discussion.
One of the forum members on Ulthuan offered some good feedback on the way Griffon mounted BSB can work and he pointed out that the roles this multi-tasking character has are changing throughout the game. The beginning or even first half is all about keeping the army together. Hence his flag waving is the priority here and 18" adds to that nicely. In the second half and end game you switch to his combat skills, as he is fast enough to either aid some troops or hunt down stragglers or even attack some regiments on his own.
I really like that approach as it keeps your eyes open for the opportunities that arise during the game. It is something I try to achieve with the few heroes in my army. Since they are already quite an investment in points, having them to do one thing only seems to me like if I didn't use their potential.
And this is where I don't necessarily agree with you but I know it is more due to point of view and choosing between two good options and picking the one that suits your personal style.
I absolutely love the flexibility. I don't feel I am not using the character or unit to the full potential if, for example, he can fight and shoot but in particular game he only fights. What that allows me to do is to pick the role better suited to particular game. Or even part of the game.
I greatly appreciate the specialists. Swordmasters are great example here. However, having the army that is elite by nature means I will have fewer bodies on the table than some others. One way to mitigate that disadvantage is by having more units. Another, is by having some that can perform different roles and add flexibility.
1/2
I was in general happy how I used him in this game (with the exception of being too far from Larry for panic check) because I think it was a good example of him doing what he had to do at particular time. First, he we was there to cover the majority of the army and position himself for potential counter attacks. That helped to mitigate the advantage EBTS units have. Then, when he was not needed as BSB anymore he was fast enough to catch yet another unit he could defeat all by his own (something eagle rider would not be able to do). So I don't think his Ld bubble was compromised with my moves.
DeleteThe suggestions you made about splitting BSB and noble on Griffon and using them as two individuals are great and have merits too. However, this is simply different philosophy and I try to look at both approaches as good but bringing different things to the table and affecting the army differently.
Also, in order to accommodate another character I would have to get rid of the unit or two from special and/or rare sections. I cannot do so by decreasing the number of core warriors as they are already at the minimum I have to meet with this type of troops.
I always appreciate the feedback. I absolutely don't mind hearing what people thing might be a good addition to the army. After all, army list building and tweaking is one of the most favorite activity for many players! However, in my attempt to learn how I could use BSB Griffon Rider to the fullest of his potential I would also love to discuss how he could have been used better in my games. I have used him only 4-5 times so far so naturally I can be either too shy with him or misuse him in several ways.
This approach has served me very well so far. I had a new element in the army and used if for some time against different opponents and only then I could evaluate its contribution to the army. Even then I could easily show that if that particular element under performed it was always due to my mistakes and not due to the element itself. :)
2/2
Well my dear friend, I feel that your argument of splitting his use turnwise makes a lot of sense.
DeleteMost of the BsB work typically gets done in the first three to four turns. After that, everything is too fragmented. Most of the deciding combats where you'd want to risk throwing a griffon hero would typically be in turns four to six.
So yes, I think in that regard your approach may actually be very clever. It's quite similar to how I play Treemen Ancients. First three turns are mostly spent as casters, healing back the wounds they get from shooting (if necessary) and providing magic support. Then he typically goes more into an anvil role. Not exactly the same, but the same philosophy at least.
Obviously, the alternatives are all decent choices on their own. But I do feel now that the way you're fielding him could work really well. In the next games, I'll try to focus my opinions, such as they are, more on how you play than with what you play =p
I am glad you see the merit in my approach and hopefully I will be able to make it happen on the battle field :)
DeleteI am always happy to receive comments and feedback, even if is about what I play with :P
Oh, one more thing. I find it amazing how much effort you put in these reports. they're much better structured than my own! So much so, in fact, that I think sometimes it can be overkill? I specifically mean the dice rolls. I'm only speaking for myself, but I like the maps and the narrative and if the dice really had their impact (two dicing a spell and getting box cars and such) then you tend to include them in the narrative.
ReplyDeleteIt doesn't bother me that you include a paragraph with all the dice rolls, but I worry a bit that it takes a lot of typing and copying and verifying time for you. And that most readers (extrapolating from my sample population of one) will just quickly skim over it, if at all.
Anyways, to resume, a fantastic report and a big enormous thank you to the two of you. Capable generals and a battle that could have gone either way. And almost no one left standing in the end. Everything we like!
It is quite intriguing that you provided the comment about the issue I was thinking about myself :) Indeed, adding these details is really, rally time consuming. At the beginning I didn't mind because I knew there are some particular members who would be interested in that. And I also don't mind people skipping it for the narrative. That is why I put them in kind of separate parts for the turn description.
DeleteHowever, I came to the conclusion that not all the details are really necessary. I think for the future reports I will keep magic phase, as it is easier to follow and it is also interesting to see how many dice were used and what spells were attempted. In the past people asked my about the magic phase as it looked like not much was happening. While when I provided the details they could see that there were many spells cast but often they were dispelled or didn't have some spectacular effect that was worthy mentioning in the narrative.
I am glad I tried that because it is always important for me to push myself and try new things. And I am enormously grateful for that type of feedback as well. As with many things, some sort of balance is also required. I don't want to spend too much time preparing the reports. That means longer for the readers to wait and less time for other hobby activities, playing games included!
Many thanks for your comments then, from both of us. I will pass the news to Loriel as promised, I am sure he will be every happy to read them and who knows, maybe even join the discussion here too!
Cheers!
.... apparently my comment was somehow vanished...
ReplyDeleteoh well, this is Loriel speaking ! ;) . Thanks for your kind words Bonsai. I made multiple replies to ulthuan topic incase you want to see my thoughs and ideas during the game. replies naturally reprsents the turn tide (as the battle was published about 1 turn per day rate)
http://www.ulthuan.net/forum/viewtopic.php?f=51&t=69175#p905039
for the actual report technics, I think magic phase is certainly something that more people should record with better details. As it is the rare places (apart from movement) where other people can judge your decision. Saying something like magic didn't have no effect is too vague to my taste. was it due low WoM? Did you roll horribly on casting results? did you opponent use scrolls, dispelled really well? did you cast insignificant spells.
Doing records on shooting and cc on dice roll scale is prolly overkill, but that also allows objectively see players "luck". every body thinks they have bad luck, but I don't personally believe in such matter. During this game I was certainly annointed by lady dices, or perhaps Swordmaster was cursed, both in feeling and by numbers. But sadly it didn't help me to win the battle.
Thanks Loriel. Artistically, I still think you won this battle, so don't feel too bad ;-)
DeleteI think you make a very good case about the magic phases in the battle reports. I typically tend to write them up like that as well. "The Magic Phase didn't really achieve anything, I'm sure some spells were tried, but I don't know, they didn't cause wounds or maybe got dispelled? I don't remember".
That's actually very boring to read. What we like about Warhammer is the assessment of risks and outcomes. If you have two dice left, you have to think if you're going for that easy 8+ casting value spell with your lvl 4 or if you're taking the risk to get off the better 10+ one. These kind of decisions offer an insight into the thinking process of the player, which I at least always appreciate.
So thanks for handing me that insight!
I also think I should maybe make an account on ulthuan.net, seems like I'm missing out on a lot of the fun! Is it going strong still? The Wood Elves site (which has never been as successful) is a bit on the low side for the moment.
Thanks for comments, Loriel! You are very kind on Ulthuan so I am glad you are here too and your feedback is always very insightful. In this particular game it was even better because you were my opponent! It is usually very hard to get any feedback from the players I played against, so I am very grateful for all your posts!
DeleteThat's correct, sometimes these details allow to see how "lucky" certain outcome was. Some people love math hammer but in my opinion they try to look at average and often forget about error margin. Provided, that these calculations are correct in the first place, they also tend to treat average as something that is simply going to happen.
In addition, these details may show that if somebody positioned his regiments better that would mean further limitation in success ratio of the dice rolls. I hope that will show that in certain situations it is still a risk to let your opponent roll dice when with little correction you could prevent that from happening at all.
I guess this is that risk assessment Bonsai talks about :)
I forgot to address the comment about Ulthuan. It is not as active as it used to be in my opinion. However, with new sub-forums, also the one about other games (I am going to try Kings of War!) it may recover still.
DeleteThere still should be quite enough nice topics to read though.
Wow that was a bloody battle - you and your opponent both played a good game. :)
ReplyDeleteI think that this was one of my favorite reports - those ambushing units really required a shift in priorities, and it was very interesting to watch how you reacted. In particular, it was very interesting to see how the Battle Standard Bearer and his griffon were able to react - I'll admit that I had not considered the versatility of that setup.
...Of course I don't own a Griffon, so maybe that's why. :)
Thanks a lot Brent! That was definitely a great game against fantastic opponent! And yes, the army is amazing, the only thing I wish is we could have played it in real life so I could showcase the models :)
DeleteMaybe one day I will!
Cheers!