
Greetings!
I had a chance to play against Mr. Galharen and his Winged Hussar Host recently over UB. Galharen is well known on Ulthuan for his unparalleled skills with painting brushes but he also is a skillful general as he has demonstrated recently by placing 3rd at one of the biggest events in Poland. Here is a link to his army blog:
The Winged Hussar Host - Army Blog
As he wanted to have a game under ETC rules we will be using these during our game. He will most likely use his trustworthy army list featuring Star Dragon and Silver Helm bus among others.
The Winged Hussar Host - Army List
Prince, Star Dragon, General; Heavy Armour; Lion Cloak; Shield, Dragonhelm, Talisman of Preservation, The Other Trickster's Shard, Sword of Might - 635
Prince, barded steed, Heavy Armour, Giant Blade, Enchanted Shield, Dawnstone - 263
Archmage, steed, level 4, Dispel Scroll, Ironcurse Icon, Obsidian Lodestone - 315 - Lore of High Magic
BSB, barded steed, Lance; Dragon Armour; Battle Standard; Ithilmar Barding, Charmed Shield, Luckstone - 136
17 Silver Helms, Lance; Heavy Armour; Shield; Standard; Musician; Champion, Ithilmar Barding - 421
5 Ellyrian Reavers, Bow (swap); Light Armour - 85
5 Ellyrian Reavers, Bow (swap); Light Armour; Standard - 95
Eagle Claw Bolt Thrower - 70
Eagle Claw Bolt Thrower - 70
Eagle Claw Bolt Thrower - 70
Frostheart Phoenix - 240
Total Army Cost: 2400
Super fast and hard hitting army, considered one of the strongest HE forces under ETC rules. I will try to provide some run down of the army choices from the point of view of my army but I am sure many forum members are familiar with this or very similar army lists.
I intend to put up a proper fight with the following force:
Outcasts - Army List
Larry the Loremaster, Earthing Rod, Armor of Fortune, Obsidian Amulet - 320
Bob the Battle Standard Bearer, Griffon (Swiftsense, Swooping Strike), Dragon Armor, Lance, Talisman of Preservation, Charmed Shield - 356
16 Archers, Full Command - 190
15 Archers, Full Command - 180
5 Ellyrian Reavers, Champion, Musician, Bows, Spears - 115
5 Ellyrian Reavers, Champion, Musician, Bows, Spears - 115
5 Dragon Princes, Musician - 155
5 Dragon Princes, Musician - 155
10 Swordmasters, Bladelord, Musician - 150
10 Swordmasters, Bladelord, Musician - 150
10 Lions, Banner, Musician - 150
Eagle Claw Bolt Thrower - 70
Eagle Claw Bolt Thrower - 70
Great Eagle - 50
Great Eagle - 50
9 Sisters - 126
Army Total: 2397
Which is my Work in Progress army list I would like to compete with for upcoming Hobby Masters.
Here is what I prepared for myself as The Winged Hussar Host overview before the game to post it after we play it.
Prince on Star Dragon - The most dangerous single model on the board. It will smash any unit I have without breaking a sweat. I can only hope to delay it with champions in a challenge and being steadfast. I expect the dragon to charge turn 2 as with its range of movement and high magic it can get almost everywhere. If I can make it attack turn 3 then it will be great already. Next I need to make sure that the dragon fights alone so it is very important I delay and divert Silver Helms. It will be more difficult with Frostheart though.
Another important thing when fighting such monstrosities is to be careful with overrun options and make sure that if that happens it does not allow the dragon to get into fresh enemy. In any case I need to assume that I will lose 3-4 units to the dragon itself if it gets to combat unharmed.
However, I believe I have some tools to wound it and either make it shy to attack thus losing fewer units or making it more risky as all the attacks I might have left can still have a chance to wound it.
Magic can be an answer here. Main weapon, boosted Searing Doom has a potential of wounding the dragon seriously. I also made a mental note to remember I can boost Burning Gaze for S6 version. While both spells are flaming and the prince would laugh at them it was no less important to kill the dragon. It might not give me points but at least it will seriously limit the options for the prince and decrease the damage potential for my opponent to deal. Bolt throwers are natural anti-aircraft weapon and I intended to use them here given the opportunity. Unlike with magic, single bolts have better chance of killing the prince as they would wound on 2+ and he would get only 4++ ward save while Dragon is wounded on 5+ and has 7 wounds. However, a combination of both is a threat and I wanted to use it to my advantage.
Last but not least, if the dragon is seriously wounded I could risk a charge of BSB on Griffon. With ASF and S6 from both I had a chance to finish the wyrm before it would strike. If I could do that with the assistance of Swordmasters, Lions or Dragon Princes then even batter. It may look like a folly but as I said, it is a solution to kill the seriously wounded dragon before it could strike. While S5 still wound on 6+ only it also reduces the armor save to 5+ which is important.
Cavalry Prince - reminds me about Mr. Seredain with his Gian Blade and 1+ rerollable armor save! Real killer too and he might not have a match in close combat among my army. Even Bob the BSB and his pet griffon would find it hard to by pass 4+ re-rollable save. But he would stay in the SH bus most likely as it makes attacking it very risky (even from the rear). I expected he might be sent on hunting missions alone when the circumstances were right but unless my bolt throwers are gone and Larry eliminated or contained, he should be much safer with the knights, also because he would benefit from MR(3) against sniping spells.
Archmage - the only wizard of the army but very important figure for the force. First of all, at least in my opinion, he is here to protect. Dispel scroll and talisman granting MR(3) are the best tools after Banner of the World Dragon which Glaharen could not take under ETC draft with this particular list. Ironcurse Icon is a nice addition against War Machines especially when you consider the fact how it can be quickly improved with Shield of Saphery attribute. Single spell cast gives them 5++ already and that is not too bad at all. It gets even better with combination of MR(3) so as you can see even deadly Searing Doom can be efficiently neglected when Archmage is with Silver Helms. And he will stay with them all the time, I am sure, so in order to get him I need to get the unit. Which would be very hard.
I am very fond of High Magic and I admire how wonderfully it adds to the potential of Galharen's army. I think there are two crucial spells for him, Walk Between Worlds and Aphoteosis. First one makes his army even faster and can put his units or monsters in a great position to attack turn 2. Second one will be amazing in healing these monsters. Wounding Star Dragon is difficult but when it is healed in the process it can be almost impossible. The rest of the spells have great utility too and I just wonder how Galharen is going to use it. I can expect SH bus would get at least 6++/5++ wards every turn depending on the strength of winds of magic and my priority will be one of these spells, even at the cost of losing units to Soul Quench for example.
BSB - seems a little under equipped but I assume it is due to lack of points. His role is to wave the flag and stay alive and with fighting prince in the front rank he should be safe. Of course 3S6 attacks on a charge help too! Oh, and with him in the first rank Archmage can stay safe in the second one which is very important as well.
Silver Helms - main unit of the army. Bunker for 3 out of 4 characters, 20 models total, very hard to get points from and without bonuses for banners it is worth 1100+ points! It has great hitting potential, even SH count with their S5 attack and re-rolls, ranks to break steadfast. With the aid of Star Dragon and/or Phoenix they can smash tough opponents too. There are not such units in my army so whatever SH attack dies.
Out of many threats Glaharen's army has Silver Helms is the one I can delay in traditional way. While his fliers don't care, Silver Helms can be diverted and slowed down so it will be very important for me to keep the eagles and reavers nearby and ready. That is my chance too because dividing the efforts of my opponent is always a very important part of the plan.
In terms of defeating that unit it would be a very hard thing to do. There 20 models to deal with, 20+ wounds and those from characters are harder to get. The unit is well protected from magic and regular shooting too, with the ability to increase its protection due to ward saves. I would need to attack it from all sides with overwhelming force to be able to grind it down and even then it would not be possible with any of the flying monsters around. So unless I have them contained somehow the only charges I was preparing to make where those to actually slow them down where I could win the turn of combat and hold them in place for one turn.
Ellyrian Reavers - I am very fond of the fast cavalry and I think Glaharen made a very good choice with including two units as a support. They would make my plan much more difficult as they can interfere with my own diverters and with bows they can hunt down the eagles too. They are one of the priorities to shoot at so that I could move my own units more efficiently.
Bolt Throwers - Very dangerous to any unit I have. I will need to use the terrain to get protection. The problem with them is that I have tools to hunt them down but the return of points delegated to the task will be poor. At the same time I will need the same units to deal with the fast elements of the army. So it was a very hard decision for me to make what is the real priority. I decided I will have to make it when I see the terrain and how I can limit their efficiency with the deployment.
Frostheart - one of the big 3, along Star Dragon and Silver Helm bus it is a very versatile support monster capable of destroying my small units alone. It has the advantage over Star Dragon as it cannot be challenged. Against some of the big regiments out there it is very helpful with its Frost Aura but against my small units it will probably be less relevant. Hence, I expect it to go for individual missions.
I was looking for a way to destroy it and I reminded myself that long time ago I had a similar dilemma with a Warsphinx. Frosty is of course much more dangerous because it flies and it is better protected but I decided the way to deal with it is the same. Throw as many sticks at it as possible and the sheer number of them should grant me a few wounds. So if given the chance I intended to use any ranged attack at my disposal to focus on Frosty as out of big 3 it is still the most "easy" to kill.
To sum it up my plan was to use magic and shooting to deal the damage on Frosty, Reavers and Star Dragon to be able to have some chance in inevitable close combat where I expected to lose units but not without a fight and if these monsters where at least seriously wounded I could kill them in return. If I managed to slow down the bus and limit the damage from Bolt Throwers I think I had a chance to earn enough points to balance out any losses.
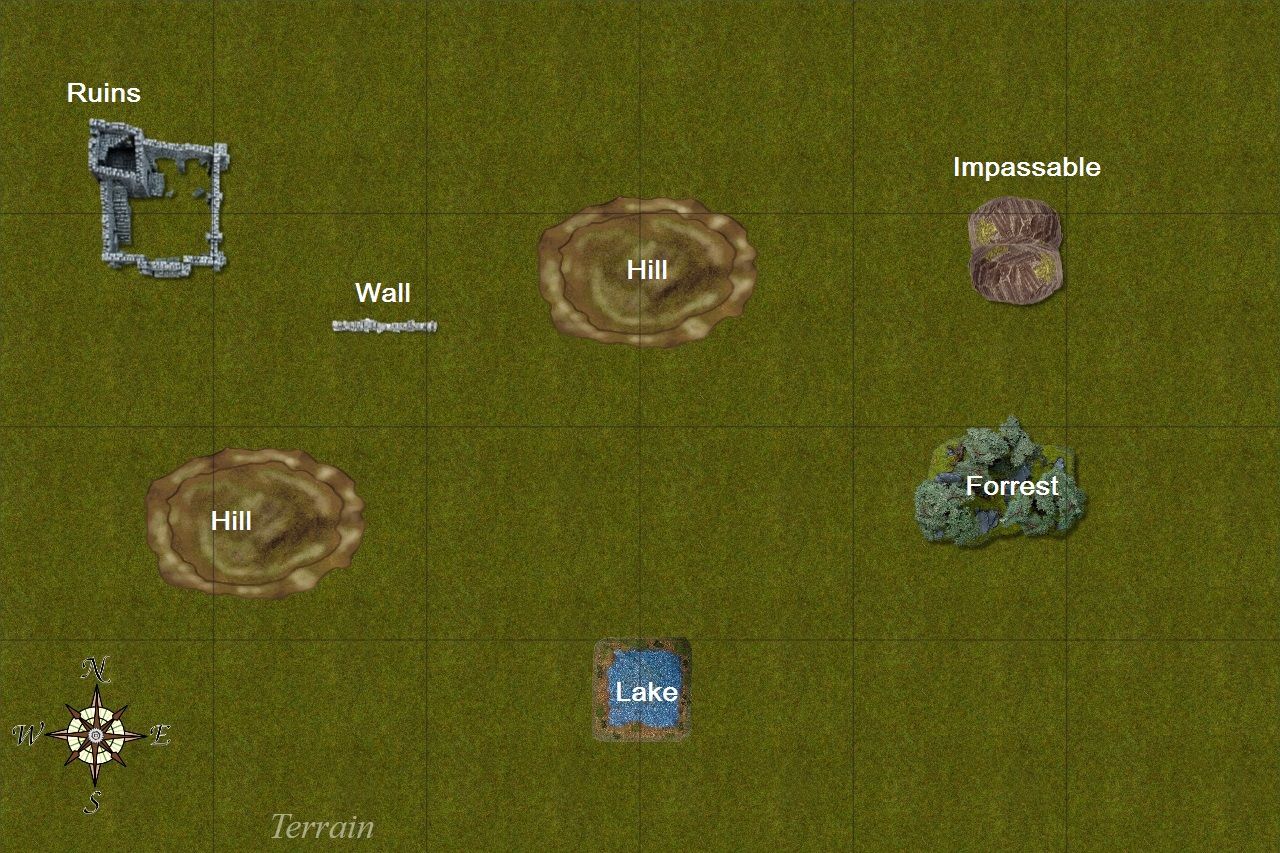
Terrain
 |
| Four Kniggits' Game |
Here are the rules for terrain under ETC format:
Hills - As per BRB description of an ordinary hill (p. 118 first 5 paragraphs, i.e. without the“Examples of hills” subsection) with following additional explanations :
- Line of Sight: Hills block Line of Sight.
Forests - As per BRB description of an ordinary forest (p. 119 first6 paragraphs, i.e. without “Mysterious Forests” subsection) with following additional explanations:
- Line of Sight: Forests are Interfering terrain providing Soft Cover for units, as described in BRB. For Line of Sight purposes Forests count as being of infinite height. This implies that units shooting trough forest will always suffer Soft Cover penalty, even if shooting from a hill or building.
Lake - As per BRB description of a Normal River (p. 120 first 5 paragraphs, i.e. without “Mysterious Rivers” subsection) with following additional explanations:
- Line of Sight: Lakes are non-interfering terrain features.
- Lakes are Water Features.
Obstacle: Wall - As per BRB description of an ordinary Wall (p. 123 with common rules for Obstacles,p.122) with following additional explanations:
- Walls definition of a unit “behind” is applied only to units actually defending the obstacle (i.e.aligned with it and touching it).
- Line of Sight: Obstacles are non-interfering terrain features.
Ruins - As per BRB description of an ordinary marshland (p.121 first 3 paragraphs, i.e. without “Examples of Marshland”
subsection) with following additional explanations:
- Ruins are NOT Water Features.
- Line of Sight: Ruins are non-interfering terrain features, providing Hard Cover for all units withmajority of their models in the feature.
Impassable
As the title says - infinite height, impassable terrain.
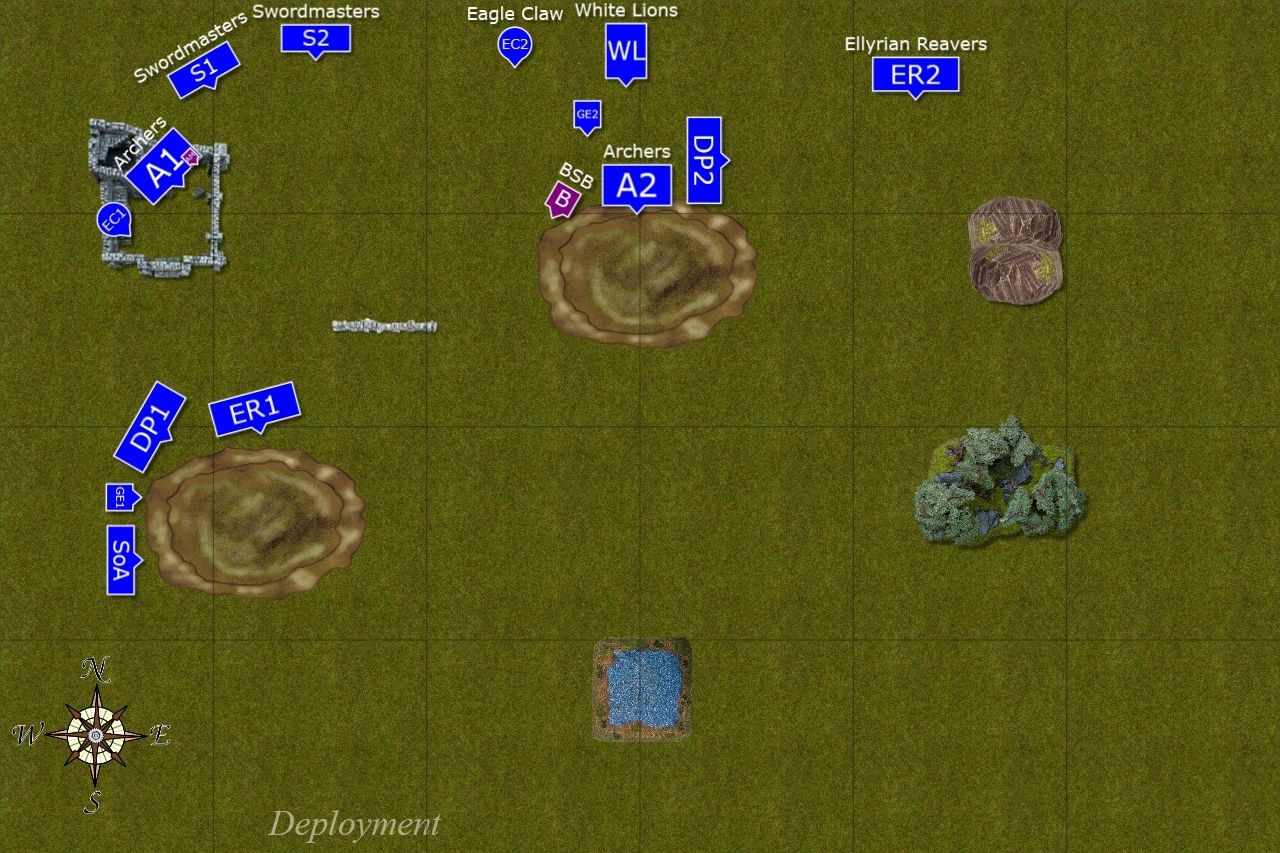
There is also a way to select the scenario under these rules. One player rolls a die and depending on the results player A chooses the scenario, player B does or it is simple Battle Line. Galharen was appointed to choose the scenario and he picked up Meeting Engagement. However, I won the roll off and had to pick the corner. After some deliberation I decided that North-West is the best option as it offers cover from Bolt Throwers even if it may limit the visibility of my own troops for the purpose of shooting and casting magic.
ETC has a modification to the rules of that scenario and there is no need to roll for each unit to see if it is going to be in reserves. I simply had to place my entire army first. Then I had the first turn unless Galharen rolled a 6 to steal the initiative.
Here is the sequence of my deployment and how Galhaner responded:
Deployment
Hills - As per BRB description of an ordinary hill (p. 118 first 5 paragraphs, i.e. without the“Examples of hills” subsection) with following additional explanations :
- Line of Sight: Hills block Line of Sight.
Forests - As per BRB description of an ordinary forest (p. 119 first6 paragraphs, i.e. without “Mysterious Forests” subsection) with following additional explanations:
- Line of Sight: Forests are Interfering terrain providing Soft Cover for units, as described in BRB. For Line of Sight purposes Forests count as being of infinite height. This implies that units shooting trough forest will always suffer Soft Cover penalty, even if shooting from a hill or building.
Lake - As per BRB description of a Normal River (p. 120 first 5 paragraphs, i.e. without “Mysterious Rivers” subsection) with following additional explanations:
- Line of Sight: Lakes are non-interfering terrain features.
- Lakes are Water Features.
Obstacle: Wall - As per BRB description of an ordinary Wall (p. 123 with common rules for Obstacles,p.122) with following additional explanations:
- Walls definition of a unit “behind” is applied only to units actually defending the obstacle (i.e.aligned with it and touching it).
- Line of Sight: Obstacles are non-interfering terrain features.
Ruins - As per BRB description of an ordinary marshland (p.121 first 3 paragraphs, i.e. without “Examples of Marshland”
subsection) with following additional explanations:
- Ruins are NOT Water Features.
- Line of Sight: Ruins are non-interfering terrain features, providing Hard Cover for all units withmajority of their models in the feature.
Impassable
As the title says - infinite height, impassable terrain.
There is also a way to select the scenario under these rules. One player rolls a die and depending on the results player A chooses the scenario, player B does or it is simple Battle Line. Galharen was appointed to choose the scenario and he picked up Meeting Engagement. However, I won the roll off and had to pick the corner. After some deliberation I decided that North-West is the best option as it offers cover from Bolt Throwers even if it may limit the visibility of my own troops for the purpose of shooting and casting magic.
ETC has a modification to the rules of that scenario and there is no need to roll for each unit to see if it is going to be in reserves. I simply had to place my entire army first. Then I had the first turn unless Galharen rolled a 6 to steal the initiative.
Here is the sequence of my deployment and how Galhaner responded:
Deployment
 |
| Outcasts |
 |
| The Winged Hussar Host |
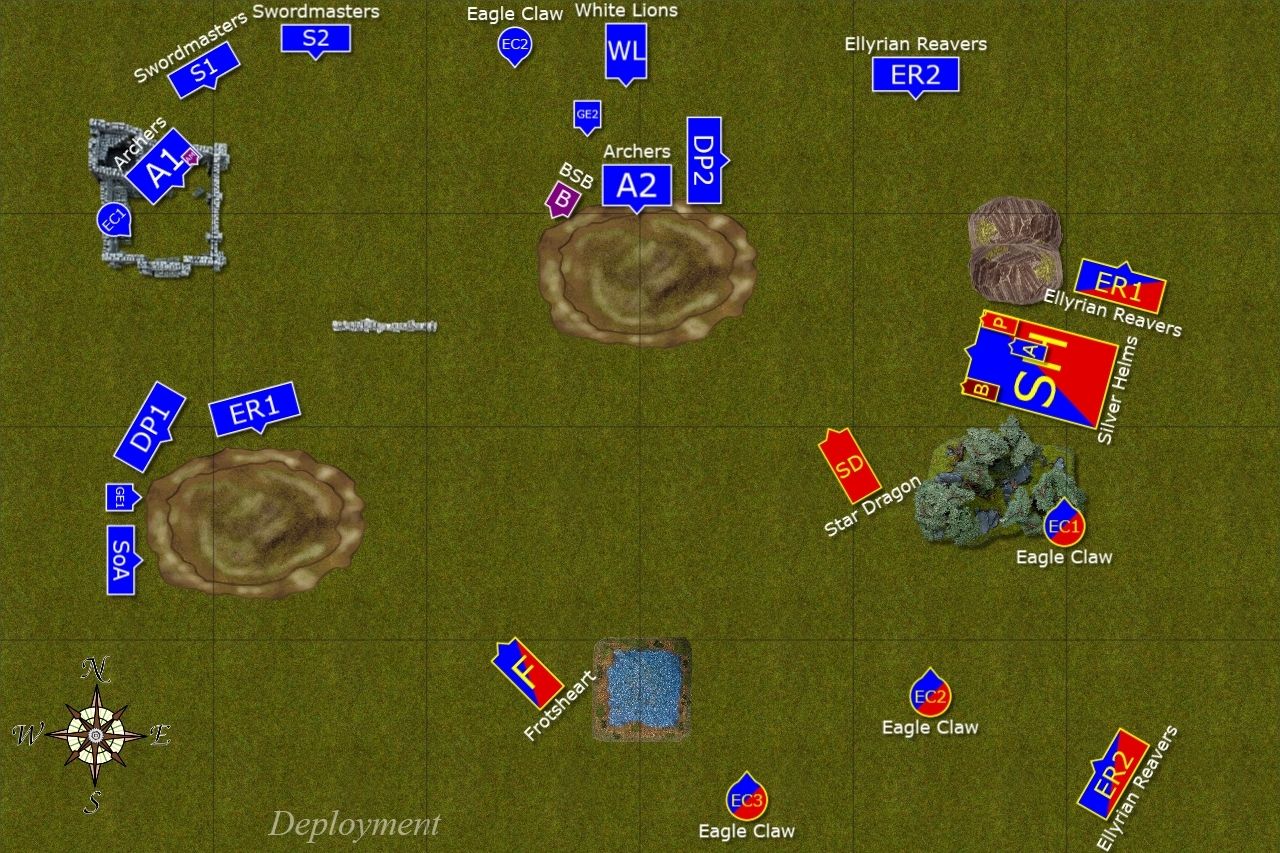
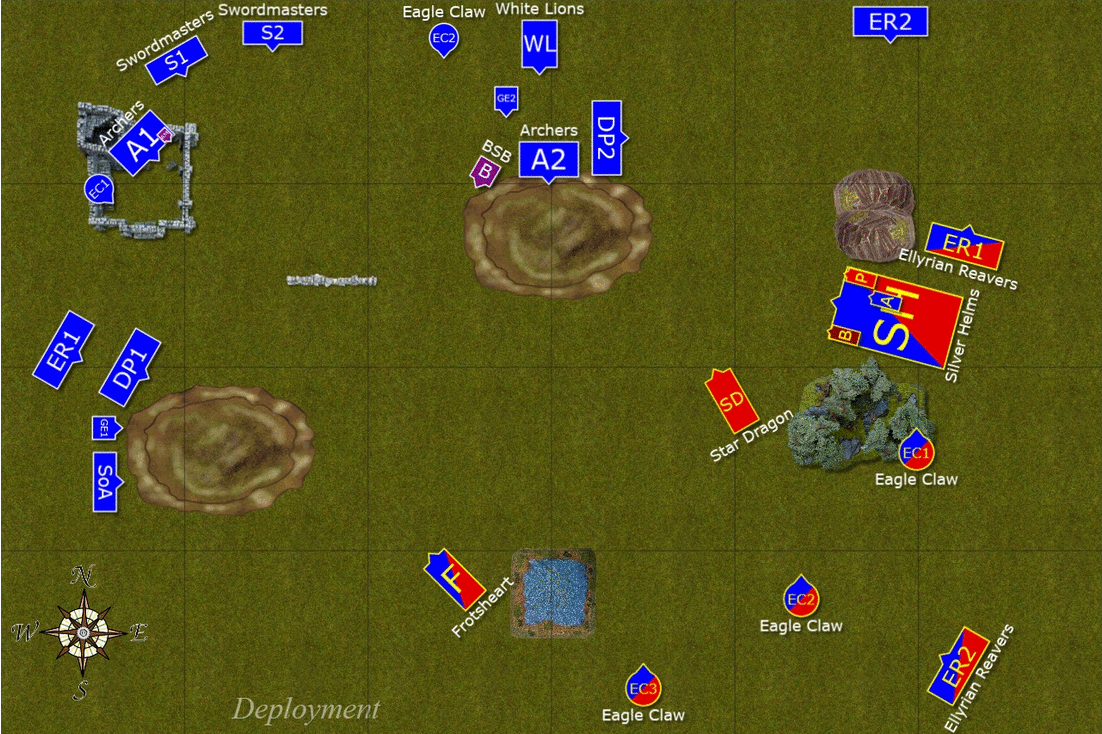
Although the result is no longer a surprise I still hope the deployment will prove interesting. I find that scenario quite a challenge, in particular when I had to deploy first. Usually I have the advantage of having more deployment drops so that I can use it and position my units where I want them the most.
Here, I had to guess where my opponent is going to deploy his army and plan accordingly. Having better odds of starting first can also be a trap as stealing the initiative does happen so I also wanted to take that into account. Galharen's army is very fast and with much more narrow deployment gap (only 12"!) I really had to be careful not to give him the chance for turn 1 charges.
At the same time I wanted to have that first turn count. That is why I deployed some of the shooters and cavalry behind the hills. Shooters would jump on it to target the units I wanted to shoot at while heavy cavalry would be able to cover some angles while remaining relatively safe from the bolt throwers.
Eagles and reavers were also nearby in case I would need to slow down some units quickly or if there was a need to move forward fast.
Despite the efforts I knew I was at a disadvantage as the distance between the armies is much smaller and Galharen would have all the knowledge of my deployment to counter it in any way he liked.
Galharen got the following spells for his Archmage: Soul Quench, Apotheosis, Walk Between Worlds, Tempest
He didn't steal the initiative, however, so I had the first turn:
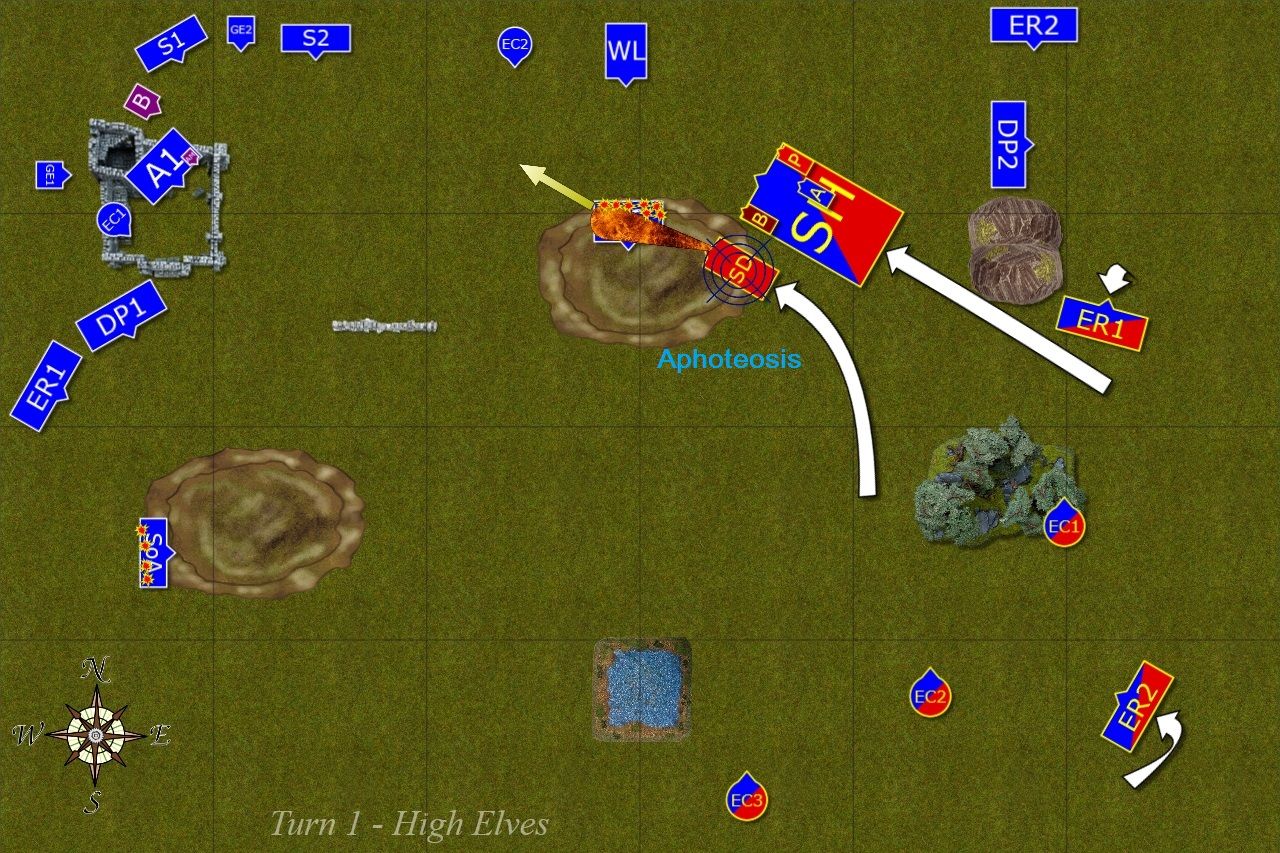
Outcasts - Turn 1
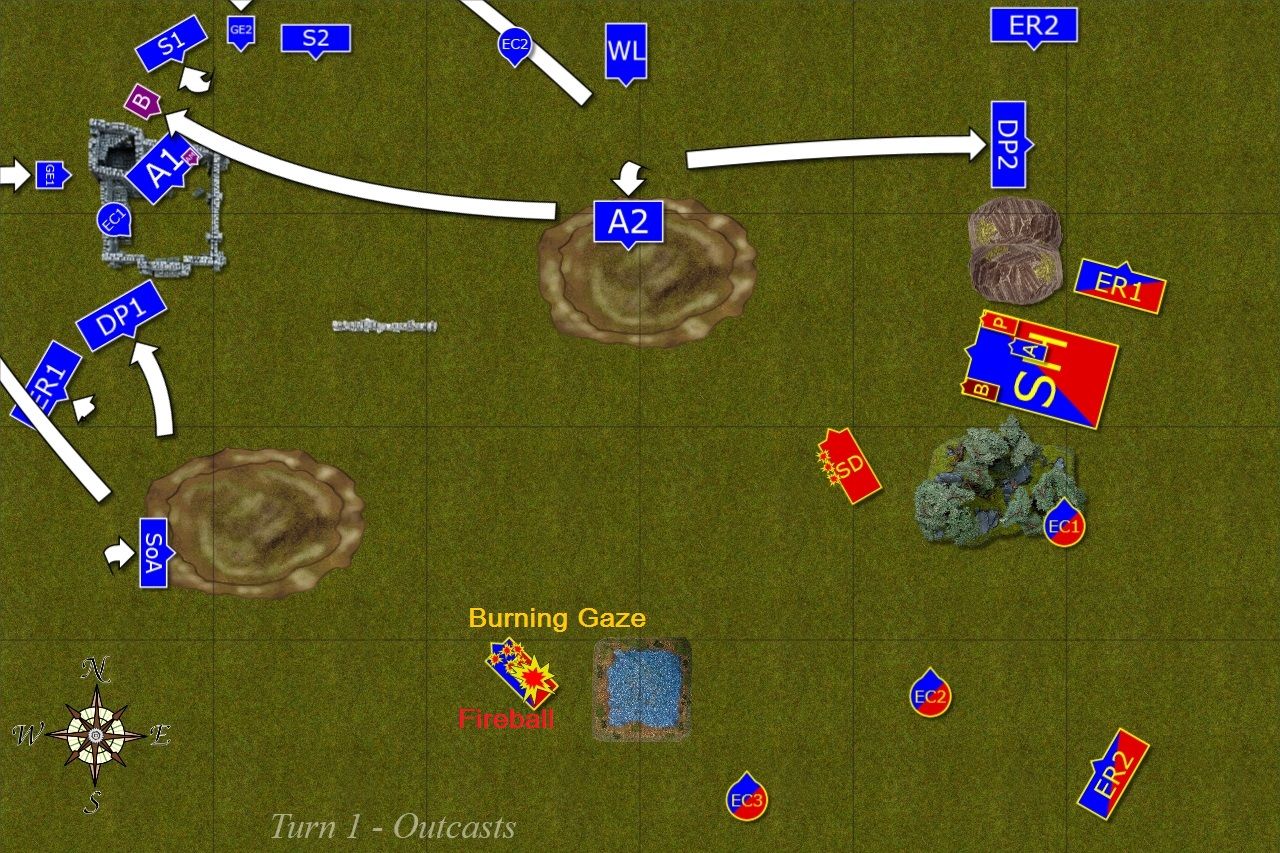 |
| Fighting Ice with Fire |
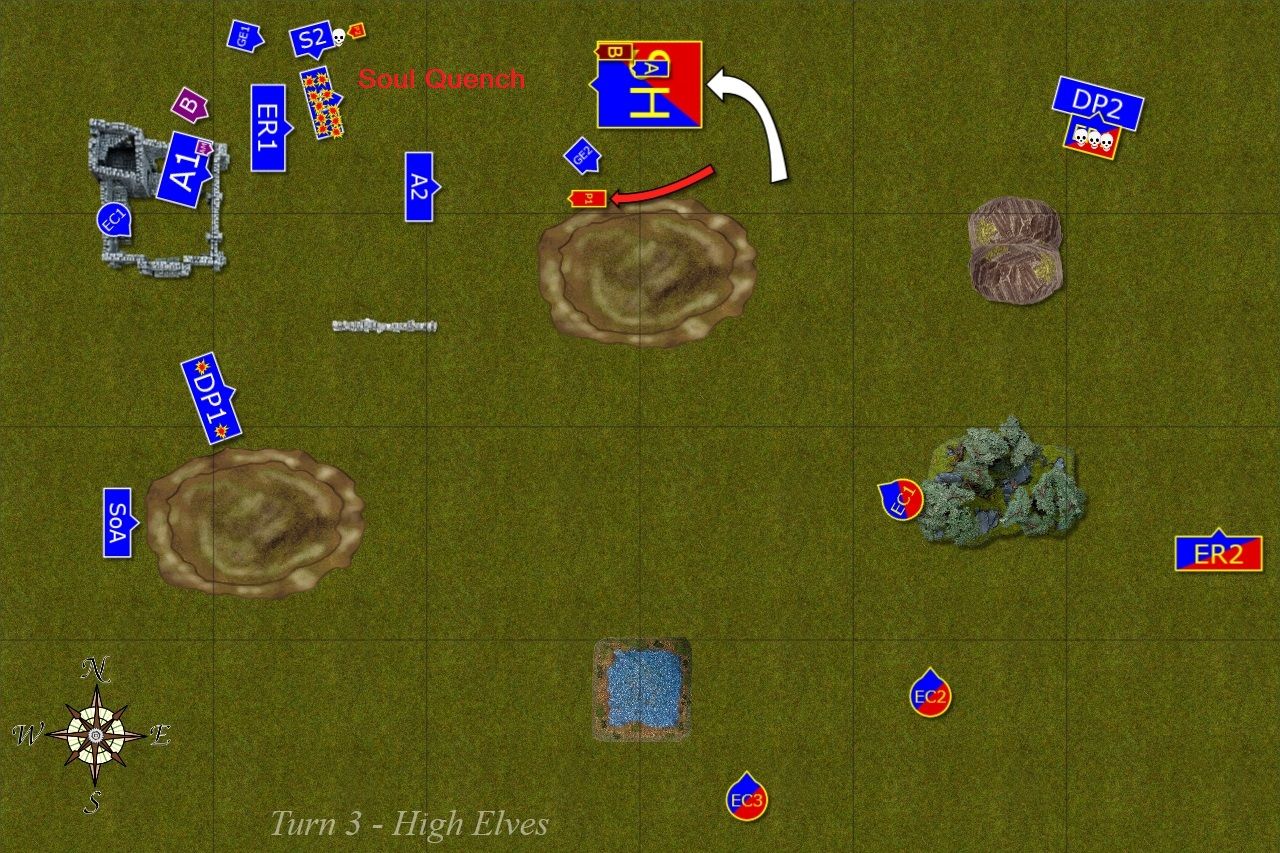
Outcasts remained in the defensive formation and withdrew some regiments for better positions for a potential counter attacks. Sisters and Archers moved a little forward to get into range of their chosen targets.
Larry the Loremaster drew from the winds of magic deeply and cast a fireball at Frostheart and wounded the Phoenix. Following Burning Gaze was unstoppable and resulted in another deep gash in the side of a frosty bird.
Sisters and Archers continued the barrage and Frostheart Phoenix finally shattered like a broken glass. Encouraged by the success of their companions, Eagle Claw crews aimed carefully. One of them shot at the Star Dragon itself and found a weak spot in between the scales, the roar of pain of a wounded beast was heard across entire battle field.
Magic Phase Details
Winds of Magic: 5,6 --> 11:7 (successful channel attempt for Galharen)
2d6 Fireball at Frostheart: cast on a roll 2,2,2,6 + 2 = 14 --> no dispel attempt --> 10 hits, 3 wounds, 1 save --> 2 wounds
Boosted Burning Gaze at Frostheart: cast on a roll 1,4,5,6,6 --> 4 hits, 1 wound, no save
Miscast Result: 3,6 --> wounded Loremaster, warded on 5++ --> 4 power dice lost
Shooting Phase Details
Sisters at Frostheart: 4+ to hit (move, long range) --> 5 hits, no wounds
Archers at Frostheart: 5+ to hit (4+ champions, move, long range) --> 11 hits total, 2 wounds, no saves --> dead Phoenix
Eagle Claw (EC1) at Star Dragon: 4+ to hit (long range, single bolt) --> hits, randomized to dragon, wounds, multiplies to 3 wounds
Eagle Claw (EC2) at Silver Helms: 4+ to hit (long range, multiple) --> 3 hits, 3 wounds, 2 saves
The Winged Hussar Host - Turn 1
 |
| Fighting fire with fire! |
Enraged Caledorian Prince flew his loyal dragon to the top of the hill where enemy archers were and ordered his beast to incinerate them. Half of the unit died horrible deaths in flames and their companions fled in panic. Enormous unit of knights galloped nearby allowing the Archmage to focus on healing the Star Dragon whose strength was restored.
Due to lack of other targets the bolt throwers aimed at the Sisters on the other hill and no less than three of them were punished for daring to shoot at the Frostheart Phoenix.
Magic Phase Details
Winds of Magic: 1,2 --> 3:2 (no channels)
Boosted Apotheosis on Star Dragon: cast on a roll of 2,2,5 + 5 = 14 --> failed attempt to dispel --> 2 wounds healed
Shooting Phase Details:
Star Dragon at Archers: 15 hits, 7 wounds (3+ to wound), failed panic test on 5,6
2 bolt throwers at Sisters: 4+ to hit (long range) --> 5 hits, 3 wounds, panic test passed
Outcasts - Turn 2
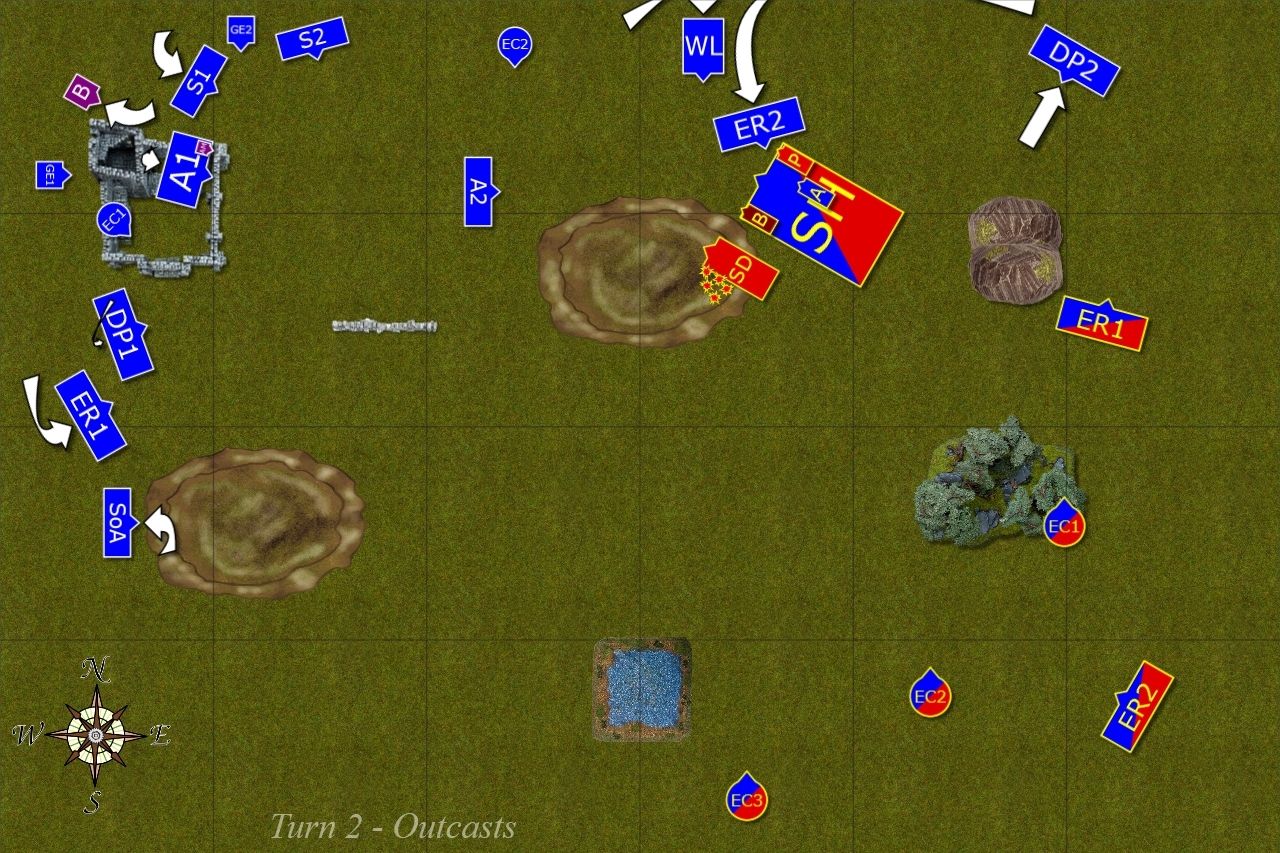 |
| Dragon Hunt continues! |
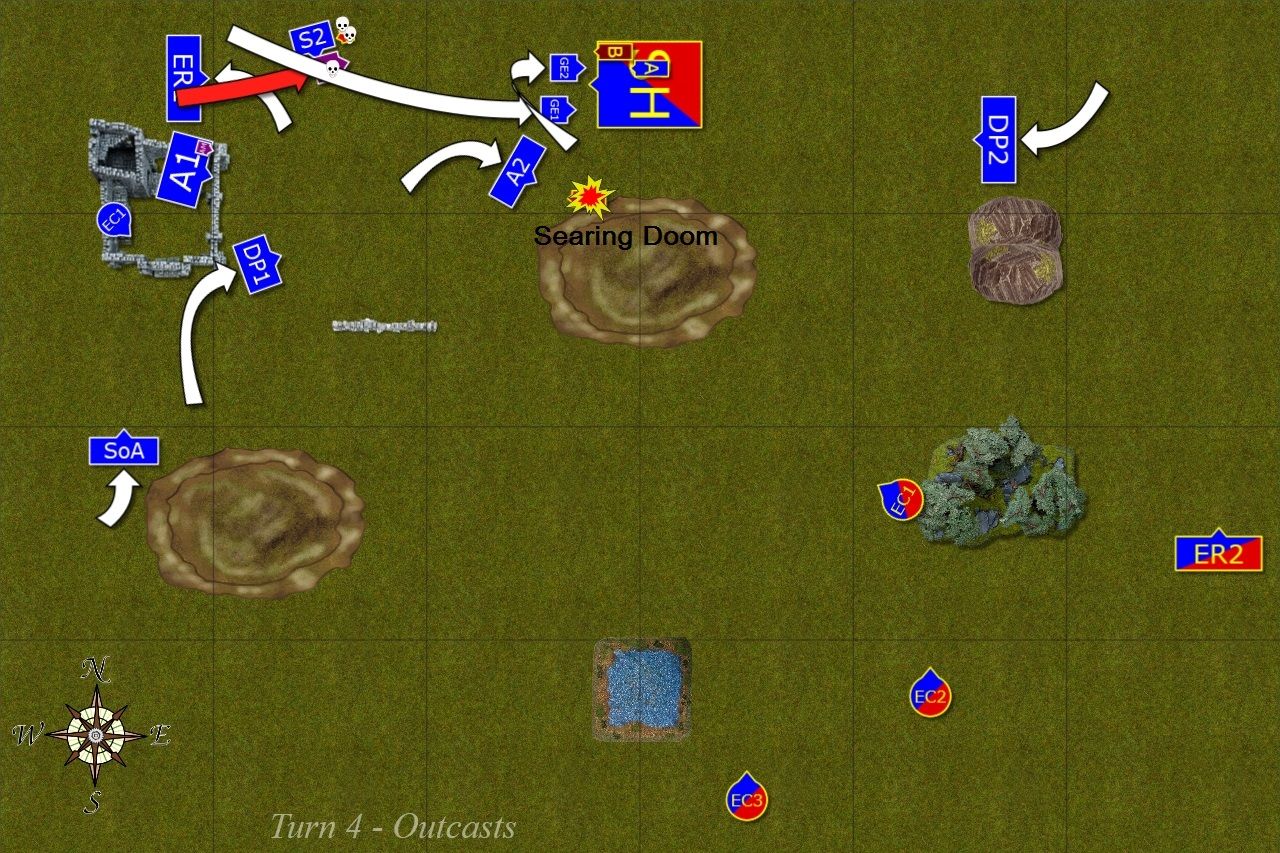
With the enemy approaching the Outcasts focused on the biggest threat, the Star Dragon and employed their tested delaying tactics in order to slow down enemy knights. Ellyrian Reavers took one for the team while Lions shifted their position to avoid the gaze of a dragon rider and getting ready to intercept impetuous silver helms.
Larry the Loremaster had power only for a single spell and he attempted to send a Searing Doom at the dragon but this time enemy Archmage didn't underestimate his adversary and dispelled that threat.
Now the shooters aimed at the great wyrm. First, Loremaster's companions shot and they too hit well wounding the dragon twice! Then one of the bolt thrower crews repeated the feat and wounded the dragon as hard as the last time! It was barely alive now and second eagle crew as well as nearby reavers tried to get that last wound from it. Unfortunately their multiple shots were not lucky enough to penetrate the thick hide while a few bolts and arrows were easily deflected by the prince atop the dragon.
Magic Phase Details
Winds of Magic: 1,6 --> 7:6 (no channels)
Boosted Searing Doom at Star Dragon: cast on a roll 1,2,3,3,4,6 + 2 = 21 --> dispelled with a scroll
Shooting Phase Details:
Archers (A1) at Star Dragon: 5+ to hit (move, long range) --> 8 hits, 6 at dragon, 3 wounds, 1 save; 2 at prince, 1 wound, saved
Eagle Claw (EC1) at Star Dragon: 4+ to hit (long range, single shot) --> hits, randomized to dragon, wounds, multiplies to 3 wounds
Eagle Claw (EC2) at Star Dragon: 3+ to hit (short range, multiple shot) --> 3 hits, 2 at dragon, 1 at prince, no wounds
The Winged Hussar Host - Turn 2
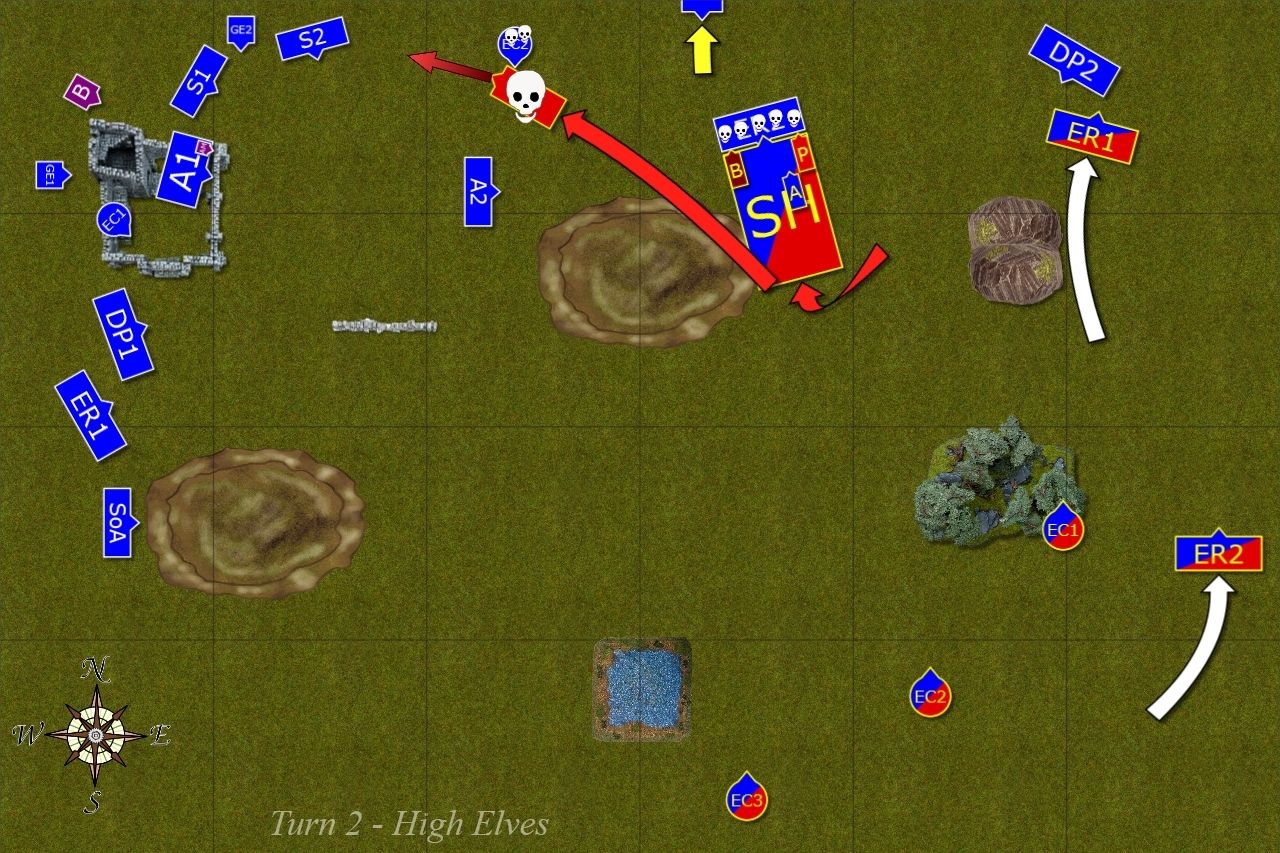 |
| Last charge of the Star Dragon |
Enraged dragon rider throws caution to the wind and charges the Eagle Claw crew that dared to shoot at him and his pet mount! Silver Helms follow the example and attack the annoying fast cavalry. Brave Reavers die to an elf and nearby Lions withdraw rather than stay to receive such a murderous charge.
In the confusion and chaos due to combat the Archmage tries to help his prince and his dragon. He draws from winds of magic and once again tries to heal the great wyrm. However, Larry the Loremaster this time bested his opponent and the spell was deflected.
The dragon was coming. You could see it flying low and picking up the speed, blood rage in its eyes. On top hated Caledorian prince, the embodiment of everything Outcasts stood against. The foolish pride, arrogance, disregard for non-Caledorians, leading Ulthuan to the fall and collapse under the waves, betraying those loyal and siding with archenemy Malekith.
The dragon was a deadly weapon but this time it was seriously wounded, it looked like it was about to crash and bury everything under its belly. Two veteran Eagle Claw crew members did their duty already but they were adamant they should at least try to make last additional effort for their companions and for all that was lost forever. The End of Time and the End of the World is upon them.
They picked huge bolts and planted them like pikes, steadied their gaze and aimed at the incoming dragon. There were no battle cries, no shouts, no war songs. Just silence and grim determination to take the wounded dragon with them.
Everybody held their breaths as the roar of rage turned into cry of pain and the sound of immense body crashing to the ground. When the dust settled Outcast could see motionless, dead dragon, single bolt protruding from his eye. There was no sign of the Eagle Claw crew and only the lone figure of the prince with his bloodied sword in his hand was seen standing tall next to his dead mount.
He slowly turned and started running towards Swordmasters ...
Magic Phase Details:
Winds of Magic: 2,4 --> 6:4 (no channels)
Apotheosis on Star Dragon: cast on a roll of 1,1,4,5,6 + 5 = 22 --> dispelled on a roll 1,5,6,6
Walk Between Worlds at Bolt Thrower (EC1): cast on a roll 3 + 5 = 8
Shooting Phase Details:
Bolt Thrower (EC2) at Dragon Princes (DP1): 4+ to hit (long rage, multiple) --> 2 hits, 2 wounds, 2 saves
Reavers (ER1) at Dragon Princes (DP2): 4+ to hit (move, short range) --> 2 hits, 1 wound, 1 save
Combat Phase Details:
Star Dragon vs Eagle Claw Crew: crew at the dragon, fear test passed, 4+ with a re-roll, 1 hit, 1 wound, no save --> dead dragon; prince kills the crew, overruns 11" into the flank of Swordmasters.
Silver Helms vs Reavers: 3A at BSB, charmed shield deflected the hit, 2A against SH, 1 hit, no wounds --> all reavers die --> White Lions fail panic test on 5,6 and flee off the table
Outcasts - Turn 3
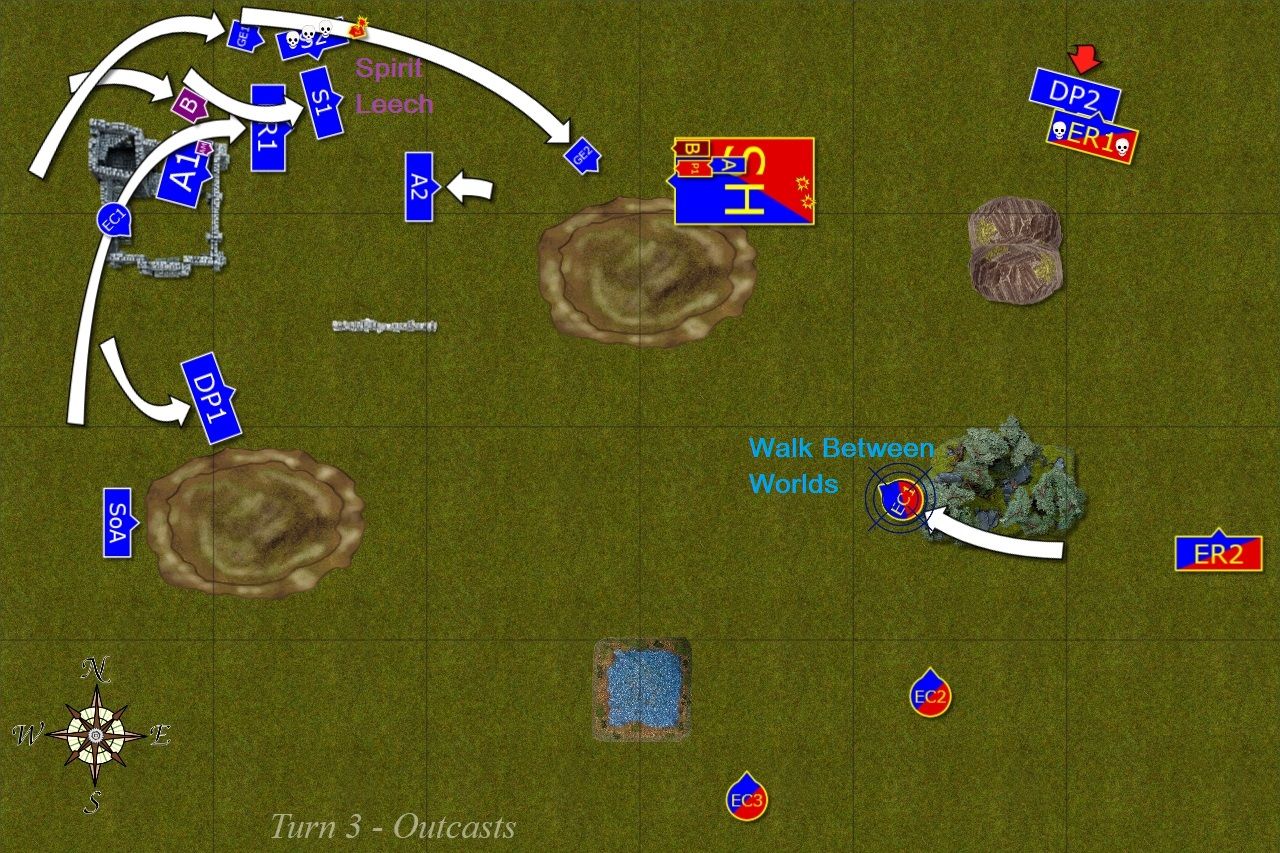 |
| Glimpse of hope for the Outcasts! |
With the dragon dead it seemed that the Outcasts have a chance to prevail! Furious prince stormed into the ranks of Swordmasters who were aided by the magic of the Loremaster. He battled enemy general in the duel of the minds but the prince ignored the pain and cut down three Swordmasters. Their companions held their ground knowing the help is coming.
In the meantime Dragon Princes charged enemy fast cavalry but could not break them and the combat continued.
Edit: I made a mistake in here as Walk Between Worlds was cast on Bolt thrower in the previous turn. I am sorry for the confusion.
Magic Phase Details:
Winds of Magic: 1,6 --> 7:6
Miasma on Prince (to lower WS): cast on a roll of 1,3 + 2 = 6 --> dispelled on a roll of 6 + 4 = 10
Blizzard on Prince: cast on a roll of 3,5 + 2 = 10 --> dispelled on a roll of 1,6 + 4 = 11
Spirit Leech on Prince: cast on a roll of 2,4,6 + 2 = 14 --> failed attempt to dispel 1,1,6 + 4 = 12 --> Loremaster ld9 + 4 vs Prince Ld10 + 2 --> 1 wound, no ward save
Shooting Phase Details:
Eagle Claw at Bolt Thrower (EC1): 4+ (long range, multiple shot) --> 3 hits, no wounds
Archers at Silver Helms: 5+ (move, long range) --> 9 hits total, 4 wounds, 1 save
Combat Phase Details:
Dragon Princes vs Reavers: 3 warriors from each side in contact --> no wounds from reavers, 2 wounds from princes, reavers pass break on 2,3
Prince vs Swordmasters: 4A on 3+ --> 4 hits, 3 wounds --> 4A swordmasters, 4+ to hit --> 2 hits, 1 wound, saved --> steadfast, passed break test on 3,5
The Winged Hussar Host - Turn 3
 |
| Power of High Magic! |
With army general alone among enemy ranks his second in command decided to join the fight. He spurred his steed but it seems he miscalculated the distance and didn't reach the archers. Silver Helms maneuvered around the eagle to set into new position and keep the pressure up. The Archmage used his powers to kill many Swordmasters with Soul Quench while Bolt Throwers finished them off and claimed two more casualties among the enemy Dragon Princes.
Magic Phase Details:
Winds of Magic: 1,6 --> 7:6 (no channels)
Boosted Soul Quench on Swordmasters: cast on a roll of 2,3,4,5,5 + 5 = 24 --> no dispel attempt --> 18 hits, 8 wounds, no saves
Walk Between Worlds on Silver Helms: cast on a roll of 1,6 + 5 = 12 --> dispelled on a roll of 1,1,1,3,4,6 + 2 = 18
Shooting Phase Details:
Bolt Thrower at Swordmasters: 4+ (long range) --> 3 hits, 3 wounds, no shots deflected, dead unit, panic tests passed
Bolt Thrower at Dragon Princes: 4+ (long range) --> 2 hits, 2 wounds, no saves, panic test passed
Combat Phase Details:
Prince vs Swordmasters: Bladelord challenges, dies, Swordmasters pass break test on steadfast
Dragon Princes vs Reavers: Reavers hit once, didn't wound, died
Outcasts - Turn 4
 |
| Larry and Bob in action! |
Seeing the opening Bob the Battle Standard Bearer flew to the rescue of nearby Swordmasters, challenges enemy general and kills him in a single combat (although being wounded in the process). Larry continues exchanging magical punches and manages to cast yet another spell irresistibly that kills lone cavalry prince outright!
With both the princes dead, the Archmage decided to withdraw in good order leaving the field to the victorious Outcasts!
Edit: Galharen threw the towel when I got Searing Doom on his cavalry prince through and rolled 6 hits that were turned into 4 wounds. We just rolled for the combat as I wanted to see how BSB and his Griffon would do. Despite inflicting 6 wounds Galharen saved 5 of them on 4++ and only thunderstomps got the last wound from the stubborn prince.
Summary
 |
| Turn-by-turn summary animation |
After-battle thoughts
I will not deny that I was very happy to win the game against such a tough list. When Glaharen gave up I was leading with 800+ points which according to the ETC scoring meant 15-5 victory. I had good rolls that helped me a lot and bolt thrower crew sneaking that last wound on Star Dragon was the most epic situation I have ever had in my games!
I think my opponent gave up too early. While I understand he was upset by losing Star Dragon and both Princes he still had a potent archmage and his soul quench and tempest had a potential to make up for the losses. His bolt throwers were not in danger and I was running out of combat troops to engage his Silver Helm bus. My magic and shooting did great damage but he still had 3 more turns to at least make the difference smaller. 800+ points is a good advantage but it is not an auto win.
As a tribute to a great player and painter as well as an example to follow, Rowan (whose excellent report you should read here: Tomb Kings at Moonstruck) I would like to analyze the game in similar fashion by starting with:
Why I think I got an advantage:
1. Deployment - I mentioned at the beginning I was at a disadvantage because I had to deploy first. Glaharen saw my entire army that tried to squeeze in between two hills and the ruins to avoid his shooting. That in turn limited my own abilities to shoot and cast magic significantly as well as options for counter-charges. He could measure and check my lines of sight and distances. He saw my archers ready to step on the hills to shoot and could plan accordingly.
However, he left his two big monsters in the open. If he only positioned his Frostheart a little to the West I would not be able to target it with my spells at all. While I was lucky with wounding it with fireball and getting IF on burning gaze (although getting only single wound) he could have completely eliminate that possibility with slight correction of the position. The same goes with his Dragon, why risk taking shots and then spending power dice to heal it when you could have avoid it and use them on some magic missiles?
2. Impatience - I think he got impatient and was reckless with his Star Dragon. The game last 6 turns and you gained less than he risked with the Dragon landing on the top of the hill where every single unit could see it. Again, I was lucky to sneak through more wounds, especially with the archers but he could easily land behind the hill, keep his options for the charge open but avoid being targeted by spells (and saving his scroll for later) and not count on healing that didn't work in the end.
He had the odds in his favor when he charged the eagle claw. And it was very lucky to get that last wound from the dragon. But was absolutely necessary? He could have waited, see if he can heal the dragon and join the combat after he did so. It was just turn 2, there were 4 more to come!
3. Lack of support - I like the fact his army has fast cavalry to support the army and bolt throwers to create range threat. I understand he deployed his bolt throwers further away to avoid being shot at by archers but I wonder if they could have been deployed better. I do believe, however, that he didn't use his fast cavalry at all. I barely managed to divert Silver Helms with my own reavers but a move of his cavalry would have immediately prevented that. I lost Lions anyway but it would have been much better to charge them already as they were in a wrong position. What is more, fast cavalry staying close to the knights could always jump out to intercept my support, try to hunt down the eagles, redirect and simply provide -2 to hit for shooting.
4. Making the most of the given opportunities - I had my initial plan on how to try and put up a fight but it was far from perfect. My own deployment was not good in my opinion, with some units in wrong spots (I will talk about that earlier). However, I was prepared to use the tools I had if I had the chance. Sometimes they work, sometimes they don't. This time they did because my opponent let me to. Position of monsters I mentioned before, exposing the dragon, failed charge with the cavalry prince, overruning without a support (although this one is not a mistake by itself because it was planned for the dragon).
I talked about first two already. Failed charge was unlucky, Galharen needed 7+ and rolled 1,2,4 for charge distance. While I was prepared to hold his character I wonder if at this stage charging with 260+ worth prince at 200 worth archers was worthy risking? If he was winning then sure but he was losing. And there was no good overrun path either. I wonder if it was not a mistake on my part to flee in the first place anyway but still. His character would be exposed and risked being targeted with spells and shooting.
I tried to play to my strengths and minimize my weaknesses but I don't think my opponent did the same. And I think the mistakes he made and that could have been avoided were the main reason things turned out ugly for him rather than above the average rolls I got this time.
I have mentioned already a few things I was not happy with, so here is what I think I should have done better.
1. Deployment - it was very tricky and I will repeat it again that deploying first puts me at a disadvantage. For starters I think I exposed Lions unnecessary. It was hard to predict which side Galharen would favor at the beginning but the more I think about the more it seems that he would have chosen the spot he really picked because it allowed him to get into contact faster and offered good protection thanks to the hill. I should move them turn 1 too, instead they were easy target and fleeing might have seemed unlucky but let's face it, they were good as dead anyway.
I wanted to use shooters soon and have them in position to try and hunt down Frostheart that worked far better than I expected. However, I wonder if swapping Archers and Sisters would have not been better? Archers had better chance to hold Frosty for a while and if ignored or after Frosty died, they could have threaten bolt throwers.
I could not use heavy cavalry well either and I wonder if I was simply too shy or maybe I should have deploy them differently?
2. Swordmasters positioning - I expected that one of the options Galharen considered was charging bolt thrower in a way that allowed him to overrun into Swordmasters. I didn't anticipate his positioning well enough though to see flank charge was possible.
3. Heavy cavalry - I wonder if it was a good idea to actually move both units and fast cavalry to hunt down bolt throwers? I had to deal with enemy reavers too and 3 bolt throwers can hurt a lot but if I attacked from both flanks maybe I would be fast enough to kill them all and not lose too many units in the process? I was concern, however, that I might need them to delay fliers but once Frosty was dead maybe it was good time to try?
It might not be anything new but I am glad I learned something new :)
Many thanks to my opponent for the game, I hope that he feels much better about our game now. Also, many thanks to all the spectators in the peanut gallery for watching it!
I hope the report was an interesting one and thanks for reading!
Cheers!
Excellent report Swordmaster. Your opponent also deserves a lot of praise, I took a look at his beginning army blog you linked to and I hope he keeps it up. Really beautifully painted army that really captures the fairy tale feeling of the High Elves.
ReplyDeleteI don't typically like character heavy armies that much. It's as I said before, they're always a very high risk very high reward kind of play. You often end up with your 600+ points character hanging on to a single wound. If you hang on to it, that's a lot of points. But a single arrow could suddenly take out 30% of your entire army. I guess that's why I like your MSU units so much. You can always recover from the loss of a unit.
Still, a lot of people like the heroic feeling of uber equipped characters and it can be a lot of fun trying to deal with them!
So in short, another highly entertaining read
First of all, I really want to thank you for the series of comments. This blog was never so active :) I hope people who comment or did in the past will start doing so regularly as it is a fantastic motivation to add new contents. Keep it coming!
DeleteIndeed, Galharen is a great painter and he has already won several painting awards. He also won a tournament with this army so I knew it is a hard nut to crack.
I think it is ETC effect or safe hammer approach that results in such forces. In a situation where the result of your game affects your team mates people don't want to take risks. Because of that they invest in harder to kill characters and huge units that are easier to protects as a whole. It is also the effect of a certain style of play where you focus on making way and positioning of these tough to hurt characters in the units so that many attacks are simply deflected. Even if you are outmaneuvered and charged from few directions at the same time.
Personally, I don't like that approach. I understand why it is attractive but it leads to the composition of forces that don't look like armies much. When they introduced 50% character allowance that pushed the composition into that direction even further.
The good thing for me is that I have more space for maneuver, although in this game it was limited by the enemy shooters as I had to use the terrain to compensate for that.
But I was happy to show my army has teeth and I just wish Galharen continued the fight as it was far from over. To be honest, I really don't understand that sometimes people just throw the towel. I mean there are of course situations where you have no army left by turn 4. But it was not the case here and it kind feels bad when they tell you afterwards that dice won you the game.
In any case I am happy with the performance and I am glad you enjoyed the read! Some more to come! :)
Cheers!
Starting my own battle reports has made me realise and appreciate just how important reader comments are.
DeleteYou've literally provided me months of entertainment at no cost at all. I'm sure there's hundreds of people who feel exactly the same way. And I understand that most people don't feel the need to comment. But as a writer, you want to have that feeling of creating something. Creating a story but more than that even, creating content. Reader comments are essential in that regard. So in short, I'll keep on commenting as my own little way of saying thank you!
I'm sure we can understand Galharen's reaction. The previous reports had a couple in which you ended up being a bit grumpy too. When the dice really roll against you or when you make a really stupid mistake that backfires everything you planned, it's sometimes hard to take it in good grace. Throwing the towel is a drastic thing to do (and I agree that in this game, he had some chances still), but I always try to show empathy to the other guy.
After all, next time it could (and probably will) be me taking the blow =)
Thanks a lot! I actually started my own reports inspired by others and thought it might be a good idea to say "thank you" to my opponents too.
DeleteI perfectly understand that not everybody likes to comment. What is more, providing feedback to the report is more time consuming than contributing to the discussion. So I am already happy to see the reports are read. However, the feedback readers provide are invaluable to me as I can further improve the quality and make the future reports more entertaining!
Oh I am certainly to blame for being grumpy in the games! Shame really and I hope it happens less and less. And I am certainly empathizing when bad luck hits my opponent. I know how it feels as everybody was in that situation at least a few times.
However, in this particular game, these rolls were the consequence of Gal's risky moves and I tried to took my chances. Sometimes they work, sometimes they don't. And at the time (as much as with me being grumpy, what I am not happy that happened) when your opponent tells you "it's stupid game" or "the dice won you the game" it also feels like you didn't deserve the victory.
That is why I do try to take whatever happens with good grace so that it does not affect my opponent's fun of winning. At the same time when something unlucky happens to him (even as a result of his mistake) I am not dancing on the grave of the fallen enemies but show empathy.
It is funny how these interactions affect your game experience and I find them very important to get right.
Cheers!