
Game 3 - David - High Elves - Meeting Engagement
In the game 3 I had a pleasure to meet David for the first time and he brought his trusty High Elves to the tournament. He decided to take some solid choices with a cavalry Prince unit as a hammer and Phoenix Guard, Caradryan and High Magic as anvil. He had some nice support of fast cavalry and ranged attacks. However, we were playing Meeting Engagement that in addition to a diagonal deployment some of the units might end up in reserves. If that happened to fast troops, that may be an advantage but if you rolled a 1 for a war machine that is obviously a waste.
Let's have look at David's list in more details then:
High Elves - Army List
Archmage, Level 4 Wizard, Dispel Scroll, Talisman of Preservation - High Magic
Prince (General), Dragon Armour, Elven Steed with Barding, Dawnstone, Enchanted Shield, Giant Blade
Caradryan
Mage, Elven Steed , Level 2 Wizard, Ironcurse Icon, Obsidian Lodestone - High Magic
Noble (BSB), Dragon Armour, Great Weapon, Shield, Elven Steed with Barding, Star Lance, Dragonhelm, Luckstone, Potion of Foolhardiness
5 Ellyrian Reavers, Bows
5 Ellyrian Reavers, Bows
6 Ellyrian Reavers, Bows, Spears, Musician
12 Silver Helms, Shields, Full Command
18 Phoenix Guards, Full Command, Razor Banner
2 x Eagle Claw Bolt Thrower
15 Sisters of Avelorn, Champion
Swedish Comp: 12.8
Archmage - Fairly standard Archmage, with 4++ ward save, dispel scroll and using high magic mainly to support his Phoenix Guard bodyguards with magic so they can have 3++. He can still be vulnerable in combat so there might be a chance to hunt him down even if PG stays unharmed.
Prince - famous cavalry prince created by Seredain himself. 1+ re-rollable save, 4 S7 attacks although no re-rolls against some of my troops/heroes. Still a powerful character that can also benefit from the Shield of Saphery thanks to dragon armor 6++ and the presence of level 2 in his unit. He will be hard to get as he will have Silver Helms to protect him. However, if I managed to reduce the number of knights significantly with shooting and magic I might have a chance to overwhelm his regiment and maybe win due to static combat resolution. The good thing was that due to the presence of my own bolt thrower I could count on him staying with his regiment more often than not, thus limiting his area of influence.
Caradryan - I have never had a chance to play against this character before (or at least I don't recall it now). He provides nice magic resistance to his unit but it feels a little overkill due to the fact they are already at 4++ and can have nice magic influence. His combat potential is somewhat reduced by the fact that his attack are flaming but against some monsters he can be very useful. Obviously, his special rule may help to kill powerful characters as well. As an infantry model can be avoided easier and again, as any other character, he is vulnerable to shooting if alone.
Mage - his job is to add protection to Silver Helms and cavalry characters. Magic resistance combines nicely with 6++ ward save from dragon armor. It can be further improved by high magic too. With the Archmage both wizards have a nice selection of spells that can help the army in so many ways, from extra movement to better performance in shooting and combat to some handy spells against hordes and characters alike.
Noble (BSB) - a nice combination of reasonable protection with hard hitting abilities to aid his Prince. Together they can pack 7-8 S7 attacks on the charge and that alone can be powerful blow. Still well equipped to fight in subsequent rounds of combat due to Great Weapon. If committed to the fight, however, he may go down eventually so the decision to charge has to be careful one.
Reavers - Being a great fan of fast cavalry, I like the presence of these units. All of them have bows so that the fight between support troops will not be easy. They are also a priority for me as I cannot allow any support troops to interfere with my movement. But with my own fast cavalry, shooting and magical ranged attacks I felt prepared to commit to that fight.
Silver Helms - Often considered just a delivery system they can hit hard against my units too. In particular White Lions and Swordmasters. On the other hand they form quite a big and cumbersome regiment, easily blocked by fast troops so I thought I might have a chance to slow it down until I was ready for to engage or keep them chasing shadows for the whole game.
Phoenix Guard - Another unit I had no chance to defeat in straight fight. Fortunately, I didn't plan to do so! I was confident that if I engaged it from both flanks and possible rear and kept them isolated I can eventually grind them down. The question was can I move my units fast enough to surround them and keep them isolated. I counted on the fact that this army needs to attack to get points thus allowing me to cover the distance faster. At the same time, there were only 2 combat units so isolating one at least should be possible.
Eagle Claws - always a threat, I needed to get to them fast. As I needed my fast cavalry to deal with their counterparts as well I wanted to add heavy cavalry to the equation and depending on the situation, the knights would attack enemy reavers or go after bolt throwers. Of course they are also great targets for the magic missiles so I wanted to use magic to good effect here too. It was important to get rid of the bolt throwers fast so that I could use my eagle riders freely.
Sisters - very good addition to ranged attacks and these ladies can cripple any of my units all by themselves so I had to find a way to neutralize them too. I wanted to use the fact they are short ranged to my advantage and engage them in shooting contest with the archers if possible. I had also an option to attack them with Dragon Princes under right circumstances.
It was a difficult match up because the points were well protected here and I had to deal with multiple threats really fast. In addition we had a river across the table that slowed down any progress (I ended up on the same table as game 1).
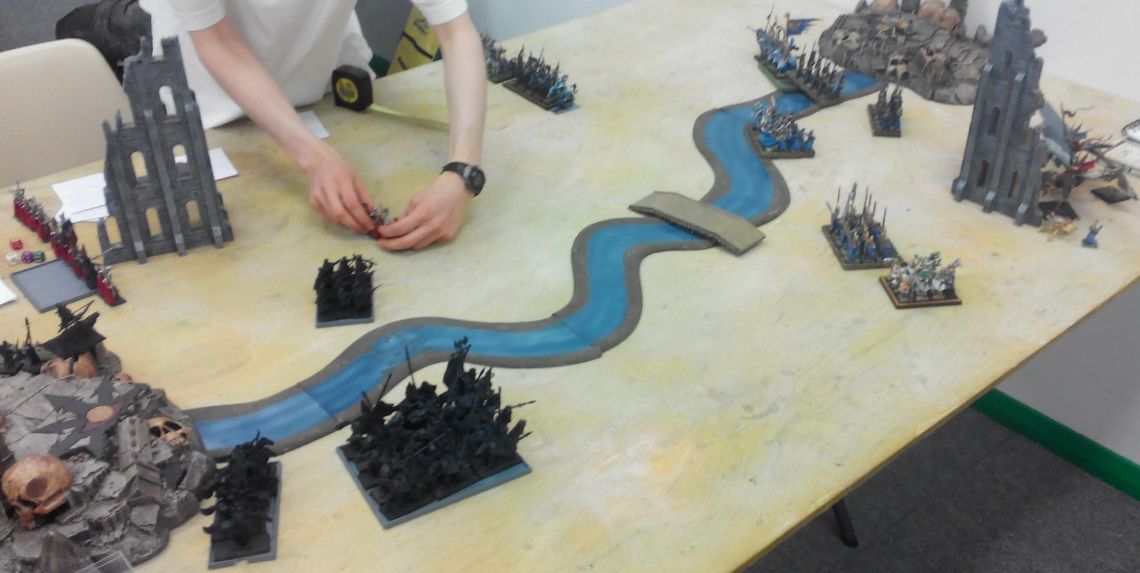
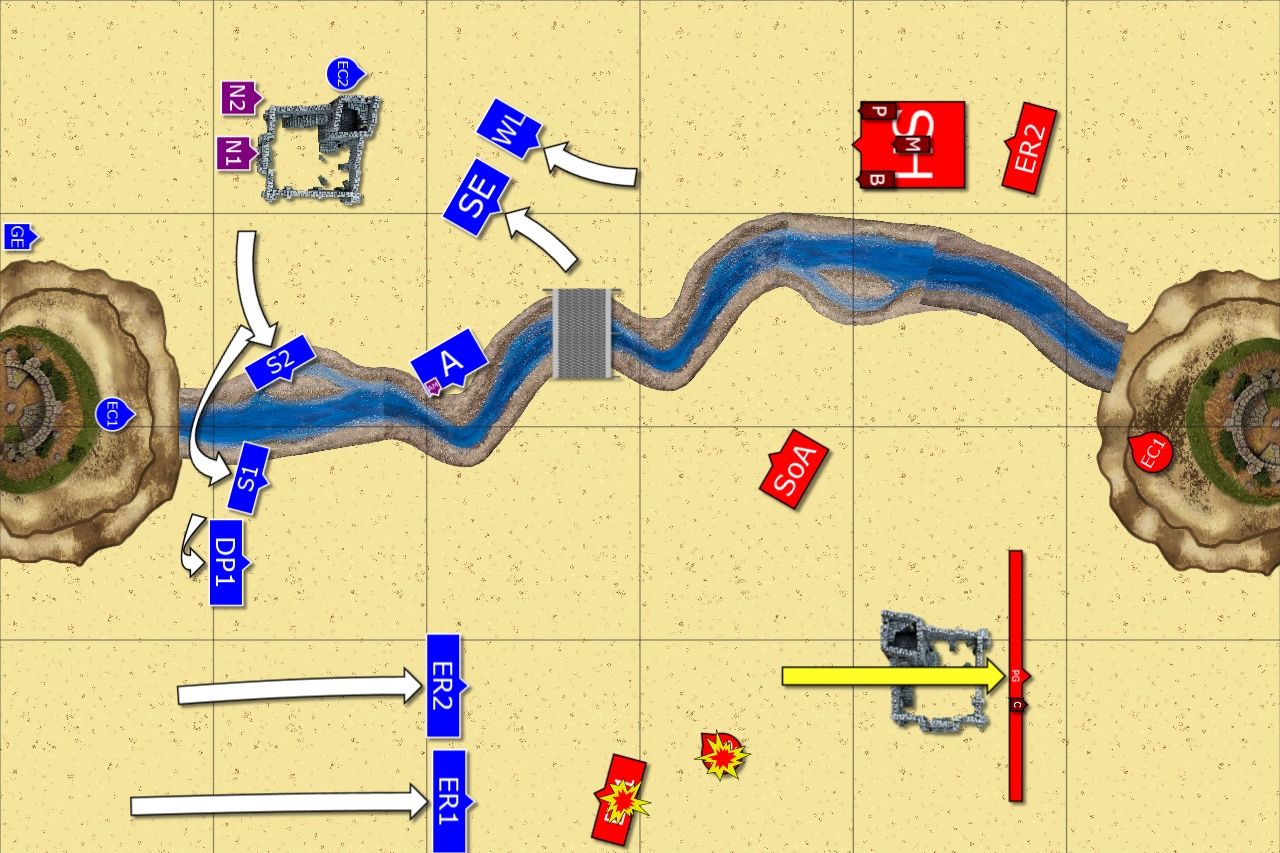
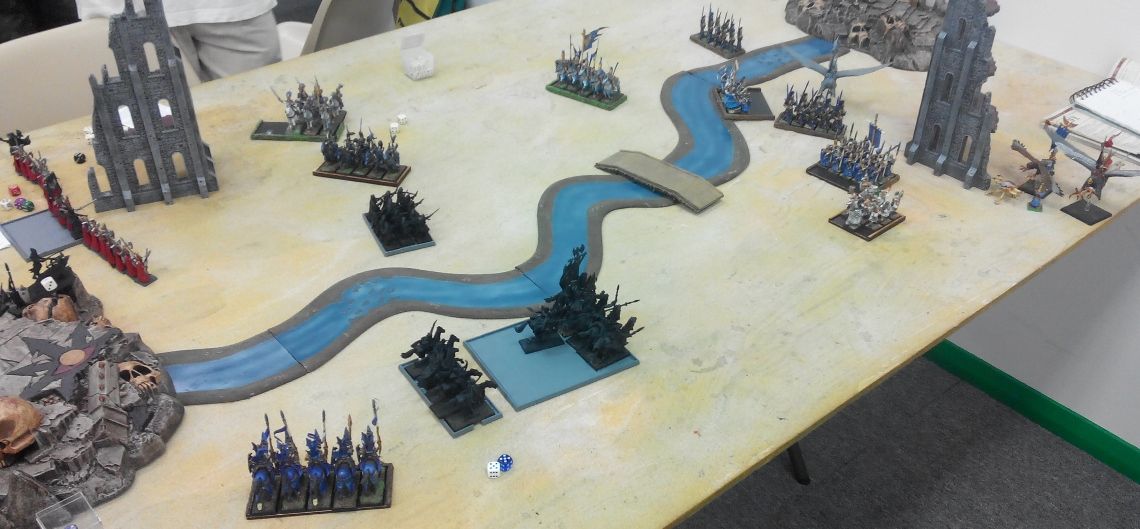
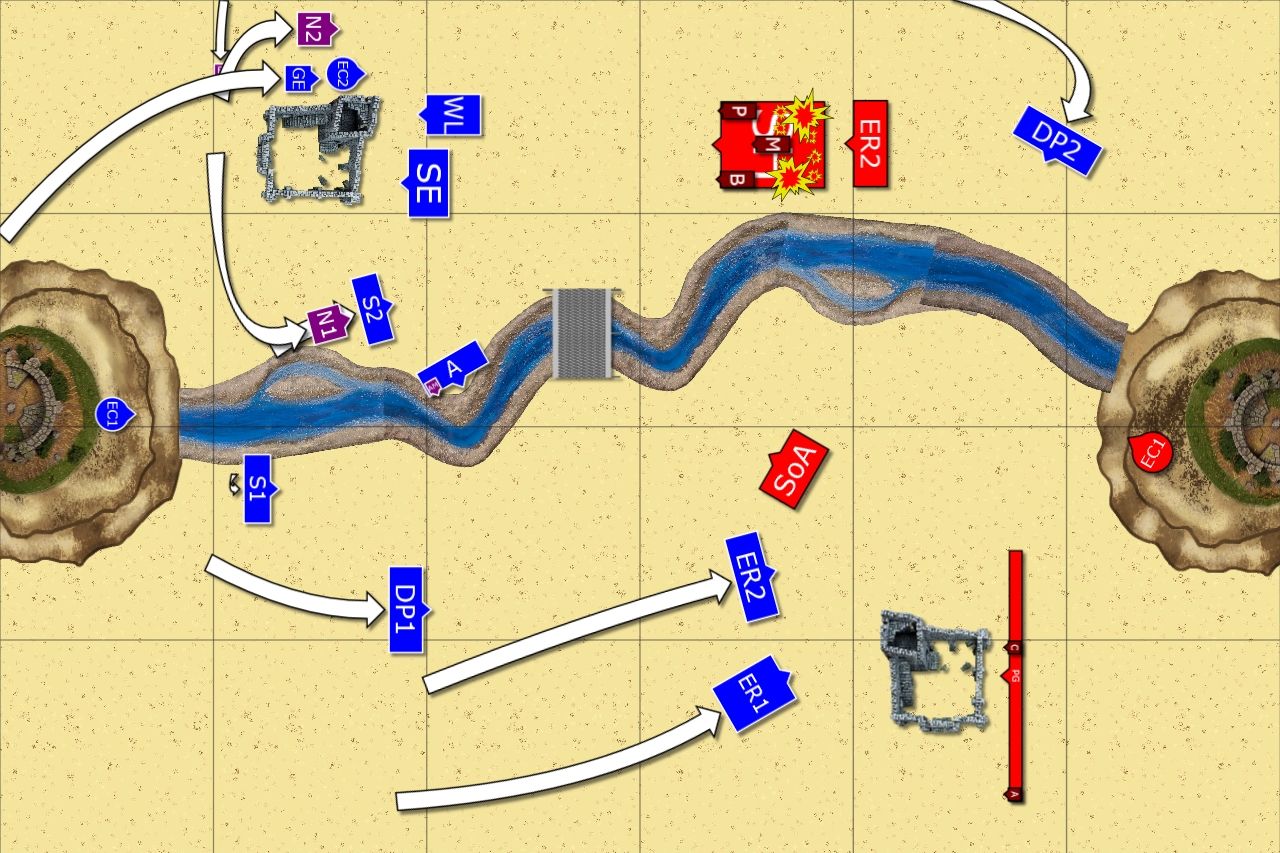
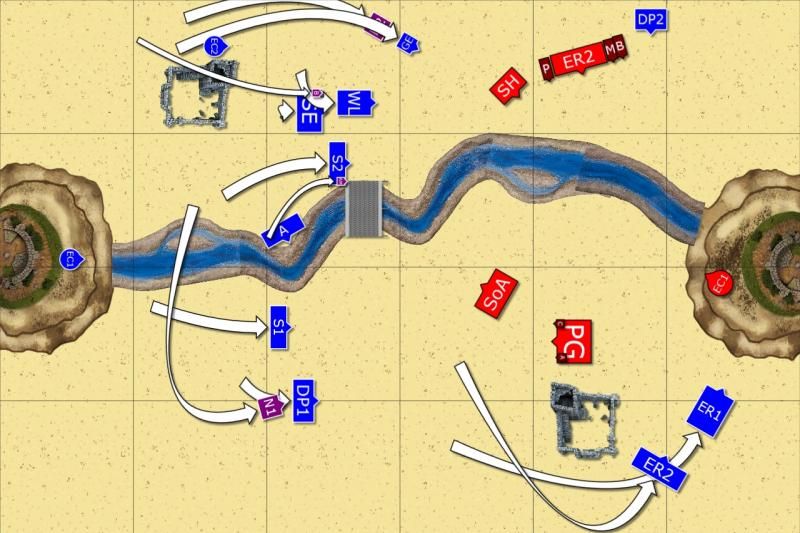
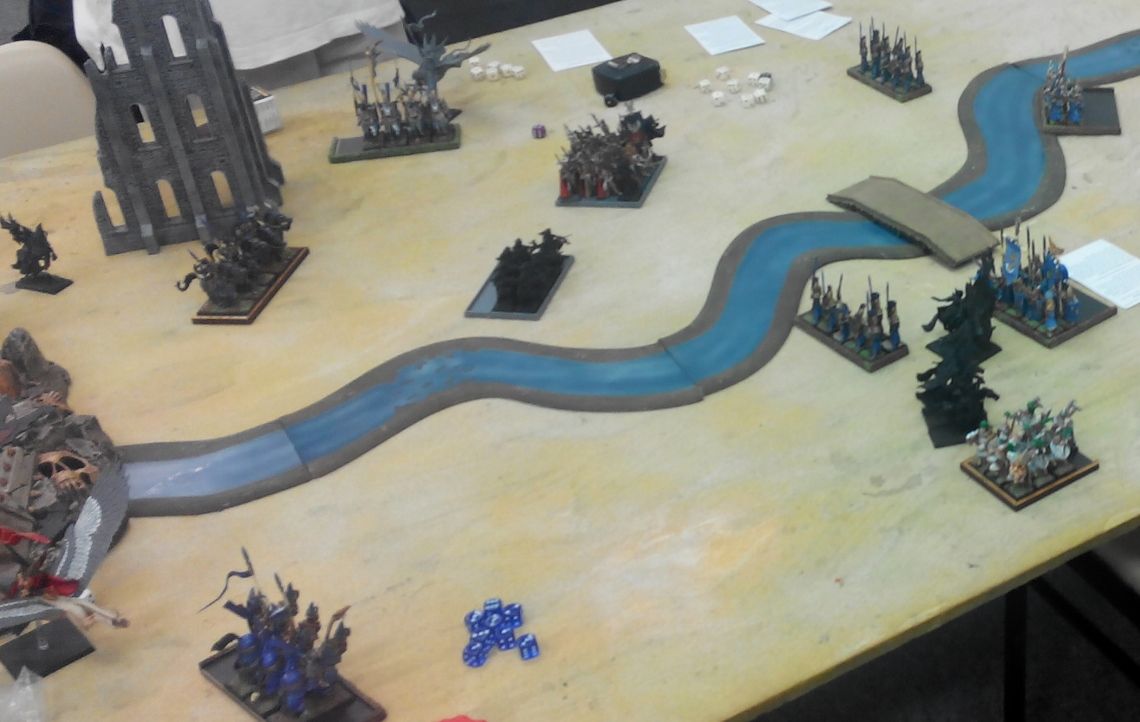
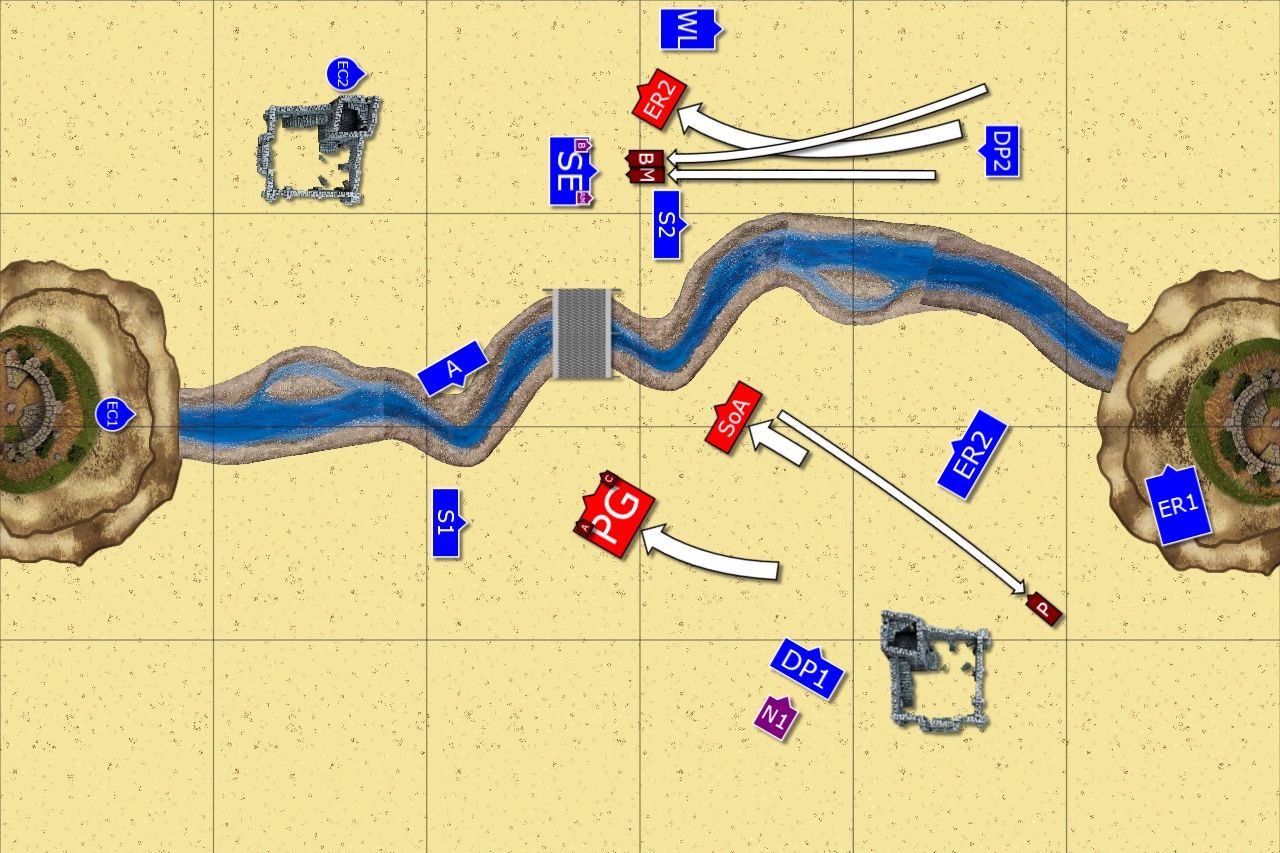
Deployment
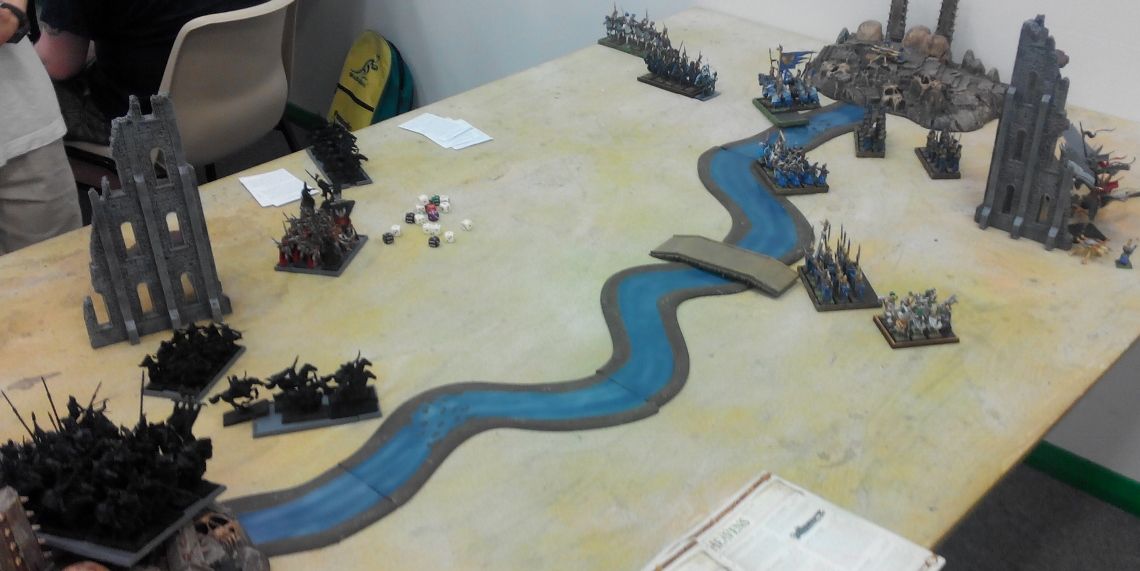 |
| Deployment of both armies after vanguard moves |
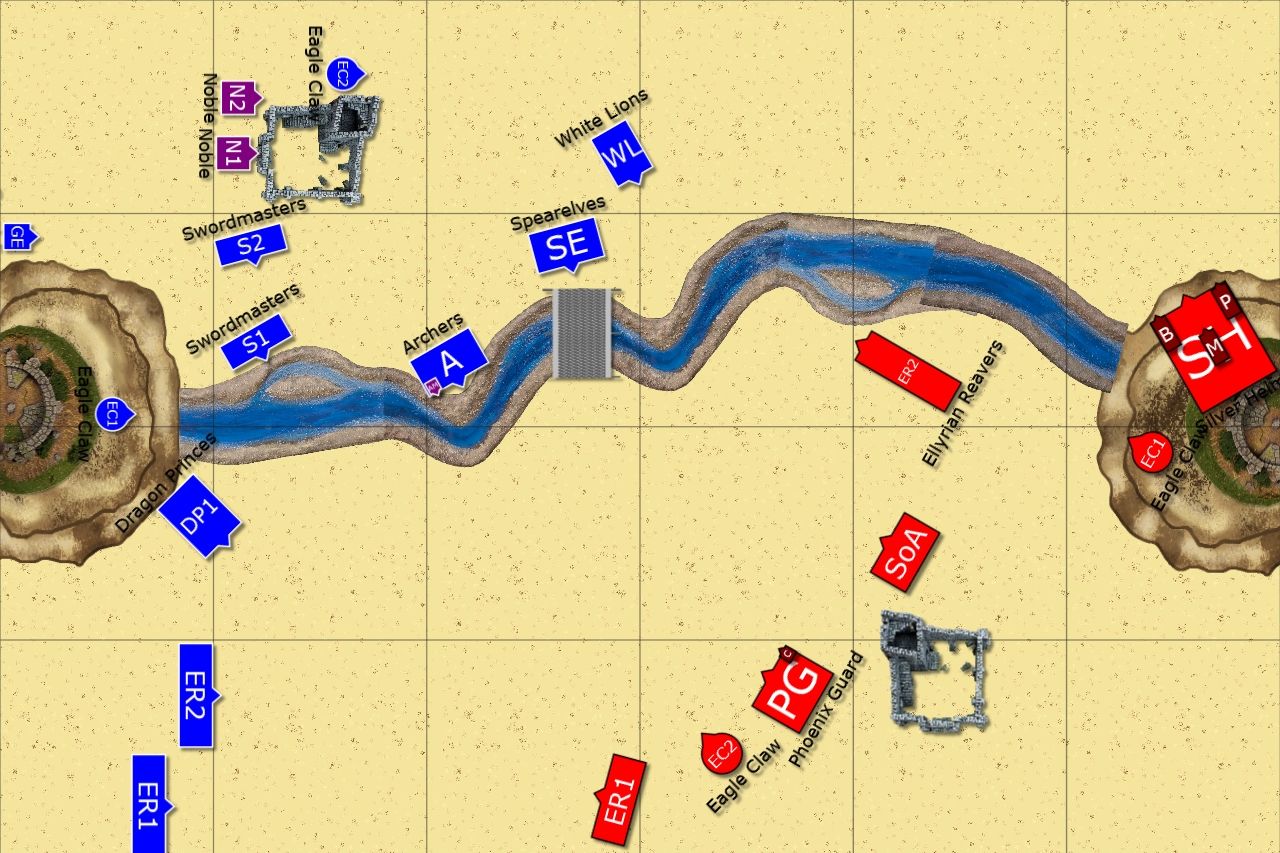 |
| This time Outcasts are deployed North |
Please, note that David's Archmage and one host of Reavers ended up in reserves. On my side, BSB and a claw of Dragon Princes didn't enter the battle with the rest of the army.
Respective wizards had following spells:
Archmage - Soul Quench, Walk Between Worlds, Arcane Unforging, Fiery Convocation
Mage - Soul Quench, Hand of Glory
Heavens Archmage - Windblast, Curse, Thunderbolt, Chainlightning
(Edit: I am not sure about Windblast as I would have changed it for Iceshard even if I rolled no doubles for spells but that is what I had in my notes. Maybe I forgot to change it?)
I tried to steal the initiative but didn't roll a 6 to do so and David had the first turn!
High Elves - Turn 1
 |
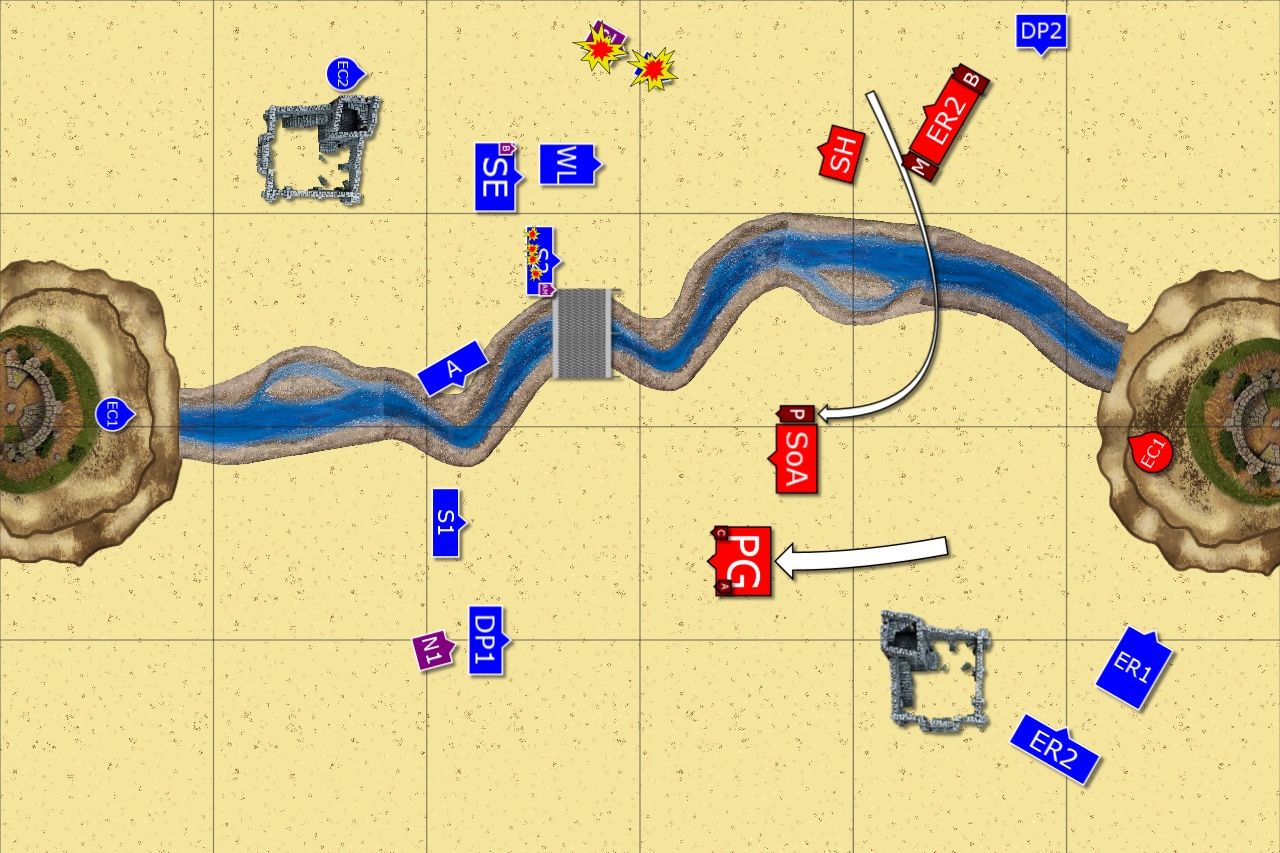
| High Elves cross their Rubicon |
 |
| Phoenix Guard reforms for Archmage arrival |
The Prince ordered his knights forward and they crossed the river and marched towards the Outcasts. On the opposite flank Phoenix Guard formed a single rank to allow Archmage to join them as soon as he shows up. With only level 2 able to cast spells magic was uneventful. As Sisters were out of range they simply marched forward to be able to shoot at their enemies later.
(Edit: David realized he slightly misplaced his PG when he rolled a 1 for the Archmage. They were too far from the table edge to allow him to join their ranks with only 5" movement. Hence, David decided to reform them in a single rank so that he can jump there as soon as he shows up.)
Outcasts - Turn 1
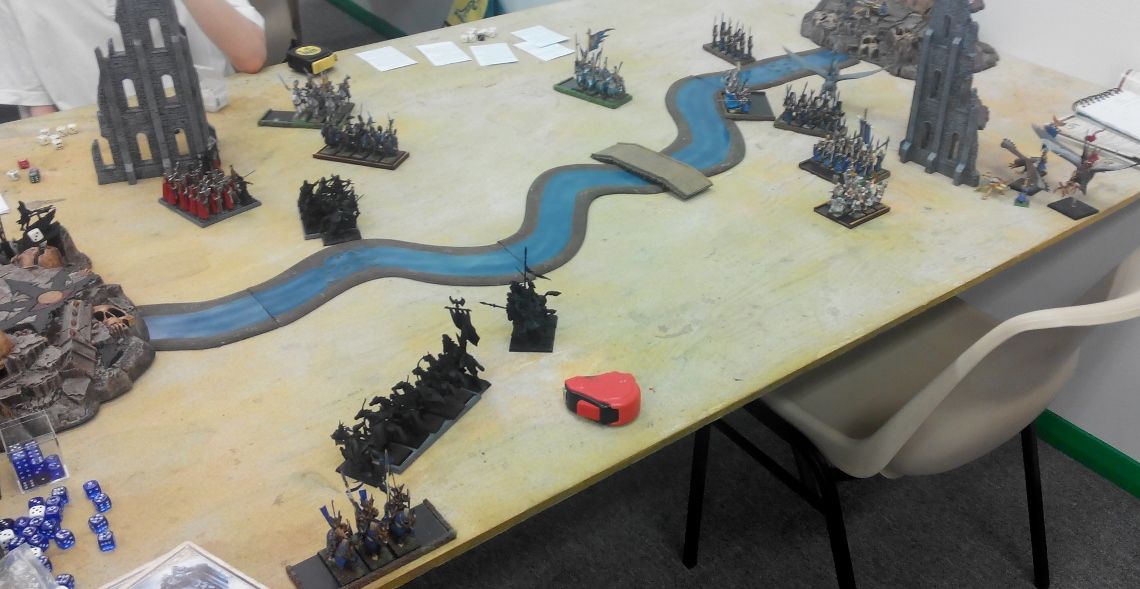
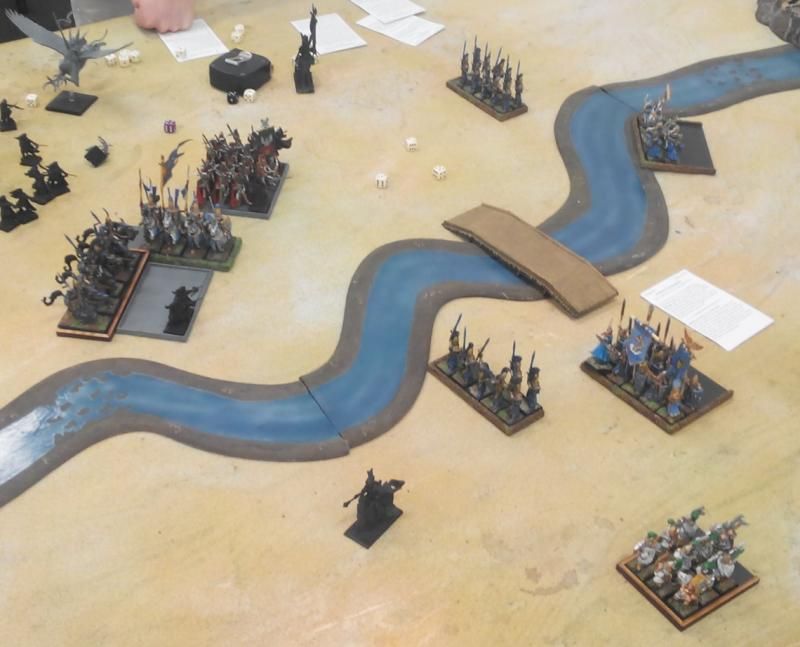
 |
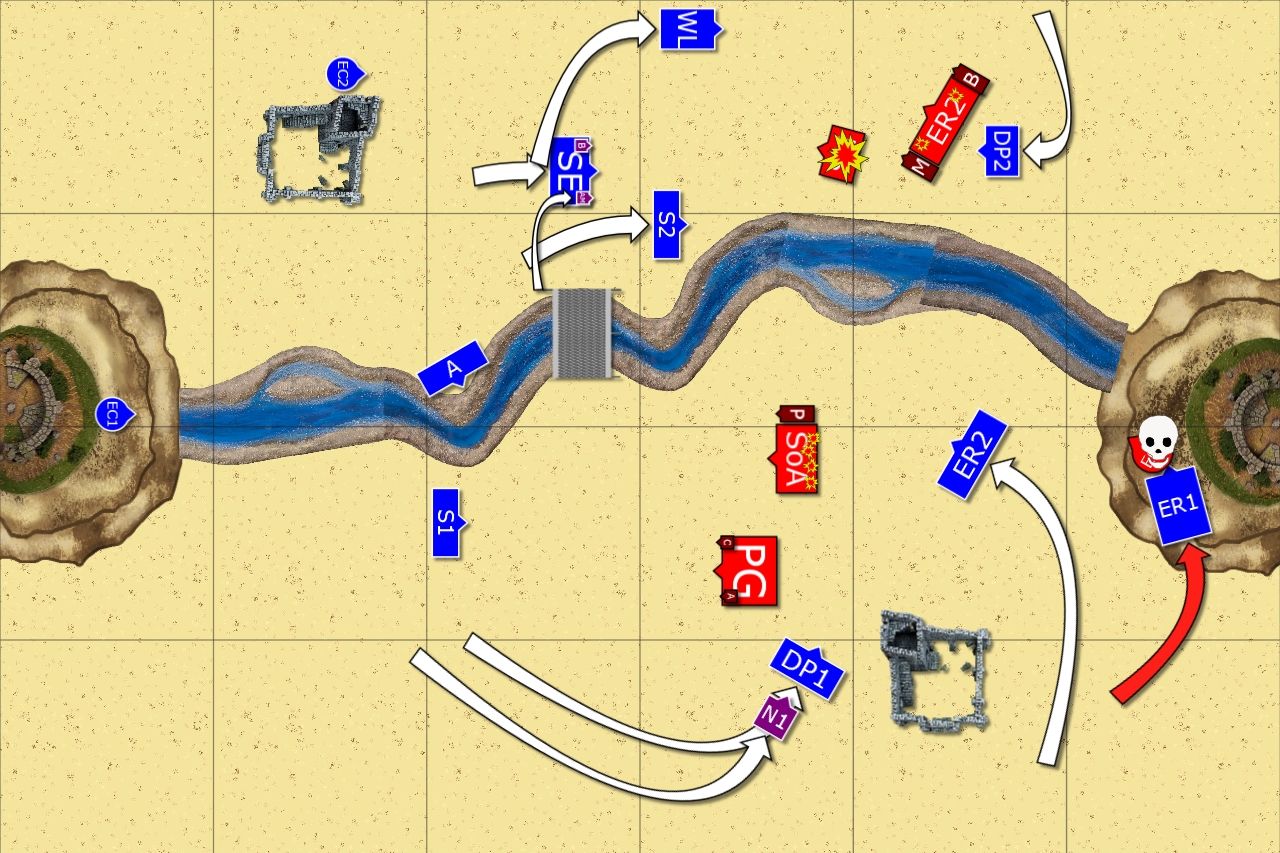
| Outcasts counter attack |
 |
| Enemy flank in trouble |
Outcasts fast cavalry moves towards their counterparts and with the help of other shooters one unit of enemy light horse is destroyed. Magic and the rest of the shooting is responsible for the destruction of the nearby eagle claw and both events result in the decision to withdraw made by Caradryan himself. His job was to protect the Archmage and he decided to abandon exposed position and move beyond the nearby ruins for extra protection. That, however, gave up the flank and Outcasts where ready to exploit the opening.
On the other bank Spearelves and White Lions moved back to put more distance between themselves and approaching cavalry.
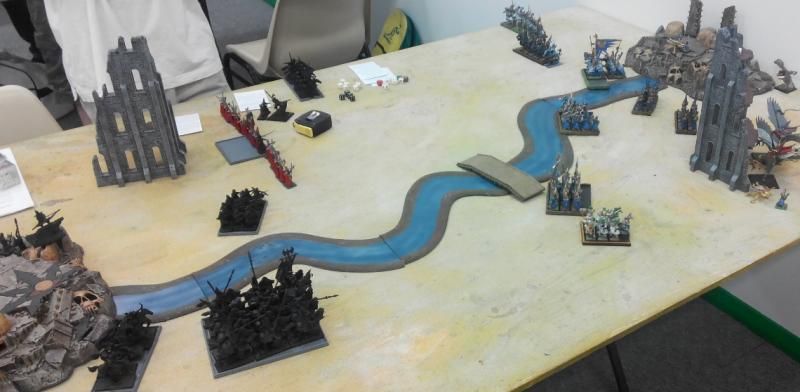
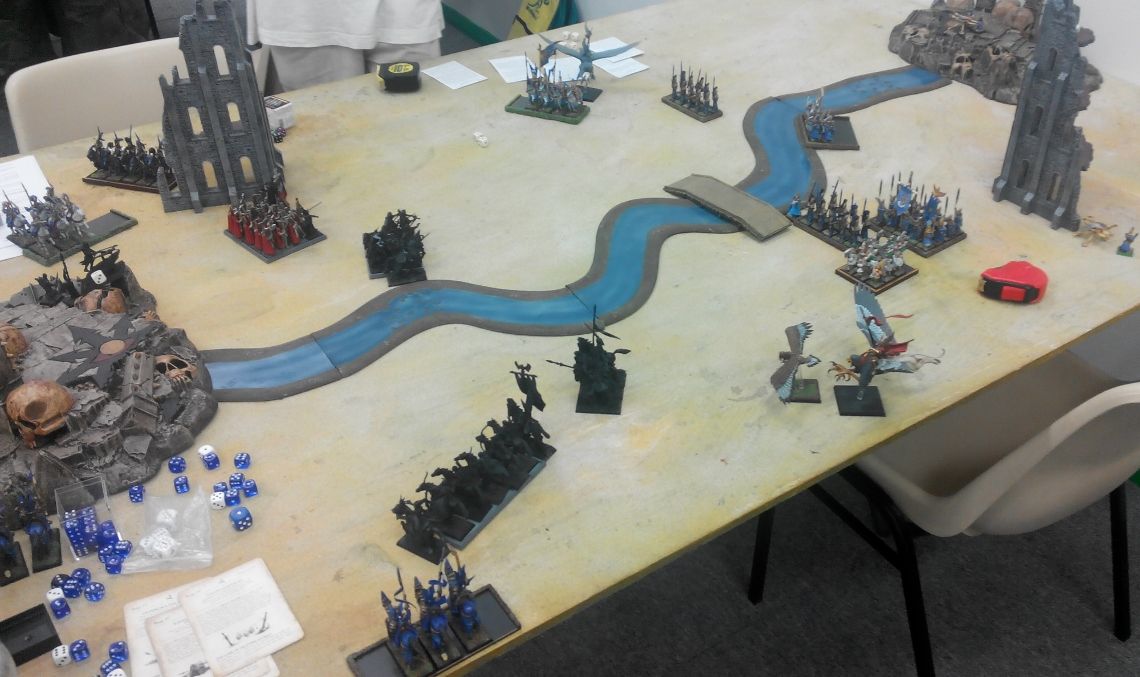
High Elves - Turn 2
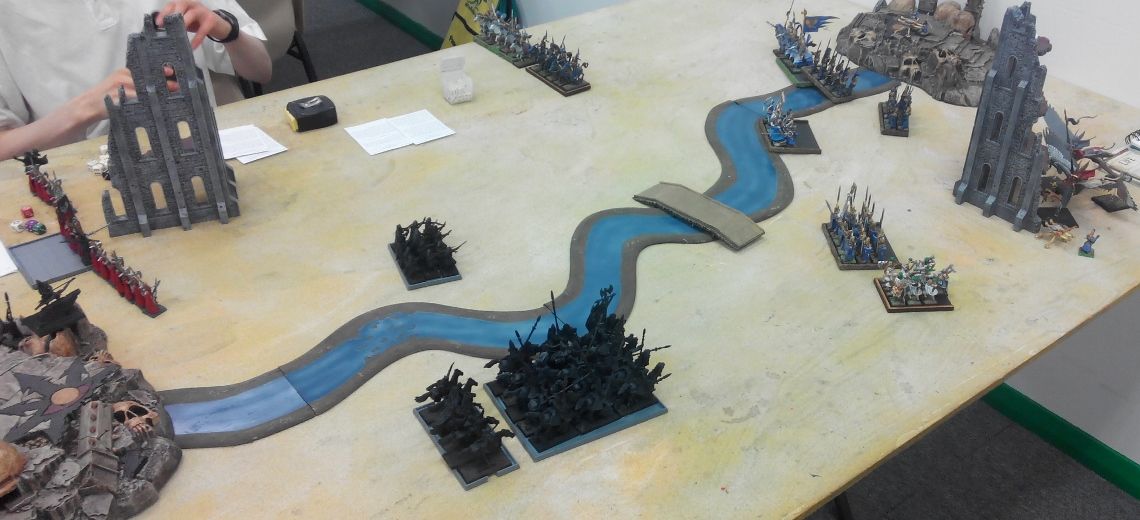 |
| Has cavalry prince hesitated? |
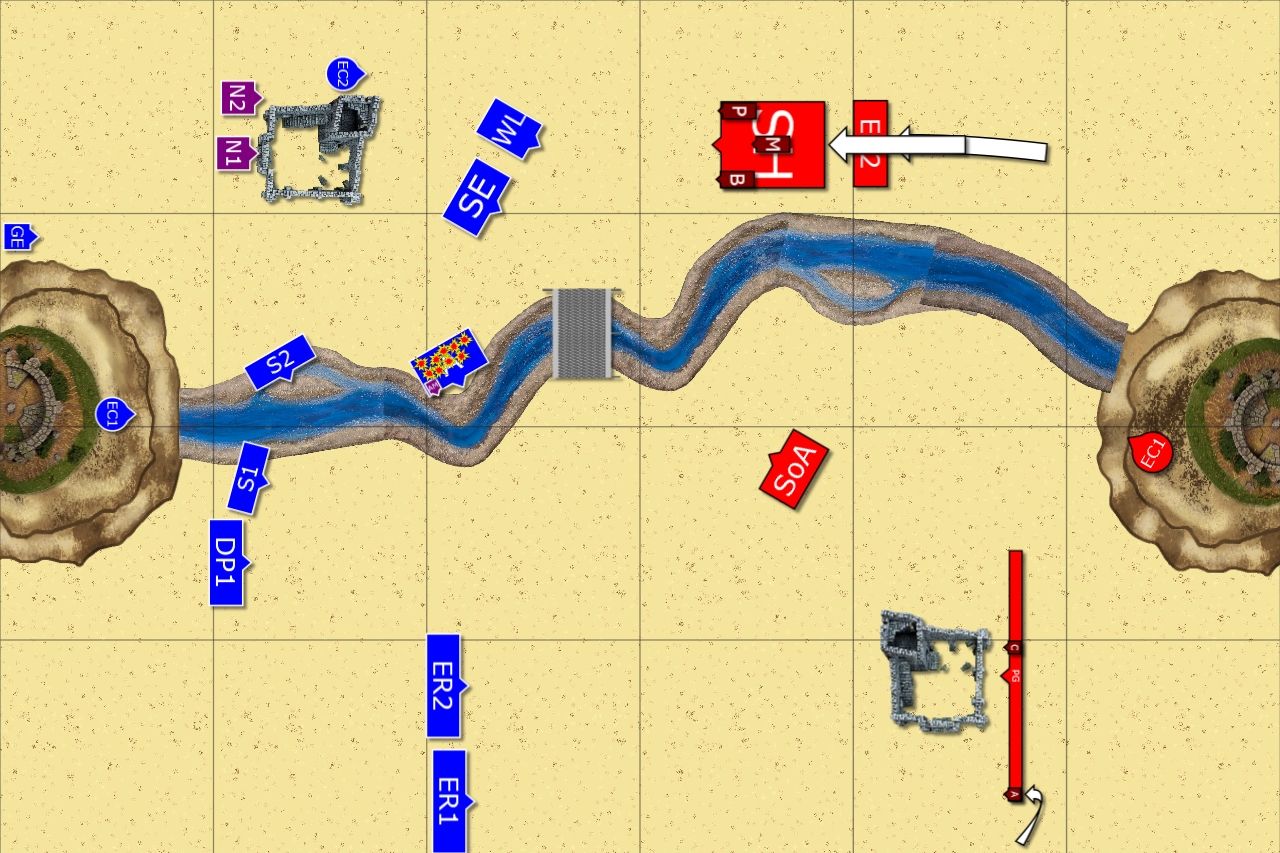 |
| Silver Helms approach cautiously |
Confident that the new position is safe, Phoenix Guard stops and reforms while the Archmage finally joins their ranks. Being late to the party means he cannot contribute to the battle just yet as his spells are out of range.
On the other hand, Sisters and remaining bolt thrower take aim at the Archers and shooting contest begins. Cavalry Prince does not risk long charge as he expected that Spearelves or White Lions would simply flee from his knights and moves forward cautiously.
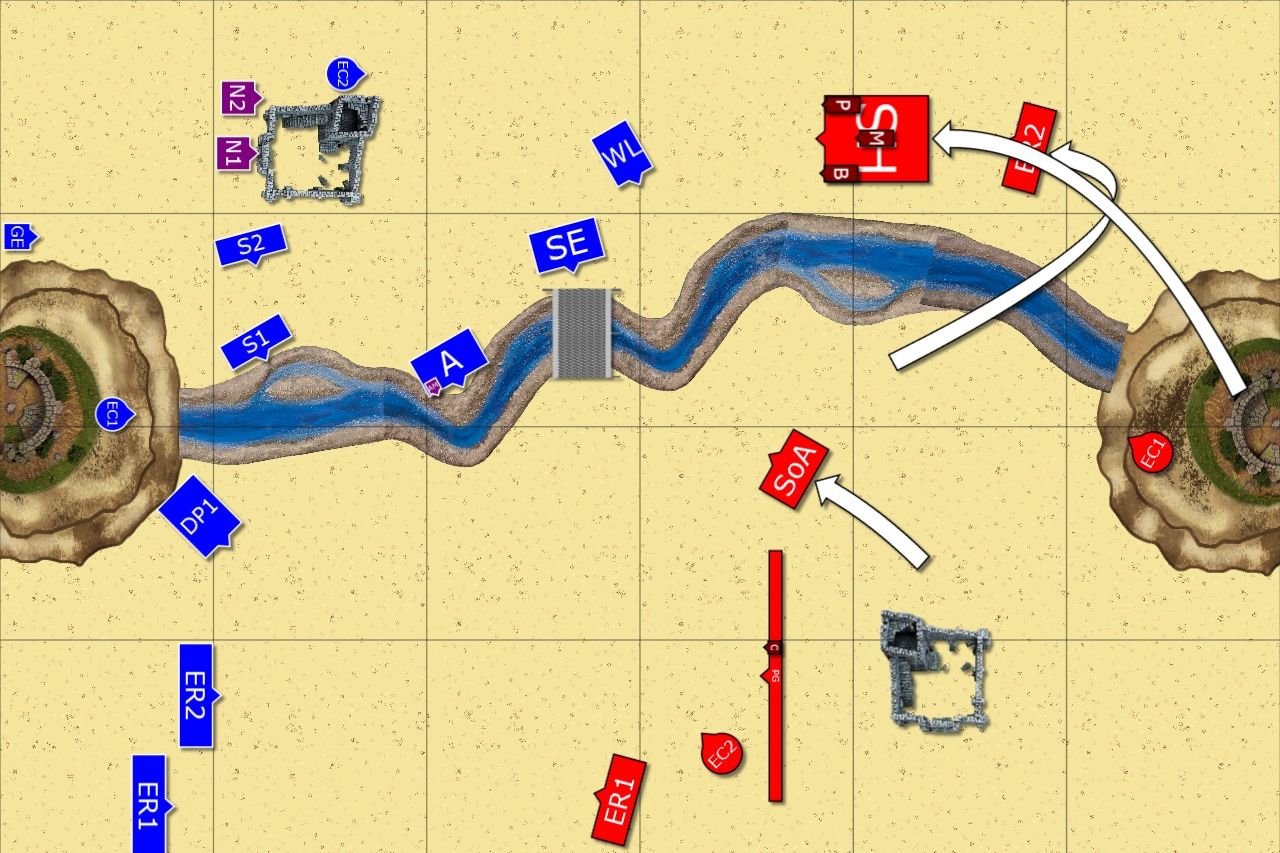
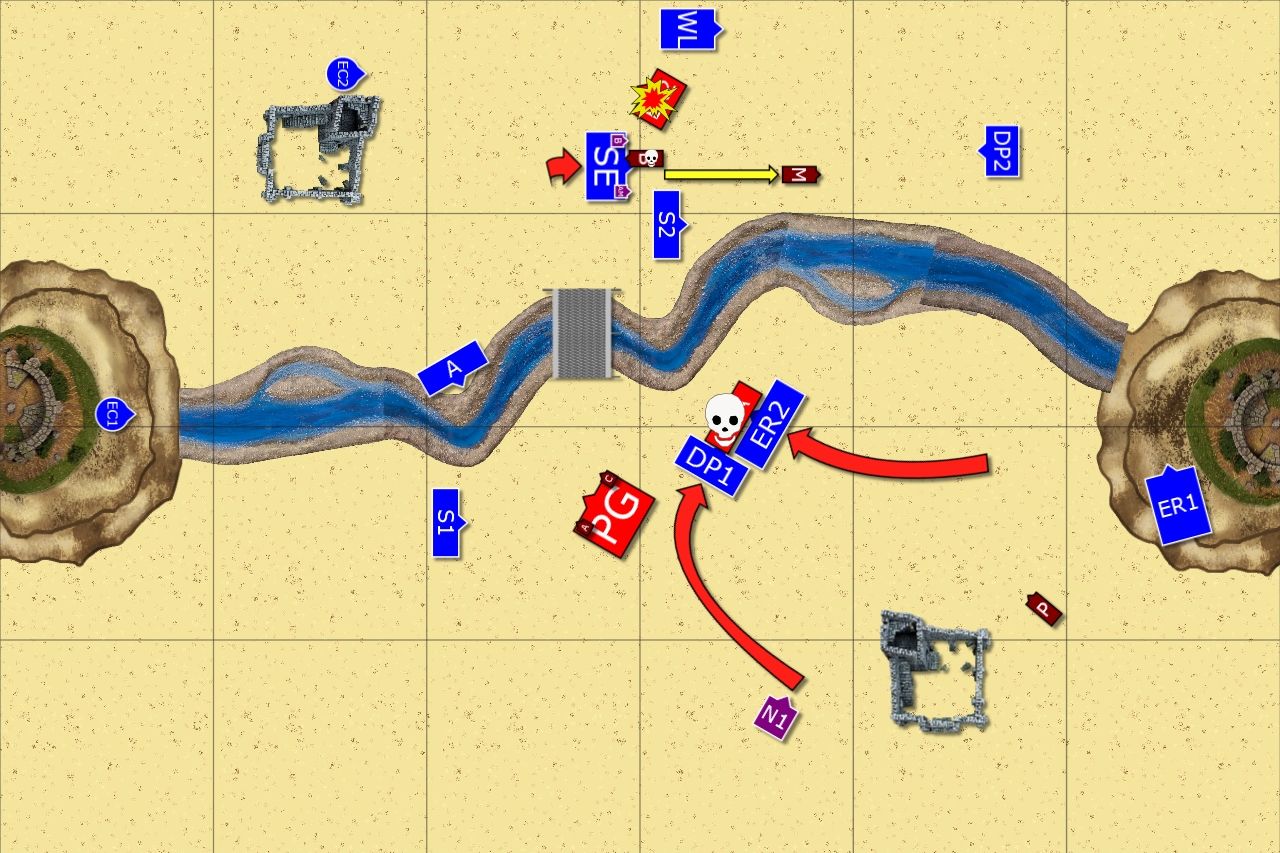
Outcasts - Turn 2
 |
| Reavers moving fast into the gap in High Elves formation |
 |
| Silver Helms under deadly fire |
Seeing the wide opening in the enemy formation, both hosts of Reavers speed towards the gap intending to threaten remaining enemy eagle claw.
At the same time, Spearelves and White Lions move back towards the ruins, planning to use them as protection against powerful foe. They didn't take into account what happened next though. The effort of Archmage and eagle claw crews saw no less than 9 Silver Helms dead. Two single bolts were responsible for unhorsing 6 proud knights. Suddenly, the most powerful enemy unit received a powerful blow.
High Elves - Turn 3
 |
| Cavalry Prince decided to move back |
 |
| Phoenix Guard blocks the gap |
Cavalry Prince decided it is now too risky to press forward as his potential targets were still far away and he didn't want to experience another round of shooting as he has just received. He and his officers moved to the nearby host of reavers while remaining 3 silver helms reformed towards the river crossing.
Phoenix Guard moved to block the path for enemy light cavalry to move through. Magic assistance was required to move them swiftly enough but they covered the gap in army formation. It seemed like eagle claw managed to defend itself from another threat too, when some enemy knights were killed and the rest panicked.
Outcasts - Turn 3
 |
| Advancing on both flanks |
 |
| Outcasts surround their enemies as many times before |
Reavers move around the ruins to find a new path to the lone eagle claw but the fact the machine is not engaged yet is not a good sign. Meanwhile, units on both flanks move forward and start surrounding the enemy.
High Elves - Turn 4
 |
| High Elves advance |
 |
| Two eagles down! |
(Edit: Please note I made a mistake with a map and that the Prince joined Sisters in turn 3)
Phoenix Guard advanced and cavalry reformed but it was level 2 and eagle claw that did the damage. First, Soul Quench killed great eagle and then a single bolt sailed through the air to hit eagle rider. It did exactly 3 wounds on it and Outcast hero was shot down from the skies.
Outcasts - Turn 4
 |
| The grip tightens |
 |
| Outcasts are all around the enemy now |
Ellyrian reavers avenge the eagle rider and destroy enemy bolt thrower. The rest of the regiments move to positions to charge the foe from different directions while keeping Phoenix Guard isolated.
Shooting (Edit: Could have been magic too) finished off proud Silver Helms, now abandoned by their leaders. Also Sisters suffer some damage from the enemy shooters.
High Elves - Turn 5
 |
| High Elves move forward |
 |
| But the Prince abandons his troops again |
All units move forward. BSB and Mage form a unit on their own while reavers move towards enemy bolt thrower. Only the Prince abandons his troops again and withdraws to the safety of nearby ruins.
Outcasts - Turn 5
 |
| Last act |
 |
| Only Phoenix Guard remained |
Outcasts launched their attack. Cavalry charged unprotected Sisters and though they fought bravely they could not stand to the enemy attack in the open, broke and were run down.
Exposed BSB and Mage were attacked by Spearelves. Bob the BSB gave challenged his counterpart to a personal challenge but enemy broke and the standard was captured. The mage escaped for now though. Nearby reavers were mercilessly shot down too.
Only Phoenix Guard remained intact at this stage and only thanks to the fact the night surprised both sides that Cavalry Prince managed to lead the survivors to the safety.
Turn-by-turn summary
 |
| Turn-by-turn animation |
After-battle thoughts
I was very happy I managed to pull out solid, 17-3 victory this game as it was not easy to get points from this army. It was a very pleasant game and David is a very nice opponent so it is a pity we run out of time to play one more turn. I hope he had a good time despite the defeat. Here are some more comments on this battle, in no particular order:
In the case of scenarios where the enemy has to deploy first I find it advantageous to be able to see their exact army formation. I think David would have benefited more with more compact battle line. For example, if his BSB was closer to PG they would have most likely passed their panic check on a re-roll. Instead, they were out of action for some time, Archmage could not cast many spells and they were kind of late to the party.
Separating units helped me to surround them and while significant amount of damage was done with ranged attacks, the fact the units were not supporting each other also helped to finish the isolated regiments.
I wonder if I could move eagle riders in a more efficient way as they didn't do much this game apart from possibly putting some pressure. At the same time when I exposed them one of them got shot anyway. They definitely need some better protection even if it is a one use only.
I keep wondering if it was a good decision to slow down the advance of Silver Helms and then to completely abandon the attack. If David pressed forward aggressively even after such powerful attack he could have charged some of my units. At the same time I still could have fled. Maybe then he should have used his reavers as a living shield in the first place? But then I could use my archers to kill them and still have a clear path to Silver Helms with bolt throwers.
While happy that I managed to stall the advance and destroy the knights as well as support troops I wonder what I could have done better to at least give myself a chance to engage Phoenix Guard. In a way the fact they fled helped them to avoid being surrounded as I needed my infantry to work with cavalry to be able to create favorable combat. However, looking at a diagram from turn 5 I can see a potential for last turn charge if we played 6 turns. Would that be enough to win and break PG is of course a different question. However, I didn't move many regiments as we were running out of time. What I would do is the following:
- move Swordmasters S1 to the flank of PG so that they cannot be charged
- withdraw Archer to be able to flee from PG charge
- move S2 towards the river bank to be ready to charge too
- reform DP1 and N1 to face PG from different directions as well
- use ER1 to block the prince
- use remaining shooting (and magic) for thinning down PG
But that is for another time to find out :)
Thanks for reading and I hope you enjoyed the report!
Cheers!
I'd almost forgotten about this game, Swordmaster. Looking back, I'm not enthused by the army list or my useage of it. I really didn't have enough board control to be effective against normal armies, let alone your MSU. I also failed to deploy well, leaving my units spread out where you could pick them apart. Sigh. I like to think that I've gotten much better since then. Perhaps we'll be lucky enough to have a rematch at some point.
ReplyDeleteDavid.
Hi David,
DeleteThanks for the comment! I am sorry this report brought back some negative memories but as you say, the defeats are simply the lessons and I am sure you would not make the mistakes you did that game. I hope to come back to Oz soon and when I do I also hope there will be 8th edition around so that we can have a rematch!
Cheers!