
Greetings!
I have recently enrolled for UB tournament organized by Warhammer-Board, a German website community who invited some international players. It is 3 round small event using ETC player's pack.
In the first round I had a pleasure to play against Eloriel, one of the organizers of the tournament who decided to bring Beastmen this time (he usually plays WE or DE or WoC).
Beastmen - Army List
Doombull *General*, Mark of Tzeentch, Great Weapon, Heavy Armor, Shield, Crown of Command, Talisman of Perservation, Dragonhelm - 368
Doombull, Mark of Tzeentch, Great Weapon, Shield, Arabyan Carpet, Armour of Destiny - 366
Doombull, Mark of Tzeentch, Shield, Gnarled Hide, Sword of Swift Slaying, The other Tricksters Shard, Dragonbane Gem, Armour of Fortune - 346
Gorebull, Battle Standard Bearer, Mark of Tzeentch, Great Weapon, Heavy Armor, Charmed Shield, Talisman of Endurance - 248
Slugtonque - 190 - Lore of Undeath
Bray Shaman, level 1, Dispel Scroll - 105 - Lore of Shadow
Bray Shaman, level 1, Chalice of Dark Rain - 120 - Lore of Shadow
10 Gor Herd, Mark of Slaanesh, Musican, Standard - 95
10 Gor Herd, Mark of Slaanesh, Musican, Standard - 95
10 Ungor Herd, Full Command - 65
10 Ungor Herd, Full Command - 65
5 Ungor-Raider, Mark of Slaanesh, Musician - 38
5 Ungor-Raider, Mark of Slaanesh, Musician - 38
5 Ungor-Raider, Mark of Slaanesh, Musician - 38
5 Ungor-Raider, Mark of Slaanesh, Musician - 38
5 Ungor-Raider, Mark of Slaanesh, Musician - 38
5 Ungor-Raider, Mark of Slaanesh, Musician - 38
5 Ungor-Raider, Mark of Slaanesh, Musician - 38
5 Ungor-Raider, Mark of Slaanesh, Musician - 38
5 Harpies - 55
5 Harpies - 55
Totaly:2474 Points
Very interesting list! It is clear that Minotaurs are here to charge, stomp, trample and basically destroy the enemies. They are also well protected with good armor and even better ward save. Multitudes of Raiders are to ensure the right placement of the Minotaurs and to block potential reinforcements. With mark of Slaanesh it is great deal as the opponent has to kill them all to get rid of the problem.
Addition of Slugtongue with Lore of Undeath is a good trick too because he can affect a few nasty unit on the enemy side (in particular cannons) and then add to the pool of redirectors or even summon some hard hitting regiments too.
You would notice that the army is above 2400 points as accordingly to ETC rules Beastmen can have more points to spend if they don't take particular choices:
Maximum unit size is increased to 550 points
May take Putrid Blightkings from Warhammer End Times: Glottkin
● Additional 75 points for the army size (Up to 300 maximum) 1 choice each
● Take Marks of Chaos as in Warhammer End Times: Glottkin 1 choice
● Slugtongue 1 choice
I decided to take my recent version of the army with a little adjustment due to possibility to play against creatures that can regenerate and blood and glory scenario.
Outcasts - Army List
Larry the Loremaster, Earthing Rod, Armor of Fortune, Obsidian Amulet - 320
Bob the Battle Standard Bearer, Griffon (Swiftsense), Dragon Armor, Lance, Talisman of Preservation, Charmed Shield - 331
16 Archers, Full Command - 190
15 Archers, Full Command - 180
5 Ellyrian Reavers, Champion, Musician, Bows, Spears - 115
5 Ellyrian Reavers, Champion, Musician, Bows, Spears - 115
5 Dragon Princes, Musician, Banner of Eternal Flame - 175
5 Dragon Princes, Musician - 155
10 Swordmasters, Bladelord, Musician - 150
10 Swordmasters, Bladelord, Musician - 150
10 Lions, Banner, Musician, Gleaming Pennant - 150
Eagle Claw Bolt Thrower - 70
Eagle Claw Bolt Thrower - 70
Great Eagle - 50
Great Eagle - 50
9 Sisters - 126
Army Total: 2397
Doombull - General - 4+ armor save, 3+ against the shooting, 3++ ward and 2++ ward against flaming attacks. It is very hard to break through these defenses. In particular on a model that has T5 and 5W. Doombull hits back very hard too and every combat he wins adds to the already impressive amount of attacks. What is more, Minotaur characters inflict d3 impacts and stomps are also good to have. Potentially, a single doombull has a good chance of killing entire units of mine in a single combat.
I cannot harm it with magic missiles because these are usually flaming attacks. I observed, however, that Elo likes to join units with his characters for time being to better distribute the shooting attacks among his characters and regiment so that they arrive in combat in better shape. Since this character is on foot he can still be diverted. My approach would be to avoid combat with such monstrosities as long as possible and feed them with units that may not be worthy much or would take them out of combat for longer.
Doombull - 2+ armor save, 4++ ward save, 2++ against flaming attacks, this characters is the most dangerous model for my army because he also has ASF thanks to his magical sword. He will have re-rolls against Swordmasters and Lions, for example. Same story, has to be avoided although wounding him with single bolts from bolt throwers is more likely than the general of the army.
Doombull - Flying Carpet - very fast and dangerous too but with worse protection. 3++ ward save is of course fantastic but 4+ armor save means I can at least try some magic missiles and even regular arrows can be lucky enough. He is also alone and exposed meaning out of three doombulls I have the best chance to target this one and he was my priority. Another reason why I wanted to hunt him down is that he can get to my bolt throwers faster than others.
BSB - adds to the killing potential of the army but is the most vulnerable of all minotaurs. Ideally breaking him in combat is the best way to destroy that character but close combat is where the minotaurs want to be. If that happens I would try to direct attacks at him to be able to kill him. This army is Ld8 only so destroying BSB is very important too.
Slugtongue - this guy has a potential to cripple my army before the game even starts. That is why I decided to deploy at the very edge of the deployment to make it more difficult for him to reach all the units and hopefully limit the impact of his special rule. Another interesting thing is that he will use Lore of Undeath and that is the first time I would ever face one. In fact, Larry the Loremaster also has a chance to use signature spell from that lore and I might use it for my own benefit.
Bray Shamen - this guys are here mainly to provide channeling but shadow magic can be very useful too. They are also worthy some more points than the units and are possible to hunt down so I will look for the opportunities to catch them.
Gor Herds - very small units, but Slaanesh marked so they would flee nowhere. They will be protecting the wizards for sure and I expect them to stay behind but with my fast cavalry I have a chance to catch them and will definitely try to do so.
Ungor Herds - delivery systems for Minotaurs as due to base size they fit in nicely. Question was how Elo would assign his characters, would they go to a single unit or spread them among two regiments. Potentially provide some wounds to balance the combat results but with huge amount of attacks by minos that might not be enough. It still might be a good idea to shoot at them to get points as well as deprive minos from living shield.
Ungor Riders - wow, how many units again? :) the interesting part is that Elo can choose how many (if at all) he wants to have in ambush. These little critters are very annoying because they can shoot, they don't panic and may at least re-direct or simply tie in combat other regiments. I also expect them to interfere with the movement phase so that Minos can reach combats they want to be in. The good thing is that I have units that can comfortably take them out one on one and I will use that advantage.
Harpies - also dangerous, very fast and with more attacks, have to be eliminated real quick. Riders are slower and can be blocked, flying units cannot and that is huge difference.
My general plan was to deploy far back and use shooting superiority to inflict damage. At the same time I wanted to use my own units to outflank the enemy and get around to the wizards that are not well defended and easier to destroy. Since they are all worth 100-200 points each it is a good amount to get some advantage. I would try to destroy all these small units on the way as well and with some bonuses for banners I think I can earn some points to balance out inevitable casualties.
At the same time I would delay Minotaurs and re-redirect them using their frenzy to make them go away from my regiments. With some luck I may even be able to hunt down one of them.
Terrain
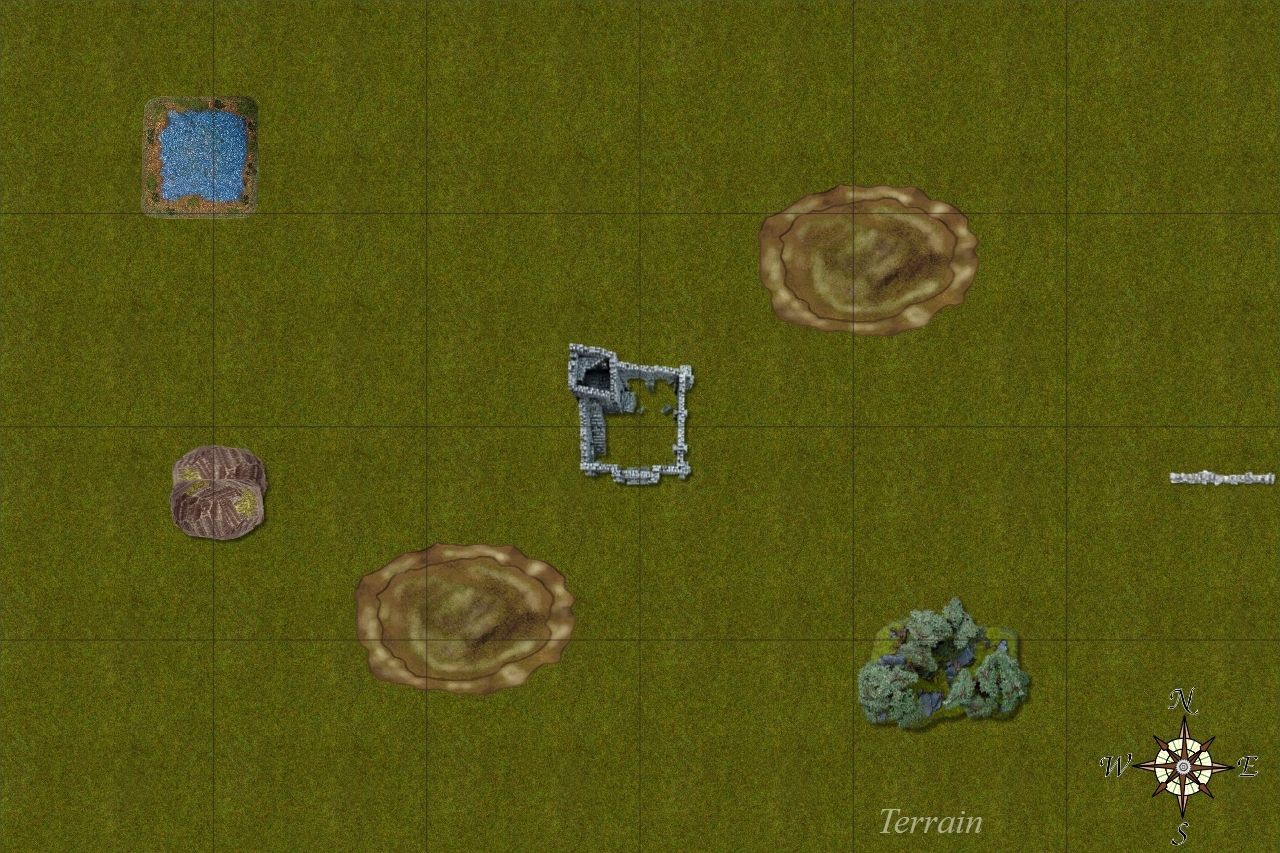 |
| The map called "Burning down the house" |
Here are the rules for terrain under ETC format:
Hills - As per BRB description of an ordinary hill (p. 118 first 5 paragraphs, i.e. without the“Examples of hills” subsection) with following additional explanations :
- Line of Sight: Hills block Line of Sight.
Forests - As per BRB description of an ordinary forest (p. 119 first6 paragraphs, i.e. without “Mysterious Forests” subsection) with following additional explanations:
- Line of Sight: Forests are Interfering terrain providing Soft Cover for units, as described in BRB. For Line of Sight purposes Forests count as being of infinite height. This implies that units shooting trough forest will always suffer Soft Cover penalty, even if shooting from a hill or building.
Lake - As per BRB description of a Normal River (p. 120 first 5 paragraphs, i.e. without “Mysterious Rivers” subsection) with following additional explanations:
- Line of Sight: Lakes are non-interfering terrain features.
- Lakes are Water Features.
Obstacle: Wall - As per BRB description of an ordinary Wall (p. 123 with common rules for Obstacles,p.122) with following additional explanations:
- Walls definition of a unit “behind” is applied only to units actually defending the obstacle (i.e.aligned with it and touching it).
- Line of Sight: Obstacles are non-interfering terrain features.
Ruins - As per BRB description of an ordinary marshland (p.121 first 3 paragraphs, i.e. without “Examples of Marshland”
subsection) with following additional explanations:
- Ruins are NOT Water Features.
- Line of Sight: Ruins are non-interfering terrain features, providing Hard Cover for all units withmajority of their models in the feature.
Impassable
As the title says - infinite height, impassable terrain.
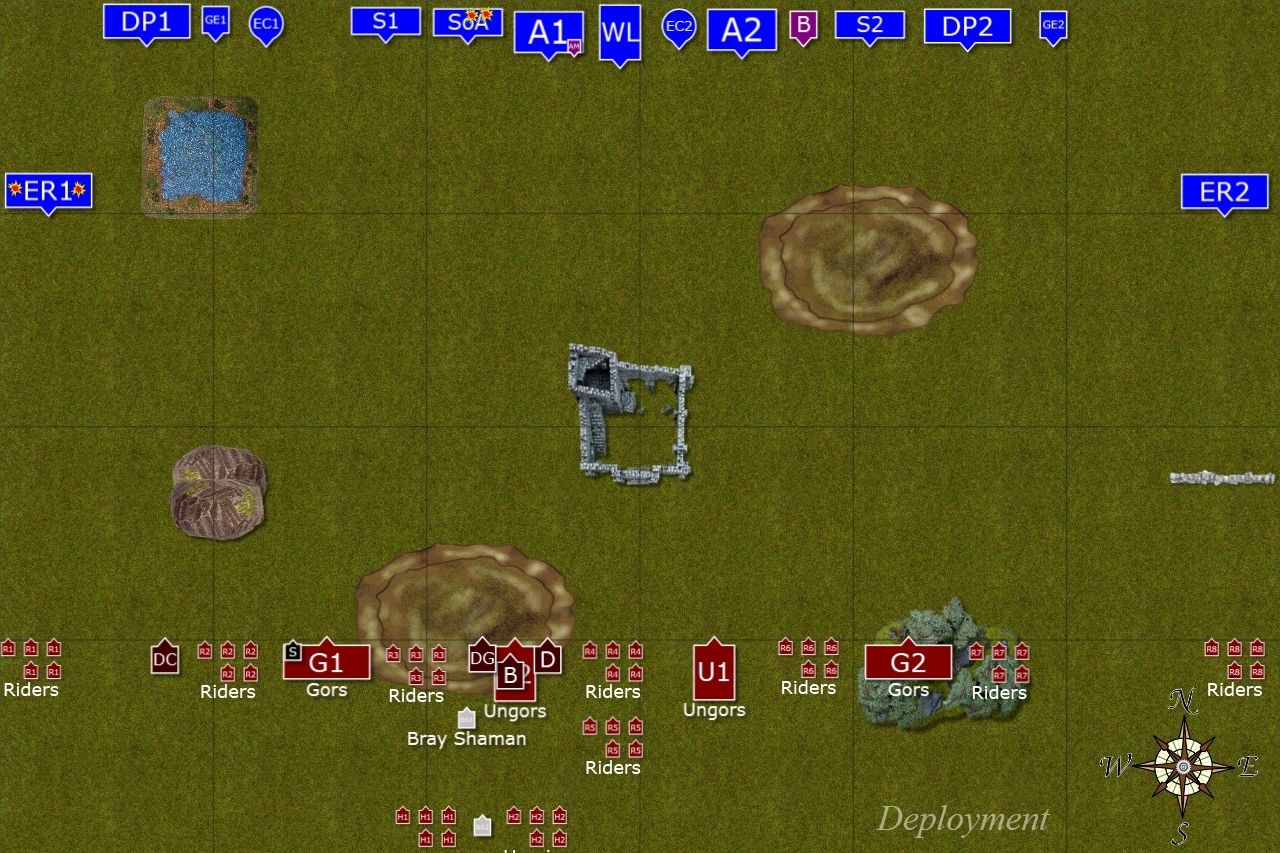
Deployment
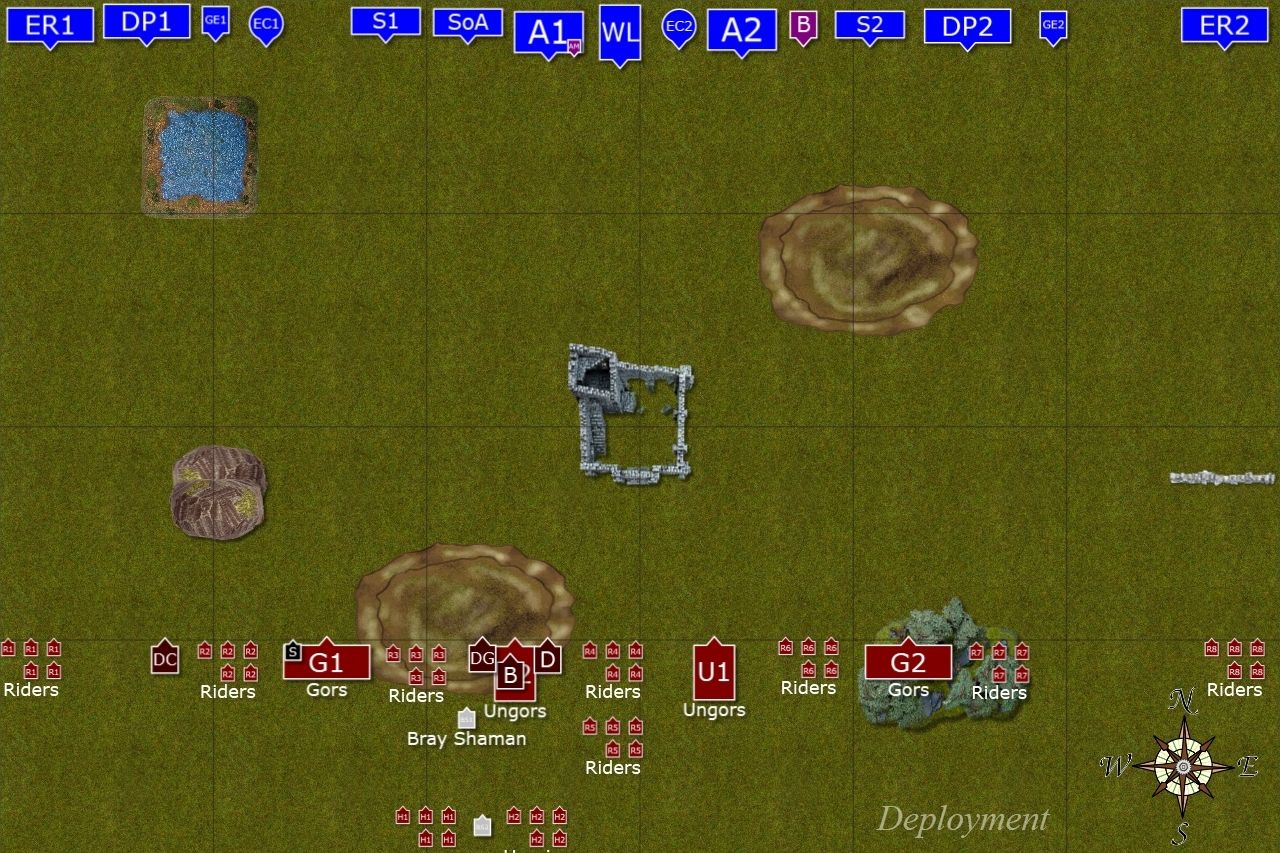 |
| Deployment of the armies |
 |
| After vanguard and Slugtongue attacks |
Slugtongue got:
Ryze - Grave Call - summons infantry up to 50 or 100 points or monstrous infantry up to 150 points
Ryze - Grave Call - summons infantry up to 50 or 100 points or monstrous infantry up to 150 points
Akar'aran - The Dark Riders - summons cavalry, monstrous cavalry or chariots up to 150 points
I won the roll off and got the first turn!
Outcasts - Turn 1
I won the roll off and got the first turn!
Outcasts - Turn 1
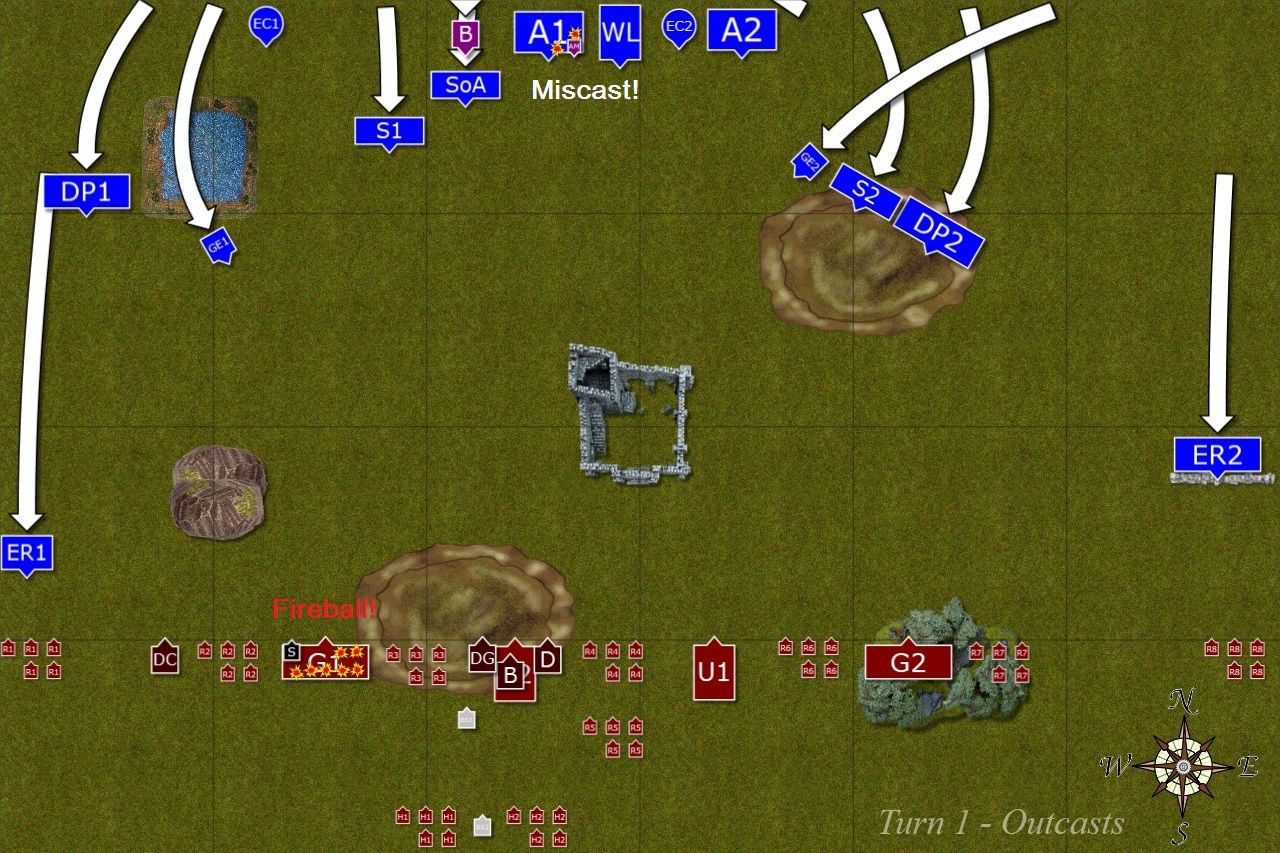 |
| Fast cavalry is fast! |
Elves moved on the flanks in order to envelop the enemy, their favorite tactics. The center remained stationary, the foe was still far away and out of range of the archers. But not for the magic missiles. Larry the Loremaster managed to cast medium fireball at gors irresistibly and used his earthing rod to contain the feedback. Luckily for him he didn't forget his spells thanks to that safety valve!
Magic Phase Details
Winds of Magic: 2,4 --> 6:5 (one channel for Beastmen)
Iceshard at Gors with Slugtongue: 5,5,5 + 2 = 17, no dispel attempt (Edit: Clearly a mistake, I kept forgetting about Mark of Slaanesh)
2d6 Fireball at Gors with Slugtongue: 1,6,6 - Irresistible Force --> 4,6 = 10 hits, 7 wounds --> Miscast: 4,6 --> re-rolled with Earthing Rod to 1,6 --> 2 archers die
Shooting Phase Details
Eagle Claws at gors with Slugtongue: 4+ to hit --> 5 hits --> 2 at Slugtongue, 1 wounds, failed regeneration; 3 at the unit, no wounds inflicted
Reavers at respective riders: no casualties
Beastmen - Turn 1
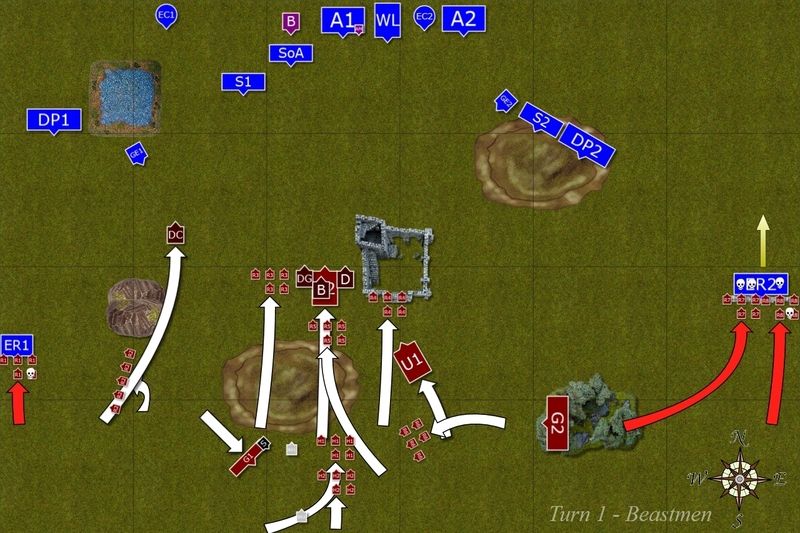 |
| Beastmen try to seize the initiative |
Beastmen used their primal cunning and converged around their big Minotaur leaders that moved forward to reach squishy Elves as soon as possible. Some riders obeyed the orders of Shaman leaders and grouped behind the hill to provide protection. Finally, the riders on the flanks took the fight to the enemy. And while the ones on the left flank could not shift the reavers, the bands on the right broke their enemy! Fortunately for the Elves their steeds were fast enough to take them to the temporary safety.
(Edit: Please, not that G2 failed their Swift Reform test)
Magic Phase Details
Winds of Magic: 1,1 --> 3:2 (one successful channel for each side)
Ryze: 1,2,3 + 2 = 8 --> failed
Combat Phase Details
ER1 vs Riders: Elves 3+ with re-roll --> 3 hits, 1 wound; steeds 4+ --> 1 hit, 0 wounds; riders 4+ (failed primal fury test) --> 1 hit, 1 wound, saved on 5+ --> draw
ER2 vs 2 bands of riders: Elves 3+ with re-roll --> 5 hits, 2 wounds; steeds 4+ --> 1 hit, 0 wounds; raiders 5+ with re-roll (passed primal fury test but -1 to hit due to obstacle) --> 4 hits, 3 wounds, no saves --> Reavers break on a roll of 9
Outcasts - Turn 2
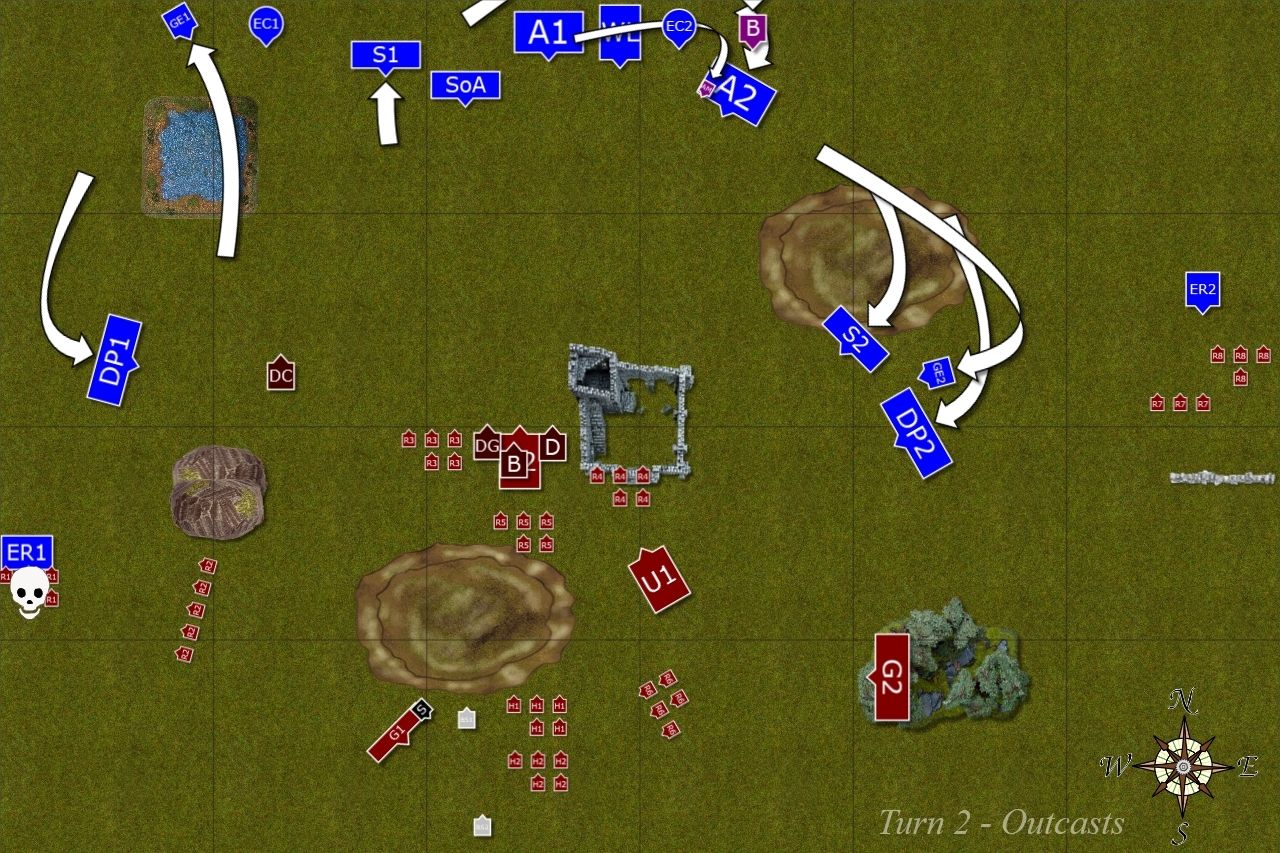 |
| Outflanking continues |
Elves continue their outflanking maneuvers and at the same time consolidate their positions in the center. They are already under the direct threat of one of the Doombulls charge but the main enemy unit is still too far to attack.
Magic Phase Details
Winds of Magic: 1,5 --> 6:6 (one channel for Beastmen)
2d6 Fireball at Flying Doombull: 1,3,6 + 2 = 12 --> dispelled on the roll of 2,2,5,5 + 2 = 16
Boosted Burning Gaze at Flying Doombull: 2,3,5 + 2 = 12 failed to cast
Shooting Phase Details
Eagle Claws at Flying Doombull: 3+ and 4+ to hit, 1 hit, 1 wound, warded on a roll of 5+
Sisters of Avelorn at Flying Doombull: 3+ due to long range, 3 hits, 0 wounds
Archers A1 at Flying Doombull: 4+ to hit (long range), 8 hits, 1 wound, saved
Archers A2 at Flying Doombull: 5+ to hit (long range, move), 7 hits, 0 wounds
Combat Phase Details
ER1 vs Riders: Elves 3+ with re-roll --> 3 hits, 3 wounds; steeds 4+ --> 3 hits, 2 wounds --> dead unit
Beastmen - Turn 2
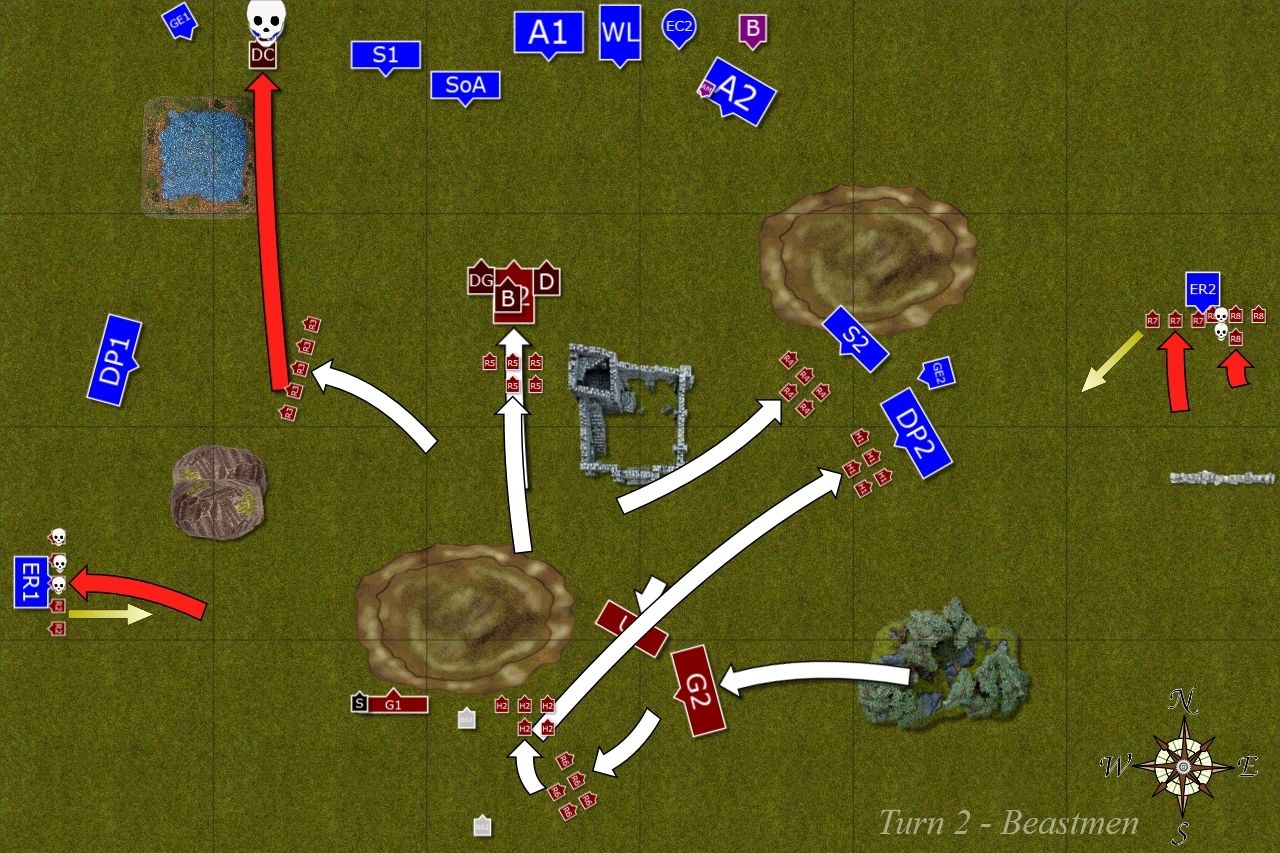 |
| Beastmen keep pressing forward |
Flying Doombull, annoyed by some Elves shooting at him, charges at the eagle claw and reduces it to splinters (Edit: needed 8+ to charge). Ungors on the extreme flanks try again to get rid of pesky Reavers but this time they lose badly and that puts some of the more vulnerable units in a bad position.
Minotaurs rush forward without paying attention to expendable riders even as they rush to intercept outflanking Elves. Beastmen herds become more and more divided.
Magic Phase Details
Winds of Magic: 5,6 --> 11:6 (no channels)
Boosted Miasma on ER1: cast on a roll 2,2,4,5,5 + 1 = 19 --> no dispel attempt --> d3 = 4 --> -2
Akar'aran: cast on 2,3,3,3,4 + 2 = 17 --> dispelled on a roll of 2,2,3,5,5,6 + 2 = 25
Combat Phase Details
ER1 vs Riders: Elves 4+ with re-rolls --> 3 hits, 2 wounds; riders (primal fury failed) 4+ --> 3 hits, 1 wound, saved; steeds 5+ --> 1 hit, 0 wounds --> Riders fail break test and are caught in pursuit
ER2 vs 2 units of Riders: Elves 3+ with re-rolls --> 2 hits, 1 wound; Steeds 4+ --> 1 hit, 1 wound; Riders fail to inflict casualties --> left unit breaks, right units holds
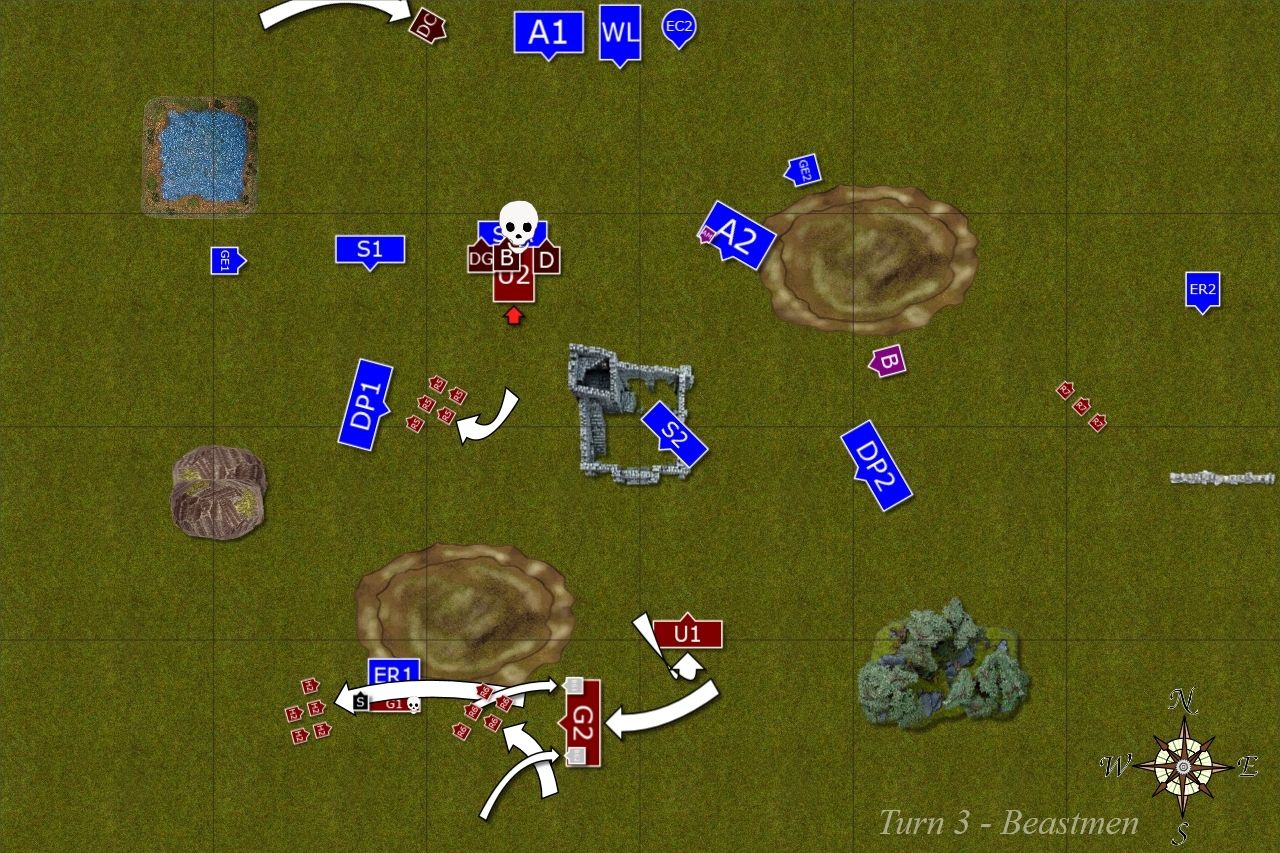
Outcasts - Turn 3
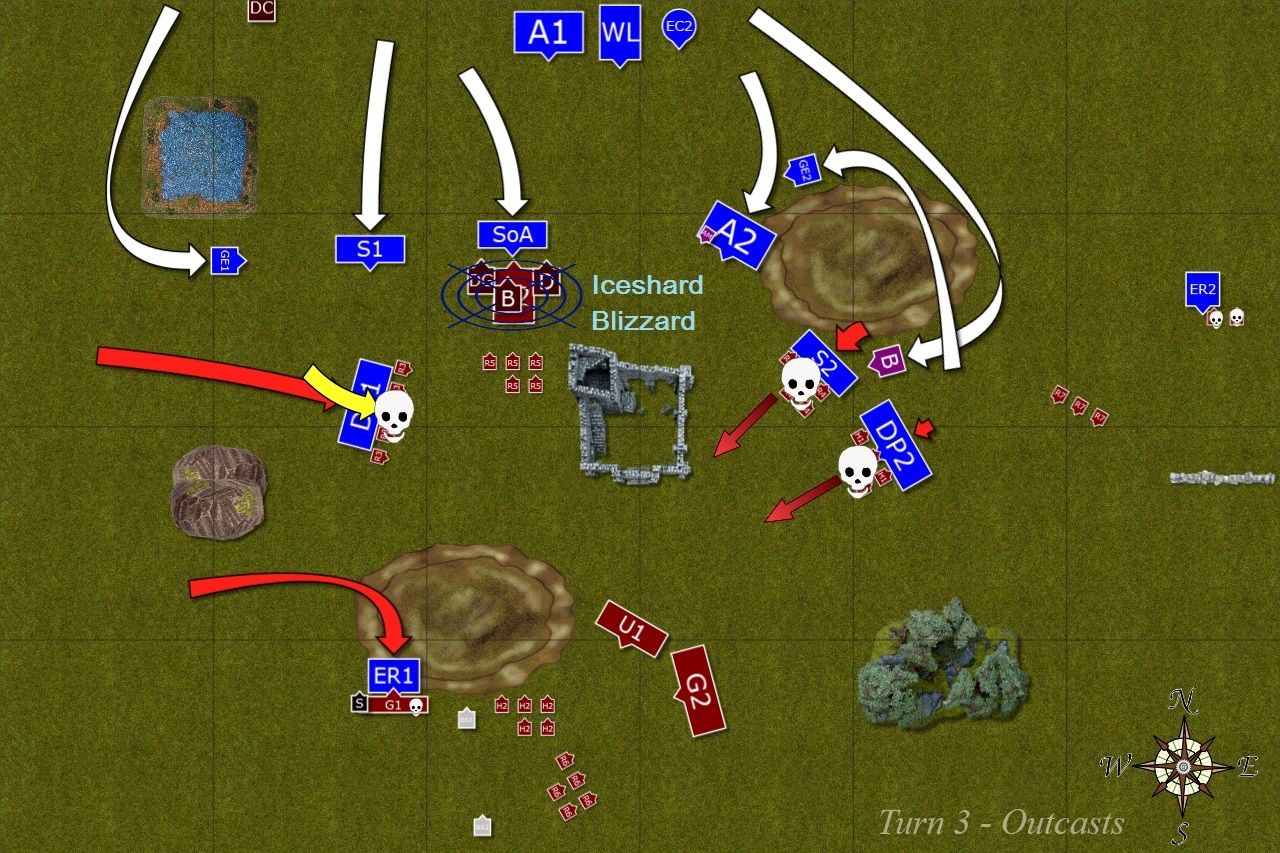 |
| Elves remove first layer of living shield |
Elven units attacked blocking rider bands. Dragon Princes and Swordmasters defeated their enemies easily. Tired and under the influence of a spell reavers attacked gors with Slugtongue but could not break them. Would they hold long enough for reinforcements to arrive?
Magic Phase Details
Winds of Magic: 5,5 --> 10:5 (no channels)
d6 Fireball: 1,2 + 2 = 5 --> dispelled on 1,2 + 2 = 5
Burning Gaze: 2,5 + 2 = 9 --> dispelled on 2,4,6 + 2 = 14
Iceshard Blizzard at Minotaurs: 4,4 + 2 = 10 --> no dispel attempt
Spirit Leach on BSB: 2,4,4 + 2 = 12 --> no dispel attempt --> Elves (Ld9 + 2 = 11) < Beastmen (Ld8 + 5 = 13) --> no wounds
Some Shooting Phase Details:
Archers A1 at Minotaurs: 7 hits, 1 hit at each Minotaur, BSB used his Charmed Shield, 3 wounds against Ungors
Eagle Claw single bolt: missed
Some Combat Phase Details:
ER1 vs Gors: Elves 4+ with re-rolls at Gors --> 1 hit, 0 wounds; Gors 3+ (failed primal fury) --> 1 hit, 1 wound, saved; Steeds 4+ --> 1 hit, 1 wound --> Gors pass break test
Beastmen - Turn 3
 |
| Minotaurs give in to their bloodgreed! |
Minotaurs have had enough of waiting and charged the Sisters who dared to block their path. Brave Elven maidens were utterly destroyed but slowed down the rampage of the beasts. ([i]Edit: With Iceshard on Mino-Bus had Ld7 and failed their frenzy check even with a re-roll from the BSB.[/i])
In the meantime Bray Shamen frantically run to hide among Gors and harpies with riders were surrounding reavers to help Slugtongue. Fortunately for him, Reavers failed to break his few bodyguards again. (Edit: Ungors U1 failed their swift reform test and only changed the formation.)
Magic Phase Details
Winds of Magic: 2,5 --> 7:6 (one successful channel for Elves)
Boosted Miasma: 1,2,4 + 1 = 8 failed to cast
Akar'aran: 3,3,5,5 + 2 = 18 --> dispelled on a roll of 1,1,2,3,4,5 + 2 = 18
Some Combat Phase Details:
ER1 vs Gors: Elves 3+ with re-roll --> 3 hits (all at the unit), 1 wound; Steeds 4+ --> 1 hit, 0 wounds --> 0 casualties from Slugtongue and Gor --> draw due to banner (Edit: I think we made a mistake here as there was no musician among Gors anymore so I should have win that by 1.)
Outcasts - Turn 4
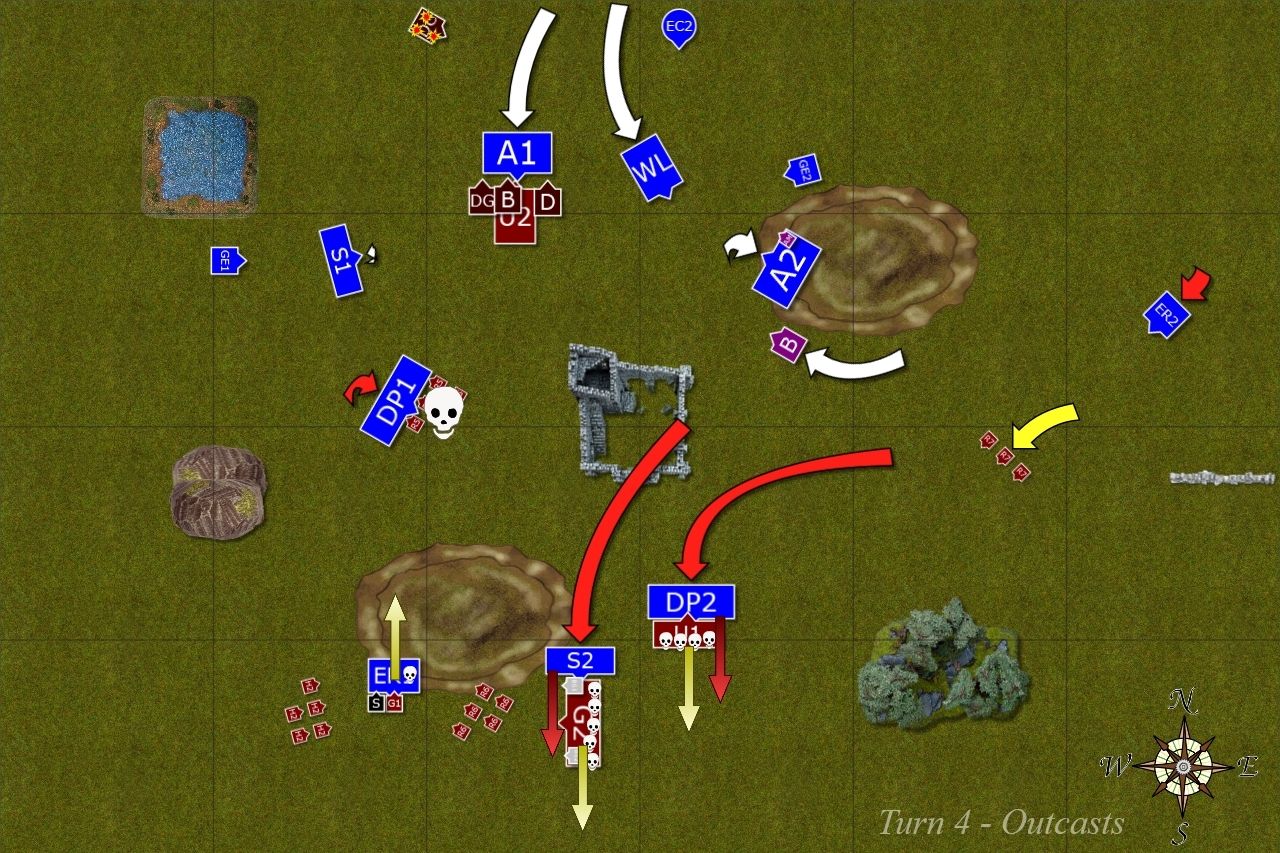 |
| Elves continue their attack! |
The situation became even more complex. On the North Archers moved forward to distract Minotaurs and to buy more time for the assault units to hunt down vulnerable hordes and enemy wizards hiding on the South.
Dragon Princes destroyed their foes again. Swordmasters spotted exposed flank of gors with two enemy wizards and charged in, won combat decisively but didn't catch the fleeing beastmen. Unfortunately, Ellyrian Reavers lost the combat against single gor and Slugtongue, broke and were run down in pursuit.
Magic Phase Details
Winds of Magic: 1,6 --> 7:6 (no channels)
Burning Gaze at Flying Doombull: 4,6 + 2 = 12 --> no dispel attempt --> 2 hits, 0 wounds
Fireball at Flying Doombull: 2,6 + 2 = 10 --> no dispel attempt --> 4 hits, 3 wounds, 2 saved
Spirit Leach at Flying Doombull: 1,5,6 + 2 = 14 --> dispelled with a roll of 1,3,4,5,6,6
Shooting Phase Details
Archers A2 at Flying Doombull: 5+ (move, long range) --> 7 hits, 0 woundsEagle Claw single at Flying Doombull: 3+ --> hits, wounds, no ward --> d3 multiplied to 2 wounds
Some Combat Phase Details:
ER1 vs Gor and Slugtongue: 2 Elves attack gor --> 0 hits, 1 wounds Slugtongue but he regenerates; Steeds fail to wound --> ER lose by 1 and fail break test
(Edit: I think I made a mistake here, I should have allocated the attacks at standard bearer as it would mean I would win the combat at least by musician.)
Beastmen - Turn 4
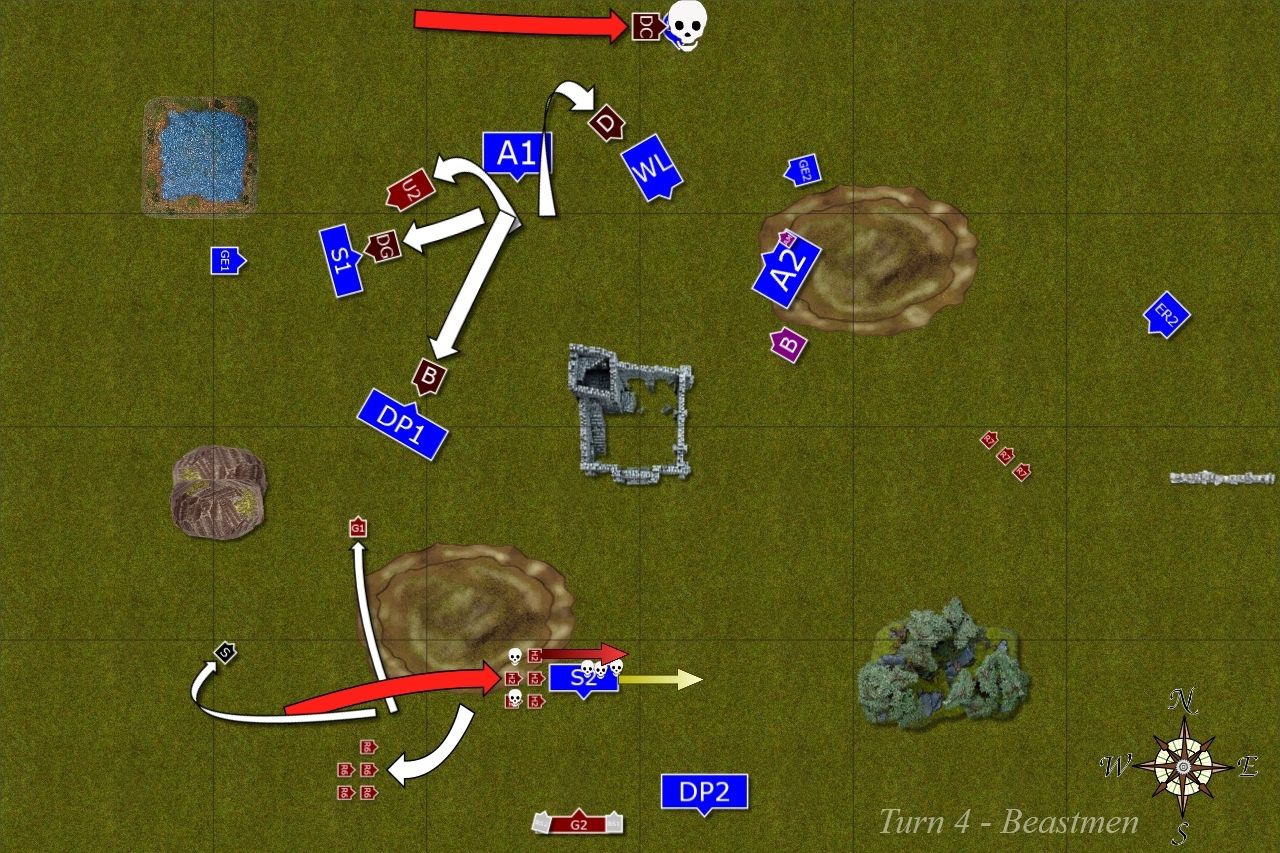 |
| Minotaurs separate to hunt alone! |
Flying Doombull hunted down second Eagle Claw with easy while his brethren moved out of their pack and started hunting down units individually, each going after different Elven unit.
Harpies spotted the chance for revenge when Swordmasters exposed their flank to the attack. The warriors of Hoeth fought well but broke from combat anyway. They were lucky to flee though but it was clear that hot pursuits were a mistake and beastmen wizards will have a chance to escape now.
Magic Phase Details
Winds of Magic: 3,5 --> 8:5 (no channels)
Boosted Miasma: 3,4,6,6 --> IF --> miscast result: 1,6 --> single wound on Gor --> 6 dice lost --> end of magic phase
Some Combat Phase Details:
Harpies vs Swordmasters: Harpies 4+ to hit ---> 6 hits (out of 9 attacks) --> 4 + to wound --> 4 wounds --> 5+ saves --> no saves; Swordmasters --> 3+ to hit, 4 attacks --> 2 hits, 2+ to wound --> 2 wounds --> steadfast, failed break test
Outcasts - Turn 5
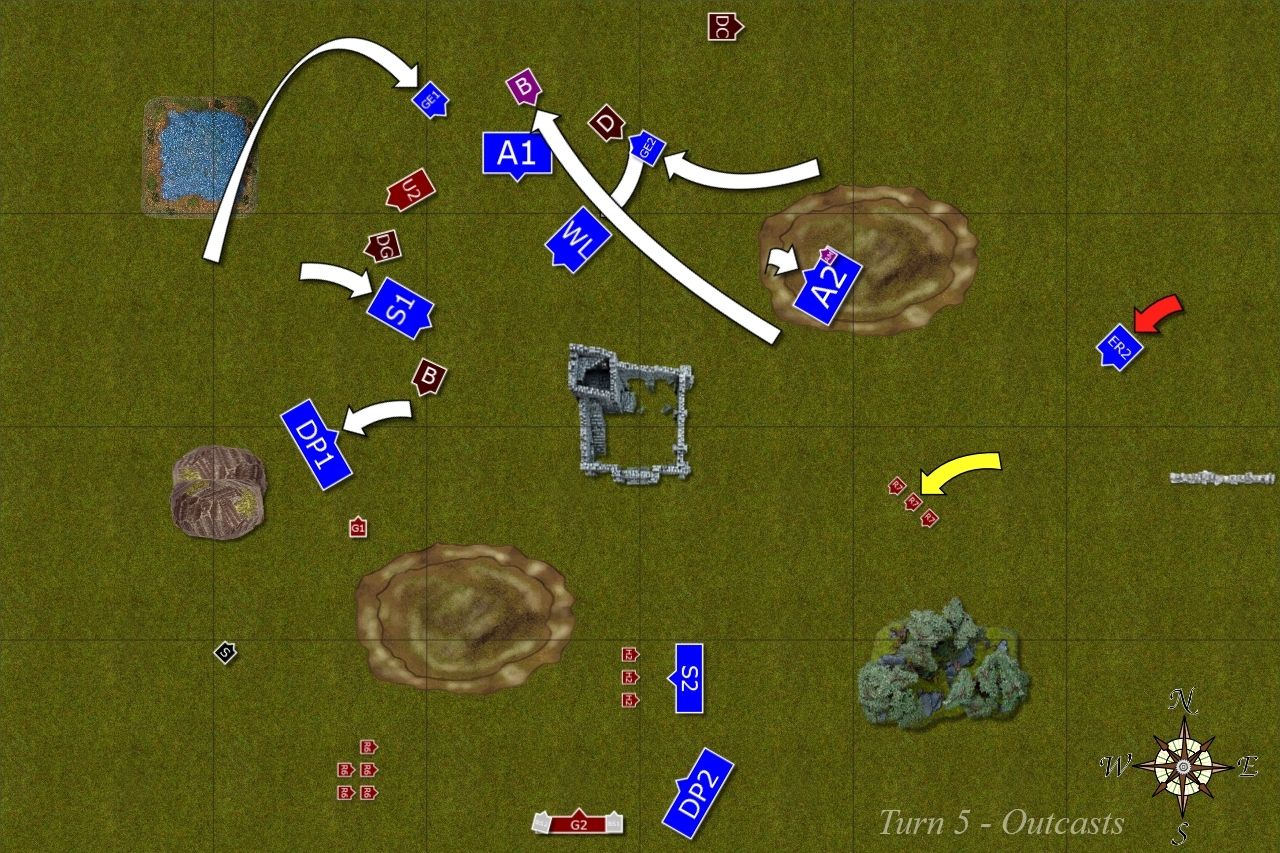 |
| Evading maneuvers |
Elven units were hard pressed but they used their superior training to execute well organized march moves and avoid the rampaging Minotaurs where possible. Sometimes it required trusty eagle to distract bloodthirsty beasts.
At the same time Larry and Archers tried to inflict some damage at the distance but could not land the killing blow just yet.
Magic Phase Details
Winds of Magic: 1,6 --> 7:6 (no channels)
Burning Gaze at Flying Doombull: 3,5 + 2 = 10 --> no dispel attempt --> 5 hits, 1 wound, saved
2d6 Fireball at Flying Doombull: 1,1,4 + 2 = 8 failed to cast
Shooting Phase Details
Archers A1 at a single Gor: 6+ to hit (long range, hard cover) --> 4 hits, 0 wounds
Archers A2 at Flying Doombull: 4+ to hit --> 8 hits, 1 wound, saved
Beastmen - Turn 5
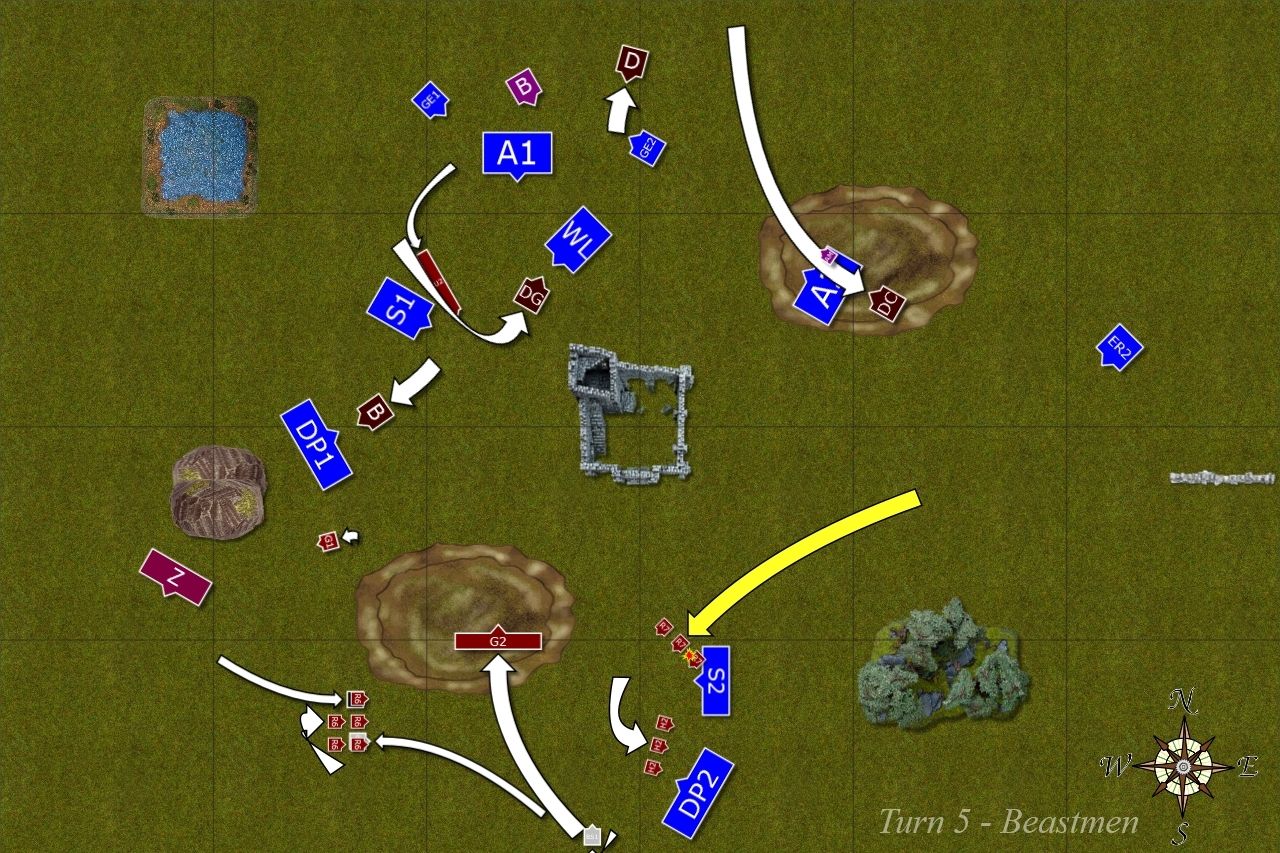 |
| Minotaurs try to catch fleet on foot Elves |
Four angry Minotaurs moved around again, trying to catch the Elves who kept avoiding them. At the same time Ungor Riders failed to rally and fled through the ranks of Swordmasters who captured one of the creatures. That also meant remaining two were blocking the attack path for the warriors of Hoeth.
One Shaman and Slugtongue moved to join last pack of riders and hid behind the hills. Slugtongue finally raised some Zombies to help him out too!
Magic Phase Details
Winds of Magic: 3,4 --> 8:5 (one successful channel each)
Ryze: 1,1,5,6 + 2 = 15 --> no dispel attempt --> 10 Zombies summoned
Akar'aran: 1,1,2,3 + 2 = 9 --> failed to cast
Outcasts - Turn 6
 |
| Last chance to hunt some beastmen! |
It was the last chance to hunt down some vile beastmen. Swordmasters charged ungors who held to prevent the attack at their Minotaur boss. They died but single survivor fled!
In the South another unit of Swordmasters chased riders away and re-directed into Gors but they fled to safety! Dragon Princes attacked herpies and killed them all. Nearby Shaman thought it was all lost and fled towards the dark forest as well.
Larry and Archers tried for the last time to inflict some more damage but while last Gor was pinned dead to the ground, Flying Doombull remained barely alive but alive nonetheless!
Magic Phase Details
Winds of Magic: 5,5 --> 10-7 (successful channel for Beastmen)
Iceshard Blizzard at Flying Doombull: 4,6 + 2 = 12 --> dispelled on 3,4,4,6 + 2 = 19
Burning Gaze at Flying Doombull: 3,3 + 2 = 8 --> no dispel attempt --> 5 hits, 2 wounds, 1 save
Fireball at Flying Doombull: 3,4 + 2 = 9 --> no dispel attempt --> 2 hits, 2 wounds, 2 saves
Spirit Leach at Flying Doombull: 2,6 + 2 = 10 --> dispel scroll
Searing Doom at Flying Doombull: 4,5 + 2 = 11 --> failed dispel attempt on 2,5 + 2 = 9 --> 2 hits, 1 wound, saved
Shooting Phase Details
Archers A2 at Flying Doombull: 4+ to hit --> 7 hits, 3 wounds, 3 saves
Beastmen - Turn 6
 |
| Sorry for that picture, don't know why it uploads to photobucket like that :( |
Great Eagles took one for the team and stopped Doombulls from causing more damage. Wounded Flying Doombull charged White Lions but they decided that they better withdraw as they would have been attacked from the flank and their chances at killing the beast were slim anyway.
With that both forces withdrew and regrouped and it seemed that Elves managed to carry the day by the narrowest of margins!
Summary
 |
| Turn-by-turn summary animation |
After-battle thoughts
First of all let me thank Elo for being a great opponent and all the spectators from the peanut gallery. There was quite a crowd there at some stage and it's just a pity we had to start the game 9:30-10pm as many people didn't stay long enough to see the end of the game. I hope they will enjoy reading this report then! :)
I was very happy to scrap 11:9 victory from that game as it was a big challenge for me to avoid the Minotaurs while trying to earn enough points elsewhere. There were moments of luck/bad luck on both sides. Before I move on to my own observations here are some points Elo emailed me to comment on the mistakes he says he made and that he believes resulted in his defeat:
1. I didn't split the Minotaurs between 2 units. Your regiments don't have the chance against the Bulls and by putting them into a single unit I limited my movement options and could not play aggressively with them.
2. Failed Frenzy test when Sisters of Avelorn where blocking the unit. If passed I would charge with BSB only, move Doombull with Sword of Swift Slaying against the Lions and the General against the Archers.
3. Charging Reavers with Riders, I should shoot at them instead.
4. I didn't bring the redirector to avoid being charged in the situation when Reavers attacked depleted unit of Gors with Slugtongue.
I agree with the above and here are my observations and comments on various things that happened in the game:
1. Deployment - I was happy with it as I limited the number of units that were affected by Slugtongue by half and didn't suffer many casualties either. The only thing I would change was the relative position of ER1 and DP1 as I had havy cavalry slowed down by the lake where I could not march.
2. Reavers - While I moved them forward in an attempt to outflank the enemy fast and in the end caused lot of trouble for enemy wizards, I wonder if I could have played them better? For example, ER1 could tempt Flying Doombull to charge them, challenge and flee to draw him away from the Eagle Claw. Or even charge him and do the same if he didn't take the bait.
When in combat I made a mistake at some stage when I split the attacks between one remaining gor standard bearer and Slugtongue. The single attack that wounded was regenerated while it would have killed the unit outright and won me the combat. I may have had broken the enemy then, instead I broke myself and lost the unit.
3. Overruns - I definitely made a mistake with overruning in turn 4. I should have restrained and reformed with both, Swordmasters and Dragon Princes. If I did I would have had more options, attack defeated units again if they rallied or attack/press against fresh targets. As a result I endangered Swordmasters who luckily escaped harpies and totally lost the chance to hunt down all 3 enemy wizards that were quite expensive in comparison.
4. Dragon princes - I left them after defeating the riders where I could press South and help in hunting down enemy wizards.
5. BSB - his main role was to make sure I have the re-rolls for swift re-forms when needed. Fortunately, I didn't but if I failed at least one test these Doombulls would have caught me. I am just wondering if I could position him better to be able to charge something in the meantime. I considered attacking Flying Doombull if possible but at that time he still had 2 wounds left and I am not sure if even with re-rolls I would by pass 3++ ward twice.
6. Lions - that was another thing I am not sure if I did properly. I exposed the flank to Flying Doombull. I decided I better flee and give up half the points (ETC rule) than risk being trampled. Lions and Doombull would strike at the same time. I had 4+ to hit, 3+ to wound with 3 attacks only. Doombull had 8A at this stage + d3 impact hits + stomp. With 3+ to hit and 2+ to wound I could have lost entire unit anyway. That would be the difference between small victory and a draw and while I didn't know the score at the moment I made that decision, I decided to play safe.
I hoped to inflict that last wound on Doombull as it would have been great but it was not to be. As you can see there were some points to collect on both sides if not for the mistakes we made so I guess 11:9 is a good reflection of the game.
Thanks for reading and looking forward to your comments and feedback!
Cheers!
What an amazing report! I really wish I could have been a spectator on this one.
ReplyDeleteI really like those flying carpet characters. You need something that has an impressive statline to compensate for the reduced magic item beefing up, but Minotaurs certainly have what it takes. I've seen Lizardmen Oldbloods and Ogre Slaughtermasters (by Greg from the Hoodling's Hole) do it too and it really adds something fun to these armies.
I think your opponent gave you a really fun game and it's nice to see the end result being close.
Somehow, it feels like your magic and shooting let you down, but you won the battle mostly in the movement phase. You were able to stall the big boys thanks to frenzy and by the time your opponent got them charge-ready, the battle was almost over and some amazing skill at putting your stuff out of sight manoeuvers carried the day.
I do have a question though. This is the second battle you use Bob on a griffon. Do you think it's worth it? You're keeping him out of combat and even if the beast lets the wounds be distributed, your hero is still more vulnerable as a net result. You get your 18" reroll bubble which is nice, but you're having to be more careful positioning Bob so he's safe, which I feel takes a bit of that larger bubble away anyhow.
In short, you could put Bob on an Eagle instead of a Griffon and get the same increased size. But with the extra benefit of an extra wound and an extra point of toughness. You don't distribute the shooting against him, so it's not all good news, but with a 3+/4++ it's not all bad? And you'd get 120 points extra to spend on something else.
Or, you know, just put him on foot again. Which I feel is the better option anyways. I understand that for MSU, you can't have everything in range of your general and bsb, but I guess I think you should ask yourself if the extra 6" is really helping in this regard, especially considering the need for putting your hero in safety?
Yes, these big fellas are like armies on their own :) On one hand it definitely adds to the heroic feel of the game and can be a great inspiration for some epic story. On the other they tend to be almost invulnerable and one can feel quite helpless when fighting against them :)
DeleteI often find the games with close results much more entertaining as these with big points difference often seem to be one sided. Of course I had games where the end result was not a good reflection of the tight and bloody battle that has just happened too so it is not a rule!
I am glad you said it about movement as this is what I mentioned about about the way I want the army to work. It does have a potential to hit the enemy from distance but if it does not work it is not the end of the world. And the best games are when a little bit of everything works together for the effect greater than simple sum of its parts. Not to mention I really like the more dynamic movement phase :)
It is hard to say if having Bob on Griffon is worthy just after 2 games but I have two more coming where he was more active :) I am sure it is my inexperience with that type of a character that does not show his full potential yet. Just to clarify one thing, he has 18" range for re-rolls due to Griffon being large target. So if I mounted him on the Eagle he would lose that.
It is of course true that Eagle riding BSB has some significant advantages. I am not going to argue pros and cons for both as I think they are actually different and have slightly different purpose despite both being BSB's and sharing the duties.
I simply love the model, don't want to proxy the eagle with it (I did it at CanCon and MiniMe and it kind of felt bad :P) and I want to play some games to see what I can achieve with it. Instead of comparing I can tell you about my observations:
- 18" covers more of the army despite being forced to look for some terrain to hide behind
- he has huge potential for counter charge and can let other combat troops to move more aggressively as he is there to be mobile reserve
- terror causing means I don't care about these stupid fear checks I tend to fail :)
I did think a lot about him in this and I actually decided it is not too bad even against some monster killers. If I happen to lose the Griffon (and with 4+ ward and charmed shield I have good chance to survive) I get back my pedestrian BSB. If he is positioned close to infantry he immediately receives 4+ Look Out Sir. He might even be well hidden from the enemy if not mounted anymore. And while I may lose the Griffon and all the benefits it provides my enemy does not get the points yet!
I will keep playing with him for some time simply to collect more experience but after these 4-5 games he is actually not too bad at all! And it does make MSU army stand out a little bit more :)
Cheers!
Well I'm already looking forward to see the games in which he's more active then.
DeleteGood catch about the Eagle, I had somehow supposed that that would also give 18".
I had noticed throughout the years that you seem much more likely than most people to fail your fear tests. You should really practice some dice rolling just for that, as every time it happens, it tends to ruin your plans =)
In any case, I'll withhold my judgment on the Griffon for a couple more games then. At the very least, it's 100% true that it adds a bit of glamour to the army!
New game is on! Let me know what you think :)
DeleteI think it is the consequence of having more units that means I simply have to test more often. Of course there were also some spectacular fails where many units fled at the same time or there was some kind of chain reaction.
However, many times (if not always) there was something I could do to either avoid such situations entirely or at least mitigate the impact. Like in the game 140 :)
Cheers!