
1. Introduction
I
really like the concept of the MSU (Multiple Small Units) army and I
enjoy playing with it a lot. In fact, I have never enjoyed Warhammer as I
am enjoying it now! What you are going to find below is an ever growing summary of my experience earned while playing with High Elves MSU.
Bear
in mind I am simply sharing my observations. I do not aim to prove that
this is the best way to play with High Elves. I do believe it can be very successful and rewarding style of play even if it is risky and with low margin of error. What is more, even with more than 100 games there are still armies out there I haven't played against.
Which is good as I can always add something new! I am sure I will learn a
lot with more battles and with more different opponents and armies I am
going to meet.
You
are more than welcome to add your thoughts and share your own
experiences. I am writing this with particular army and style of play in
mind but there are elements which can be used elsewhere.
2. General principles
MSU
idea appeared for the first time on Druchii.net in 7th (or maybe even
6th) edition. Back then it relied on the principle that if you kill
enough enemies then there will be no one to hit you back. Thanks to that
a small regiment of elite warriors charging from the flank could break
much larger unit of less skilled soldiers simply by the virtue of more
attacks it could deliver at the same frontage.
With
8th edition a lot of new rules appeared. In particular steadfast and
step up seemed to favour big hordes and nothing else. No matter how many
foe small regiment can kill there always will be some more to fight,
especially that it is hard to break them on the charge and after that
they can reform to bring more warriors to fight. This would mean war of
attrition in which small elite regiments are often doomed. It looked
like MSU armies have no right to be efficient anymore.
However,
MSU can still be as good approach to the game as any and what is more
it can also use new rules 8th edition provides to its advantage. SmithF
reintroduced the concept and I recommend his excellent topic on MSU in
general as well as battle log (which he started to update with new
reports again):
Here,
I am going to to talk about MSU from the point of view of High Elves
but bear in mind that some principles are quite general. The difference
will lie in the means to achieve the same goals and tools you are going
to employ to do so.
The
main principle of MSU approach is that with more units you are able to
use movement phase more efficiently to create much more favorable
combats than just when you clash two big regiments head to head.
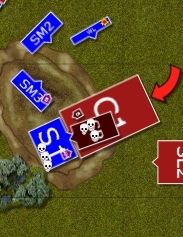
Example

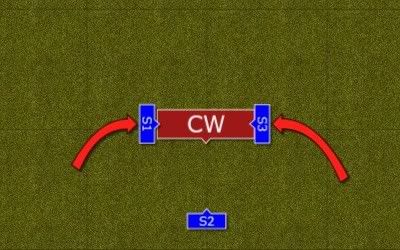
3
units of 10 Swordmasters can set up a trap for 30 Warriors of Chaos. By
fleeing with one the other two can attack the flanks of the bigger
regiment.
It
is of course an ideal situation but illustrates the principle very
well. Big unit of Chaos Warriors uses horde rule to maximize the number
of its attacks but only to the front. Instead of engaging it head to
head in bloody combat Swordmasters surround its flanks and while hitting
with their full number of attacks, they robe bigger unit of its
advantage. Only 3 warriors at each flank can fight, they cannot use
horde and step up attacks rules and are also engaged from both flanks
which means they will not be able to reform if they are not going to
break first. In such situation small units would also sustain smaller
amount of damage than a single unit fighting from the front. Even if big
unit of warriors is going to hold after an initial attack they will
melt quicker in subsequent rounds of combat.
Basically
with the advantage of having more regiments it is possible to control
movement phase better so that one can have an opportunity to create
situations where even big and dangerous units can be defeated.
3. MSU army components
I am going to describe components which, in my opinion, the HE MSU army requires to have to operate properly.
3.1. Multiple Small Units
It
is important to understand that “small” is a relative term. Some other
armies, with access to cheaper soldiers may still have successful army
lists which at the same time contain regiments with 20-30 warriors.
“Small” is more connected to the point cost of a unit. Even in High Elf
force one can use regiments of 20+ Spearelves in a similar fashion as
with more regular forces and it will not be against the principles of
MSU army.
My
personal approach is to have regiments with cost 150-200 points and
only with some exceptions if I feel it is justified to do so. With many,
relatively not expensive regiments you do not present juicy target, you
confuse the enemy as to what to attack and even if you lose some unit
that loss is significantly smaller and not as crippling as it might have
been in the case of bigger unit.
3.2. Characters
The
same goes with characters, if I include expensive ones and/or many of
them I might find out I do not have enough points left to have
significantly more regiments than my opponent thus denying myself the
advantage to out-deploy him. A fully equipped hero in HE army is worth
150-200 points. It is the cost of a regiment in an MSU army.
This
is not to say that you should avoid including characters. If you have a
good idea for a hero then go for it! Just remember that with MSU army
such an expensive target will be even more tempting for the enemy to
focus on. And this is something you want avoid too.
It
is also important to try and assign multiple roles for your expensive
heroes. With so many small regiments some of the typical builds for
characters might not be as efficient or as necessary. For example, BSB
with Armor of Caledor and Dawnstone does not add that much to MSU army
as he does to the unit of 35 Spearelves in a more traditional force.
My
own approach is to take the minimum of characters and for me it meant
the Archmage as a magical defense and BSB for his re-rolls and ranged
attacks (e.g. Reaver Bow). At the moment I am also experimenting with a
Loremaster and BSB. More on them later on when I discuss the army list.
They are still expensive and fragile so it is crucial to keep them safe.
3.3. High Strength/Numerous Attacks
MSU
army relies on inflicting multitudes of wounds while minimizing attacks
hitting it back so it is important to include units which provide high
strength and numerous attacks. Swordmasters, White Lions, Dragon Princes
but also Spearelves and Lothern Sea Guard can be very useful here. If
you choose to pick only one type of unit it can be as good as variety of
them as long as you know how you want to use them.
Personally
I go for variety so I can better use the tools I have. Sometimes it is
better to send Swordmasters in, sometimes White Lions have the edge and
sometimes a lot of S3 attacks LSG and/or Spearelves provide can be much
more useful.
3.4. Stubborn Troops
It
is quite important to have some stubborn regiments in the MSU army
(since we don’t really have Immune to Psychology units I am not going to
talk about it here). It is because sometimes you can force a charge
from the enemy, hold it in one place and thanks to that you will be able
to attack its flanks. There are many foes who can inflict 10+ wounds to
our fragile elves so be careful how you use small units of White Lions.
However, it is one of the very useful options when Lions get close to
the enemy, block their movement or at least limit the options and force a
difficult decision. To charge and suffer from 10+ I5, S6 attacks and be
flanked later or not to charge but receive the charge following turn.
Both options may seem to be bad and the decision is more about choosing
lesser evil for many opponents.
3.5. Shooting
MSU
army is a combat orientated one but it does benefit from some bow fire
and some players like to include war machines too. It is mainly to get
rid of support units of the enemy so that the control of the movement
phase is better, even if MSU force usually can deal with such regiments
in close combat too.
Concentrated
fire on a big horde unit might seem to be a waste of arrows but it can
be useful to break steadfast during incoming fights and because of that
every arrow counts!
There
are also targets, such as fanatics or lone models which can be
troublesome (or deny victory points if not destroyed) but which can be
easily finished off with 10 archers.
3.6. Support troops
As
much as it is tempting to use only heavy hitters in your army with a
minimum of Archers there is a great need for support regiments in MSU
army. The most often use of such units is to divert powerful foe so that
other units can swarm on other targets or to position it in a less
favorable way.
Other
duties such as war machine hunting, wizards assassination or fighting
against enemy support troops can be performed by such units. Great
eagles, Ellyrian Reavers, chariots or shadow warriors can all be used to
great effect.
Units
of Archers, Sea Guard and Spearelves (especially when suffered
casualties in the game) can be used for that duty too. In general it is
worth remembering that each unit can always have (or should have) a
secondary role to play so that you are never out of tactical options and
there is always a way to come up with another plan.
3.7. Magic
Magic
phase is a beautifully complex one where you aim at the best use of the
power/dispel dice you have at your disposal. Winds of magic can be
fickle but spells are what makes that game so colorful (literally if you
look at colors associated with each lore :)). There are many aspects of
magic that are present in the game:
Active magic defense
Main
role of Magic I chose for the army is defensive rather. It is there to
provide better chance to dispel enemy spells. From that point of view a
single Archmage, who also acts as a general and inspires nearby troops
(Ld9 is always better than Ld8 after all), is usually enough to provide
very reasonable protection. His +4 to dispel roll is very good indeed.
Having
a single Loremaster might seem as a very weak protection against enemy
spells if one can call it protection at all. However, I have found out
that it simply changes the approach to spells dispelling. With
Loremaster it is better to choose one or two spells as the ones that
have to be dispelled at all cost. It can be quite difficult sometimes to
make that decision but against some armies even the Archmage is not
enough to dispel it all. Hence, it might be a good idea to make that
decision no matter who is your spell caster.
Passive magic defense*
Dispelling
enemy spells is not the only way to prevent the enemy from getting the
best of their magic phase. There are many deadly spells out there which
have limited range. For example, Death Lore has some powerful spells
which target your characters but are short ranged (or require more dice
to cast in order to have more powerful version of the spell). It is
beneficial then to position your characters accordingly so that they are
not even a viable target. In order to be able to hurt your characters
the enemy has to close in but by doing so he risks getting into charge
range of your elites which might not be a great idea for many wizards
(even if accompanied by their bodyguards). Even if you force them to
cast more powerful version of a spell it is already a success as they
need more power dice to do so and will attempt to case fewer spells
while at the same time risking some miscasts.
Some
players go even further and do not take level 4 wizard at all. They
either take 2 level 2 for more diversity or a single level 2 for
absolute minimum of magical protection. What this approach can ensure is
that usually powerful and devastating spells which can kill entire
units with characters in them seem to be much less spectacular when used
to destroy 10 warriors with a single level 2 mage. They often require
considerable amount of power dice and again the enemy risks a fatal
miscast. It might be a good exchange even if your opponent loses his
Grey Seer in order to cast Dreaded 13th spell to remove such a small
regiment.
* paragraph added thanks to feedback from SmithF
Magic offense
It
is not to say, however, that a single Archmage is not able to cast
spells successfully. Hence it is also important to consider Magic Lore
to support your MSU army. Yes, to support. Magic can be the main weapon
of the army but it is not so in MSU force. You need to be prepared for
phases when magic is not strong enough to get your spells through and
still be able to win. If you, however, can cast spells then it will be a
nice bonus.
I
think that any magic lore can be used for MSU army. It is really a
matter of taste and personal approach. Of course, Life spells for
example seem to benefit horde formations more but as always it is up to
the player to make his tools workable. There is nothing to say you
cannot have support mage or more arcane items in MSU army either. Just
remember it is costly investment and one more mage is one less regiment.
No
matter which way you choose it is important to consider how easy spells
from particular Lore are cast. With single Archmage you might find it
quite difficult to cast powerful spells so maybe it is a better path to
go for spells of a less spectacular effect but which can be cast easier.
You also need to know exactly in what way you want your magic to
support your troops.
I
used to play with High Magic before new book was released because it
has cheap spells to cast and any choice of spells you end up with will
help. They are not as spectacular as some spells from the rulebook but I
managed to use them to great effect in my games and there were a few
times when they did have a huge impact.
I
then switched to Metal Magic as I needed some means to fight high armor
troops while at the same time the lore has some handy protective or
augment spells. Now, with the new army book, I play with Loremaster. I
like his flexibility and the fact he always knows 8 spells. They are
relatively easy to cast so that you can force the enemy to make hard
decisions as to what to dispel.
No
matter which magic lore or which spell caster you are going to choose
it is important to plan your magic phase accordingly. You should not
cast your spells at random just because you can. The order of spell
casting and amount of dice used is very important. In order to better
understand how magic phase can be executed to the full effect I highly
recommend following article by Brewmaster_D. Although Brewmaster is
using completely different approach and heavily relies on magic to win
his games, his thoughts and ideas are very good to follow for anyone:
Magic Phase Strategy
Magic Phase Strategy
3.8. Command groups
Some
regiments have them some don’t but wherever it was possible I included
musicians. They are essential for swift reforms and add greatly to the
maneuverability of the army. They are the first members of the command
groups I take.
Some
regiments have champions. I have found out it is handy to have them
here and there to stop powerful character. Champion can challenge thus
ensuring the unit will remain steadfast for a turn. This can help to
organize the defense better and even make a counter charge in the
following turn if required or buy that extra turn for the rest of the
army.
Some
other units have banners. One reason is to increase fortitude points
for Blood and Glory scenarios but can be useful in combat too. On the
other hand I wanted to avoid too many of them as first they decrease the
number of warriors and second give free victory points which are far
easier earned from small regiments.
3.9. Sacrificial Units/Baits**
Great
Eagles are probably the extinct species by now considering how often
they are sacrificed for greater good. With the new book a lot of young
riders are called to do so as well. No wonder HE are dying race when the
bravest and youngest are sacrificing their lives.
However,
simply placing them in front of the enemy regiment is not going to
spring the trap you set every time you do so. Your opponent knows that
by such placement you want to achieve some kind of advantage. It may be
time advantage (delaying him for a turn), space advantage (slowing him
down) or both.
But
it is also a very obvious situation and your opponent might not fall
for it and might try his shooting and/or magic to get rid of the eagle
but to maintain his formation and deny any further advantage. What is
more he is not going to separate his units so that you can charge him
from all sides. Basically, you need to find out a way to make it
attractive for him to abandon his positions or to force him to make hard
decisions.
The
harsh truth of the game is that some of your units will die. But you
can decide when and how they do so (and maybe thanks to that they will
also survive the game too!) not your opponent. In general I am reluctant
to sacrifice units (elven life is very precious) but in dire situations
it might be the only way to win the battle.
Hence
you can combine both and make the sacrificial regiment attractive
enough to be attacked and use that for setting up favorable situations.
Example
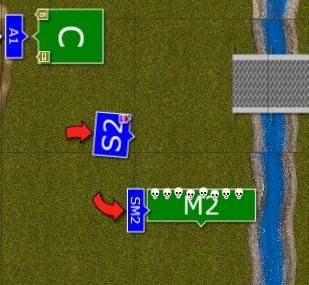
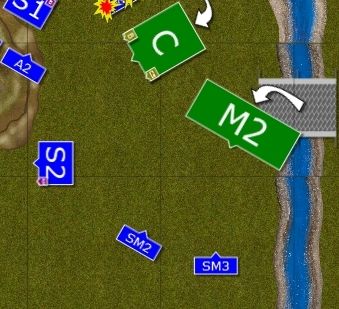
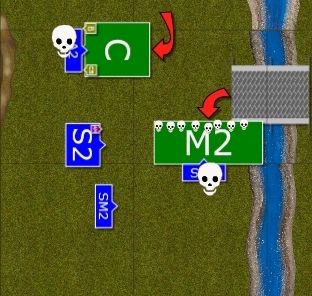
In this game I faced a tough challenge in the form of WoC army with big frenzied troops. I could not handle Chosen regiment in the frontal assault and in addition I wanted to separate two enemy units to deal with them separately. I had to use quite desperate solution because we played Meeting Engagement and my enemy started much closer to my lines than usually and I had less time to obtain good positions.
In
this situation I sacrificed Archers so that frenzied Warriors would
overrun in the direction I wanted (away from the Archmage) and at the
same time I exposed Swordmasters for Marauder attack. Both enemies
charged and decimated my small regiments. However, Warriors were out of
position and could not catch valuable foe until the end of the game
while Marauders first lost many of their numbers from first Swordmaster
unit attacks and then were finished by the flanking charge of the other
Swordmaster regiment.
Example
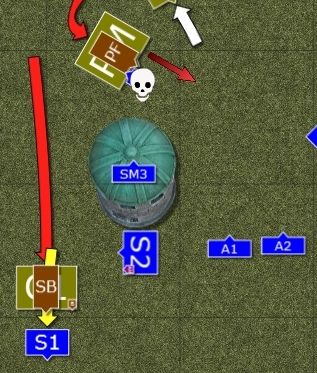

This
time I faced dreaded Skaven in Watchtower scenario. My goal was to
first, separate two main regiments of the enemy, i.e. Clanrats with
Screaming Bell and Plaguemonks with Plague Furnace. I wanted to focus on
Screaming Bell unit and try to destroy it while at the same time keep
the Monks busy and away from the tower. To do so I kept moving Great
Eagle and Archers units in front of it and angled it in such a way that
they had to pursue/overrun away from the tower. I sacrificed 300 points
to do so but plague monks and the furnace have never reached the tower
and any meaningful combat.
** paragraph added thanks to feedback from SmithF and inspiration from joey_boy and his Wood Elves MSU article:
4. Army List Examples
The
army list is for me a constant work in progress. I don't like to make
dramatic changes and prefer to play with particular list for some time
but eventually some new units find their way into my army list. With the
new book there are even more choices to pick from. Let me discuss the
the units I had in the army I took to ConVic 2013 tournament as an
example. I have also left the description of units for the old army book
and old army list for comparison.
Please, note that this army was created just after new HE army book for 8th edition was released. After that I played with some different options trying to test new possibilities. You will see these in various battle reports. Here, the army lists are mainly for the reference point and to show what I look for when picking particular characters and/or units.
Please, note that this army was created just after new HE army book for 8th edition was released. After that I played with some different options trying to test new possibilities. You will see these in various battle reports. Here, the army lists are mainly for the reference point and to show what I look for when picking particular characters and/or units.
4.1. 8th edition army list
Outcasts - Army List
Loremaster,
level 2, Armor of Caledor, Sword of Might - 300
(or Loremaster, level 2, Shield of Merwyrm , Sword of Might, Earthing Rod, Golden Crown - 300)
(or Loremaster, level 2, Shield of Merwyrm , Sword of Might, Earthing Rod, Golden Crown - 300)
Loremaster
is an interesting character and I switched to him simply out of
curiosity. My metal Archmage was still very good (I switched to Metal
Lore after CanCon 2013) but I wanted to try options for new characters
from the new army book.
I
like his reliability and flexibility thanks to 8 signature spells he
knows every game. I have found out I can cast quite a few spells each
game and even against level 4 enemy wizards he has a chance to get
something through. At the same time I like his combat abilities and I
think he can handle rank and file enemies quite well. Very often I was
in a situation with my Archmage when his unit was in a good position to
attack but I didn't do it as I didn't want to risk losing him in combat.
Loremaster should be much more versatile here.
I
added the new set up in brackets. I missed Earthing Rod during the
tournament when my Loremaster cascaded 4 times, in 3 cases jumping down
the hole too. I wanted to keep SoM to be able to use ASF and having
magical attacks helps too.
His
level 2 can be sometimes problematic but I have learned already I need
to pick a spell or two I want to dispel and brace myself against others.
Against some armies level 4 is not enough anyway so it is not that I am
in far worse situation here.
Battle Standard Bearer, Dragon Armor, Halberd, Charmed Shield, Potion of Strength, Reaver Bow - 157
Whatever
I have written about BSB is still true. It is probably the most
important character and model in my army. His shooting efficiency is not
as good as it used to be but having Potion of Strength can be a nice
bonus once in a while.
15 Archers, Full Command - 180
I
used to have 2 units of these but smaller and with no banners. This
unit is there for long range fire but also doubles as a ranked unit due
to lack of second LSG regiment. It is still archers unit and I prefer to
use them defensively but once in a while they proved to be useful in
ranked formation.
15 Sea Guard, Full Command - 210
LSG
seems to suffer from the changes in new book even more than previously.
With heavy cavalry and light horse as core many players do not see any
reason to take them. I still like them and they were useful in their
usual role of a versatile unit.
2 x 5 Ellyrian Reavers, Musician, Spear, Bow - 2 x 10⁵
I
was very happy to find out they are in core but I was taking them
anyway. As they are cheaper I could afford full equipment and two units
at 2400. Again, as with all the units I kept after the release of new
army book all the reasons I had to take them remain. And they still are
here to perform similar roles.
Just
to highlight one of the things I have observed. People take them as
throw away unit. They might be called to perform that duty but it is not
the main and only thing they can do. I think there is much more to fast
cavalry and I will try to use them in a more sophisticated way if
possible.
5 Dragon Princes, Musician, Banner of Eternal Flame - 175
5 Dragon Princes, Musician - 155
Dragon
Princes are still very reliable and even better now with 6++ ward save.
I have added the musicians they lacked and transferred BoEF from Lions
to them. The reason is that they are faster and that they kept their
re-rolls to hit, very important in monster hunting.
2 x 11 Swordmasters, Bladelord, Musician - 2 x 163
With
no option to give Bladelords magic items other than weapons I kept them
cheap. Swordmasters are still good in combat even without the re-rolls.
One needs to simply be more careful with how to use them. But they
didn't fail me in the games I used them at all.
10 White Lions, Muscian, Standard - 150
10 White Lions, Muscian, Gleaming Pennant - 155
Lions,
in the same manner as Swordmasters, were changed in new army book. Not
striking first and losing the re-rolls was a very significant change but
nevertheless they are still a force to be reckoned with. Together with
SM and DP they are my assault teams. One thing I haven't used with them
yet but which seems very good idea is to form them in cubes. That allows
for better attacks concentration at a small frontage that may have a
lot of benefits. Such as receiving less attacks from the enemy, being
able to direct more attacks against characters or to be able to squeeze
where wider formation cannot, to name the few.
5 Shadow Warriors - 70
Shadow
Warriors are a new addition to the army list that came with new army
book. I always wanted to use scouts but have never had enough points to
do so. I would love to have more of them but at the moment I use just 5.
I need to learn a lot about them and how to use them efficiently and
not as yet another sacrificial regiment. They are not the unit that will
perform tasks that will bring a lot of glory. They will do some
seemingly minor jobs but I believe these will be as important to the
overall victory as any other.
Eagle Claw Bolt Thrower - 70
I
added bolt thrower some time ago and I really like it. As a single war
machine it is sometimes overlooked. If I lose it then it is not that
many points. While long range shooting is very handy. Its crew managed
to shoot down some tough opponents too, such as disk riding chaos
champions or be very useful in thinning down monstrous cavalry.
2 x Great Eagle - 2 x 50
Stalwart eagles are here to perform their typical duties. Nothing changed here.
2 x 5 Sisters of Avelorn - 2 x 70
Sisters
are another new addition that came with the new army book. These ladies
add a lot of flexibility to the shooting phase and they shine against
forces of evil in particular. I might have lost some range in my
shooting but in general it became more dangerous and more versatile than
before. A very reliable part of the toolbox that army brings to battle.
4.2. 7th edition book army list
Many
things I have written below might not apply anymore. However, I have
decided to keep it in an original version as it can illustrate better
how the same units fit into the army concept before and how they fit
now.
Archmage, Annulian Crystal, High Magic – 300
Army
general and its only spell caster. His main duty is to provide +5
dispel bonus. To further augment his defensive skills he has Annulian
Crystal which helps enormously. He is also very vulnerable so I need to
be very careful with his placement.
As
I have mentioned before he uses High Magic, a very versatile although
less spectacular magic lore. Its strength also lies in low casting
values so even with very weak winds of magic he is capable of casting
some spells.
In
the meantime I have also tried some additional equipment such as
Dragonbane Gem (2+ ward against flaming attacks), Bow of Seafarer (bolt
thrower) or Folariath’s Robes (immune to non-magical attacks). The Robes
are quite useful and I might yet find out myself returning to that
item. The bow was an interesting experience but his BS4 is a little too
low for such a potent weapon to be used to the fullest.
There
are plenty of other useful items for this character and I am sure I
might try some new equipment but his main role is the same regardless.
Provide magical defense, inspire nearby troops and support them with
cheap but useful spells whenever possible.
Battle Standard Bearer, Heavy Armor, Shield, Great Weapon, Reaver Bow, Dragon Helm – 174
Battle
Standard Bearer seems to be a must in every army and MSU force is no
exception, although in this case his usefulness comes mainly for all
other Ld tests and slightly less for break tests. High Elves have good
Ld but they are still not immune to psychology. You might be surprised
how many tests your army is forced to take in one game, especially
against undead and daemons. This re-roll is very handy and you should
make sure your BSB is close enough to lend it to units which need it the
most. He cannot be everywhere and it is even more so in the case of MSU
army, often widely spread across the battle field. That is why his
initial placement and moves later in the game should be considered
carefully.
Since
our characters are expensive and there are few of them in MSU army
there is even a greater need to use them in multiple roles. That is why
BSB is equipped with a Reaver Bow. With his BS6 these 3 S5 shots per
turn can be very helpful. He can wound tougher targets, he can hit
obscured ones with better chance and can be the bane of lone characters
too. You can treat his bow as an equivalent of a magic missile with that
difference that he always has 3 shots but does not suffer from miscasts
and does not take away power dice.
Great
Weapon is a very useful addition but he is not to take part in combat
unless absolutely necessary. Even then it can be very risky as his
armour is not that great and he can be relatively easily wounded and
killed. However, GW and ASF make sure that some of the enemies will
think twice before they attack him or unit he joined.
2 x 10 Archers, Light Armour, Musician – 2 x 125
Very
good support troops, add a little long range firepower, useful mainly
in weakening lightly armoured targets so good at killing enemy support
regiments from afar.
Sometimes
can also be used as a flanking regiment and since they also benefit
from ASF rule it can be as good option as any. They are not shock troops
so do not expect them to do much against close combat specialist and it
might even be a suicide. But timely charge at a flank of an enemy in
narrow formation in addition to the charge to the front can give you
that extra +1 from flank charge and might disrupt enemy ranks too.
In
dire situation they can also be used as diverters and be sacrificed to
enable other regiments to destroy the enemy unit but that is not their
primary role.
Light
armor might look as a waste of points but I include it due to the fact
the miniatures I use do have armor and once in a while I am glad I have
that 6+ armor save as there are some enemies who do strike at S3. 1
wound less might be that 1 wound difference between the victory and
defeat.
2 x 15 Sea Guard, Full Command – 2 x 220
They
are included for their versatility. Additional 30 bows can help in
quicker elimination of support troops and is always annoying for the
enemy, no matter of they really inflict any damage. However, they are
not archers with better armor. They can and often should be used in
combat. Or at least make a threat they can.
I
really like the fact I can keep them moving and still be able to shoot.
They are not going to fight on their own but their additional rank,
especially when charging from the flank, can be very helpful. They are
not that big unit either and are not as strong magnets to template
weapons as Spearelves in deep formation can be. Although I noticed that
my enemies still try to target them with such attacks.
They
are not easy to use as their role is not well specified and depends a
lot on the enemy they face. They even can start the game as archers to
join the fight where required to turn into archers again if some
stragglers need to be finished in the last turns.
Their
strength lies in flexibility and I really like them in my army as there
is always something for them to do. Either in shooting or movement and
combat phases.
10 White Lions, Musician, Banner of Eternal Flame - 178
10 White Lions, Musician, Gleaming Pennant - 173
First
two regiments out of six heavy hitters I included in the army. Probably
the most versatile units too as they are as good in attack as in
defense. Due to stubborn they often are used as baits which are
difficult to ignore because they can attack following turn but when
charged can deal significant damage too. Banner of Eternal Flame makes
them perfect monsters hunters and with many deployment drops there is
always a way to position them in the right spot to do so. Gleaming
Pennant is excellent if the unit needs to operate outside of the BSB
range but has to perform anvil duty and stop some powerful enemy long
enough for other regiments to be able to counter charge. They often
occupy the center of the line (or close to it) as it is the best
position to intercept enemy units and are close to help other regiments.
10 Swordmasters, Musician, Bladelord, Amulet of Light - 183
10 Swordmasters, Musician, Bladelord, Talisman of Loec - 178
The
most killy units of the army and kind of its special forces. It is
amazing how much fear they cause in opponents even at such a small
number. I have run units without Bladelords so far but I included them
to have magical attacks and Talisman of Loec is an experiment. They used
to operate closely with Spearelves when I used them so that they did
the killing while Spearelves added static combat resolution and together
they were very good teams even for frontal attacks against some units.
Now they are a junction between sea guard and lions and often these 3
units operate as a task force, supporting each other.
They
are of course very fragile. Any protection they can get is good. For
example I sometimes placed them behind single line of White Lions to
provide additional -2 to hit penalty if the enemy wanted to shoot them
while Lions benefit from their Lion Pelts protection.
As
dangerous as they are they might have problems with 1+ armor save and
are definitely better against anything that is not that well protected.
That is why they often can operate with Lions so that sheer number of
attacks prevails one way or another. Having said that small units of
knights are usually equally quickly defeated by Swordmasters as by
Lions. Even chaos knights and knights of Empire might be very reluctant
to charge them in the frontal attack. Only Mournfangs and Demigryphs are
dangerous enough to win against them in one-on-one combats (and usually
on the charge) so it is important to choose fights wisely.
2 x 5 Dragon Princes – 2 x 150
Many
players think cavalry has no use in 8th edition anymore. It seems some
got used to the fact that knights used to break any foe in a single
glorious charge. It is not that easy when infantry can be steadfast.
Some
player like to field big units of heavy cavalry with powerful
characters. A typical hammer unit which can indeed deal a lot of damage.
But
what about small heavy cavalry regiments operating without powerful but
expensive characters? I think they still have uses and can be great
too. Hence 2 units of 5 Dragon Princes each instead of more Swordmasters
or Lions.
Dragon
Princes are still shock troops in this army but although they are not
able to pack as many attacks on narrow frontage as Swordmasters and they
hit with S5 instead of S6 like Lions they have the advantage of armor
and charge distance. There are enemies out there which are quite
dangerous to small infantry units. Chariots are very good example. Their
impact hits mean ASF is less of an asset. Often the enemy can have 2 or
more of them heading towards a single unit and small regiment might not
even survive to hit back. Dragon Princes are good at intercepting such
threats.
Since
they have a longer charge range and benefit from swifstride rule their
charge is more likely to hit home even at longer distance. They can
perform a swift outflanking move and be ready for a coordinated charge
when infantry might need another turn to get to the position.
They
can be very good at destroying enemy shooters as they can withstand the
fire infantry is much more vulnerable to. They can double as war
machines hunters and monsters hunters, especially that the enemy beasts
cannot stomp/thunderstomp them.
If I could find some points I would give them musicians too as they are even more efficient with their swift reform ability.
2 x 5 Ellyrian Reavers, Bows, Spears, Musicians – 2 x 112
Light
cavalry also seems to be less popular choice. They don’t hit as hard as
heavy cavalry, are more expensive than eagles and take away points
which could be spent on other special regiments. What is more with so
many units do one really needs another fast regiment?
While
it is all true I really like them in my army and I think the difficulty
in their use is similar as with Sea Guard. On the first glance they
seem like a unit which is not good at anything in particular and on top
of that other regiments can do specific things better. But the more I
use them (and Sea Guard too) the more I am glad to have multi-purpose
regiments as they greatly add to the flexibility of my army.
First
thing Reavers add is redundancy. While I have eagles to divert and hunt
war machines they are often first targets for shooting and magic
missiles. Reavers can do that to and it is more difficult to get rid of
all of them quickly. They also hit harder than eagles thanks to re-rolls
and more attacks so can be used as shock troops too. My reavers hunted
down a little more resilient troops such as chariots or Razorgors thanks
to their speed, spears and ASF. They are also much more efficient at
destroying war machines, especially from Dwarven armies.
Flexibility
is also the reason why I equip them with bows. Sometimes having only 5
shots is not great. But sometimes you only need to inflict 1 more wound
and your archers might be in bad spot or simply you don’t want to waste
so many arrows. Reavers are usually close enough to have that 4+ to hit
after they moved and it is more difficult for the enemy to hide from
them. There is also kind of psychological effect to that as people tend
to make mistakes when annoyed by light cavalry shooting at them all the
time. And they always can aim at the same target as other units so I can
focus the fire for greater effect.
Last
but not least their ability to flee and then reform and keep moving is a
great asset. It can help you to bait the enemy so that they break
formation and then return to the position where they cannot be attacked
but which enables them to go to the rear. Their speed and
maneuverability is a huge asset and a weapon in itself although not as
straightforward in use as in the case of other regiments.
2 x Great Eagle – 2 x 50
The
eagles are so useful for any type of HE army that there is a separate
topic about tips and tricks how to use them. They are as much needed in
MSU army despite its greater maneuverability. They are very handy when
there is a need to trap that big, fat enemy unit so that your regiments
can position themselves for a proper charge next turn. They add to the
number of units which are annoying to the foe and which are much faster
than any other in the army.
The
only thing I would add to any way you want to use your Eagles is that I
always try to position them so that they are not easy target to aim at
(if possible of course). If there are no cannons having them behind
heavy cavalry helps. I also try to keep them until it is absolutely
necessary to use them so I do not fly them to the front of the enemy
turn 1 just because I can. Reavers are much better at that as they can
flee and return to the fight next turn. Eagles are too precious to
sacrifice them just because they are worth “only” 50 points each. It
might be that they are indeed sacrificed very often but make sure it is
really for greater good. The longer the eagle is around the more
dangerous it is and the better your situation can be.
This
army list is not final version. I don’t think I would ever be able to
have one. Things constantly change, the fact new books are released is
one reason for that. Another is my growing experience with different
armies. There are a lot of them which I haven’t played against yet so it
might happen that I will recognize the need to include something I
haven’t yet to be prepared for yet another threat. I will probably not
be able to have a perfect solution for everything but at least I will
find out with which tools I am most comfortable with. For comparison,
have a look at the army which was suggested to me long time ago and
which was the force I based my first list on.
4.2. Another example of HE MSU army
Archmage, level 4, Jewel of the Dusk – High Magic
BSB, GW, Dragon Armor, Radiant Gem of Hoeth, Pidgeon Plucker Pendant – High Magic
2 x 10 Archers, Musicians
2 x 20 Spears, Musicians, Standards (one with Banner of Eternal Flame)
3 x 10 Swordmasters, Musicians
3 x 10 White Lions, Musicians
2 x 5 Dragon Princes, Musicians
3 x Great Eagle
Harder
hitting force and more combat orientated. Other than that I leave it to
you to compare two armies and find out which one you like better and
what might be differences in some crucial details about their way of
fighting.
5. Deployment
Assembling
army list is only the beginning. Deployment of your army on the battle
field is a very crucial thing and for me it is separate phase of the
game. It is not rare occasion when a game is won or lost at this stage.
Deployment
is very important for MSU army because it aims to out-deploy the enemy.
It may seem to be easy with more regiments than typical enemy armies
have but it does not mean MSU force can deploy in random order and
fashion. Since it supposed to give an advantage one has to think how to
do so properly. Besides with many regiment it is also easy to end up
with crowded formation when units do not support each other and even
stay in the way preventing charges and adding to the general confusion.
Deployment
depends on many factors. Apart from the enemy army list, which is kind
of obvious, there are following things I try to take into account:
5.1. Terrain
Sounds
obvious but it is important so it is also worth reminding. I try to
quickly discuss each piece of terrain and its effect it can have on
units or line of sight. It also makes it clear for the situations later
in the game and there are no nasty surprises.
In
particular I look for forests and rivers/lakes as if I can draw the
enemy into combat while his unit remains in such terrain then they
cannot be steadfast and cannot claim rank bonus. Very good situation for
my army as it can deal a lot of wounds and win against otherwise
difficult to break enemy such as horde regiment or a unit with deep
ranks.
Another
important terrain is the one which forces dangerous terrain test. It is
good to enter such area with your infantry as it makes a good defensive
position against chariots and cavalry. Sometimes you can combine
effects and have also protection against shooting if you are in the
forest on some kind of ruins.
I
am also learning how to use buildings to my advantage, it seems obvious
to put some shooters in there as they can target units around the
building and have good defensive position (although sometimes it can be a
trap so be warned and do not enter the building which is in the range
of an organ gun!).
5.2. Scenario
I
am aware that many players do not use scenarios in their games but for
those who do (and I recommend doing so, as it spices up the game and you
can always modify some victory conditions to make them more “fair” :)) a
few reminders.
If
your are playing Blood and Glory it is obvious you don’t want to risk
your banners in the same way as during Battleline so take that into
account and even change the deployment order to make sure you can place
most vulnerable regiments in the safe(r) place.
In
the Meeting Engagement in particular and in some other scenarios it is
worth remembering you are much closer to the enemy. Even if you have
first turn there is a chance your opponent can steal it from you (on a
roll of 6) so be prepared for that too and do not deploy in a way they
you can be charged instead charging yourself.
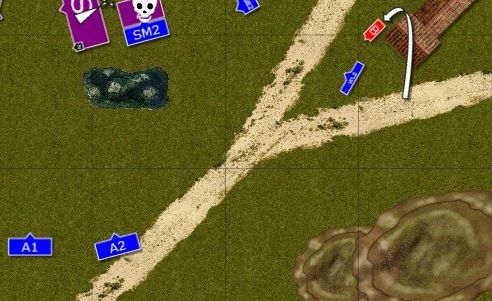
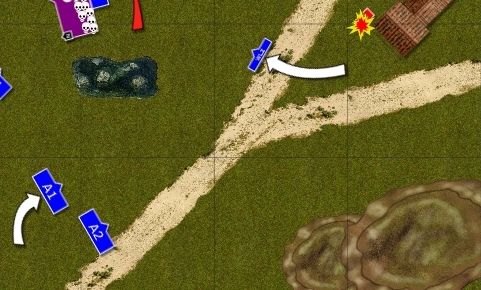
Example
In
the game against TK I won roll-off and had a great chance to move
first. I wanted to use that to my advantage and positioned Dragon
Princes forward. They could attempt charges turn 1. If I failed charge
rolls nothing bad happens as I can flee with them to safety and use them
later on. But if I succeeded then I could potentially break through and
have opened path to vulnerable artillery behind. If my opponent stole
the initiative it is still ok as majority of my army is further back and
cannot be engaged early.
5.3. Going second
I
am used to the fact I am going second. That is why I deploy in such a
way that I can take that into account. It usually means I deploy my
regiments a little further than the edge of deployment zone so that the
enemy shooters need to move to get into range. If possible, and with 24”
range of some troops it is the most common situation, I deploy 6” away
from the edge so that even if they move they are out of range anyway.
On
the other hand some of my regiments could have some good targets to
attack (cavalry in particular) so it pays off to consider such placement
that enables first turn charges. Even if they are long ones it is worth
risking as I have enough units to follow and protect the regiment that
failed their charge roll while if it works it can be a surprise for the
enemy. What is more, if the target of the attack is broken then cavalry
can be behind enemy lines in no time too. (see example from Meeting
Engagement section)
Going
second affects the light cavalry too. I need to take into account the
fact that if I move towards the enemy they might be in shooting range so
I try to prevent that (although there were games when I did the
contrary and suffered the consequences). I might vanguard them to try
and draw some attention and early charges which is good as they can
flee, rally and move again. Vanguard move can also position them on a
good spot to charge in my turn 1 with even greater chances of success so
if there is a good target for them I try to do so.
5.4. Order of deployment
I
often start with deployment of Archers, LSG and Reavers because these
regiments usually occupy the center of my formation (in the case of
infantry) and Reavers are going to vanguard anyway (although I do not
use it to redeploy or change direction as it is quite risky and adds to
the confusion). If the enemy does not have war machines such as cannons I
can then deploy my eagles. If he does, I wait until he deploys them and
try to position the birds where he cannot aim at them or at least where
it is safer (relatively of course). I then try to make sure they are
more than 6” away from other units to prevent panic tests unless the
regiments are close enough to BSB to get re-rolls. But even then, if
possible, I try to avoid that. Then I proceed to position my heavy
hitters.
Example
Here
I made a crucial mistake. I knew I am facing doom divers which are very
dangerous for my heavy cavalry but I still deployed them outside of the
influence of the BSB. I lost one unit of DP who then panicked another
heavy cavalry and nearby Swordmasters out of the board. It was heavy
blow and I had to fight an uphill battle with 2000 point army against
2500 one. I didn’t manage to recover from that.
But
it is not the rule and sometimes it even pays off to keep Archers and
LSG as last to deploy as otherwise they might have no good targets to
shoot at or their priority targets can be obscured, out of range etc.
5.5. Formation
With
so many regiments the battle line MSU army is going to form can be
wide. It helps to envelope the enemy with smaller number of units.
Because of that the center is occupied by infantry while the flanks are
controlled by cavalry. Since I have 2 unit of each regiment it can even
be symmetric. The advantage of that formation is that the enemy cannot
say if there is any part of the formation that is more important.
Placement of characters can sometimes tip the balance slightly to one
side or the other but even then not so much.
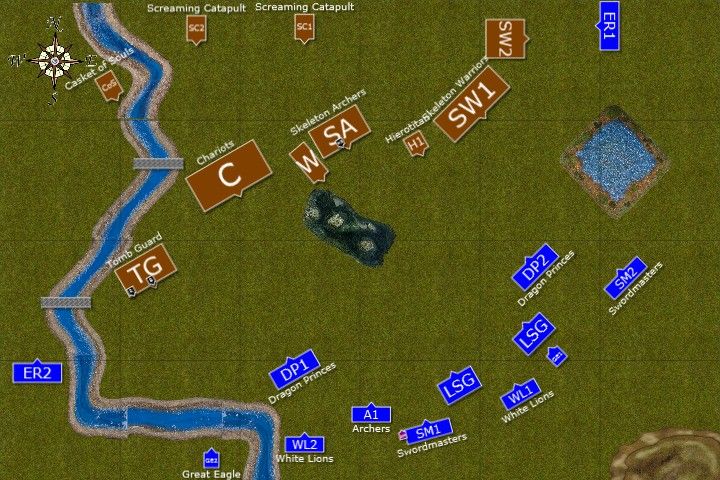
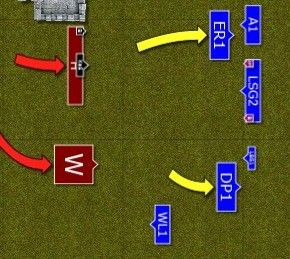
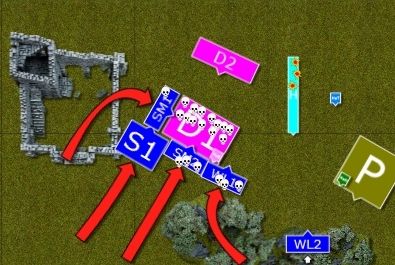
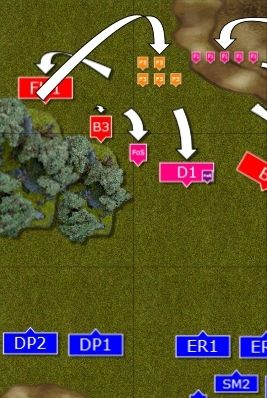
Example
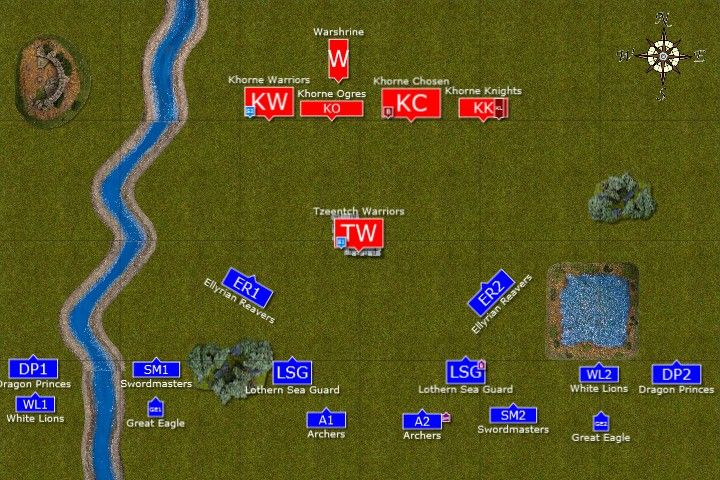
Symmetric
formation with strong flanks and fire base at the center gave me the
opportunity to envelope the enemy quickly, set up some traps and shoot
at him without other regiments blocking line of sight. At the same time
he had difficult choice to make as whether to split up his force or to
keep it tight but go against one half of the army leaving the other half
unchecked.
It
is of course not the only way of deploying troops and often it is not
even the most common one. Sometimes formation is forced by scenario such
as Dawn Attack. Sometimes a form of refused or weighted flank can also
be beneficial.
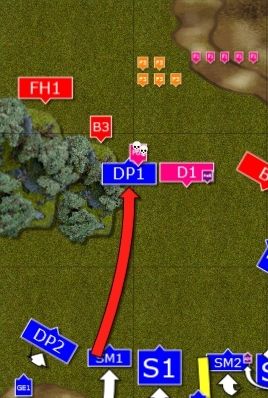
Example
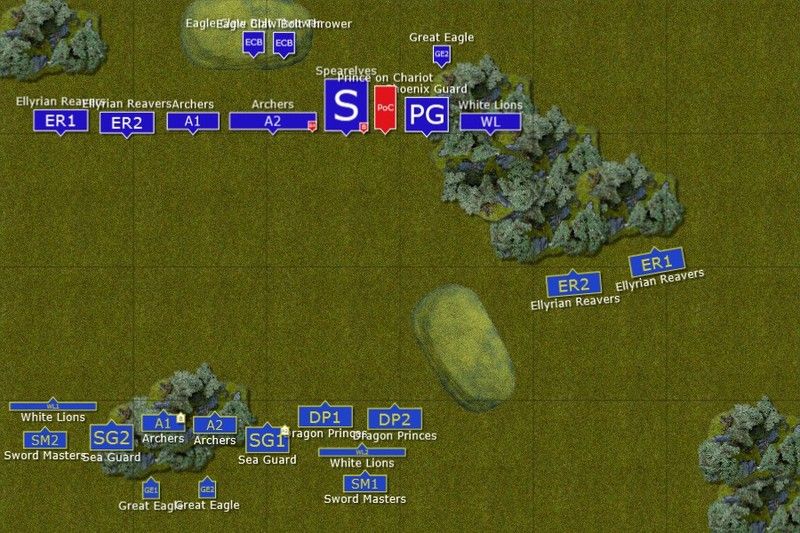
(Reproduced from the army list topic of Elithmar of Lothern - Elithamar of Lothern - Battle Report)
Suspecting
that big archer unit is carrying Banner of Eternal Flame I positioned
Dragon Princes in the center so that they can cover the distance to the
enemy fire base quicker and with smaller chance of being intercepted.
Shooting regiments took good defensive positions in the forest but are
close to respond to the threat from the Eastern flank and to support
other troops.
Combat
infantry supports each other and 2 regiments can move swiftly to either
reinforce cavalry or turn to the center to engage the enemy. At the
same time other 2 units protect fire base and threaten the flank of the
opposing army if it decided to attack my cavalry. Last but not least
light horse can either harass enemy advance or use the forest to attack
from another flank if heavy cavalry had difficulties in destroying
support elements of the enemy army.
There
were just 2 examples of how formation can look like, one is symmetric
the other one is asymmetric. But by no means they are not standard
deployments and I doubt there is even such a thing. There are a few
points, however, that I have found quite important in assembling your
regiments for battle. In no particular order:
- Support each other – this is true at any stage of a game (if
possible of course). Try not to leave any regiments in a position that
when it is charged you cannot counter attack in your following turn. A
little twist here and there means that your angles are right and there
is no situation when the enemy attacks and you cannot attack back
because you cannot really see it although it is 2 inches away.
- Use terrain – there are usually more benefits from being in some
kind of cover with unit unless we are talking about cavalry. In that
case it might be better to position them relatively in the open to avoid
dangerous terrain test. In all other cases you can always use that -1
to hit penalty for the enemy when your troops are in the woods or that
they have to make a dangerous terrain test while attacking your unit in
the ruins.
- Avoid crowd – as I have shown in one of the examples being too
crowded may result in unlucky chain effect of failed panic tests or in a
situation when rallied unit blocks friends from moving or charging the
enemy. If possible use check board formation so that units have gaps
through which to withdraw or to move forward.
- “Living Shield” – having said that you should not be too crowded
there might be some exceptions when it is better to position units
close together. In particular some kind of “Living Shield” can be used
but fortunately without entirely sacrificing troops, merely using the
ones with better protection to give some of it to their friends. For
example, single rank of White Lions can nicely protect Swordmasters
staying behind them from enemy shooters as they have more difficult
choice. To shoot at Lions without penalties but knowing they have 3+
armor save against shooting or at Swordmasters with additional -2 to hit
penalty. The same can be done with Dragon Princes and Eagles and even
when you position one Reaver unit behind another it can be good as you
would probably be able to save one of them. Even more so with Shield of
Saphery on the front line regiment.
- Task forces – form units into task forces. They might be as
small as 2 regiments or as big as half of the army. They will operate on
their own then but with particular goal in mind. You can change task
forces during the game depending on the situation and how quickly you
achieve with them what you wanted to gain.
5.6. Characters Placement *
Characters
are very important for the MSU army as for any other. However, due to
the usually spread formation the influence they have over some regiments
is limited. For example, forces with small number of units can create a
protective area of 12" radius where majority of the army can benefit
from re-rolls to Ld tests due to proximity of their BSB as well as
higher Ld value thanks to the Inspiring Presence of their general.
MSU
army can and should use this advantage as well but due to its nature it
is less likely that all the unit will benefit from that. It is very
important then to consider where to place precious few characters to
help the regiments the most. In the case of the Archmage it also should
be a relatively safe place but close enough to the enemy so that he can
cast his spells (24" as maximum range for spells from High Magic). BSB
is also taken to inspire troops and with his Reaver Bow he should be in
30" from the chosen target too.
High
Elves are disciplined troops but even with Ld8 the odds to fail some
tests are high enough. There are many situations where such tests simply
have to be passed or otherwise carefully prepared plans might fail. One
way to address that problem is to assign each character to separate
flanks of the army formation.
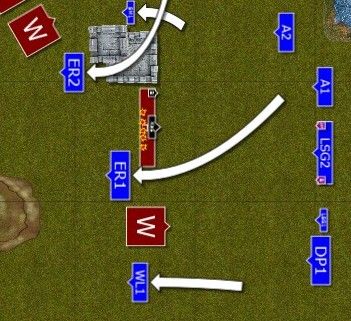
Example
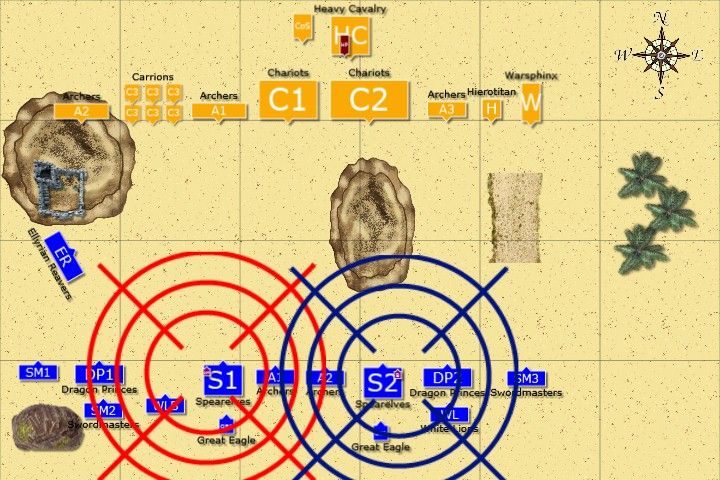
When
fighting against fear-causing enemy you are going to take a lot of Ld
tests. Here I deployed the Archmage on the center-West (red circle
indicates his area of influence) and BSB on the center-East (blue circle
for his area of influence). Thanks to that units on the West have Ld9
and those on the East can re-roll their tests. I find re-rolls more
important so I decided to position BSB where I was about to roll some
terror tests as well.
If
you are not fighting against fear-causing enemy but need to strengthen
the resolve of units in particular area you can deploy your characters
closer to each other so that their influence overlaps.
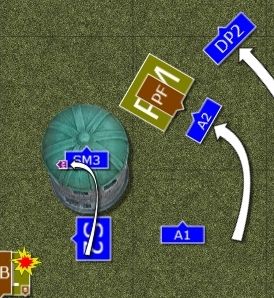
Example
In
the game against Bretonnia I wanted to surround main unit of the enemy
with as many regiments as possible. In order to do so I needed to
destroy support units first. However, I had to take into account the
fact that knights are faster than my infantry and I might need to
receive the charge to do so. Hence I placed my Archmage (who had
Folariath's Robes in this game) in a unit of LSG to act as an anvil.
Thanks to that they had Ld9 while nearby BSB ensured I could re-roll any
break tests (hopefully on steadfast). My opponent took the bait with
his six knights and charged in. I managed to hold and then
counter-attacked to destroy the enemy and then reform to face the main
unit of my opponent (not shown here).
My
characters are very fragile so positioning them is also important from
the point of view of their safety. As long as they live they do not give
away a significant amount of victory points to the enemy but also
support troops longer. Usually placing them with Swordmasters, Lions or
LSG is more than enough to prevent any early charges by fast enemy
troops who would die easily if they attempted the charge. Of course you
might want to consider changing the unit who at particular time protects
the characters as Swordmasters and Lions in particular need to be in
combat while at the same time it is something the characters should
avoid at all costs. What can happen if it the character is killed in
such situation is illustrated by the following example:
Example
In
the game against Warriors of Chaos at CanCon 2012 I recklessly moved
White Lions with BSB forward. My opponent charged in with his chariot.
Despite quite significant amount of S6 attacks I failed to destroy it
and my enemy killed BSB. I lost combat and failed a break test. What is
more, in the following turn my units which were prepared to counter
attack Chaos Knights panicked due to killed eagle and fled from their
perfect positions. All this could have been avoided if BSB were alive.
That mistake decided the outcome of the game. If I deployed BSB in a
safer place the battle would have been much closer
In
general there is no single way of deploying your characters as it
depends on the enemy and other circumstances present during particular
game with its scenario etc. But you need to know exactly what you want
to accomplish with them and how to protect them so they can do their
job.
*This paragraph was added thanks to feedback from GuessRange from wargamerau.com
6. Movement
Some
armies are designed to out-shoot the enemy. Some to out-magic it. MSU
armies aim at gaining superiority in the movement phase. Before I start
writing about my own observations in that matter I would like to draw
your attention to some old articles by Machiara and Papa Elf (who
basically adopted a lot of Machiara’s ideas and tried to implement them
for High Elves armies in particular):
In one of them it is said that Movement Phase has really two purposes:
1. To create a situation when you can have uneven fights in your favor.
2. To prevent the enemy to do likewise.
Some
of the ideas in the above mentioned articles are outdated due to the
fact they were written for previous editions. For example, skirmishers
no longer have ability to see in every direction that limits their area
of influence to the front rank as every other unit.
However, there are new rules which I try to use with MSU army to my advantage:
- Random charge distance – new rules for determining charge
distances mean that in theory the area of influence of your units are
bigger since an infantry regiment can potentially have a charge distance
of 17 inches while cavalry can attack targets at 20 inches away (with
greater probability too, thanks to swift stride). It is not likely to
accomplish such a fit but the enemy often has to take that into account
and by threatening him with an attack you can prevent him from reaching
better positions.
- Swift reform/other reforms – with musicians and high leadership
you can be much faster. Instead of performing wide and cumbersome wheels
you simply swift reform and move in the desired direction. Very good
when you want to catch the opponent off guard and pretend you are
attacking towards one part of the battlefield and then go elsewhere. Of
course you have to be careful how you reform and that you do not create
chaos among your own ranks but keeping the enemy guessing can be a good
idea. And might force him to make mistakes too.
Another
use of swift reform is to use it in order to threaten enemy units
trying to maneuver around you or between your regiments. It can be
tricky as you don’t want to chase faster units (or fliers) this way and
simply turn your unit on the spot. But this is the option you have so
you can try to use it.
Swift
reform also helps regiments who defeated their enemies to quickly
reinforce their companions. Reforming in general is very useful thing
to do so look for opportunities and try to anticipate movements of units
to choose the best option. At the same time limiting the options for
the enemy to do so is very helpful. Attacking from two directions gives
that advantage and if it is done from any other than front it can also
mean a significant reduction in the attacks the foe can direct back at
you.
Example
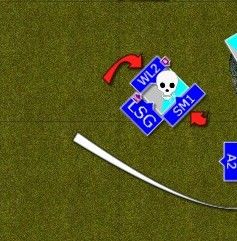
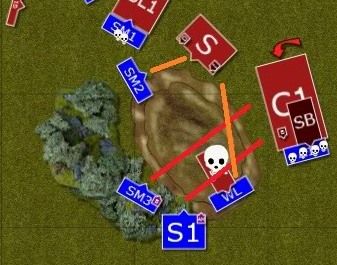
Here
you can see that I managed to charge with Swordmasters and Lions
against Stormvermin and defeat them in 1 turn. I used combat reform
after that to be in a position to counter charge next turn when
Spearelves held big clanrat unit in place.
Last
but not least swift reform helps your shooters to change facing and
keep shooting. Deadly against light troops trying to sneak around. Also
useful when you try to position sea guard to create better multi charges
but annoys the enemy as you are not only threaten them with unfavorable combats but can kill that one warrior too many that might
be the difference between having and not having steadfast or kill that
lonely character who thought he is safe.
Example
Vampire
BSB on Hellsteed has just defeated light cavalry. He was in a
relatively safe position but keen eyed elven archers spotted him. They
swift-reformed to be sure they are in range and managed to get that
lucky shot that finished cursed creature of the night.
- Fast cavalry – less straightforward to use but I really like it.
Now and again you might find a narrow gap in enemy lines which is too
narrow for other units but thanks to free reform you can get through and
threaten vulnerable war machines. It is also very helpful to threaten
the foe with flank/rear charges too. They might fail their Ld test due
to close proximity of your unit and might not march, does not happen
often but it is always good to force such a test.
Their
feigned flight rule is also very handy, especially against frenzied
regiments and can help you to draw them into a trap without sacrificing
your own units to do so. In other cases the enemy might have to declare
the charge against them first in order to redirect against another unit.
First, they might fail to do so and then have to chase light horse. If
not they might be still in a bad spot for a successful charge against
another unit (i.e. too far to have good chance to make it) and still
fail the charge. You can of course withdraw with second regiment too
thus slowing down your enemy further. In any case there are a lot of
opportunities to perform feigned flight and then come back to the fight,
especially that you can do so by moving around enemy regiments and
immediately position your light cavalry in a threatening place without
losing a turn as it would be for other unit.
Example
One
of the light cavalry units performed a feigned flight move forcing a
failed charge and thus the gap was created between the Dwarven units.
Reavers reformed and immediately moved into it to reform again behind
enemy lines ready to attack their war machines. Another unit also
exploited the gap between Dwarven unit and the tower.
- Always Strike First/Initiative order – it is not exactly the
rule that helps you directly in the movement phase but thanks to that
you can be more aggressive with your units and be more efficient in
positioning them for the best charge option. The enemy often fears even
10 Lions or Swordmasters because they will strike before them and with
their high output damage it is very risky to do so if you are not
attacking with big regiment or well armored warriors or both. Thanks to
that you can march with one of your regiments boldly towards the enemy,
stop and inch or two, thus preventing any sophisticated movement and
force a difficult decision – charge first but still suffer greatly and
risk counter attack or try to move back but with possible combined
charge going his way next turn regardless.
Obviously,
with new army book, the units with great weapons do not have re-rolls
anymore so exposing them to charge of the enemy can be risky. Hence, it
is important to take all odds into account. It may work against lower
initiative troops but then if they are also quite numerous, you might
still be at disadvantage. Units that kept ASF might not be strong enough
to inflict significant damage either.
However, it is just another option you should consider while fighting for domination during movement phase.
Example
I
moved my hard hitters towards the enemy but I positioned Spearelves and
Swordmasters in such way that Daemonettes would struggle not to engage
both units at the same time (and I always could flee from that charge).
Since my enemy hesitated and didn’t charge first I could attack with 4
units against one. This example also shows how the advantage in the
number of units available works to your advantage. You can outflank the
enemy easier even with ranked infantry and since the opponent knows you
can flee and still have units to charge he has a tough decision to make.
Apart
from 8th edition rules that you can use in the movement phase to gain
advantage and prevent the enemy in doing likewise there are things that
are good for you:
- Multiple Small Units - This is also foundation of the whole
concept. Multiple Units. Even though they are infantry in majority you
can use them efficiently to overwhelm the enemy so that there is nowhere
for it to hide and no matter how it turns or reforms, it will always be
attacked from many directions. What is more, by setting up multiple
charges you diminish the impact of the random charge range and even if
some units do not get into the contact with the enemy there are enough
of them to create favorable fight for you anyway.
Example
In
the course of battle I managed to position several units close enough
to attempt a multiple charge on an isolated regiment of enemy ranked
infantry. I sacrificed an eagle to hold gors in place and then declared
the charge with 6 units. Only one failed the charge roll and combined
effort was enough to destroy 25 strong gor unit with 2 characters in a
single turn.
- Space - MSU army needs space to be able to be as efficient as
possible. It means that in the first turn of the game you might need to
clear the field from enemy support units as they can divert your
regiments, block movement and be generally annoying. This is where your
shooting and cavalry can shine. Shooting can wound tougher targets such
as chariots or some war beasts while light cavalry or skirmishers can be
destroyed by it. Cavalry can intercept faster regiments which can harm
your infantry (and you do want them to be at full strength before the
combat starts). Heavy cavalry is also good at attacking enemy shooters
and aid light horse in war machines hunting so that your infantry does
not have to worry about presenting a flank to cannon crew of your enemy.
Because you have many units at your disposal you can perform all these
tasks at the same time. Another great advantage of the MSU army.
- Great Eagles - Great Eagles are well known for their usefulness
and they deserve a separate entry. Fortunately there is a whole tread
for you to read about tricks available to any HE player so I am not
going to steal the topic from the rightful owner and instead give full
credit to Collinisimo and other contributors by linking this topic: Link
- Threat Zones* - I believe it was in Machiara's article I read
about it for the first time in the context of warhammer game and I
learned about the concept from chess (surprise, surprise!). All your
regiments have that front arc area zone where they can either shoot or
charge and any enemy entering it risks being attacked. This is a very
useful thing as you can create zones during movement phase where the
enemy will be reluctant to go into. They might fear your powerful charge
and will slow down their advance. Or maybe their units are vulnerable
to shooting and can be thinned down or even panicked and because of
that his formation will not spread as much as he would like to thus
preventing him from using movement to his full advantage. It might force
him to make difficult decisions as he would like to shoot/cast a spell
at your regiment but it might require entering the threat zone from your
elites ready to attack next turn. So he has to choose between risking
his shooters/spell casters and not using them in the role they are the
best.
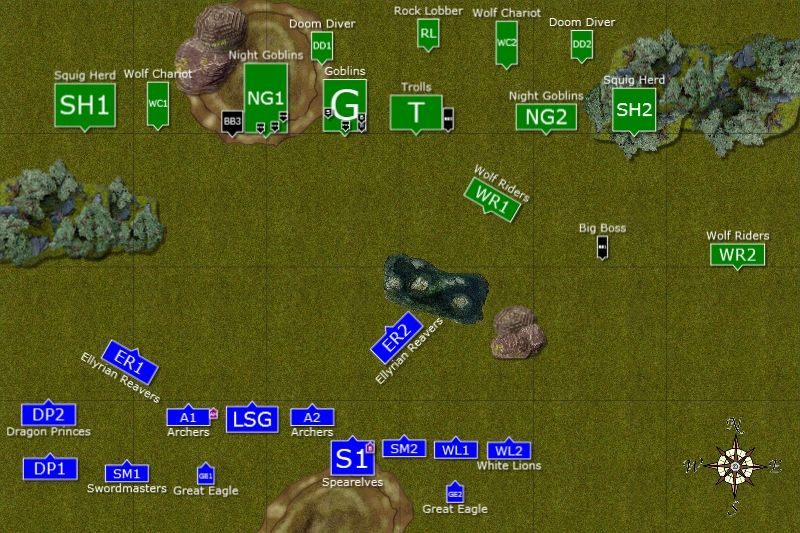
Example
In
this game of two MSU armies we tried to out-deploy and outmaneuver each
other. I find Flamers quite dangerous for my small units but I have a
good counter for that threat in the form of Dragon Princes. My opponent
knew that and tried to lure my cavalry to the flank and take them away
from the center of the battlefield. I achieved my goal which was
preventing Flamers from shooting without any penalties (their efficiency
was reduced and their target choice limited) and I also used a small
mistake my opponent made by placing his Fiend a little too close when I
could risk long charge. I made it but then could not break through in
order to overrun into flamers but in the end I managed to destroy the
Fiend and the Crusher so it was not lost opportunity either.
It
is also worth remembering that a perceived threat is as dangerous as a
real one. It is another concept borrowed from chess. Once the unit is
committed it cannot be elsewhere. Of course ultimate goal is to commit
the regiment but at the same time when you maneuver to gain the best
advantage possible you can keep the enemy guessing. Also, if you try to
position your units in the way that they threat many enemy regiments at
the same time you can confuse the opponent as to where your attack is
rally aiming. The best for that are flying units so you might consider
adding a flying heroes to your army for the very purpose of that option.
* paragraph added thanks to feedback from SmithF
7. Additional Examples
There
are a few more examples of interesting situations which occurred in my
games I would like to share with you. I hope I will be able to update
that part with more games coming.
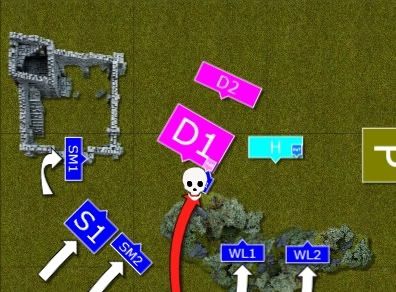
7.1. Abomination Hunt
Skaven
Abomination is powerful monster and with its special attacks it can
easily eat one small regiment per turn. It was crucial for me then to
come up with an idea of how to hunt it down. It is very fast with its
3d6 random movement and you cannot flee from it. It has "regeneration"
special rule so it was very important to attack it with White Lions who
have Banner of Eternal Flame. If I could do so from the flank then even
better. Here is what I managed to achieve:
Due
to its Random Movement Abomination moved ahead of main Skaven battle
line. I positioned an Eagle exactly 1 inch in front of it so that it has
no other option but to charge. I moved White Lions to be 6.1 right
behind the eagle so that when Abomination overruns it does not go too
far for another Lion regiment to charge it from the flank. As you can
see my opponent sees the danger and tries to shoot at Lions but 5 of
them remains and they charge in. They do not kill the Abomination in
that turn yet (I managed to finish it in subsequent round of combat) but
I stopped it already.
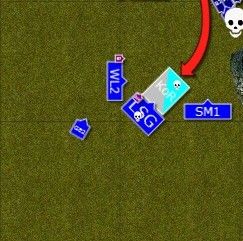
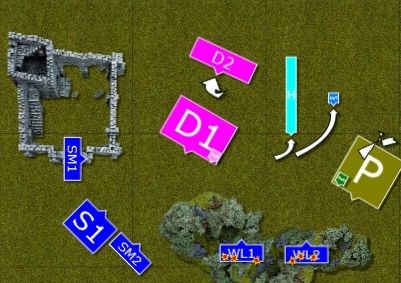
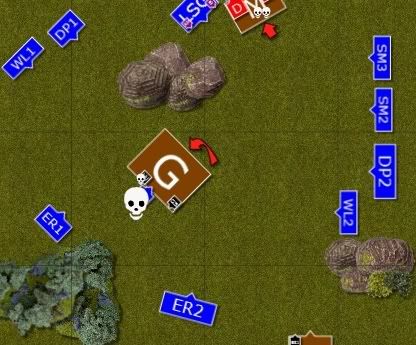
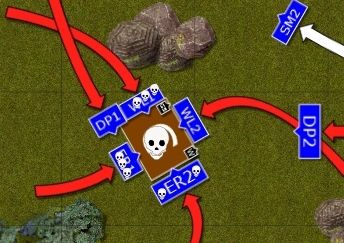
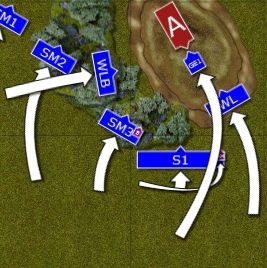
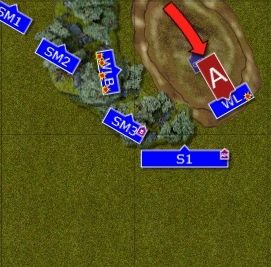
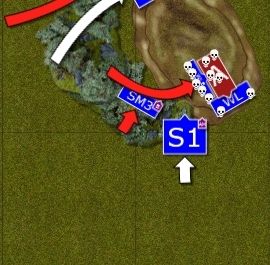
7.2. Dealing with Frenzied Ranked units
Ranked
units with frenzy can be very dangerous because they produce a lot of
attacks and even if they lose combat they may still be steadfast and
difficult to defeat quickly. This is one way of dealing with them:
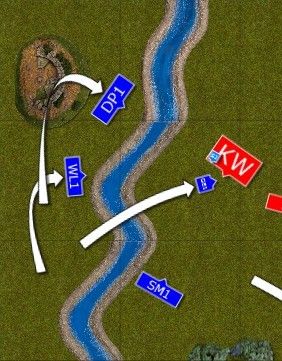
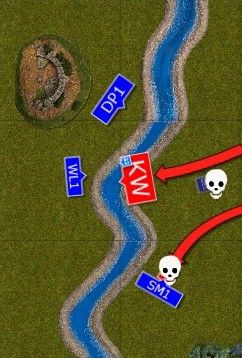
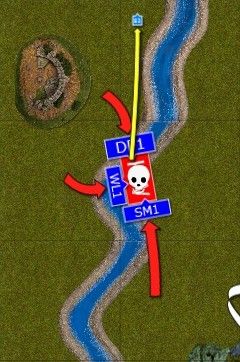
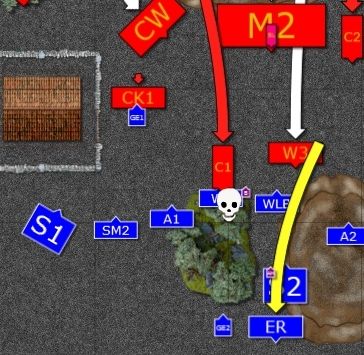
I
positioned an Eagle in front of the Khorne Warriors regiment. I also
moved 3 other units (task force) to positions and my opponent had to
choose. Either to attack or be attacked. He chose to kill the eagle and
had to overrun. As he entered the river he immediately lost steadfast
rule and his ranks did not count to the combat resolution. Then I
charged with my 3 heavy hitters from 3 sides and managed to inflict
enough wounds to kill the entire regiment. However, the same would work
against horde of khorne marauders for example, who would lose badly and
unless they were lucky to get insane courage they would be broken
easily
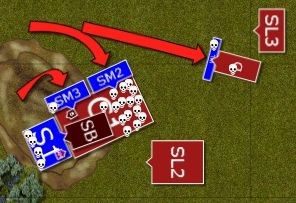
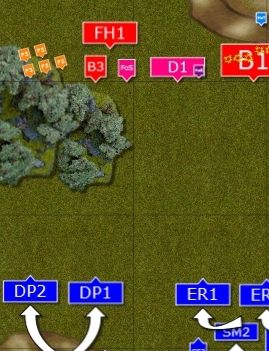
7.3. Multiple Charge
There
are many examples of multiple charges but I chose this one because ...
it didn't happen. I missed that opportunity and if I were not lucky to
hold with Spearelves against Clanrats with Screaming Bell I would have
lost that game badly.
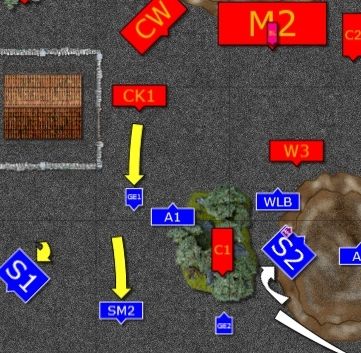
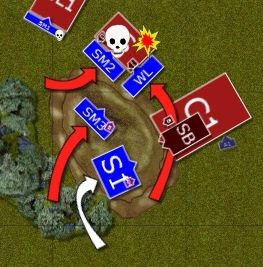
In
the middle of the game sometimes it is hard to spot great
opportunities. In this situation I saw that I am in a good position to
charge Stromvermin with Swordmasters from the front and Lions from the
flank. I also sacrificed Archers to slow down Clanrats with Screaming
Bell. To our surprise Archers survived the charge and even managed to
hold on Insane Courage! But then I was so overwhelmed with joy that I
didn't spot another opportunity.
I
should have charged with Swordmasters and Spearelves to the flank of
that big regiment. It would pin it down again and although it is
unbreakable I would be able to start killing clanrats earlier. Also, my
two other regiments who defeated Stormvermin would be able to help my
following turn and it would be possible to get the bell as well while in
the game I didn't have enough time to finish it. What is more
important, however, I would not risk Spearelves with the Archmage as I
did in the game.
7.4. Defending characters against powerful fliers
Even
with so many regiments it might happen that the characters have no safe
place to hide. It is in particular difficult against powerful fliers
such as Bloodthirster or Lord on Dragon. Such beasts don't even have to
attack your character, they will simply destroy the unit so that they
can catch the survivors in hot pursuit.
Another
problem is that you cannot really block such powerful enemy with your
units as they can simply fly over. If you place the character behind the
regiment the foe will simply overrun into your mage or bsb. Another
unit might be handy but then we are talking about the situation when you
might run out of the units to sacrifice. Besides 2 regiments equal the
cost of BSB with a bonus VP for battle standard and their cost is close
to what enemy would get for an archmage too. So it is not really that
great exchange.
However,
I think I managed to design the formation in which you can save the
life of your characters at the cost of one unit, at least for a turn or
two. Which means that it might be long enough for them to live until the
end of the game.
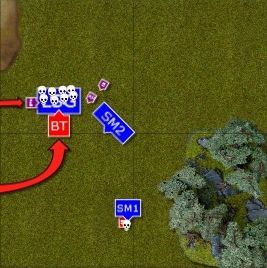
In
the game against Daemons of Chaos I faced a big challenge (literally!)
in the form of Bloodthirster. I managed to elude his attention for some
time and it happened that I needed just one more turn to survive with my
characters. As you can see on the diagram I positioned my 2 units at an
angle with only a small gap in front. My characters were between the
units, one inch away from each regiment and presenting their front to
the Bloodthirster. In that situation Bloodthirster could not land
between them to attack my characters. He could only charge a unit. As he
had to maximize the number of models in contact it also meant he would
not be able to pursue or overrun into my archmage either. Another
important factor here is that I didn't have any champions in these units
so I could not challenge and by sacrificing one be able to remain
steadfast one turn longer. It did help, however, to be able to cast
Courage of Aenarion to make the regiments stubborn as the one attacked
suffered too many casualties to remain steadfast. Thanks to this
formation my characters survived the game and when we calculated the
points it was a draw!
8. Summary
As
I said at the beginning I wrote this rather long post to collect my
observations on High Elves MSU. It is possible that with growing
experience I will update it, especially with some more interesting
examples. I would also appreciate any feedback on any part. Do you think
I should elaborate on some particular subject? Maybe I missed
something?
I
also trust it was interesting reading despite the length. I simply
decided to write everything I consider worth mentioning even if it seems
obvious.
If these observations are any good (and I believe some of them may be useful :)) then it is thanks to:
Wardancer
aka Eastern Barbarian - who convinced me that it is a very good
idea to try out MSU approach when I was failing badly with my cavalry
prince and started to doubt if I can play Warhammer at all. He patiently
played game after game with variety of armies to help me to prepare to
the first tournament at which I played with this army. Thanks bro!
SmithF - for showing the MSU armies can be fun to play with in 8th edition too!
Milliardo - for support and understanding the need to talk about tactics more than army list building :)
Brewmaster_D
- for being stubborn and forcing me to eat my keyboard in order to
defend my own way but having a great time discussing magic lores and
core selections.
And
all the members from Ulthuan and Warhammer.org who: disagreed with me
on many matters thus helping me to try and explain my point of view
better (I know I failed often in that regard); popped by and said they
like the reports and the army style - that really kept me going!; all
the readers - I will do my best to provide more and better quality
reports so that HE MSU saga continues.
Thanks for reading!
Thanks for getting this blog up and running, I really enjoy your battle reports. How up to date is your thinking on MSU in this initial post?
ReplyDeleteHi Dan,
ReplyDeleteThanks a lot! I am glad you enjoy the reports!
In general all the ideas are still valid. When I mentioned that I would like to update it I meant to give more examples on how to tackle different threats, maybe even add separate chapters about particular army books.
Army list constantly evolves too and that might need to be updated as well, with new experience and new observations.
If you have any suggestions as what would be a good addition, don't hesitate to let me know!
Cheers!
This was a great bit of work. Can I ask your permission to re-post this onto the Eighth Edition for Life (EEFL) forum (giving links to here and full credit of course). We are trying to gather as many great articles (such as this) and put them all in one place.
ReplyDeleteHi Mark,
DeleteThank you very much for your comment! I am glad to learn it is still useful. I would be very happy to share this article with anyone who is interested. So feel free to use it (or any content of this blog if you find something interesting)!
Thanks!