

Greetings!
In the last game of the Return of the King tournament I played against Peter and his Dwarfs. Classic match up in any fantasy system!
It was also quite an interesting situation in the tournament standings as thanks to my two big victories I found myself fighting for a podium. Very exciting!
I have never played against Peter before so the fact I had an opportunity to play against him at last was even more important! Peter brought quite compact Dwarf army with a formation that I soon learned to respect a lot :)
Dwarfs - Army List
20 Rangers, Regiment, Infantry, Crushing Strength (1), Pathfinder, Vanguard, Elite and Stealthy due to Herneas' Hunting Party formation
- 10 Ironguard, Troop, Infantry
- 10 Ironguard, Troop, Infantry
- Golloch's Fury, Hero (Monster), Base Size (50x100mm), Crushing Strength ((3), Headstrong, Iron Resolve, Piercing (2), Strider, Very Inspiring
20 Rangers, Regiment, Infantry, Crushing Strength (1), Pathfinder, Vanguard, Elite and Stealthy due to Herneas' Hunting Party formation
- Herneas the Hunter, Hero (Infantry), Individual, Inspiring (Rangers Only), Crushing Strength (1), Vanguard, Pathfinder, Elite and Stealthy due to Herneas' Hunting Party formation
10 Berserker Brock Riders, Regiment, Cavalry, Crushing Strength (1)
- Berserker Lord, Hero (Cavalry), Individual, Inspiring (Berserkers Only), Crushing Strength (1),
6 Earth Elementals, Horde, Large Infantry, Crushing Strength (1), Pathfinder, Shambling
- Stone Priest, Hero (Infantry), Inspiring (Earth Elementals only), Individual, Surge (8)
But that also was a serious warning sign. Because it also meant this small and quite compact army should be able to deal significant amount of damage. First impression was that this army has some good ranged attacks and can put up a decent fight as well.
I needed to avoid the shooting initially and/or engage in favourite shooting exchange with Rangers. While it seemed I should be able to manoeuvre freely (as Dwarfs would not be able to control entire width of the battle field), approaching the shooters will always be tricky.
My army for reference:
Outcasts - Army List
3 Drakon Riders (DR1), Regiment, Large Cavalry, Thunderous Charge (1), Crushing Strength (1), Fly, Dwarven Ale
- 5 Silver Breeze (SB), Troop, Cavalry, Nimble, Bows
- 5 Silver Breeze (SB), Troop, Cavalry, Nimble, Bows
- Drakon Rider Lord (DL1), Hero, Large Cavalry, Crushing Strength (1), Thunderous Charge (1)
3 Drakon Riders (DR2), Regiment, Large Cavalry, Thunderous Charge (1), Crushing Strength (1), Fly
- Drakon Rider Lord (DL2), Hero, Large Cavalry, Crushing Strength (1), Thunderous Charge (1), Diadem of Dragon-Kind
10 Stromwind Cavalry (S), Regiment, Cavalry, Thunderous Charge (2)
- Noble War Chariot (N1), Hero, Large Cavalry, Bow, Thunderous Charge (2)
3 Forest Shamblers (FS1), Regiment, Large Infantry, Crushing Strength (1), Vanguard, Pathfinders
- Forest Warden (FW2), Large Infantry, Hero, Crushing Strength (2), Pathfinders, Nimble, Vanguard, Surge (3), Inspiring Talisman, Alchemist Curse (10)
20 Palace Guard (PG1), Regiment, Infantry, Crushing Strength (1)
- Army Standard (AS), Hero, Infantry, Individual, Inspiring, Lute of Insatiable Darkness
20 Palace Guard (PG2), Regiment, Infantry, Crushing Strength (1)
My army has 13 elements, 12 scoring units and total Unit Strength of 16. As I have mentioned earlier, it was a bit surprising to see the nominal advantage in all of these.
My army has 13 elements, 12 scoring units and total Unit Strength of 16. As I have mentioned earlier, it was a bit surprising to see the nominal advantage in all of these.
Terrain
 |
| Terrain details and objective markers |
Deployment and Scenario
 |
| Elves vs Dwarfs |
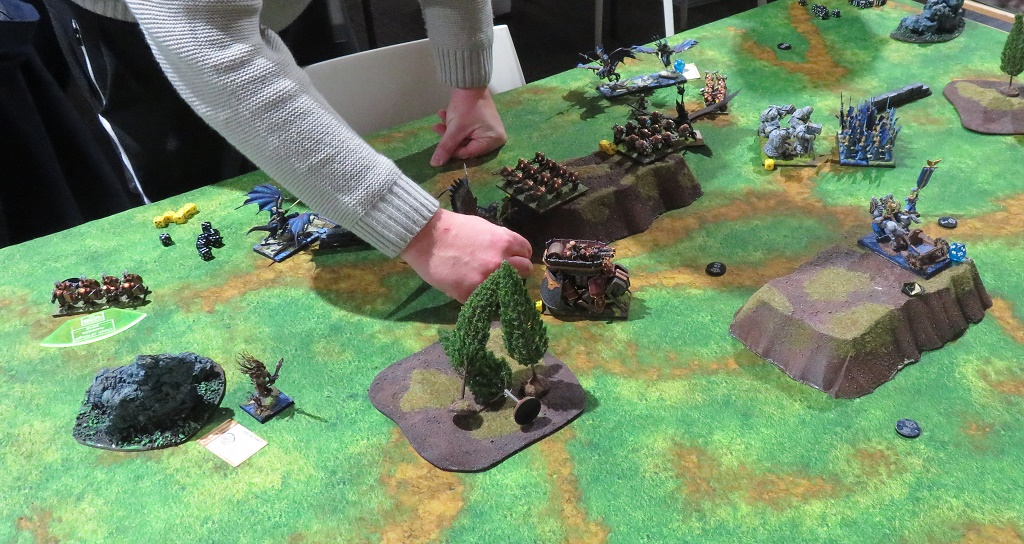
In this round we played Pillage as a scenario and we ended up with 6 objective markers total. I tried to spread them a bit while Peter preferred them a bit closer to each other.
Because of that I divided my army into three groups. Two flanking forces, with the one on the left flank reinforced with Forest Shamblers and the Warden to help against faster Brock Riders. The one on the right seemed to have more space for manoeuvring. And the middle group, comprised mainly of light shooting elements but also with Storm Wind cavalry.
The plan was to draw the centre of the Dwarven battle line forward, engage in some shooting duel while advancing on both flanks fast for double envelopment.
Spoiler alert: the plan failed to take into account the fact that the hill did not provide any cover, if the enemy occupied the hill on the other side of the battle field. :)
Peter won the roll off and decided he will wait for me to advance first.
 |
| Deployment after Vanguard moves. |
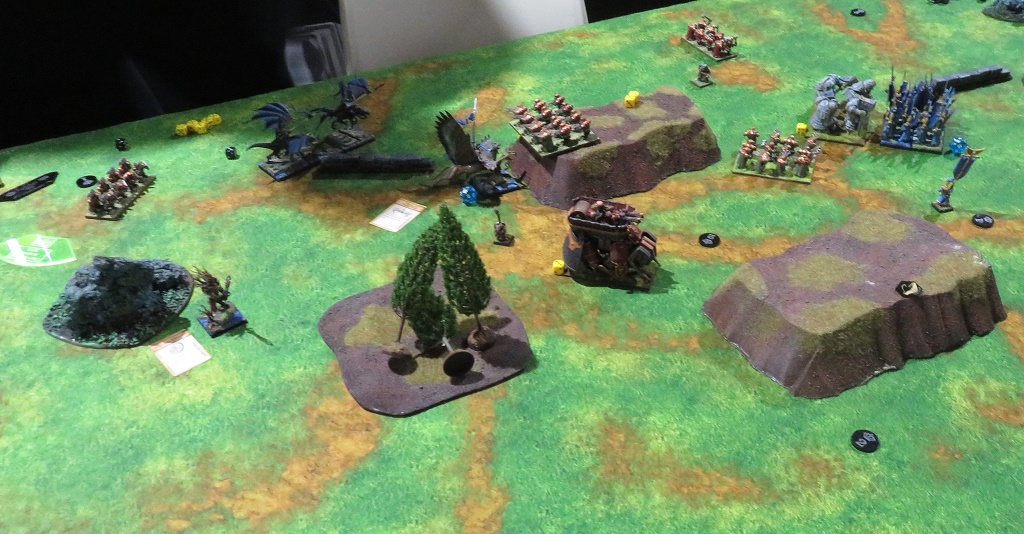
Outcasts - Turn 1
 |
| Outflanking manoeuvres. |
 |
| Elves open fire but without much of an effect. |
Elven army moved forward as planned. Both fast groups on the flanks advanced at speed while the centre moved only to get into position for shooting. Unfortunately for Elves, they were not able to inflict much damage upon stealthy Rangers.
Dwarfs - Turn 1
 |
| The power of Rangers' shooting. |
 |
| Storm Wind Cavalry is no more. |
Storm Wind cavalry advanced a bit too much forward and found itself to be a target for Dwarven Rangers. The shooting was much more heavy than expected and as a result the Elven Knights suffered a lot of damage. So much, in fact, that the regiment lost too many of its numbers to remain any substantial threat to the enemy,
Outcasts - Turn 2
 |
| Elves continue their outflanking manoeuvres. |
 |
| While the units in the centre withdraw. |
The Elves continued advancing on the flanks in order to catch their enemies off guard. However, Dwarfs seemed to be experienced enough not to abandon their good, defensive formation. And just adjusted it a little to face approaching Elves.
Dwarfs - Turn 2
 |
| Rangers shoot down another Elven unit. |
 |
| Brock Riders defeat their first enemy. |
Brock Riders, infuriated by the nearby Drakon Lord that dared to shoot at them with he help of his magical Diadem, attacked the first available enemy unit. Even tough Forest Shamblers failed to hold their ground and were defeated!
Also Silver Breeze cavalry suffered enough damage, much like Storm Wind knights, and had to flee the battle.
Outcasts - Turn 3
 |
| Uphill battle for the Elves. |
 |
| More vigorous manoeuvring. |
Elves attacked back but their efforts were not as successful. Despite the losses, Brock Riders held their ground. That put Palace Guard in difficult position. Not only they had to fight against the enemy they hoped to defeat but were in danger of being attacked by two enemies at the same time!
Similarly, the Drakon Lord and Riders were not able to defeat the lone Berserker Lord on the opposite flank.
Dwarfs - Turn 3
 |
| Brock Riders defeat another enemy unit. |
 |
| Golloch's Fury |
Elves continued sustaining damage. Brock Riders routed the unit of Palace Guard, claiming the second victory over the enemy in a row. While Golloch's Fury destroyed the Chariot one of the Elven nobles was riding to battle in.
Outcasts - Turn 4
 |
| Elves keep fighting. |
 |
| Some much needed successes for the Elven army. |
Elves kept on fighting and managed to defeat the stubborn Brock Riders and their Lord. Both Drakon Riders units were now behind the enemy lines. At the same time, Drakon Lords engaged the Rangers in order to limit their shooting abilities.
Dwarfs - Turn 4
 |
| Dwarfs do not stop either! |
 |
| Elves are running out of units! |
Although Elves started noting some successes, Dwarfs did not stop either. Ironguard attacked damaged Drakon Riders and routed them. While the Drakon Lord was shot down from the skies by Herneas himself!
Outcasts - Turn 5
 |
| Battle for the hill! |
 |
| Desperate measures. |
Elves continued their desperate fight. Drakons managed to defeat one of the Rangers' units while Palace Guard valiantly kept on fighting against Earth Elementals.
The Forest Warden, using his magical spell, cast another Alchemist's Curse at Golloch's Fury but it was not yet enough to destroy the behemoth.
Dwarfs - Turn 5
 |
| Drakon Lord down! |
 |
| Heavy losses on both sides but Dwarfs gain upper hand. |
Dwarfs managed to gain significant advantage and despite losses on both sides, they seemed to be in a far better shape. Especially when one more unit was defeated, this time Drakon Lord was shot down by Golloch's Fury.
Outcasts - Turn 6
 |
| Last Elven Charge. |
 |
| Earth Elementals are defeated! |
In the final attempt to swing the balance of the battle, the Elves attacked Earth Elementals and succeeded in defeating them! Unfortunately, heroic attempt of the Army Standard was nowhere near to that effect.
Dwarfs - Turn 6
 |
| Parting Shots |
 |
| Dwarfs are victorious! |
Dwafs remained in control of three objectives and it meant their achieved their strategic goals. Drakon Riders were shot down from the skies for good measure. It was a bloody victory but victory without doubt!
Summary
 |
| Turn-by-turn animation summary |
After-battle
Many thanks to Peter for a great game and congratulations for well deserved victory! Peter played very well and used the strengths of his army perfectly, so no wonder he was victorious.
I am afraid I made a few mistakes that also contributed to the defeat of my army.
The deployment was obviously the first one. I can't explain why but I completely forgot that the hill is not going to provide any cover to the units behind it, when the enemy is on top of the second hill. That combined with the vanguard move meant that Rangers were in a perfect spot to inflict damage. While they could afford to be in the open thanks to their Stealthy special rule.
I could even spread my units as soon as the game started but I did not do it and had to pay for it.
Second mistake was to move Storm Wind into range of all the rangers and not getting Army Standard close enough to provide inspiring presence. That helped Dwarfs to avoid any early pressure from such regiment. Not to mention that I simply lost it for nothing.
You could see how I hesitated next and pushed the units back when there was no need at all. Even if Golloch's Fury moved forward to shoot, I could have had some units to distract the Rangers anyway.
From now on it was an uphill battle and I was not able to rout enemy units early enough to get back to the game. I probably should not have moved Drakons on the left flank completely behind the rock so that they could still engage Iron Guard when Brocks committed to the fight. That would have opened new opportunity to outflank the enemy and remove one of the units controlling the objective.
It was a good game, however, and I hope I will have an opportunity for a re-match at some stage!
Thanks for reading!
No comments:
Post a Comment