

Greetings!
After a few months break, the best Tournament Organiser I have ever met, Matt "The Apron Boy" was back with a new event! It was named "Return of the King" and rightly so! No wonder then that players responded to the call enthusiastically. Significant number of them drove from interstates, only to be able to participate in what was guaranteed to be a great day of gaming and Kings of War.
To accommodate popular wish, there were four games to be played and the armies were limited to 1850 points. Black Jack scoring system was used as well. If you are interested in the results of the tournament, here is the link to the final score (you can check the results after each turn as well):
When I learned that my most regular opponent on Universal Battle, Jeff, is going to attend I decided to challenge him to the battle in the first round! I simply wanted to make sure we can finally have a game with real models and do not rely on the respective scores during the event to make it happen.
Jeff usually wins in our games and wins decisively too. However, I hoped that perhaps this time I will be able to come up with a good plan and execute it well to prevail. He also told me that in the most recent interview with the hosts of the Direct Misfire podcast, he was asked to bring League of Rhordia to the tournament. So he did!
Here is the army list he brought to the event:
League of Rhordia - Army List
40 Halfling Archers (HA1), Horde, Infantry, Bows, Stealthy
- Duke on Ancient Winged Alarez (DoA), Hero (Monster), Crushing Strength (2), Fly, Heal (4), Iron Resolve, Thunderous Charge (1), Very Inspiring
40 Halfling Archers (HA2), Horde, Infantry, Bows, Stealthy
- Duke on Ancient Winged Alarez (DoA), Hero (Monster), Crushing Strength (2), Fly, Heal (4), Iron Resolve, Thunderous Charge (1), Very Inspiring
20 Halfling Braves (HS1), Regiment, Stealthy
- Wizard on Alarez (WoA), Hero (Large Cavalry), Fireball (6), Fly, Thunderous Charge (1)
20 Halfling Braves (HS2), Regiment, Stealthy
- Wizard on Alarez (WoA), Hero (Large Cavalry), Fireball (6), Fly, Thunderous Charge (1)
20 Halfling Braves (HS3), Regiment, Stealthy
- Battle Shrine[1] (BS), Hero (Large Cavalry), Lightning Bolt (5), Rallying (2)
20 Halfling Braves (HS4), Regiment, Stealthy
20 Halfling Braves (HS5), Regiment, Stealthy
Night Stalkers - Allies
20 Phantoms (P), Regiment, Crushing Strength (1), Shambling
- Dread Fiend (DF), Hero (Large Cavalry), Crushing Strength (2), Nimble, Vicious
It is also quite typical for Jeff to pick a unit that seems to be overlooked by other players and use it perfectly using its strength. Halflings are quite good at limiting the efficiency of the ranged attacks with their Stealthy special rule.
Two hordes of Archers provided good shooting abilities and with 2 Wizards and Battle Shrine, these were augmented even further.
Two Dukes were the hitting power of the army, very flexible and hitting hard enough, especially when allowed to hit in the flank.
Last but not least the allied contingent of the Night Stalkers further boosted the close combat abilities of the army and speed to intercept enemy fliers.
I planned to fight against this army using my speed and manoeuvrability. I wanted to either get into favourable, one-on-one combats or outflank the enemy. The challenge was that if I didn't break the units in the charge, I would most likely face some counter attacks from the sides. I also needed to avoid being shot at because every damage point lost prior to the fight would be putting my fragile units at risk.
Here is the army I took to this event:
Outcasts - Army List
3 Drakon Riders (DR1), Regiment, Large Cavalry, Thunderous Charge (1), Crushing Strength (1), Fly, Dwarven Ale
- 5 Silver Breeze (SB), Troop, Cavalry, Nimble, Bows
- 5 Silver Breeze (SB), Troop, Cavalry, Nimble, Bows
- Drakon Rider Lord (DL1), Hero, Large Cavalry, Crushing Strength (1), Thunderous Charge (1)
3 Drakon Riders (DR2), Regimen, Large Cavalry, Thunderous Charge (1), Crushing Strength (1), Fly
- Drakon Rider Lord (DL2), Hero, Large Cavalry, Crushing Strength (1), Thunderous Charge (1), Diadem of Dragon-Kind
10 Stromwind Cavalry (S), Regiment, Cavalry, Thunderous Charge (2)
- Noble War Chariot (N1), Hero, Large Cavalry, Bow, Thunderous Charge (2)
3 Forest Shamblers (FS1), Regiment, Large Infantry, Crushing Strength (1), Vanguard, Pathfinders
- Forest Warden (FW2), Large Infantry, Hero, Crushing Strength (2), Pathfinders, Nimble, Vanguard, Surge (3), Inspiring Talisman, Alchemist Curse (10)
20 Palace Guard (PG1), Regiment, Infantry, Crushing Strength (1)
- Army Standard (AS), Hero, Infantry, Individual, Inspiring, Lute of Insatiable Darkness
20 Palace Guard (PG2), Regiment, Infantry, Crushing Strength (1)
In comparison to the army at 2000, I did not include the regiment of Chariots. My army has thus 13 elements, 12 scoring units and total Unit Strength of 16. I am at a clear disadvantage in terms of Unit Strength so I would need to work hard to even out the score. the reason being that if I could do that I would limit the ability to either contest the objectives or to add enough unit strength to control the area.
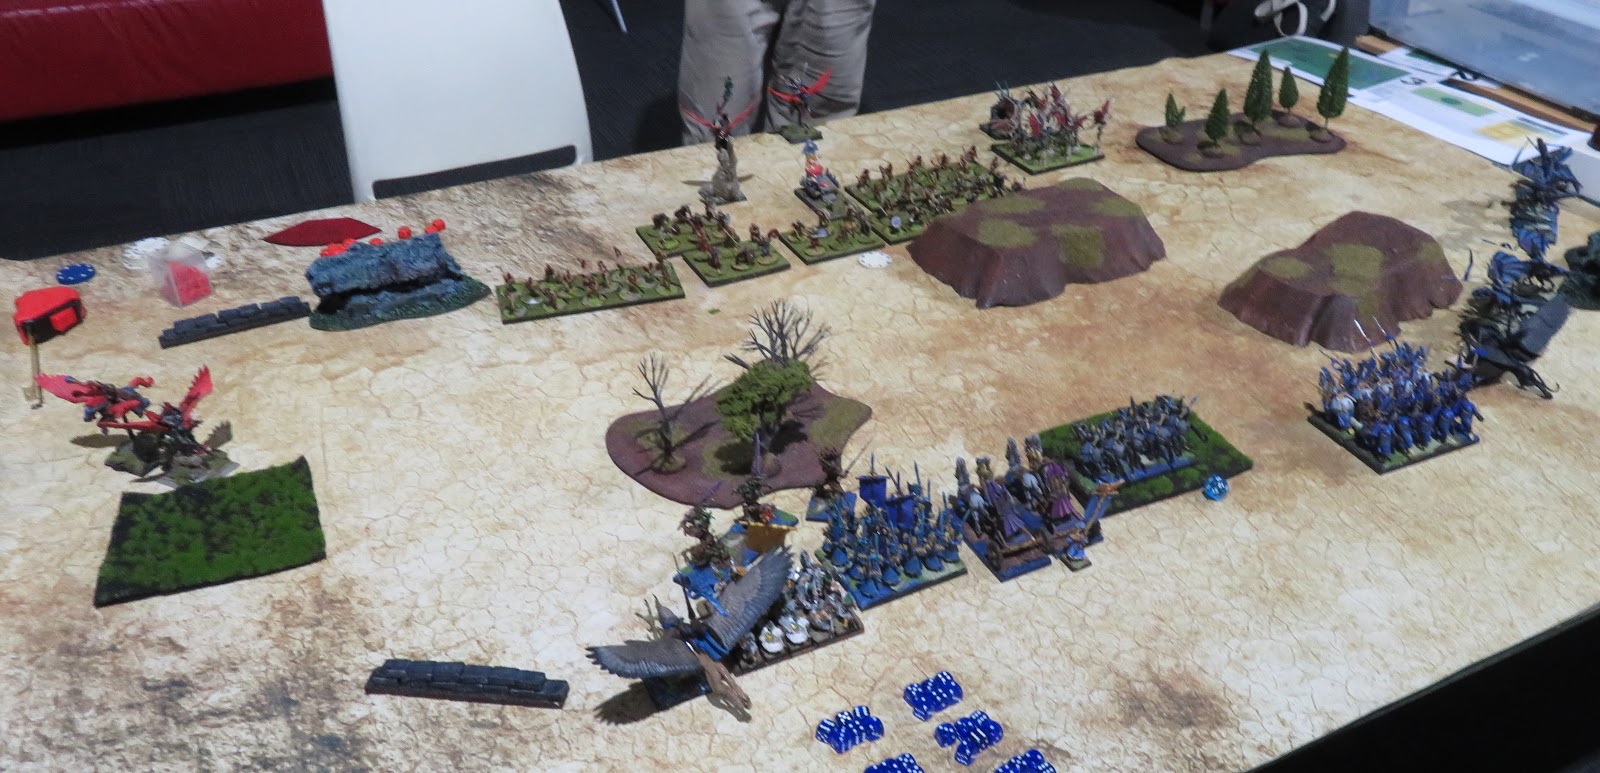
Terrain
Deployment and Scenario
In the first game we played scenario Dominate. Which is always a challenge for me because of the fact my units are not suited to move to the centre, park there and defend it against all attacks. I need to first, inflict damage to the enemy and second, outflank whatever they have in the middle to shift the balance.
If I don't succeed in outflanking or simply do it too late, I would lose the game. At the same time, I can ill afford casualties early in the game, especially when we have similar number of elements.
My plan was thus as follows. Keep the centre relatively empty, with a bit of shooting there to start doing some damage at the distance. Advance the slower infantry through terrain to limit the enemy shooting. Use the fast and harder hitting elements on the right flank to engage enemies there, if possible to break the opponents and/or seek the chance to outflank. And use my own heroes to either intercept Dukes or add to the flank protection of the other regiments.
I needed a good coordnation of these attacks and success especially on the charge.
Outcasts - Turn 1
Outcasts moved cautiously, using the terrain as cover. Only the shooters moved into range and aimed at one regiment of Halfling Braves. There were some casualties but not enough to be worried about it.
Rhordia - Turn 1
Halflings remained mostly in their initial, well defended positions and trusted in their superior numbers as well as ranged attacks. At least for now. Only on the one flank Duke and the Wizard flew to the side and attempted to threaten Elven advance.
Outcasts - Turn 2
Elves continue manoeuvring to attack positions. On the left, the Shamblers moved into range to attack the Archers and shifted to be able to receive the charge from the impetuous Duke. On the right the fast and hard hitting unit were also preparing to charge their enemies.
Rhordia - Turn 2
The Halflings, and even more so their allies, did not fall for an obvious trap and did not charge recklessly without much of the support. Instead, they continued shooting at the approaching Elven units, inflicting some damage again.
Outcasts - Turn 3
Elves decided to launch an attack. Majority of the charges where to intercept and stop enemies from counter attacking the main unit, Storm Wind cavalry. Or, in the case of the Forest Shamblers, to stop enemy Archers from shooting.
Unfortunately for Elves, the knights failed to break their enemies on the charge and all plan was at a great risk of failure now.
Rhordia - Turn 3
The retaliation was not yet powerful but Elves lost one of the Darkon Lords nonetheless. Hit in the flank by the vicious Dread-Fiend, Elven commander fell.
Almost all other units counter charged with the notable exceptions of the Duke who evaded his adversary. And Braves who fought against Elven Knights. Instead, the shooters aimed at the Elven cavalry and inflicted some damage at range.
Outcasts - Turn 4
Elves committed more units to the fight and although this time two regiments of Braves were routed, the dangerous Dread-Fiend and Phantoms were perfectly intact.
Rhordia - Turn 4
Patience in waiting for the right moment to counter attack paid off. Both Drakon Riders units perished when counter attacked, especially with the Duke joining the fight and no inspiring presence to help the isolated Elves units.
Storm Wind cavalry also paid for the failure and was shot down to pieces.
Outcasts - Turn 5
Elves continued their attack on the left, if only to minimise the losses. Forest Shamblers managed to finally rout the Halfling Archers. Enemy Wizard was also shot down from the skies. However, Palace Guard failed to rout their adversaries and ended up with the flank exposed to the attack of the Duke himself.
Rhordia - Turn 5
Elves had now very few units to resist the counter attack. And more units were lost in the process. Palace Guard survived for now but were wavered and could not counter charge either.
Outcasts - Turn 6
Elves knew they lost the battle so they charged one more time to make their enemies pay more for their victory. Unfortunately for Elves, that last charge was also a failure as neither Duke nor Braves were routed.
Rhordia - Trun 6
The Halflings and their Allies needed only to move forward to completely dominate the battle field and have ultimate control over the centre. Elves lost two more units and few survivors withdrew quickly.
Summary
After-battle
Many thanks to Jeff for a great game and congratulations for the victory! I hoped our first game with real models would be closer but it was still fantastic to play against Jeff in person.
My plan did not work and I went down badly, losing the game 1:20. Ouch! I must admit I was surprised how resilient Braves can be, especially with the help of Healing and Rallying 2 of the nearby Battle Shrine.
As always, it was interesting to see how Jeff uses his army. This time, he patiently waited for the right time, always close enough to the centre to push it for the centre and win the scenario.
Looking back at the game I think I should have pushed through the forest on the left from turn 1. I also diverted one regiment of Palace Guard and I should have moved them together as long as they were not threatened with flank attack from the Duke.
I didn't coordinate my attacks well either. Even if Storm Wind broke Braves on the charge, I may have not been able to push through, Duke alone would have been enough to intercept my knights.
I considered flank charges with Drakon Riders against Braces and Archers in my turn 4. Perhaps I should have risked these (provided there was enough room) and maybe I would have been able to rout two enemy units. I most likely would have suffered from the counter attack but that would be good exchange from the point of view of respective unit strength.
An alternative deployment is also something to consider, however at this stage I don't have any good ideas yet. Let me know how would you deploy against Jeff's army!
Interesting fact is that both of us had 4-5 seconds left on the clock by the end of the game! :)
Thanks for reading!
In comparison to the army at 2000, I did not include the regiment of Chariots. My army has thus 13 elements, 12 scoring units and total Unit Strength of 16. I am at a clear disadvantage in terms of Unit Strength so I would need to work hard to even out the score. the reason being that if I could do that I would limit the ability to either contest the objectives or to add enough unit strength to control the area.
Terrain
 |
| Terrain Details |
Deployment and Scenario
 |
| Outcasts vs League of Rhordia and Night Stalker Allies. |
In the first game we played scenario Dominate. Which is always a challenge for me because of the fact my units are not suited to move to the centre, park there and defend it against all attacks. I need to first, inflict damage to the enemy and second, outflank whatever they have in the middle to shift the balance.
If I don't succeed in outflanking or simply do it too late, I would lose the game. At the same time, I can ill afford casualties early in the game, especially when we have similar number of elements.
My plan was thus as follows. Keep the centre relatively empty, with a bit of shooting there to start doing some damage at the distance. Advance the slower infantry through terrain to limit the enemy shooting. Use the fast and harder hitting elements on the right flank to engage enemies there, if possible to break the opponents and/or seek the chance to outflank. And use my own heroes to either intercept Dukes or add to the flank protection of the other regiments.
I needed a good coordnation of these attacks and success especially on the charge.
 |
| Deployment after Vanguard |
Outcasts - Turn 1
 |
| Cautious Advance |
 |
| So it begins! |
Outcasts moved cautiously, using the terrain as cover. Only the shooters moved into range and aimed at one regiment of Halfling Braves. There were some casualties but not enough to be worried about it.
Rhordia - Turn 1
 |
| Halflings remain in their positions. |
 |
| Halflings keep the tight formation |
Halflings remained mostly in their initial, well defended positions and trusted in their superior numbers as well as ranged attacks. At least for now. Only on the one flank Duke and the Wizard flew to the side and attempted to threaten Elven advance.
Outcasts - Turn 2
 |
| Outflanking Manoeuvres. |
 |
| Outcasts continue their advance. |
Elves continue manoeuvring to attack positions. On the left, the Shamblers moved into range to attack the Archers and shifted to be able to receive the charge from the impetuous Duke. On the right the fast and hard hitting unit were also preparing to charge their enemies.
Rhordia - Turn 2
 |
| Defensive game continues. |
 |
| The Allies pull back |
Outcasts - Turn 3
 |
| Attack! |
 |
| Elves decided to launch their attack. |
Elves decided to launch an attack. Majority of the charges where to intercept and stop enemies from counter attacking the main unit, Storm Wind cavalry. Or, in the case of the Forest Shamblers, to stop enemy Archers from shooting.
Unfortunately for Elves, the knights failed to break their enemies on the charge and all plan was at a great risk of failure now.
Rhordia - Turn 3
 |
| Counter attack. |
 |
| Drakon Lord down! |
The retaliation was not yet powerful but Elves lost one of the Darkon Lords nonetheless. Hit in the flank by the vicious Dread-Fiend, Elven commander fell.
Almost all other units counter charged with the notable exceptions of the Duke who evaded his adversary. And Braves who fought against Elven Knights. Instead, the shooters aimed at the Elven cavalry and inflicted some damage at range.
Outcasts - Turn 4
 |
| Another wave of attacks. |
 |
| Once again - not as successful as needed. |
Elves committed more units to the fight and although this time two regiments of Braves were routed, the dangerous Dread-Fiend and Phantoms were perfectly intact.
Rhordia - Turn 4
 |
| Counter Attack! |
Patience in waiting for the right moment to counter attack paid off. Both Drakon Riders units perished when counter attacked, especially with the Duke joining the fight and no inspiring presence to help the isolated Elves units.
Storm Wind cavalry also paid for the failure and was shot down to pieces.
Outcasts - Turn 5
 |
| Elves attempt to minimise the losses. |
 |
| Small measure of temporary success. |
Elves continued their attack on the left, if only to minimise the losses. Forest Shamblers managed to finally rout the Halfling Archers. Enemy Wizard was also shot down from the skies. However, Palace Guard failed to rout their adversaries and ended up with the flank exposed to the attack of the Duke himself.
Rhordia - Turn 5
 |
| Elves are being pushed back. |
 |
| More Elven Losses. |
Elves had now very few units to resist the counter attack. And more units were lost in the process. Palace Guard survived for now but were wavered and could not counter charge either.
Outcasts - Turn 6
 |
| Last Elven charge. |
Elves knew they lost the battle so they charged one more time to make their enemies pay more for their victory. Unfortunately for Elves, that last charge was also a failure as neither Duke nor Braves were routed.
Rhordia - Trun 6
 |
| Halflings Dominate the Centre! |
The Halflings and their Allies needed only to move forward to completely dominate the battle field and have ultimate control over the centre. Elves lost two more units and few survivors withdrew quickly.
Summary
 |
| Turn-by turn animation summary. |
After-battle
Many thanks to Jeff for a great game and congratulations for the victory! I hoped our first game with real models would be closer but it was still fantastic to play against Jeff in person.
My plan did not work and I went down badly, losing the game 1:20. Ouch! I must admit I was surprised how resilient Braves can be, especially with the help of Healing and Rallying 2 of the nearby Battle Shrine.
As always, it was interesting to see how Jeff uses his army. This time, he patiently waited for the right time, always close enough to the centre to push it for the centre and win the scenario.
Looking back at the game I think I should have pushed through the forest on the left from turn 1. I also diverted one regiment of Palace Guard and I should have moved them together as long as they were not threatened with flank attack from the Duke.
I didn't coordinate my attacks well either. Even if Storm Wind broke Braves on the charge, I may have not been able to push through, Duke alone would have been enough to intercept my knights.
I considered flank charges with Drakon Riders against Braces and Archers in my turn 4. Perhaps I should have risked these (provided there was enough room) and maybe I would have been able to rout two enemy units. I most likely would have suffered from the counter attack but that would be good exchange from the point of view of respective unit strength.
An alternative deployment is also something to consider, however at this stage I don't have any good ideas yet. Let me know how would you deploy against Jeff's army!
Interesting fact is that both of us had 4-5 seconds left on the clock by the end of the game! :)
Thanks for reading!
Great battle report!
ReplyDelete