

Hello!
In the second practice game prior to the next event I had a great pleasure to play against Dean from Olympian Games. Dean usually organizes tournaments for Mortem et Gloriam enthusiasts but this time he was to participate one. And needed a sparring partner to test his army. I was happy to accept the challenge!
Last time we played against each other Dean had great looking Parthain army. However, this time he brought the force of French Ordonnance. I have never had an opportunity to play against it but I expected similar units to those I fought against in 100 Years' French armies.
Here are the details of the army Dean had. We played at 10,000 per side:
French Ordonnance - Army List
Commanders
Army Commander (AC) - Professional
Subordinate General (CP1) - Professional
Subordinate General (CP2) - Professional
Subordinate General (CP3) - Professional
Camp
TuG's
4 Ordonnance Men-at-Arms (VdG) - Cavalry, Drilled Loose, Superior, Armored Horse/Fully Armored, Charging Lancer, Devastating Chargers, Dismountable, Melee Expert
4 Italian Knights (IK) - Cavalry, Drilled Loose, Average, Armored Horse/Fully Armored, Charging Lancer, Devastating Chargers, Melee Expert
4 Feudal Knights (FK) - Cavalry, Formed Loose, Superior, Fully Armored, Charging Lancer, Devastating Chargers, Dismountable, Melee Expert
6 Archers (A1) - Infantry, Drilled Loose, Average, Protected, Experienced, Powerbow, Stakes
6 Archers (A2) - Infantry, Drilled Loose, Average, Protected, Experienced, Powerbow, Stakes
6 Archers (A3) - Infantry, Drilled Loose, Average, Protected, Experienced, Powerbow, Stakes
6 Archers (A4) - Infantry, Drilled Loose, Average, Protected, Experienced, Powerbow, Stakes
6 Archers (A5) - Infantry, Drilled Loose, Average, Protected, Experienced, Powerbow, Stakes
8 Crossbowmen (C2) - Infantry, Formed Loose, Average, Protected, Experienced, Crossbow
8 Pikemen (P) - Infantry, Formed Close, Average Protected, Pike, Shove
I must admit I was a bit surprised that the army is relatively small. It has 10 TuG's, however, which means its break point is still better than mine - 5. It was also interesting to see quite a number of shooting units. I definitely did not want my cavalry anywhere near the Longbows for sure! At the same time, slow Phalanx may have it hard to get to the Archers on its own, even if it was a preferred enemy to fight against in melee.
The initial plan was to try and fight against enemy Pikemen, try to involve one of the Archers unit in a shooting duel with Cretans and maneuver with the Cavalry to be able to avoid being shot at. While hopefully get to the right position for some charges.
I used exactly the same army as in the previous game, here is the list:
Early Seleucids - Army List
Commanders
Army Commander (AC) - Competent Professional
Subordinate General 1 (CP1) - Competent Professional
Subordinate General 2 (CP2) - Competent Professional
Subordinate General 3 (MP) - Mediocre Professional
Subordinate General 3 (MP) - Mediocre Professional
Camp
Camp (C2) - Poor, Flexible
TuGs
8 Guard Argyraspides (A) - Infantry, Drilled Close, Superior, Protected, Pike, Shove
8 Phalangites (P1) - Infantry, Drilled Close, Average, Protected, Pike, Shove
8 Phalangites (P2) - Infantry, Drilled Close, Average, Protected, Pike, Shove
8 Phalangites (P3) - Infantry, Drilled Close, Average, Protected, Pike, Shove
6 Thracians (T) - Infantry, Formed Loose, Average, Protected, Devastating Charger, Melee Expert
4 Companions (C1) - Cavalry, Drilled Loose, Superior, Protected, Charging Lancer, Melee Expert
4 Line Cavalry (LC1) - Cavalry, Drilled Loose, Average, Protected, Charging Lancer, Melee Expert
4 Line Cavalry (LC2) - Cavalry, Drilled Loose, Average, Protected, Charging Lancer, Melee Expert
4 Line Cavalry (LC2) - Cavalry, Drilled Loose, Average, Protected, Charging Lancer, Melee Expert
SuG's
6 Tarentine Cavalry (TC) - Cavalry, Skirmisher, Average, Protected, Javelin, Experienced, Cantabrian
6 Horse Archers (HA) - Cavalry, Skirmisher, Average, Unprotected, Bow, Experienced, Combat Shy
6 Horse Archers (HA) - Cavalry, Skirmisher, Average, Unprotected, Bow, Experienced, Combat Shy
9 Cretan Archers (CA) - Infantry, Skirmisher, Average, Unproteced, Bow, Skilled, Combat Shy
Pre-Battle
Pre-battle phase ended in the terrain with a secure flank with the river and a few patches of the rough going terrain. Be it the woods or some uneven ground. It definitely added to the aesthetics of the battle field and I was very happy to be able to use my new, freshly painted terrain pieces too!
The scouting did not result in a significant advantage for any side and we tried to predict the positioning of enemy forces while deploying our units.
Deployment
Dean deployed his army in the refused flank formation. He nicely covered entire battle line with shooting units, guarded the open flank with Pikemen and spread units of the Knights.
I decided to form one battle group on the left to allow Cretans their chance for shooting duel while being protected by rough going terrain. Pikes and Thracians were to advance towards the enemy. Although Thracians were a bit nervous considering they would need to approach against Longbowmen.
The second half of the Phalanx was deployed on the center-right to start approaching towards enemy Pikemen and avoid shooters in the middle. The infantry was supported by the cavalry on the extreme flank. The role of mounted troops was to outflank the enemy and be able to assist Phalangites as soon as they get to melee.
Last but not least, the Companions were deployed in the middle as a mobile reserve and to protect respective flanks of the advancing Phalangites. They were not, however, to get too close to the enemy Longbowmen!
If the plan worked, I should be able to attack both flanks of the enemy formation, avoiding some of the shooters, at least for a while.
Seleucids - Turn 1
French army remained quite static, sending only the Archers and Crossbowmen forward, to be able to shoot at the advancing enemy early.
On the other hand, Seleucids moved their entire army, with units on both flanks approaching at a faster pace than those in the center.
French - Turn 2
Seleucids continued their advance on the flanks but this time Cretan Archers begun their shooting duel on the left. While the cavalry on the right moved fast forward, executing the outflanking maneuver.
French responded in expanding the frontage of their Pikemen formation and sending the Italian Knights contingent to the right.
Seleucids - Turn 3
While the units on the right flank were getting closer to each other, it was clear they are going to clash soon. However, the remaining French knights were not merely observing the situation but spurred their horses and moved towards the center. This literally opened them a lot of options for the attack.
Seeing this, Seleucids started maneuvering their Phalangites towards the enemy cavalry while Companions attempted to close the gap and look threatening!
French - Turn 4
Finally the armies engaged in melee. Phalangites charged against the Archers and Argyraspides attacked enemy Pikemen, gaining advantage thanks to their deeper formation. Also cavalry charged Italian Knights, hoping to prevail thanks to numerical superiority.
In the meantime, French Knights dismounted to prepare to fight against Phalangites while the Archers on the extreme left withdrew. They were loosing the duel with the Cretans and decided to disengage before it is too late.
Seleucids - Turn 5
French army decided to engage in the center as well, with Dismounted Knights fighting against the Phalangites, while Archers joined in melee. Mounted Men-at-Arms also attacked and where met by the Companions, who held hoping nearby Phalangites would join them to swing the balance.
Fortunately for Seleucids, the assistance of the light cavalry helped Argyraspides to break enemy Pikemen. While Line Cavalry prevailed against Italian Knights. It looked like Seleucids won on the right flank and could send more troops towards the center.
Alas, it was not to be as fortune is fickle and due to unforeseen dramatic change of the conditions, both armies were forced to disengage.
Summary
After-battle
Many thanks to Dean for a great game! This preparation must have worked really well as Dean fought really well at the tournament and ended up 2nd! Well done indeed!
It was a very interesting game because I have never fought against so many Longbowmen. However, it seems that my plan worked as I did not suffer significant casualties due to shooting. At the same time, I managed to get into melee relatively quickly. And with a great result on the right flank.
I was thus curious what would have happened if we played two or three turns more. I hoped to hold in the center and re-direct units from the right towards the center. Perhaps send one unit of Phalangites to attempt an attack on the camp. But use the faster Line Cavalry to attack the enemy from flank and rear, as they were already busy fighting against some units in the middle of the battle field.
As always, the goal is to improve the speed of play, even if it never feels like I am doing things too slow.
It was also my last game before another tournament and I was looking forward to it already!
Thanks for reading!
Pre-Battle
Pre-battle phase ended in the terrain with a secure flank with the river and a few patches of the rough going terrain. Be it the woods or some uneven ground. It definitely added to the aesthetics of the battle field and I was very happy to be able to use my new, freshly painted terrain pieces too!
The scouting did not result in a significant advantage for any side and we tried to predict the positioning of enemy forces while deploying our units.
Deployment
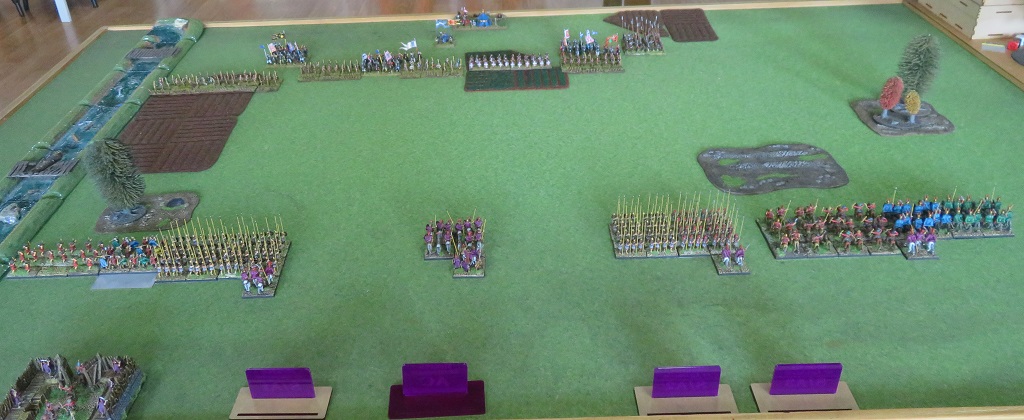 |
| Early Seleucids vs French Ordonnance. |
 |
| Deployment of the Armies. |
Dean deployed his army in the refused flank formation. He nicely covered entire battle line with shooting units, guarded the open flank with Pikemen and spread units of the Knights.
I decided to form one battle group on the left to allow Cretans their chance for shooting duel while being protected by rough going terrain. Pikes and Thracians were to advance towards the enemy. Although Thracians were a bit nervous considering they would need to approach against Longbowmen.
The second half of the Phalanx was deployed on the center-right to start approaching towards enemy Pikemen and avoid shooters in the middle. The infantry was supported by the cavalry on the extreme flank. The role of mounted troops was to outflank the enemy and be able to assist Phalangites as soon as they get to melee.
Last but not least, the Companions were deployed in the middle as a mobile reserve and to protect respective flanks of the advancing Phalangites. They were not, however, to get too close to the enemy Longbowmen!
If the plan worked, I should be able to attack both flanks of the enemy formation, avoiding some of the shooters, at least for a while.
Seleucids - Turn 1
 |
| Turn 1 - Sequence of Actions |
 |
| Mounted skirmishers lead the way |
French army remained quite static, sending only the Archers and Crossbowmen forward, to be able to shoot at the advancing enemy early.
On the other hand, Seleucids moved their entire army, with units on both flanks approaching at a faster pace than those in the center.
 |
| So it begins! |
French - Turn 2
 |
| Turn 2 - Sequence of Actions. |
 |
| Seleucid cavalry in the outflanking maneuver. |
Seleucids continued their advance on the flanks but this time Cretan Archers begun their shooting duel on the left. While the cavalry on the right moved fast forward, executing the outflanking maneuver.
French responded in expanding the frontage of their Pikemen formation and sending the Italian Knights contingent to the right.
 |
| Getting closer on the flanks |
Seleucids - Turn 3
 |
| Turn 3 - Sequence of Actions. |
 |
| Getting busy on the right! |
While the units on the right flank were getting closer to each other, it was clear they are going to clash soon. However, the remaining French knights were not merely observing the situation but spurred their horses and moved towards the center. This literally opened them a lot of options for the attack.
Seeing this, Seleucids started maneuvering their Phalangites towards the enemy cavalry while Companions attempted to close the gap and look threatening!
 |
| Armies about to engage! |
French - Turn 4
 |
| Turn 4 - Sequence of Actions |
 |
| First Charges |
Finally the armies engaged in melee. Phalangites charged against the Archers and Argyraspides attacked enemy Pikemen, gaining advantage thanks to their deeper formation. Also cavalry charged Italian Knights, hoping to prevail thanks to numerical superiority.
In the meantime, French Knights dismounted to prepare to fight against Phalangites while the Archers on the extreme left withdrew. They were loosing the duel with the Cretans and decided to disengage before it is too late.
 |
| Seleucids focus their attack on the right. |
Seleucids - Turn 5
 |
| Turn 5 - Sequence of Actions. |
 |
| Meanwhile, in the center of the battle field... |
French army decided to engage in the center as well, with Dismounted Knights fighting against the Phalangites, while Archers joined in melee. Mounted Men-at-Arms also attacked and where met by the Companions, who held hoping nearby Phalangites would join them to swing the balance.
Fortunately for Seleucids, the assistance of the light cavalry helped Argyraspides to break enemy Pikemen. While Line Cavalry prevailed against Italian Knights. It looked like Seleucids won on the right flank and could send more troops towards the center.
Alas, it was not to be as fortune is fickle and due to unforeseen dramatic change of the conditions, both armies were forced to disengage.
 |
| Final stage of the battle. |
Summary
 |
| Turn-by-turn animation summary |
After-battle
Many thanks to Dean for a great game! This preparation must have worked really well as Dean fought really well at the tournament and ended up 2nd! Well done indeed!
It was a very interesting game because I have never fought against so many Longbowmen. However, it seems that my plan worked as I did not suffer significant casualties due to shooting. At the same time, I managed to get into melee relatively quickly. And with a great result on the right flank.
I was thus curious what would have happened if we played two or three turns more. I hoped to hold in the center and re-direct units from the right towards the center. Perhaps send one unit of Phalangites to attempt an attack on the camp. But use the faster Line Cavalry to attack the enemy from flank and rear, as they were already busy fighting against some units in the middle of the battle field.
As always, the goal is to improve the speed of play, even if it never feels like I am doing things too slow.
It was also my last game before another tournament and I was looking forward to it already!
Thanks for reading!
great report
ReplyDeleteThanks!
Delete