

Hello!
Last time I played against Leigh we had two spectators. It happened that one of them, Paul, had time to play recently and he brought his Early Imperial Romans. Not only I had a chance to play against a new opponent but it was also much closer to the potential historical opponent as I could get!
I was very curious how the Phalanx would do against the Legions in Mortem et Gloriam. I just wish I had more models painted for 15mm but it seems that after a nice period of time where I painted three units, I could not find enough of breaks to finish Tarentine Cavalry. Perhaps soon, as I got some more reinforcements and it looks like I have almost all the models for the initial 10000 points I wanted to paint.
When I had a quick look at Paul's army it became even more intriguing because there were a lot of TuG's with 4 bases but also quite a number of Superior units. Here are the details:
Early Imperial Roman - Army List
Commanders
Army Commander - Talented Professional
Subordinate General 1 - Competent Professional
Subordinate General 2 - Competent Professional
Subordinate General 3 - Mediocre Professional
Camp
Camp - Fortified, Average
TuG's
4 Equites - Cavalry, Drilled Loose, Superior, Protected, Unskilled/Javelin, Short Spear, Melee Expert
4 Equites - Cavalry, Drilled Loose, Superior, Protected, Unskilled/Javelin, Short Spear, Melee Expert
4 Equites - Cavalry, Drilled Loose, Superior, Protected, Unskilled/Javelin, Short Spear, Melee Expert
4 Legionaries - Infantry, Drilled Flexible, Superior, Protected, Impact Weapon, Melee Expert, Integral Shooters
4 Legionaries - Infantry, Drilled Flexible, Superior, Protected, Impact Weapon, Melee Expert, Integral Shooters
4 Legionaries - Infantry, Drilled Flexible, Superior, Protected, Impact Weapon, Melee Expert, Integral Shooters
4 Legionaries - Infantry, Drilled Flexible, Superior, Protected, Impact Weapon, Melee Expert, Integral Shooters
4 Auxilia - Infantry, Drilled Flexible, Average, Protected, Unskilled/Javelin, Short Spear, Melee Expert
4 Auxilia - Infantry, Drilled Flexible, Average, Protected, Unskilled/Javelin, Short Spear, Melee Expert
4 Auxilia - Infantry, Drilled Flexible, Average, Protected, Unskilled/Javelin, Short Spear, Melee Expert
4 Auxilia - Infantry, Drilled Flexible, Average, Protected, Unskilled/Javelin, Short Spear, Melee Expert
SuG's
4 Light Horse - Cavalry, Skirmisher, Average, Unprotected, Experienced/Javelin
4 Light Horse - Cavalry, Skirmisher, Average, Unprotected, Experienced/Javelin
Eleven TuG's meant that the break point for this army is six TuG's, much better than my four. On the other hand all TuG's are "only" four bases strong and potentially a bit easier to break than mine with eight or nine bases. But then, the Legionaries in particular would make up for the lack of numbers for all their claims for being Superior, having Impact Weapons and Integral Shooters as well as being Melee Experts.
It also looked as if Romans had an advantage in Cavalry department, having three TuG's of Superior Equites to my two of Average Line Cavalry. I knew that letting any of these TuG's to go around any of my flanks would be disastrous. Hence the plan was not to let it happen. Easier said than done but if the terrain was suitable, perhaps I would have a chance to narrow the battle field a bit to help to anchor at least one flank.
In comparison to previous game I made some corrections and changes. I upgraded Army Commander to Talented Professional and added more bases to both Cretan Archers and Thracians. Here are the details:
Seleucids - Army List
Commanders
Army Commander - Talented Professional
Subordinate General 1 - Competent Professional
Subordinate General 2 - Competent Professional
Camp
Camp - Average, Protected
TuGs
8 Argyraspides - Infantry, Drilled Close, Superior, Protected, Pike, Shove
8 Phalangites - Infantry, Drilled Close, Average, Protected, Pike, Shove
8 Phalangites - Infantry, Drilled Close, Average, Protected, Pike, Shove
8 Phalangites - Infantry, Drilled Close, Average, Protected, Pike, Shove
8 Phalangites - Infantry, Drilled Close, Average, Protected, Pike, Shove
9 Thracians - Infantry, Formed Loose, Average, Protected, Devastating Charger, Melee Expert
4 Line Cavalry - Cavalry, Drilled Loose, Average, Protected, Charging Lancer, Melee Expert
4 Line Cavalry - Cavalry, Drilled Loose, Average, Protected, Charging Lancer, Melee Expert
SuG's
6 Javelinmen - Infantry, Skirmisher, Poor, Unprotected, Javelin, Experienced, Combat Shy
6 Javelinmen - Infantry, Skirmisher, Poor, Unprotected, Javelin, Experienced, Combat Shy
6 Tarentine Cavalry - Cavalry, Skirmisher, Average, Protected, Javelin, Experienced, Cantabrian
9 Cretan Archers - Infantry, Skirmisher, Average, Unproteced, Bow, Skilled, Combat Shy
Pre-battle
Paul was the defended this game as I decided to see how it is to be an invader this time. All my games so far I have been defending so I thought it is a good time for a change! Paul had good cards too and he wanted more terrain on the battle field. No wonder, with all these Flexible TuG's he could use rough terrain to his advantage, in particular against my Phalanx and Cavalry.
We ended up in the Dense Terrain with a River or Coast on the secure flank. However, Paul did not have much in terms of scouting and he did not use the cards he had left from the pre-battle phase. As a result I outscouted his army and he had to deploy 40% of his force straight away.
Deployment
 |
| Phalanx versus Legion. |
 |
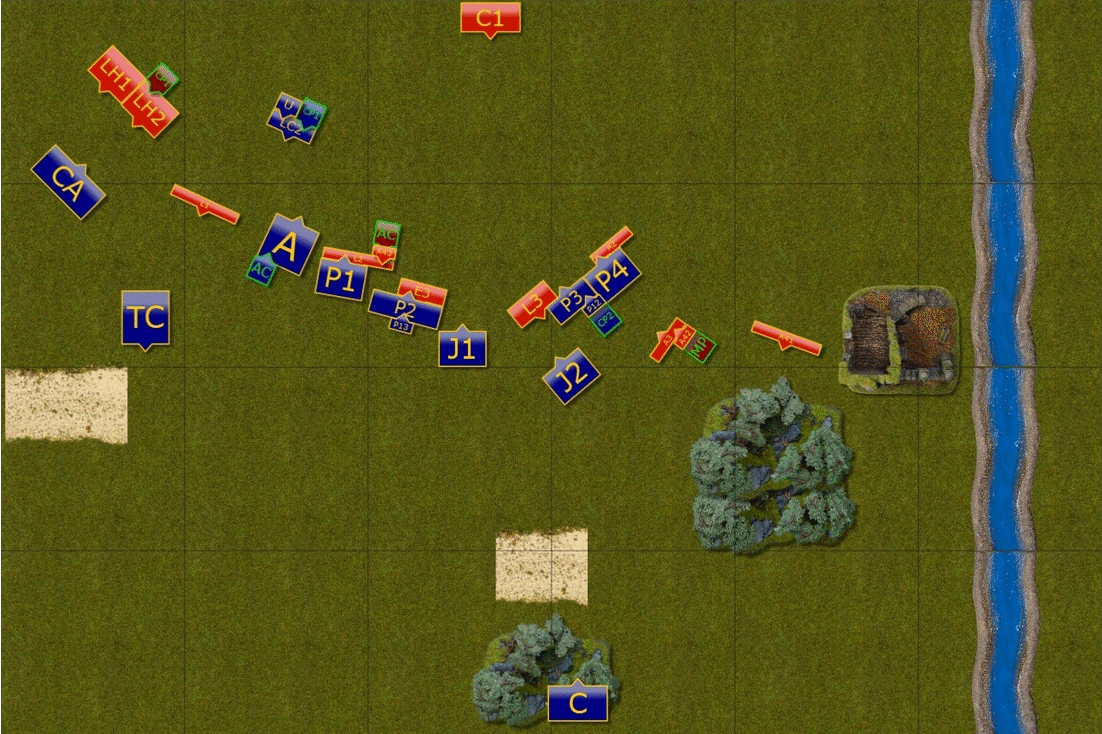
| Deployment of the armies. |
Due to terrain I decided to divide my army into two groups. On the center-right I had a smaller block with two TuG's of Phalangites and Thracians. Their role is to hold that flank and perhaps use the terrain to advantage.
The second, stronger block of Phalangites, including Argyraspides were to advance as fast as possible to pin any enemy facing them. I was pondering how to use my cavalry and decided to place them on the left flank. The reason was that I had inferior mounted troops and placing them in the middle seemed like favoring the enemy. While on the flank they enjoyed the support of the Phalanx and had an opportunity to attack the units further to the left.
In addition, I added Cretan Archers and Terantine Cavalry to occupy rough ground and counter enemy skirmishers.
Interestingly, Paul deployed his cavalry forward, with second line of Legionaries. (Edit: I apologize for a mistake, I have not initially added fourth TuG of Legionaries who were deployed in the second line). He deployed only a small group of two TuG's of Auxilia to my right flank.
Based on that I decided to press forward on both flanks, as I thought I had an advantage on the right if I could engage with Auxilia with my block before any reinforcements would arrive. Especially, that as an attacker I was an active player first.
Seleucids - Turn 1
 |
| Turn 1 - Sequence of Actions |
Seleucids were eager to clash with the Romans and moved both Phalanx blocks at a double to close the distance to the enemy as quickly as possible.
Romans responded by sending the first line of cavalry to pass by the advancing Phalanx and attack Seleucid counterparts. At the same time Legionaries were also sent towards the center to help isolated Auxilia.
 |
| Phalanx advancing. |
 |
| Situation after first maneuvers. |
Early Imperial Roman - Turn 2
 |
| Turn 2 - Sequence of Actions |
As the Romans on the left flank got very close, Seleucids commenced their units to attack. However, Romans performed tactical retreat and slower Phalanx could not yet make any contact. Even Seleucid Line Cavalry begun their charge from a bit too far away and could not reach the enemy.
 |
| Romans avoided combat - this time! |
 |
| First combats in the center. |
Seleucids - Turn 3
 |
| Turn 3 - Sequence of Actions |
Seeleucids pressed forward on both flanks and this time their heavy cavalry not only destroyed one TuG of Auxilia but also caught withdrawing Equites! However, having spent the momentum of the charge on the infantry, against cavalry the damage was far less spectacular.
The Phalangites advanced on both flanks. On the right Thracians furiously charged the Auxilia but their devastating charge proved to be ineffective. Nearby Phalangites advanced towards Legionaries instead, foolishly trusting the barbaric mercenaries to do their job.
 |
| Seleucids attempt to break the enemy formation. |
 |
| Units engage on all fronts. |
Early Imperial Roman - Turn 4
 |
| Turn 4 - Sequence of Actions |
Both armies now engaged all their main forces. Only some skirmishers on the left flank were still maneuvering around.
And both armies noted some successes. First, Auxilia on the right flank broke Thracians. That was bad news for nearby Phalangites as they needed some time for a grind match against Legionaries. Would they manage to break through or would Auxilia arrive in time to shift the balance?
Then on the opposite side of the battle field Seleucid Line Cavalry managed to break the Roman infantry. However, hot pursuit carried the mounted warriors a bit far away from the fight and they would need to spend time maneuvering in order to assist the Phalangites.
 |
| First crack in the Roman battle line. |
 |
| Who will break first? |
Seleucids - Turn 5
 |
| Turn 5 - Sequence of Actions |
The struggle continued and both armies suffered more casualties. On the left flank Argyraspides broke Roman Equites but Legionaries also won versus the Seleucid heavy cavalry.
On the right flank Phalangites pressed hard knowing they don't have much time and managed to break some of the Legionaries. However, another two elements of the Roman army kept the Phalanx in place. It meant that Auxilias would now have a chance to attack Seleucid infantry from the rear!
 |
| The vicious fight on the left flank. |
 |
| The fate of the battle is still hanging in the balance. |
Early Imperial Roman - Turn 6
 |
| Turn 6 - Sequence of Actions |
The fight became more desperate as both armies stretched their effort to break the opponent to the extreme. While Seleucid Line Cavalry charged Legionaries from the rear and Argyraspides got ready to attack another group of Romans, it was the Phalanx on the right flank that broke first when attacked by Auxilia. That sealed the fate of the Seleucid army that was very close to overwhelming their opponent. However, stubborn Roman defense allowed them to prevail this time. Just!
 |
| The situation just before the last TuG of Phalangites on the right broke. |
After-battle
I would like to congratulate Paul for his well deserved victory! In fact, I made a mistake and I thought my breaking point is at 5 TuG's while it was at 4. Thus we continued fighting for the next turn. However, it is clear that Paul managed to break my army first and victory is his.
I greatly enjoyed our game! Firstly, because I always envisioned the fight between the Legion and the Phalanx as one of the most crucial confrontations in the ancient military history. I must admit it is one of the reasons I started playing Mortem et Gloriam! It was then a fantastic opportunity and an experience to have a game with almost perfect historical match up.
Secondly, this game looked to me even more dramatic than any I have played so far simply because the struggle of both armies was quite bloody and desperate. What is more, there were some very interesting maneuvers during the course of the game. I must say Paul surprised me a few times and I definitely learned new lessons.
In general, I was happy with the plan. I would have preferred some terrain on the flanks to be a bit more towards Roman's side but I could not really move it any further. At the same time, Roman army had plenty of Flexible TuG's so even if Thracians were fighting in the forest it would not have automatically transferred into an advantage.
I managed to pin down enemy units and enter war of attrition where Phalanx may get an upper hand. However, it was really unfortunate that Thracians did not hold a turn longer. I actually thought they would be able to break one of the TuG's they were fighting against. But Devastating Chargers did not help to obtain significant advantage against Auxilia with Short Spears. And after that we were equal with both sides having Melee Expert. Perhaps I should have expanded the frontage, even from the start, to bring more dice and increase the chances to inflict the damage. Or even bring one TuG of Phalangites along with Thracians to help against Auxilia.
Another option would have been to actually wait with Thracians and let the Legionaries come to my units instead. It would have prevented my line from breaking too early.
In any case I observed I am still learning to anticipate when and what maneuvers are possible. It is quite interesting to note that it is not easy at all to be able to claim flank charge bonuses. TuG's often are able to maneuver in what seems to be exposed flank when in fact it is not. Perhaps I was too shy with the Phalangites on the right flank and assumed that Legionaries would reach me quicker than was possible.
Another element that I noted is a little bit difficult for me to anticipate well is timing for charge. In some cases I simply did not take into account that Javelin equipped Equites can still run away and I could not reach the enemy that I thought overextended itself. In others it turned out not to be the best option. For example, when Line Cavalry charged Legionaries. The combination of Superior, Impact Weapon and Integral shooters meant that even when attacking from the rear the advantage was "only" + 3. When attacking from the front it was even worse. Not being able to get Shatter effect when needed did not help but then it looked like a risky endeavor anyway
Hence, the question now is how to maneuver the cavalry to the maximum effect and how to be able to use less maneuverable Phalanx to enable the cavalry to get where it needs to be.
I also still don't know how to use my skirmishers. I felt that I did well only when I could shoot at unengaged enemy bases to try and help TuG's that are already in combat. I think I need to check the rules for Run Away and Skirmish again. Perhaps sending the Javelinmen and Terntine Cavalry together against enemy infantry early in the game would have been a better idea? At least Tarentines had better chance to avoid the foe and a few points of damage here and there was what I needed in the ensuing combats. There were quite a few where I was that one wound away from breaking enemy TuG.
I observed that some micro moves are important but I am still a bit confused what I can do and when. For example, I was charging with Phalangites and pushed one file with 1BW move forward to allow both files to fight. After alignment one file touched the side of enemy base. I wonder what I can do in order to bring both files to the fight. The way we played was to play green card to move one base at a time. Which was not efficient because it was too slow to build enough depth of formation to claim much needed bonuses.
I was very impressed by the maneuverability of smaller Roman Legionaries TuG's. With the same frontage and base move they maneuvered better. Perhaps it was also due to the fact that Paul was moving them with 4 generals as opposed to my 3 and that he did so for smaller blocks of TuG's. Something to consider for the future for sure.
I am already looking forward to the next opportunity to play against Paul and his Romans. Perhaps this time of a Republican flavor too!
Thanks for reading!
great report ! thanks a lot your comments of after battle, nice to see that you convert players around you.
ReplyDeleteKind regards.
PUNCH
Thank you! Analyzing the game helps me to learn it better and hopefully I will not make the same mistakes twice!
DeleteI didn't need to do much to make Paul interested as it seems he likes the system a lot already. :) It is definitely good to increase the number of players, especially when they play the armies from the similar historical periods.
Cheers!