

Hello!
After almost a month of break, Leigh and I managed to find some time to play another game of Mortem et Gloriam. This time we spiced up the things and decided to play at 10000 points. Two of Leigh's friends also showed up as spectators. It is great because it seems that popularity of MeG system grows.
I have been painting since our last game so I was happy to add my "proper" size, 15mm models to the army. Leigh always has a dilemma, which army from his vast collection to play with this time? He mentioned something about 12 Elephants before the game but in the end he brought his Free Company force.
It is definitely something different than he has fielded so far. Not only playing against an army from a completely different historic period creates its own kind of challenge. But this force was smaller than the armies he played with earlier.
Here are the details of his army list:
Free Company - Army List
Commanders
Army Commander - Competent Professional
Subordinate General - Competent Professional
Camp
Camp - Poor, Protected
TuG's
4 Veteran Knights - Cavalry, Formed Loose, Superior, Fully Armored, Charging Lancer, Devastating Chargers, Melee Expert
4 Men-at-Arms - Infantry, Drilled Close, Average, Fully Armored, 2-H Cut-Crush, Melee Expert
4 Men-at-Arms - Infantry, Drilled Close, Average, Fully Armored, 2-H Cut-Crush, Melee Expert
4 Men-at-Arms - Infantry, Drilled Close, Average, Fully Armored, 2-H Cut-Crush, Melee Expert
4 Men-at-Arms - Infantry, Drilled Close, Average, Fully Armored, 2-H Cut-Crush, Melee Expert
6 Longbowmen - Infantry, Formed Loose, Average, Protected, Experienced, Powerbow, Stakes
6 Longbowmen - Infantry, Formed Loose, Average, Protected, Experienced, Powerbow, Stakes
6 Longbowmen - Infantry, Formed Loose, Average, Protected, Experienced, Powerbow, Stakes
8 Crossbowmen - Infantry, Formed Loose, Average, Protected, Experienced, Crossbow
6 Brigans - Infantry, Tribal Loose, Average, Protected, Melee Expert
6 Brigans - Infantry, Tribal Loose, Average, Protected, Melee Expert
SuG's
6 Britons - Infantry, Skirmishers, Average, Unprotected, Experienced, Javelin
I must admit I was not sure how a game with such unusual (at least for me) opponents would go. But since the main goal here is to keep playing and learning the rules in the process, I focused on what kind of challenge Free Company presents to my Seleucids.
First thing I noticed is that it was almost entirely comprised of TuG's. Eleven of them equaled to break point of 5, exactly the same as mine. However, TuG's were smaller, with Men-at-Arms in particular being at 4 bases each.
Second thing I paid attention to was the fact that five units had Fully Armored and that was a concern. I have never played against such foes but I remembered it does grant additional +1 in melee and provided better protection from shooting. Knights and Men-at-Arms also had good weapons and Melee Expert so they seemed to be very good in Melee. Would the Phalangites be a match?
Three TuG's of Longbowmen plus one TuG of Crossbowmen meant that Leigh had significant advantage in terms of shooting. My small cavalry units seemed to be specifically vulnerable to such threat.
Last but not least, however, the army was infantry based with only a single TuG of super powerful Knights. Unfortunately, I have not painted much of my own cavalry yet so I did not have enough to possibly gain some advantage in terms of speed of my units.
Seleucids - Army List
Commanders
Army Commander - Competent Professional
Subordinate General 1 - Competent Professional
Subordinate General 2 - Competent Professional
Camp
Camp - Average, Protected
TuGs
8 Argyraspides - Infantry, Drilled Close, Superior, Protected, Pike, Shove
8 Phalangites - Infantry, Drilled Close, Average, Protected, Pike, Shove
8 Phalangites - Infantry, Drilled Close, Average, Protected, Pike, Shove
8 Phalangites - Infantry, Drilled Close, Average, Protected, Pike, Shove
8 Phalangites - Infantry, Drilled Close, Average, Protected, Pike, Shove
8 Phalangites - Infantry, Drilled Close, Average, Protected, Pike, Shove
6 Thracians - Infantry, Formed Loose, Average, Protected, Devastating Charger, Melee Expert
4 Line Cavalry - Cavalry, Drilled Loose, Average, Protected, Charging Lancer, Melee Expert
4 Line Cavalry - Cavalry, Drilled Loose, Average, Protected, Charging Lancer, Melee Expert
SuG's
6 Javelinmen - Infantry, Skirmisher, Poor, Unprotected, Javelin, Experienced, Combat Shy
6 Javelinmen - Infantry, Skirmisher, Poor, Unprotected, Javelin, Experienced, Combat Shy
6 Tarentine Cavalry - Cavalry, Skirmisher, Average, Protected, Javelin, Experienced, Cantabrian
6 Cretan Archers - Infantry, Skirmisher, Average, Unproteced, Bow, Skilled, Combat Shy
Only after the game I realized that I actually did not have 5 TuG's of Phalangites but fielded "only" 4. I decided to increase the number of Phalanx blocks simply because these were the units I have recently painted. Upgrading one of the generals to competent and adding Cretan Archers was simple way of getting to 10000 points.
The plan was to get my pikes into melee as quickly as possible and see if the fact I had 8 bases in each versus 4-6 in the enemy units would make enough of a difference. I wanted to somehow limit the effectiveness of the Longbows so I intended to use Javelinmen as skirmishing screen. I also needed some terrain to protect the flanks because on the normal size table my formation would be relatively narrow.
Pre-Battle
We had 6 cards this time and after the roll off I became the defender while Leigh chose to invade. I started with Standard, Normal for Rocky Ground/Woods. However, Leigh played his cards better and in we ended up in Dense terrain with the River or Coast on the secure flank. As we didn't have proper "terrain" for the river/coast we decided to narrow the width of the table by 6BW to represent that. The diagrams will show the river as intended, however.
I managed to Outscout Leigh as he had only a single card for Scouting and I got a nice, red one to make a significant difference.
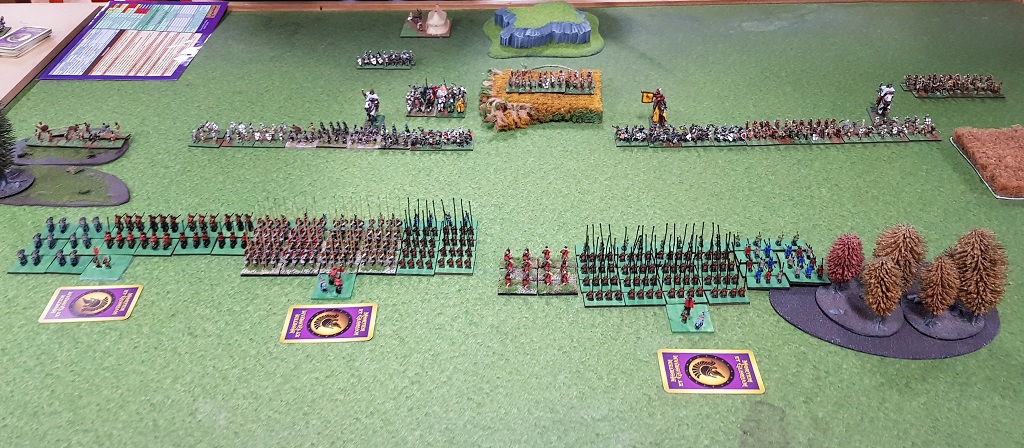
Deployment
 |
| Deployment of the Armies. |
 |
| Unreal match up - Seleucids vs. Free Company |
Thanks to terrain placement I had my flanks reasonably protected. Leigh also mentioned he somehow mistook my cavalry for infantry. I believe it is due to the fact that the cavalry in 10mm was next to 2 TuG's that were represented by 15mm models. No wonder he had his Lobbowmen on the wrong flank! I really need to paint the proper cavalry models real quick.
My plan was really simple. I wanted my cavalry and Phalanx with Argyraspides and 2 TuG's of Phalangites to hit the enemies across them. It looked like a weaker flank, despite the reserves of Men-at-Arms and the Knights behind them.
The second block of Phalangites would advance as well but would engage the enemy to pin it down and prevent being outflanked. If my center left managed to push through while the right would hold long enough, I hoped to gain adgantage for some crucial flank attacks.
As Leigh was an Invader his was the first turn.
Free Company - Turn 1
 |
| Turn 1 - Sequence of Actions |
 |
| Protecting right flank. |
Both armies wasted no time in getting as close to each other as possible. Seleucids moved their left flank and center a bit faster in order to engage their enemies there first. While the phalanx on the right used the protection of the woods to guard the right flank of the army.
 |
| Getting ready for first charges. |
Seleucids - Turn 2
 |
| Turn 2 - Sequence of Actions |
 |
| Line cavalry charges first. |
Seleucids attempted to seize the initiative and charged with their Line Cavalry against Brigans and Crossbowmen. They inflicted some damage but the enemy infantry held their ground. The nearby Phalanx moved forward to join the fight while Free Company units maneuvered to allow their Knights to charge too.
 |
| My apologies for the blurry picture of Turn 2. |
Free Company - Turn 3
 |
| Turn 3 - Sequence of Actions |
 |
| The Phalanx about to rout the Crossbowmen. |
More units started engaging in melee on the left and in the center. Cavalry and Brians exchanged blows with cavalry gaining a bit of an advantage. However, nearby Crossbowmen faced the full might of Seleucid Argyraspides and Phalanx units and eventually broke.
It immediately created a gap in Free Company battle line, which was quickly exploited by pursuing Phalangites. They faced a single unit of Men-at-Arms defending the camp.
At the same time one group of Phalangites in the center was fighting against another Men-at-Arms units, supported by the Knights. Both sides fought hard and both sides sustained casualties.
The units on the right flank got closer to each other but there neither side committed to the melee yet.
 |
| End of Turn 3 just before pursuit move of the Argyraspides. |
Seleucids - Turn 4
 |
| Turn 4 - Sequence of Actions. |
 |
| Melee on all fronts. |
Seleucids pressed the advantage and widened the gap in Free Company formation. The cavalry finally broke the Brigans while Argyraspides chased Men-at-Arms to the camp.
In the meantime, the units on the right flank fully engaged in melee where this time the Phalangites were hard pressed. However, their deep formation allowed them to keep fighting and inflicting casualties too. The Thracians were instrumental at this stage as they held the flank against the Brigans, even if some of the enemy still reached the flank of the Phalangites.
 |
| Seleucids control the left flank. |
Free Company - Turn 5
 |
| Turn 5 - Melee |
(Edit: Due to the fact the shop were we played was about to close, we simply proceeded to melee in order to see if we can reach the breaking point of any army.)
The vicious fight on the right flank continued with both sides sustaining casualties but not yielding yet. However, as Argyraspides broke into and sacked Free Company camp, the army of mercenaries lost the motivation to fight and conceded defeat.
 |
| Seleucids sack the camp. |
After-battle
I would like to thank Leigh for a great game! I am glad we managed to finish the battle, even if we played at 10000 points this time. Clearly we get better and better.
While my plan was simple and straightforward, with no sophisticated tactics employed, it was very enjoyable game. What is more, I believe we both learned a lot too. One of the lessons, for sure quite obvious for veteran players, is that TuG's with 8 bases are not that easy to break and can keep on fighting for some time.
It was definitely very important for me that my right flank kept on fighting and kept on inflicting damage. That balanced the combination of Melee Expert + Fully Armored + HC&C weapons for Men-at-Arms. Having said that, I was truly impressed by the ability of these small units to inflict damage and it is not the first time when I keep thinking about those Cataphracts!
It was also interesting to note that quite a few units were on the brink of destruction. My Thracians and Phalangites on the right flank were that 1 wound away from being broken. At the same time, Leigh's Knights, Longbows and Men-at-Arms were in the same position too. The KaB test for the Sacked camp could have broke these units as well.
I also noted that at this stage 1 month break had some impact on our game play as we simply forgot a few rules. In addition, as we entered the phase of the game we did not reach in our earlier games, it also slowed things down. I guess I have to keep browsing those rules in between the games more often, if only to keep my memory fresh.
We also started employing some of the more intricate moves allowed in the game. Turning bases to face the enemy in order to prevent flank attack was important. But perhaps the most interesting moment was when I run away with skirmishers and counter charged with Phalangites. I do hope we did it right and we have not violated any rules in the process.
Winning the game was great but I always try to see if I could learn something after every battle so that I can do it better next time. I believe that I should have charged with my Thracians first so that I would have prevented Brigans from hitting the flank of the Phalangites.
I also made a mistake in not turning the Phalangites that fought along Argyraspides. I turned them only 90 degree but it was not enough to allow them to charge Men-at-Arms from the rear. 180 degree turn would have been much better.
This time it didn't have dire consequences but often the result of the battle boils down to such details so I will need to make sure I better anticipate where the units need to be to utilize their full potential.
Thanks for reading!
thanks for this nice report!
ReplyDeleteand congrats for your Victory!
have you found Something interesting in the sacked camp? any treasure? ;-)
Kind regards.
PUNCH
Thank you! I am glad you enjoyed this report too!
DeleteIt was good to play with more elements and it was encouraging to learn we can play as fast as in the case of smaller battles. It still took more than 3 hours but I think we are getting there :)
The victory is always sweet and yes, we found enough treasure to hire some Tarentine Cavalry :D
Cheers!