

Hello!
Leigh and I decided to establish regular Mortem et Gloriam gaming and the aim is to play every fortnight. Hopefully, there will be more people interested in time too. For now I am very happy he is willing to spend his time as well in order to play more games and learn the rules better.
I am still using my 7000 points of Seleucids so hopefully Leigh is not bored with my army yet! My aim is to keep playing with this force for some time, expand it to 10000 to be ready for the event in July and then see if I want keep adding to it or if I want to invest in something new.
But these are the long term plans. At the moment it is important to keep learning and trying to get more efficient so that the games can be resolved in given time.
Leigh brought his Franks this time and I was very curious about the re-match as that was the same army he played with at the small tournament a few weeks ago.
Early Merovingian Frank - Army List
Commanders
Army Commander - Competent Instinctive
Subordinate General - Mediocre Instinctive
Camp
Camp - Poor, Protected
TuG's
4 Noble Cavalry - Cavalry, Formed Loose, Superior, Protected, Short Spear, Melee Expert
4 Noble Cavalry - Cavalry, Formed Loose, Superior, Protected, Short Spear, Melee Expert
4 Cavalry - Cavalry, Formed Loose, Average, Protected, Short Spear, Melee Expert
4 Cavalry - Cavalry, Formed Loose, Average, Protected, Short Spear, Melee Expert
6 Warriors - Infantry, Tribal Close, Average, Protected, Short Spear, Devastating Charger
6 Warriors - Infantry, Tribal Close, Average, Protected, Short Spear, Devastating Charger
6 Warriors - Infantry, Tribal Close, Average, Protected, Short Spear, Devastating Charger
6 Warriors - Infantry, Tribal Close, Average, Protected, Short Spear, Devastating Charger
6 Warriors - Infantry, Tribal Close, Average, Protected, Short Spear, Devastating Charger
6 Warriors - Infantry, Tribal Close, Average, Protected, Short Spear, Devastating Charger
SuG's
4 Light Cavalry - Cavalry, Skirmisher, Average, Unprotected, Javelin, Experienced, Cantabrian
6 Archers - Infantry, Skirmisher, Average, Unprotected, Bow, Experienced
6 Javelinmen - Infantry, Skirmisher, Average, Unprotected, Short Spear, javelin, Experienced
Playing against the same opponent with the same army provides unique opportunity to apply the lessons from the first game and see if new approach can work better.
Last time I played against Franks I was impressed by the cavalry and how fast it moved around my unprotected flank. Hence, I wanted to do something about it and limit the advantage Leigh had in the sheer number of units.
I also remembered that when the infantry fought against each other then the Phalanx of pikes started creating cracks in the enemy battle line. In addition, I also remembered that with only two commanders it was not easy to have enough cards to coordinate the maneuvers. In fact, it was quite possible that units would advance at different speed towards the enemy and that would created some gaps in formation.
My general plan was then to use some terrain to protect the flank, deploy closer to the middle of the battle field so that the Phalanx can pin something early and look for the opportunities to exploit potential gaps in formation.
Here is my army list for the reference:
Pre-battle
The 5-days pre-battle keeps intriguing me and I hope that eventually I would be able to get the most out of it. For this game I became the Defender and I could choose the starting position. Somehow before I thought that with Standard and Plains as a choice for Seleucids I can only choose the white column on the matrix that corresponds to Plains. However, I was told that every square with "S" on it is an option too.
Hence, to limit maneuverability of the enemy cavalry a little, I chose Normal terrain with Mountains or Forest as Secure Flank. In this way, I would be sure that no units are going to go close to Secure Flank as it is very difficult to move Tribal infantry or cavalry through such terrain. At the same time, my army has naturally more narrow frontage so I can use the open ground to advance towards the enemy and put some pressure on it.
However, Leigh got a bit better card on the last day and we ended up in Normal with Rocky Ground as Secure Flank. Hence, we started with 6 pieces of terrain and ended up with 5 of them staying on the table.
I saved one card for the scouting and that proved to be helpful as I managed to outscout the enemy by 10%. As we played at 7000 points we used modified approach where each player deploys 3 units at a time instead of usual 4.
Deployment
When I was thinking about the way I should deploy I decided to follow the guidelines I obtained from the author of the game, Simon. I have recently asked on the forum about the ideas on how to upgrade 7000 strong force to 10000. And in addition to the comments about the composition I also received great insight on how to deploy. Of course, at 7000 it must be a bit different but here are the things I wanted to achieve. Here is the link to the topic if you are interested in more details:
Seleucids - Upgrading from 7000 to 10000
Keep Thracians near the rocky ground and guard the flank of the Argyraspides and Phalangites TuG's. I kept Argyraspides and Phalangites in their deep formation as I had the best enemy troops opposite them.
The opposite flank would be covered by Phalangites in wide formation and assisted by Tarentine Cavalry and Javelinmen. Their role is to hold off enemy advance by simply being there. However, Phalangites should negate the bonuses the cavalry normally has so that would give them a bit more staying power, even if not in 3-4 ranks.
Last but not least I positioned my Line Cavalry in the center to be flexible with supporting either flank. While I still had gaps in the formation I felt a bit more secure than last time. Now the question was how to create the opportunities for coordinated attacks where Pikes would pin enemy down and Line Cavalry would hit it, preferably from the flank.
Leigh was the Invader so he was the active player in the first turn.
Early Merovingian Frank - Turn 1
Frank Warriors were very eager to get to the fight and they immediately advanced at the double. They didn't care that the other groups my not follow at the same pace.
The cavalry advanced quickly on both flanks too. However, the units on the right flank moved very close to the Seleucid Phalangites. Due to that some gaps in the formation appeared already.
At the same time, Seleucids also advanced but well drilled soldiers of the Alexander's Successor kept the line steady.
Seleucids - Turn 2
Seleucid Line Cavalry was the first to charge against the Warriors and the attack in the open almost created gap in the formation. Warriors held for now but were hard pressed.
At the same time impetus Frank cavalry on the right flank charged the enemy Phalangites without waiting for the orders. Second unit of Seleucid Line Cavalry tried to charge the attacking horsemen but were just a bit too far to do so in time.
Both armies send in more units to close the distance with their adversaries but it was clear that Frankish commanders have issues with coordinating the efforts. The gaps between different elements of the army started to grow bigger.
Early Merovingian Frank - Turn 3
Disclaimer: Unfortunately, just before the beginning of this turn my camera run out of battery. I got the final picture from Leigh and tried my best to recreated the sequence of actions. I apologize for any inconsistencies but I hope it will still show the flow of battle.
More and more units were committed to the fight. On the right flank, another unit of cavalry charged Seleucid Lancers. As they were attacking too they also hit the flank of the Frankish horsemen fighting against Phalangites. Even light cavalries from both sides engaged in melee.
After short but vicious fight it seemed like the Seleucids gained advantage on that flank as enemy light horse and one unit of Cavalry were destroyed. The second one was still in the fight but sustained more casualties and had its flank exposed to the attack from the Phalangites.
In the center another unit of Seleucid Lancers was breaking through the Warriors. One group was routed already and the other was getting close to follow the suit.
The fight on the left flank was not yet resolved though. Frankish Nobles routed the skirmishers but got stuck against the infantry. While Thracians lost some warriors they still held and Argyraspides started inflicting some casualties upon both Noble Cavalry and Warriors. Phalangites next to them also pushed hard.
With two TuG's gone and another three in big trouble, things did not look good for Franks. It was thus quite lucky that both armies had to disengage before the battle could conclude with the clear victory on one side.
After-battle
Many thanks to Leigh for another great battle! Once again, we learned quite a lot and managed to try a few new things. Leigh attacked with few units on purpose, not necessarily making the best decisions but he did so anyway to see what can happen.
However, it was a bit disappointing that we could not finish yet another game. I had an impression that one more turn would possibly bring us to the resolution. I have already routed two TuG's. Cavalry on the right flank was in bad shape and the inevitable flank charge from the pikes would help to inflict that last point of damage required to break it.
The cavalry in the middle was also gaining upper hand and was now fighting one-on-one versus the Warriors. I needed to destroy one more base to break the unit and there were good chances for that to happen.
If the Argyraspides and Pikes would manage to break another TuG of Warriors that would be game over.
I managed to note how much time we spent for each turn. Setting up the game, pre-game and deployment took us 30 minutes or so. Turn 1 was another 30 minutes. Turn 2 and 3, however, were 1 hour each. Although we were much faster than in our first game, I think we still have long way to go. In addition, we had a few situations where we needed to consult the rulebook. We also fell into a trap of discussing too many things at the same time, especially that Leigh's friend was also observing the game.
Apart from the obvious, i.e. playing more to get familiar with the rules and perform actions faster, as well as limit the discussions not directly related to the game, what would be the good idea to implement in order to speed things up?
I am still glad that we had some interesting fights this time, with entire line of my army engaged in melee at some stage. I was happy with the general plan and I think it worked. Of course, if Leigh was not so impetus, perhaps things would have worked differently too! But it was definitely good to see more action and more complex situations.
A few things I learned this time:
1. Even if the attacking TuG is going to hit my own TuG it does not guarantee that Skirmishers can avoid them. I chose to Skirmish so reduced my movement by 2BW, then rolled 1 and reduced that by another 2BW. Which means I didn't move the Skirmishers at all and they got destroyed upon contact.
2. Expanding frontage is done one file at the time so I may need more cards for it but it is still a good option.
3. Once TuG's start breaking, things speed up. One of the reasons is that Kill-a-Base test can claim quite a few bases nearby and that helps to create bigger cracks in enemy formation.
What I would do differently is placing the rocky ground on the left flank more forward so that advancing skirmishers and Thracians would have some advantage against the enemy. I was lucky they held in the open but I need to avoid such situations in the future for sure.
I hope you enjoyed reading about the game regardless of the inconclusive end. I will do my best to make it happen next time!
Thanks!
Playing against the same opponent with the same army provides unique opportunity to apply the lessons from the first game and see if new approach can work better.
Last time I played against Franks I was impressed by the cavalry and how fast it moved around my unprotected flank. Hence, I wanted to do something about it and limit the advantage Leigh had in the sheer number of units.
I also remembered that when the infantry fought against each other then the Phalanx of pikes started creating cracks in the enemy battle line. In addition, I also remembered that with only two commanders it was not easy to have enough cards to coordinate the maneuvers. In fact, it was quite possible that units would advance at different speed towards the enemy and that would created some gaps in formation.
My general plan was then to use some terrain to protect the flank, deploy closer to the middle of the battle field so that the Phalanx can pin something early and look for the opportunities to exploit potential gaps in formation.
Here is my army list for the reference:
Seleucids - Army List
Commanders
Army Commander - Competent Professional
Subordinate General 1 - Competent Professional
Subordinate General 2 - Mediocre Professional
Camp
Camp - Average, Protected
TuGs
8 Argyraspides - Infantry, Drilled Close, Superior, Protected, Pike, Shove
8 Phalangites - Infantry, Drilled Close, Average, Protected, Pike, Shove
8 Phalangites - Infantry, Drilled Close, Average, Protected, Pike, Shove
6 Thracians - Infantry, Formed Loose, Average, Protected, Devastating Charger, Melee Expert
4 Line Cavalry - Cavalry, Drilled Loose, Average, Protected, Charging Lancer, Melee Expert
4 Line Cavalry - Cavalry, Drilled Loose, Average, Protected, Charging Lancer, Melee Expert
SuG's
6 Javelinmen - Infantry, Skirmisher, Poor, Unprotected, Javelin, Experienced, Combat Shy
6 Javelinmen - Infantry, Skirmisher, Poor, Unprotected, Javelin, Experienced, Combat Shy
6 Tarentine Cavalry - Cavalry, Skirmisher, Average, Protected, Javelin, Experienced, CantabrianPre-battle
The 5-days pre-battle keeps intriguing me and I hope that eventually I would be able to get the most out of it. For this game I became the Defender and I could choose the starting position. Somehow before I thought that with Standard and Plains as a choice for Seleucids I can only choose the white column on the matrix that corresponds to Plains. However, I was told that every square with "S" on it is an option too.
Hence, to limit maneuverability of the enemy cavalry a little, I chose Normal terrain with Mountains or Forest as Secure Flank. In this way, I would be sure that no units are going to go close to Secure Flank as it is very difficult to move Tribal infantry or cavalry through such terrain. At the same time, my army has naturally more narrow frontage so I can use the open ground to advance towards the enemy and put some pressure on it.
However, Leigh got a bit better card on the last day and we ended up in Normal with Rocky Ground as Secure Flank. Hence, we started with 6 pieces of terrain and ended up with 5 of them staying on the table.
I saved one card for the scouting and that proved to be helpful as I managed to outscout the enemy by 10%. As we played at 7000 points we used modified approach where each player deploys 3 units at a time instead of usual 4.
Deployment
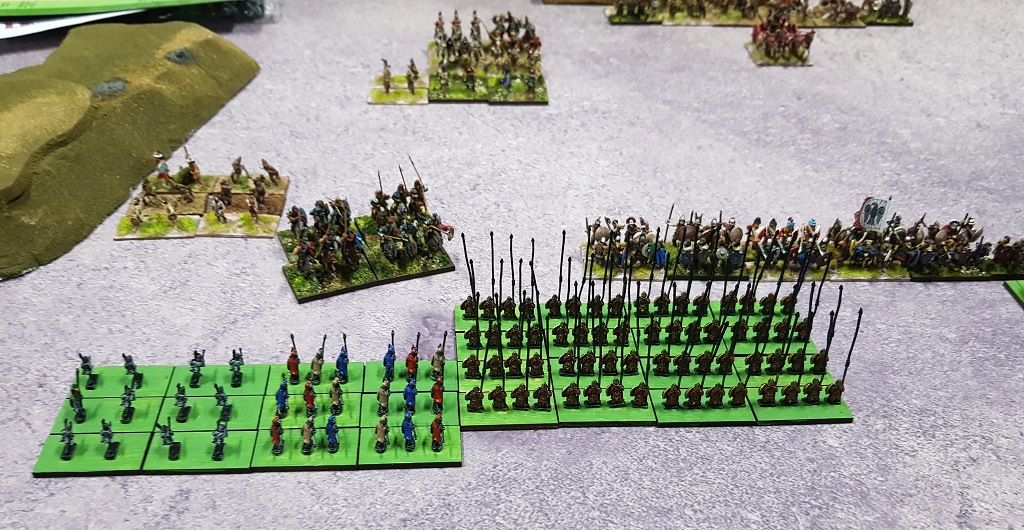
 |
| Armies ready for battle. |
 |
| Deployment of the armies. |
When I was thinking about the way I should deploy I decided to follow the guidelines I obtained from the author of the game, Simon. I have recently asked on the forum about the ideas on how to upgrade 7000 strong force to 10000. And in addition to the comments about the composition I also received great insight on how to deploy. Of course, at 7000 it must be a bit different but here are the things I wanted to achieve. Here is the link to the topic if you are interested in more details:
Seleucids - Upgrading from 7000 to 10000
Keep Thracians near the rocky ground and guard the flank of the Argyraspides and Phalangites TuG's. I kept Argyraspides and Phalangites in their deep formation as I had the best enemy troops opposite them.
The opposite flank would be covered by Phalangites in wide formation and assisted by Tarentine Cavalry and Javelinmen. Their role is to hold off enemy advance by simply being there. However, Phalangites should negate the bonuses the cavalry normally has so that would give them a bit more staying power, even if not in 3-4 ranks.
Last but not least I positioned my Line Cavalry in the center to be flexible with supporting either flank. While I still had gaps in the formation I felt a bit more secure than last time. Now the question was how to create the opportunities for coordinated attacks where Pikes would pin enemy down and Line Cavalry would hit it, preferably from the flank.
Leigh was the Invader so he was the active player in the first turn.
Early Merovingian Frank - Turn 1
 |
| Turn 1 - Sequence of Actions. |
Frank Warriors were very eager to get to the fight and they immediately advanced at the double. They didn't care that the other groups my not follow at the same pace.
The cavalry advanced quickly on both flanks too. However, the units on the right flank moved very close to the Seleucid Phalangites. Due to that some gaps in the formation appeared already.
At the same time, Seleucids also advanced but well drilled soldiers of the Alexander's Successor kept the line steady.
 |
| Tribal Warriors rush towards the enemy. |
 |
| First lines about to clash. |
Seleucids - Turn 2
 |
| Turn 2 - Sequence of Actions |
Seleucid Line Cavalry was the first to charge against the Warriors and the attack in the open almost created gap in the formation. Warriors held for now but were hard pressed.
At the same time impetus Frank cavalry on the right flank charged the enemy Phalangites without waiting for the orders. Second unit of Seleucid Line Cavalry tried to charge the attacking horsemen but were just a bit too far to do so in time.
 |
| Impetus Frankish Cavalry. |
Both armies send in more units to close the distance with their adversaries but it was clear that Frankish commanders have issues with coordinating the efforts. The gaps between different elements of the army started to grow bigger.
 |
| Left flank before the lines collide. |
 |
| The fate of both armies hangs in the balance. |
Early Merovingian Frank - Turn 3
 |
| Turn 3 - Sequence of Actions. |
Disclaimer: Unfortunately, just before the beginning of this turn my camera run out of battery. I got the final picture from Leigh and tried my best to recreated the sequence of actions. I apologize for any inconsistencies but I hope it will still show the flow of battle.
More and more units were committed to the fight. On the right flank, another unit of cavalry charged Seleucid Lancers. As they were attacking too they also hit the flank of the Frankish horsemen fighting against Phalangites. Even light cavalries from both sides engaged in melee.
After short but vicious fight it seemed like the Seleucids gained advantage on that flank as enemy light horse and one unit of Cavalry were destroyed. The second one was still in the fight but sustained more casualties and had its flank exposed to the attack from the Phalangites.
In the center another unit of Seleucid Lancers was breaking through the Warriors. One group was routed already and the other was getting close to follow the suit.
The fight on the left flank was not yet resolved though. Frankish Nobles routed the skirmishers but got stuck against the infantry. While Thracians lost some warriors they still held and Argyraspides started inflicting some casualties upon both Noble Cavalry and Warriors. Phalangites next to them also pushed hard.
With two TuG's gone and another three in big trouble, things did not look good for Franks. It was thus quite lucky that both armies had to disengage before the battle could conclude with the clear victory on one side.
 |
| Final stage of the battle. |
After-battle
Many thanks to Leigh for another great battle! Once again, we learned quite a lot and managed to try a few new things. Leigh attacked with few units on purpose, not necessarily making the best decisions but he did so anyway to see what can happen.
However, it was a bit disappointing that we could not finish yet another game. I had an impression that one more turn would possibly bring us to the resolution. I have already routed two TuG's. Cavalry on the right flank was in bad shape and the inevitable flank charge from the pikes would help to inflict that last point of damage required to break it.
The cavalry in the middle was also gaining upper hand and was now fighting one-on-one versus the Warriors. I needed to destroy one more base to break the unit and there were good chances for that to happen.
If the Argyraspides and Pikes would manage to break another TuG of Warriors that would be game over.
I managed to note how much time we spent for each turn. Setting up the game, pre-game and deployment took us 30 minutes or so. Turn 1 was another 30 minutes. Turn 2 and 3, however, were 1 hour each. Although we were much faster than in our first game, I think we still have long way to go. In addition, we had a few situations where we needed to consult the rulebook. We also fell into a trap of discussing too many things at the same time, especially that Leigh's friend was also observing the game.
Apart from the obvious, i.e. playing more to get familiar with the rules and perform actions faster, as well as limit the discussions not directly related to the game, what would be the good idea to implement in order to speed things up?
I am still glad that we had some interesting fights this time, with entire line of my army engaged in melee at some stage. I was happy with the general plan and I think it worked. Of course, if Leigh was not so impetus, perhaps things would have worked differently too! But it was definitely good to see more action and more complex situations.
A few things I learned this time:
1. Even if the attacking TuG is going to hit my own TuG it does not guarantee that Skirmishers can avoid them. I chose to Skirmish so reduced my movement by 2BW, then rolled 1 and reduced that by another 2BW. Which means I didn't move the Skirmishers at all and they got destroyed upon contact.
2. Expanding frontage is done one file at the time so I may need more cards for it but it is still a good option.
3. Once TuG's start breaking, things speed up. One of the reasons is that Kill-a-Base test can claim quite a few bases nearby and that helps to create bigger cracks in enemy formation.
What I would do differently is placing the rocky ground on the left flank more forward so that advancing skirmishers and Thracians would have some advantage against the enemy. I was lucky they held in the open but I need to avoid such situations in the future for sure.
I hope you enjoyed reading about the game regardless of the inconclusive end. I will do my best to make it happen next time!
Thanks!
I'm new to the game as well and I'm enjoying your reports and thoughts on the game.
ReplyDeleteTo me, it feels like turbo-charged Field of Glory.
Hi Mick!
DeleteThank you for your comment! I am glad to know you enjoyed the reports. I hope to be able to post them on regular basis and to move to more tactically orientated discussion eventually.
I haven't had a chance to play Field of Glory although I bought the rules some time ago. I simply didn't have any potential players to play with. Hence I do not really have a reference historical system to compare.
I am enjoying the game at the moment and I would like to get to the point where I can remember the rules sufficiently to allow for smooth game play.
What army/armies are you playing with at the moment?
Cheers!
thanks for this nice report.
ReplyDeleteyou will see very soon that practice of MEG speed up the games.
having a doctrine with your army and a some sort of commands who have tasks and attributions may help to finish games ,a competent sub + 1 tug of 2 or 3 nellies+1 tug of thureo +1 sug of 6 skirmishers to cover the éléphants : they can progress to attack in open ground or cover the flanks of the phalanxs,or the advance of the line cavalry, you can also use them as a link between the pikemen and the mounted .
roll skulls!
PUNCH "on the forum"
Hello!
DeleteThank you! I can tell you that I have just finished my first game tonight and it was at 10000 points too! We definitely get better and even though there is a lot to learn and improve, it was good to be able to play the battle until one army broke.
Thank you for the advice too. I am painting my new 15mm scale units and I hope to replace 10mm ones soon. When it is done I will be able to add even more units to the collection and choose different units combinations.
Thanks!