

Greetings!
In the second game I had a pleasure to play against Ogres commanded by Daniel. I have never had a chance to play against Daniel before so I was very happy to meet a new player! Daniel told me he used to play a lot of historical systems so it is good to know that Kings of War became his chosen fantasy system.
I have had a chance to play against Ogres before, however, so I knew I am to have a tough nut to crack. This was to be a battle between armies with quite different approach to warfare by default. However, Daniel emphasized melee aspect with his force even more. Here is his army list:
Ogres -Army List
6 Warriors, Horde, Dwarven Ale (Headstrong)
- Grokagamok, Hero
- Giant, Monster
6 Warriors, Horde, Brew of Haste (+1 Speed)
- Warlord, Hero
- Giant, Monster
6 Warriors, Horde
- Red Goblin Blaster, Monster
6 Warriors, Horde
- Red Goblin Blaster, Monster
6 Shooters, Horde
So many Horde units! Even the shooting one is decent in melee. Each element could take on any of my units and win, especially if we ended up in some kind of war of attrition. But let's have a look at the units first:
4 x 6 Warriors - The majority of the army, the Warriors form very flexible battle line, able to hold the enemy and attack depending on the situation. On one hand Defense 5+ and 15/17 nerve can take quite some punishment and still keep going. On the other, hitting on 3+ with 18 attacks with Crushing Strength will always do the damage. They are as fast as Elven infantry so outpacing them is not a straightforward thing to do.
6 Shooters - long range support that can blow the hole in the enemy lines, especially if the targets are small as my units. Prior experiences thought me that there is no use in hiding so I intended to use my own shooting to deal some damage and have some fast units to get to the flank (if possible) to rout them. That's of course easier said than done but this is one way of dealing with them. I also had to accept they would destroy some of my units before I reach them anyway.
2 x Giant - Giants are a great addition to the army. Faster and not bothered by any terrain. More reliable as they have higher nerve but also because they are more maneuverable due to smaller base. Their attacks may vary but what they can do is to either hold some enemies in place (and my small units can die anyway) or sneak to the flanks where they can deal a lot of damage.
2 x Red Goblin Blaster - quite a psychological weapon. It can do a lot of damage but is not that predictable. It cannot be ignored but sometimes it takes a lot of effort to take one down. Shooting would be an option to deal with it but I had a feeling I may not have an opportunity. I was willing to send a unit or two to get rid of them so that I could have more freedom in the movement phase.
Warlord and Grokagamok - a unit in his own, has the same defensive abilities as full Horde of Warriors! He has fewer attacks but Crushing Strength (2) and is much more maneuverable due to being Nimble. If the Warlord is good then Grokagamok is even better! He hits harder as has Crushing Strength (3) and Amputator converts these hits into massive amount of damage.
In general, I faced the army that would want to get into melee as soon as possible and with Speed 6 it can do it fast. Every element is capable of eliminating any one of mine in a single turn of melee. Hence the key to survival will be to divide these units and try to overwhelm them with multiple charges. No matter what is the scenario my aim would be to take down the shooters and blasters so that my fliers could land in good spots undisturbed. I was prepared for exchanges but as long as it was unit for unit I should have a slight advantage as mine are cheaper and I have a few more of them.
Terrain
 |
| Terrain details |
10 pieces of terrain were as follows:
Forests - Height 6
Blocking - Height 4
Hill - Height 2
Obstacle - Height 0
Difficult - Flat
Hill - Height 2
Obstacle - Height 0
Difficult - Flat
Deployment and Scenario
 |
| Deployment of the armies. |
 |
| Deployment with objective markers (orange - primary, white - secondary) |
It was the first time for me to play scenario Occupy and I was very curious about it. It was interesting to note how the objective markers have to be placed and that there are two types of them. It seemed to be that there were quite a few different approaches to securing the victory in this situation but all would probably end up in fighting for the middle objective anyway.
I opted to go for the option where I wanted to defend one primary objective and go for two secondary ones on flanks. Defending the primary objective was risky because I did not want to be static when I had to face powerful Ogre units who are looking for a fight. However, I thought that while going for the secondary objectives on the flanks I may also be in a good position to either divert the enemy units and thus keeping the primary objective safe or threaten the foe with flank charges if they kept moving forward.
When we deployed I decided to refine the plan. First, I had to deal with the Shooters as mentioned at the start and I was in a good position to shoot at them for a turn or two. Then Blasters were isolated on the flanks which gave me the chance to charge them or shoot at them before they could detonate among my units. I did not expect to have much time to do so as I thought that Ogres may cover the distance fast. That's why I wanted Drakons in more threatening positions in turns 2-3.
Well, that's the plan so let's see if that worked :)
I won the roll for the first turn and I chose turn 1 as it would have allowed me more time for shooting and getting to the flanks.
Outcasts - Turn 1
 |
| Approaching the enemy. |
 |
| Opening salvo. |
Elves moved forward, in the center to secure the first strategic objective and to get into the effective range for the shooting. The main target was the unit of Ogre Shooters who suffered some damage but were otherwise not impressed.
On the flanks Drakons and associated units moved to threaten enemy flanks but perhaps in a bit too enthusiastic manner.
Ogres - Turn 1
On the flanks Drakons and associated units moved to threaten enemy flanks but perhaps in a bit too enthusiastic manner.
Ogres - Turn 1
 |
| Ogres advance. |
 |
| And shoot back. |
Ogres marched forward at a double and formed a staggered formation to put pressure on the Elven units but not allowing to be charged by many of them at the same time. Both Blasters rolled forward but it seems the one on the Western flank malfunctioned and instead of a powerful blast it produced a lot of noise and smoke and did absolutely nothing. (Edit: Daniel was extremely unlucky here as he needed anything but 1 on d6 to get Drakons in the range of the blast ... and he rolled a '1' :( )
Shooters aimed at the closest target and despite intervening terrain and heavy cavalry armor, Elven Storm Wind wavered!
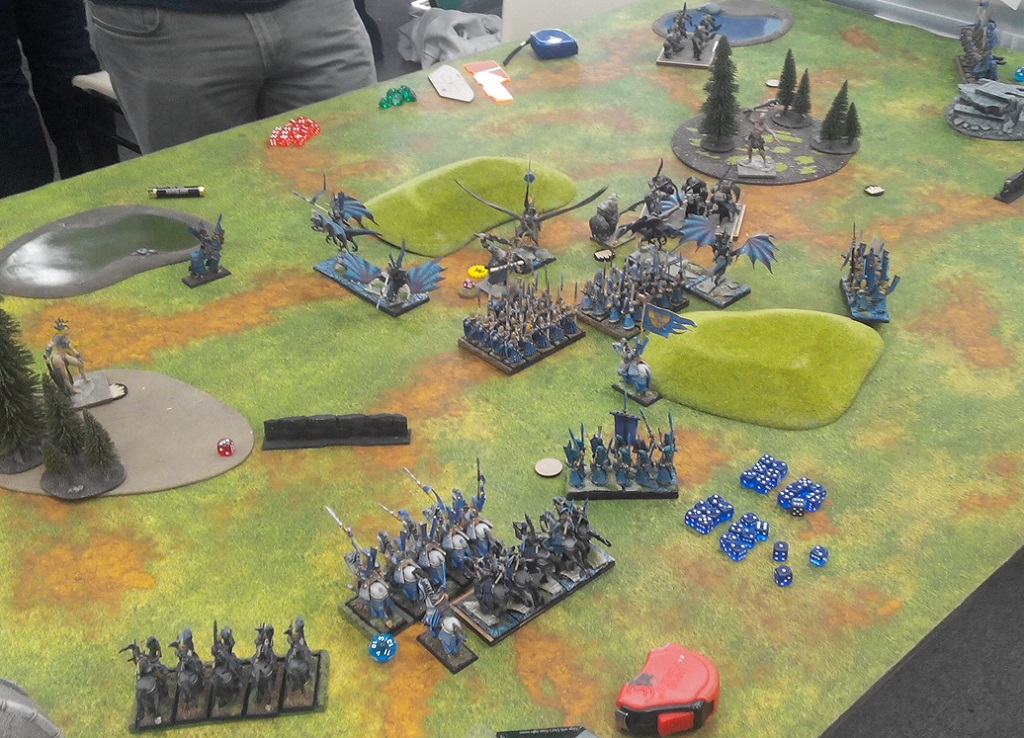
Outcasts - Turn 2
 |
| Outflanking maneuvers. |
 |
| Setting up the trap. |
Both Drakon Riders units used their speed to land on the flanks of the main Ogre battle line. On the West the Shooters were again the target for Elven arrows and this time they wavered, further helping nearby Drakons to prepare for the inevitable attacks.
On the East, Storm Wind cavalry charged the Blaster and although wavered, survived the detonation and allowed the Drakons to change the direction and avoid the Giant. To make sure that Ogres would not have space for maneuver, chariots charged in too. Encirclement was in progress.
Ogres - Turn 2
 |
| Preparing to receive the charges. |
 |
| Chariots stood no chance. |
Ogres noticed that they were outmaneuvered so they consolidated their formation and tried to cover all the angles. The chariots stood no chance against the might of the Warriors and Grokagamok and were reduced to splinters.
Outcasts - Turn 3
 |
| Powerful blow! |
 |
| Even the Ogres could not hold their ground. |
Now it was time to intercept the enemy and Elves chose their targets carefully. Drakon Riders on the East had a chance to attack the enemy from the rear and that was enough to defeat them. The Warlord too was picked up and got wavered. Finally, combined effort of Palace Guard and second unit of Drakon Riders destroyed second unit of Warriors while avoiding Grokagamok and his unit. Last but not least Elves routed badly damaged Shooters with their ow fire.
Ogres - Turn 3
 |
| Ogres keep fighting. |
 |
| Redressing the ranks |
Many other armies would have withdrawn by now but Ogres kept fighting. Both Giants started approaching the Elven units in the center and Grokagamok and his Warriors reformed to engage.
Outcasts - Turn 4
 |
| Change facing. |
 |
| Elves kept punching. |
Using the momentum Elves delivered another powerful blow, this time to finish off the wounded Warlord but also stop the Giant from outflanking their formation.
Ogres - Turn 4
 |
| Grokagamok fights back! |
Although there were many Elven units left, Grokagamok decided to take on them one by one. Palace Guard was the target for his attacks and while Elves held this time they were badly damaged.
Outcasts - Turn 5
 |
| Defending the positions. |
 |
| And securing the objective on the other flank. |
The units facing Grokagamok had to rearrange the formation in order to slow him down and allow the reinforcements time to arrive. While on the East Drakons and Storm Wind cavalry managed to execute another combined charge to rout the Warriors defending the objective.
Ogres - Turn 5
 |
| Another Elven unit claimed by Ogres. |
Second attack of the Ogres was too much for Palace Guard and they were routed. However, the Ogres were slowed down and Elves had another chance to attack their enemy.
Outcasts - Turn 6
 |
| No more Ogre Warriors. |
 |
| Another combined charge. |
One last time Elves executed their combined charge and one more time even the mighty Ogre Warriors could not hold their ground.
Ogres - Turn 6
 |
| Last Ogre standing. |
 |
| Sea Guard holds - barely. |
Grokagamok was left alone as his pet Giant wondered off somewhere. But that was just fine, he could keep clubbing the Elves on his own. The Sea Guard managed to hold their ground and while Grokagamok was not defeated he decided it is time to withdrew to get a new army.
Summary
 |
| Turn-by-turn animation summary. |
After-battle thoughts
First of all I would like to thank Daniel for the game. I know it may have not be that enjoyable for him but I would like to say I admire the fact he took the result without getting cranky or any word of complaint. I wish I would be like him as I know I can get grumpy when things don't go well. Hopefully we will get a chance for a rematch too!
I was happy my plan worked and that I had opportunities to execute the combined charges, the only way I could get down these Ogre Warriors. The staggered formation they adopted seemed to help me a bit. I wonder what would have happened if Daniel pushed his all units in the center at the same full speed.
I know I was not ready to commit my units turn 2 so I would have to withdraw to wait for the Drakons. But it is quite possible I would have had to go for some exchanges in order to stop the advance and to buy some more time.
Another possibility I was wondering about was if the Ogres deployed on the opposite flank and were approaching from that direction. That would have meant "their" primary objective would have been defended and maybe we would have ended up fighting for that middle one to see who could prevail.
Thanks for reading!
Hi SM!
ReplyDeleteI was intrigued with the Ogres, firstly because it was one of my armies from the 8th edition days of warhammer, secondly are they well valued in KOW? The reason I ask is, they seem to get alot for the same amount of points as your army.
I like his battle line setup without the obvious holes, but in saying that, I've seen you crack similar forces like this in the past so onto the battle!
Your first turn you mention the Drakons move in a 'bit too enthisiastic manner', what did you mean by this? Were you worried they would be charged by the Blaster as I would think the Warriors wouldn't have been able to?
Very intriguing to see the Warriors pull back to reinforce the position! Daniel must know his stuff!
A very early encirclement tactic comes to life in your second turn. Well executed sir! Armies look great on the battlefield as well!
Turn 3 - so many red arrows! Interesting however that you're able to be so offensive and attack with no less than five units, however at the same instance you're able to setup defensively and withdraw your left flank in anticipation of attack from the giant really giving it no good options.
From turn 4, it appears its a classic mop up action on your part. You've got the units and resources in order to simply setup bad choices for the opponent, simply tightening the noose with each turn that goes on.
I'd be interesting to find out how Daniel did in the rest of the event. Regardless of this result, I'm sure he would have walked away from this game, learning a lot about the game and his army.
Congratulations on the victory!
Hi Jimmy!
DeleteIt simply awesome to get more comments from you! I had a feeling you may be interested in that game as you own Ogre army yourself :)
They seem to be quite popular in KoW and what is also interesting from the background point of view they are branded as Neutral. No wonder a few armies enrolled them on mercenary pay check!
The solid battle line looked formidable and intimidating so I will not hide I was concern if I am going to be able to distract the units so that they can break that solid formation.
I mentioned I moved Drakons a bit too far forward simply because of potential damage dealt by the Blasters. The Blasters can detonate in their own shooting phase and it was my mistake to land Drakons in spots where the Blasters could get 1-2 inches away from them. I got lucky Daniel rolled '1' for the left Blaster meaning my Drakons didn't even get a single wound.
Turn 3 was decisive I think. Of course prior maneuvers of both armies led to it but it was the moment which I think emphasizes the strong points of MSU army. I didn't know if I can have an opportunity to attack with so many units and I didn't know which unit is going to team up with which against particular target. However, having many units opens a lot of options and allowed me to check the various scenarios by measuring which Ogre unit is in range and then make a decision.
What I did know is that I had to move to the flanks fast and I am happy I could turn toward the center with fast Drakons while be in range for the attack with other units. The sacrifice of chariots was also important because otherwise Ogres would have been able to attack my infantry first. Or my infantry would not be able to aid the fast elements.
Indeed, turn 4 was a consequence of turn 3 fights and allowed me to carry on with the gained momentum. This is very dynamic mechanics of KoW game that allows it as after victorious melee you can reform and face new direction instead of spending the turn for maneuvers.
I talked to Daniel after the game and it turned out he was on constant alert from work and I think he had to go before game 3 started. I hope he will attend another tournament in the future and is not going to be disheartened by this defeat.
Thanks!