

Greetings!
In game 3 I met Matt, the man who not only organized this tournament but is the mastermind behind the organization of Clash of Kings - Australia
He is doing absolutely fantastic job about the event, promoting it and securing the sponsorship of so many companies that is beyond believe.
He was there to make sure that there was an even number of players and that nobody would need to play fewer games than other participants.
It was thus a great pleasure to play against Matt, also because I have not had a chance to do so earlier.
Matt is currently building an army of Dwarfs and he is using Scibor Miniatures for all the units in his army (with the exception of artillery). They are absolutely fantastic, it was my first opportunity to see them alive and I must say that Matt's army will be gorgeous when painting is done. Keep up the great work Matt!
As to the army list here are the details:
Dwarfs - Army List
40 Shieldbreakers, Horde, Blessings of the Gods - 240
- 10 Berserkers, Troops, Fire-oil - 130
- 10 Berserkers, Troops - 130
- Ironbelcher Organ Gun, War Engine - 85
- Warsmith, Hero - 85
20 Ironguard, Regiment - 160
- Ironbelcher Organ Gun, War Engine - 85
20 Ironguard, Regiment - 160
- Ironbelcher Organ Gun, War Engine - 85
10 Berserker Brock Riders, Regiment, Maccwar's Potion of Caterpillar - 230
- Berserker Lord, Hero, Mounted - 150
10 Berserker Brock Riders, Regiment, Brew of Haste - 225
- Sveri Egilax, Hero - 240
Kings of War is a system where there is a good chance that two armies from the same list will look differently, even if there are some elements that are similar. I faced Dwarfs already but in this force there were units I had to deal with for the same time.
40 Shieldbreakers - this unit is a perfect example. They are obviously the hammer of the army as CS(2) is simply great. In order to make the most of it they also had Blessings of the Gods artifact. With Elite special rule they would hit often enough. On the other hand they had 4+ defense that is not that good when compared to what the army can offer.
Hence, potentially it would be possible to shoot at them and inflict substantial damage. Either to help in melee or maybe even have a chance to rout them. I did expect, however, that they would kill any unit they would be able to catch.
2 x 20 Ironguard - if you have a hammer you need an anvil. In this case, two! I haven't had a chance to play against defense 6+ units that much. These two regiments are great because they combine the best armor you can have with very nice nerve value. It would take a lot of effort to rout such a unit. At the same time, against my own fragile infantry they can happily go for war of attrition. Hitting on 3+ and with 12 attacks they have good chances to inflict some constant damage while not receiving much in return.
The obvious weakness is their low speed. So it can be used in order to get into the position to attack such regiment. However, this weakness is much less of a problem when Ironguard arrives as a second wave, letting faster units and artillery to occupy the enemy.
2 x 10 Berserker Brock Riders - these units, on the other hand, are very familiar. I am not surprised Matt included them, also because he used fantastic Ram Riders to represent these regiments. However, Matt equipped one of them with Brew of Haste so that he had a regiment with Pathfinder and another one as fast as my own heavy cavalry. I had a small speed advantage with Drakons but a frontal assault is not what Brock Riders are afraid of. In fact, they may even invite it.
Hence the way to take them out would require either preliminary shooting to inflict some damage to balance out their great nerve value. Or coordinated attack from the front and a flank. The second option definitely required some sacrifice in order to allow my own units to get into position and to pin the Riders in place.
2 x 10 Berserkers - pedestrian Berserkers are a very intriguing unit. They are faster than regular Dwarfs, cannot be wavered, have a nerve similar to regiment size units and huge number of attacks. That is a bit balanced by the fact they hit on 4+ but the sheer amount of dice rolled will result in damage done. They are also almost naked with 3+ armor so I am sure they don't like shooting. It is a cowardly way of waging war anyway! :)
They can be used either as a distraction (one cannot simply ignore such unit) or stay behind their better armored brethren to be unleashed at the right moment. I was curious which option Matt is going to choose. If they are going to spearhead the attack then I will defnitely shoot at them. If they are going to be kept in reserve I would need to be cautious and look for a different opportunity.
3 x Ironbelcher Organ Gun - another new unit that I have not faced before. 15 attacks each, hitting on 5+ at best. But with Piercing (2) and 24" range. The potential to do a lot of damage is there. I can try and mitigate the efficiency but even hitting at 6+ and especially when all of them can focus the fire on a single target, they are still very dangerous. And it makes for a very good psychological weapon.
In addition, I was sure they will be protected in some way. Either by cavalry to intercept the potential war engines hunters (heroes are great at that role) or infantry being ready to avenge those that would fall to the charge of faster troops. They are not that easy to shut down with shooting because of defense 5+ either.
It all depended then how they were going to be deployed. I expected them to be close to each other because of the presence of Warsmith. That also allows to protect each other and makes it easier to focus the fire on a single target. That meant I would try to avoid them and only if I could move the units to their flank I would try and threaten them directly.
Warsmith - his role is obvious, provide Elite to all the Organ Guns and inspire them. But it makes these war engines even more deadly. What I needed to use as the advantage is the fact that they have 24" range and that being deployed together they are going to neglect other areas of the battle field.
Berserker Lord - very good melee orientated hero. He can only inspire his fellow Berserkers but since there are 4 units of those that would come handy. 8 attacks with CS(1) and Vicious (thanks to the angry Ram this time :)) is great on its own. He can be great in intercepting these nasty fliers and pinning them down.
As his fellow Riders, his armor is not that great but he cannot be wavered and his nerve value is high. It is more difficult to get him because he is much more maneuverable and due to small base he cannot be easily attacked by more than one unit. In general, with individuals like him I can't have a very specific plan and just need to wait and see the deployment as well as be ready to use any opportunity during the game.
Sveri Egilax - Berserker King, bigger, meaner and tougher version of the usual mounted Berserker Lord. Sveri has 10 attacks on his own and with Elite and CS(1) + TC(1) he will do damage even attacking from the front. But without Individual rule he can smash entire units on his own too. He may be less maneuverable though but it is still Speed 8 hero. Even harder to kill due to excellent nerve value. Again, I will need to wait and see how is going to be deployed to estimate if I have a good opening to try and lure him out. I needed to do that in order to be able to attack from many sides at the same time. Otherwise he would go through my units one by one.
Overall a dangerous army from my point of view. Flexible to go either for defense or to carry the fight to the enemy. Can participate in every phase of the game. With a nice amount of units that can cover quite a wide selection of roles, depending on the enemy, terrain and scenario. A tough nut to crack for sure!
Deployment and Scenario
We had the following terrain types:
Hills - height 1
Forests - height 4
Ruins - blocking, height 3
Obstacles - height 1
We played Push! as a scenario and we rolled for the number of tokens. It happened to be 3 tokens per side in addition to the one in the very middle of the battle field.
The terrain was good. It offered some cover from shooting but at the same time, mainly thanks to height 1 hills, the units would be still visible. So the middle of the battle field was fairly open.
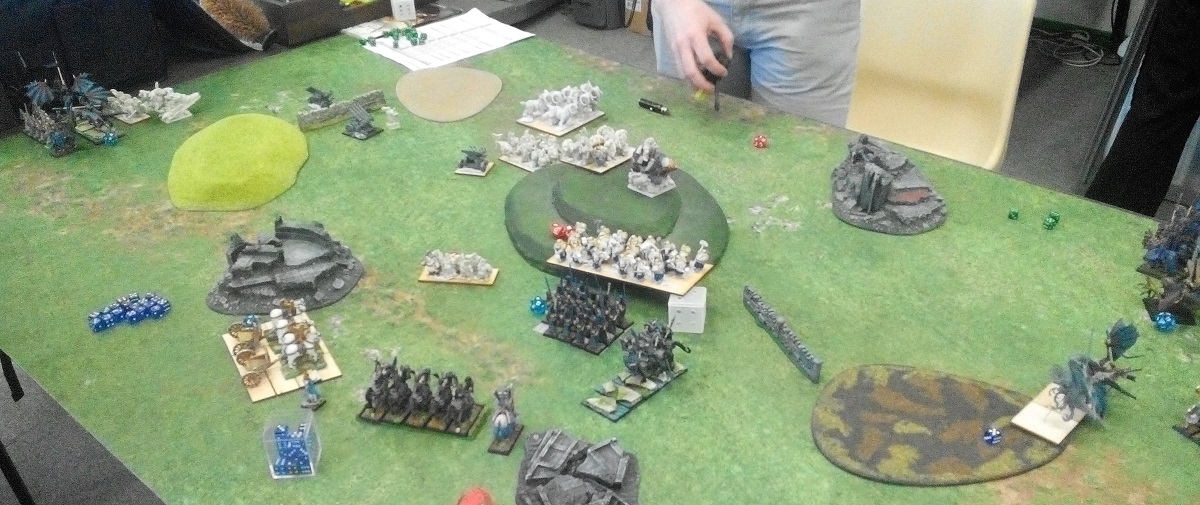
My main concern was the deployment of the Organ Guns. Because Matt had 13 elements in his army I had to have a deployment plan that was good regardless of the exact position of the war engines and allowed to adapt to the situation.
Taking into account the scenario first I decided I will give all the tokens to Palace Guard troop and have it use terrain and other units as cover. This unit would not fight unless absolutely necessary. As I had two of these I also decided to position one on each flank and assign tokens to the one that would have better chances of survival.
Next, I needed to have a plan about the one in the center. I knew that Matt has an advantage here with his tougher units. He could march towards the middle and simply claim the token. I would have difficult time getting it back unless the unit that tried to claim it would have been isolated and/or weakened by shooting.
Because of that I wanted to have my fast units on the flanks to be ready to help the center and shooters and infantry in the middle. That would allow me to threaten the enemy who would want to claim the token and be ready to attack it when it did so.
During the deployment phase I came up with the following idea. Initially, I wanted to deploy in the formation that had infantry in close support of each other. However, I noticed that Matt is deploying his war engines on the left instead of the center.
Usually I try not to redeploy my units because it often leads to a disaster. But in this case, war engines cannot keep up with my units that easy. Hence, I started deploying to the left too but the idea that the chariots, sea guard and fast cavalry will turn right and establish new battle line in the center. At the same time, the fast units at the flank will remain there, keeping out of range, until at least the Drakons could fly over and be able to outflank the war engines.
If that works then I should be able to save my units and hunt down the war engines. At the very least the batter of organ guns would spend some time moving to acquire the targets rather than shooting. And each turn without shooting is a good sign for me. What is more, war chariots and sea guard are units that can aid the army in melee, unlike the war engines, so even when they are not shooting they can potentially threat the enemy with charges.
Third time in a row I got the first turn!
Outcasts - Turn 1
The Elves begun to move according to the plan. Units on the left advanced slightly, making sure they are out of range of the Organ Guns. On the opposite flank Elves moved further in order to corner the lone unit of Brock Riders.
At the same time, units in the middle started re-deploying in order to form a new battle line in the center of the battlefield.
2 x 20 Ironguard - if you have a hammer you need an anvil. In this case, two! I haven't had a chance to play against defense 6+ units that much. These two regiments are great because they combine the best armor you can have with very nice nerve value. It would take a lot of effort to rout such a unit. At the same time, against my own fragile infantry they can happily go for war of attrition. Hitting on 3+ and with 12 attacks they have good chances to inflict some constant damage while not receiving much in return.
The obvious weakness is their low speed. So it can be used in order to get into the position to attack such regiment. However, this weakness is much less of a problem when Ironguard arrives as a second wave, letting faster units and artillery to occupy the enemy.
2 x 10 Berserker Brock Riders - these units, on the other hand, are very familiar. I am not surprised Matt included them, also because he used fantastic Ram Riders to represent these regiments. However, Matt equipped one of them with Brew of Haste so that he had a regiment with Pathfinder and another one as fast as my own heavy cavalry. I had a small speed advantage with Drakons but a frontal assault is not what Brock Riders are afraid of. In fact, they may even invite it.
Hence the way to take them out would require either preliminary shooting to inflict some damage to balance out their great nerve value. Or coordinated attack from the front and a flank. The second option definitely required some sacrifice in order to allow my own units to get into position and to pin the Riders in place.
2 x 10 Berserkers - pedestrian Berserkers are a very intriguing unit. They are faster than regular Dwarfs, cannot be wavered, have a nerve similar to regiment size units and huge number of attacks. That is a bit balanced by the fact they hit on 4+ but the sheer amount of dice rolled will result in damage done. They are also almost naked with 3+ armor so I am sure they don't like shooting. It is a cowardly way of waging war anyway! :)
They can be used either as a distraction (one cannot simply ignore such unit) or stay behind their better armored brethren to be unleashed at the right moment. I was curious which option Matt is going to choose. If they are going to spearhead the attack then I will defnitely shoot at them. If they are going to be kept in reserve I would need to be cautious and look for a different opportunity.
3 x Ironbelcher Organ Gun - another new unit that I have not faced before. 15 attacks each, hitting on 5+ at best. But with Piercing (2) and 24" range. The potential to do a lot of damage is there. I can try and mitigate the efficiency but even hitting at 6+ and especially when all of them can focus the fire on a single target, they are still very dangerous. And it makes for a very good psychological weapon.
In addition, I was sure they will be protected in some way. Either by cavalry to intercept the potential war engines hunters (heroes are great at that role) or infantry being ready to avenge those that would fall to the charge of faster troops. They are not that easy to shut down with shooting because of defense 5+ either.
It all depended then how they were going to be deployed. I expected them to be close to each other because of the presence of Warsmith. That also allows to protect each other and makes it easier to focus the fire on a single target. That meant I would try to avoid them and only if I could move the units to their flank I would try and threaten them directly.
Warsmith - his role is obvious, provide Elite to all the Organ Guns and inspire them. But it makes these war engines even more deadly. What I needed to use as the advantage is the fact that they have 24" range and that being deployed together they are going to neglect other areas of the battle field.
Berserker Lord - very good melee orientated hero. He can only inspire his fellow Berserkers but since there are 4 units of those that would come handy. 8 attacks with CS(1) and Vicious (thanks to the angry Ram this time :)) is great on its own. He can be great in intercepting these nasty fliers and pinning them down.
As his fellow Riders, his armor is not that great but he cannot be wavered and his nerve value is high. It is more difficult to get him because he is much more maneuverable and due to small base he cannot be easily attacked by more than one unit. In general, with individuals like him I can't have a very specific plan and just need to wait and see the deployment as well as be ready to use any opportunity during the game.
Sveri Egilax - Berserker King, bigger, meaner and tougher version of the usual mounted Berserker Lord. Sveri has 10 attacks on his own and with Elite and CS(1) + TC(1) he will do damage even attacking from the front. But without Individual rule he can smash entire units on his own too. He may be less maneuverable though but it is still Speed 8 hero. Even harder to kill due to excellent nerve value. Again, I will need to wait and see how is going to be deployed to estimate if I have a good opening to try and lure him out. I needed to do that in order to be able to attack from many sides at the same time. Otherwise he would go through my units one by one.
Overall a dangerous army from my point of view. Flexible to go either for defense or to carry the fight to the enemy. Can participate in every phase of the game. With a nice amount of units that can cover quite a wide selection of roles, depending on the enemy, terrain and scenario. A tough nut to crack for sure!
Deployment and Scenario
 |
| Terrain |
We had the following terrain types:
Hills - height 1
Forests - height 4
Ruins - blocking, height 3
Obstacles - height 1
We played Push! as a scenario and we rolled for the number of tokens. It happened to be 3 tokens per side in addition to the one in the very middle of the battle field.
The terrain was good. It offered some cover from shooting but at the same time, mainly thanks to height 1 hills, the units would be still visible. So the middle of the battle field was fairly open.
My main concern was the deployment of the Organ Guns. Because Matt had 13 elements in his army I had to have a deployment plan that was good regardless of the exact position of the war engines and allowed to adapt to the situation.
Taking into account the scenario first I decided I will give all the tokens to Palace Guard troop and have it use terrain and other units as cover. This unit would not fight unless absolutely necessary. As I had two of these I also decided to position one on each flank and assign tokens to the one that would have better chances of survival.
Next, I needed to have a plan about the one in the center. I knew that Matt has an advantage here with his tougher units. He could march towards the middle and simply claim the token. I would have difficult time getting it back unless the unit that tried to claim it would have been isolated and/or weakened by shooting.
Because of that I wanted to have my fast units on the flanks to be ready to help the center and shooters and infantry in the middle. That would allow me to threaten the enemy who would want to claim the token and be ready to attack it when it did so.
 |
| Deployment with tokens assigned. |
During the deployment phase I came up with the following idea. Initially, I wanted to deploy in the formation that had infantry in close support of each other. However, I noticed that Matt is deploying his war engines on the left instead of the center.
Usually I try not to redeploy my units because it often leads to a disaster. But in this case, war engines cannot keep up with my units that easy. Hence, I started deploying to the left too but the idea that the chariots, sea guard and fast cavalry will turn right and establish new battle line in the center. At the same time, the fast units at the flank will remain there, keeping out of range, until at least the Drakons could fly over and be able to outflank the war engines.
If that works then I should be able to save my units and hunt down the war engines. At the very least the batter of organ guns would spend some time moving to acquire the targets rather than shooting. And each turn without shooting is a good sign for me. What is more, war chariots and sea guard are units that can aid the army in melee, unlike the war engines, so even when they are not shooting they can potentially threat the enemy with charges.
Third time in a row I got the first turn!
Outcasts - Turn 1
 |
| Redeployment begins! |
 |
| Shy move on the flanks. |
The Elves begun to move according to the plan. Units on the left advanced slightly, making sure they are out of range of the Organ Guns. On the opposite flank Elves moved further in order to corner the lone unit of Brock Riders.
At the same time, units in the middle started re-deploying in order to form a new battle line in the center of the battlefield.
Dwarfs - Turn 1
 |
| Dwarfs advance too. |
 |
| Berserkers lead the way. |
Grumbling about typical cowardly Elven behavior, the Dwarfs moved forward. Even the war engines advanced as the bearded warriors didn't expect their enemies to meet them any time soon.
Berserker units advanced ahead of the entire army, eager to get into melee as soon as possible.
Outcasts - Turn 2
 |
| Right flank moves forward ... |
 |
| ... left withdraws. |
The units on the left didn't take the obvious bait and withdrew a little, to stay out of range of the Dwarven artillery. The units in the middle continued their maneuvers and first arrows were shot but without any particular effect.
The units on the right kept advancing but didn't move close enough for the Brock Riders to charge any of them yet. Only the drakon lord found a spot to land on the flank where the enemy could not intercept him.
Dwarfs - Turn 2
 |
| Dwarfs claim the hill. |
 |
| War Engines are rolled forward again. |
Brock Riders on each flank remained quite passive, an unusual sight indeed.
Outcasts - Turn 3
 |
| First Charge. |
 |
| And some more serious shooting. |
Elves on the left moved back again. It seemed like they are going to keep avoiding the Dwarfs forever!
The units in the middle could finally focus their firepower on a single target and it showed promising effects. The Dwarfs were damaged significantly, although they didn't show that it affected them at all.
On the right, the Drakon Lord attacked Brock Riders alone. He hoped that he would be able to distract them for a while and allow Storm Wind to get into the flanking position. All he needed to do now is to survive the counter charge. Dwarfs - Turn 2
Dwarfs - Turn 3
 |
| Shieldbreakers claim the treasure! |
 |
| Dwarfs shift their attention to the center. |
In the middle, Shieldbreakers claimed the treasure anyway. They were now exposed but Ironguard was follwing to support if needed.
The Brock Riders attacked Elven Lord but their attacks were not powerful enough to impress Elven general.
Outcasts - Turn 4
 |
| Finally Elves advance. |
 |
| But something didn't quite work. |
After a lot of dancing around Elves decided it is time to get close and personal. The units on the left flank moved forward to threaten the Berserkers. The nearby hill offered some protection and with Brock Riders and third Organ Gun focused on the center, there was a chance to win that flank.
On the right the gamble made by Drakon Lord paid off. He was joined by the knights and even stubborn Dwarf cavalry could not hold against this assault.
Last but not least the units in the middle of the battle field charged weakened Shieldbreakers but somehow the attacks didn't hit home and Elves were in a very bad spot. (Edit: Please, note that the diagram is, unfortunately, not accurate. The chariots had no option to charge Shieldbreakers and due to close proximity to blocking terrain they could not reach Berserkers with a single pivot.)
The assistance of the shooters also was far below the expectations as they could not destroy Berserkers who were threatening the flank of Elven infantry.
Dwarfs - Turn 4
 |
| Dwarfs show how to do it! |
 |
| Counter attack! |
Dwarfs used the opportunity and counter attacked. Berserkers on the left flank were joined by their commander and together they destroyed the unit of Elven knights. One of the Organ Guns re-positioned in case Drakon Riders wanted to jump over the Dwarven units while the other opened fire. It didn't cause a lot of damage but young Drakons, not yet accustomed with laud artillery, got nervous and embarrassed Elven riders had to spend time calming them down.
In the center, second unit of Berserkers didn't think twice and moved to attack exposed flank of the Sea Guard. Elven infantry was routed under the pressure of such a ferocious attack. Last but not least, Shieldbreakers charged Palace Guard but this time elite Elven warriors held their ground.
Outcasts - Turn 5
 |
| Elves reclaim the token! |
 |
| Units from the right flank come to the rescue. |
Despite the problems with the attacks on left and in the center, the Elves pressed on. This time the units from the right flank started to add their help too. Palace Guard and Drakon Riders finished off the Shieldbearers and claimed one of the treasures! The shooters partially redeemed themselves by finally routing the Berserkers.
Dwarfs - Turn 5
 |
| Sveri attacks alone. |
 |
| Organ Guns sing again. |
With the infantry a bit too far to help and cavalry not yet in the position, Sveri the King of Berserkers charges alone. Drakon Riders feel his wrath but they hold their ground and protect the treasure. Unfortunately, nearby Palace Guard is destroyed by Organ Gun and second unit of Drakon Riders is once more under a lot of pressure.
Outcasts - Turn 6
 |
| Sveri is dead! |
 |
| Last charge of the Elves. |
Determined to protect the treasure, Elves attacked Sveri and captured the King of Berserkers! The shooters tried to silence one of the Organ Guns but were not successful.
The Elves done what they could to prevail in that battle. But the last word belonged to Dwarfs.
Dwarfs - Turn 6
 |
| Final salvo! |
 |
| Elves lose more units but Dwarfs are late! |
With the King captured, the Dwarfs had no choice but to disengage and negotiate.
Summary
 |
| Turn-by-turn animation summary |
After-battle thoughts
I really enjoyed our game and I would like to thank Matt for being a great opponent! It was a great pleasure to play against you and your great looking army and I hope we will have more chances to continue the classical conflict between Dwarfs and Elves!
The interesting outcome of the battle was that while Elves secured the objective of the scenario, Dwarfs destroyed more units and won on the attrition, so the end result was modified in Matt's favor.
I am very happy with the result as it seems that my plan worked in general. I just wonder how could I play better so that the losses were smaller. Especially considering the fact that if there was turn 7 I still had a chance to win the scenario but I would have lost even more units.
The things I would have done a bit different are mainly related to movement. In particular in the center I didn't do a good job when I blocked chariots with Sea Guard and was too close to the blocking terrain. Because of that I could not intercept the Berserkers when things didn't work well against Shieldbreakers. But perhaps that attack was also premature and I should have focus on shooting at them one more turn.
Another problem was on the left flank. I think it was ok to keep the distance for some time as it tied the Brock Riders and Organ Guns and prevented them from joining the fight in the middle. However, that waver with a single point of damage on Drakon Riders was unfortunate. My first opponent, Richard, suggested I could still withdraw them 5 inches through Palace Guard and then attack with them, thus giving the cavalry time to recover. I thought I didn't have enough space to do so but I think I was wrong.
I was also wondering if I could engage Brock Riders on the right a turn earlier but it is possible I would have not had a good position for a flank attack yet. However, it was still possible to fit three elements, i.e. Drakon Lord, Drakon Riders and Storm Wind in the front arc so maybe I should have been more aggressive there.
As always I am very curious about your comments!
Thanks for reading!
No comments:
Post a Comment