
 Greetings!
I keep being lucky and get to play against new opponents and new armies. It is a great experience indeed because I am happy to meet new players. At the same time it is even more exciting to face the challenge of playing against a force I haven't met on the battle field before. It means that I need to come up with the plan on the spot and put it to the test immediately!
This time I had an honor to play against Meniskusmike from Mantic forum. We managed to find a suitable date for both of us despite quite a significant time zone difference. Mic brought his Kingdoms of Men army and it was also the first time when I was about to play against the force with an allied contingent! Mic added two regiments of Brotherhood knights that really added nice flavor to his army and reinforced Crusader theme I imagined it might use in terms of modelling project.
Mic was very kind to provide details on his army list before the battle and here it is:
Kingdoms of Men
40 Footguard, Horde, Dwarven Ale - 235
- 10 Militia Mob* - 50
- 10 Militia Mob* - 50
- 10 Militia Mob* - 50
- Wizard, Hero, Bane Chant (2), Lightning Bolt (3), Inspiring Talisman - 85
- 10 Militia Mob* - 50
- 10 Militia Mob* - 50
- Wizard, Hero, Bane Chant (2), Lightning Bolt (3), Inspiring Talisman - 85
40 Bowmen, Horde, Brew of Keen-eyeness - 210
10 Knights, Regiment, Maccwar's Potion of the Caterpillar - 215
- 5 Knights, Troop - 125
- 5 Mounted Sergeants, Troop - 105
- General, Hero, Warhorse - 120
10 Knights, Regiment, Blessing of the Gods - 220
- Hero, Hero, Warhorse, War-bow of Kaba - 70
Brotherhood Allies
10 Order of the Brotherhood, Regiment - 205
My first impression was that this army has a lot of armored might in the form of 4 regiments of the Knights, horde of Foot Guard and 2 cavalry troops. It was clear that I was outnumbered in terms of heavy cavalry and that was a challenge in itself. Heavy infantry in horde formation was a perfect anvil for the knightly hammer. Two supporting troops would be fantastic to get rid of any interfering enemy units trying to block the steam roller of steel.
In addition, the armored might could use further support in the form of a very dangerous bowmen horde (at least for Elves who are not sporting the heaviest armor in the world of Mantica). Three more groups of Militia Mobs were there to work as a road blocking elements for the enemy but if left unchecked might cause further trouble too.
Let's have a look at the elements of this army with more detail:
40 Footguard - foot knights with a very high nerve and armor they are obviously the anvil of the army. They can take significant damage and hold the line where needed. but with 25 attacks hitting on 3+ they can also prove to be dangerous to the lightly armored Elves. Dwarven Ale makes them Headstrong meaning they are more likely to keep fighting, no matter the odds.
To defeat them I would need a few units of my own to coordinate the attack but even then I would expect at least one counter charge and that might be all their heavy cavalry needs to crush my units. However, as infantry horde formations are slow I may be able to avoid it for a while.
3 x 10 Militia Mobs - these poor fellas have low chance of survival and it feels like they are some penitent troops forced to join the army. They are obviously expendable and provide living shield for more valuable units of the army. Still, even small elements like that can prove troublesome if unchecked. Hopefully I will have a chance to shoot at them when they are not in range of any inspiring heroes. Which may be more difficult to achieve sine Kingdoms of Men special rule allows their heroes to inspire units in 9" radius.
40 Bowmen - the main source of ranged attacks for this army. With artifact they are very dangerous since they hit on 4+ with 20 attacks. Again, my lightly armored units would not like to draw the attention of this enemy. The good thing (sort of) is that they cannot split their fire and will "only" shoot at a single target. They are also sporting very little armor and may accumulate damage faster than other units.
Initially I was thinking about disrupting them with a fast element of my own. Drakon Lord would be great for such mission so I planned to look for openings to use him to distract enemy shooters.
Knights - 2 regiments with artifacts and 1 troop already created armored fist or hammer to hit the enemy fast and hard. Very dangerous on the charge as all heavy cavalry. One regiment with Pathfinder, the other with Elite special rules made them even more versatile and harder to counter.
Fortunately, I have a few units on my own that are faster and can at least attempt to charge first and deprive the Knights of their Thunderous Charge. However, the challenge lied in the fact that I had to face even more knightly units so that my opponent could easily go for an exchange on come out with significant amount of the knightly regiments left to swing the balance into his favor.
5 Mounted Sergeants - this is a very intriguing unit. They trade the elite status of the Knights and a bit of armor for speed and maneuverability. I think they are a fantastic unit to support the Knights either is those who clear off the field from enemy expendable elements that want to block the charges, go for targets against which the heavy cavalry is an overkill and always threaten the enemy with a flank or even rear charges.
My own fast cavalry would be well equipped to engage them but I would need to make sure I can deal with Sergeants fast, otherwise they might start harassing my own units.
Heroes - I decided to group them together as a sort of single entry as I see their role as leaders (general and wizard as sources of Inspiring) and additional ranged support (lightning bolt and war-bow). Very versatile and useful in their roles and due to their Individual status, not so easy to engage and eliminate either.
10 Order of the Brotherhood - first unit of the allied Knights, Brotherhood can be considered elite regiment among the knights thanks to their higher nerve value. The same set of strengths and weaknesses as for regular heavy cavalry applies here. The problem for me lies in the fact that I will need to find a way to deal with so many units of heavy cavalry at the same time.
10 Order of Redemption - not only the most dangerous of all enemy units, Order of Redemption is also a source of Inspire for their companions in the Brotherhood. I expect them, of course, to team up to use that benefit to the fullest. With regeneration 5+ they are also much more resilient than regular knights and 20 attacks can hurt even when deprived of Thunderous Charge.
I had a bit of advantage over this army in the form of speed and maneuverability so I intended to use it to charge first against exposed/isolated knights. I needed to make the number of respective heavy cavalry units at least equal. I also hoped to be able to use my own Spears to mitigate the danger of heavy cavalry.
I also wanted to use my advantage in the shooting department as focused fire could be dangerous even for the knights.
Here is my army for reference:
Outcasts - Army List
10 Stormwind, Regiment, Potion of the Caterpillar (Pathfinder) - 235
- 5 Silverbreeze, Troop - 145
- 5 Silverbreeze, Troop - 145
- Drakon Rider Lord, Hero, Large Cavalry - 160
3 Drakon Riders, Regiment, Dwarven Ale (Headstrong) - 185
- 5 Stormwind, Troops - 140
- Bolt Thrower, War Machine - 90
20 Palace Guard, Regiment - 150
- 10 Archers, Troop - 115
- 10 Palace Guard, Troop - 105
- Bolt Thrower, War Machine - 90
20 Spearelves, Regiment - 140
- Elven Mage, Hero, Inspiring Talisman, Bane Chant - 110
20 Spearelves, Regiment - 140
- Battle Standard Bearer, Hero - 50
- Bolt Thrower, War Machine - 90
20 Spearelves, Regiment - 140
- Elven Mage, Hero, Inspiring Talisman, Bane Chant - 110
20 Spearelves, Regiment - 140
- Battle Standard Bearer, Hero - 50
Terrain
 |
| Terrain details |
The river going through the battle field offered some interesting options. On one hand it was a good defensive feature but on the other both armies had offensive elements that would not like to attack through difficult terrain.
There were quite a few forests that would limit the effectiveness of shooting, not exactly great news for my army and I think it would affect Mic's army to lesser extent. There were two hills present and only one in the deployment zone. But even this one was not a perfect spot for the shooters due to nearby forests.
We also decided to use recommended height 1 for the hills. That means further penalties for the shooters.
We rolled for the sides and Mic won. He picked South and what is more, we also rolled Kill scenario! So in our first game it will all be about who can do more damage to the enemy!
Deployment
 |
| Deployment Order |
Deployment Order:
1. Militia (M1) - Silver Breeze (SB1)
2. Militia (M2) - Silver Breeze (SB2)
3. Militia (M3) - Archers
4. Bowmen - Spearelves (S1)
5. Wizard - Palace Guard (PG2)
6. Footguard - Bolt Thrower (BT1)
7. Mounted Sergeants - Bolt Thrower (BT1)
8. Knights (K3) - Army Standard
9. Hero - Spearelves (S2)
10. Knights (K1 - Pathfinder) - Palace Guard (PG1)
11. Knights (K2 - Elite) - Mage
12. General - Drakon Riders
13. Order of the Brotherhood - Drakon Lord
14. Order of Redemption - Storm Wind Cavalry
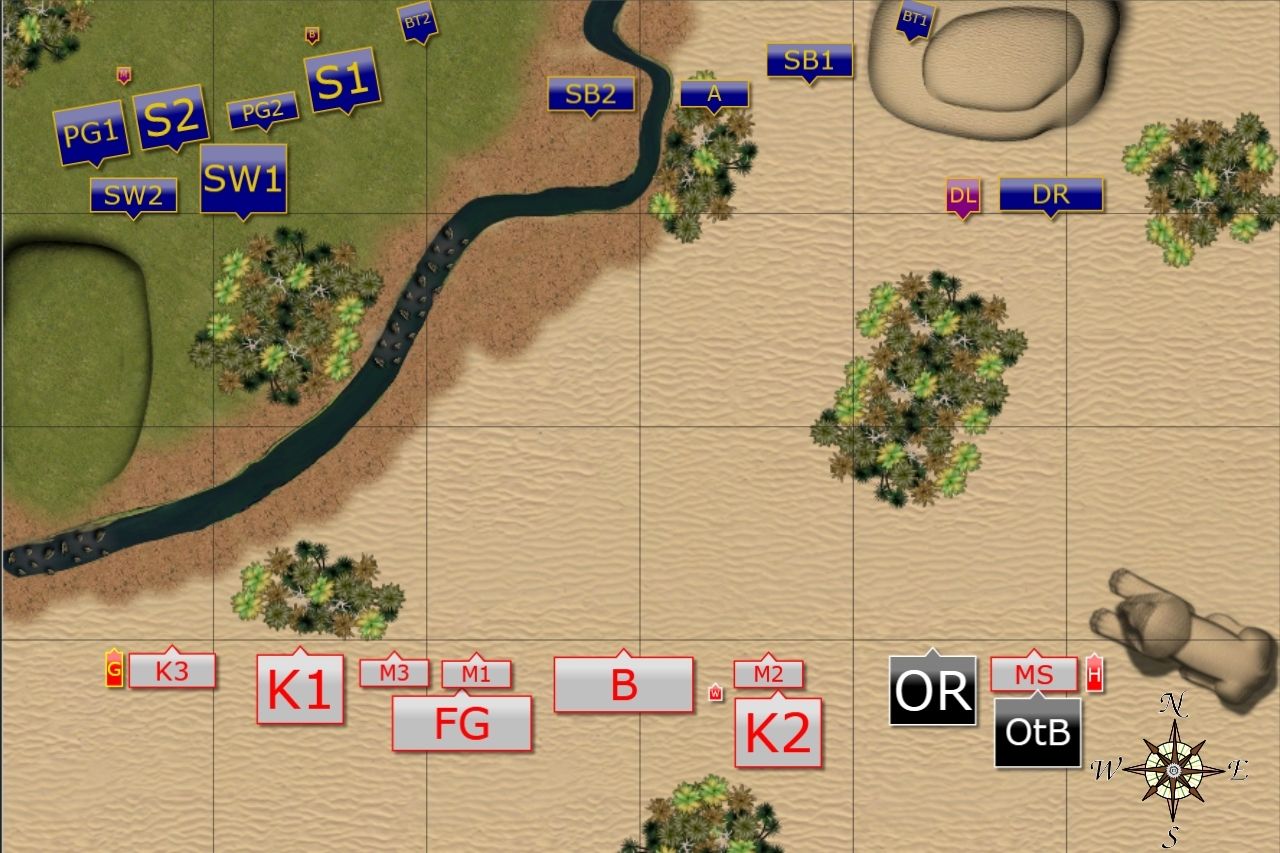 |
| Final Deployment |
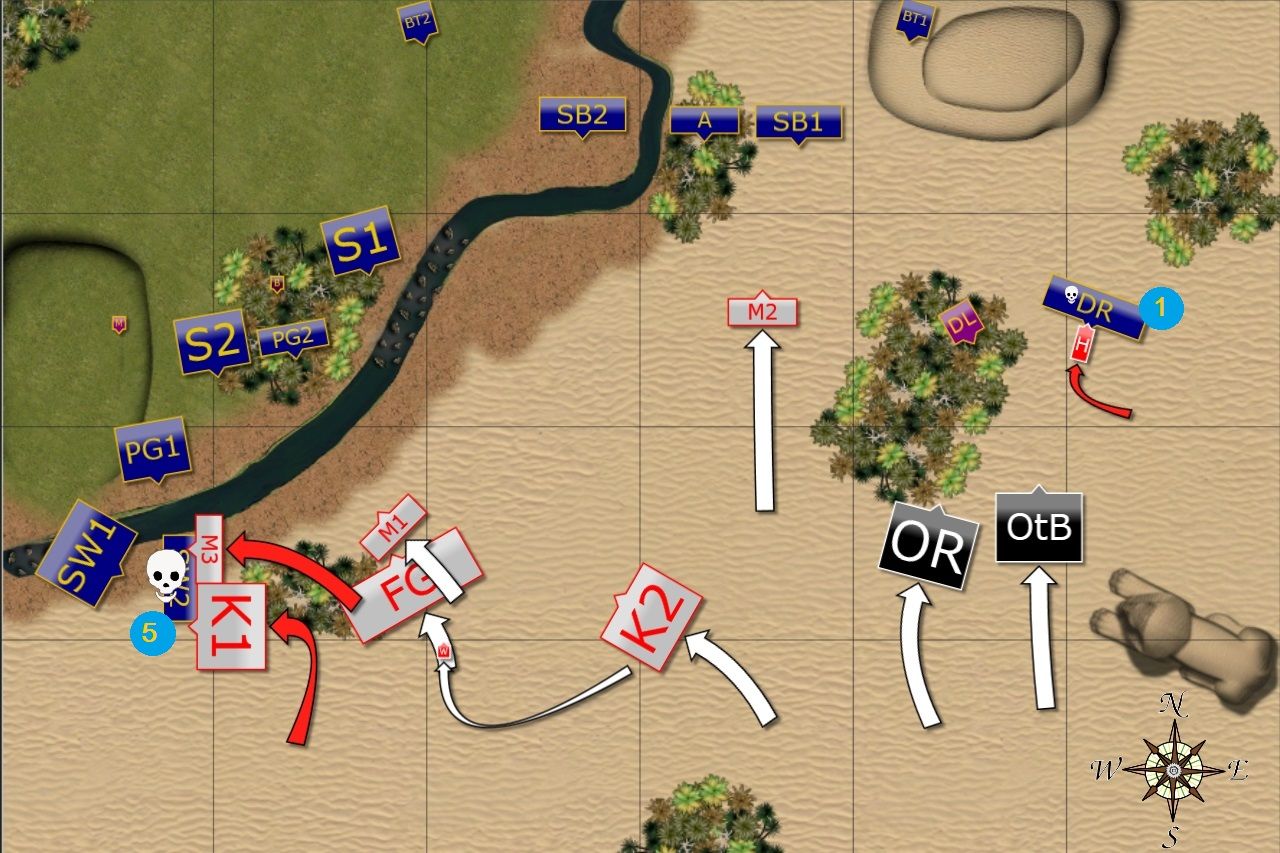
With so many knights in the opposing army I decided it might be a good idea to deploy majority of the forces beyond the river. While Spears could already deprive heavy cavalry of powerful thunderous charge, additional hindered effect was also important to have.
At the same time I could not simply deploy entire army in the corner as it would have limited my own maneuverability. What is more, if I started giving away that idea too early I might have ended up with lots of enemy units surrounding me there already.
With a few forests on the battle field the clear line of sight was obstructed but I still wanted to use my own shooting while limiting that of the enemy. That is why I deployed my archers and fast cavalry a bit further from the deployment edge. That ensured their safety even if Kingdoms of Men army would go first. However, occupying central position left me with some freedom of choice as to what to shoot at.
Although it was not guaranteed I thought the horde of Bowmen would deploy in the center of the battle line too. Partially because of the same reasons (i.e. best overview of the battle field and more flexibility in the target choices) but also because I expected the other units would also like to use cover for their benefit.
As you can see I also kept my cavalry and flying units till the last moment. I have noticed I often have a few options as to where to position these elements and that is also affected by the positioning of enemy. My initial plan was to place heavy cavalry in front of infantry (as I did) but I wanted to make sure they will not face all the knights at once either. That is why I decided to gamble and placed drakons with the lord on the Eastern flank.
Why is it a gamble? Because my opponent might not have reacted to it. If he didn't, I would have faced quite a big contingent of faster and well armored elements with my infantry. However, that also left me with the option of positioning entire fast and hard hitting contingent on the East, using forest for cover and trying to sweep that flank. While infantry would use the terrain to play defensive game until cavalry would arrive to the rescue.
In general, I was happy with the deployment because infantry and cavalry on the West could advance using the terrain as defense, I had good concentration of force on that flank, the middle of the battle field was covered by the shooters and drakons distracted brotherhood and didn't let them to simply turn and gallop to help the units on the opposite side.
I was very curious if that plan would work though. As always my army depends on good timing and coordination between various elements. If anything gets slowed down then Kingodms of Men army would grind my fragile units down in the war of attrition.
I won the roll off for the first turn and elected to take it.
Outcasts - Turn 1
 |
| Elves advance on the flanks. |
Elves seized the initative and advanced on both flanks with hard hitters spearheading the attack. The units in the middle kept safe distance from a very dangerous horde of Bowmen formation across the battle field. However, keen-eyed Elves spotted an opportunity to eliminate that threat.
The new plan was quickly formulated and centuries of eexperience allowed to implement it on the spot. Bolt thrower crews got the message to focus on the Bowmen to inflict some damage. They succeeded beyond the expectation and impressed even the enemy commander.
Kingdoms of Men - Turn 1
 |
| Drakon hunt begins. |
The human army moved forward to meet their enemy. The advance on the West was more cautious, probably to give time for the Bowmen to get into range. They opened fire at the Elven heavy cavalry but this time the protection of the forest and fine armor meant no damage was done.
On the East the drakon hunt begun. Hot headed Sergeants sped forward to tempt the Elven flying cavalry into reckless charge. The Knights behind them were to advance to prevent Drakons from flying over and landing in the safe zone.
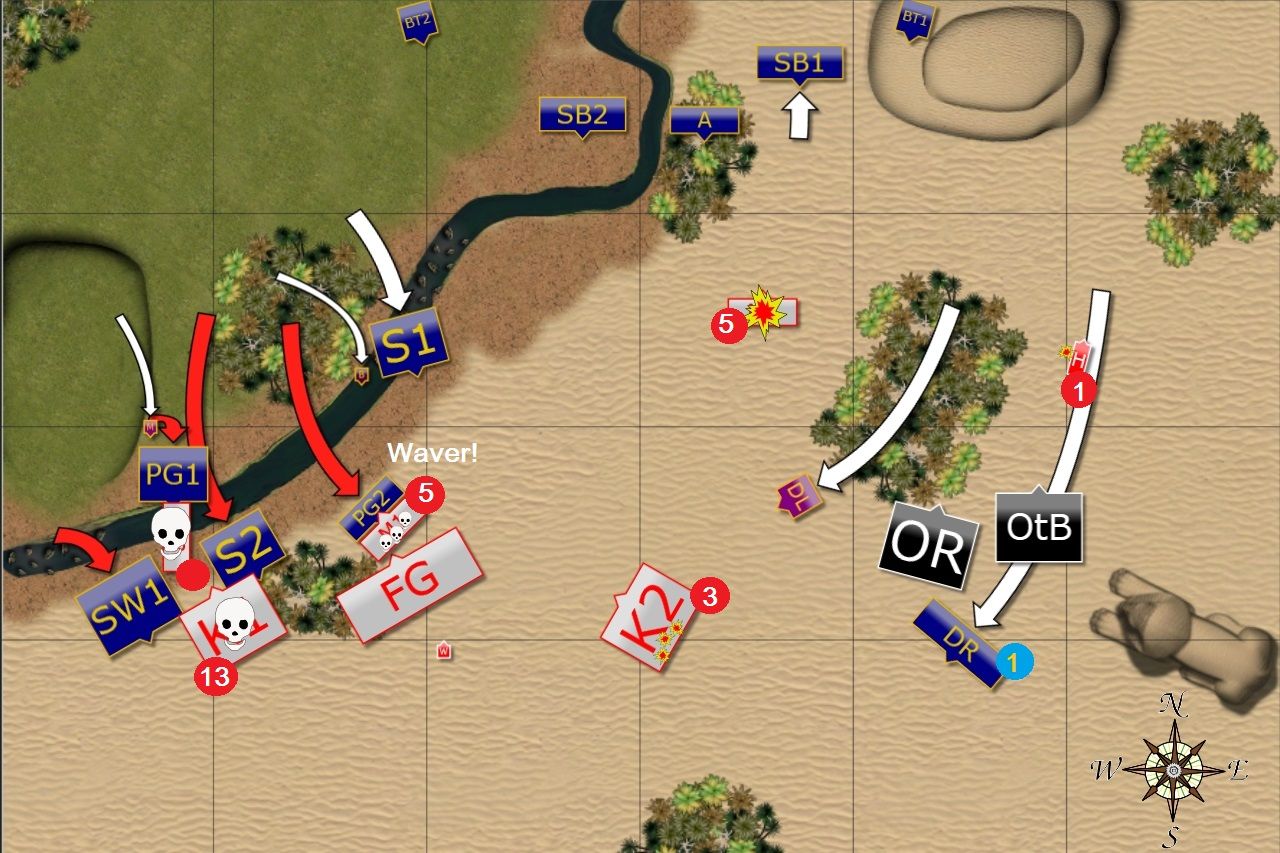
Outcasts - Turn 2
 |
| Elves - fist to charge! |
Now it was time to hit the enemy army simultaneously on three different points. Heavy cavalry on the Western flank charged the human general while their companions were to block the troop of Knights. The attack went better than expected with both, general and the Knights routed.
At the same time Drakons charged the Sergeants who moved a bit too far and what supposed to be a trap turned out to be a grievous mistake. Not only poor fast cavalry was lost but the units of the Brotherhood allies were too far to attack the Drakons in return!
While fast units engaged the enemy on the flanks, the shooters continued with their plan. As Bowmen already took significant damage, all Elven units moved into range and entire contingent of Elven ranged attack specialists aimed at the enemy archers. This time humans have had enough and fled the battle despite the inspiring presence of the nearby wizard.
Kingdoms of Men - Turn 2
 |
| Counter attack |
The Knights and Militia avenged their companions and Elves suffered first casualties. Second group of Militia and Foot Guard moved towards Elven infantry while another regiment of Knights turned towards the West to fill the gap in the battle line and reinforce their companions on that front.
In the meantime, the Brotherhood allies moved towards the Drakons hoping to catch them in time. To help to achieve that the valiant Hero attacked the Elves all by himself. He earned the respect of noble Elven warriors but he could not do much damage on his own.
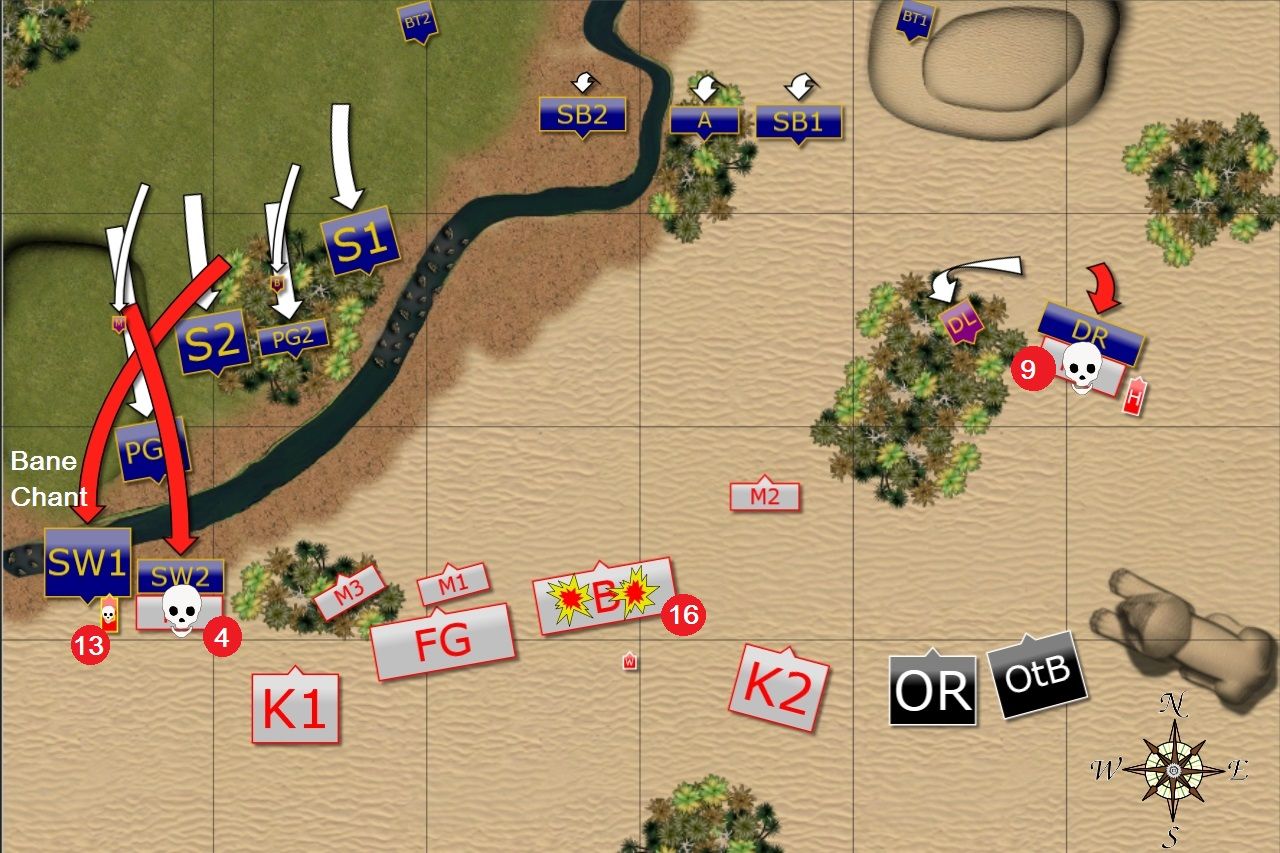
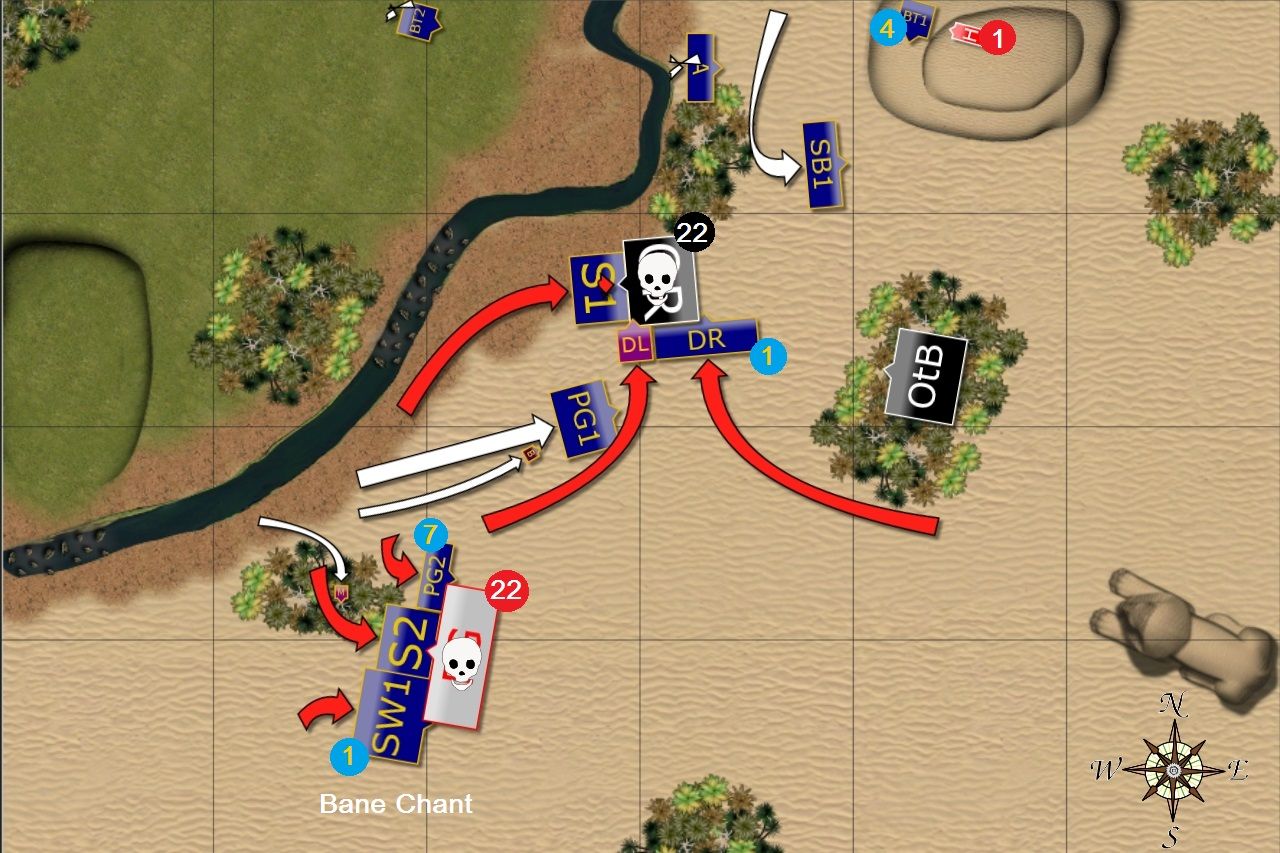
Outcasts - Turn 3
 |
| The attack continues on the Western flank. |
Elves started gaining advantage on the Western flank and used the opportunity to continue the attack before the reinforcements arrived. Heavy cavalry and Spears bypassed militia and hit enemy knights together. The charge was powerful enough to rout yet another unit of the human army.
Palace Guard units attacked militia mobs, destroying one of them and wavering another. Third militia group met their end at the hands of Elven archers. Even the last of Kingdoms of Men knightly units suffered damage as they were caught in the open by Elven war engines.
Drakons, succeeding in attracting attention of powerful Brotherhood heavy cavalry, used their speed to go beyond enemy lines.
Kingdoms of Men - Turn 3
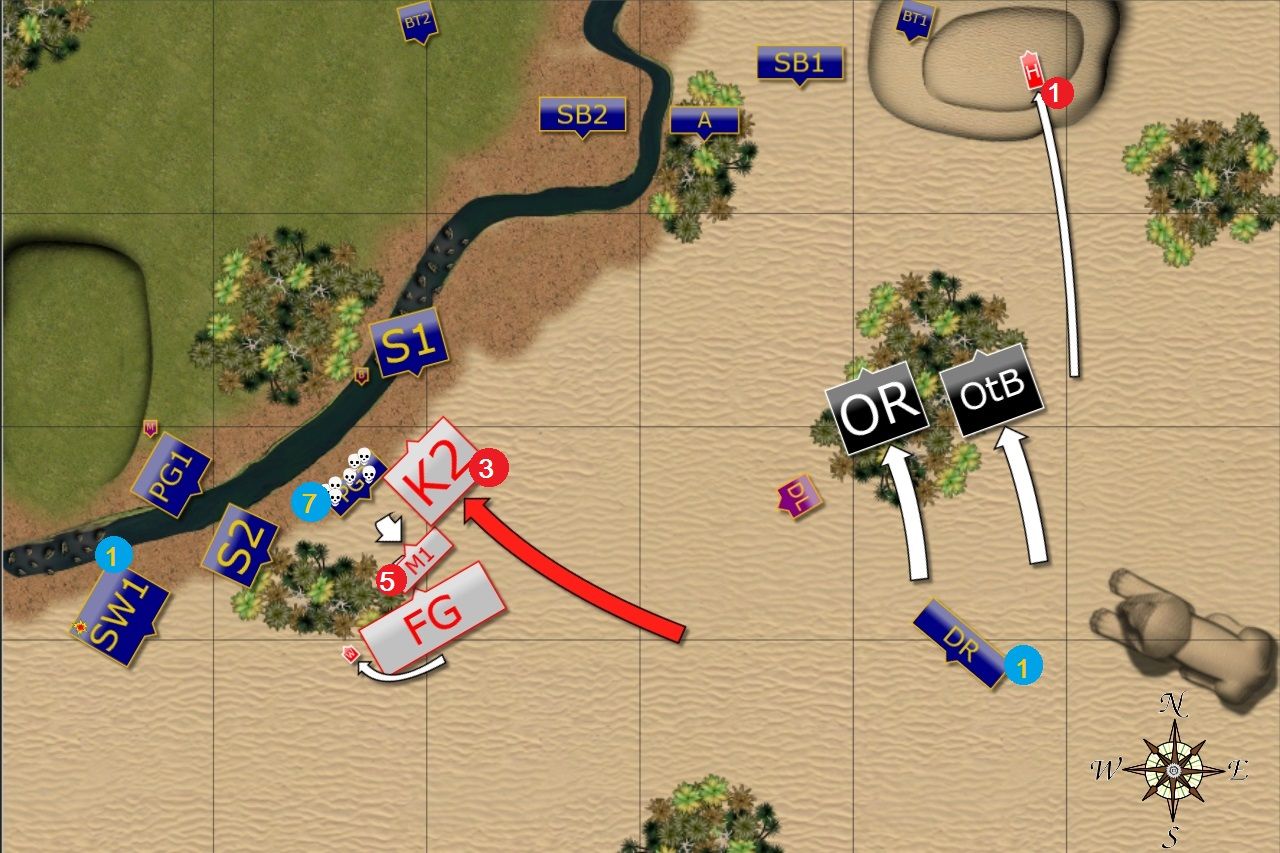 |
| Another attempt to counter attack |
Despite the significant losses the human army didn't even think about giving up. The Knights attacked the nearest Palace Guard but Elves held against the odds!
The Brotherhood maneuvered into the forest and aimed at Elven fire base.
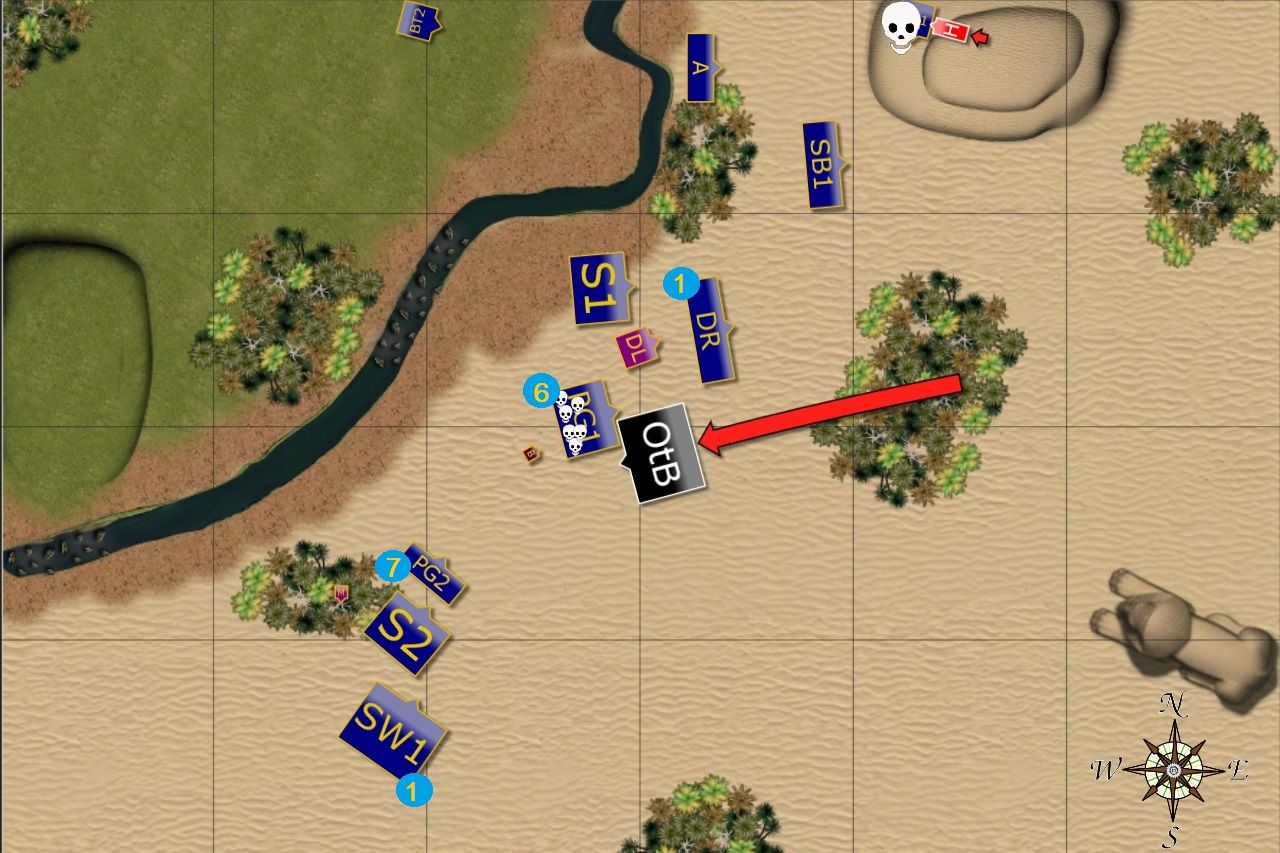
Outcasts - Turn 4
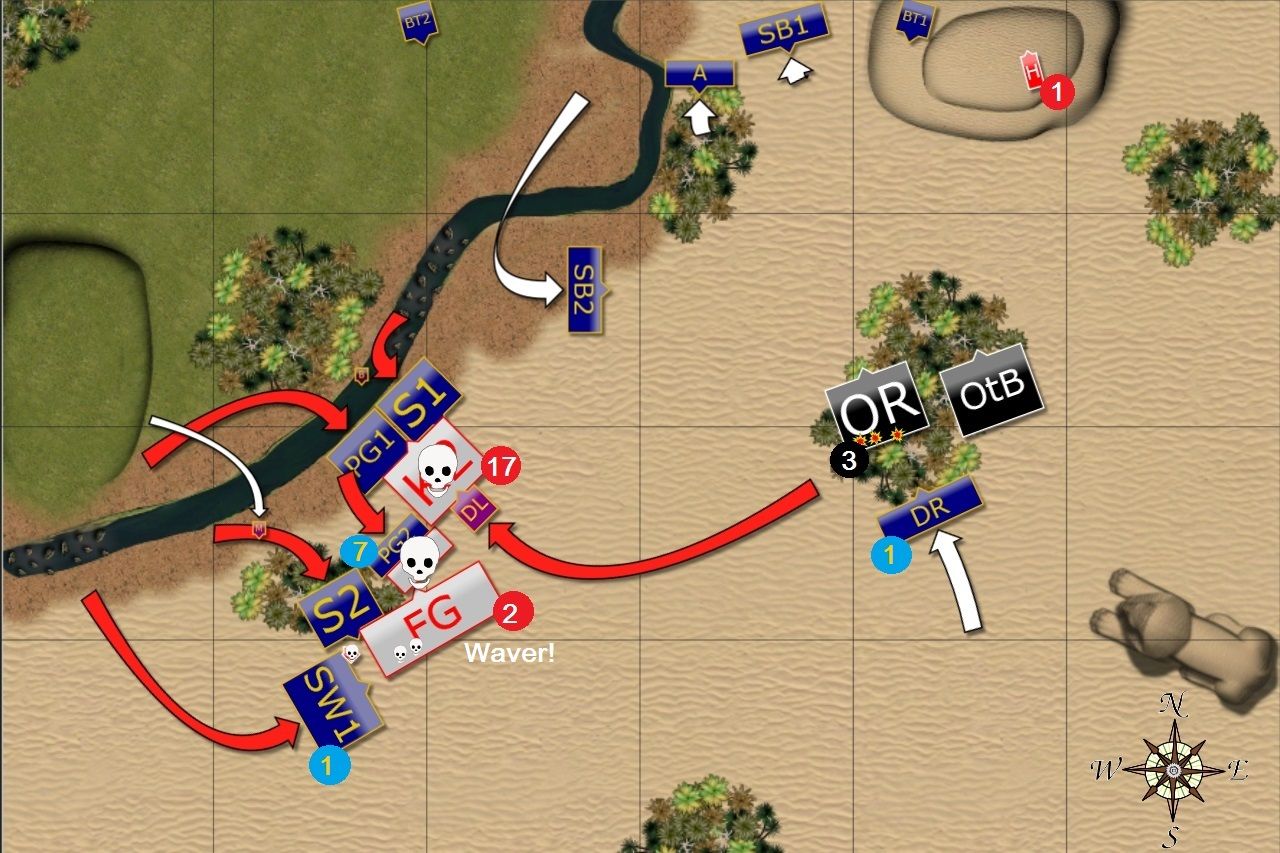 |
| All out assault on the Western front. |
Palace Guard, although heavily damaged, were still combat ready and finished off last of the militia mobs.
Then it was up to Storm wind cavalry to finish the job but something didn't go as planned. Elven knights captured enemy wizard but instead of hitting the exposed flank of the Foot Guard they stopped! Now the unit of Spears would need to attack the foot knights completely alone.
Somehow that reckless attack surprised the humans and they wavered expecting more enemies to come at them. Instead of counter attacking then they decided to consolidate their positions.
Edit: It was quite unexpected turn of events. I charged the wizard with Storm wind cavalry with the intention to continue against Foot Guard. However, I rolled "1" for the advance and it was too short to reach them! Then I proceeded to roll double 6's for a nerve check after inflicting mere 2 points of damage on the infantry horde.
Kingdoms of Men - Turn 4
 |
| The Brotherhood finally attacks! |
Elven fast cavalry was too relaxed it seems as it moved into range of the Brotherhood knights and powerful Order of Redemption punished such carelessness immediately.
However, Elven units were now surrounding both Foot Guard and Brotherhood units and the situation didn't look well for the human army.
Outcasts - Turn 5
 |
| Yet another powerful Elven attack. |
Humans fought bravely and it seemed that Elves had to deal one more blow to break the spirit of their enemies. Frontal attack against the Foot Guard was powerful and even headstrong foot knights could not hold against it.
Then Drakons finally had the opportunity to show their martial prowess and the combined attack against Order of Redemption saw even that enemy knights routed.
Kingdoms of Men - Turn 5
 |
| Last charge |
With only a single unit and a lonely hero left, the humans still decided to fight. The hero destroyed one of the deadly bolt throwers and the Knights of the Brotherhood attempted to rout Elven elite infantry but failed.
It was clear that Elves won this battle and out of respect for exemplary bravery of their adversaries, they withdrew from the field in good order, letting the survivors to come home.
Summary
 |
| Turn-by-turn summary animation |
After-battle thoughts
First of all, I would like to thank Meniskusmike for a game! It was great to finally meet "in person" and thanks a lot for the opportunity to play against such a great army. One might think, looking at the result of this encounter, that poor humans stand no chance against other forces. I have to tell you that it would be a very foolish and completely wrong conclusion. Meniskusmike played a game with the very same army shortly after and he soundly beaten his enemy. I am not going to make a mistake of underestimating his force for sure, simply because I got lucky in our first battle!
Meniskusmike was very kind to provide a few observations on his own after the game:
As for the game I made several mistakes!
1st the deployment, I should have had a much tighter battleline where the army can mutually support each other. I separated them into two main battle groups with the infantry on my left and the cavalry on the my right which meant the cavalry were too far away to help the infantry when I needed them.
2nd I should have been more aggressive particularly with the knight troop and the general on my left if I moved them further forward you shouldn't have been able to charge the general with the stormwind cav reg and moved everyone else up in support as it was that simple mistake let you come all the way round by flank!
3rd If only I had moved my brotherhood cavalry further up I MAY have managed to get the drop on your drakons and got them more into the game but as it was I had 3 units of heavy cavalry left out on the limb waaaay out on the right not doing a lot!
I certainly didn't expect to win and even more so to win so decisively. There are a few elements that I think helped me to achieve the victory this time:
1. Eliminating Bowmen early - my initial plan was to use my shooters to remove support units of the enemy. It is often the way I want to use my shooting for as it allows me to maneuver more efficiently. However, when I saw Bowmen horde exposed in the middle I decided to change the plan and see if focusing fire on them would work. I decided not to get into harms distance with fast cavalry and archers though and use bolt throwers only for the opening salvo. I got very lucky because I hit with all the shots and blast was also quite spectacular.
Interestingly, the following turn when I focused the fire of 5 elements at the same time, bolt throwers did exactly 1 point of damage. But the plan worked and I am glad I can now use the shooters in such fashion too.
2. Pathfinder - I can't tell you how much this ability helps on Storm Wind cavalry. This regiment hits hard but the ability to do so despite the terrain such as forests or rivers was priceless.
3. The Bortherhood - I was ready to sacrifice my drakons and the lord to keep the Brotherhood knights on the Eastern flank and to attract the attention of a more powerful force than the drakons presented on their own. When I was presented with the opportunity to disengage and fly behind the enemy lines I took it because it was even better option and it also left the Brotherhood without the target to charge.
Later on Drakons could also participate in attacks and eliminated the most powerful regiment in the game.
I am sure Meniskusmike is going to enact a revenge next time we play and I am looking forward to the re-match. I hope this was just a start of the series of games we are going to play in the future.
Thanks for reading and please, leave your comments and feedback!
Cheers!
Solid game there Swordmaster! And against an army I recognize! I'll add my thoughts to your forum thread in a little bit.
ReplyDeleteThanks! I hoped you might find this game interesting! I have just read your comments on the mantic forum and will address them shortly!
DeleteHey SM
ReplyDeleteThanks for another wonderful report right from the opening descriptions through to the conclusion. I must say I loved the map and the details in that and instantly imagined it in reality on the tabletop.
Once again apologies for not having a great deal to add to the discussion however you've displayed again an exemplary approach to the game which is simply why you succeed so well at your chosen discipline. Need to play some more X-wing mate! :) Excellent coordination as usual is what has won you this game and ironically enough if any uneducated person took a look at your battle reports from a previous gaming system from years ago they'd be struggling to tell the difference in regards to you playing a different game. This tells me that your skills have transferred over so well and you've shaken off any hang ups from the last game, embraced the KOW system and brought the MSU play style and adapted it to the system so well.
Is there a tournament coming up perhaps close by you can attend? I think that would be a wonderful challenge for you and more 'tabletop' games for you to get the dust off the models are always welcomed.
Looking forward to the next report as usual!
Hi Jimmy,
DeleteAlways great to hear from you so no apologies required!
It would be fantastic to have an opportunity to build a table like that and I hope one day I will be able to have something similar in my future gaming room. :)
I really appreciate your comment on transferring between the systems. I think at the beginning my prior gaming experience was more of an obstacle than help but I am glad it finally seems to fall into the right place. I must say I am very happy with this army that is indeed quite similar to what I used earlier and that I can present a threat to my opponents with it.
KoW has so many different forces out there, however, that I still feel like I learned only about a smaller fraction of the myriad of opponents out there.
There are indeed some tournaments going to happen in Sydney in the following months and I will do my best to attend them. I haven't been to an event for a long time and as they have a few one-dayers that might be my chance. Real life still keeps me busy but one day over a weekend should be possible to arrange.
I have also ordered some new bases and movement trays with the aim to prepare the models better for KoW games! Hopefully I will be able to show some progress sooner than later!
Thanks again for your feedback!
Cheers!
Great as always. Still reading these!
ReplyDeleteWelcome back! I am glad you do! And I hope you have some new games to talk about too :)
DeleteNot in KoW so much. Having some fun with the twilight moments of Warmachine MkII as well as Guild Ball, but keen to take The Brick out for a spin sometime soon again.
DeleteReally awesome to see you tackling a diverse bunch of foes. Somehow your blasted MSU elves have pulled it out again, and you weren't even outdeploying this time!
Nice! Would be great to see the Brick in action again! :)
DeleteThanks for kind words! I think the result of this one was misleading. Things may always go different ways and I just have a feeling my opponent hesitated a bit. My impression is that in a few games I have played so far that indecisiveness was the main problem for my enemies.
But I am sure it is often a consequence of just starting to play with particular army. I expect that in potential re-matches the games will be more intense. Hopefully I will be able to organize these!
Cheers!