
 Greetings!
This time I am going to present a report from the battle against Mr. laribold who recently has defeated me in 9th Age with his Reptilians. We started the game on Friday 13th but had to stop in the middle of turn 3. We managed to finish the game yesterday which is great because, unfortunately, saved games tend to remain unfinished.
Another interesting fact is that laridbold initially wanted to play with Forces of Nature but some trials in his gaming club showed he didn't quite like the army after all. Then, in the break we had, he also played a couple of games with Salamanders and we already know that his army evolved significantly from what he used against me.
Salamanders - Army List
20 Salamander Primes, Regiment - 140
- 10 Ghekkotah Hunters, Blowpipes - 100
- 10 Ghekkotah Hunters, Blowpipes - 100
- Clan Lord on Fire Drake, Hero - 235
20 Ancients, Regiment - 170
- 10 Ghekkotas Hunters, Bows - 120
- 10 Ghekkotas Hunters, Bows - 120
- Mage-Priest, Hero, Fireball(10) - 90
20 Ceremonial Guard, Regiment - 160
- Herald, Hero - 60
6 Tyrants, Horde - 210
- Komodon, Monster - 125
10 Kaisenor Lancers, Regiment - 170
3 Ancients on Rhinosaurs, Regiment - 180
Salamanders have "Flames of Kthorlaq" special army wide rule which means that in general all units have Crushing Strength 1. Similar to what Orcs got and I think it is quite powerful thing to have. But are they just more scaly version of the green menace?
20 Salamander Primes - These are standard Slamander warriors. Def5 means they are pretty tough. 12 attacks and 4+ to hit might not seem like much but it combines nicely with the CS1 and Pathfinder should help them to use terrain to their advantage.
20 Ancients - Elite infantry. They cannot be wavered which alone is a great asset. Def5 as usual. Higher nerve too which means they will be harder to rout. Same amount of attacks but hitting on 3+.
20 Ceremonial Guard - They look like spear armed version of the Primes with more attacks. They also have Phalanx which is also a very good option. So, better anvil than Primes but might not hit as well as Ancients (I think it is better to have 12 attacks that hit on 3+ than 15 that hit on 4+) and not as durable but they can do well against any of my units one on one for sure.
6 Tyrants - the hardest hitting of the infantry units. The best morale. Brutal to make enemies run away faster and Fury to make sure they can always counter charge. These 4 infantry units can form a core of the battle line and will be very hard to break in the frontal assault. The only advantage here is that they are Speed 5 so they will need a bit of time to get into the position for the attack.
Ghekkotahs - very fast and Nimble infantry that can also shoot. They might not be the best shooters in the world (5+) but they have Vicious special rule that means a few more shots will find their mark. 4 units of these will nicely mask the deployment plan for a while, will offer cover for big brutes behind them and may also interfere with the movement of my troops. If they form the first line I will need to take care of them fast.
10 Kaisenor Lancers - Salamanders version of the heavy cavalry. They hit on 4+ but have 18 attacks (usually heavy cavalry has 16 attacks and hits on 3+). They also have lower defense of 4+ which is a little surprising but for 170 points you still get quite hard hitting and fast cavalry.
3 Ancients on Rhinosaurs - the best of the best in the Salamander's army. They will wound everything on 2+ on the charge. My light troops will be wounded on 2+ anyway (with the exception of heavy cavalry and fliers). Very, very dangerous unit, relatively fast too. I expect both cavalry units to operate on flanks where they could maximize their efficiency and if they start rolling the flanks then I am doomed.
Komodon - an interesting artillery of the Salamanders. It has 36" range and can shoot after moving. It hits on 5+ but has 3 attacks and Blast as well as Piercing(2). That may prove to be problematic because it has potential to hit very hard even in a single shot.
Clan Lord - very powerful hero on a very versatile mount. He is great in melee but with Breath (16) he can also add to the ranged warfare. Fortunately for me he does not fly as that would have been even harder to contain.
Mage-Priest - Fireball (10) is what he really adds to the army. It may not look like a big deal on its own but I have already learned it can be very helpful in getting these wounded units or simply inflicting some wounds for lucky nerve tests.
Herald - his role is simple, stay out of trouble but keep waving his flag to inspire nearby troops. Since he is pedestrian I expect him to be with the infantry line.
I consider Salamanders as tough army. They might not be fast (at least not all the elements in this force) but there are quite a few units that I cannot ignore due to various reasons. And dealing with them all quickly is a challenge.
I guess the key, as often, would be to eliminate the support first to have more freedom in the movement phase. Then divide and conquer because as long as these tough units stick together it will be very hard to breach their line.
Here is my army list for reference:
Outcasts - Army List
10 Stormwind, Regiment, Potion of the Caterpillar (Pathfinder) - 235
- 5 Silverbreeze, Troop - 145
- 5 Silverbreeze, Troop - 145
- Drakon Rider Lord, Hero, Large Cavalry, Blade of the Beast Slayer - 180
3 Drakon Riders, Regiment - 175
- 5 Stormwind, Troops - 140
- Bolt Thrower, War Machine - 90
20 Palace Guard, Regiment - 150
- 10 Archers - 115
- Bolt Thrower, War Machine - 90
20 Spearelves, Regiment - 140
- Elven Mage, Inspiring Talisman, Bane Chant - 110
20 Spearelves, Regiment - 140
- Battle Standard Bearer, Hero - 50
Prince, Hero, Mounted, Quicksilver Rapier, Pussy Cat - 95
I mentioned that in the report against Forces of Abyss but this list is not legal. I could not include Prince as I don't have enough regiments. I removed him as soon as I noticed the mistake but unfortunately he was present for first 3 turns of the game.
My sincere apologies for that mistake to laribold and the readers!
Terrain
 |
| Terrain |
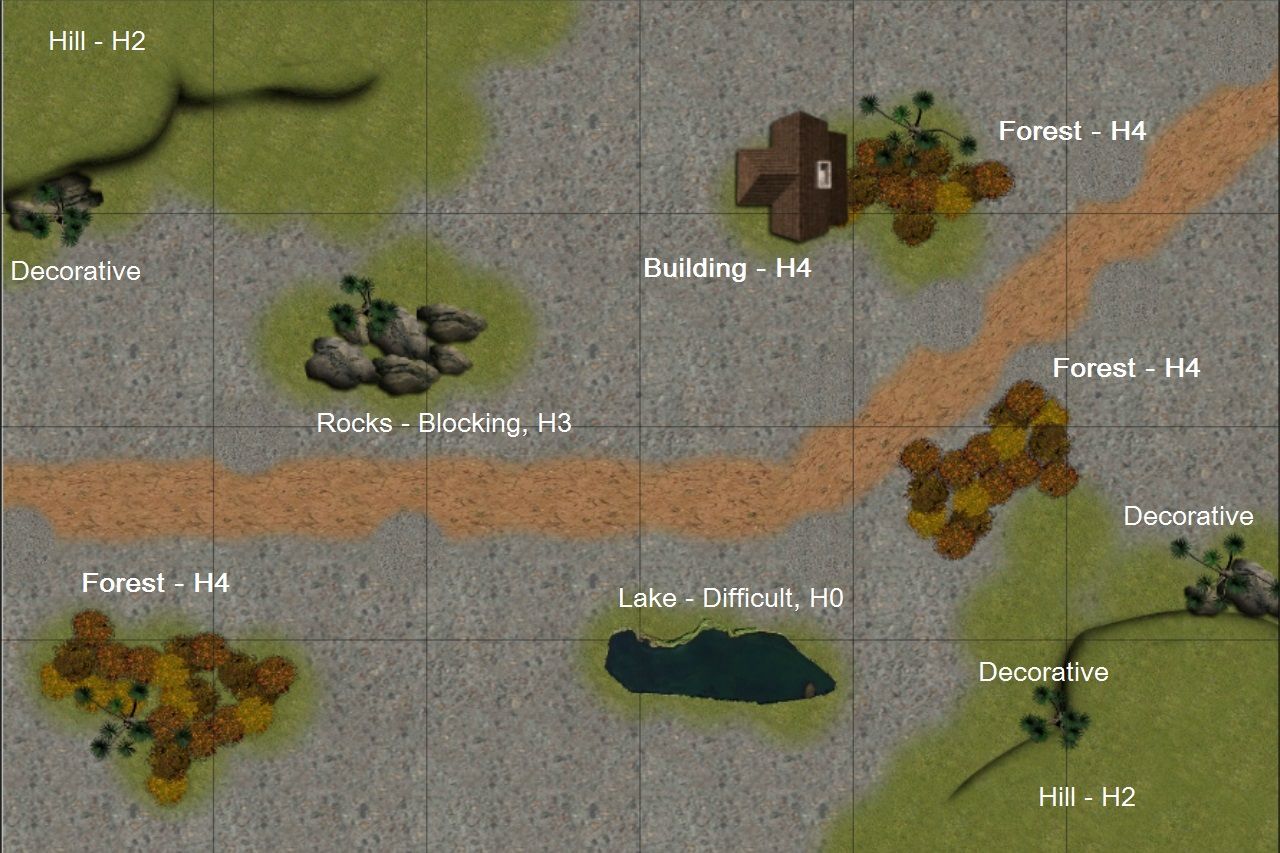
I tried to add relevant information about the terrain on the map above, so here is just a recap of it:
Building - Height 4
Forest - Height 4
Rocks - Height 3
Hill - Height 2
Lake - Height 0
We also had some decorative pieces of terrain for a change :)
Deployment
 |
| Deployment Order |
We rolled for the scenario and got Invade! It was the first time for me to play with the scenario in KoW so I was very curious about the outcome and how that would affect the game. I will present the deployment order first and the discuss it in the context of the scenario.
I won the roll off to pick sides and chose South.
Deployment Order:
1. Silver Breeze (SB1) - Primes
2. Silver Breeze (SB2) - Gekkotah Hunters (GP1)
3. Bolt Thrower (BT1) - Ghekkotah Hunters (GB1)
4. Bolt Thrower (BT2) - Kaisenor Lancers
5. Spearelves (S1) - Ghekkotah Hunters (GB2)
6. Spearelves (S2) - Herald
7. Stormwind (SW2) - Ghekkotah Hunter (GP1)
8. Archers - Tyrant
9. BSB - Ancients
10. Palace Guard - Ceremonial Guard
11. Mage - Mage-Priest
12. Prince - Ancients on Rhinosaurs
13. Stormwind (SW1) - Komodon
14. Drakon Riders - Clan Lord
15. Drakon Lord
 |
| Final Deployment |
I chose South because due to the building and rocks in the North Salamanders had to split the forces. I liked that because as long as they had unified front of 4 heavy infantry I would be in a difficult position to break through. With narrower middle pass and two flanks it already meant the forces will be split.
Southern half also had a clear view (with an exception of the forest on the East) and I thought it will be important in the context of the scenario. I could use my own bolt throwers and archers, who I planned to keep in my half, to shoot at the enemies invading my zone. Especially later in the game, were such units might have been damaged already.
I didn't quite plan to leave the middle empty and my own deployment looked pretty chaotic. But my aim was to win West flank, possible with small casualties and threaten Salamander's center. At the same time, forces on the East would delay the enemy and possibly harass the center too if the foe decided to face stronger contingent on the West.
That would also slow then down a little, thus making it possible to block them from entering my half of the battle field.
However, I also knew it would not be so easy to do so because it does not matter where enemy enters my half and it seemed impossible to prevent that across the whole width of the battle field. That is why I wanted to win the West fast to carry the fight into the enemy territory. By doing so I hoped to keep him there as he would not be able to afford such strong force behind his back.
Last but not least I decided it might be a good idea to let the enemy begin because the last turn to jump over the line towards the deployment zone of my opponent.
As it happened, I won the roll off and this time let laribold to begin.
Salamanders - Turn 1
 |
| Salamanders advance cautiously |
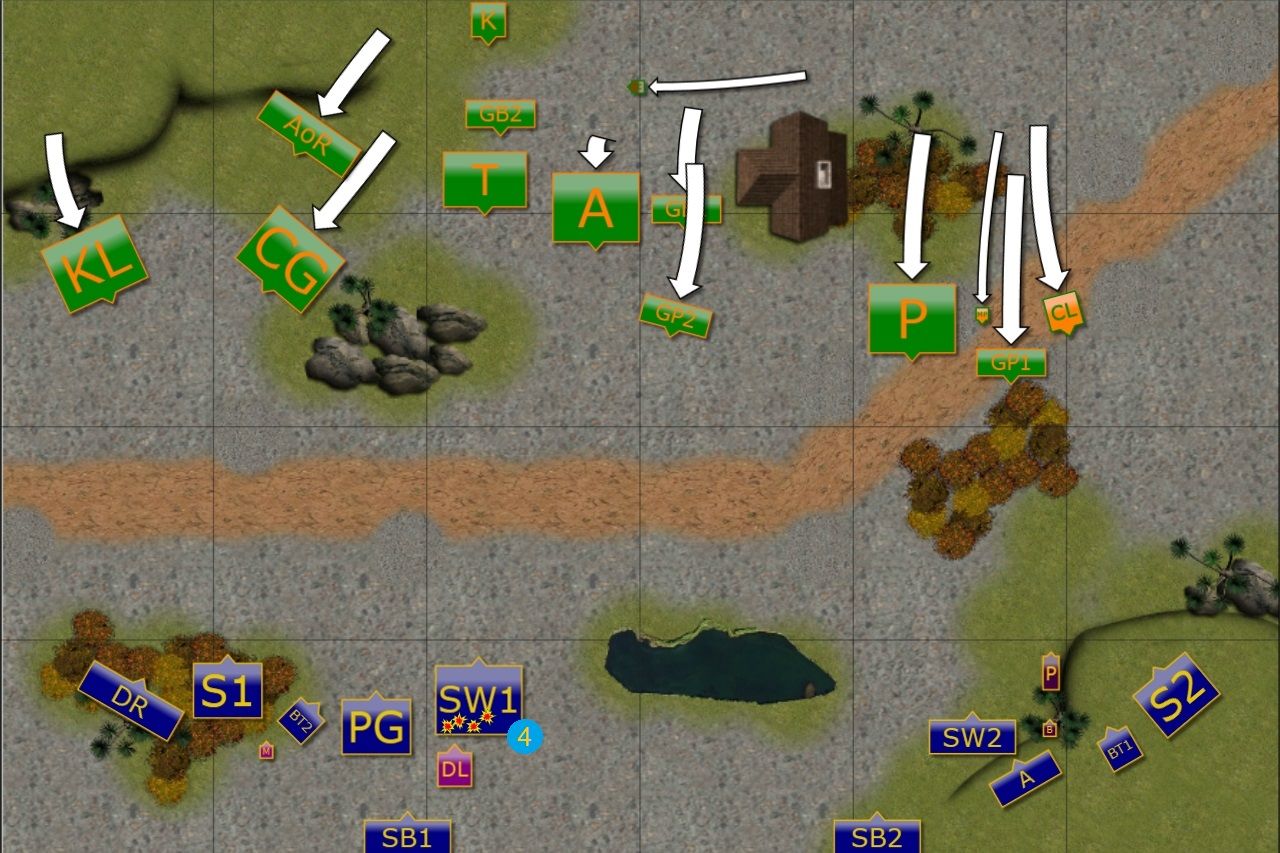
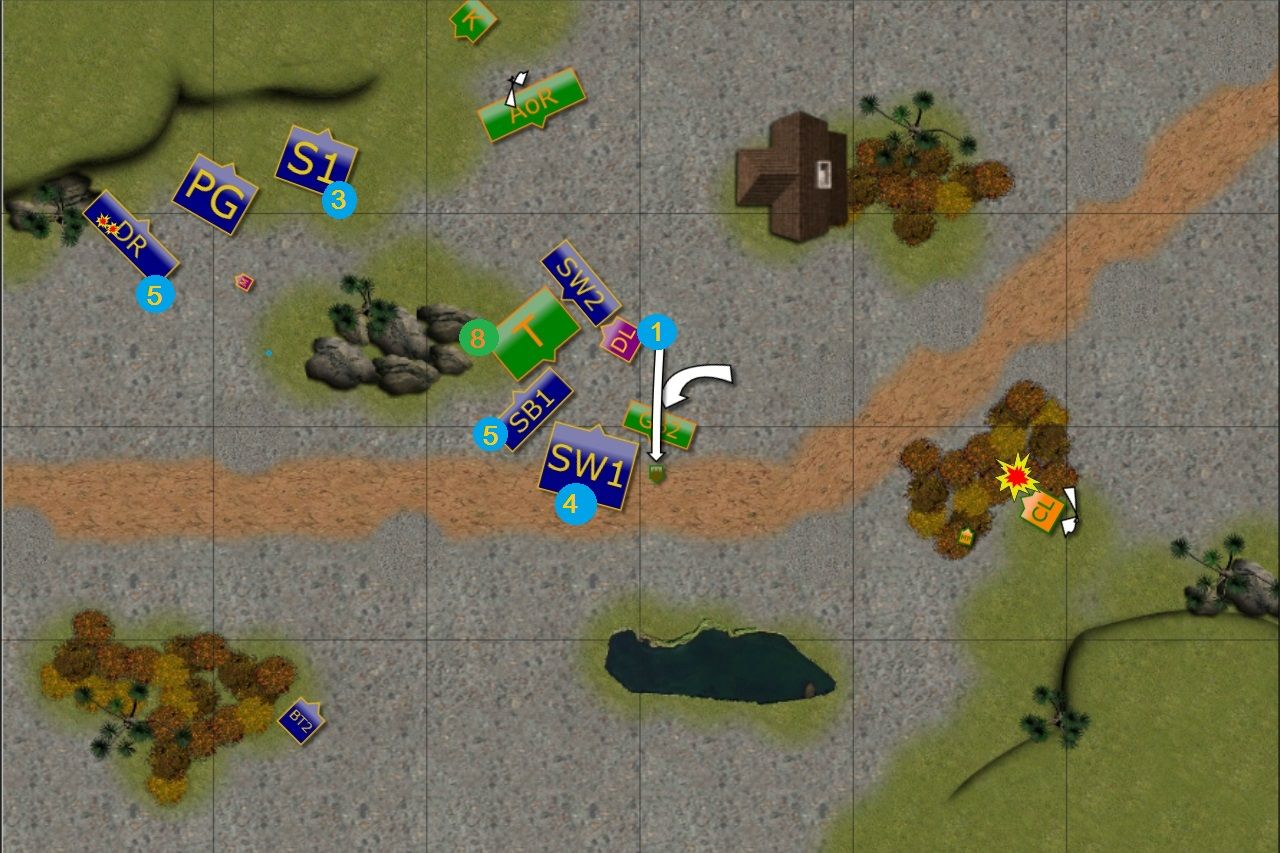
Surprisingly, Salamander's invasion was not a full out assault but a cautious advance. Only the units on the East moved forward fast but only thanks to the protection of the nearby forest. Especially the center didn't quite move much.
Despite that, Komodon happily spit some poison at the Stormwind cavalry and brave Elven knights suffered some damage.
Outcasts - Turn 1
 |
| Elves advance too! |
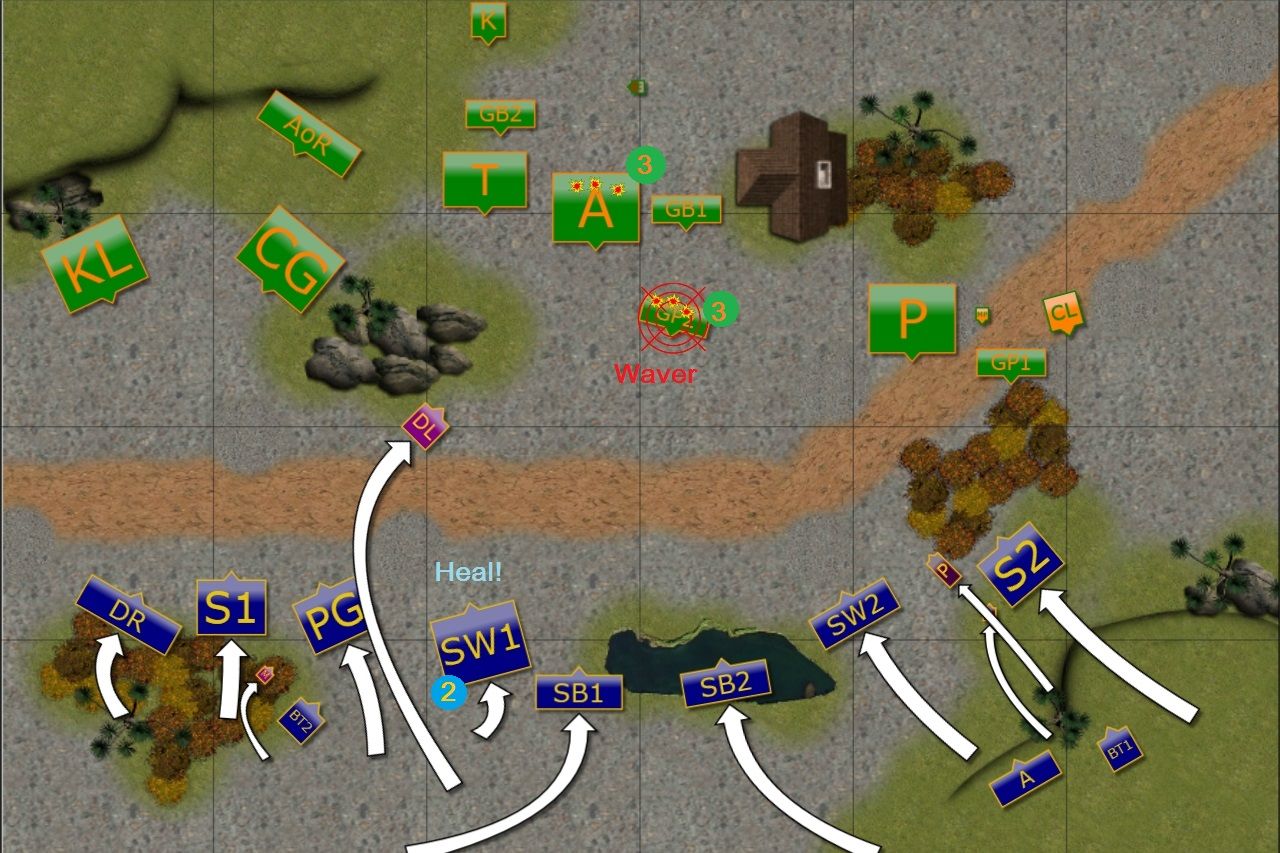
Elves closed the distance to the enemy but kept outside of the range of their foes. Only Drakon Lord, using the rocks for some cover from nasty Komodon, flew far to jump over enemy lines and get rid of the venom spitting monster.
In the meantime Mage healed some damage on the Knights. The fast cavalry aimed at one of the smaller lizards and wavered them while Bolt Throwers started to hit Slamanders' Ancients.
Salamanders - Turn 2
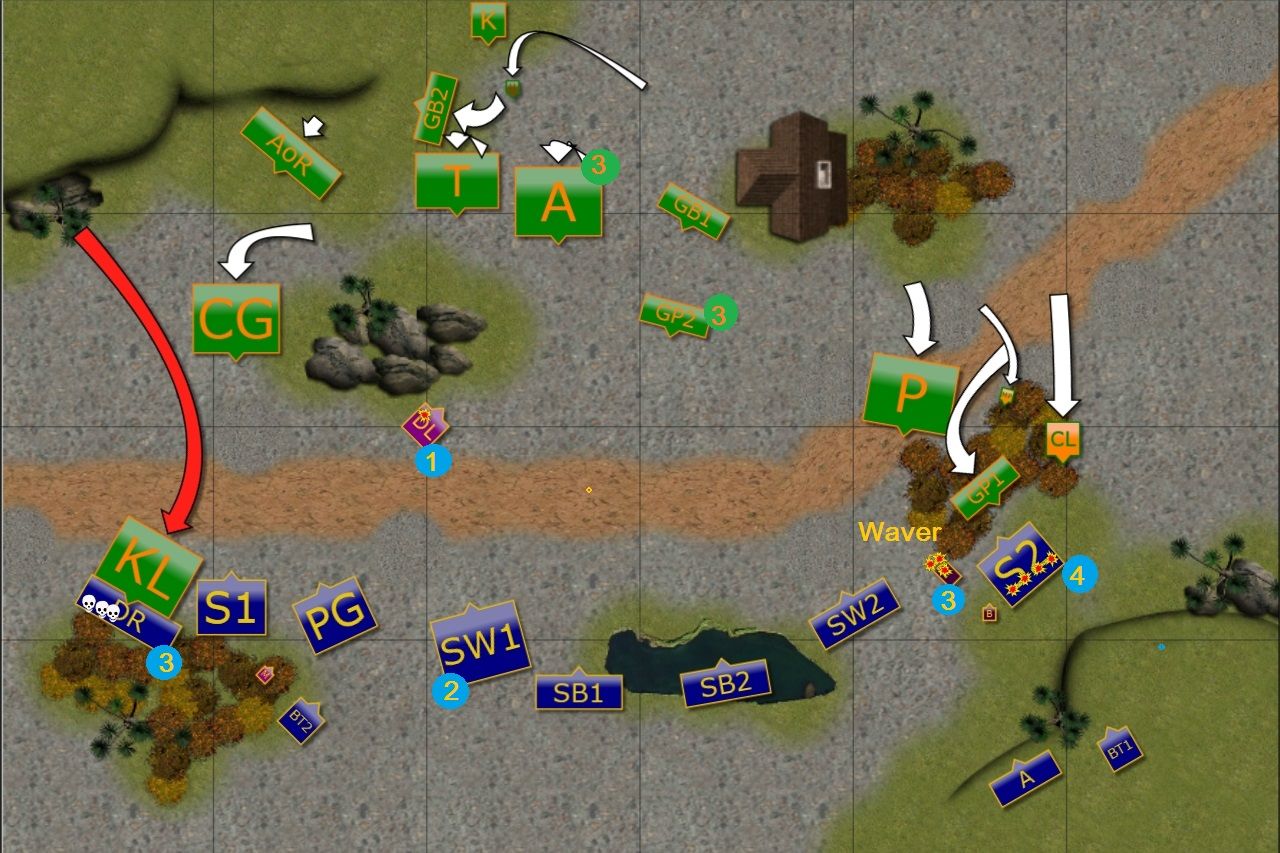 |
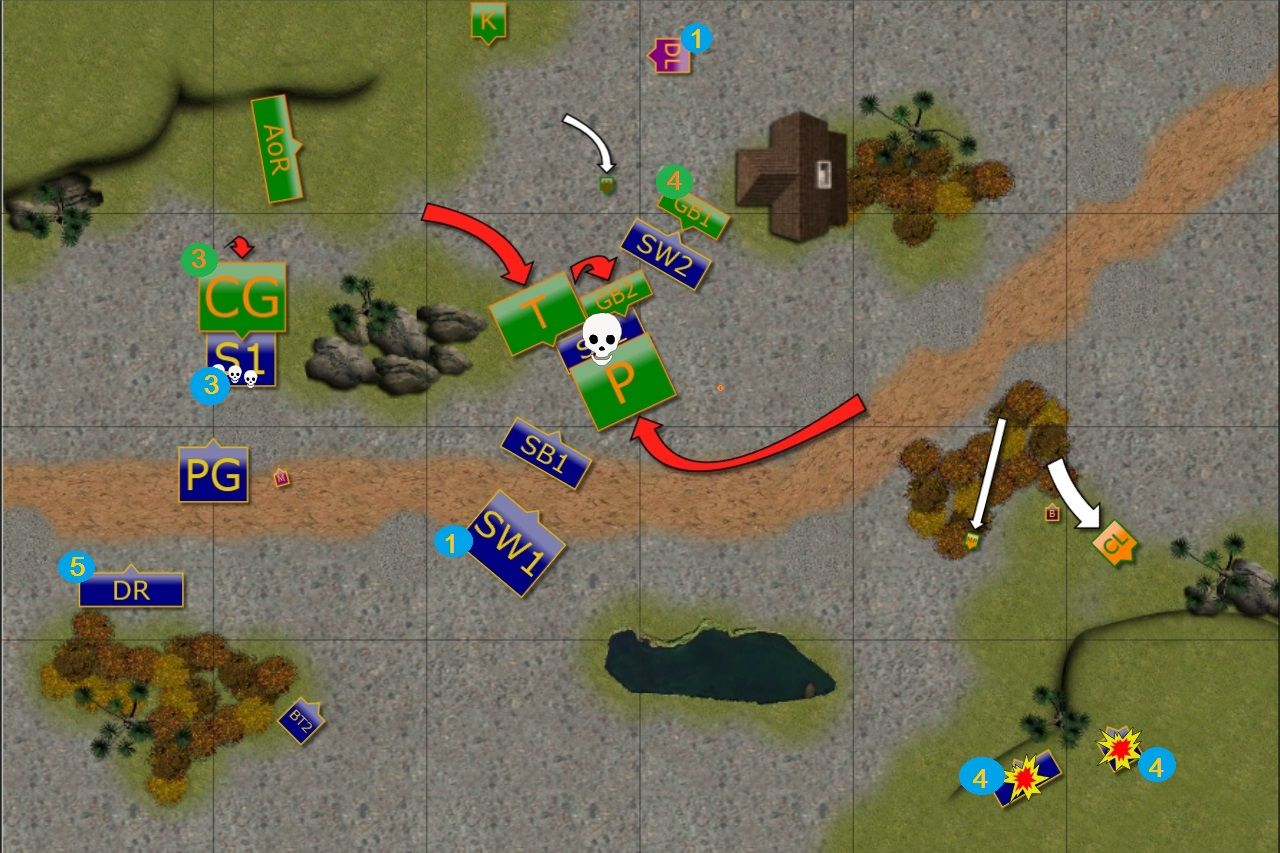
| Salamanders attack on the flanks! |
Drakons advanced a little bit too much forward and Lancers were too happy to miss that opportunity. However, despite such a clear charge in the open they fail to impress and need to pull back. That is bad news for them, as nearby Elven troops will get ready for counter attacks.
On the opposite flank Clan Lord and Mage-Priest both used their flaming attacks to punish the Elves that advanced a bit too far forward for their own good.
Komodon too added to the efforts of the whole army but this time he inflicted only a single wound on the Drakon Lord.
Outcasts - Turn 2
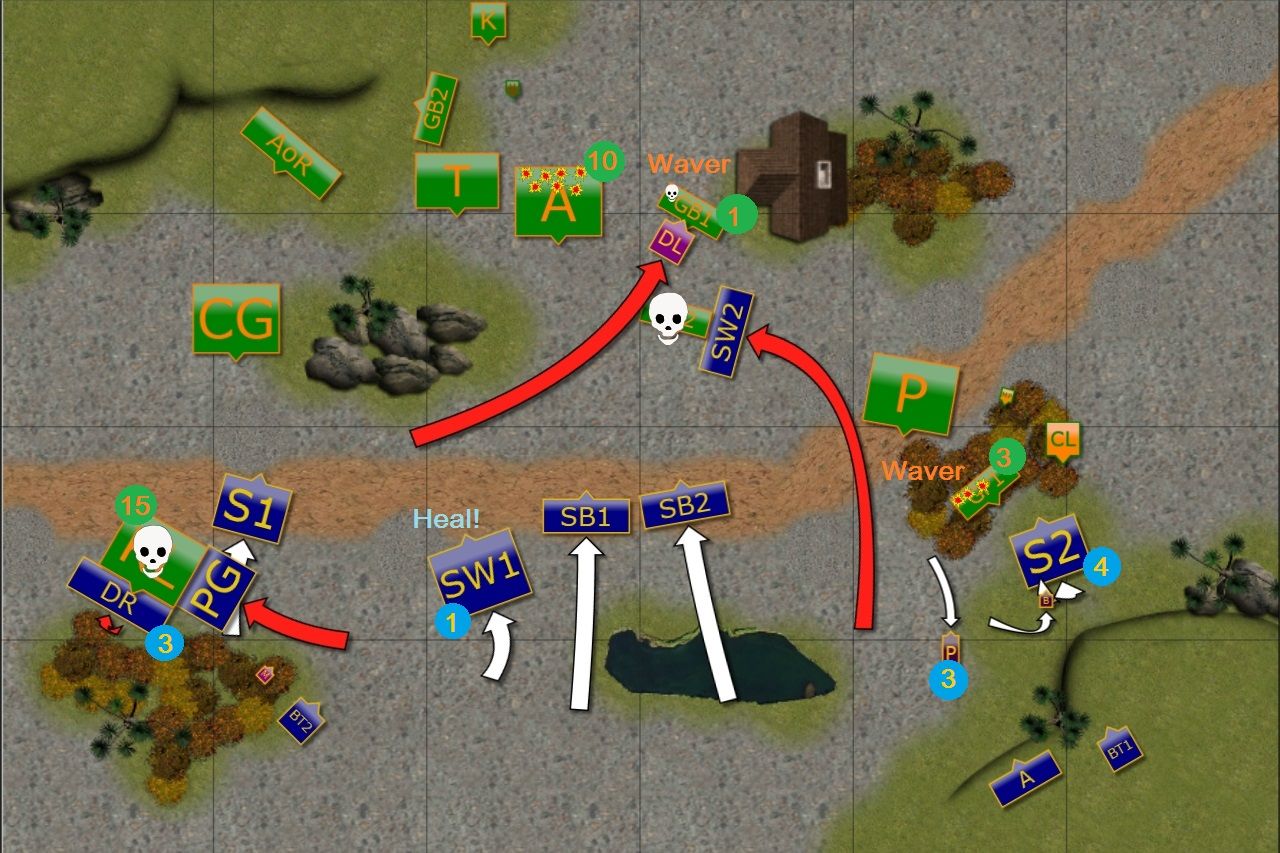 |
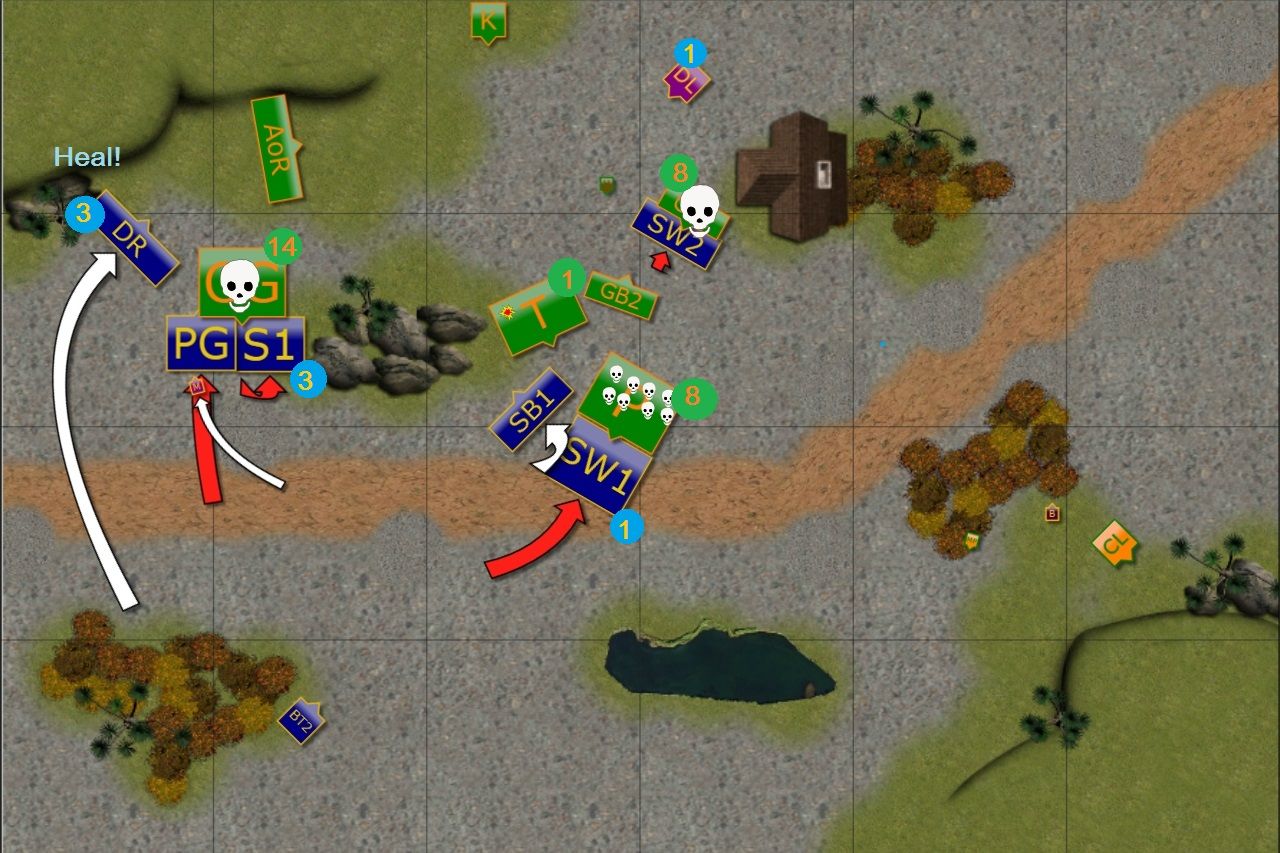
| Elves fight back! |
Drakons and nearby Palace Guard took the opportunity to eliminate dangerous enemy unit. Coordinated attack saw Lancers destroyed while Spearelves covered the combatants in the case Ceremonial Guard would want to come to aid reckless cavalry.
In the center the shooters focused fire on already damaged Ancients and they were now at the edge of extinction. Stormwind squadron saw the chance to avoid dangerous units on the Eastern flank and to get rid of small lizard at the same time and charged in without hesitation. Drakon Lord dived in too but he didn't inflict as much damage as expected. However, he wavered his chosen target so that was not too bad after all.
Finally, the units on the Eastern flank wavered yet another troops of the enemy and delayed Clan Lord a little bit.
Salamanders - Turn 3
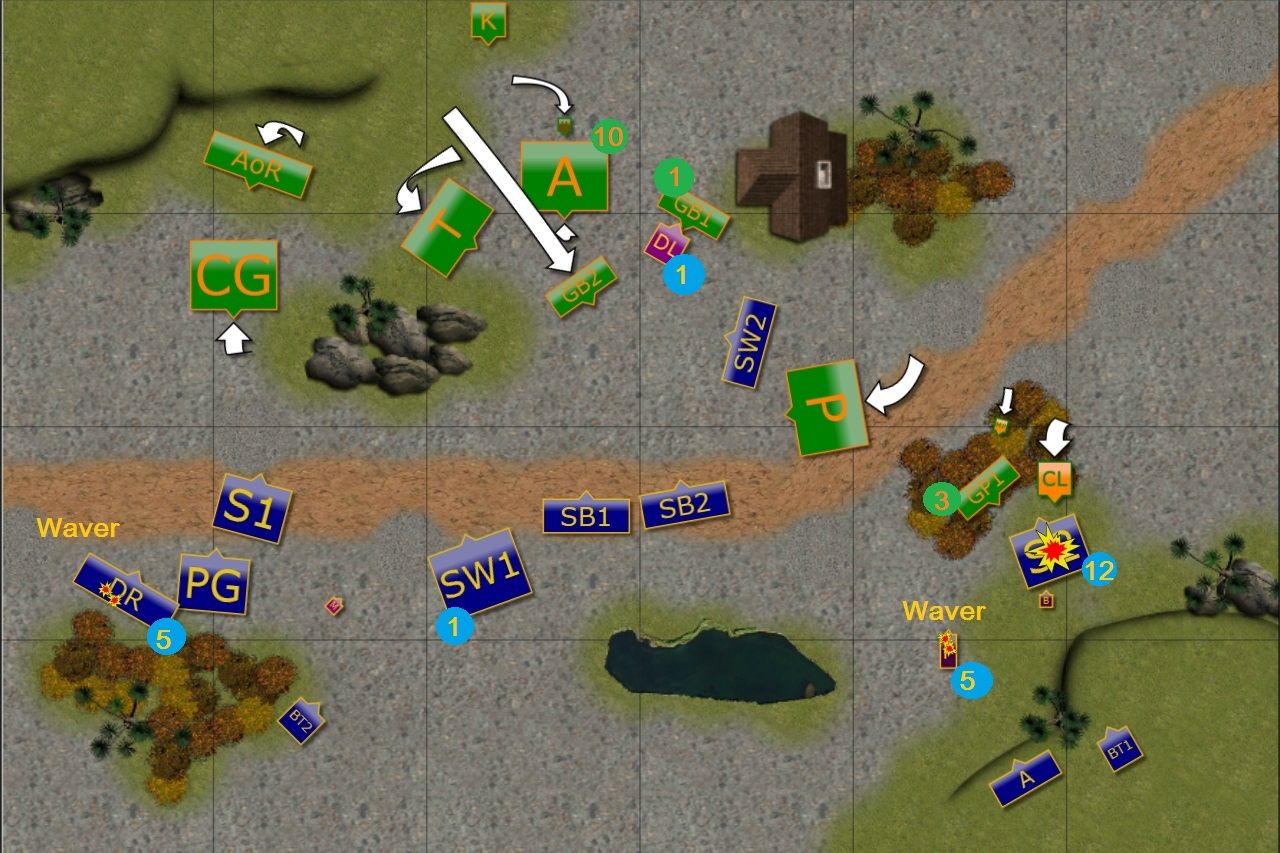 |
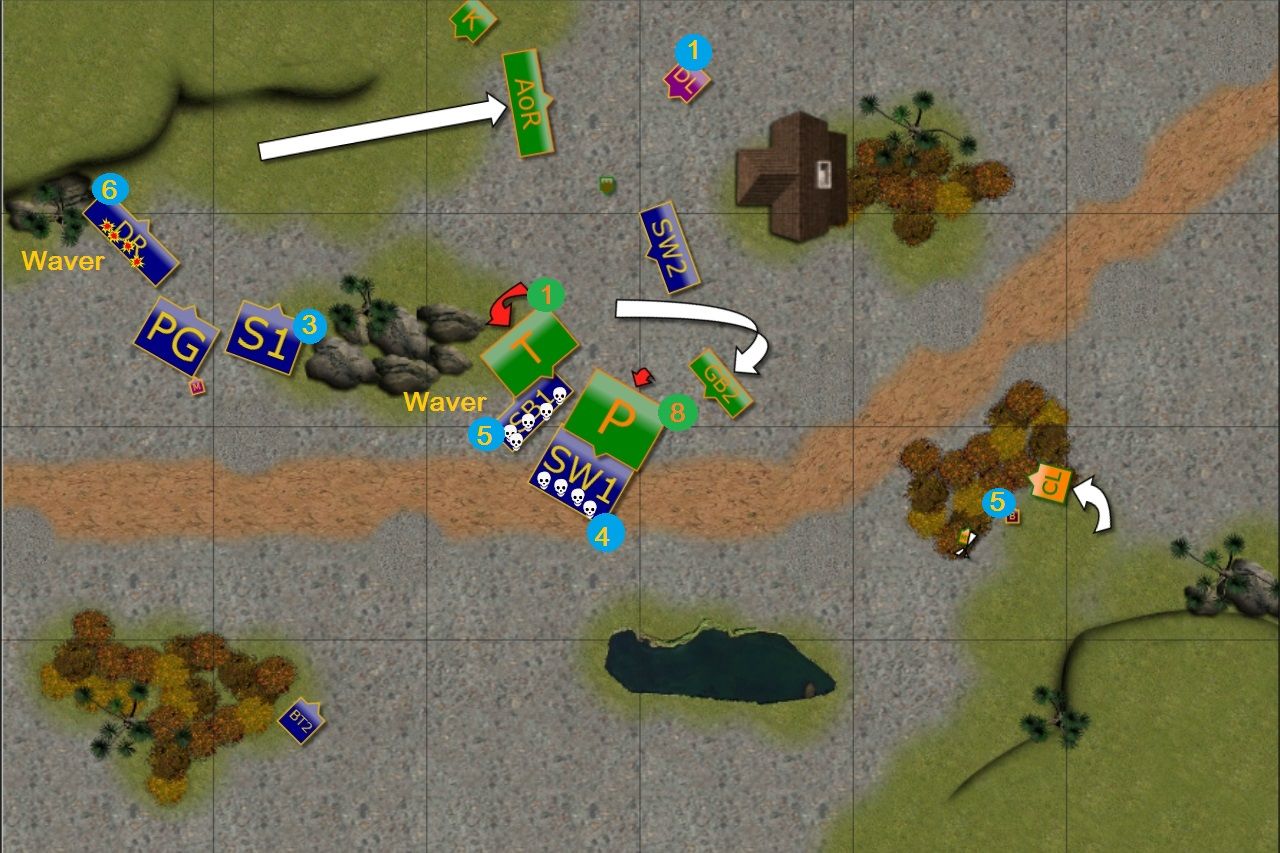
| Salamanders put their trust in ranged attacks. |
Ceremonial Guard pulled back a little not wanting to risk confrontation with three Elven units alone. Fortunately, Komodon hit the Drakon Riders again and wavered the flying cavalry.
Ghekkotas moved forward to shield badly wounded Ancients but it looked like postponing the inevitable.
On the East things look much better though as Elven Spears could not hold against storm of fire the Salmanders' leaders unleashed.
Outcasts - Turn 3
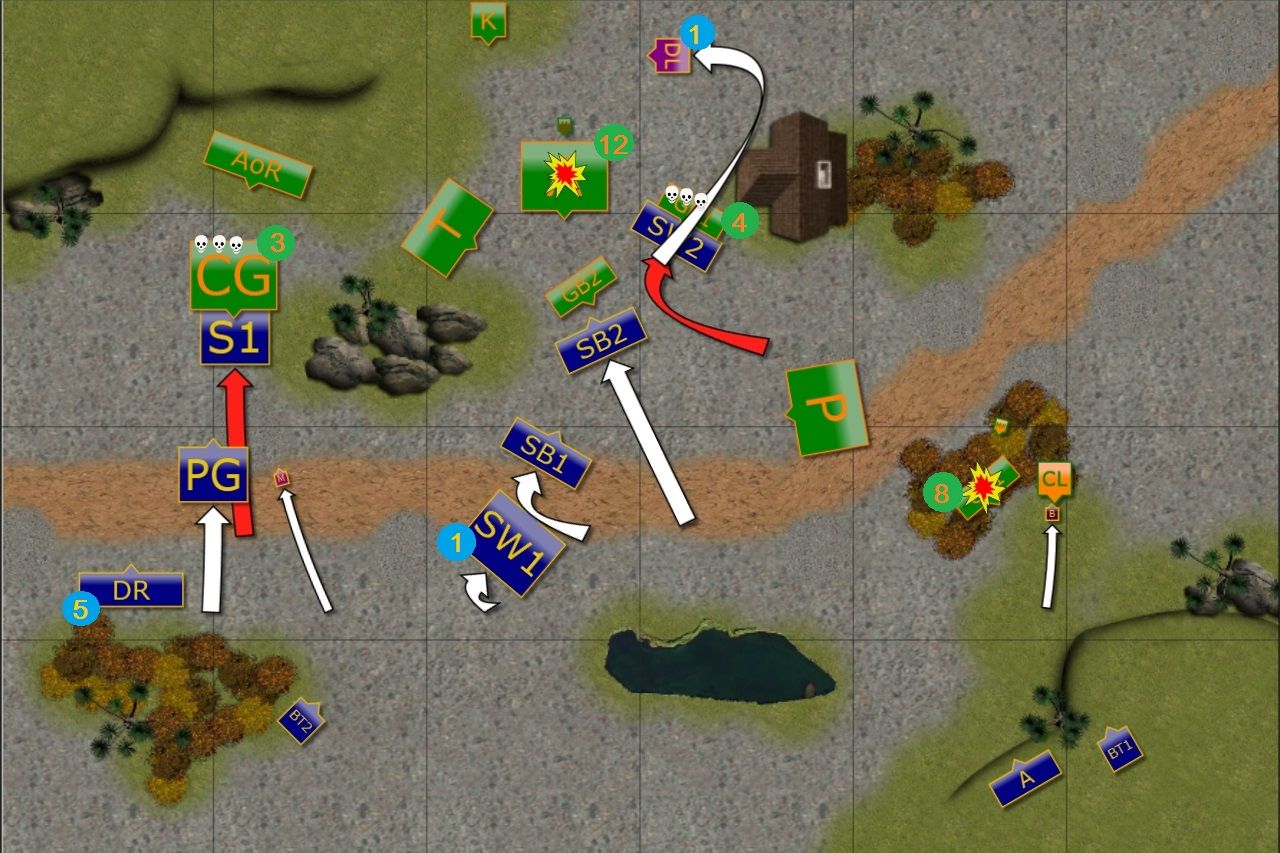 |
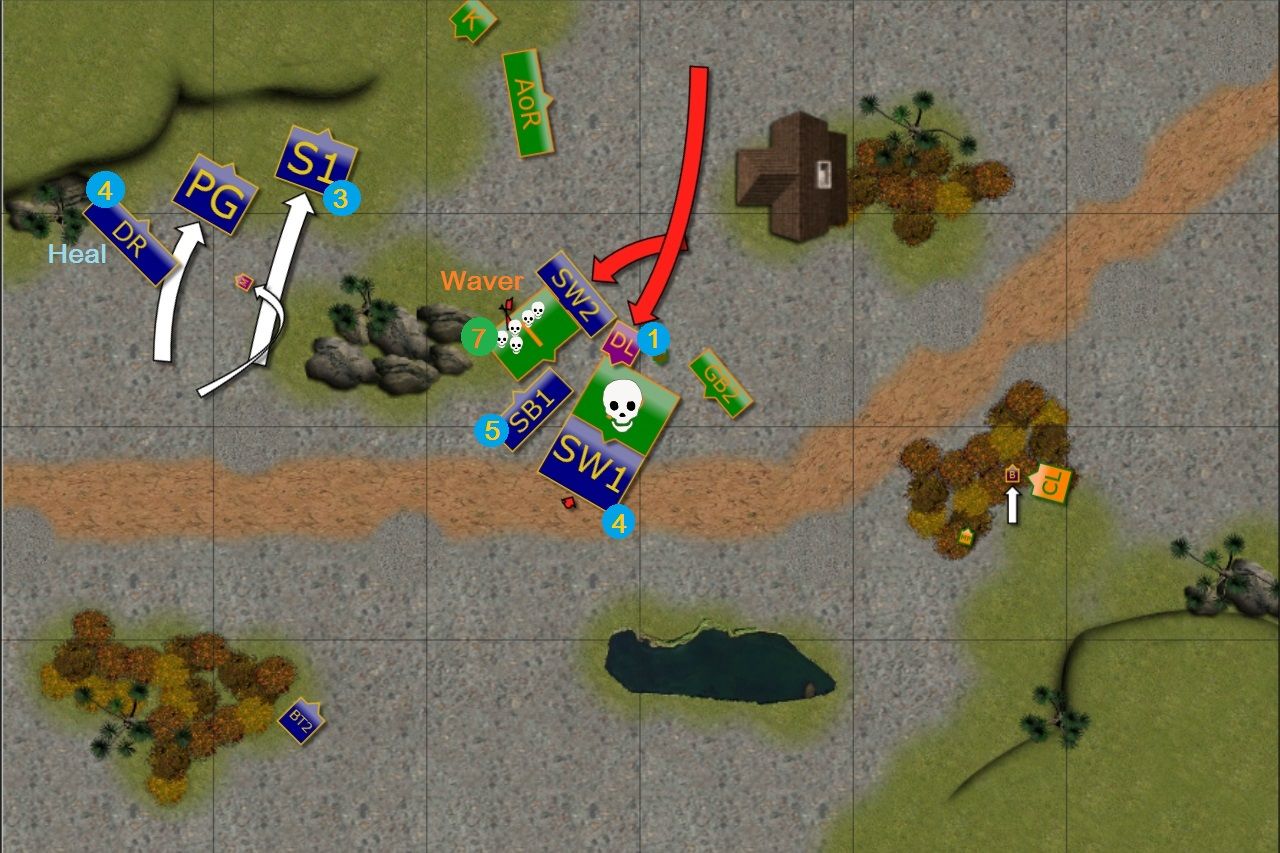
| Elves push through the center |
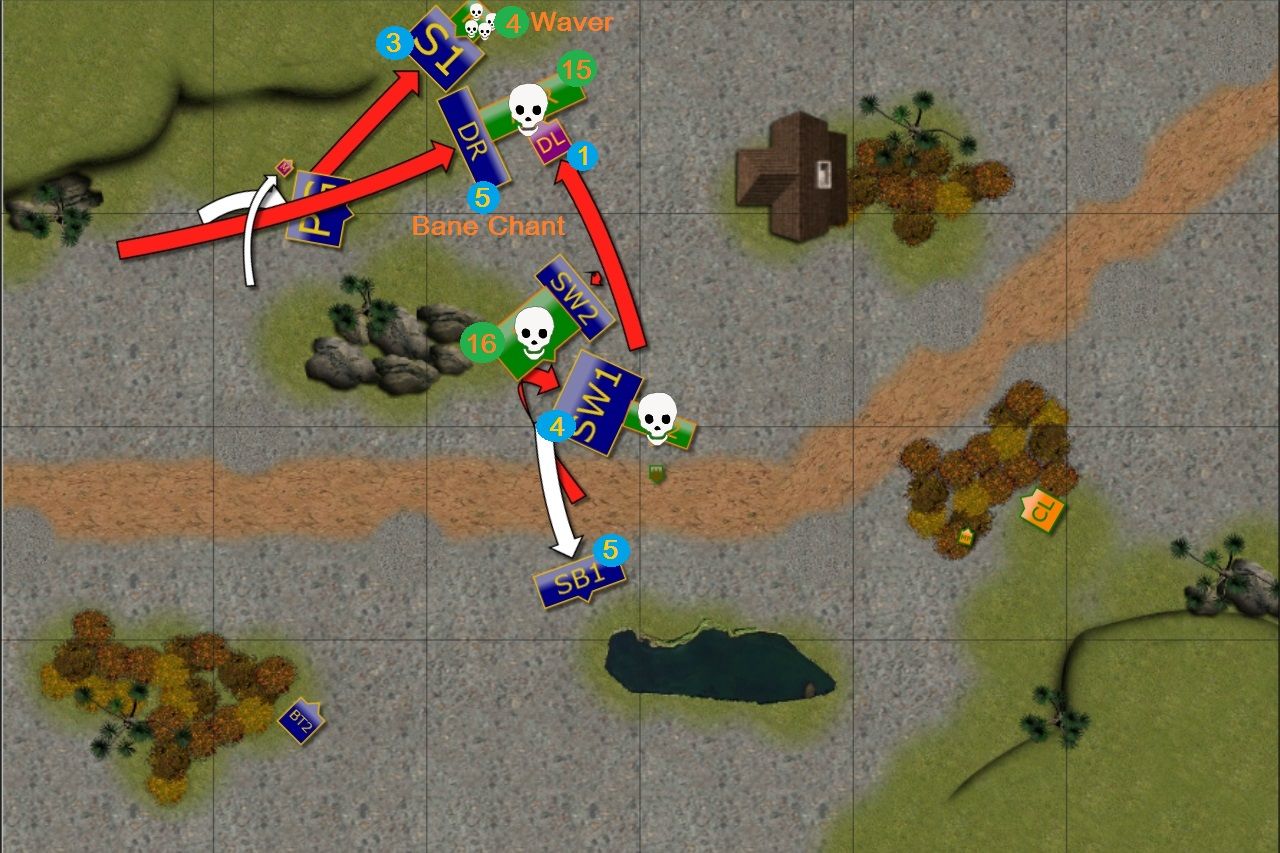
With enemy Lancers gone and infantry pulling back, Elves decided to push more aggressively on the West. The aim was to block Ceremonial Guard and Ancients behind them so that Drakes could recover and Palace Guard would be in the position to counter.
In this situation, Stormwind cavalry directed their attention to the center of the battle field. Their companions charged Ghekkotas but somehow little critters survived yet another charge! (Edit: But were wavered in the process. )
Drakon Lord flew over to distract Komodon while fast cavalry moved to the center to shoot at the wounded Ancients. They added their efforts to Bolt Throwers and together they managed to rout the regiment of Ancients but only just!
The Archers on the Eastern flank did good too and destroyed yet another unit of Ghekkotas hunters.
Salamanders - Turn 4
 |
| Salamanders don't give up the center and win on the East! |
Ceremonial Guard charged Elven spears but without reinforcements they didn't have much chance to destroy the enemy. What is more, Ancients turned away their steeds and decided to threaten Elven Lord if he charged Komodon.
In the center, poor fast cavalry earned a lot of grudges it seemed and three units attacked them from all sides.
Finally, on the far East another storm of fire routed Elven shooters from the hill. The battle was entering its decisive moments.
Outcasts - Turn 4
 |
| Elves dominate the West but the center is still contested |
Spears and Phoenix Guard both attack now and rout Ceremonial Guard. Drakon Riders cover their flank and get some healing from the Mage.
In the Center Stormwind cavalry units charge their adversaries, smaller squadron finally routes Ghekkotas but Primes hold fast. Drakon Lord decided not to attack Komodon just yet and got ready to lend his support to the fight in the middle of the battle field.
Salamanders - Turn 5
 |
| Slamanders keep fighting for the center |
Although the Western flank belonged to the Elves now, Slamanders were not making it easy for their enemies. Komodon shifted its bloated body and spit at incoming drakons, wavering them again!
In the center the fight became even more intense. Tyrants attacked blocking fast cavalry but surprisingly the Elves only wavered but didn't rout! Primes pushed hard against Stormwind but failed to hurt them enough to avoid being attacked again.
Finally, on the East lonely Elven BSB became a target for Salamanders' leaders but managed to survive this time.
Outcasts - Turn 5
 |
| Elves gain upper hand in the middle |
Elven infantry moved at a double on the Western flank to get into charge position against Komodon that avoided destruction. Drakons got healed by the Mage too.
In the center Elves charged again, seizing the opportunity to finish off Primes for good and attack an exposed flank of Tyrants who got wavered in the process! (Edit: Unfortunately, we forgot they have Fury special rule and they remained as they are for their subsequent turn :(.)
Salamanders - Turn 6
 |
| Final effort by Salamanders |
With their combat troops neutralized, Slamanders could only use ranged attacks to try and harm the Elves. However, only Elven BSB was killed this way. Komodon hit the Drakon Riders but this time they didn't care and Ghekottas failed to damage Elven Knights completely.
Outcasts - Turn 6
 |
| Final attack! |
Remaining Slamanders' units were in bad positions so Elves wasted no time to deal the killing blow. Drakons and their Lord charged the Ancients and routed them. Stormwind cavalry finished off the Tyrants too and the other regiment of Knights had no problem in destroying Ghekkotas.
Last but not least, Spearelves charged Komodon but the beast survived!
After that charge it was clear that Salamanders' army ceased to exist and Elves entered enemy territory triumphant.
Summary
 |
| Turn-by-turn animation summary |
After-battle thoughts
I would like to thank laribold for a great game and once again apologize for mistake in the army list. It was a great pleasure to play against him again and I am glad we managed to finish the battle in two installments. I definitely think we should have another rematch because I feel the need to prove that it was not a coincidence that I gained upper hand this time. Of course I am fully aware that his army is going to be even tougher to defeat but this is the only way. :)
To be honest, however, I think I got some luck in this game. For example, that silly mistake of not properly checking the distance between Drakon Riders and Lancers almost cost me the unit. Sure, it also helped me to destroy enemy cavalry but it was still grievous mistake I should not have made.
My deployment was far from perfect too. With the full benefit of hindsight I should have deployed BT1 further towards the edge and in the bottom left corner of the hill. Archers should have been behind the lake. And I should not have moved Spears towards Clan Lord so recklessly. I needed them close enough to be able to move forward if necessary but I was in the shooting range too early. Now wonder I lost that flank so quickly.
I think the fact that laribold was quite reluctant to move his center forward, as well as the fact he didn't use his Ghekkotas as living armor helped me too. I could destroy Ancients with shooting that created a gap in the line of tough infantry and managed to get rid of two support units that otherwise would have interfered with my moves.
Don't get me wrong, I am more than happy with the result and the fact I managed to rout so many tough regiments. But my moves were not smooth enough and there were moments where things could go wrong.
That exchange of punches in the middle was in particular dangerous as whoever was going to win had the path open to the enemy half as that were scenario conditions.
I wonder if I played differently if it was "just" kill scenario. I think I would probably go first instead and try to inflict some damage with the shooting. I still would try to kill enemy units although it is possible I would not approach them immediately as I had shooting superiority I could use to eliminate targets without obstructing the line of sight.
But here I had to carry the fight to the enemy to prevent it from entering my half of the table. It is quite possible then that the scenario made me take more chances than I would normally do.
I hope you enjoyed the report despite some mistakes.
Thanks for reading!
Loving the batreps. Not sure that t2 stormwind troop flank charge should have been a flank charge?
ReplyDeleteHi Jonah,
DeleteThanks! I am glad you like the report.
Thanks also for being meticulous! It seems that in creating a diagram I might have made a mistake in positioning. However, we did check during the game where the leader point of Stormind cavalry was and it happened to be in the flank of Ghekottah's troop.
Cheers!
In Turn 5, DL charged P not T in a co charge with SW2. Curious why you made that decision since SW1 might have routed P all by themselves. Given the way that the West was folding, I think AoR would have been occupied by that. Was it simply so that when you refaced, you were facing in the right direction?
ReplyDeleteHi Dan!
DeleteI decided to charge with the Drakon Lord against the Primes because my own cavalry have already lost Thunderous Charge bonus. In the previous turn they were attacked and since they suffered some damage they were disrupted. I was not sure their counter charge alone would be enough to eliminate that unit.
At the same time Tyrants were still blocked and I was losing nothing by the flank charge of Stormwind troops alone. I got good roll and destroyed that enemy too, which was great but I didn't expect that. I thought I would lose either fast or heavy cavalry troop in counter attack but with Stormwind regiment and Drakon Lord nearby I had enough resources to mount another counter punch without enemy behind my back.