
Greetings!

After first KoW game between myself and Eastern Barbarian we decided it cannot go without a re-match. It was only a matter of time. However, EB also was wondering if he should bring Orcs again or shall he try Forces of Abyss instead, that looked very interesting to him from the very beginning. It is quite typical for EB to jump into new game and tackle a few forces at the same time and he decided to give Mantic Daemons a go!
Forces of Abyss - Army List
20 Succubi, Regiment, Mace of Crushing - 195
- 10 Flamebearers, Troop - 105
- 10 Flamebearers, Troop - 105
- 10 Flamebearers, Troop - 105
- Abyssal Temptress, Hero, Bane Chant - 105
20 Succubi, Regiment - 190
- 10 Gargoyles, Troop - 80
- Chroneas, Monster - 210
10 Abyssal Horsemen, Regiment, Potion of the Caterpillar (Pathfinder) - 235
- Abyssal Champion, Hero, mounted - 155
10 Abyssal Horsemen, Regiment - 215
- Abyssal Harbinger, Hero - 60
3 Tortured Souls, Regiment - 145
Army wide rule is Fury, meaning that unit can still counter-charge even if wavered. That is a very handy and aggressive rule for sure! As usual I will try to assess the enemy units with a little bit more detail:
20 Succubi - Very fast infantry, with 25 attacks hitting on 3+ they will do some damage even to the well armored foes. At the same time they have only 3+ defense making them very vulnerable. It is mitigated by Ensnare and Stealthy special rules that apply -1 to hit penalty for melee and shooting attacks, respectively. They will be a match for any infantry I have and I expect they will want to get into combat fast, as the sooner they get in the better.
2 x 10 Flamebearers - Very interesting shooting troops. On one hand, 18 inches of the range is a little bit shorter than usual (at least I got used to 24 inches) but on the other it is balanced by Piercing (1). They are fragile, with 3+ defense but have Regeneration 5+ to help them out. I will definitely try to take them out early because I have a few fragile regiments myself and limiting enemy ranged attacks is always a good thing.
10 Gargoyles - Gargoyles are one of the irregular troops and are definitely very useful as war machines hunters. They fly which in itself is a great asset. They are fragile but also regenerate very fast. It looks like some kind of pattern for Abyss armies to be fragile but able to heal back! Another priority, in particular for shooters, as they cannot be allowed to move behind my lines as that can be dangerous even for well armored units.
Chroneas - Chroneas was so good that recent rules state that it is one choice unit per army only. It is tough, with a very good nerve and massive 20 breath attacks that are also Piercing (1). That sounds like a death sentence for many units that go nearby. Fortunately, it is only movement 5 so effective range is 17 inches. Possible to avoid for a turn or two but then the armies need to get into combats. And that is when Chroneas can also be very dangerous as it can simply pick up damaged units to finish it off. What is more it cannot be Disordered so even if you damage it in melee it can shoot at you next. Quite important as it cannot fight at all. I would need dedicated melee units to fight it and I expect I will suffer from its breath attacks anyway.
2 x 10 Abyssal Horsemen - heavy cavalry but slightly better, in my opinion, than typical knights since they have Crushing Strength(1) and Thunderous Charge(1). It means they still hit hard even if hindered. One of the units has Pathfinder anyway but the tactics where the Knights are charged to strip them off TC is not as efficient here. They are slightly slower though so that could be the edge I could use against them. And of course Bolt Throwers help :)
3 Tortured Souls - another intriguing unit that is not simple equivalent of what I have in the army (such as knights vs horsemen). They are very fast in charge but can't move at a double due to Shambling. They have good nerve and cannot be wavered at all. Average defense but life leech that will help them heal. Also, Crushing Strength(2) on a flying unit is a big advantage. I would need to be very careful with them as I cannot allow any flank charges for them. It will be a little more difficult for them to get behind my lines without the ability to move at a double but they are still quite maneuverable.
6 Molochs - Molochs look like the toughest enemy unit for me. They are a steamroller. 24 attack with CS(2) and Brutal may rout many enemies on the charge. At least they have defense 4+ and movement 5. Slower enemy is easier to outmaneuver and with defense 4+ my own heavy hitters can actually do quite some damage too. Hopefully, I will be able to hit them first and hard enough to eliminate the danger.
Characters - there are 3 characters in the army. Champion and Harbinger provide sources of inspire while Temptress adds a little bit of magic. Champion is also fast and hits reasonably hard for a character. It can easily get my flanks or even charge the shooters to disorder them.
In general, I faced the army with similar amount of elements, with some fast and hard hitting units too. There is a shooting support but I think my army has an advantage here. Forces of Abyss might be a little bit slower if you compare the units of the same category but I think more of them hit harder than the Elven counterparts.
Here is the army I used for this game (I used the same force I have been using for a few recent games):
Outcasts - Army List
10 Stormwind, Regiment, Potion of the Caterpillar (Pathfinder) - 235
- 5 Silverbreeze, Troop - 145
- 5 Silverbreeze, Troop - 145
- Drakon Rider Lord, Hero, Large Cavalry - 160
3 Drakon Riders, Regiment - 175
- 5 Stormwind, Troops - 140
- Bolt Thrower, War Machine - 90
20 Palace Guard, Regiment - 150
- 10 Archers - 115
- 10 Archers - 115
- Bolt Thrower, War Machine - 90
20 Spearelves, Regiment - 140
- Elven Mage, Inspire, Bane Chant - 110
20 Spearelves, Regiment - 140
- Battle Standard Bearer, Hero - 50
As it worked in previous battles, I wanted to use my shooting to eliminate enemy support (shooting and flying) to get advantage in the movement phase. I think I would benefit in not committing to melee in the form of frontal charges unless able to bring two units against one and when the target is lightly armored or damaged already. I was very curious and excited about this game because I think the armies are evenly matched with particular strengths and weaknesses that should make the difference in the end result.
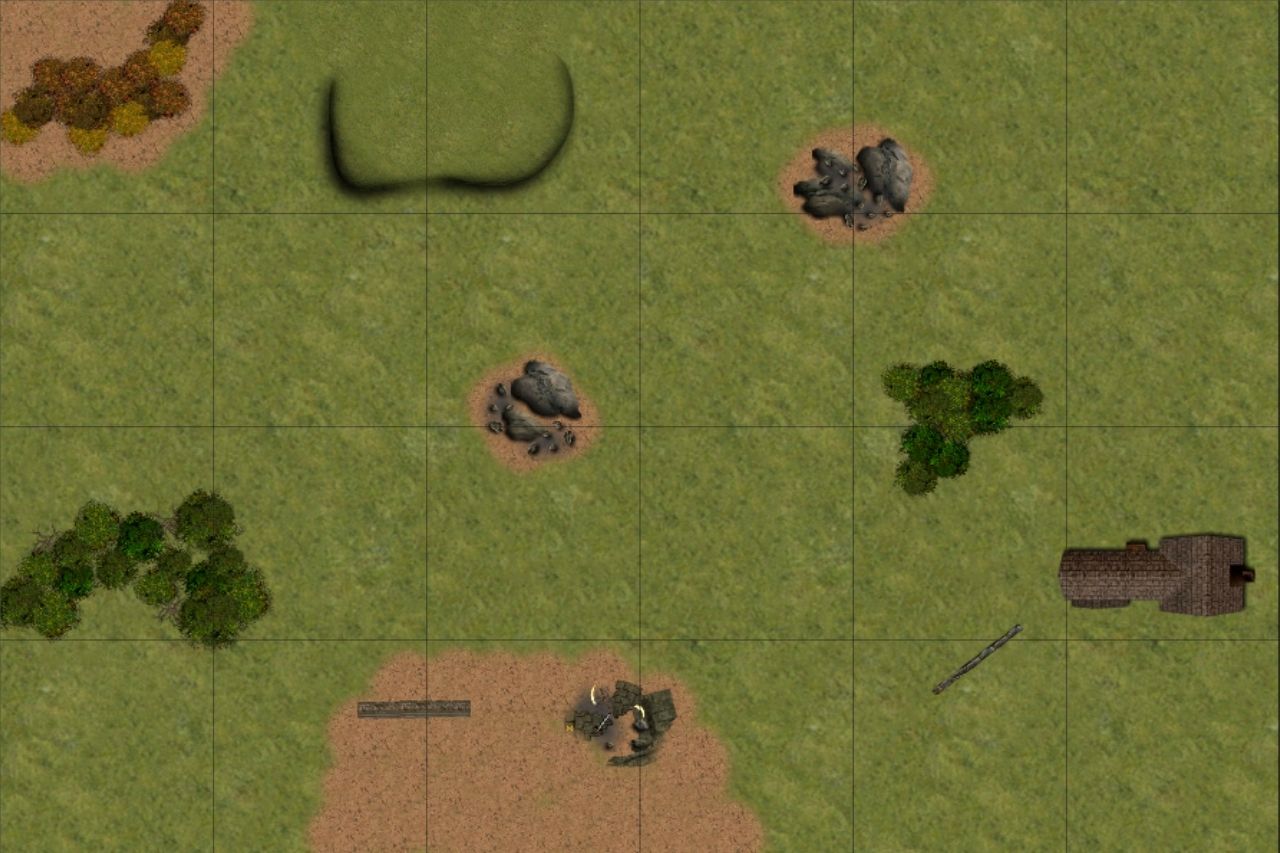
Terrain
 |
| Terrain |
We used the following heights for respective terrain pieces:
Hill - 2
Forests - 4
Rocks - blocking, 2
Walls - obstacles, 1
Ruins - difficult, 0
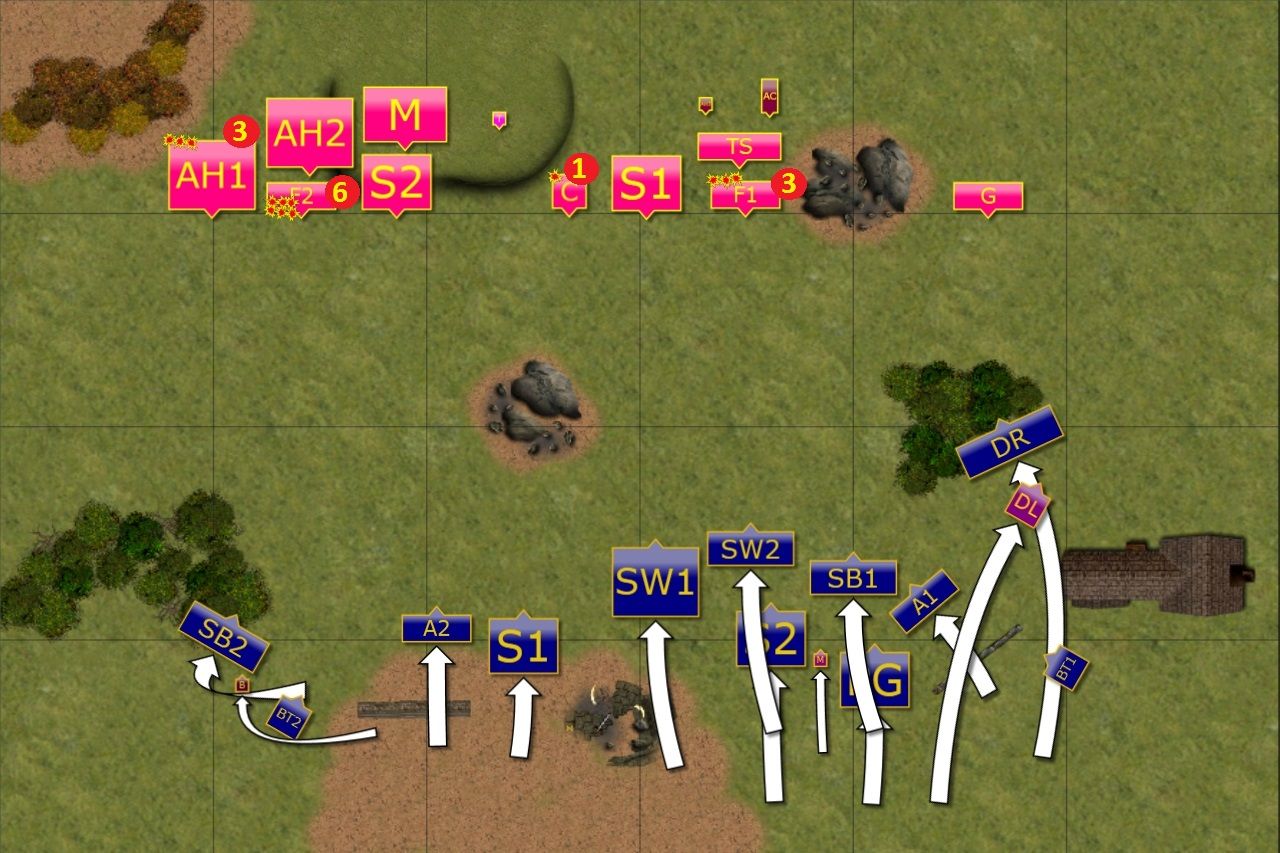
Deployment
 |
| Deployment Order |
Deployment Order:
1. Flamebearers (F1) - Archers (A1)
2. Gargoyles - Silver Breeze (SB1)
3. Flamebearers (F2) - Archers (A2)
4. Tortured Souls - Silver Breeze (SB2)
5. Abyssal Champion - Bolt Thrower (BT1)
6. Abyssal Horsemen (AH1) - Bolt Thrower (BT2)
7. Succubi (S1) - Spearelves (S1)
8. Abyssal Horsemen (AH2) - Storm Wind (SW2)
9. Succubi (S2) - Spearelves (S2)
10. Chroneas - Palace Guard
11. Temptress - BSB
12. Harbinger - Mage
13. Molochs - Rest of the Army
 |
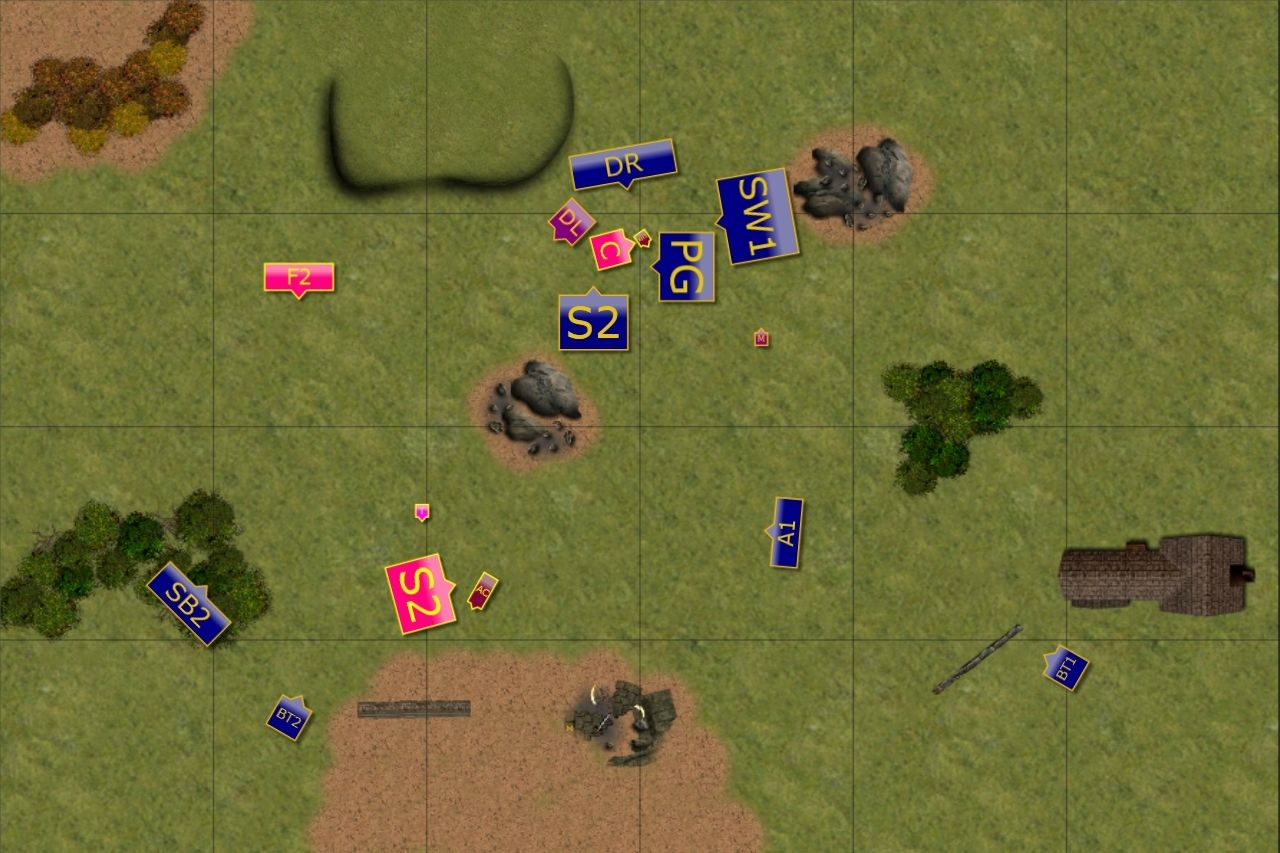
| Final Deployment |
Deployment phase is always very interesting and tricky one. I have found that I tend to come up with some frame for a plan when I see the enemy army and the terrain but then during the deployment process it still goes through many iterations and changes. Not sure if it is good or bad :)
The initial plan was that I wanted to use middle rocks to my advantage. I knew it would divide our forces in two. So the first idea was to try and have overwhelming force on one half and enough resources on the other to successfully delay the enemy. I thought I would go with heavy cavalry on the left flank but when EB deployed his own horsemen there it didn't look that easy. I may have extra charge range but I didn't want to create kind of stalemate and be slowed down just because two cavalry forces would be too cautious.
Then I decided it actually creates an opportunity to carry on with the plan, just with different execution. Instead of positioning the cavalry on the flank I went to the center because that allowed me to still threaten the forces on the left. At the same time I could use sheer speed to attack slower half on the right and maybe even get the fliers to flank/rear charges.
The question was, would EB press forward on the left and if yes, would the small forces there be enough to slow him down.
Only one way to find out! :)
I won the roll off and took the first turn.
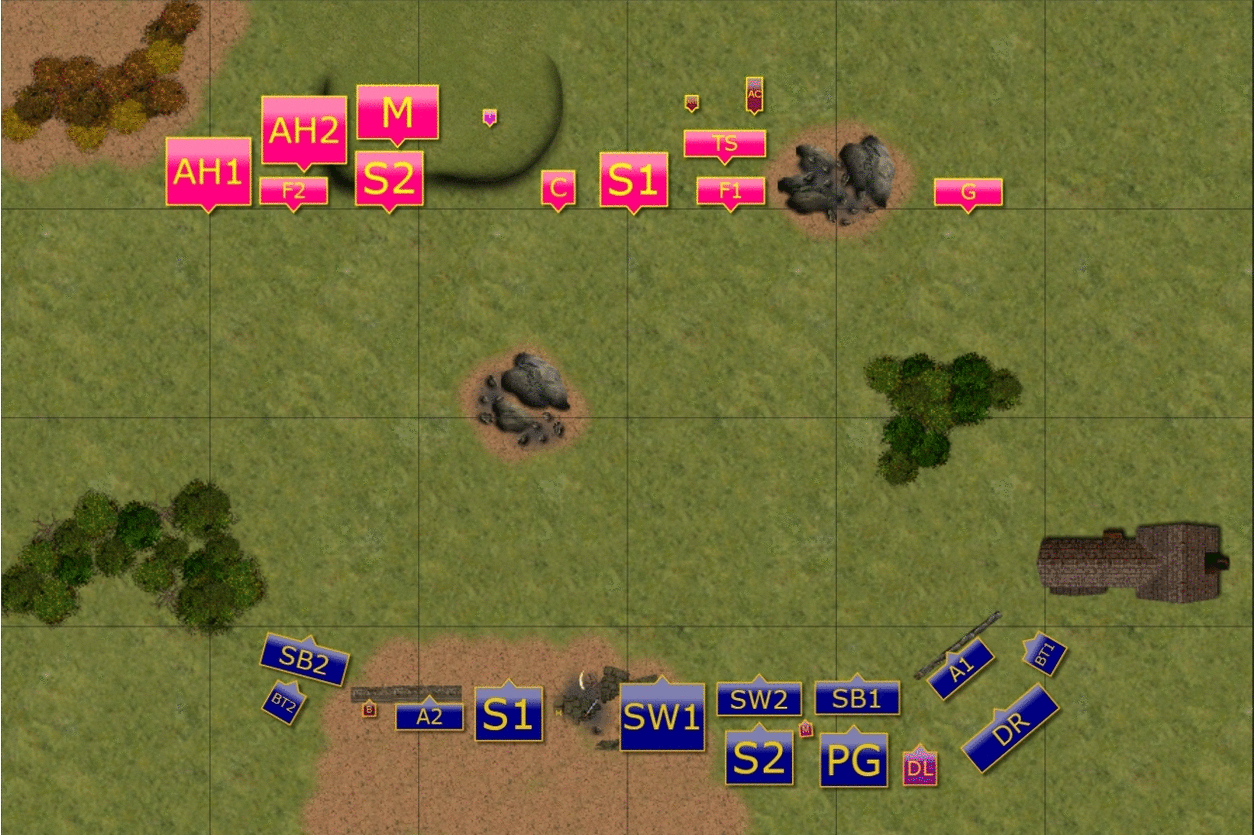
Outcasts - Turn 1
 |
| Advance! |
Elves moved forward across entire battle line. On the left, the units advanced to get into the range of the enemy and let lose. They inflicted some damage and wavered the flame bearing daemons.
On the right the advance was a little bit more aggressive, with cavalry units moving to have their foes in the charge range that would force them to either move away and give up the terrain or move forward to meet the thunderous charge head on.
Forces of Abyss - Turn 1
 | |
| Abyssal Horsemen gallop forward! |
Daemonic horsemen didn't wait and galloped forward towards the few weak looking shooters of the Elven army. Only Molochs turned towards the center to support the other flank while nearby Chroneas moved towards Elven knights, tempting them to attack.
Gargoyles spotted a safe landing zone on the extreme flank and swooped past Drakons.
Outcasts - Turn 2
 |
| Preemptive strikes |
Elves decided to slow down enemy advance with some charges that didn't have a chance to rout the enemy but ensured the foes would have to stop to counter attack.
The forces on the right continued outflanking while the shooters aimed at their chosen targets. On the Eastern front, Archers pivoted and shot at gargoyles and were lucky to banish the flying daemons to the abyss they came from. Nearby fast cavalry silenced Flamebearers too if only for a while.
Then on the left flank, combined effort of the fast cavalry, archers and both bolt throwers inflicted a serious damage on one of the horsemen regiments and the survivors fled to safety!
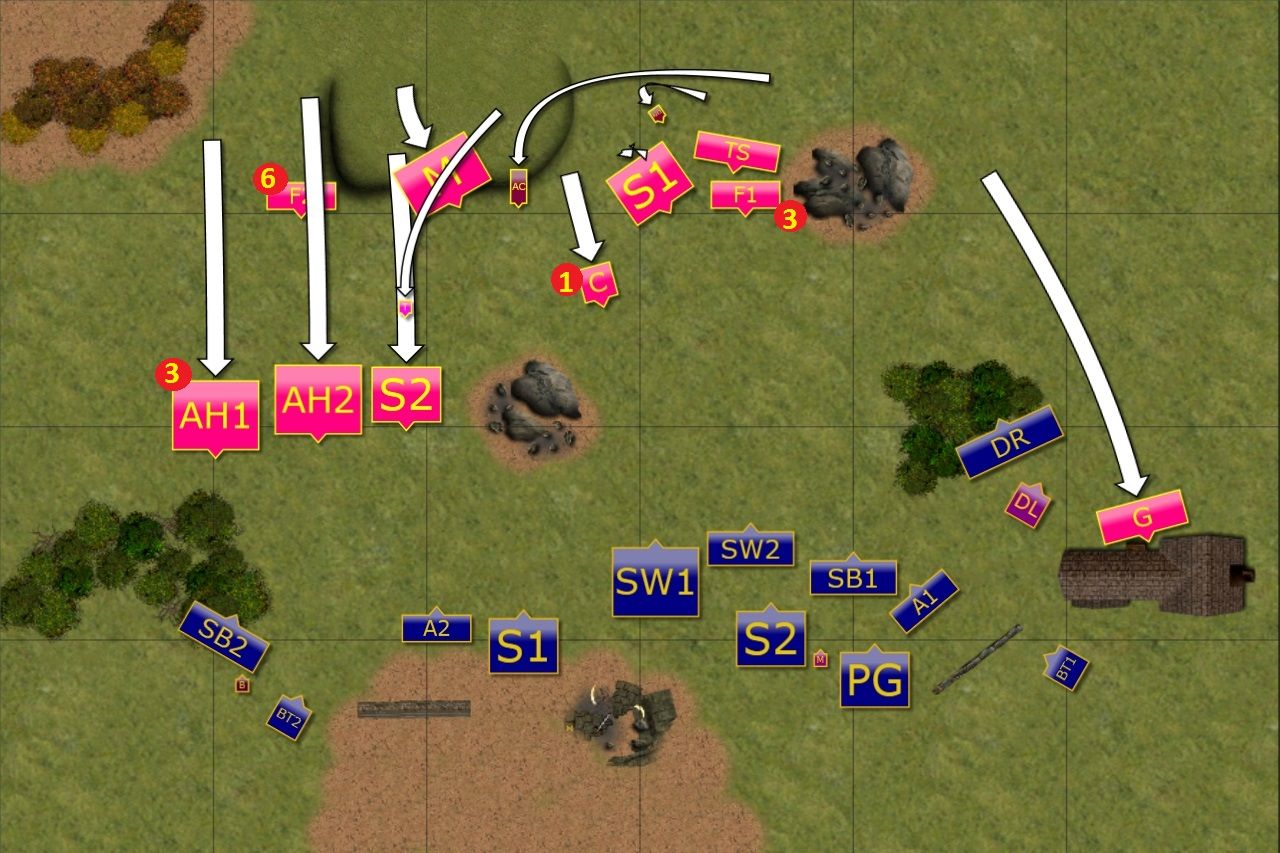
Forces of Abyss - Turn 2
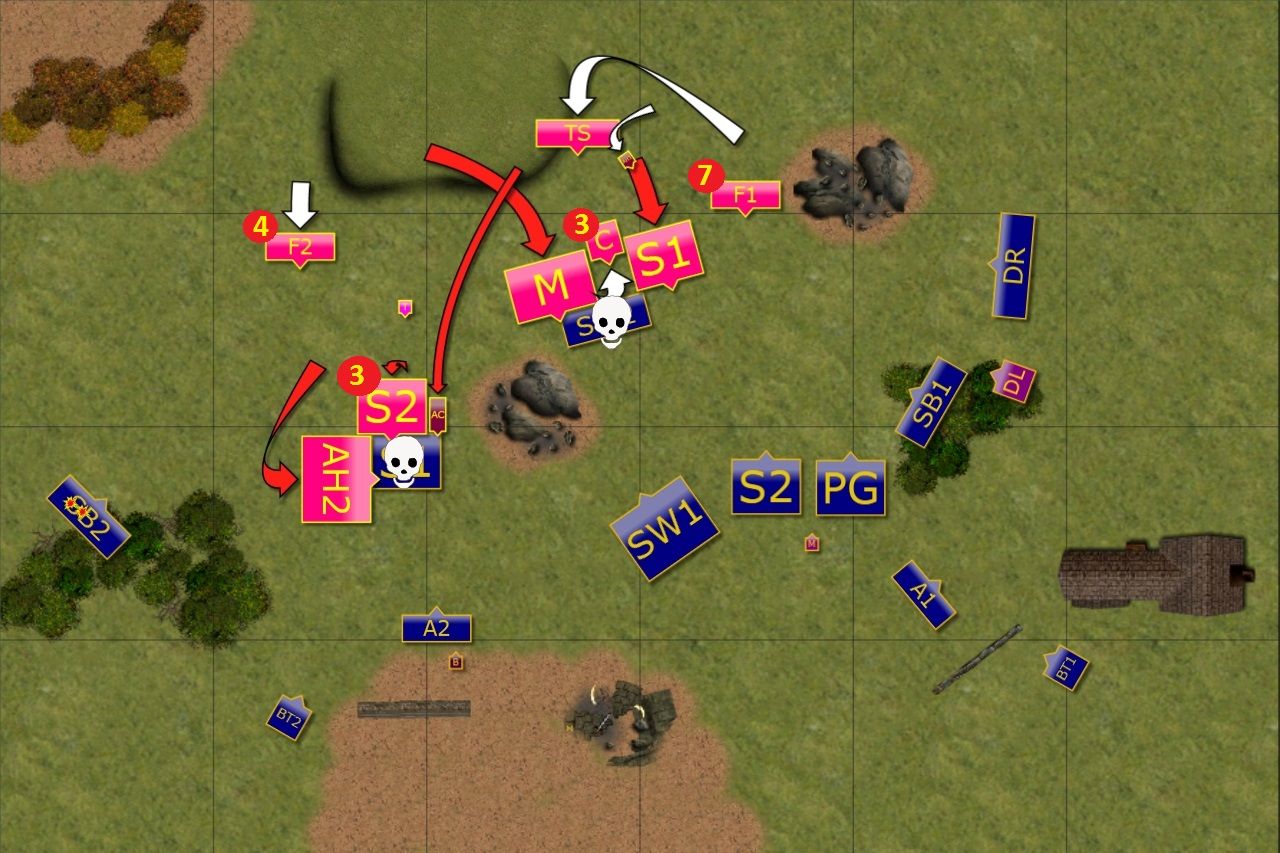 |
| Counter-Charge! |
Forces of Abyss counter attacked and isolated Elven units stood no chance. However, their noble sacrifices would be avenged. At least that was the plan of the Elven commanders.
The shooters were quite limited in what they could do as only left Flamebearers had a good target. However, Elven fast cavalry was not impressed.
Outcasts - Turn 3
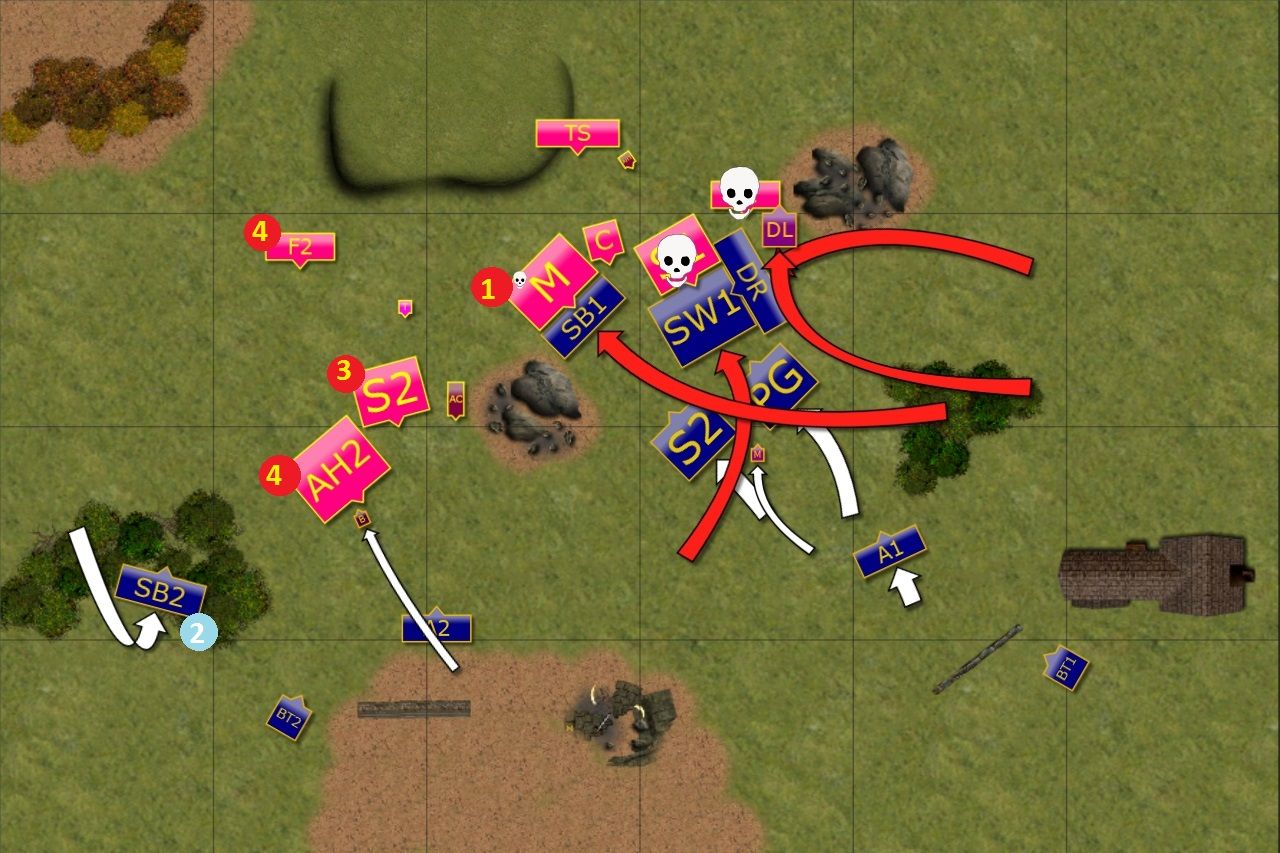 |
| First wave attacks on the right! |
With some of the faster elements on the left flank in no position to aid their right, Elves decided on the charge in strength.
Fast cavalry distracted Molochs so that they would not be able to attack exposed flank of the knights. Storm Wind cavalry and Drakons charged Succubi that overextended in their previous attack and could not prevent being flanked by one or the other and were smashed by heavy hitters.
Drakon Lord finished off nearby Flamebearers and Elven units reformed to brace for impact. It was clear the Forces of Abyss would counter immediately and second wave of Elven army was ready to support too.
In the meantime, the shooters tried to repeat the fit and targeted enemy horsemen but this time damage was not as impressive. Thanks to another noble sacrifice, however, they will have one more chance to do so.
Forces of Abyss - Turn 3
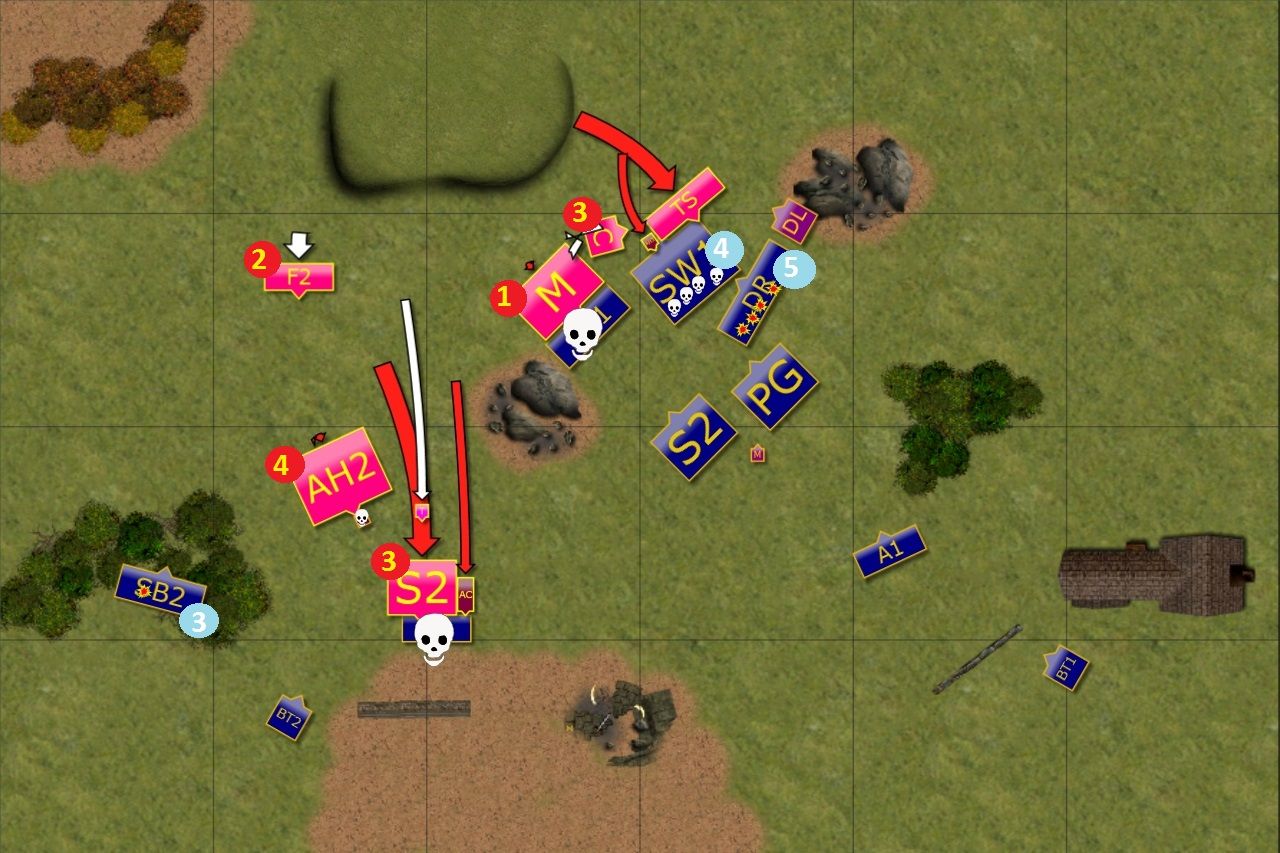 |
| Forces of Abyss stopped! |
Forces of Abyss pressed forward once more. On the left, Archers were positioned a little bit too much forward and paid ultimate price for their mistake. Noble BSB died and saved only Bolt Thrower crew from certain death.
On the right Molochs and Tortured Souls attacked Elven cavalry but while Silver Breeze was not a problem for Molochs, heavy armored knights didn't care much. Finally, Chroneas tried to rout Drakon Riders but they refused to do so despite significant damage.
Outcasts - Turn 4
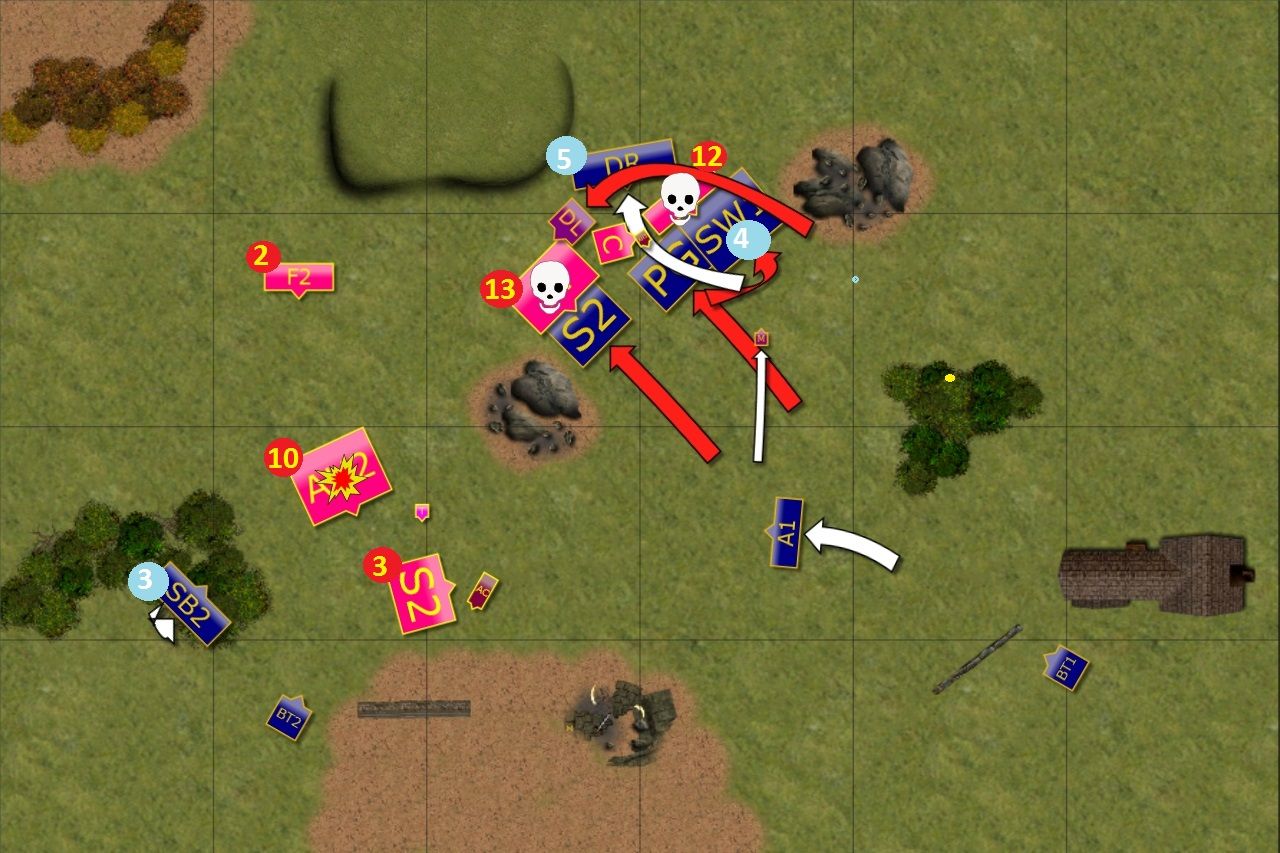 |
| Another heavy blow! |
With the momentum of the Forces of Abyss attack slowed down it was time to seize the opportunity to strike a killing blow.
Storm Wind cavalry, despite broken lances, charged in and made room for Palace Guard to team up against Tortured Souls. Daemons suffered heavy casualties and could not hold against such a powerful attack.
Drakon Riders flew over the heads of the combatants and landed behind the enemy lines to attack from the rear. But Drakon Lord and Spearelves didn't need any help. Surprisingly, their charge was powerful enough to rout Molochs anyway. All that despite the lack of magical support as the mage could not get his spells through.
The swift attack of Succubi on the left exposed the nearby horsemen who once again were a target for the shooters. Fast cavalry and both bolt throwers hit home and second regiment of horsemen routed, with their general a little bit too far away to make them hold the line.
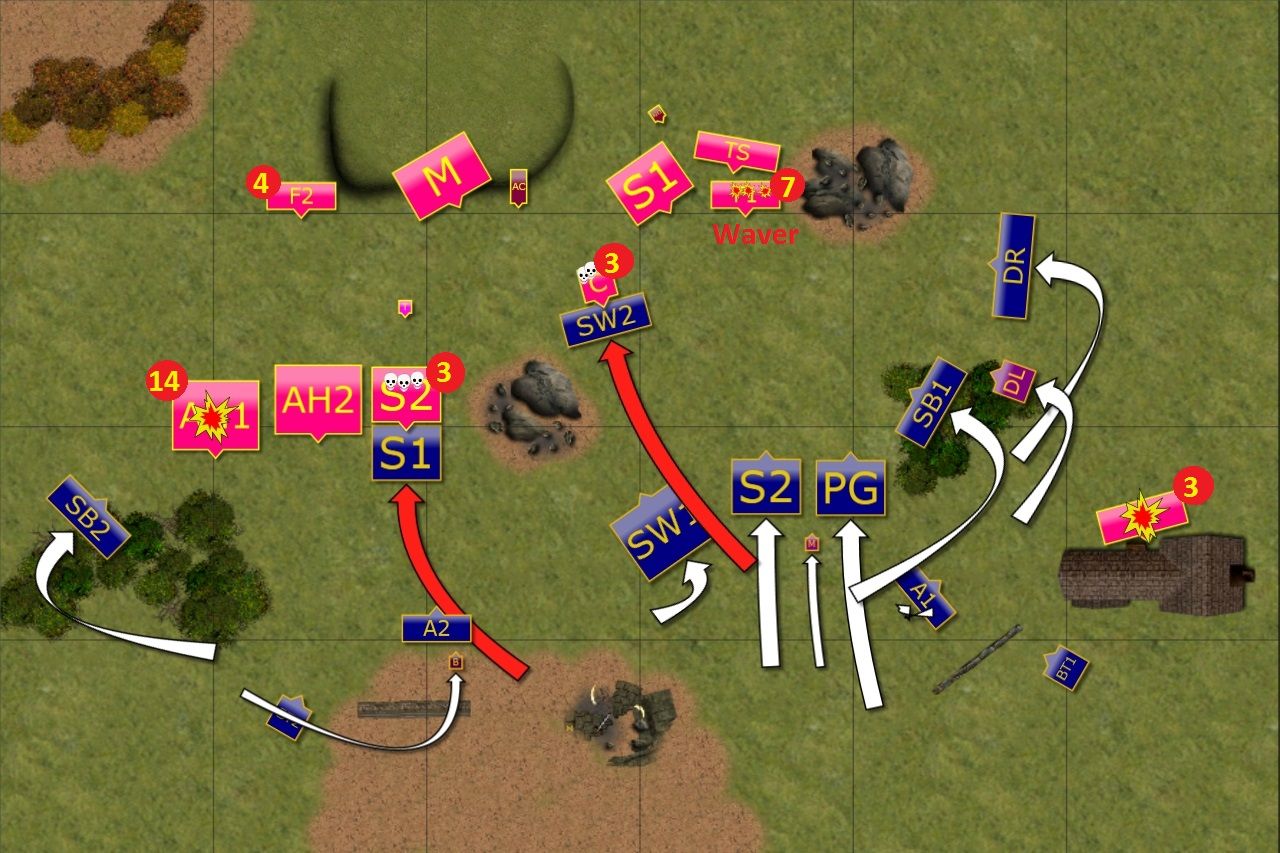
Forces of Abyss - Turn 4
 |
| Situation at the beginning of a turn 4 |
At this stage EB decided to call it as he was left with only a few isolated elements. I expect he would get my Bolt Thrower with his general easy, possibly fast cavalry with flamerbearers and wounded drakon riders looked like a prime target for Chroneas.
But it was clear I could still mount a few powerful attacks to seal the deal and keep the advantage. I was surprised the game was over so quickly as I didn't expect it to be so brutal and so decisive at all.
Summary
 |
| Turn by turn animation summary |
After-battle thoughts
First of all I would like to thank EB for a game. I know it was not easy and I am myself surprised how efficient my own army was. We talked about the battle just after it and the first impression was not good. It didn't look, at first glance, that EB made any glaring mistakes and that his army is weak. It was not good then because it was hard to learn from the defeat and get better next time. However, I hope I can provide some further comments I formulated while writing a report. As many times before, I could see, I think, options that were missed during the game.
Let's start with the deployment. The fact there were two regiments of cavalry one one flank is not a mistake. However, we both noticed that the fact they were facing directly South limited their movement because EB wanted to move them a little bit towards the center. That, however, meant pivoting and no "at a double" order. Second, his Champion started the game a little bit too far away from them. I think these three at least should have formed a team and stay together.
I have also observed from my own games that it might be good idea to shield troop type of the units at the very start since they have low nerve value. Even with inspire they still can be wavered and kind of useless, in particular when have shooting abilities. I think then, that very fragile Flamebearers should have started in a second line, despite the fact their shorter range might force them to deploy closer to the enemy. It might be better though to have them move at a double behind the other units first and stay healthy for shooting later on.
I wonder if caution on right flank was not required. My cavalry was at maximum range so a little pull back would force me to move forward only and buy more time for the horsemen on the left. I understand why Chroneas moved forward too but again, I think it would be more valuable as kind of reserve floating around and threaten backyard, in particular if drakons were about to land there.
I admit the shooting was very efficient. Of course I would like to point out that it took several units shooting at a single target for two turns to be able to rout them. But it is still impressive to rout two heavy cavalry units with shooting alone.
I didn't miss with Bolt Throwers much this game and when I multiplied the number of hits I usually got around 4 total. But when I looked at the game again, I think a few factors helped me here.
First, BT1 had a clear line of sight to the horsemen when an inch back would probable mean some cover. I would need to check the exact rolls but it is always good idea to get any cover from any source. Second, while they got a lot of damage having inspiring champion nearby would still increase the chances of both regiments to survive.
Next, I think that charging Spearelves with Horsemen and Succubi was overkill. I think it was possible to tie Spearelves in combat with Succubi, who might have done the job in a single turn anyway. And charge Bolt Thrower or Archers with them instead. That immediately limits the number of shots received and nets some points in the process. Finally, the proximity of mounted champion would allow to attack Bolt Thrower and Archers at the same time, effectively overrunning that flank.
Now I had a look at these massive combats on the right flank. First, apart from the fact that Chroneas should have stayed as a reserve and scare away fliers from landing behind the lines, I think there was no need to Molochs and Succubi to charge against Storm Wind troops together. Molochs would do the job alone perfectly. But Succubi exposed the flank to the Drakons or Heavy Cavalry, no matter how they reformed. I think that instead they could again pull back a little or at least offer only front as that might prove problematic for alignment of the attackers.
Then the reform of the Molochs left that space for Drakon Lord to flank charge them. He was responsible for something like 9 damage points! If only they shifted a little they would have been safe. I would have charged them with Spears anyway, to block them and help winning against Tortured Souls but then I would have been sacrificing another unit.
All these situations helped me to achieve the victory. Some of them seem to me now that type of details that simply come from experience, even a few more games should be sufficient to get that feel of how you can move and what are the consequences. Despite some devastating charges, this time that area of flank exposure was small. So I think a little more attention in the future would prevent that entirely.
I am glad that EB already is plotting a revenge and he has already told me about some tweaks to the army list he plans to use next time. While I think army list building is something that always can be addressed, at this very early stage it is probably more about getting units you are simply comfortable with.
As always, thanks for reading and if you liked the report, please leave a comment or two!
Cheers!
Hello,
ReplyDeleteI really like your battle report, really clear. I might give KoW a go too, I am still sad they killed Fantasy and in my sadness, I sold everything I had. I might start a new army for KoW.
Now, I have a question for you. What is the new program you are using for your battle report. Before I can see it was Battle Chronicler, but for this one (and the ones after) it doesn't look like it.
Thanks
Hi frenchi!
DeleteThanks a lot! I am glad you like the report. Also sorry to hear you sold all you had for Fantasy but it is very understandable. Hopefully, there will be a fresh start for you and you will also explore possibilities other manufacturers offer in terms of miniatures.
I am still using Battle Chronicler! As we play online on Universal Battle, I simply imported a map we used for our games into BC and use it as another background. Thanks to that I have all the details as they were in the game!
Cheers!