
 Greetings!
I have finally had a chance for another game in KoW. It happened that it was a re-match against Loriel and his Empire of Dust. Both of us are trying to find our ways in the new system, hence new armies in comparison to what we had last time.
Cursed Kings - Army List
40 Revenants, Horde, Cascet of the Damned - 210
- Idol of Shobik, Monster - 350
6 Enslaved Giants Archers, Horde - 245
- Cursed High Priest, Hero, Surge (10), Heal (4) - 135
- Soul Snare, War Engine, Lightning Bolt (5), Heal (3) - 110
- Bone Giant - 190
6 Enslaved Giants Archers, Horde - 245
- Cursed High Priest, Hero, Surge (10), Heal (4) - 135
- Monolith - 80
- Bone Giant - 190
3 Swarms, Regiment - 65
3 Swarms, Regiment - 65
3 Scavengers, Regiment - 90
Because it is a new game for me I am going to give some description of each entry just to try and get familiar with the enemy. If you are more experienced player you might want to skip that part or see if I assess these elements properly. :)40 Revenants - one of the mainstay regiments of this army for sure. The have the highest nerve value, -/24, meaning they are the toughest nut to crack, at least on paper. They have good defense of 5, hit on 4+ in melee with 25 attacks. These guys look like elite infantry and are dangerous opponent. Their potential disadvantage lies in the fact that they have wide frontage so that the can receive the charge of several units at the same time.
They also benefit from the casket of the damned. It is a unit upgrade that allows adding 5 dice to Surge spell directed at this unit once per game. As High Priests have Surge (10) it means that once per game the unit can move 5 inches and then use 15 dice to cast Surge, with every 4+ the unit moves further inch. So in theory it can move up to 15 inches in the shooting phase only and up to 20 if the spell is cast only once.
Idol of Shobik - he is some kind of special character for the army and he is tough. First of all his defense is 6. He is medium fast with 7 inches of movement but Inspires units in 9 inches instead of 6, has crushing strength (4) so he will do damage to any of my units on 2+. He has massive 10 attacks in his own and nerve -/18. He can heal with 6 dice and provides Iron Resolve to units in 6 inches. It means that if the unit is Steady as a result of the nerve test it can regain 1 point of damage.
As you can see he is extremely versatile character, being able to provide all kind of support but also tough to rout and being able to deal a lot of damage all by himself.
6 Enslaved Giants - there are 2 hordes of these powerful constructs. They are two other mainstay units of the army and also main shooting providers. Their giant crossbows have 36 inches range what means it is very hard to deploy anything outside of their attention if they are positioned on the edge of the deployment. They might hit on 5+ only but they have 18 attacks. What is more they have Piercing (2) which means that whatever hits does damage on 2+ against my infantry and light cavalry, while heavy horse and drakes on 3+. So I can easily expect around 10 damage points per turn, either against 2 targets or against 1 units if focused fire. That means that a single volley by these constructs potentially delete a unit per turn.
The only consolation is that they have the rule Reload so that they cannot move and shoot.
At the same time they are not too bad in close combat either! Again, 18 attacks, 5+ to hit with Crushing Strength (1) means they can do quite a few wound when attacking or counter charging and assuming by the time something approaches them it is already damaged it can be enough to finish off the enemy. With nerve -/17 and defense 4+ these guys will stick around unless attacked by a powerful enemy.
Cursed High Priest - High priests have several important roles to play for this army. First of all they are additional sources of inspire. There are 2 of them so with the Idol there are 3 sources of inspire in the army. Their second, probably even more crucial, role is to move the shambling horde faster. With Surge (10) they can move them a little bit around. The interesting thing is that this can be augmented by Monolith (see later) and the same target can be Surged more than once. In my first game I learned that it can be a powerful combination when you think you are safe behind the enemy lines.
In addition, they can use Heal which is great with generally higher values of nerve and the fact the army has a rule Lifeleech (1) which means they regain one point of damage if they deal damage in combat. Add to that previously mentioned Iron Reseolve and these guys can keep the army recovering any damage real quick.
Soul Snare - it is a very interesting war engine. It basically casts the spell called Lightning Bolt with 5 dice, always hitting on 4+. The spell has Piercing(1) rule which improves chances to do damage by 1 and the range is 24 inches. It can also move and fire so effective range is 29 inches with possibility to extend that by any Surge spell.
Bone Giant - another powerful unit that benefits from high nerve -/19, crushing strength (3) - it wounds unit in my army on 2/3+, has d6+6 attacks and hits enemies on 4+. It has small footprint allowing it to use 7 inches move to sneak to the flanks and then be Surged to combat for these powerful flank attacks. With defense 5+ it is tough too and the combination of high nerve means that in order to eliminate one quite an effort is required.
Monolith - very interesting element of the army. It cannot move and its main and only role is to augment allied spells by 2. So whatever is in 6 inches away from it the benefit is granted. The disadvantage is lack of mobility but if one plans on being defensive and let the enemy to come to him it is a perfect addition.
3 Swarms - 2 units of expendable troops. These little buggers can simply move forward and block enemy advance. They are very easy to destroy but that also means the effort is put into crushing bugs and not fighting the real enemy.
3 Scavengers - they are similar to Swarms but may be a very dangerous unit as they can fly behind enemy lines, use nimble to pivot twice and then are ready to charge from the flank/rear. They have 9 attacks that hit on 5+ but it is not that bad when doing so from the flank/rear.
In general, I faced a defensive army with powerful shooting in the form of two units of Guardians augmented by Soul Snare. I had to choose between moving straight at them and suffer casualties in the process or trying to move with the use of cover and outside their arc of sight. But that meant I would slow down the advance and might have harder time in coordinating or moving to good position.
Guardians, Giants, Revenants and Idol are all powerful combat troops too and as I said before, their counter attacks might be enough to finish what shooting started.
With 4 sources of Heal in the army (Priests, Idol, Soul Snare) and Lifeleech and Iron Resolve special rules this army has the potential to heal a lot fast. At the same time 3 sources of Surge can be really dangerous.
To battle this army I took:
Outcasts - Army List
10 Stormwind, Regiment - 215
- 5 Silverbreeze, Troop - 145
- 5 Silverbreeze, Troop - 145
- Drakon Rider Lord, Hero, Large Cavalry - 160
10 Stormwind, Regiment - 215
- Drakon Rider Lord, Hero, Large Cavalry - 160
3 Drakon Riders, Regiment - 175
- Bolt Thrower - 90
20 Palace Guard, Regiment - 150
- Bolt Thrower - 90
20 Sea Guard, Regiment - 170
- Elven Mage, Inspire, Bane Chant - 110
20 Sea Guard, Regiment - 170
This time I decided to take more heavy cavalry at the expense of Hunters. More regiments and fewer troops as well as added one regiment of Drake Riders. What I wanted to achieve is faster army that can approach the enemy quicker and hopefully exploit the flanks. Stormwind cavalry hit harder than anything I have in the army and I hoped their higher nerve, 14/16, would be sufficient to stay around longer than small unit with 10/12.
At the same time I know that the shooting potential of the enemy is high so that 14/16 may not be enough to stick around for long.
I don't have much shooting, the same as before and I don't think I will have the chance to do much damage. Bolt Throwers are good but the enemies are tough and have great abilities to heal themselves. In that case I will try to focus my shooting at the units that might be hurt on its own or are wounded and can be destroyed easier.
The piece I needed to form a plan was terrain.
Terrain

We have four pieces of Forest here. They block line of sight although we decided that unit on the hills can see above the forests without any penalty. The regiments inside the forest can be seen but are -1 to hit for shooting, cannot move at a double unless have the rule pathfinder and if attacking through can be hindered.
The shore on the left flank was all inaccessible so in effect we played on a narrower battle field. The green part on the right is still flat, only the brownish hills are elevated positions.
I decided I will position my infantry in the center first, at the back edge of the deployment to avoid being shot by all shooters at the same time. Then I thought I will go on the flank with the shore if possible with my fast elements and will either turn to the center with some but will send fliers further, to use the forest as a cover and emerge on the flank or even rear if possible.
Loriel won the roll off and picked South as his deployment zone.
Deployment
 |
| Deployment order |
1. Enslaved Guardians (EG1) - Sea Guard (SG1)
2. Revenants (R) - Palace Guard (PG1)
3. Bone Giant (BG1) - Sea Guard (SG2)
4. Enslaved Guardians (EG2) - Elven Mage
5. Bone Giant (BG2) - Stormwind (SW1)
6. Swarms (S1) - Silverbreeze (SW1)
7. Idol of Shobik (IoS) - Drake Rider Lord (DL1)
8. Monolith (M) - Silverbreeze (SW2)
9. Swarms (S2) - Bolt Thrower (BT1)
10.Soul Snare (SS) - Bolt Thrower (BT2)
11. High Priest - Drake Riders
12. High Priest - Drake Rider Lord (DL2)
13. Scavengers (S3) - Silverbreeze (SW2)
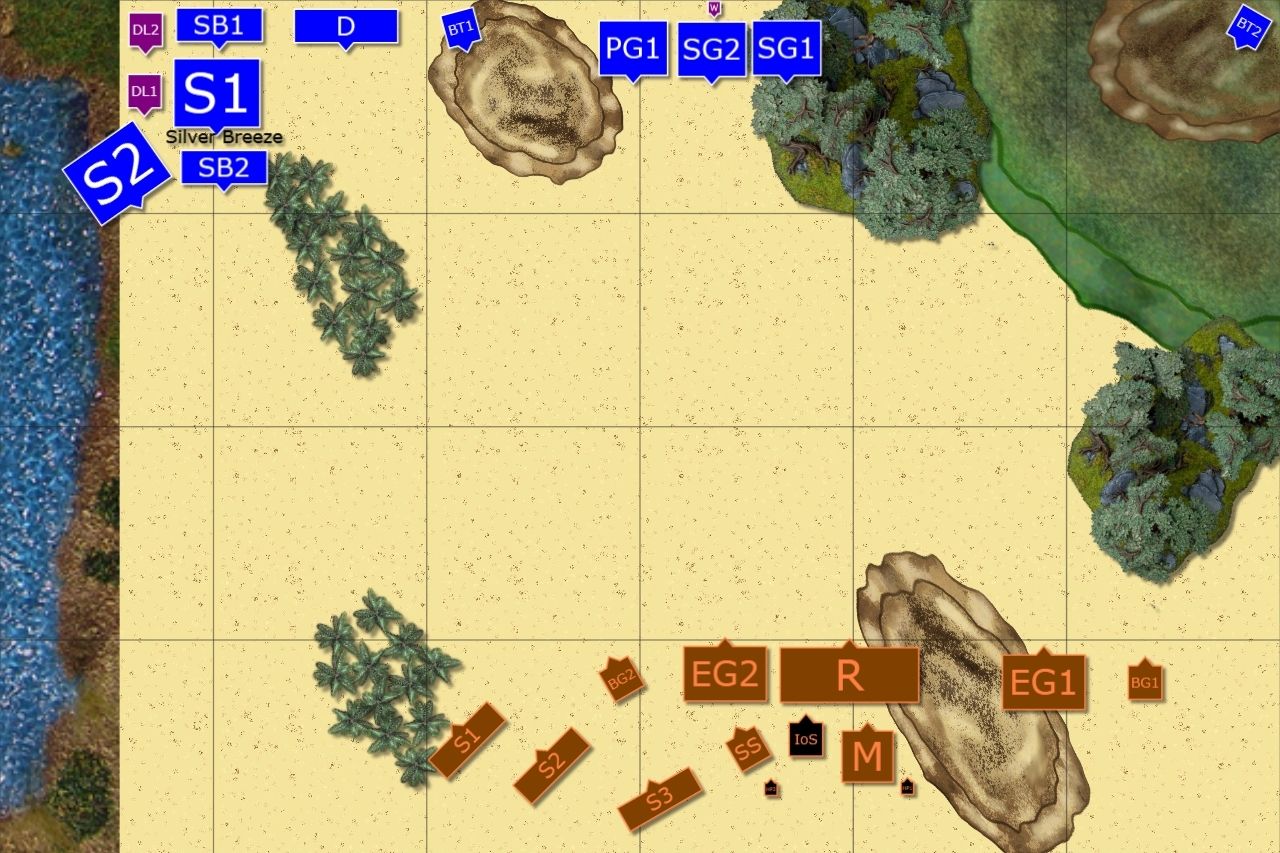 |
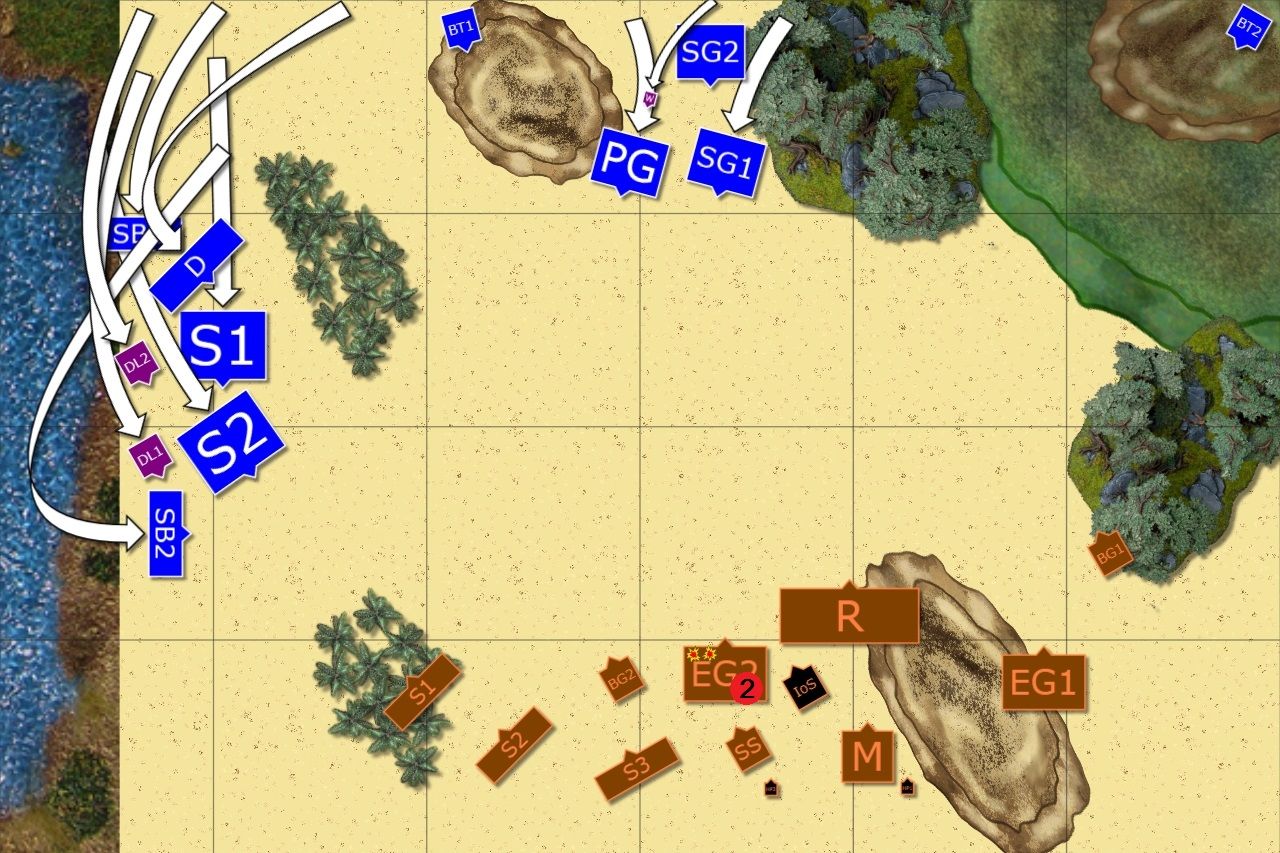
| Final Deployment |
It looked to me I am a little too crowded on the left flank but the advantage I had with this deployment was that only infantry was available as targets for shooting and one of these regiments was in the forest. At the same time none was in range for Lightning Bolts.
Loriel won the roll off for the first turn and he chose to have the first turn.
Edit: When I surveyed the diagrams I made in Battle Chronicler I noticed that I was not meticulous enough to keep the relative distances close enough to reality and some maps may suggest that units were not in range for certain spells, Surge in particular but also the range for Monolith effect. Please, accept my apologies in advance for potential confusion and if in doubt, please do not hesitate to ask.
Cursed Kings - Turn 1
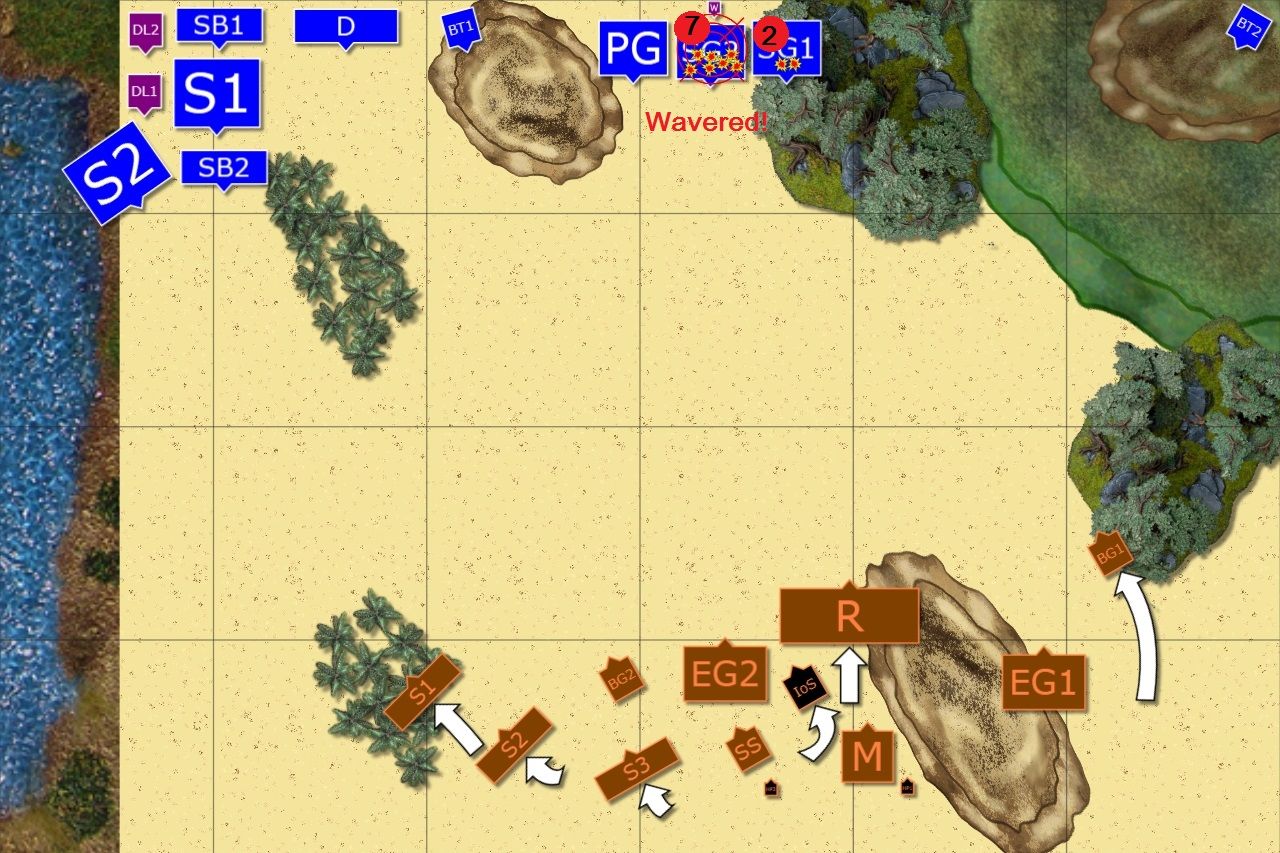 |
| Opening fire |
The army of bones moved slowly and simply re-adjusted their defensive positions. Only Enslaved Guardians could shoot and only Elven infantry was in range. The regiment in the forest received minor damage but the one in the open was less lucky and Elven warriors wavered under such a heavy fire.
Outcasts - Turn 1
 |
| Fast approach on the flank |
All fast elements moved at haste on the flank along the shore of the ocean. That allowed them to avoid the attention of the Enslaved Guardians for a while. Infantry in the middle left one regiment of Sea Guard behind and moved forward too, although not at full speed.
Bolt Throwers tried to damage the very dangerous Guardians but at this distance the effect was too small.
Cursed Kings - Turn 2
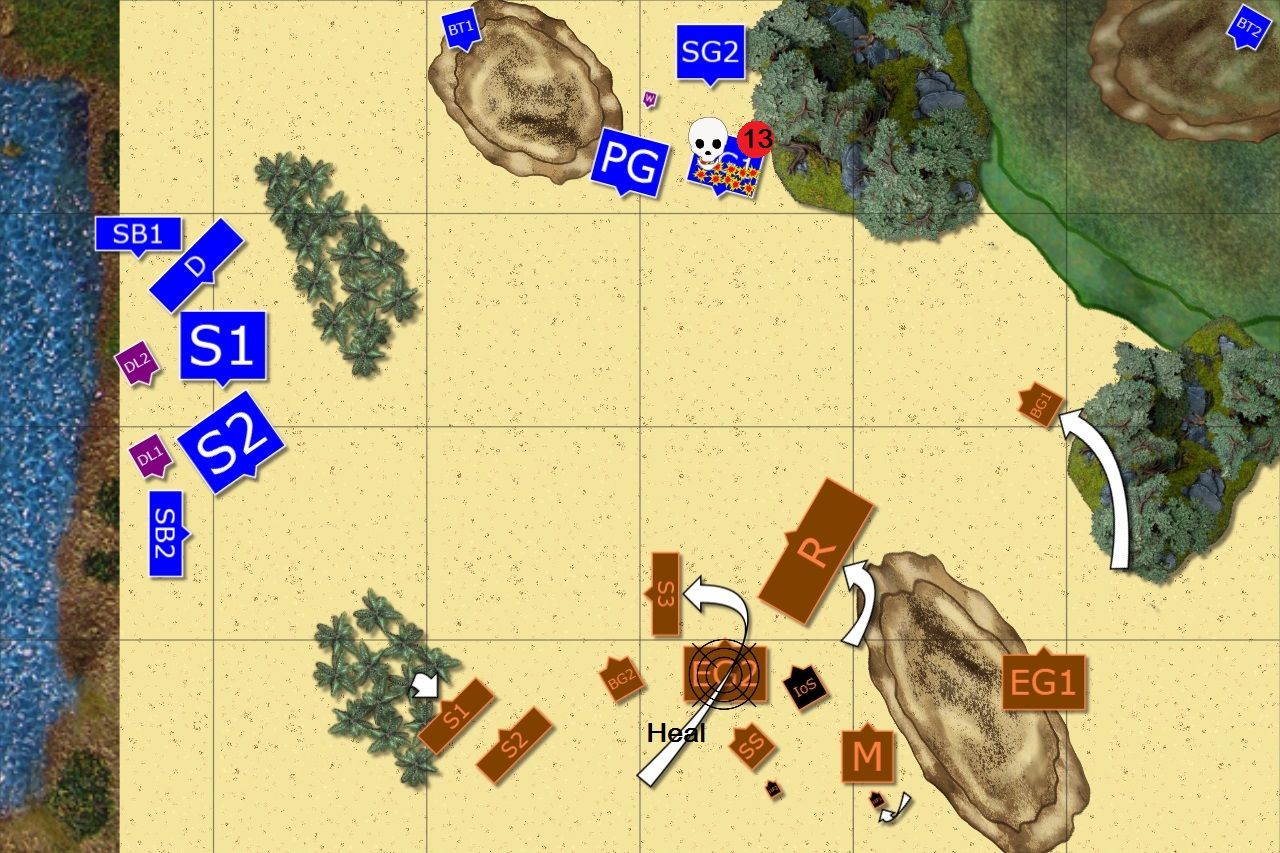 |
| First Elven unit was destroyed |
The undead army kept its good defensive position and only some regiments moved around to change their positions. Guardians showed the true power of their crossbows and Sea Guard regiment was routed after sustaining horrendous casualties.
Outcasts - Turn 2
 |
| Elven shooting claims one enemy regiment too. |
Outflanking force emerged in between the forests and light cavalry spearheaded the attack. Infantry moved fast forward and Elven Mage managed to heal Sea Guard a little. Bolt Throwers took aim at less resilient enemy and the regiment of Scavengers was destroyed.
Cursed Kings - Turn 3
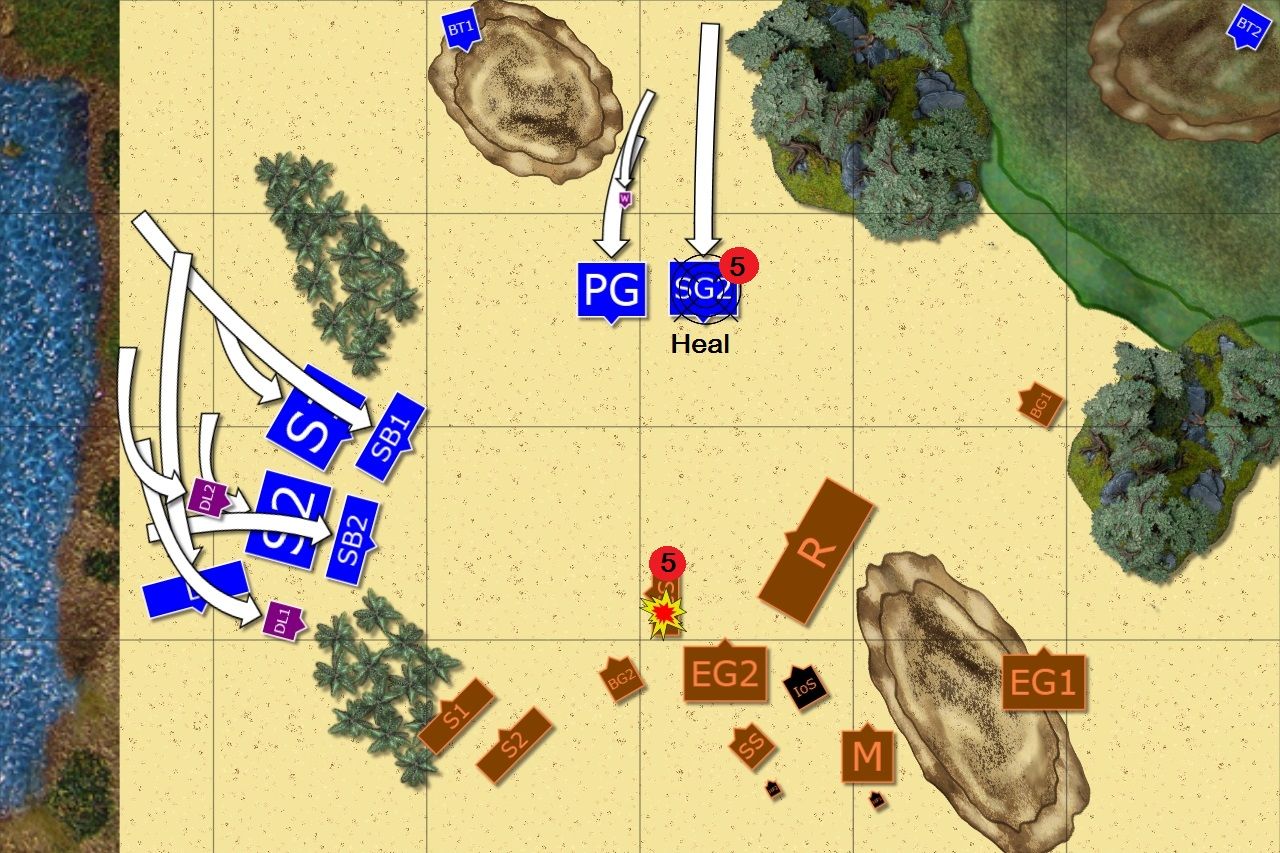
 |
| Blocking the enemy advance. |
Mindless swarms of many creatures of the desert were sent with the single mental order of the general of the undead army towards the approaching cavalry. It would not stop them for long but at least it would slow down the advance and allow them to move Guardians into new position and be ready for advancing enemy.
Outcasts - Turn 3
 |
| First Elven charges |
The Elves decided to perform preemptive attack to disorder the enemy and get into the position to launch main assault. First, Silverbreeze cavalry charged the Guardians in order to distract them and prevent them from shooting. Their companions tried to clear the path but nasty swarms refused to disperse.
Both Drake Rider Lords attacked the Giant in the woods so that it could not charge the advancing cavalry from the flank.
Finally, Sea Guard and Bolt Throwers aimed at approaching Giant from their quarters of the battle field and braced for impact. Palace Guard was getting ready to counter charge.
Cursed Kings - Turn 4
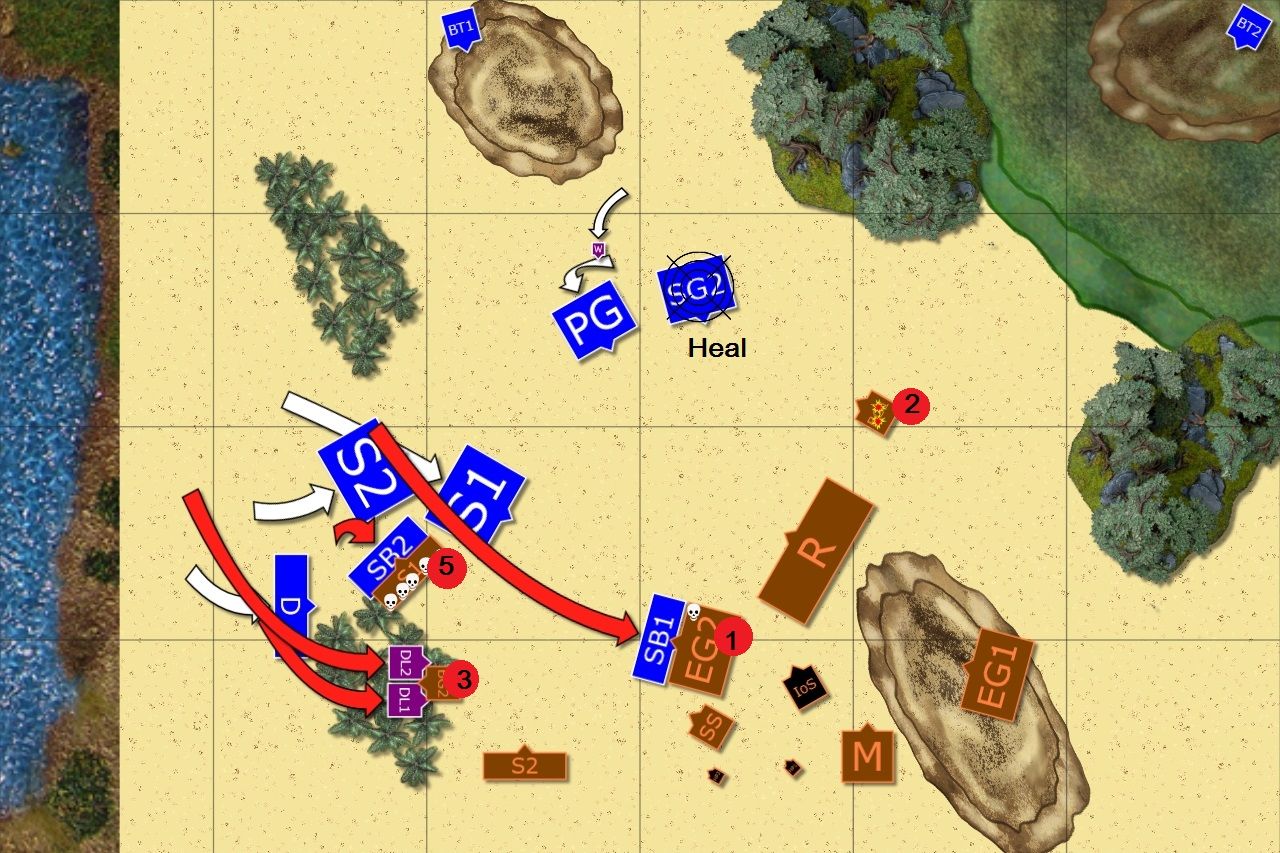
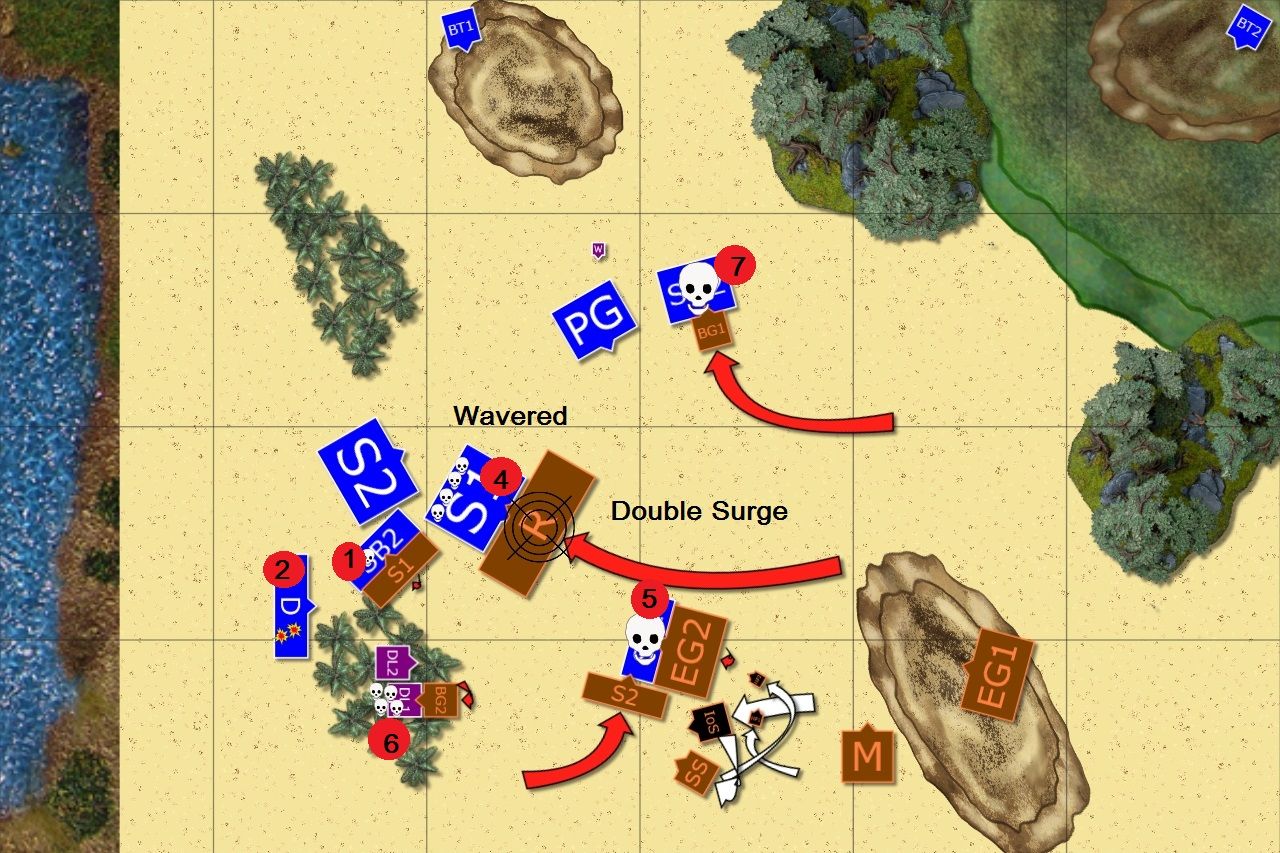 |
| Powerful counter attack |
Undead troops surged forward to enact vengeance on the intruders who dared to enter sacred desert. Bone giants stormed their respective foes. On the left flank Drake Rider Lord barely survived the encounter while Sea Guard on the right flank was not so lucky and despite the encouraging shouts of the nearby Mage they were destroyed. Silver Breeze cavalry that attacked Guardians paid ultimate price for their folly too.
Swarms hit the fast cavalry that was not impressed but could not move anywhere either. But the biggest hit came through the center. Revenants shambled towards the Elven heavy cavalry. Then both priests started their incantations and shambling horde suddenly moved with unnatural speed and hit surprised Elven knights. Their armor was sturdy enough to deflect majority of the attacks but they still wavered. That was a heavy blow in its own because in the narrow passage in between the forests the reinforcements were blocked as well.
Outcasts - Turn 4
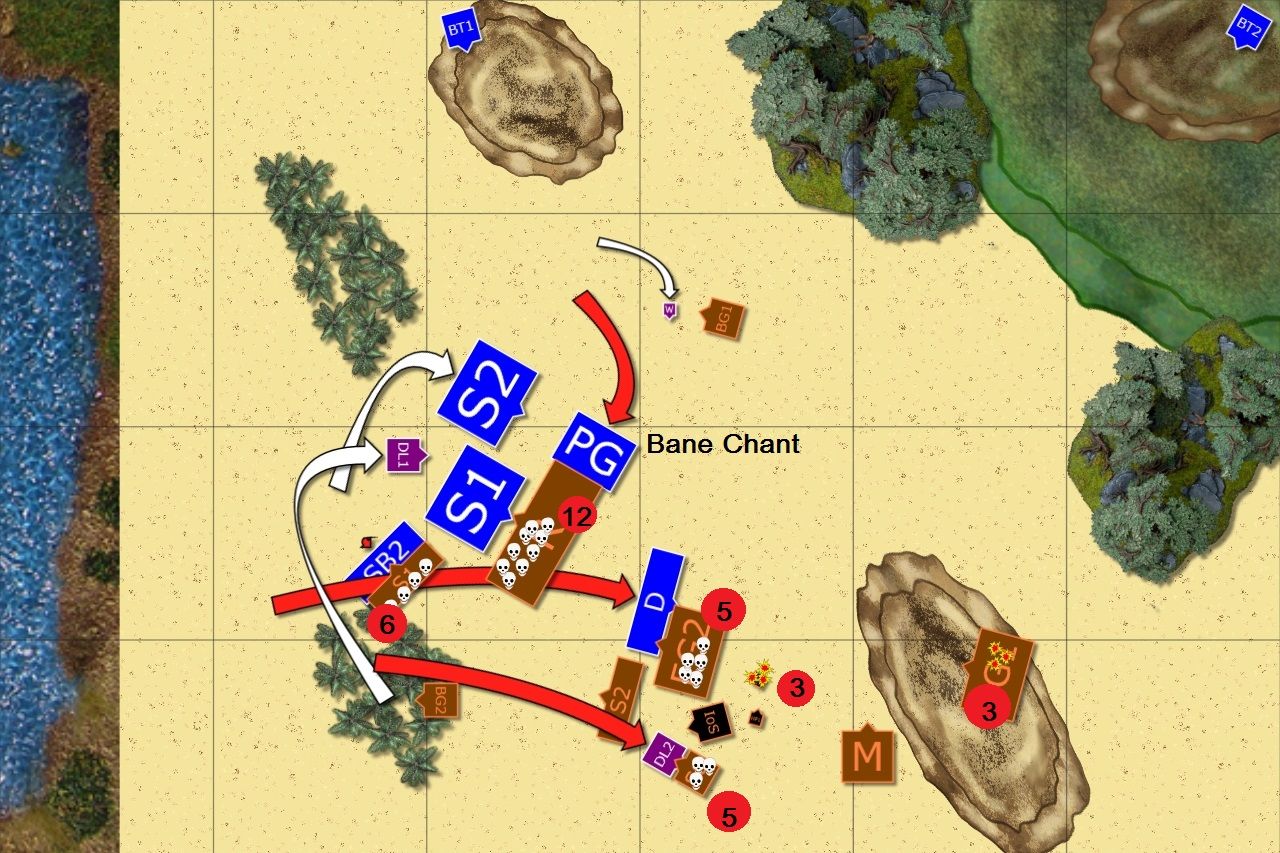 |
| Elves press hard again. |
It was very hard situation and Elves were desperate. Palace Guard charged the exposed flank of the Revenants and were aided in their efforts by the wizard but despite huge amount of damage it was still not enough to destroy the enemy.
Silverbreeze still could not get rid of the swarms and Drake Riders as well as Drake Lord recklessly attacked enemies alone. They didn't rout them and were about to face dire consequences.
Bolt Throwers aimed at two different targets this time. One high priest and Guardians on the hill were damaged but not enough to make that count.
Cursed Kings - Turn 5
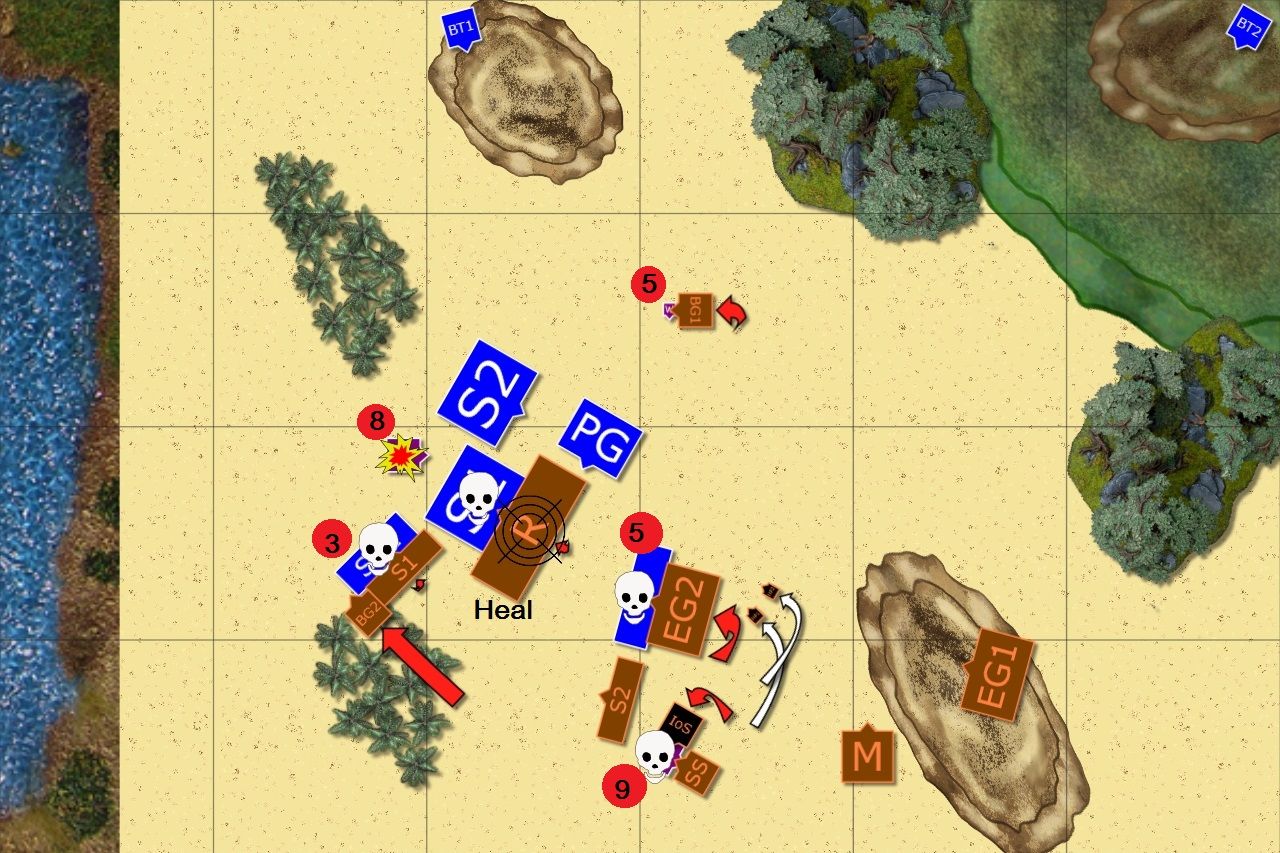 |
| Killing blow |
Another massive counter attack was coming. On the left flank Giant punished Elven fast cavalry for their incompetence and inability to destroy swarms when given the chance. Drake Lord and Drake Riders also were destroyed when their enemies descended upon them.
Guardians on the hill took aim at seriously wounded Drake Lord and another leader of the Elven army was destroyed. Finally, healed Revenants stormed into previously wavered heavy cavalry and this time they were routed too.
Surprisingly, Elven Mage survived the encounter with the Giant for the time being but after losing no less than 5 units in a single, powerful attack, the Elven army (or the remnants of it) decided to quickly disengage and save whatever was left to be saved.
The victory was clearly on the side of the Empire of Dust!
Summary
 |
| Turn-by-turn animation summary |
After-battle thoughts
It was my first game ever when I threw the towel and I really feel bad about it. But the victory was clear and Loriel simply out played me and punished my numerous mistakes immediately and to great effect. He did very well with his army, had a very good plan to first, force me into hard decisions about the deployment and then to use his army's strengths to great effect.
Congratulations, King Loriel, really well done! Please, accept my apologies for throwing down the towel, even if I think I could do little to even make the margin of the defeat smaller. However, I simply could not fight off the frustration that built up during the game at my incompetence and poor performance and decided it would be better to stop the game at this stage.
The good thing after such a disastrous defeat is that there are plenty to things to discuss and learn from. It is even more important for the new player as I am in KoW.
Deployment
I think I have mentioned that before but the challenge in the game of KoW is that by the game nature all armies have multiple units or elements. As each of them is deployed separately it is really hard to outdeploy the enemy, in particular with the army like Elves that has more expensive units. We ended up with 13 elements each. I believe KoW requires different philosophy for the deployment because of that. I think one needs to form a plan about the initial formation regardless of the enemy but taking into account the terrain. I guess it will be possible to predict the enemy deployment with some experience but that is not available at the moment.
I still have mixed feelings about the deployment. On one hand I managed to save cavalry wing from shooting at the beginning of the game. If I deployed them in the center I would have to face powerful shooting. Cavalry has better defense than infantry but then I would be exposed to shooting without cover unless I sacrificed fast cavalry as a living shield. All options are both viable and risky.
I also had infantry very far away which, from the perspective of hindsight, I think was a mistake. In theory the benefit was supposed to be that I didn't say which flank I am going to support with infantry. But I gave it up when cavalry was deployed on the single flank. I think the good approach will be to assume that I am going to lose a unit each turn due to shooting against this army and simply choose which one it will be by exposing some and hiding the other while not holding back and putting pressure as fast as possible.
I will try to prepare some variants of the deployment later. Assuming, of course, that Loriel's army is not going to change its formation. It is of course not true but I think it is still beneficial to do so.
The Game
Now, what could have been done better during the game? I will try to discuss my options as I saw them during the battle and discuss other options I could have used (although I might have not necessary seen them before).
Turn 1
I could not do much about the shooting of the Guardians. They were hitting on 5+/6+ but were wounding on 2+. Loriel chose to shoot at each Sea Guard regiment. With 7 points of damage he needed 7-8 on 2d6 to waver my unit and 9+ to rout it. There is an interesting observation I made here.
In this situation in order to stay steady I had ~53% probability to pass. Probability I would waver was ~39% which is huge considering there were only two results that led to it. At the same time the probability to be routed was ~8% thanks to the fact there was a wizard with inspiring presence. Without him the probabilities would be, ~41%, ~31% and ~28% for steady, waver and rout, respectively.
I must say that is is a very intriguing result. First of all there is a very significant chance the unit will be wavered and could not do much. And while the chances of routing are dramatically reduced with the inspiring character nearby, the probability to get wavered is also increased. It is totally different mechanics and I think I will need to take that into account for the future games.
In my turn 1 I made a mistake by not moving the mage properly and not having Sea Guard unit in his arc of sight so that I could not heal it.
Turn 2
One more time the Guardians showed their might in ranged warfare. They didn't inflict more damage points than expected. If you have 36 shots total, hit at 5+ and then do damage at 2+ then 11 damage points is simply the average. But it accumulated to 13 damage points total and even with inspire there was little chance to save that unit. It shows my mistake with deploying infantry so far away because I lost a unit and had severely damaged the second one and I haven't left my deployment zone yet!
I got lucky with the shooting this time as I inflicted enough damage and rolled high enough to get rid of one of the expendable troops. It is not much but at least one of the elements in the enemy army would not block the advance.
I still keep wondering about the role of limited shooting I have in that army. It can destroy troops on its own but might not be enough to do significant damage on the tougher targets. And they got healed anyway. However, when they get healed other spells are not cast. But then, Loriel had enough sources of various spells that he still could heal the Guardians and cast other spells if needed.
Turn 3
That was interesting to observe how Loriel reacted. I wonder if he still maneuvered if I applied more pressure with infantry (i.e. deployed them closer and be already in charge distance) or would he chose to shoot at them instead. Here, he had space to breath and change the facing so that he could cover the flank with his shooters. It also shows that the idea of positioning everything on one flank resulted in easy decision for Loriel. He had no threat on the right flank so could easily turn his Guardians and be ready to repel my attack.
I was in a kind of difficult position again. First of all I was blocked by Swarms but also was threatened by the Giant if I stayed where I was. So I had to do something to keep moving and address the threat. I didn't want to move further around the forest because it would not keep me safe from the Guardians on the hill (unless we play it wrong and forests block LoS no matter what). At the same time I would not be able to attack anything as I would not see the targets. Finally, even if I attacked the Giant in the forest I am hindered, meaning I hit at -1 penalty and lose Thunderous Charge.
That is why I chose to attack with Lords as they have Crushing Strength that is not affected by the forest. However, I don't think it was a good idea to send both of them since I only wanted to block the Giant.
Another thing I did that is probably not such a great plan was to charge with light cavalry against Guardians. Yes, I stopped them from shooting, that is a good thing. But I was in a position to counter with only a single heavy cavalry and that whole crowded formation proved to be my undoing. So the idea was not too bad in general but I didn't back up that bold move with proper maneuvers.
In this situation I should have done something different. I believe the following plan would have been much better:
- DL1 into the flank of the Swarm, 10 Attacks hitting on 4+, rerolls of 1's and wounding on 2+ would have been far better than 7 attacks hitting on 5+.
- DL2 into Giant to block it a little. It still can pivot and then charge with Surge but would not be able to attack much on its own. And DL could hold against frontal assault for a while.
- Move Drakes towards the South but pivot to see the Giant and be able to counter with DL in the following round as well as use the forest to hide it from all but Guardians on the hill. Stay in 6 inches from DL just in case.
- Maneuver the cavalry past the Swarms and towards the center. In that way I could still have good point of view for charges but also provide some cover with fast cavalry as well as connect with infantry better.
Turn 4
Turn 4 was the beginning of the end and a direct consequence of my mistakes. First, the one I made turn 1 by not positioning mage properly now backfired when I lost Sea Guard, with the exact same probabilities for stead, waver and rout results as in turn 1 due to shooting. While one may think that it was simply unlucky to lose a unit when there was only 8% chances for it being routed, I could have avoided that if I healed it. One point less damage would result in SG being wavered. But more importantly, would leave Giant with exposed flank to the attack of the Palace Guard that assisted with Bane Chant would have had huge chance to fall it down.
Double Surge should have not been a surprise either. First of all I positioned myself 13 inches away from Revenants. They moved 5 inches in their movement phase so they needed only 8 inches in the shooting phase. Loriel maximized the chances for success by moving his priest so that they would be 6 inches away from Monolith but also way inside 12 inches range from Revenants. First Surge, cast with 12 dice move the horde by 3 inches only but second one added 6 more. In fact, Loriel forgot about his Casket which would have added 5 dice extra for this spell. Anyway, I should have taken that into account and it seems that with the cavalry I should simply park a little bit further to avoid such a nasty surprise.
You can again ask about the chances to get the regiment of Heavy Cavalry wavered when it sustained 4 points damage. Loriel needed 10-11 for that result and 12 to rout. Since there was no hero to inspire around, respective probabilities for steady, waver and rout results are approximately 83%, 14% and 3%. Again, one can call it unlucky but I think it was simply my mistake to position the regiments in such way that blocked one with the other. The best way to take such effects into account is either to avoid them all together or move in a way that any waver result would not affect the rest of the army. Interestingly, it would have been better to actually rout that unit as that would have opened path for counter charge.
I simply should have positioned my units better so that I could still maneuver around wavered regiment, something I will definitely take to my heart for later games. At the time it was crushing as that single result made my plan fall apart but as I expected, closer look revealed all the things I did up to this moment that were the real cause for disaster. Also note, that even if Loriel lost his Revenants, he was in a good defensive position to hit me back again anyway.
Depressed and frustrated, I followed the path towards the catastrophe blindly. Instead of re-thinking the situation I charged wildly, not taking into account the chances and not considering the consequences.
First of all I could measure if the Lord that was not engaged in combat could flank charge the Giant. You see, it had to align to the other Lord and thus probably exposed his flank. If he did I should have charged again, this time having 15 attacks and a chance to damage the giant further.
More importantly, I should have charged with Drakes in aid for Palace Guard. PG did a great job of inflicting 12 points of damage upon revenants. Then I rolled 11 for nerve test and that was just 1 point short of the rout. Yes, I would have been left in the open but I would be in the situation that allowed for some chance to fight back.
Turn 5 was just a killing blow I deserved for the whole game of making mistakes and bad maneuvering. It was a harsh lesson but now that I see how certain things affect the game flow I can adjust my plans accordingly. In particular, it was very important to see how easy it is actually to get your units wavered so one should always take that into account.
I am still trying to figure out what would be my perfect army list and I really want more units in it. I have already made some changes so I guess I should schedule new game asap. :)
Thanks for reading and I hope it was still good report!
Cheers!
Great read. You always learn more from mistakes and losses than wins ;)
ReplyDeleteLooking forward to the next battle.
I actually found out I learn the most when I write a report :D
DeleteBest report I've seen ever. Excellent work!
ReplyDeleteBTW, I freaked out at the deployment animated image when the units started to appear! Didn't spected that!
Hi Sir. Dies,
DeleteThanks for the comment! I am really glad you liked the report. I guess it is thanks to all I have learned since I started writing them up a few years ago and the valuable feedback I have received since then.
Gif animations are easy to make and they add greatly to the report I think! it just makes things easier to follow too. I am glad I discovered that method :)
I am looking forward to further suggestions because I am sure I can make these reports even better!
Cheers!
Your reflections help me to understand the game better, thanks!
ReplyDeleteThank you! It was my second game in KoW so I was learning by making a lot of mistakes :)
Delete