
 |
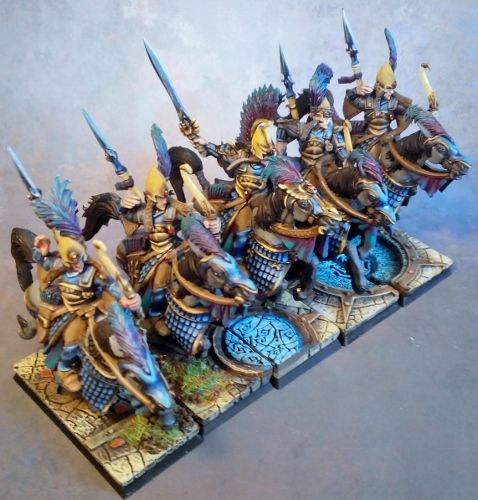
| Ellyrian Reavers - full unit |
It took me some time but I have finally finished painting five more Ellyrian Reavers to replace old metal miniatures. I wanted to test a few new ideas while painting this unit. First of all I decided to purchase and use new paints from Scale 75 company. They were recommended to me by Mr. Volomir himself and I decided to give it a try. I also wanted to improve my painting in the process by using better contrasts and using cold colors for scale armor and warm ones for the plate armor and clothes. Finally, I also ordered resin bases from MircroArt Studio.
The Paints


I tried to order the paints directly from the manufacturer. Unfortunately, the customer service proved to be very poor. First of all you have to wait quite long for them to reply to you. For instance, I convinced a friend to combine the order and as I wanted to get 5 sets and he was interested in mega set I simply asked for a discount. Especially, that we ordered to Australia. I also could not find an information on shipping costs.
In reply I got a short information that I can find the costs on the website (but no guide as where should I look for it) and the discount question was totally ignored. Please, note, that I don't necessarily expect one. I simply thought it might be nice to have one on a bigger order and the one that goes across half of the world.
I found the info finally. It seems in order to get the estimate you simply have to go through the whole procedure to order the products and only when you are about to place the order the information about the shipping cost is added to the total sum of money to pay. When I learned that company does not provide any choice for shipping other than ordinary post with no insurance I simply decided not to order from them.
What I found interesting is that Hangar 18 had these paints in stock. I contacted them and I received the information as soon as they started their working day. They offered two different types of shipping with the insurance and I actually paid for the same products slightly less than from the manufacturer!
In the I got 5 boxes of new paint sets, 8 bottles each. I ordered 2 Alchemy sets, 2 NMM sets and 1 inks. Each has a small brochure in the box, with some ideas for painting. In general, it is a very good idea and I really appreciated some advice. However, the English translations seem to be done by Google translator and further add to the poor impression on the product or rather on the customer treatment.
The paints are quite thick and require very intense mixing. Simple shaking is not going to do the job at all. I got myself a small mixing tool just for that purpose. In the end I still took the pigment from the bottle to mix it later with the water instead as even after such treatment the paints were not even.
When well prepared they covered the surface nicely and I like the soft non-shining effect they provide.
Technique


I used mix of Scale 75, Vallejo and Citadel paints for this unit as I still didn't have all of them covered by the new range.
In general, I followed the order of painting the purple clothes first, then proceeded to blue armor, followed by gold armor and finishing with details and the steed.
In the case of clothes I used purple as main color but highlighted it with blue and then turquoise for warm effect. Blue armor had a layer of dark blue cover, then blue metallic as first layer and then highlights with lighter blue colors. Thanks to that I hoped to achieve the effect where the shine of metallic is still there but softened with matt colors.
I followed the same idea with gold armor. Please, note, I don't assume I can paint NMM here. I call it gold armor as it reminds me about one but the way I highlight the areas is is quite crude in comparison to what real NMM should look like. I don't posses the skills to get it yet and I also wanted to obtain cartoony feel of my miniatures. Hence, for example, lack of use of metallic colors after first layers.
Bases


I always wanted to add some more mystic or magical effect to the miniatures I paint and I decided, after observing many of the others fantastic figures, that bases are as important to the overall effect as miniatures themselves.
I ordered some for trials and main challenge was how to paint them in an interesting way. In the end, after some unsuccessful trials with inks, I resorted to simple drybrushing with the exact colors and sequence I used for gold armor. I differentiated between the stone and the metal frame of the glowing structure only in a way that stones where heavily highlighted while frames where left darker and only the edges were highlighted.
Then I painted red leafs with the dip of ink on top. And used blue colors for glowing interior of the mystic base.
I also tried to use some static grass but abandoned it after two trials and I think the bases look better without it.
I did notice, however, that the width of the base is not 25 mm as it should be but only 22 mm that will make a bigger difference once models are placed in a movement tray.
I did notice, however, that the width of the base is not 25 mm as it should be but only 22 mm that will make a bigger difference once models are placed in a movement tray.
Overall Effect


I am very happy with the overall effect as I think the models look better and the elements of scale armor and clothes don't look the same anymore. I like that the models look richer and the bases look more interesting than the ones I used so far.
Things to Improve


While not quite visible on the pictures the models will require more clean strokes. I am better than I was but I noticed I can become impatient and that affects the quality. It is also an obvious statement but brushes with good shape and tip as well as fresh wet palette for the painting session will help enormously in achieving the right effect.
I think I need to work more on golden armor especially on the helmet. The steed still looks too flat and I will need to more more on its curves :)
But other than that (which is still good amount of things to improve) I believe I got significantly better and can't wait to proceed to the next painting project :)
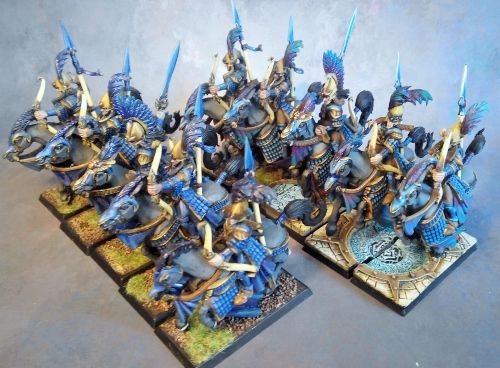 |
| Old (left-front) vs New (right-back) |
Thanks for reading!
Looks great swordmaster!! Loving the effect, and those bases really do make the model pop!!
ReplyDeleteHi Gatti!
DeleteI see you liked my painting so much that you commented twice :D
Thanks for the kind words, mate, really appreciated. I hope I will be able to continue with some more on a regular basis.
Cheers!