
Greetings!
This is the first report from the games I played during Castle Assault 2013 tournament that took place in Newcaslte.
The first game of Castle Assault was Dawn Attack. The scenario followed the rules from the rulebook with following modifications:
1. If you had 1 or more standards in your opponent's deployment zone at the end of the game you got 2 Battle Points.
2. If you kept your deployment zone clear of enemy standards at the end of the game you got 2 Battle Points.
3. If you had more standards in your opponent's deployment zone than they had in yours then you got 1 Battle Point. If there are the same number of standards then 0.5 BP each.
As you can see it payed off to have units with standards and keep them moving too!
In the first game of the tournament I played against Jonathon and his Beastie Boyz. Jonathon traveled from Queensland to participate in the event and I had a pleasure to meet him earlier this year when I played at the tournament organized by Queensland Northern Knights. Back then our game was unresolved as it ended up with a draw. I think we both were eager to find out if one of us can prevail this time :) I was very happy to start the tournament with a game against Jonathon as he is a gentleman and a great player. I was sure I could have a challenging game played in great, sporting spirit!
Johnathon brought different army than the one he had at QNK Joust 9.0 Here is his list (from memory):
Beastmen of Chaos - Army List
Great Brayshaman - Lore of the Beast
Brayshaman - Lore of the Beast
Brayshaman - Lore of the Beast
BSB, Beast Banner
40 Gors, Full Command
25 Bestigors, Full Command
25 Bestigors, Full Command
5 Ungor Riders
Tuskgor Chariot
Tuskgor Chariot
Tuskgor Chariot
5 Harpies
5 Harpies
5 Harpies
Castle Assault had special rules but let me start with the list I took:
Outcasts - Army List
Larry the Loremaster, level 2, Shield of the Merwyrm, Golden Crown, Earthing Rod, Sword of Might - 300
Bob the Battle Standard Bearer, Dragon Armor, Halberd, Charmed Shield, Potion of Strength, Reaver Bow - 157
15 Archers, Full Command - 180
15 LSG, Shields, Full Command - 210
5 Ellyrian Reavers, Musician, Spear, Bow - 105
5 Ellyrian Reavers, Musician, Spear, Bow - 105
5 Dragon Princes, Musician, Banner of Eternal Flame - 175
5 Dragon Princes, Musician - 155
11 Swordmasters, Bladelord, Musician - 163
11 Swordmasters, Bladelord, Musician - 163
10 White Lions, Muscian, Standard - 150
10 White Lions, Muscian, Gleaming Pennant - 155
5 Shadow Warriors - 70
Eagle Claw Bolt Thrower - 70
Great Eagle - 50
Great Eagle - 50
5 Sisters of Avelorn - 70
5 Sisters of Avelorn - 70
Total: 2398
The list didn't change at all in comparison to ConVic with an exception of equipment for Larry. The reason for that is that I completely failed to paint any new units (planned to paint more silver helms and fix chariots) and since I knew this army and it played well last time, I decided to give it a go again.
After two tournaments with Larry, Bob and company I have some very interesting observation on both, the army performance and my own approach. But we have to wait for that :)
Now a little bit on Battle Comp and scoring system. First, the table to start with:
0 - 100 - 7.5 : 7.5
101 - 250 - 8 : 7
251 - 400 - 9 : 6
401 - 600 - 10 : 5
601 - 800 - 11 : 4
801 - 1100 - 12 : 3
1101 - 1400 - 13 : 2
1401 - 1800 - 14 : 1
1801+ 15 : 1
Then each game scenarios allowed for getting up to 5 BP. I will explain these in the introduction to the each game.
Now, battle comp. Each army was peer comped and could get 1-6 comp points. They were used as follows to modify the final score from the game.
Say player A has comp 5 and Player B has comp 3. You calculate the difference, which is 2 in this example. Next, the player with the higher comp (player A) adds the difference to his overall score and player with lower comp (player B) subtracts the difference from his. So, for example, if the game was a draw (10:10 after applying bonuses for scenario) the overall result is:
Player A - Player B - 12:8
I have never used that system before and in combination with modified scenarios it was quite interesting to see it working. I was awarded very high, 5.5 comp but I also knew that using battle comp after each game would make any victory against tougher army even bigger and I could expect more experienced opponents and more difficult match ups in every next game.
Jonathon's army was comped at 5.5 so we were perfectly equal. The result had to be decided by skills on the battle field only! His army was more compact and with less support units than the previous one. On the other hand, 2 units of bestigors are tough nut to crack. Also if you consider the fact that he had potentially access to triple Wildform spell! 7 support units is not bad either and could greatly help main blocks to reach what they wanted to attack. Chariots are always a problem and had to be dealt with quickly.
Of course, the scenario could interfere with the most carefully laid plans so let's see what the deployment looked like:
Deployment
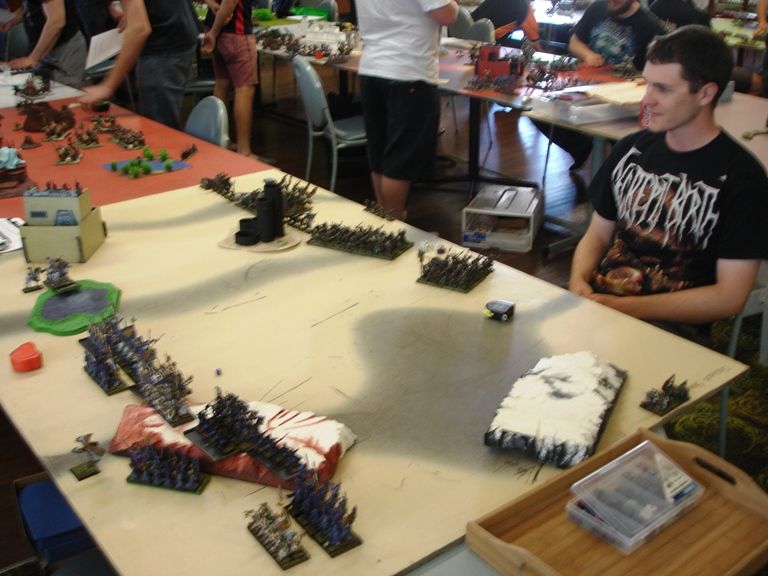 |
| Jonathon keeps calm and stoic |
 |
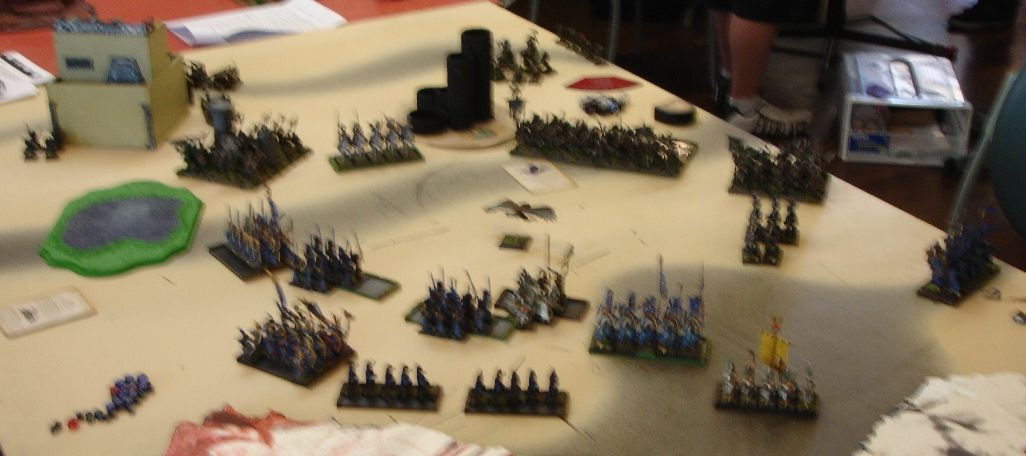
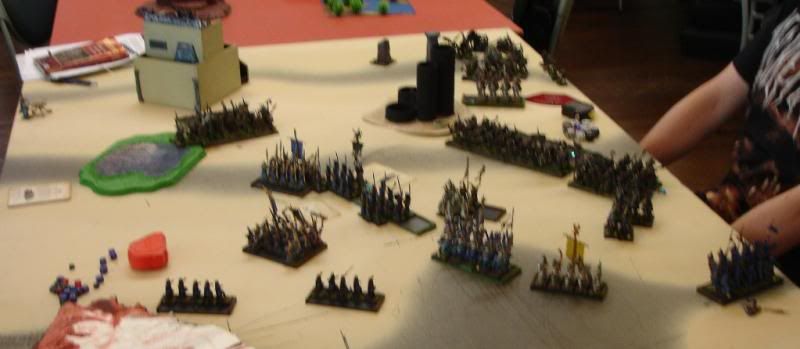
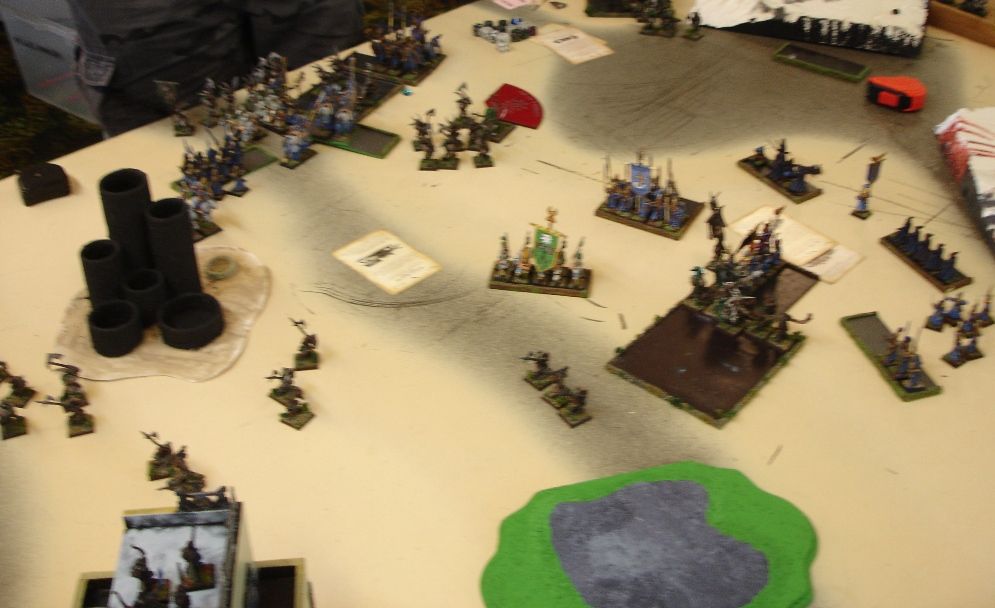
| Armies arrayed for battle |
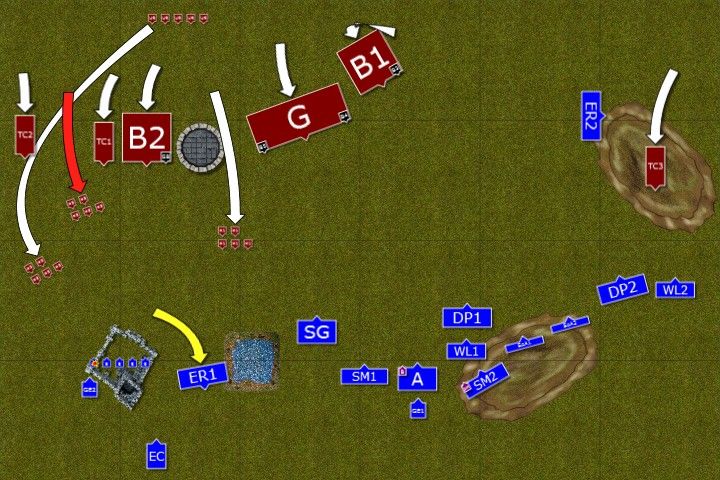
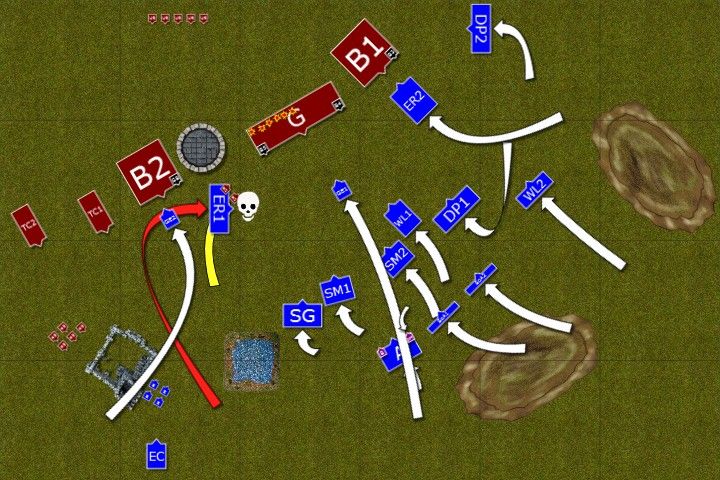
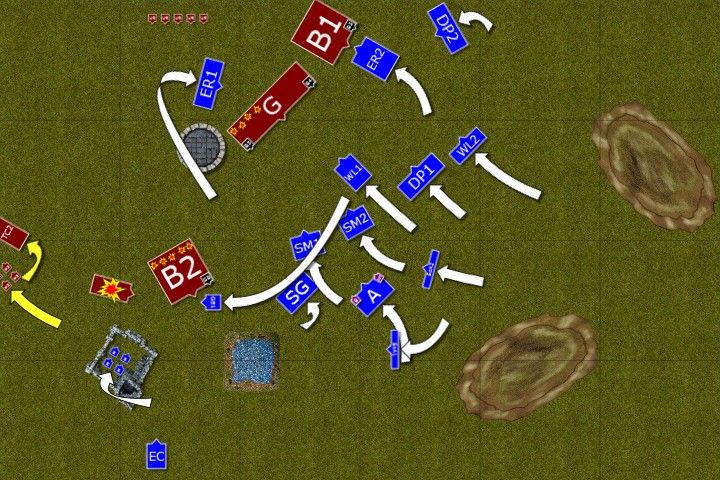
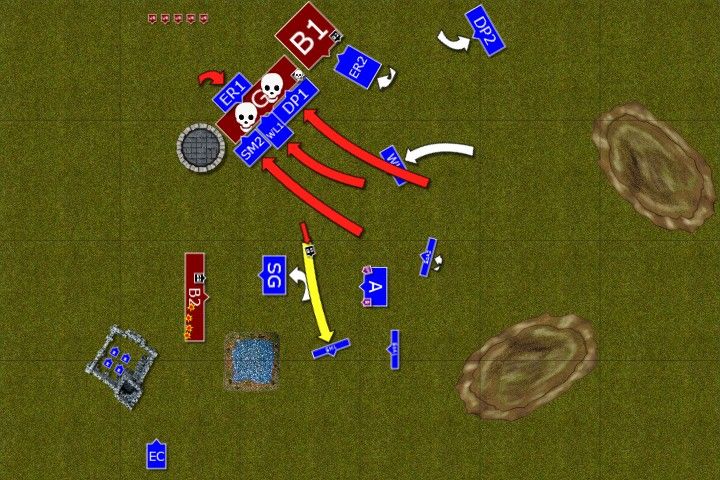
Great Brayshaman was with Bestigors B2, BSB and one Brayshaman joined Gors while second Brayshaman was with Bestigors B1.
Bob the BSB led the Archers while Larry was escorted by his trustworthy Swordmasters.
Somehow the armies arrived to the battle field on opposite corners and it looked more like a meeting engagement rather than a dawn attack! That also meant that my shooting was a little limited in terms of target choice and I could not aim at chariots right from the start.
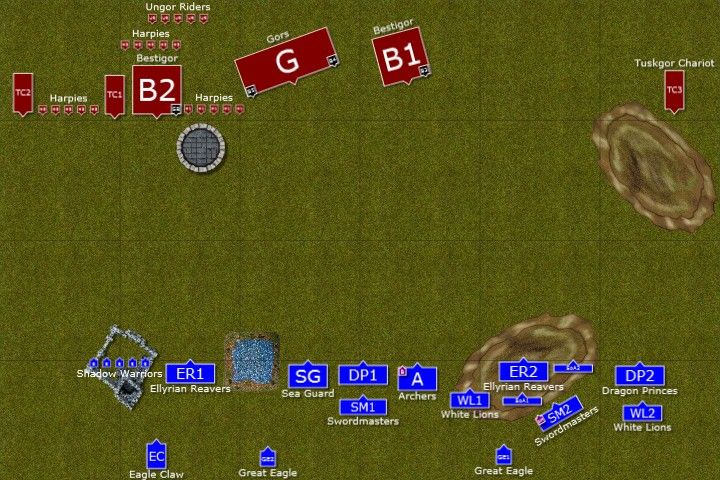
I also had to deploy my army first, so it might explain the way I positioned the units as I didn't know where the enemy is going to show up. Hence the positioning of Sisters in particular was a little too far away to be able to shoot turn 1.
I knew I had to divide Jonathon's blocks to have a chance against them. Beastmen are very good in combat thanks to Primal Fury and great weapon wielding Bestigors are really dangerous if confronted only from the front. Hence, as usual, I would look for opportunities to get these combined charges, preferably from the flanks. At the same time I had to divide my own forces to keep some standards in my own deployment zone and what is more, do something to prevent any of Johanton's infantry regiments entering mine.
As you can see it was a very interesting situation where we both had to tackle a selection of objectives.
Beastmen shamen had following spells:
Great Brayshaman - Wildform, Curse, Amber Spear, Flock of Doom
Brayshaman - Wildform
Brayshaman - Wildform
Jonathon tried to roll a 6 but this time it didn't happen and Outcasts unusually had the first turn.
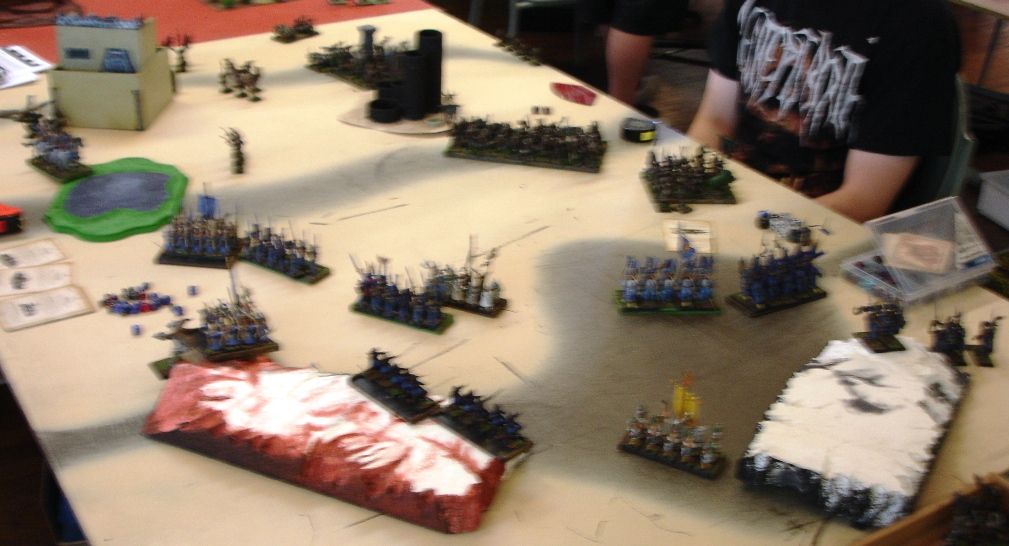
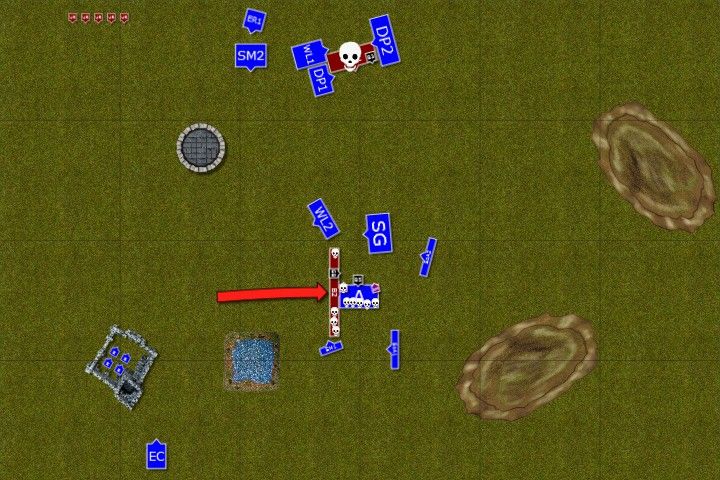
Outcasts - Turn 1
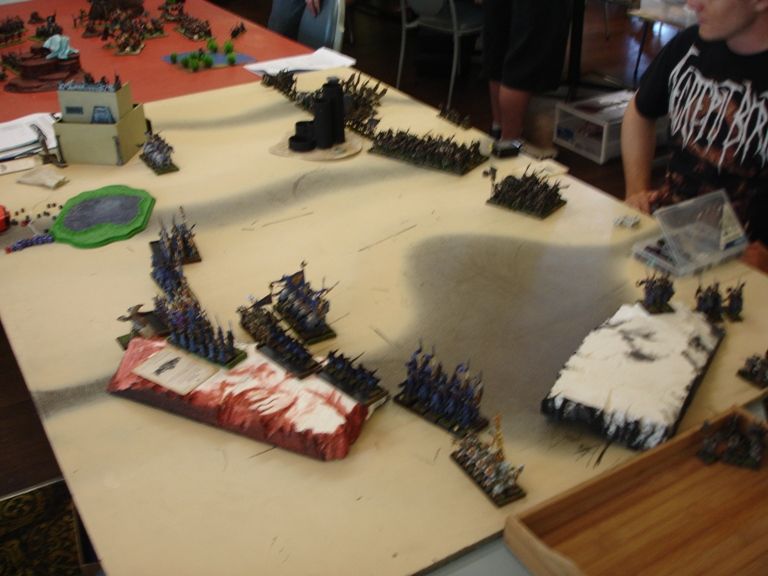 |
| Outcasts move forward |
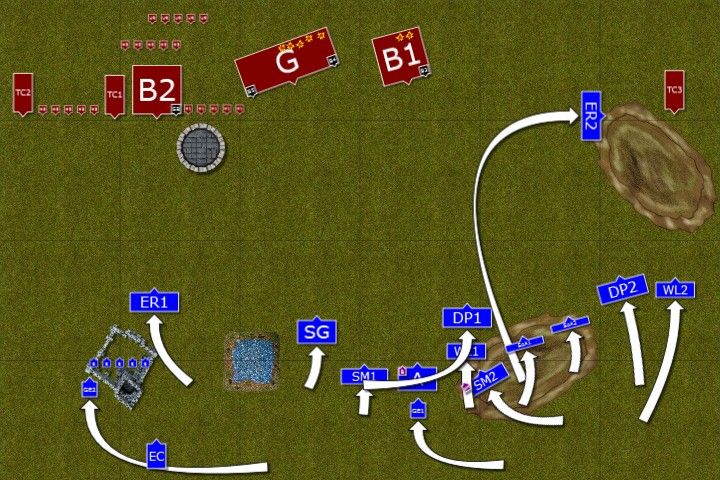 |
| Steady advance of the Elves |
With both armies in opposite corners of the battlefield the enemy was out of range for some elven troops. Despite that, some arrows found their marks and few foul Beastmen fell to the ground. Other than that the Outcasts just closed the distance to the enemy on their Eastern flank and in the center.
Beastmen of Chaos - Turn 1
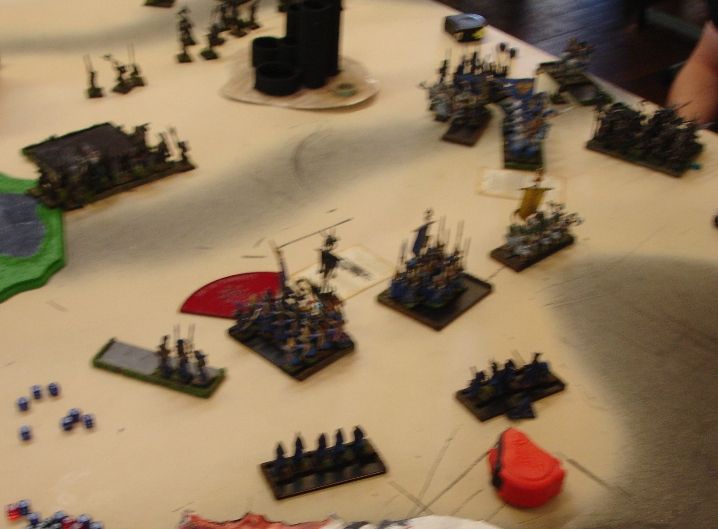
 |
| Blurry picture number 1 |
 |
| Beastmen advance too |
Spotting ellyrian reavers on the West beastmen attack. But swift elven horseman easily avoid their enemies. It seems that bot armies advance with more determination on their respective right flanks.
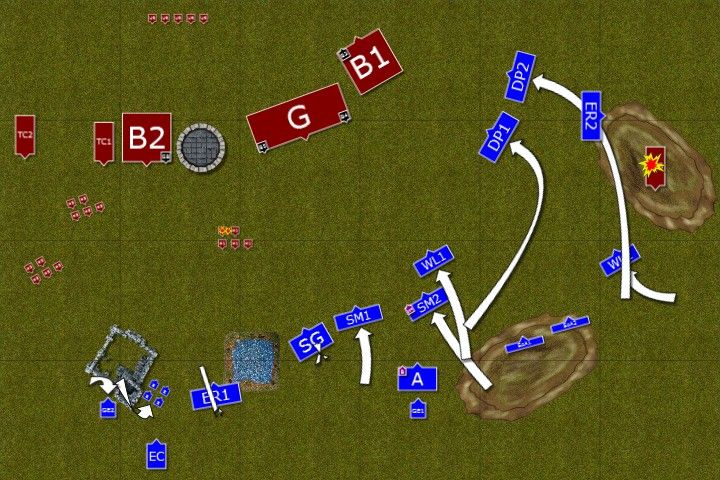
Outcasts - Turn 2
 |
| Blurry picture number 2 |
 |
| Outcasts keep advancing |
Despite dark magic at work, that made usually very accurate elven archery less efficient, Outcasts managed to destroy lone chariot on the West. But in general the evil beastmen magic saved many of the unholy warriors.
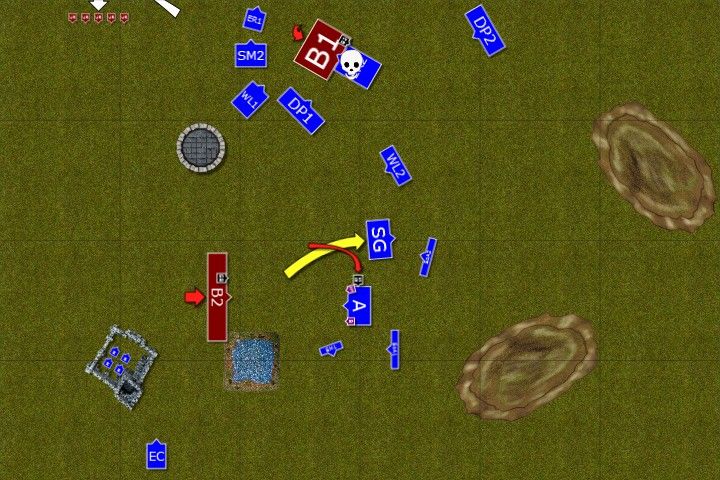
Beastmen of Chaos - Turn 2
 |
| Beastmen slowed their advance |
 |
| Only harpies attacked |
Not wanting to expose their flank, beastmen units slowed down. Only regiment led by Great Brayshamn himself kept the pace and advanced towards the elves as normal. Harpies attacked again but the flock that charged reavers died and the other one didn't reach elven eagle claw in time.
Outcasts - Turn 3
 |
| Game of maneuver continues |
 |
| The Outcasts bid their time and look for openings |
On the West Ellyrian Reavers counter charged and destroyed fleeing harpies. Great Eagle distracted Bestigors to give elves chance to withdraw.
The rest of the army maneuvered further, with some elite infantry swiftly changing formations to be able to pack stronger punch all together against enemy horde. Elven archers kept shooting at Gors, steadily decreasing their numbers.
Beastmen of Chaos - Turn 3
 |
| Blurry picture number 3 |
 |
| Chariots set a trap for elven fast cavalry |
Gors and Bestigors on the flank of Beastmen formation kept withdrawing and blocking the passage for swift elven cavalry. On the West charioteers set up a trap for elven light cavalry and Great Brayshaman ordered his warriors to dispatch pesky eagle, slowing him down.
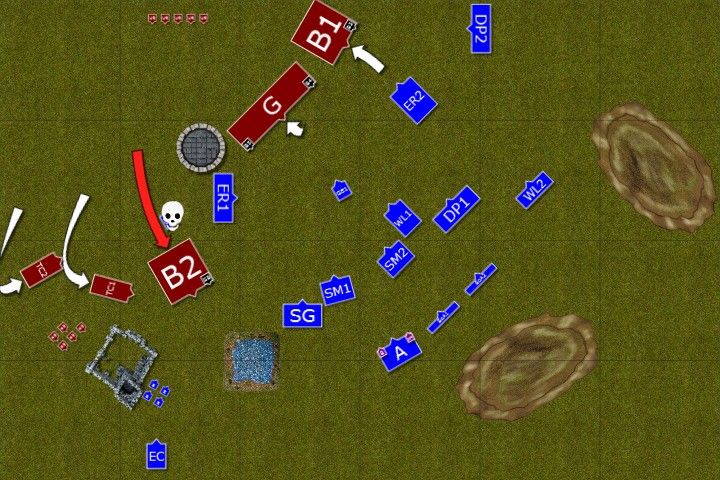
Outcasts - Turn 4
 |
| High Elves tighten their grip and Lions lead the way |
 |
| Beastmen flank collapses |
High Elves press a little more towards the enemy lines so that they have no room to go back. Reavers block one unit of bestigors while the eagle lands in front of another. Archers keep shooting at the enemy units knowing each casualty before the combat increases chances of their companions to win.
Then Larry the Loremaster, sensing that his opponents are distracted, summons enough power to cast quite a spectacular fireball that consumes the chariot. Seeing a horrible fate of the charioteers, nearby harpies and another chariot crew flee the battle. Great Shaman can only watch hapless as they were too far away for him to hold them.
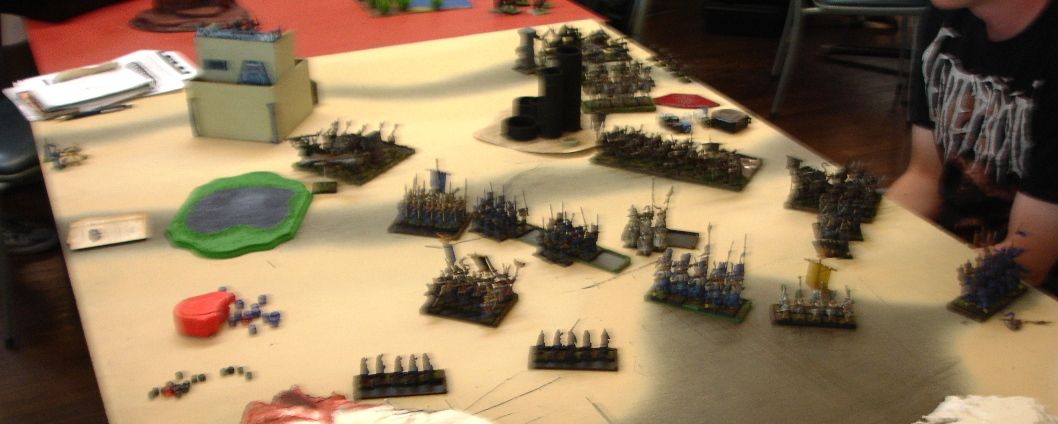
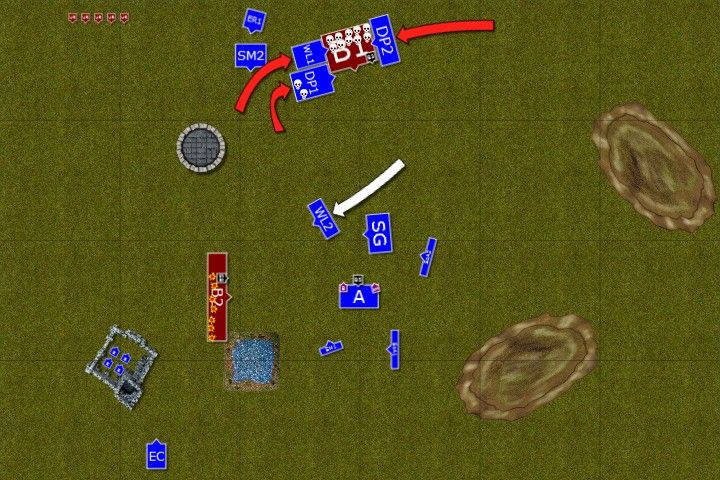
Beastmen of Chaos - Turn 4
 |
| Mexican stand off? |
 |
| Charge of the Wargor BSB! |
Beastmen units had nowhere to withdraw. In these circumstances Wargor bellowed his battle cry and charged alone against Swordmasters. Warriors of Hoeth managed to wound him but the fight continued as Wargor's strength and toughness were magically increased by Shamen.
Outcasts - Turn 5
 |
| Devastating charge! |
 |
| The horde is no more! |
After careful and sometimes cautious manoeuvrings Elves charged as one. Four regiments attacked in perfect coordination and Beastmen were cut to pieces. Those that survived the onslaught tried to escape but swift Reavers and Swordmasters didn't give them that chance. Victorious units reformed to threaten nearby Bestigors.
On the other hand second unit of Swordmasters lost their nerve and fled from the Wargor.
Beastmen of Chaos - Turn 5
 |
| Wargor continues to attack |
 |
| Beastmen try to counter attack |
Enraged Wargor charged elven archers with Loremaster and BSB among them. The Loremaster challenges but again, Wargor's is toughened and elven warrior cannot land a killing blow. What is more, he is badly wounded himself!
Bestigors on the Northern front destroy elven fast cavalry but that is not enough to break from the encirclement. On the South, Great Brayshaman leads his depleted unit to attack but they are still too far away.
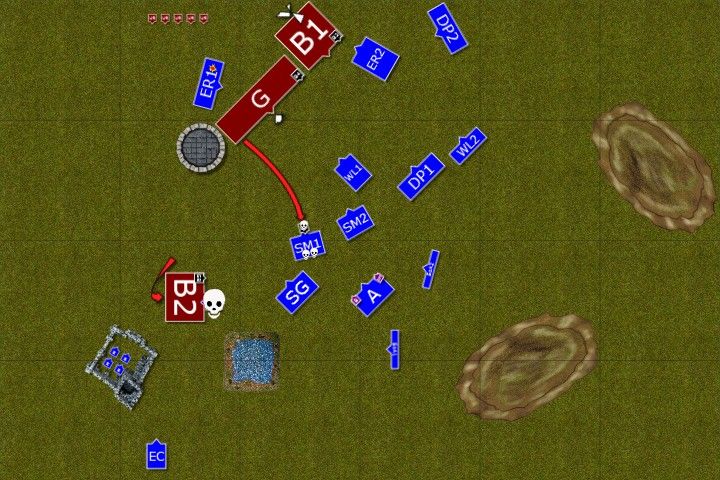
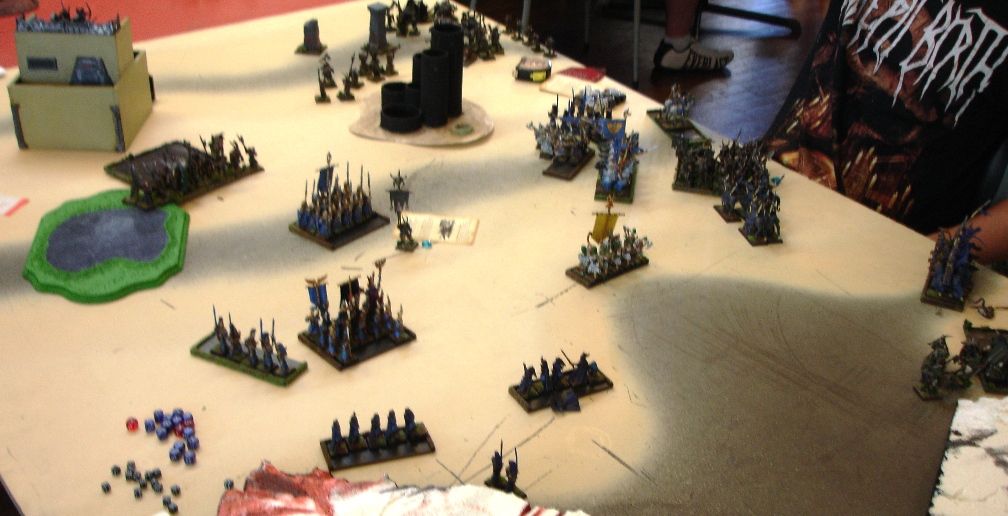
Outcasts - Turn 6
 |
| Another powerful charge by High Elves |
High Elves attack isolated Bestigors and inflict heavy casualties but steadfast Beastmen still hold. Wargor and Loremaster were locked in a challenge without either of the adversaries gaining upper hand.
Another enemy unit was peppered with arrows but thin line of Bestigors remained unimpressed.
Beastmen of Chaos - Turn 6
 |
| Dead Beastmen everywhere! |
 |
| Last chance for Beastmen to turn the tide |
Bestigors on the North finally broke under relentless pressure from High Elves and were cut in pursuit. But their companions charged elven archers in the flank. Elven BSB fought valiantly but he died defending his companions. The Loremaster barely held against brute Wargor but thanks to that Elves held the line and remained victorious!
Summary
 |
| Turn-by-turn summary animation |
After-battle thoughts
That was close! When I failed to wound Wargor in a challenge I thought I might lose both of my characters and a unit and that means lots of points to my opponent. Luckily Archers remained steadfast and I made that Ld9 break test. With the exception of that situation, where I had nothing to stop Bestigors from charging my characters (maybe I should have held with LSG in the first place?) I was very pleased with the game.
But let me first thank Jonathon for a great game and for being a gentleman! It is always a pleasure to play against him! Thanks, Jonathon ! I am glad we had a chance to play first game at CA and that we continued our sport rivalry started some time ago during QNK Joust 9.0
It seems that Dawn attack messed a little with our deployments forcing both armies to spin around the axis and making it look more like a meeting engagement. From one point of view it saved chariots (for a while at least) but at the same time they had no good targets to attack. It also meant Sisters of Avelorn had more difficulties with being in range for shooting so I could not fully take advantage of that first turn.
I tried changing formations during the game and I must admit I like Lions cubes but forming Swordmasters in no ranks was a mistake. Simply because they lose steadfastness. They have to be 5 wide for that purpose and precisely because of the they fled from Wargor and opened a path to the backyard. But ability to change the frontage and keep marching forward was very useful as I could herd Gors back and the pressure was maintained.
It was great to be able to pack so many attacks against Gors. I think that shows a weakness of horde formation, in particular if attacked by High Elves who can fight in 3 ranks. Despite lack of re-rolls elite infantry destroyed enough Gors to take away their steadfastness. Even a single rank of elven warriors was then enough to deny that. I think Jonathon could reform into deep formation and that might have been better as less attacks would have been directed at his unit. And also, his regiment would remain steadfast.
I was also wondering how one should reform when it is impossible to avoid multiple charges and I came to the conclusion that it is better to offer front and rear rather than both flanks as you gave more warriors to attack back. Again, that could mean Bestigors would have remained steadfast as with more attacks they would have been able to kill at least one Dragon Prince to get rid of my ranks.
It was very difficult to wound that T6 Wargor with S5 attacks. Somehow I could not land that last blow and barely saved Larry with his 4++ parry saves. And with 2-3 attempts to cast the same spell it is very hard to stop it.
In the end I was happy to prevail but also to get some bonus points from scenario. The game ended 17-3 in my favor and considering the fact I was very close to losing both characters and not "only" BSB I was very glad to get it.
Thanks for reading!
Wow, I'm a bit behind on the reports!
ReplyDeleteI have a soft spot for beastmen as that was my first competitive army. I think that beastmen are one of the trickier armies to run effectively however. They are one dimensional in that they usually have no ranged element other than magic missiles. That requires that they close with the enemy as quickly as possible. His side of the board was pretty lacking in terrain so he had to 1) advance but most likely be flanked due to how many units you bring or 2) castle in a corner to prevent flank charges but allow his support to be destroyed from distance. Neither option is very appealing.
The strength of beastmen lies in numbers and very strong combat. He would have been better served to bring fewer characters and more units to elongate his battle line and advance without having to worry about his flanks as much. You can't build a list for just one type of opponent when playing a tournament of course, but just for theory's sake, I think that type of list would have made the game tougher for you. I think he did well with what he had, especially considering that he almost got your characters! It was a risky move to have them in harms way at the point of a battle where it was pretty clear that you had won, but it worked out in the end!
I anxiously await to hear how well this tournament went for you after doing so well in the previous one!
Great report as always!
Hi Dan!
DeleteThanks for your always great feedback! Don't worry about being a little behind, I simply decided to post more frequently and hopefully get all the reports uploaded before 9th edition revolution hits in. I have already noticed that people are less motivated for Warhammer unless they are preparing for the upcoming ETC event.
Beastmen have a very old army book and it shows. Combined with some of the coolest but overpriced monsters there is no wonder they are difficult to master. However, End Times provided them with Marks and additional unit in the form of Blight Kings. I have seen an army with Tzeentch characters, Slaanesh support and 2 units of Kings among others and it was very, very good! (not to mention it had plenty of units too)
I think it showed in Johnaton's play that he could not decide which way to go. He could not quite castle due to scenario and randomness of the deployment. Then he tried to advance but was visible concerned about lack of cover for his main battle line.
But he did very well, in my opinion, and I was indeed in a risk of losing my characters so I think it was reckless on my part.
Johnaton is now playing Daemons with great success and he also travels a lot to many interstate tournaments earning him Marco Polo title :)
As to the tournament overall result you will see that soon as I have only two games left to add.
Cheers!