
Hi guys!
This time I was lucky that Joel, whom I have met on two tournaments already, was visiting the capital village and offered me a game. He wanted to test his army for the upcoming tournament with Swedish Comp (yes, I know, boring :)). We decided on a battle line but let's have a look at Joel's list first:
Warriors of Chaos - Army List
Sorcerer Lord, Mark of Tezeentch, Disc, Level 4, Talisman of Preservation, Dragon Helm, Dispel Scroll - Lore of Tzeentch
BSB, Mark of Tzeentch, Shield, Disc, Armor of Destiny
5 Chaos Hounds
5 Chaos Hounds
Chaos Chariot, Mark of Nurgle
Chaos Chariot, Mark of Nurgle
15 Chaos Warriors, Mark of Nurgle, Shields, Halberds, Full Command, Banner of Eternal Flame
15 Chaos Warriors, Mark of Nurgle, Shields, Halberds, Full Command, Banner of Swiftness
3 Chaos Ogres, Mark of Nurgle, Musician, Great Weapons
3 Chaos Ogres, Mark of Nurgle, Musician, Great Weapons
3 Skullcrushers, Ensorcelled Weapons, Musician
3 Skullcrushers, Ensorcelled Weapons, Musician
Swedish Comp = 10.5
It might not be the toughest WoC army out there but make no mistake, these guys are tough, very tough. The interesting thing about our games with Joel is that each time there is something new due to changes to army books. First game we both had army lists from old books. Then Joel got his new list and we met again. This time it was my turn.
That meant that this time almost every single unit in WoC army was better in close combat in one-on-one confrontation. Only warriors with flaming attacks might have trouble against Dragon Princes. Chariots are always a problem and heavy type of chaos armies are potentially not that easy to shoot down. Not that I would not try to do that anyway :D Chaos Ogres were an interesting addition and I think they might be a problem for many armies anyway. Mark of Nurgle in addition to the high toughness and good armor save makes this army very dangerous.
Usual suspects in the form of flying characters with 3++ ward save were there too. But the main weapon is magic for them (although BSB can do some hunting too).
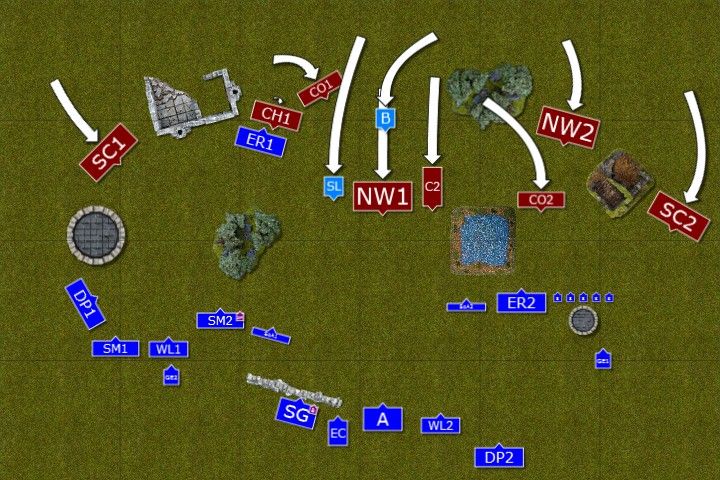
I decided on the following approach. Deploy a little further back with shooters (but not all of them), detach some guards on one flank (the one I wanted to delay) and create a local superiority on the other flank (as I had more units to do so). I also wanted to go for blows exchange in magic, much like in the case of last game against Galrauch. As the only thing Warriors of Chaos respect is brute strength :)
My list for reminder:
Outcasts - Army List
Archmage, level 4, Earthing Rod, Golden Crown - Lore of Metal - 255
Battle Standard Bearer, Dragon Armor, Halberd, Charmed Shield, Potion of Strength, Reaver Bow - 157
15 Archers, Light Armor, Full Command - 195
15 LSG, Full Command - 210
2 x 5 Ellyrian Reavers, Musician, Spear, Bow - 2 x 10⁵
2 x 5 Dragon Princes, Musician - 2 x 155
2 x 12 Swordmasters, Bladelord, Musician - 2 x 176
10 White Lions, Muscian, Banner of Eternal Flame - 165
10 White Lions, Muscian, Gleaming Pennant - 155
6 Shadow Warriors - 85Eagle Claw Bolt Thrower - 70
2 x Great Eagle - 2 x 50
2 x 5 Sisters of Avelorn - 2 x 70
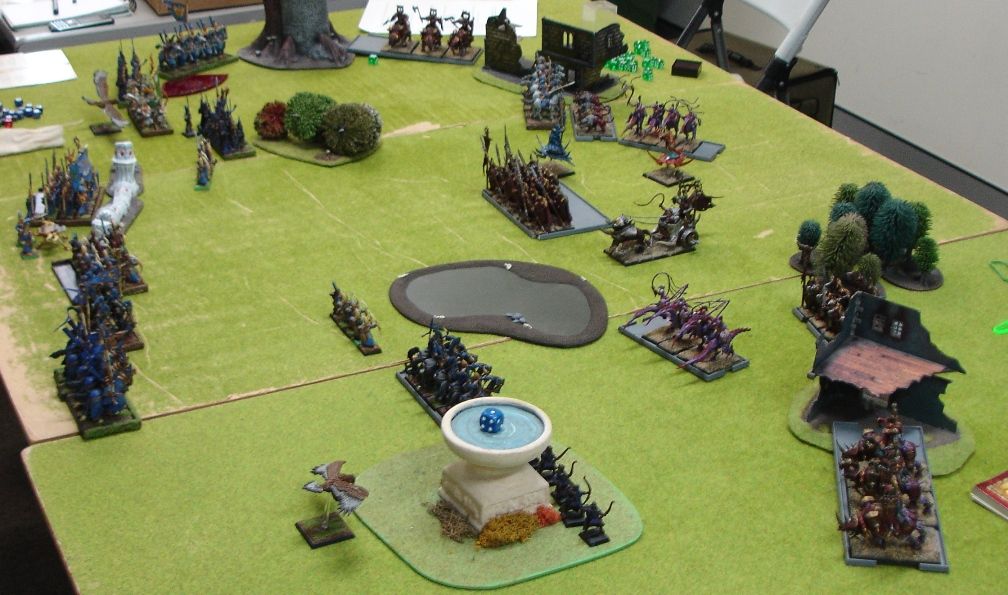
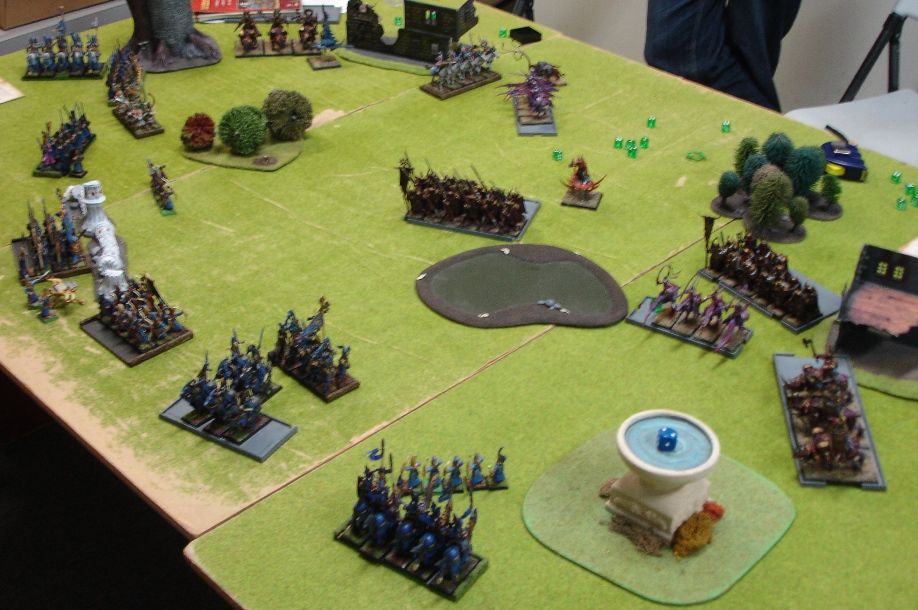
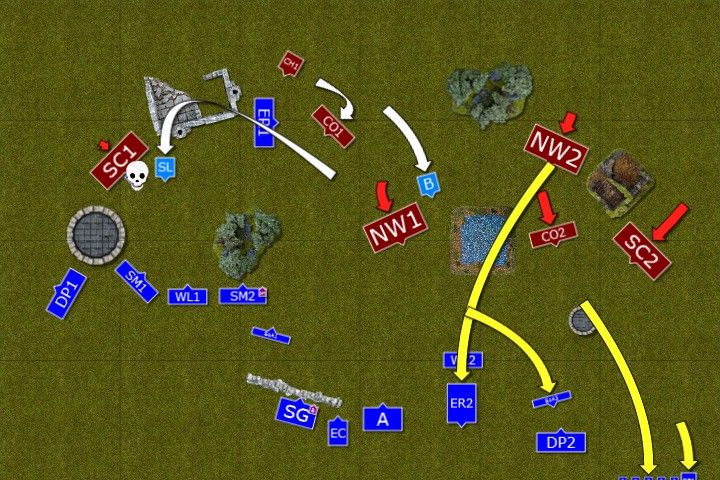
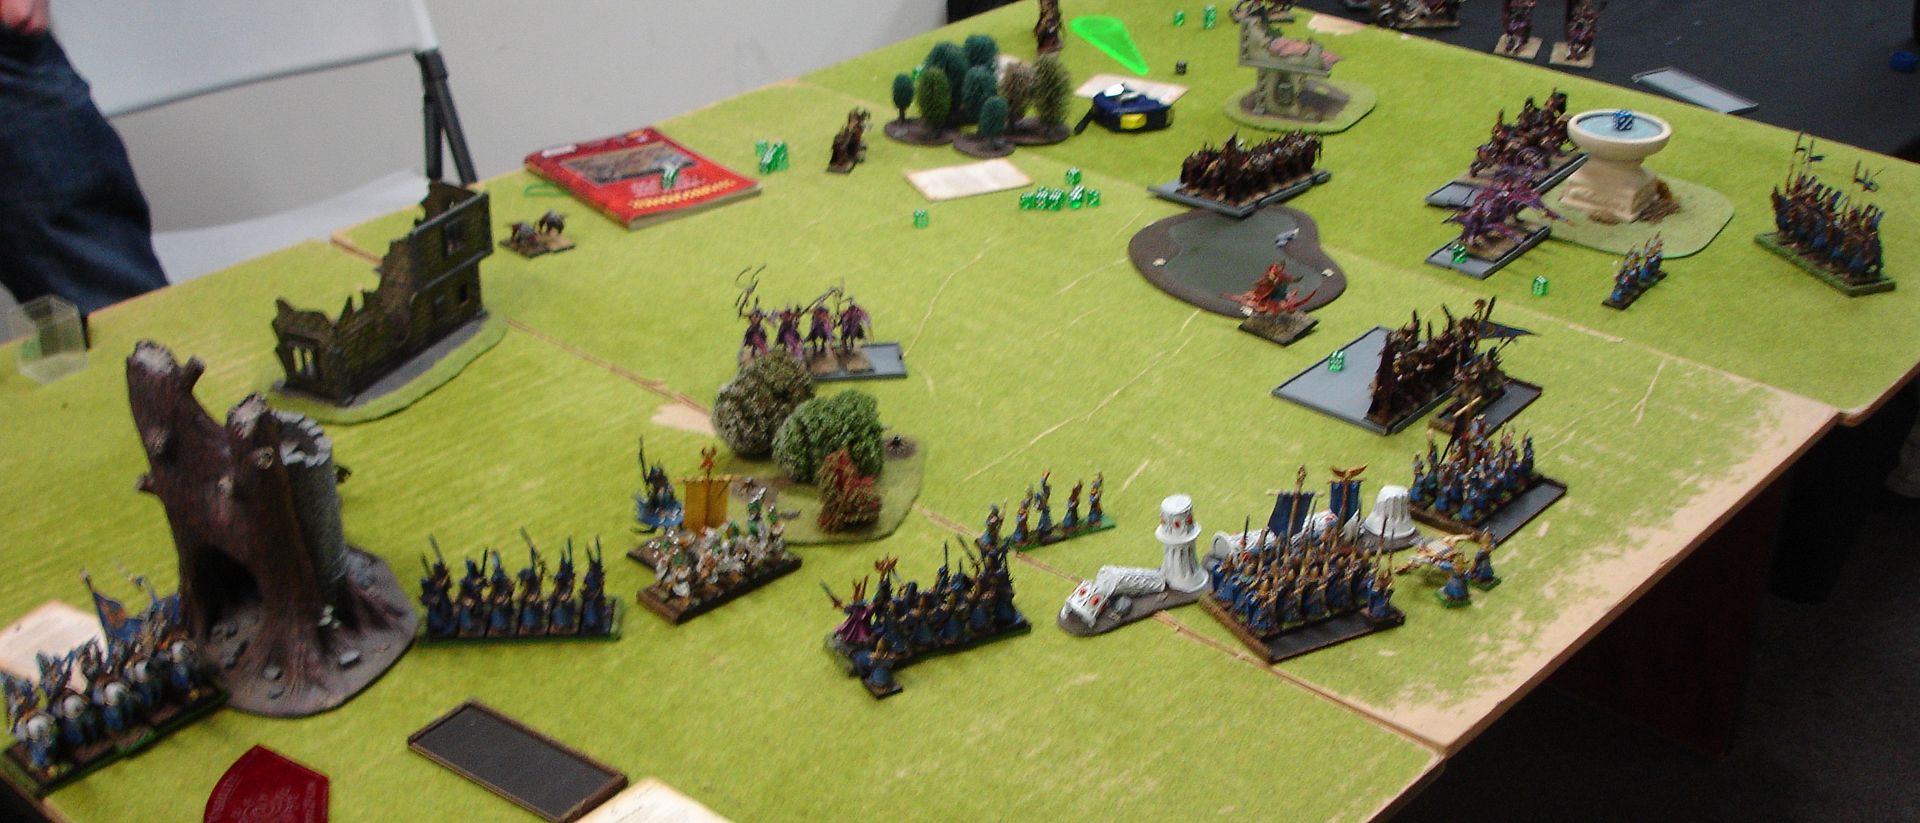
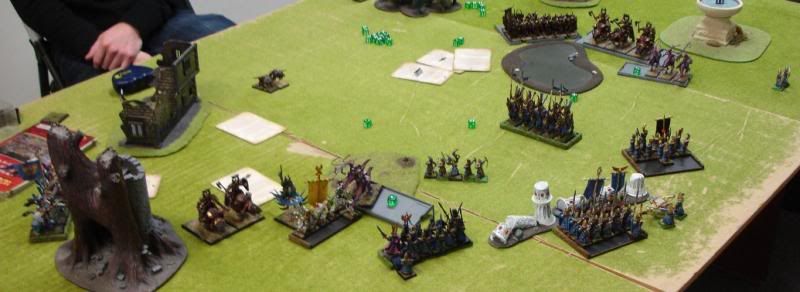
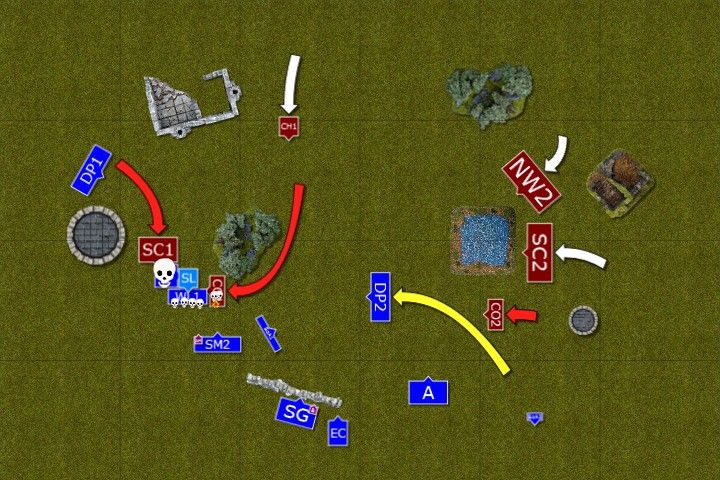
Deployment
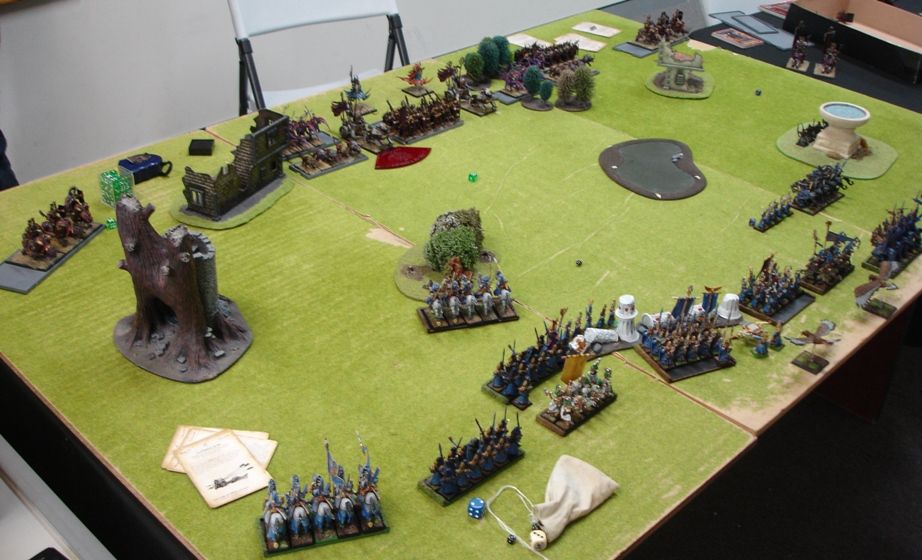 |
| Armies arrayed for battle |
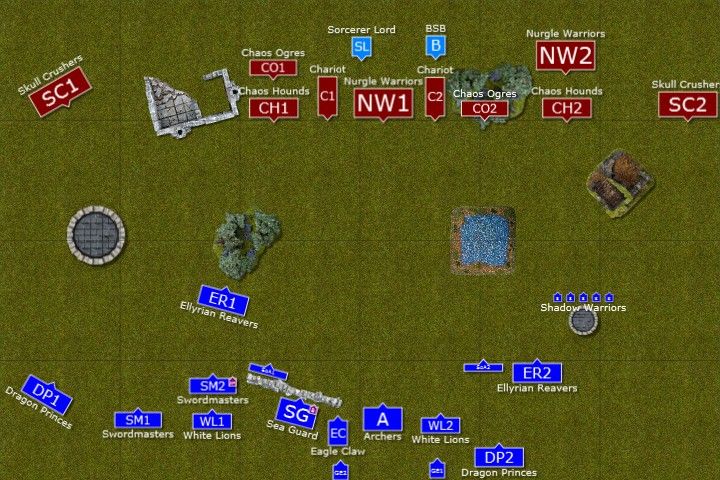 |
| Deployment after vanguard move |
We played with mysterious terrain but the forest occupied by ogres turned out to be not magical at all. While leaders of the Chaos army were on their own, elven characters joined their units. BSB led sea guard to battle while Swordmasters protected the Archmage.
The wizards had following spells:
Sorcerer Lord - Treason of Tzeentch, Pink Fire of Tzeentch, Bolt of Change, Glean Magic
Archmage - Searing Doom, Enchanted Blades, Glittering Robe, Golden Hounds
Please notice, that the hellstriders double as Chaos Ogres in the photos.
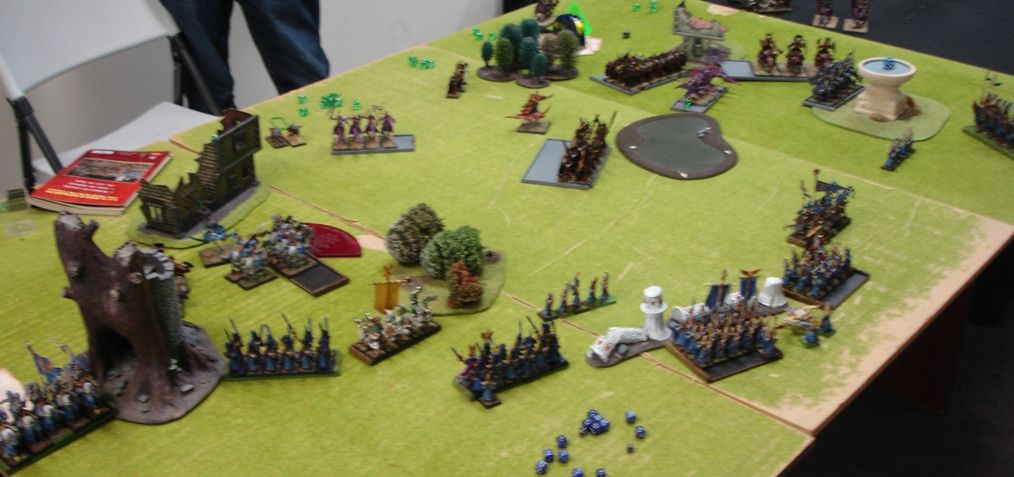
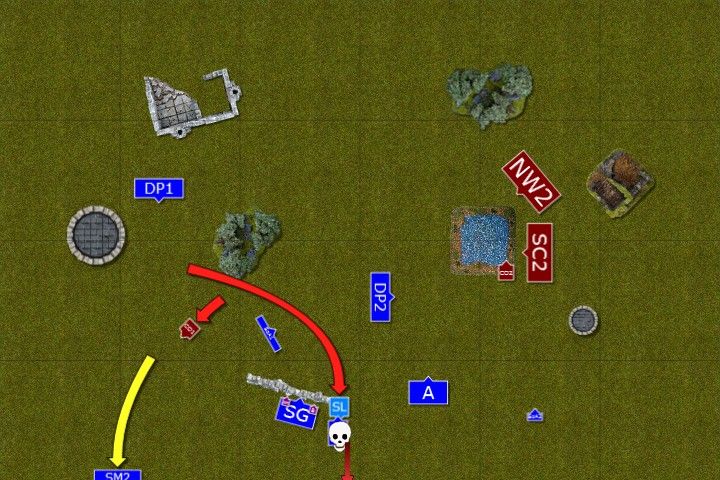
Surprisingly High Elves got the first turn this time.
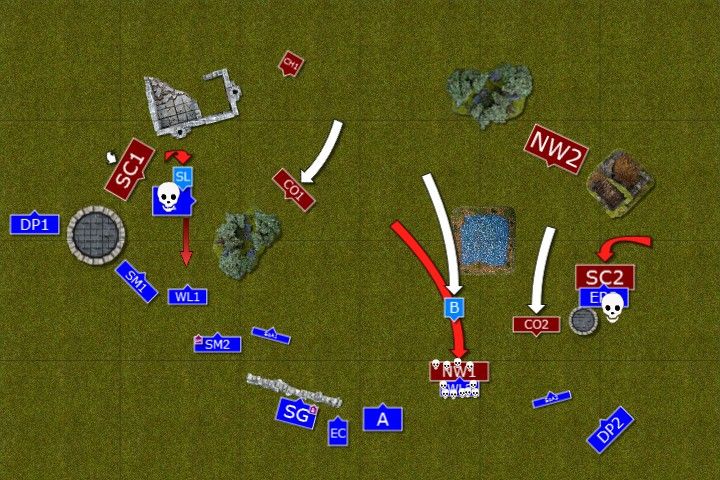
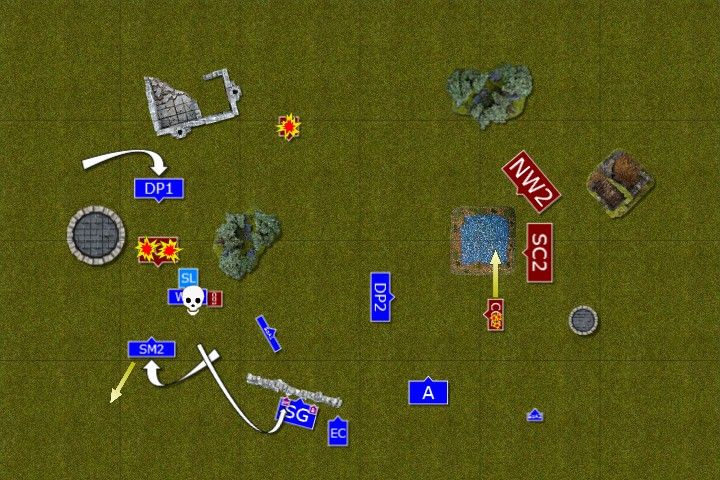
Outcasts - Turn 1
 |
| Weighted flank formation in action |
 |
| First blood for Elves |
Elves adopted aggressive defense. It meant they moved forward with combat specialists, threatening to attack and at the same time used their magic and shooting to kill or wound the enemy. As the result on chariot was destroyed (in great part thanks to magic bows of the Sisters), second was damaged and a pack of war hounds was no more.
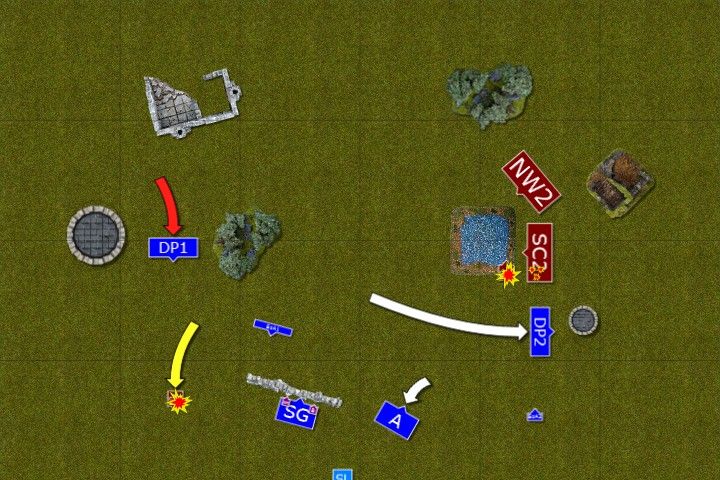
Warriors of Chaos - Turn 1
 |
| Chaos Army moves forward |
 |
| Warriors march as if nothing happened |
Not concerned with the loss of the chariot, the army moved forward. Not close enough for efficient use of magic, chaos sorcerer hoovers behind his units to avoid incoming arrows.
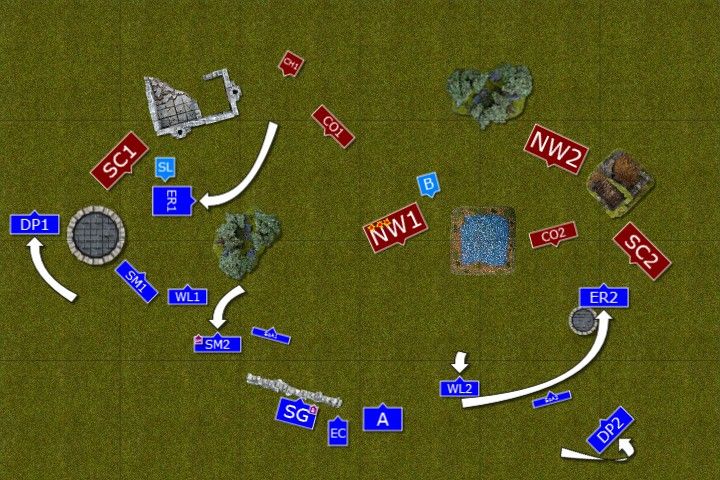
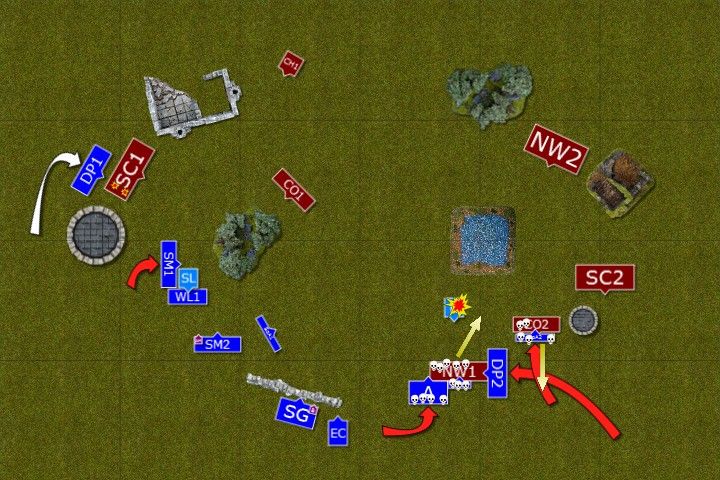
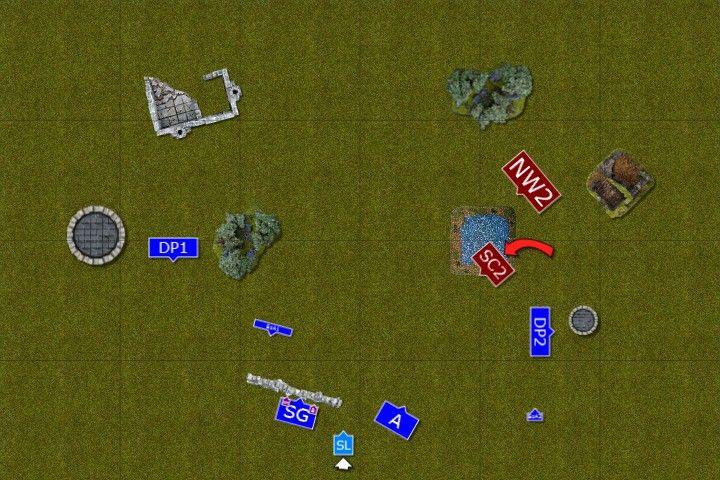
Outcasts - Turn 2
 |
| Ellyrian Reavers harass the enemy |
 |
| Deadly dance has just begun |
Ellyrian reavers used their famous skills and raced in between clumsy foe distracting and making it difficult to maintain cohesive battle line.
The shooters focused on another chariot and the powerful construct was eventually brought down too.
While the forces on the Eastern flank slowed down the enemy, the units on the West tried to use the time to overwhelm the enemy. Unfortunately, the steeds of the Dragon Princes were already disturbed by the chaotic energies and the knights had to spend time to regain control instead of swiftly moving around to threaten enemy rear.
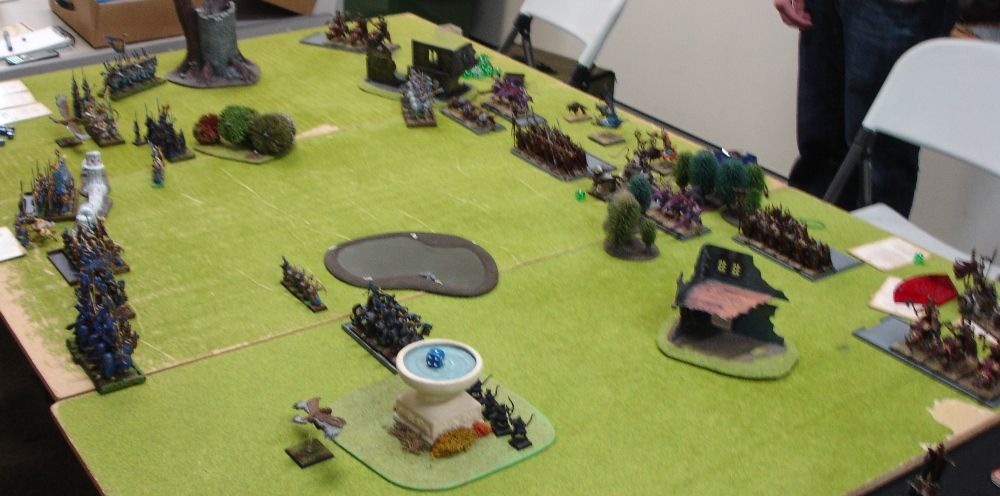
Warriors of Chaos - Turn 2
 |
| Warriors of Chaos press hard on the East |
 |
| Not all went according to the plan |
Chaos forces attacked on the East. While Reavers and Sisters both perfectly executed the feigned retreat and in result slowed down enemy forces, then Shadow Warriors and the Great Eagle left the battle field in confusion. Not all went according to the plan.
On the West bloodthirsty skullcrushers attacked the eagle but before their fury would carry them too far forward, Sorcerer Lord stopped the juggernauts.
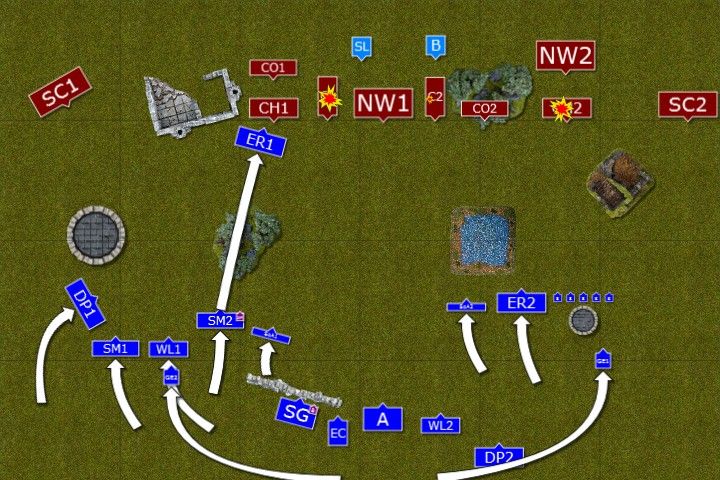
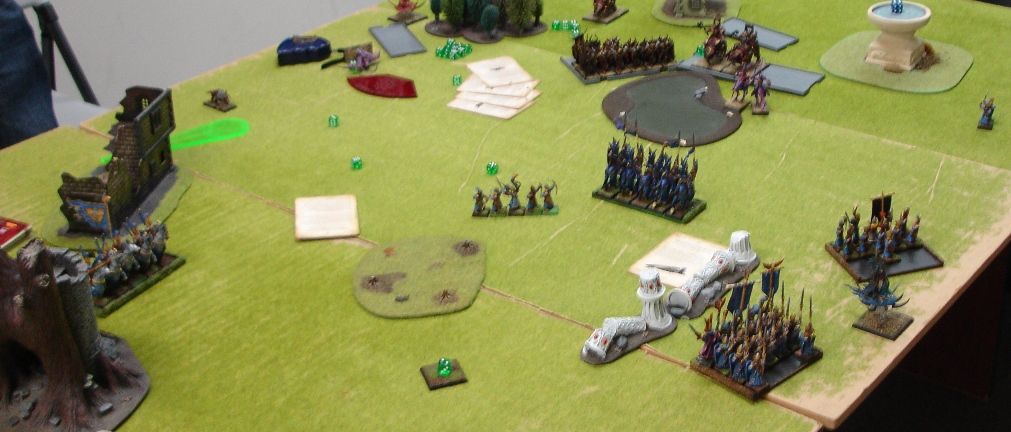
Outcasts - Turn 3
 |
| Elves regroup |
 |
| Ellyrians position to slow down the enemy once more |
Light cavalry moves in again and brave Ellyrians position themselves to slow down the enemy (if possible). Other regiments regroup and shoot down a few warriors from the warriors unit in the center.
Warriors of Chaos - Turn 3
 |
| Warriors attack again |
 |
| Elves hold their ground |
Both reavers units take the brunt of the attack and are destroyed but at least the slow down the enemy. Warriors in the center charge White Lions. Brave Chracians kill a few of the corrupted warriors but suffer huge casualties themselves. They stubbornly hold their ground but it is clear that even with the rescue coming they might not survive this battle.
Outcasts - Turn 4
 |
| High Elves counter attack |
 |
| The center is secured (for a while at least) |
High Elves counter attack. On the West Swordmasters aid White Lions attacked by the chaos general but despite a lot of blows landed on his armor all but one are deflected. The Sorcerer is hard pressed but does not break confident the rescue is on the way. The Archmage tries to cast spells at the sullcrushers but manages to wound some only.
On the East Sisters valiantly charge the Ogres, even killing one, to make way for Dragon Princes. The Knights charge and with the aid of Archers they break the warriors and run them down. Unfortunately Lions do not survive this battle.
In the meantime magically aided bolt hits the BSB of the chaotic army. His magical protection saves him but in the moment of distraction caused by the blow he ignored more arrows coming at him. Burning missiles, getting even hotter on the impact, hit precisely into two tiny slits of his helmet and with a crush his lifeless form topples down from the disk to the ground.
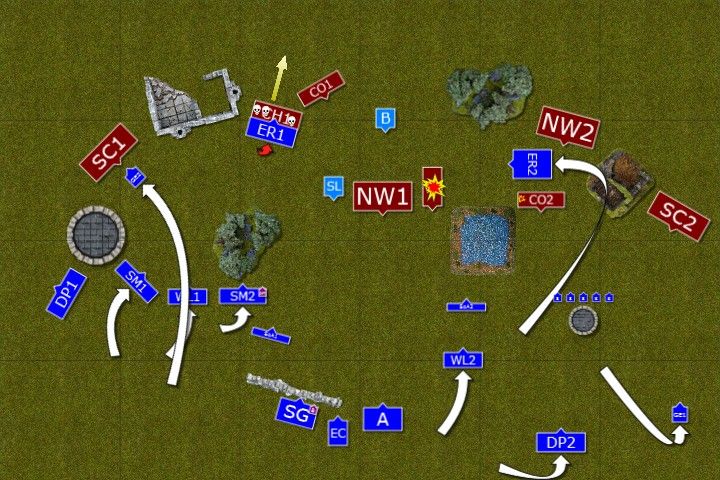
Warriors of Chaos - Turn 4
 |
| A counter to the counter attack |
 |
| Warriors try to break through on the West |
Skullcrushers charge the Swordmasters and even warriors of Hoeth cannot stand to that attack. They try to destroy the Sorcerer but again his magical protection proves to be too much. Only Lions are left fighting him, although the flank charge of the Ogre (his wounded companion was claimed by the venomous forest) keeps them hard pressed.
The Sorcerer, even in the midst of combat, duels with his counterpart and yet again wins. While no physical damage is done, elven Archmage temporarily lost another spell from his memory. What is worse, renewed energies allowed the Sorcerer to cast it on his own unit making them even more vicious in combat. (Edit: Glean Magic robbed my Archmage from 2 spells and reduced him to level 2, this turn he lost Enchanted Blades)
Outcasts - Turn 5
 |
| Bloody encounter on the Western flank |
Archmage gathers his powers and this time he manages to break through the defenses of the Sorcerer. The spell is also powerful enough to destroy remaining two of the skullcrushers.
However, White Lions were not able to withstand one more round of fight and are destroyed. As a result, nearby Swordmasters break and flee to safety.
On the East a similar behavior is shown by the Ogre who panics after seeing his last companion pierced by the arrows.
Warriors of Chaos - Turn 5
 |
| The Sorcerer continues his rampage |
 |
| Eagle claw is his next victim |
The Sorcerer and his pet Ogre chase away the Swordmasters and then the general of the Chaos army flies towards the eagle claw. The crew fights bravely but is no match for their foe.
Outcasts - Turn 6
 |
| Last attack by High Elves |
 |
| Ogres are hunted down |
With no combats High Elves attacked at range. Both surviving Ogres were mercilessly shot down. The Archmage tried to finish Skullcrushers with powerful spell but magical energies were not strong enough this time.
Warriors of Chaos - Turn 6
 |
| The Sorcerer returns to the battle field |
Both armies are bloodied and upon his return to the battle field the Sorcerer decided to disengage. He still had 2 powerful units but High Elves were not yet broken despite heavy casualties they suffered. In fact, the balance shifted slightly to their favor.
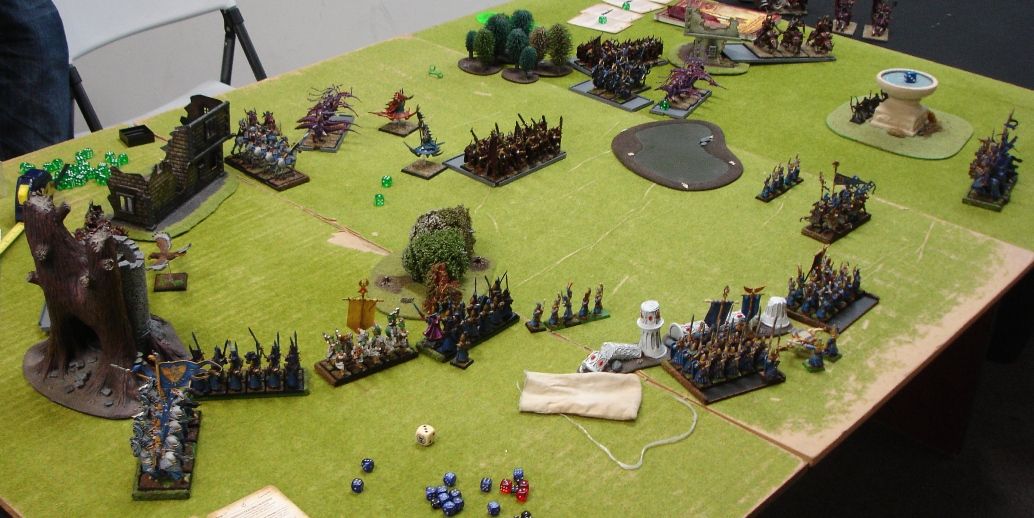
Summary
 |
| Turn-by-turn summary |
After-battle thoughts
First of all I would like to thank Joel for the great game! It was really good to meet again and I guess we are developing a nice string of battles. Time to think about some story to wrap it up. Especially, that there is a chance there will be more episodes :)
There were some very interesting situations during it and I am sure you would agree that many times the balance shifted from one side to another. Let me go through some in no particular order.
I like to start with the deployment. This time I was quite happy with it. I believe I managed to do it well enough to be able to employ that aggressive defense I wanted to. As I have mentioned, Warriors of Chaos are very tough and one needs any extra help to thin them down and gain time to prepare favorable combats.
The only thing I am wondering is if I did well to position Dragon Princes on the West. I was unlucky to fail first swift reform and then I had treason of tzeentch on them so they were testing on Ld5 of their steeds. I could have avoided that with an appropriate formation (4 wide to be able to move through the gap) and not be late to aid infantry in their struggle. However, since Warriors on the East had flaming attacks it was ideal to send both units of Dragon Princes against them. If they could have avoided skullcrushers and ogres on their way.
The situation on the East when Shadow Warriors and Great Eagle fled was my mistake. I miscalculated the direction in which my rangers were supposed to retreat. And positioned Great Eagle in the wrong spot. What is more, when I was taking a dangerous test due to fleeing through impassable terrain (sorry for not mentioning that in the report) I lost one model. I took it from the wrong side. If I did it from another the great eagle would have not been clipped and would have not needed to test. Tiny detail but matters so much. As a result, I lost 2 units and had to sacrifice reavers to slow down skullcrushers.
Speaking of which I must admit I was surprised by Joel's great move with his Sorcerer. I didn't anticipate he could park him nearby and by doing so he prevented a disastrous overrun of his regiment. Well done, Joel!
I really liked that feint and counter-feint moves on the West. Unfortunately for me I could not break through that accursed 3++ ward save with so many high strength attacks. And when I could break the sorcerer he simply passed his Ld6 test. Then I was attacked by skullcrushers and again tried to land some blows on the wizard but again Joel expertly passed his saves.
I had a chance to counter the Ogre with Swordmasters. I didn't do it because the forest forced dangerous terrain tests so the whole unit would have been affected (apologies for a mistake on a diagram where it seems that the Ogre is in the open). I also was reluctant to move Archie into the combat. It proved to be good decision as he destroyed the skullcrushers anyway.
Unfortunately, the destruction of White Lions panicked nearby Swordmasters. I think I should have been more careful in positioning and either try to keep them in 12" from BSB (a little difficult as he tried to shoot at the time too) or maybe move them back to be away more than 6". I simply thought I would be able to have that combined charge from the front and back against skullcrushers or even cast magic and still be able to fight them if the spell didn't succeed.
I was very happy with my shooting and having 1st turn did help a little too. But only because I decided to deploy Sisters a little bit forward. Their S4 + AP against forces of destruction rule was really powerful here. Suddenly, tough chariots were saving on 5+ only and elven players know how good it is. Shooting down BSB was obviously very lucky but at the same time made for a great story :) (female elven ranger in Warhammer Online anyone? :)).
The fact that I didn't have to face Gateway this time made things easier on one hand but at the same time I really struggled to cast my spells, in particular when I failed to dispel or win duel in Glean Magic. I was lucky that I didn't lose searing doom in the process.
When we calculated the points it turned out that High Elves won by a very small margin. Which is great for me as it shows very well how close the game was. I didn't break the Sorcerer but I shot down the BSB and broke the warriors nearby. Oh, one more thing. I was not meticulous enough to position my Lions and Archers so that when Lions were attacked Archers should have been in the flank zone. I charged with them anyway but I can't remember if their banner and rank made up for the 4 wounds they lost in that combat. The warriors were not steadfast anymore but they failed their Ld7 test which was not that obvious either.
Thanks for reading!
Great game Mr Swordmaster!
ReplyDeleteI really liked your deployment and think you played a fantastic game. The dragon princes getting slowed down on the left flank and the flee trouble on the right flank were really the only things I noticed that might want to be changed. Speaking on deployment, I think that is where your opponent messed up a bit and you did a good job of using that to your advantage by using reavers to block his more hitty troops on your left flank. The hounds should have been deployed differently so as they could be used to block your troops and not his own. I will say that the terrain likely influenced the placement but I still think it could have been improved with some creative adjustments.
As a side note: your opponents move to use his sorcerer to block his own troops overrun was brilliant! It's tricks like that which make bat reps so much fun. I would not have thought of that in a million years! So devious.
My main thought about the battle report is my own possibly devious trick that I'd like to run by you. Deploying frenzied troops on the edge of the board is a risk that needs to be taken advantage of. Troops that come back on the board can't charge or march so here is my thought:
1. Use eagle to set up an overrun that will force skullcrushers on your right flank to run off the board.
2. Knowing where your opponent will re-enter, use either reavers or shadow warriors to block-in that area where he will be forced to return.
3. If done correctly, your opponent will be stuck because he can't charge that turn and can't reform since it would bring him within 1" of your troops.
4. This ensures a DP flank charge!
5. Even if you don't break/pop skullcrushers (not sure if they can break or not, I'm unfamiliar with them), they still can't reform after combat with the correct placement of your blocking troops!
By the way, I'll be leaving for Europe this Saturday, so if you don't hear from me after that, that is the reason. I get back around the 18th, so any reports I miss, I'll be sure to go back and catch up on them when I return!
I may have a bat rep for you before the end of March hopefully. That is my goal!
Thanks for the report!
Hi Dan,
DeleteNow that was a quick reply! Thanks a lot for your feedback, very valuable and always greatly appreciated :)
I will try to address your comments in more details but in the meantime, check the ideas posted by Kanadian on TWF as a comment to what could have been done with the Crushers in that particular game. I am sure you will find it very interesting :)
http://warhammer.org.uk/phpBB/viewtopic.php?f=12&t=94823&start=870
Hi Dan,
DeleteA little bit more in reply to your comment!
I am glad you liked this game as it was one of my favorites. First, I was happy with my performance but second, as you said, Joel played great too and his move with the sorcerer was absolutely fantastic!
It is a very good plan to divert Skullcrushers. They are not unbreakable, just frenzied and very tough to kill but any unit hit in the flank can suffer. It was definitely risky for Joel to deploy them on flanks and I should have done better job in diverting them.
Your are correct that I could have used my unit number superiority to seize initiative on that flank too!
Thanks a lot for your feedback again! Enjoy Europe and let me know when you are back, hopefully there will be some more reports for you to read!
Cheers!