
Greetings!
In my first game I faced Simon and his Dark Elves. Little did I know what kind of caliber of a player I am facing. Only later I have found out that Simon is actually the highest ranking player in NSW and will participate in this year Masters (a tournament for the highest ranking players in Australia, participation is granted by invitation only). He was invited to join ETC team for 2013 too. He decided to have a go at a small tournament in Canberra and was one of the two players who came from Sydney to do so. However, seeing his army list and playing against vile Druchii I knew was up to a challenge anyway.
Army Lists and pre-battle considerations
After 3 tournaments with composition scores in Oz I have noticed that in general players just take the armies they like. They are either hard but players aim at massacring the opponents or the lists are softer but the players can still be very tough opponents and can count on a little extra leverage for the overall scoring. It seemed that Simon prefers to crash his enemies as suits Druchii merciless warriors and make up for lower comp score with his outstanding results from battles. At least it was the case with this army :)
Dark Elves - Army List
Dreadlord on Dark Steed, Sea Dragon Cloak, Blood Armor, Pendant of Kaleth, Crown of Command, Biting Blade
Supreme Sorceress, level 4, Sacrificial Dagger, Talisman of Preservation - Lore of Shadow
Death Hag BSB, Cauldron of Blood
Sorceress, level 2, Dispel Scroll - Lore of Fire
Assassin
30 Corsairs, extra hand weapon, Full Command, Sea Serpent Standard
25 Warriors, Full Command
10 Crossbowmen
20 Black Guard
5 Harpies
5 Harpies
5 Shades
Hydra
This army is very dangerous on its own but with eternal hatred all over the place it was even more so. With sheer volume of the attacks, re-rolls to hits every round of combat and numbers to step in big regiments could chew through my small units if given the chance to fight one on one. Powerful magic, with ability to generate extra dice constantly meant I was to face quite relentless magic phase. Unkillable dreadlord was a danger too, easily able to hold against almost anything I could throw at him and if close to BSB it would have been very difficult to break him with some lucky static combat result. The good thing was that Simon didn't have that much shooting and at least in that field I had some considerable advantage.
Outcasts - Army List
My army list had to be changed from 2500 to 2400 version and I had a hard time to decide what to leave at home. In the end I opted for some more tests for Eagle Claw and what better environment for that than a tournament!
Archmage, Staff of Solidity - High MagicBSB, Heavy Armor, Shield, Great Weapon, Dragon Helm, Reaver Bow
10 Archers, Musician
10 Archers, Musician
15 LSG, Shields, Full Command
15 LSG, Shields, Full Command
10 Swordmasters, Bladelord, Amulet of Light
9 Swordmasters, Musician, Bladelord, Talisman of Loec
10 White Lions, Musician, Standard, Banner of Eternal Flame
10 White Lions, Musician, Standard, Gleaming Pennant
5 Dragon Princes
5 Dragon Princes
5 Ellyrian Reavers, Spears
Great Eagle
Great Eagle
Eagle Claw Bolt Thrower
I also had to drop one Swordmaster but with one unit of Reavers it was exactly 100 points less and I was ready to go. I wanted to use my units superiority to overwhelm one flank with combined charges. Seeing hydra on the West I decided to go there to hunt the beast down and surround the opposing enemies. Even Black Guard might have tough time against a few of my units if they combine their efforts. I didn't want to completely abandon Eastern flank though since thanks to that I could maintain the pressure from both sides and keep the enemy threatened. As long as these big units had many targets and were stretched I could use the gaps in between them or simply prevent them from supporting each other.
Since Druchii are also T3 and lightly armored foes I wanted to use my shooting superiority to some effect. Shooting down Simon's own shooters was the priority and then I wanted to focus on the units I intended to fight against if possible.
In the end, however, I wanted to hit them in close combat and hit them hard as eternal hatred is for nothing if there is no one to hate me :)
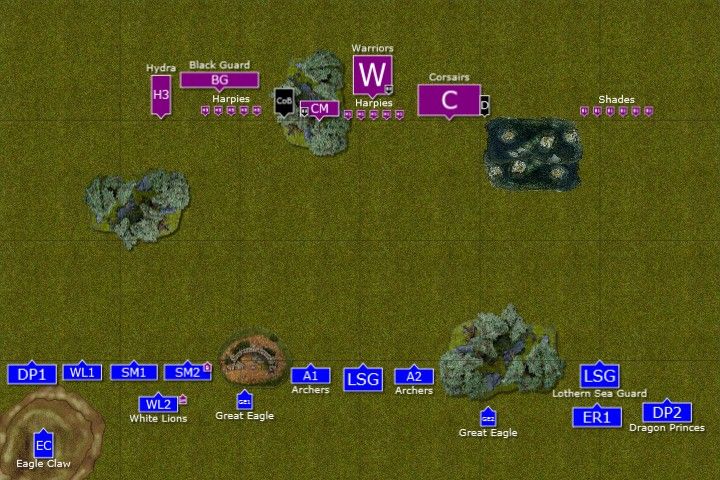
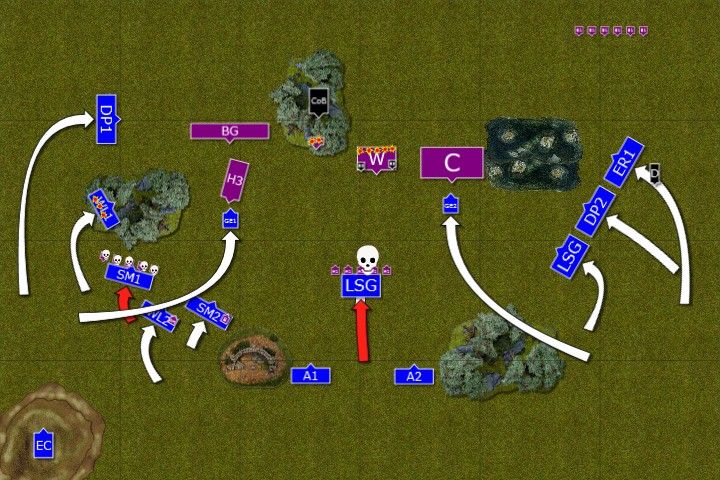
Deployment
You need to forgive me but during the tournament I had no time to make notes about details such as deployment order. I usually opened deployment with archers and eagles often followed by sea guard.
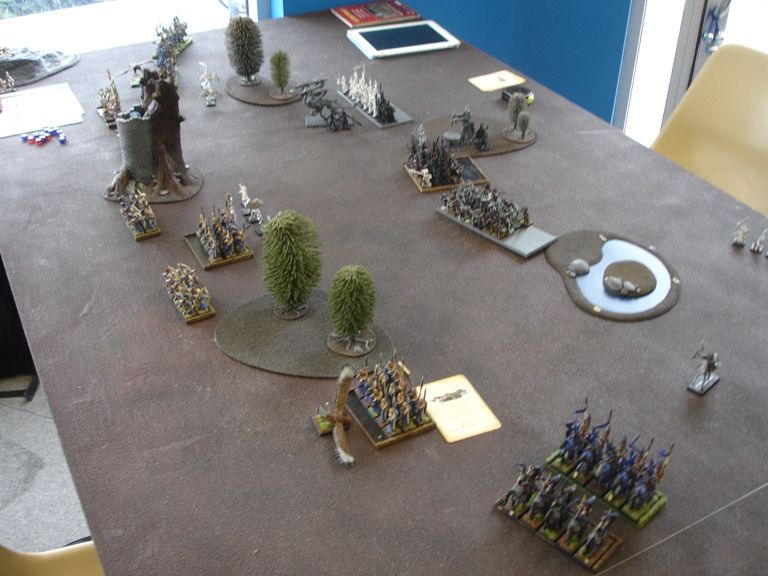
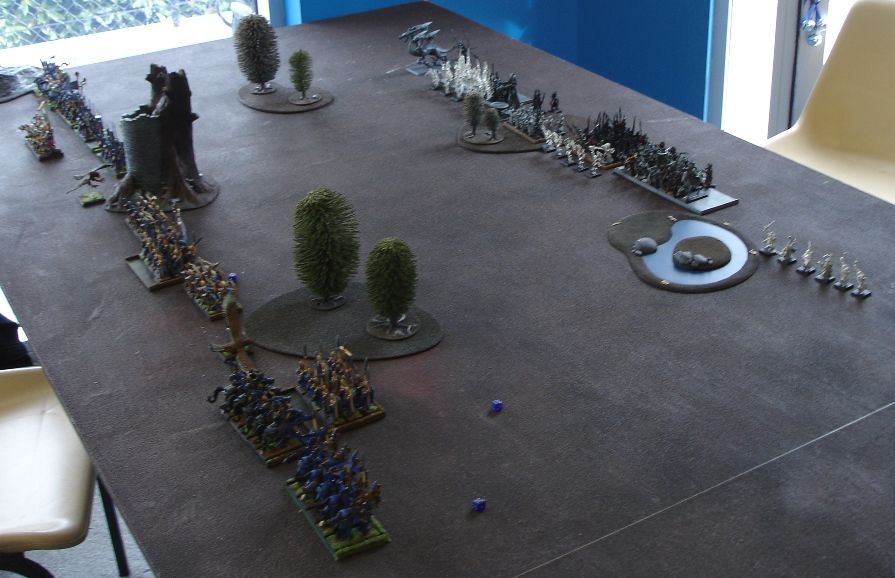 |
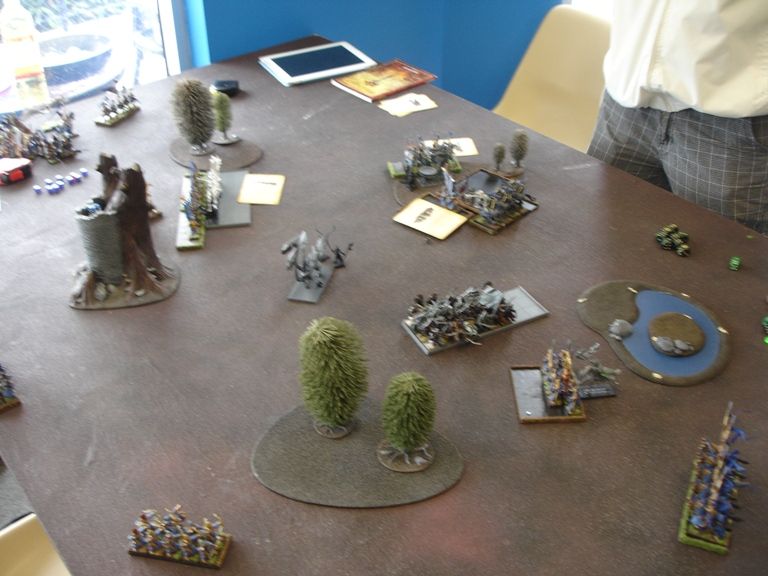
| Deployment of both armies. Simon has just bought his Druchii so the painting is at the very early stage |
 |
| Both armies after scouts deployment and vanguard move. |
Initially I deployed Reavers in front of the Dragon Princes on the East but when Simon deployed his Shades there I decided to use Vanguard move to hide them behind Sea Guard and also add extra distance in between the regiments. No need to provide easy target right from the start!
Dreadlord was deployed with Corsairs. Level 4 was accompanied by warriors ready to give their lives for her and level 2 was deployed with Crossbowmen. Archmage started with White Lions while BSB was with Swordmasters ready to shoot as soon as possible.
Wizards got following spells:
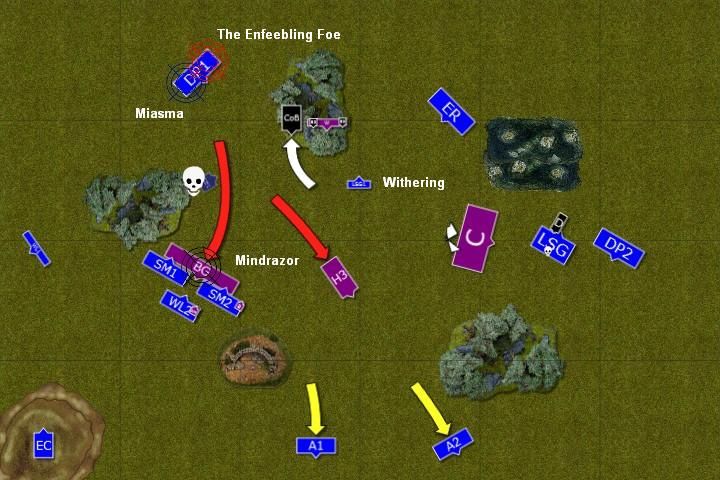
Supreme Sorceress - Miasma, The Enfeebling Foe, The Withering, Okkam's Mindrazor
Sorceress - Fireball, Fulminating Flame Cage
Archmage - Drain Magic, Shield of Saphery, Fury of Khaine, Flames of the Phoenix, Vaul's Unmaking
To my surprise I won the roll-off for the first turn so it was my chance to begin the battle for a change.
Outcasts - Turn 1
Dreadlord was deployed with Corsairs. Level 4 was accompanied by warriors ready to give their lives for her and level 2 was deployed with Crossbowmen. Archmage started with White Lions while BSB was with Swordmasters ready to shoot as soon as possible.
Wizards got following spells:
Supreme Sorceress - Miasma, The Enfeebling Foe, The Withering, Okkam's Mindrazor
Sorceress - Fireball, Fulminating Flame Cage
Archmage - Drain Magic, Shield of Saphery, Fury of Khaine, Flames of the Phoenix, Vaul's Unmaking
To my surprise I won the roll-off for the first turn so it was my chance to begin the battle for a change.
Outcasts - Turn 1
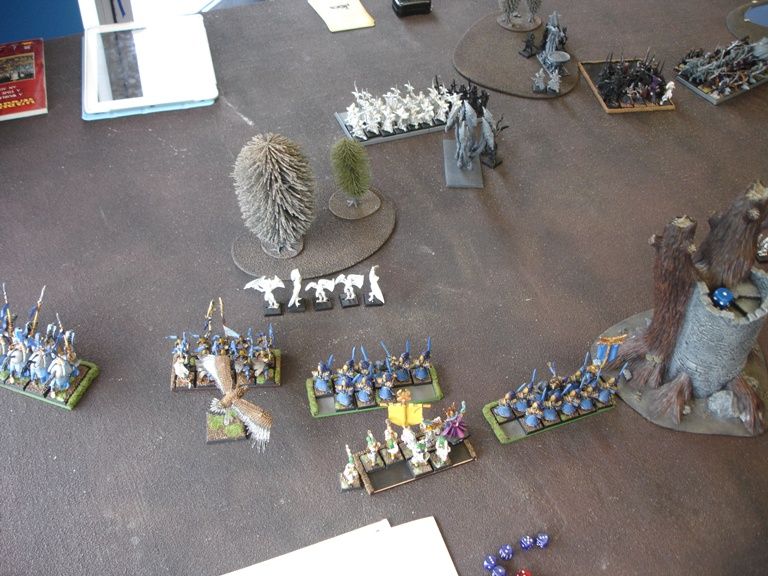
 |
| Delaying force on the East ... |
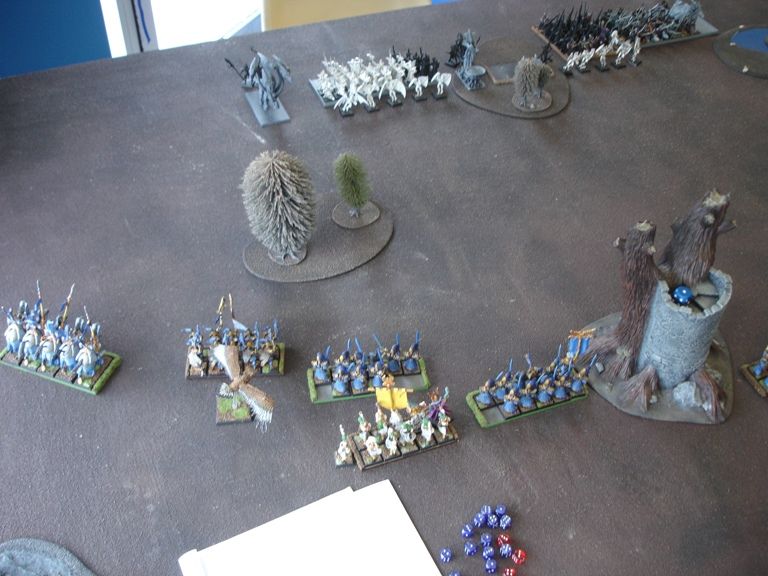 |
| ... and main forces on the West |
 |
| High Elves begin envelopment |
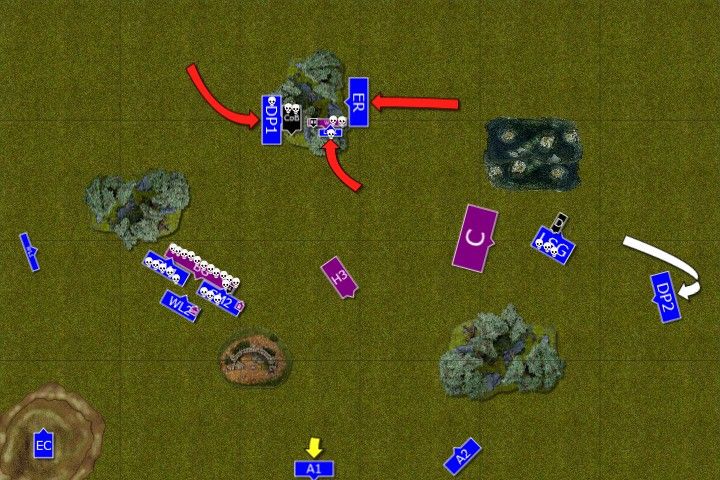
The regiments on the East move forward with light horse being protected by their heavily armored companions. Both units aimed at Shades who were left in the open. On the West the striking force moved at a steady pace. In the center only Sea Guard moved forward to be able to shoot at their enemy. All units able to do so focused their fire at Druchii crossbows and despite some protection from the forest only 2 of them and a Sorceress survived.
Dark Elves - Turn 1
 |
| Arrogant Dreadlord moves forward on his own to face the flanking force of his enemies |
 |
| Harpies fly to sacrifice themselves for their masters benefit |
 |
| Dark Elves move towards their hated kin |
Druchii army moved forward to meet their hated kin as soon as possible. Harpies were sent to slow down High Elves advance. Arrogant Dreadlord moved on his own to intercept flanking force of the enemy while Shades pulled back a little and shot at incoming heavy cavalry but their bolts didn't find any weak spots.
The Sorceress moved to join her mistress among warriors. The onslaught of her own retinue made her very angry and in her cold fury she wanted to punish High Elves. In doing so she drew too much energy and while her Fireball was cast with such a force even the Archmage could not stop it she also could not prevent magical feedback. 9 of the warriors lied dead as a result and only the fact that Supreme Sorceress treated them as expendables saved the adept of the black arts from her wrath. Few White Lions died too.
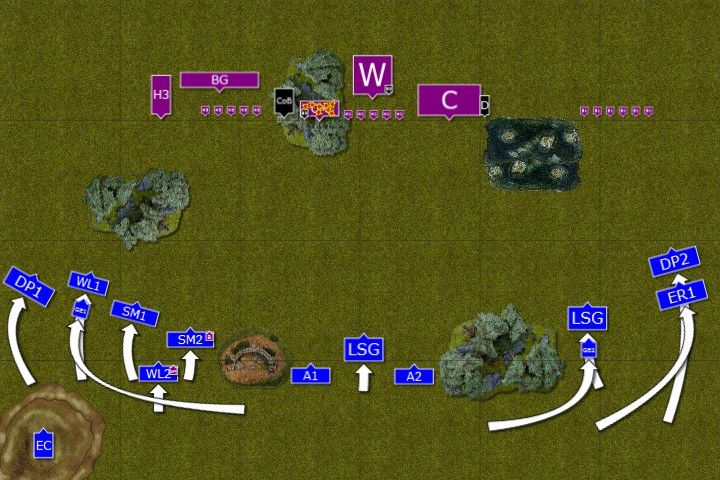
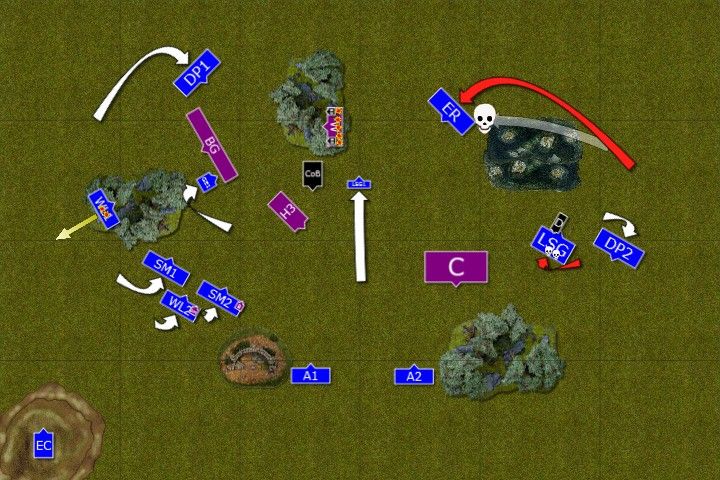
Outcasts - Turn 2
The Sorceress moved to join her mistress among warriors. The onslaught of her own retinue made her very angry and in her cold fury she wanted to punish High Elves. In doing so she drew too much energy and while her Fireball was cast with such a force even the Archmage could not stop it she also could not prevent magical feedback. 9 of the warriors lied dead as a result and only the fact that Supreme Sorceress treated them as expendables saved the adept of the black arts from her wrath. Few White Lions died too.
Outcasts - Turn 2
 |
| High Elves start setting up some traps |
 |
| High Elves continue their advance and clear the field from Harpies |
Seeing that the Harpies were so close to their lines High Elven warriors charged vile creatures. In the center they tried to flee but didn't escape swift Sea Guard. On the West they were simply butchered by elven elites.
Regiments on both flanks kept encircling their foes with Great Eagles swooping down to harass the enemy too.
Regiments on both flanks kept encircling their enemies. On the East High Elven units ignored the challenge of the Dreadlord. On the West White Lions entered the woods which happened to be treacherous indeed as they lost 3 of their number due to poison.
Magic and shooting was directed against survivors of the crossbowmen regiment, which ceased to exist and against quickly melting warriors protecting both sorceresses. Suddenly Druchii wizards didn't feel so safe anymore.
Dark Elves - Turn 2
 |
| Hydra attacks |
 |
| Hydra almost decimates Sea Guard unit |
Eager to kill some Asur Shades charge against Ellyrian Reavers but swift horseman of Ulthuan kill 4 of the Druchii scouts before they have a chance to strike. Remaining 2 flee through swamps with Reavers in pursuit.
Dreadlord parades in front of the Sea Guard and Dragon Princes to provoke some reckless charges and to protect the flank of the frenzied Corsairs who just caught one of the Eagles.
On the West beastmasters directed Hydra to the center of the battle line and the fire breath it unleashed at nearby Sea Guard cost life of all but 3 High Elves. The survivors were determined to keep fighting though.
Sorceresses ordered their heavily depleted regiment to pull back and hide in the woods while Black Guard reformed to face advancing cavalry.
Outcasts - Turn 3
 |
| High Elves do not commit their main forces yet |
Ellyrian Reavers avoid any dangers on the swamp with great skill of horsemanship and even catch fleeing Shades in the process. Sea Guard intercepts the Dreadlord hoping to hold him for as long it takes. Nearby Dragon Princes, knowing their heavy armor can be their doom in the swamp move back.
On the West White Lions suffer even more from the poisonous forest and are forced to pull back and re-group (Edit: Nothing like failing 2 DT rolls to force a panic test which is then failed ... with a re-roll :D).
Dragon Princes keep moving around Black Guard to threaten the rear of the Druchii army while Swordmasters form a battle line with a support of second regiment of Lions behind them.
Shooters aim at a weakened warriors and the unit now is almost finished with both Sorceresses having no place to hide.
Dark Elves - Turn 3
 |
| Dark Elves strike back |
 |
| Black Guard charges in and overruns into Swordmasters. An epic fight is about to begin! |
Dark Elves attack in order to break the encirclement. But Hydra only forces archers to withdraw and as they pull back to safety the beast has no one to attack. Black Guard removes the obstacle in their path and overrun into both Swordmaster units, eager to show the warriors of Hoeth who is the real elite.
Supreme Sorceress does what she can to either aid her troops or to weaken her foes before the combats and she is very successful. She also orders Death Hag to invoke Khain's protection as her unit is definitely too small to offer any safety on his own.
Outcasts - Turn 4
 |
| High Elves attack again |
 |
| Sorceresses are in trouble |
High Elves having a chance to capture the Battle Banner of the Druchii army together with both Sorceresses do not hesitate. Dragon Princes charge Cauldron and kill both witch elves. Death Hag strikes back but she is able to kill only one knight.
Three Sea Guard warriors and Reavers both charge in against warriors. Supreme Sorceress challenges High Elven champion to a personal duel and is wounded in the fight. Dark Elves still hold though.
Black Guard and an Assassin hiding in their ranks rush with anticipation against their enemies. The Assassin challenges one of the Bladelords and although he kills his adversary it is not without a wound being inflicted in return. Arrogant Druchii are sure of their success but warriors of Hoeth strike with preternatural speed and before Black Guards swing their halberds no less than 11 of them are dead already. Swordmasters pay bloody price for that but they already are getting upper hand and only stubbornness of the Black Guard achieved through rigorous training keeps them in the fight.
Dark Elves - Turn 4
 |
| Black Guard is no more |
 |
| Sorceress fight for survival |
Corsairs charge the Sea Guard locked in combat and kill all but 1 of them who is then caught in pursuit. Supreme Sorceress manages to avoid blows by High Elf champion and this time Druchii gain upper hand but Asur warriors keep fighting. Dragon Princes finally manage to kill the Death Hag and claim the Battle Banner of the enemy as a trophy.
In the epic fight between elite warriors of both armies Swordmasters leave no doubt who is the real master of the battlefield. Blag Guard warriors are killed to an elf despite Khaine's protection. The Assassin attempts to flee but is slain in hot pursuit.
Seeing her army almost destroyed Supreme Sorceress calls upon the powers of Drakness and in the magic nightfall she disengages and returns to the Black Ark with the few survivors of the host.
After-battle thoughts
As we run out of time we stopped at turn 4 and calculated the points. It turned out I claimed 13-7 victory which is a great success for me, especially considering the fact I played against a very good player with a very dangerous army. Of course I hoped to get the main prize, the Supreme Sorceress, but even without that I am very pleased with the result. What is even more important, the game was great and I would like to thank Simon for a fantastic battle played in great spirit.
I did make a few mistakes, however, so let's have a look at a few things I could have done better as well as some general remarks.
1. With harpies and Dreadlord on steed there is an opportunity to block two units at once if they are too close together. I made that mistake with Sea Guard and Dragon Princes in particular. I aimed at a simple trap with an eagle at Corsairs who had to overrun thus presenting flanks. But that plan was shattered by hydra on one side and dreadlord on the other. If I kept Sea Guard and Dragon Princes a little more apart I could attempt a flank charge. I think I would even do so with a single unit.
2. Another mistake was to accept the challenge with a champion. I was under the impression that I had to accept as there was no back rank to withdraw but I was mistaken. I can refuse the challenge and still fight with a champion. Something that could allow me to strike with Reavers and maybe even kill the Supreme Sorceress on the charge.
3. I was unlucky with Lions who first lost 3 and then 2 of their numbers due to poison and then failed their re-rollable panic test. Fortunately I had more units to step in and keep fighting.
4. I positioned an eagle so that there would be a room to charge Black Guard if they refused to attack it. But then it happened they were in the flank arc thus carrying them towards Swordmasters. Since BG were in such a wide formation they had to engage both regiments at once. I thought I am in trouble as BG had also mindrazor on (wounding on 2+ is better than on 3+ and 6+ armor save is better than nothing) but I rolled well and had enough attacks to kill entire unit in 2 rounds of combat. The assassin killed both bladelords and thanks to the fact he challenged I could direct more attacks against the unit. I think it was the fight of the battle and I got even more confidence in Swordmasters after that. If used right they can really fight many other elites and win.
5. My two additions, Staff of Solidity and Eagle Claw were very useful. I think I did roll double 6's with Fury of Khaine to kill the Corssbows so that saved my Archmage. Eagle Claw simply added wounds and it was important to do so against crossbows and warriors. I think I also tried single shot against Hydra but it was probably saved.
In general I was very happy to win first game, also because I knew that I got a significant advantage and if we had a little more time I would have had a chance to get warriors and both Sorceresses while other units of the Druchii army were too far away to make any difference.
Thanks for reading and if you liked the report, please, leave a comment or two! :)
Cheers!
No comments:
Post a Comment