
Greetings!
I had a re-match against Beastmen. My opponent agreed to have another go at my MSU HE with some changes to his army list.
Pre-battle considerations and army lists
I had a re-match against Beastmen. My opponent agreed to have another go at my MSU HE with some changes to his army list.
Pre-battle considerations and army lists
After last game I knew how deadly Minobus can be if allowed to fight so I decided that this time I will avoid it, shoot it if possible and only if things elsewhere would go good and if I had enough heavy hitters left I might risk charging it and destroying it. But the priority was not to get it fight so that it does not get so many attacks as last time.
As I have mentioned the BoC army was a little different than previously and I will also try to update it as soon as I have details on magic items.
Beastmen - Army List
Doombull, Axes of Khorgor, 1+ re-rollable armor save
Great Bray Shaman, Level 4 - Lore of Beasts
Gorebull BSB, Shield, Heavy Armor, Talisman of Preservation, Ironcurse Icon
Wargor
Bray Shaman, Herdstone - Lore of Shadow
Bray Shaman, Dispel Scroll - Lore of Shadow
38 Gors, Full Command, Additional Hand Weapon
29 Ungors, Full Command
5 Ungor Raiders
Tuskor Chariot
Tuskor Chariot
7 Minotaurs, Champion, Musician, Great Weapons
Razorgor
Razorgor
Razorgor
Harpies
Outcasts - Army List
I also made some changes to the list, the main being changing Spearelves for LSG and BSB who can shoot too.
Archmage, Level 4, Annulian Crystal - High Magic
BSB, Heavy Armor, Shield, Great Weapon, Reaver Bow, Dragonhelm
15 Lothern Seaguard, Musician, Standard
15 Lothern Seaguard, Musician, Standard
10 Archers, Light Armour, Musician
10 Archers, Light Armour, Musician
10 White Lions, Standard, Banner of Eternal Flame
10 White Lions
8 Swordmasters
8 Swordmasters
5 Dragon Princes
5 Dragon Princes
5 Ellyrian Reavers, Musician, Bows, Spears
5 Ellyrian Reavers, Musician, Bows, Spears
Great Eagle
Great Eagle
Great Eagle
I think I can use LSG well in small numbers of 15 where they can be mobile and in turns where I prepare combo-charges they can be annoying with their shots. I want them for flexibility and not for replacement for archers for example. I might keep them back if that is more beneficial but I can move them close too if I decide it is a better option. Sometimes it could be also possible to move them close to the enemy and then park in front of some big unit, keep shooting and hold the line for elites to charge the enemy to the flank while at the same time preventing it to respond to movements of Lions, Swordmasters or Dragon Princes. Shooting BSB was taken so that I can use them in multiple roles. His high S magical shooting attacks can be handy in different situations, he is a little better protected than wizard-BSB but I still would not like him to fight if possible. Besides I was curious if I can use that type of BSB properly.
We rolled for spells and we got:
Great Shaman - Wildform, Flock of Doom, Curse, Transformation
Brey Shaman - Miasma
Brey Shaman - Miasma
Archmage - Drain, Curse, Courage, Flames, Vaul's Unmaking
Deployment
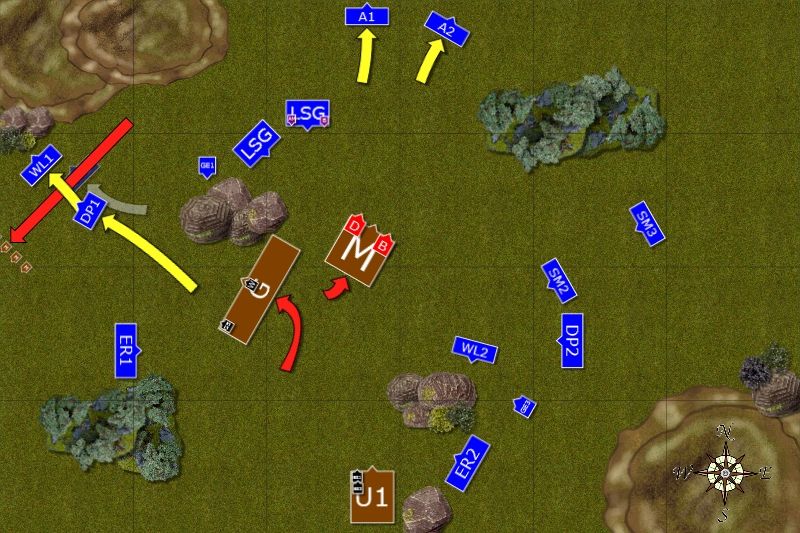
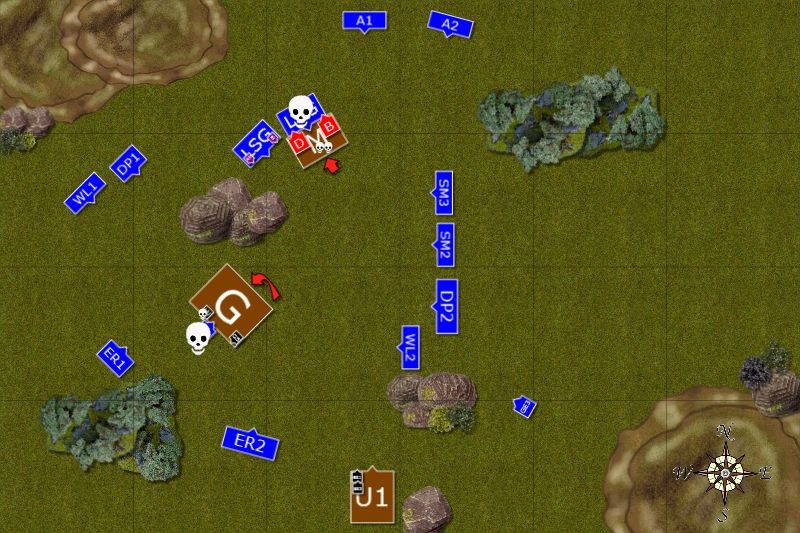
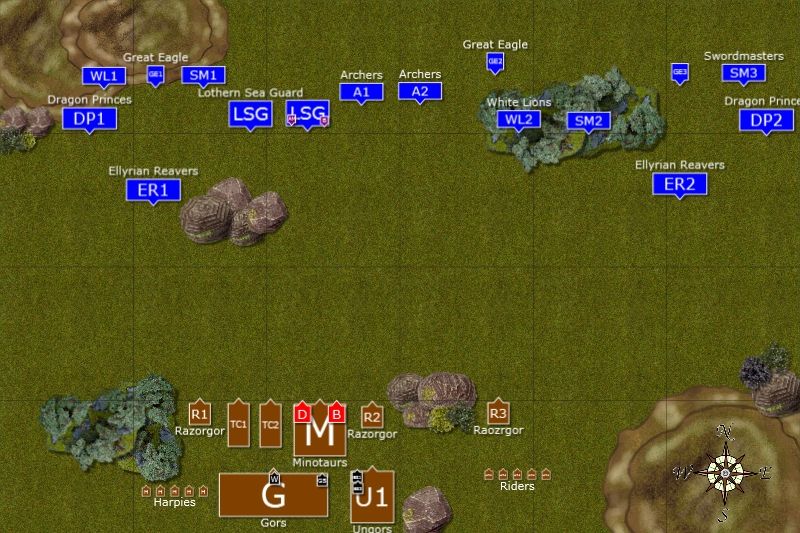 |
| Deployment of the armies after vanguard |
The big rock to the left of Ungors with Brey Shamen is Herdstone. Beastmen won the roll off and theirs was 1st turn
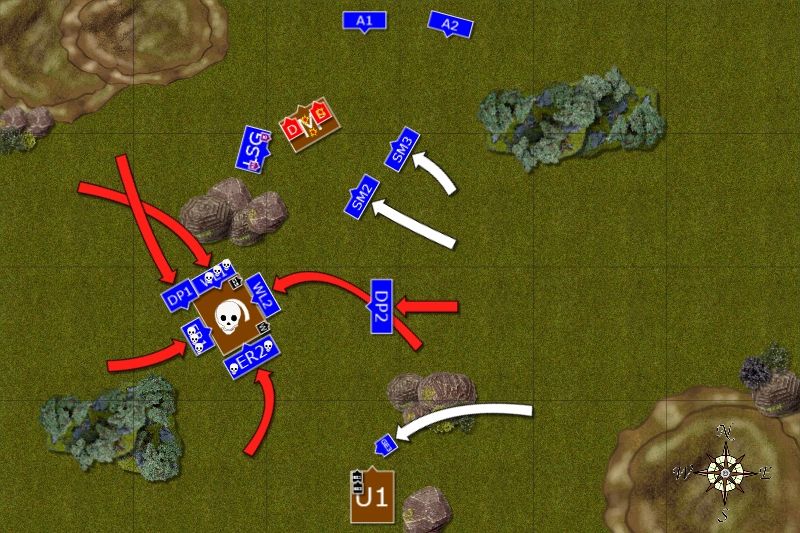
Beastmen - Turn 1
Beastmen - Turn 1
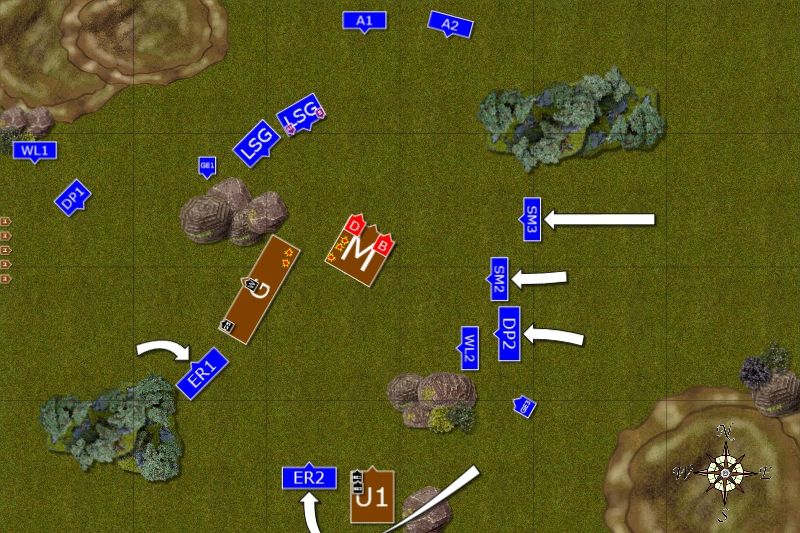
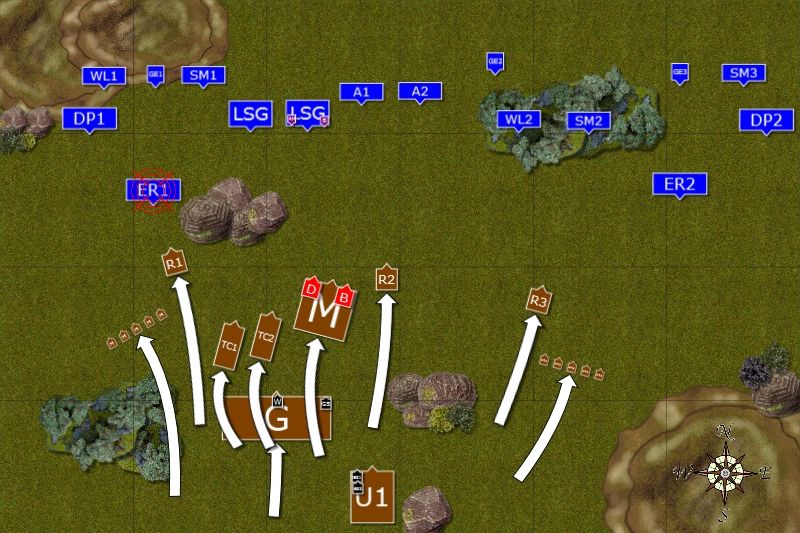 |
| Beastmen move towards elven lines |
Beastmen moved towards the Elves without hesitation with only two Shamen and their Ungor bodyguards to take care of the Herdstone. Ellyrian Reavers on the Western flank found themselves in the middle of the swamp which appeared as if from nowhere and it was clear it is the effect of evil magic of great shaman.
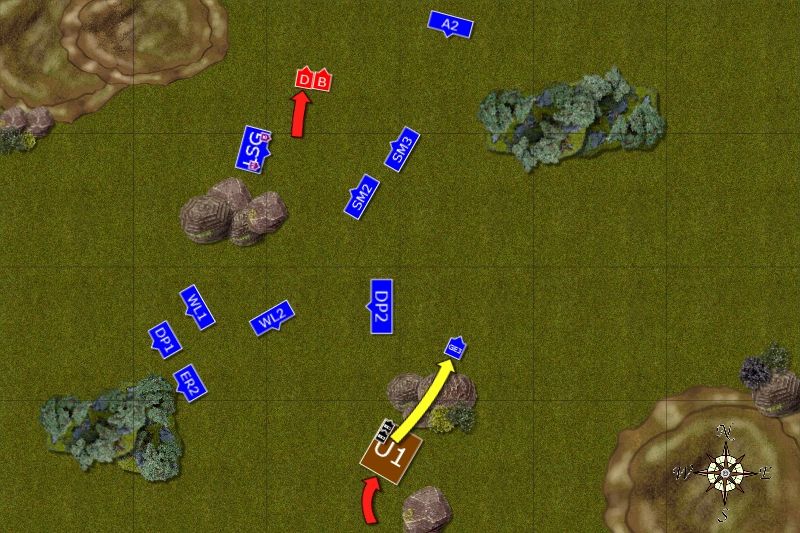
Outcasts - Turn 1
Outcasts - Turn 1
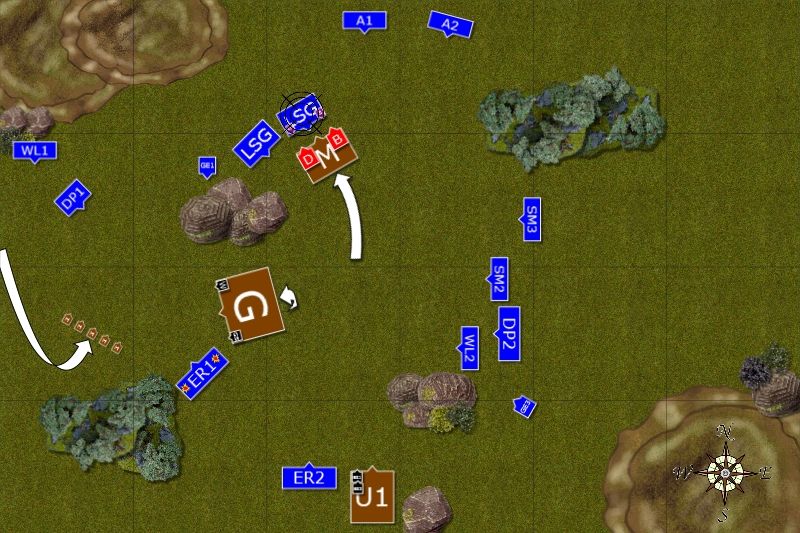
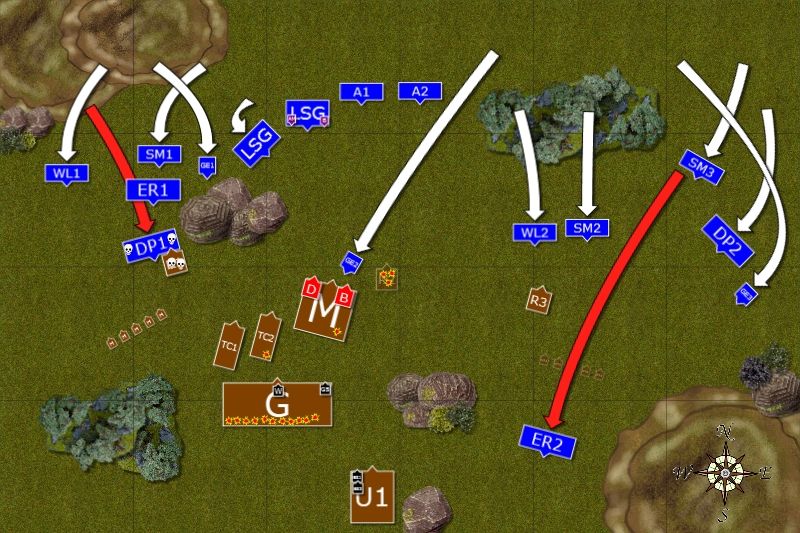 |
| Elves moves swiftly at the both flanks |
Elves do not wait for the enemy to gain momentum and move quick at both flanks. On the West Dragon Princes charge the Razorgor but fail to kill it outright and the wounded beasts drags two knights from their horses. On the East Ellyrian Reavers charge enemy skirmishers and run them down. All other regiments move forward with an exception of the Sea Guard and Archers who open fire at incoming Beastmen. As a result another Razorgor lied dead, pierced by many arrows and both, chariot and minotaur, took a wound. Elven Archmage breached magical defenses of the great shaman quickly and flames engulfed Gor horde killing no less but 11 of them.
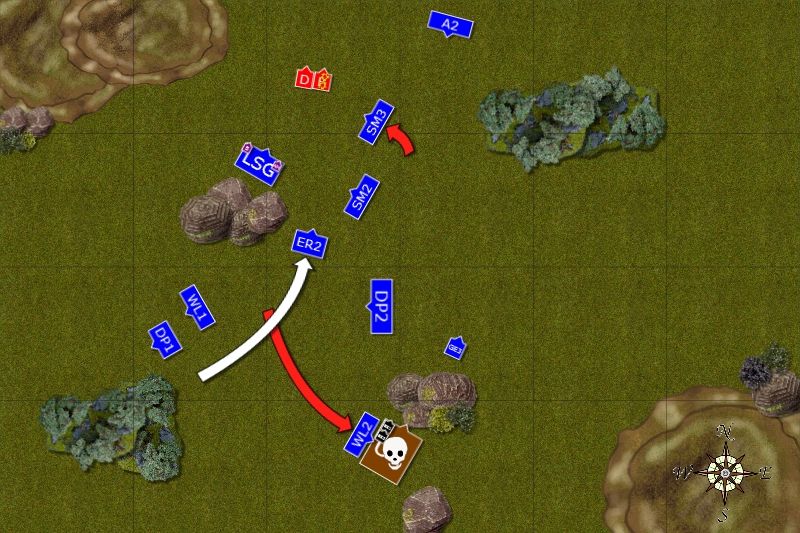
Beastmen - Turn 2
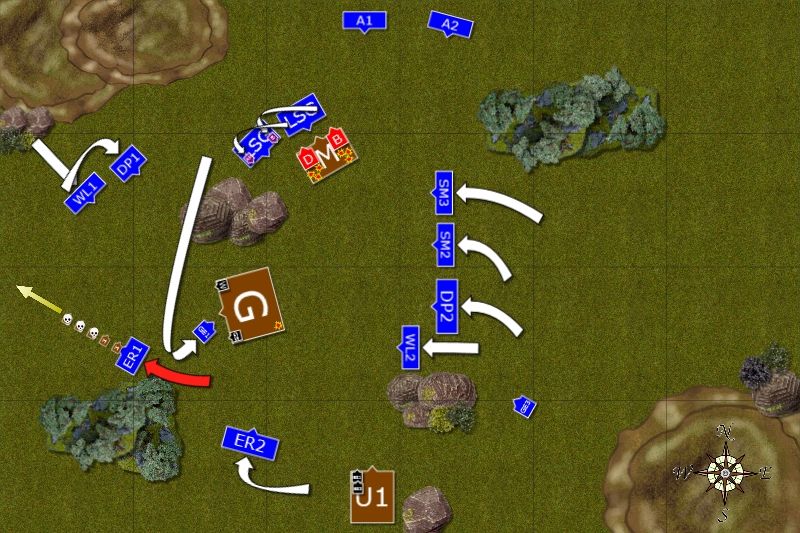
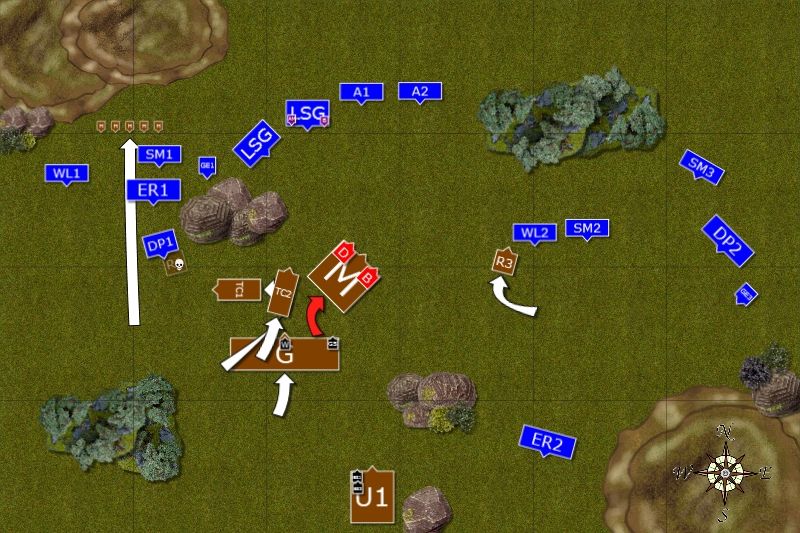 |
| Beastmen push forward in tight formation |
Minotaurs charged the eagle that landed in front of them and soon they began the feast. On the West Dragon Princes finished the Razorgor and were ready to charge the chariot that was guarding the flank of Minotaurs. On the East another Razorgor got confused and slowed down not running fast enough to escape nearby White Lions. Harpies flew behind elven lines. Great Shaman toughened up Minotaurs and put down magical fire which still burned Gors.
Outcasts - Turn 2
Outcasts - Turn 2
 |
| Elves continue to envelope the enemy |
Dragon Princes charged the chariot and this time all attacks hit home and it was destroyed before the crew could strike back. On the East Lions easily hunted down Razorgor and kept running to get out of sight of the Minotaurs. The rest of the army kept moving around the flanks of the beastmen units.
In the meantime, elven center opened fire at Minotaurs and two brutes lied dead. Archmage summoned enough energy to get his magic missile through and second chariot was destroyed in a blast. It looked like Beastmen army lost its support troops all too quickly.
Beastmen - Turn 3
 |
| Beastmen try to catch elven units in long charges |
Beastmen knew they need to attack now or they will be encircled. Minotaurs charged both Archer units but both regiments withdrew and big brutes didn't reach their targets. Gor horde charged Dragon Princes who elected to withdraw but in doing so confused both White Lions and Swordmasters and all 3 units started to flee. Nearby harpies spotted that and attacked Swordmasters, destroying them and flying out of sight of enemy troops. Suddenly the opening appeared for Beastmen on the Western flank.
Outcasts - Turn 3
 |
| Elves close in |
Regiments from the East closed in while both light horse squadrons moved around and let lose their arrows at Gor horde killing one or two. White Lions and Dragon Princes rallied and were ready to close the gap before Gors managed to exploit the opening. Lothern Seaguard kept shooting at Minotaurs and another one was killed.
Beastmen - Turn 4
 |
| Beastmen move West in hope to break through |
Minotaurs close the distance to Lothern Seaguard so that they don't have the opportunity to retreat. Gors reform into deep formation and move West where they want to break through. Harpies come back to the battle too. Beastmen shamen combined their efforts and soon Reavers found themselves attacked by evil crows while Lothern Seaguard led by BSB were engulfed in some mysterious fog obscuring the sight.
Outcasts - Turn 4
 |
| Elves set up the trap for Gors |
Elven units move as one to set up the trap on Gor regiment. Eagle lands in front to it to distract it while Reavers charge harpies so that they do not warn Gors in time. BSB and Archmage move to join second unit of Lothern Seaguard. Bow armed troops keep firing at Minotaurs and with the aid of BSB and Archmage they decreased their number to 2. Despite that they are still very dangerous.
Beastmen - Turn 5
 |
| Last attempt to break through for Beastmen |
Heavily depleted Minotaurs charge Lothern Seaguard who wound champion badly but cannot finish the beast. Then Doombull and BSB proceed to swing their heavy blades and brave elves all die but at least the enemy is slowed down for a while. Gors kill the eagle and reform to face the units coming from the center of the battlefield.
Outcasts - Turn 5
Outcasts - Turn 5
 |
| Elves charge from all directions |
Time has come and Elves charge all at once. Only Dragon Princes from the West cannot make it but 5 other regiments hit Gors and in resulting carnage elves manage to kill 24 of them at a cost of 5 reavers and 3 lions. Remaining gors with wargor and great shaman can't summon enough courage to hold and flee to be run down by pursuing cavalry.
At the same time archers, sea guard and archmage combine their efforts and kill remaining minotaurs and even manage to wound their BSB. Only he and Doombull are left from the mighty regiment now.
Beastmen - Turn 6
At the same time archers, sea guard and archmage combine their efforts and kill remaining minotaurs and even manage to wound their BSB. Only he and Doombull are left from the mighty regiment now.
Beastmen - Turn 6
 |
| Last charges by remnants of Beastmen army |
Doombull and BSB try to charge the only target in their sight but Archers withdrew again. Ungors chase away the eagle which landed too close to their herdstone. The short fight is ended when the eagle manages to get to the air again and flies away.
Outcasts - Turn 6
Outcasts - Turn 6
 |
| Elves destroy the herdstone |
Swordmasters spotted exposed flank of beastmen BSB but misjudge the distance and do not reach their target in time. Archers, Lothern Seaguard, BSB and Archmage again focus their attention at Minotaurs. Archmage destroys protective talisman of enemy BSB and all the arrows wound him badly but could not take away his last wound and both Minotaurs survive the battle.
White Lions manage to charge from afar and hit Ungors in the flank with such impetus that little beastmen flee and are caught in pursuit. Elves are victorious again and all that remains from Beastmen army are Minotaur leaders.
After battle thoughts
I must admit I am happy with the outcome of the game a lot. Having said that I still made some mistakes. So there are a few points I would like to highlight.
1. Chain of failed panic tests again disrupted my plans. I need to anticipate the fleeing paths better and still position the units more carefully.
2. Avoiding combat with Minotaurs was good idea and I am glad I could destroy the unit itself although it took a lot of effort. I also wanted to finish off his BSB with Swordmasters despite the fact that I might lose the unit in the process due to returning attacks of the Doombull.
3. The most costly mistake which fortunately for me was not exploited by my opponent was made in my turn 4. I moved my characters to second unit of LSG but I didn't move it away. If my opponent aligned his charging minotaurs a little to the left his overrun would touch the second regiment and he would destroy it in combat with his powerful characters. I would lose my archmage-general and BSB then. It might not be enough to swing the result into Beastmen favor but I should avoid such mistakes at all cost.
4. Using LSG was interesting even if I ended up in using them as archers this time. My plan was to move them in front of Gor horde but my opponent protected that unit well in the first half of the game. Maybe I should have deployed LSG more to the center then as the rocks blocked line of sight and I could not move them around anyway (as it would have taken them too long).
5. I didn't have musicians this time and I must admit I need them back, at least for elite infantry. When Lions killed Razorgor and overrun far I could only reform them next turn and could not approach Gors quickly enough. I think it was also a mistake of my opponent not to overrun with them after killing the eagle as it would at least get him out of reach ot the regiments approaching from the East. To prevent that to happen I needed this extra mobility from swift reform.
Thanks for reading!
No comments:
Post a Comment